Week 14: Interfase & Application Programming
This week is about interfase and application programming, so our assignment was to write an application that interfaces a user with an input and/or output device that we made. This is the group assignment for the week!
For my final project, I am using a MIDI controller device that I designed and programmed, so I wanted to test using Processing to interact with such a board. At first, I looked up what code libraries and scripts I could use to produce a simple interfase.
To perform this test with my ESP32-S3-WROOM equipped MIDI controller board with 7 tactile switches, I followed this example, making sure to dowloand the MIDIbus library on Processing first...

In CPP for Arduino IDE:
Arduino Code:
        #include

          #include "USB.h"
          #include "USBMIDI.h"

          USBMIDI MIDI;

          const int pins[] = { 0, 4, 5, 6, 7, 8, 18 }; // Pins for buttons
          int butState[] = { 0, 0, 0, 0, 0, 0, 0 };
          int prevState[] = { 0, 0, 0, 0, 0, 0, 0 };

          int notes[] = { 40, 48, 56, 64, 72, 80, 68 }; // MIDI notes for buttons

          void setup() {
            MIDI.begin();
            USB.begin();
            for (int i = 0; i < 7; i++) {
              pinMode(pins[i], INPUT_PULLUP); // Set button pins as input with internal pull-up resistors
            }
            for (int i = 0; i < 7; i++) {
              butState[i] = digitalRead(pins[i]);
              prevState[i] = butState[i];
            }
          }

          void loop() {
            for (int i = 0; i < 7; i++) {
              butState[i] = digitalRead(pins[i]);
              if (butState[i] != prevState[i]) {
                prevState[i] = butState[i];
                if (butState[i] == 1) {
                  MIDI.noteOff(notes[i], 0);
                } else {
                  MIDI.noteOn(notes[i], 126);
                }
              }
            }
            delay(100); // Delay to debounce buttons
          }
And then in Java for Processing:
Processing code:
  import themidibus.*; // Import the library

  MidiBus myBus; // The MidiBus object
  int[] buttonStates = new int[7];

  void setup() {
    size(400, 200); // Set the window size
    MidiBus.list(); // List all available MIDI devices

    // Initialize the MidiBus
    myBus = new MidiBus(this, 0, 1); // Change the indices to match your ESP32 MIDI device
    textSize(20);
  }

  void draw() {
    background(0); // Set the background to black
    fill(255); // Set text color to white

    for (int i = 0; i < 7; i++) {
      if (buttonStates[i] == 1) {
        fill(0, 255, 0); // Green for pressed buttons
      } else {
        fill(255, 0, 0); // Red for released buttons
      }
      rect(50 + i * 50, 100, 40, 40); // Draw rectangles representing buttons
    }
  }

  // This function is called when a MIDI note on message is received
  void noteOn(int channel, int pitch, int velocity) {
    if (pitch >= 40 && pitch <= 80) {
      int index = -1;
      for (int i = 0; i < 7; i++) {
        if (pitch == 40 + i * 8) {
          index = i;
          break;
        }
      }
      if (index != -1) {
        buttonStates[index] = 1;
      }
    }
  }

  // This function is called when a MIDI note off message is received
  void noteOff(int channel, int pitch, int velocity) {
    if (pitch >= 40 && pitch <= 80) {
      int index = -1;
      for (int i = 0; i < 7; i++) {
        if (pitch == 40 + i * 8) {
          index = i;
          break;
        }
      }
      if (index != -1) {
        buttonStates[index] = 0;
      }
    }
  }
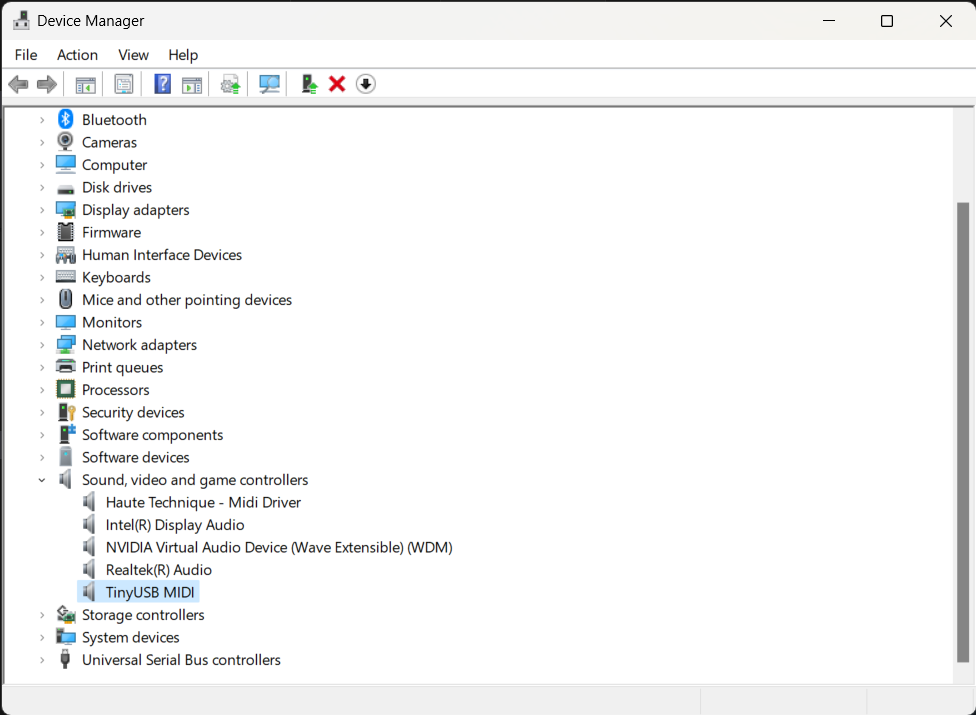
Right away, my code was not working because I had to determine the indices of my MIDI device in the Processing code. At first, I made sure that my MIDI device was being read as such by my PC by checking the Device Manager and looking for it there.
Once I established that the connection was good, I ran this simple code in Processing to get the proper indice for my MIDI controller so I could add it to my Java code:
Processing code:
        import themidibus.*; // Import the MidiBus library

        void setup() {
          MidiBus.list(); // List all available MIDI devices
        }

        void draw() {
          // We don't need to draw anything for this sketch
        }
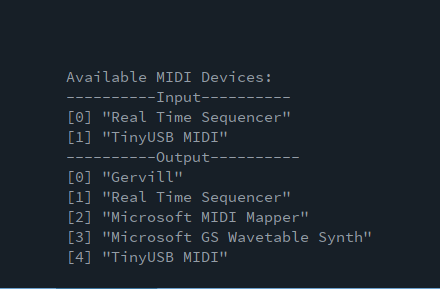
This code returned the following information in the monitor:
Next, I modified the code with the appropriate indices for my MIDI device as ready by my PC. What followed after running the code, however, was a null pointer exception error:
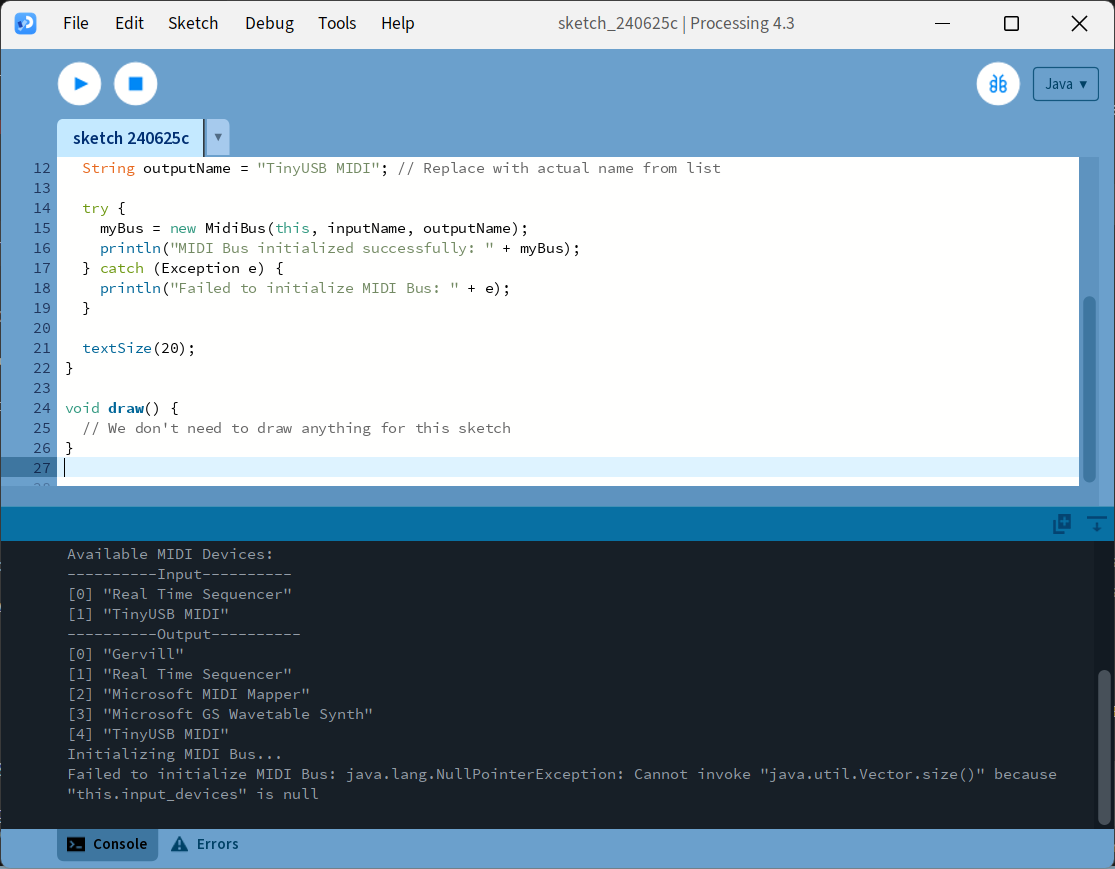
In troubleshooting this issue, I learned that a NullPointerException in Java usually occurs when you attempt to use an object reference that has not been initialized. In the context of the Processing sketch I was running, this likely means that the MidiBus object (myBus) had not been properly initialized.
So I checked MIDI device initialization and added debugging statements:
Processing code:
        import themidibus.*; // Import the library

        MidiBus myBus; // The MidiBus object
        int[] buttonStates = new int[7];

        void setup() {
          size(400, 200); // Set the window size
          MidiBus.list(); // List all available MIDI devices

          // Initialize the MidiBus with the correct indices
          // Replace X and Y with the actual indices for your ESP32 MIDI device
          println("Initializing MIDI Bus...");
          myBus = new MidiBus(this, 0, 1); // Change these indices based on your device list output
          println("MIDI Bus initialized: " + myBus);

          textSize(20);
        }

        void draw() {
          background(0); // Set the background to black
          fill(255); // Set text color to white

          for (int i = 0; i < 7; i++) {
            if (buttonStates[i] == 1) {
              fill(0, 255, 0); // Green for pressed buttons
            } else {
              fill(255, 0, 0); // Red for released buttons
            }
            rect(50 + i * 50, 100, 40, 40); // Draw rectangles representing buttons
          }
        }

        // This function is called when a MIDI note on message is received
        void noteOn(int channel, int pitch, int velocity) {
          println("Note On - Channel: " + channel + " Pitch: " + pitch + " Velocity: " + velocity);
          if (pitch >= 40 && pitch <= 80) {
            int index = -1;
            for (int i = 0; i < 7; i++) {
              if (pitch == 40 + i * 8) {
                index = i;
                break;
              }
            }
            if (index != -1) {
              buttonStates[index] = 1;
            }
          }
        }

        // This function is called when a MIDI note off message is received
        void noteOff(int channel, int pitch, int velocity) {
          println("Note Off - Channel: " + channel + " Pitch: " + pitch + " Velocity: " + velocity);
          if (pitch >= 40 && pitch <= 80) {
            int index = -1;
            for (int i = 0; i < 7; i++) {
              if (pitch == 40 + i * 8) {
                index = i;
                break;
              }
            }
            if (index != -1) {
              buttonStates[index] = 0;
            }
          }
        }
Still, after confirming my device was indeed being read by my PC, downloading the midi library on Processing and checking for updates, revising and declaring device indices, I was still getting a null exception error and/or failure to initialize.
Here are notes on debugging from this experience, which I tried applying several times:
- Check Library Version Compatibility by ensuring the midibus library is compatible with my version of Processing, which can sometimes lead to issues.
- Verify Device Names and Indices by double-checking device names and indices we are using to initialize the Midibus object and that they match what is listed in the MidiBus.list().
- Restart Processing and Reconnect MIDI Device Sometimes, simply restarting Processing and reconnecting your MIDI device can resolve initialization issues.
- Check for Updates or Bug Fixes Check the GitHub repository or official documentation of the themidibus library for any reported issues or updates. There might be bug fixes or workarounds available.
So there are my learnings in attempting to use my MIDI device as such to interfase with a user. I moved onto a different code altogether to get something successful going after that.
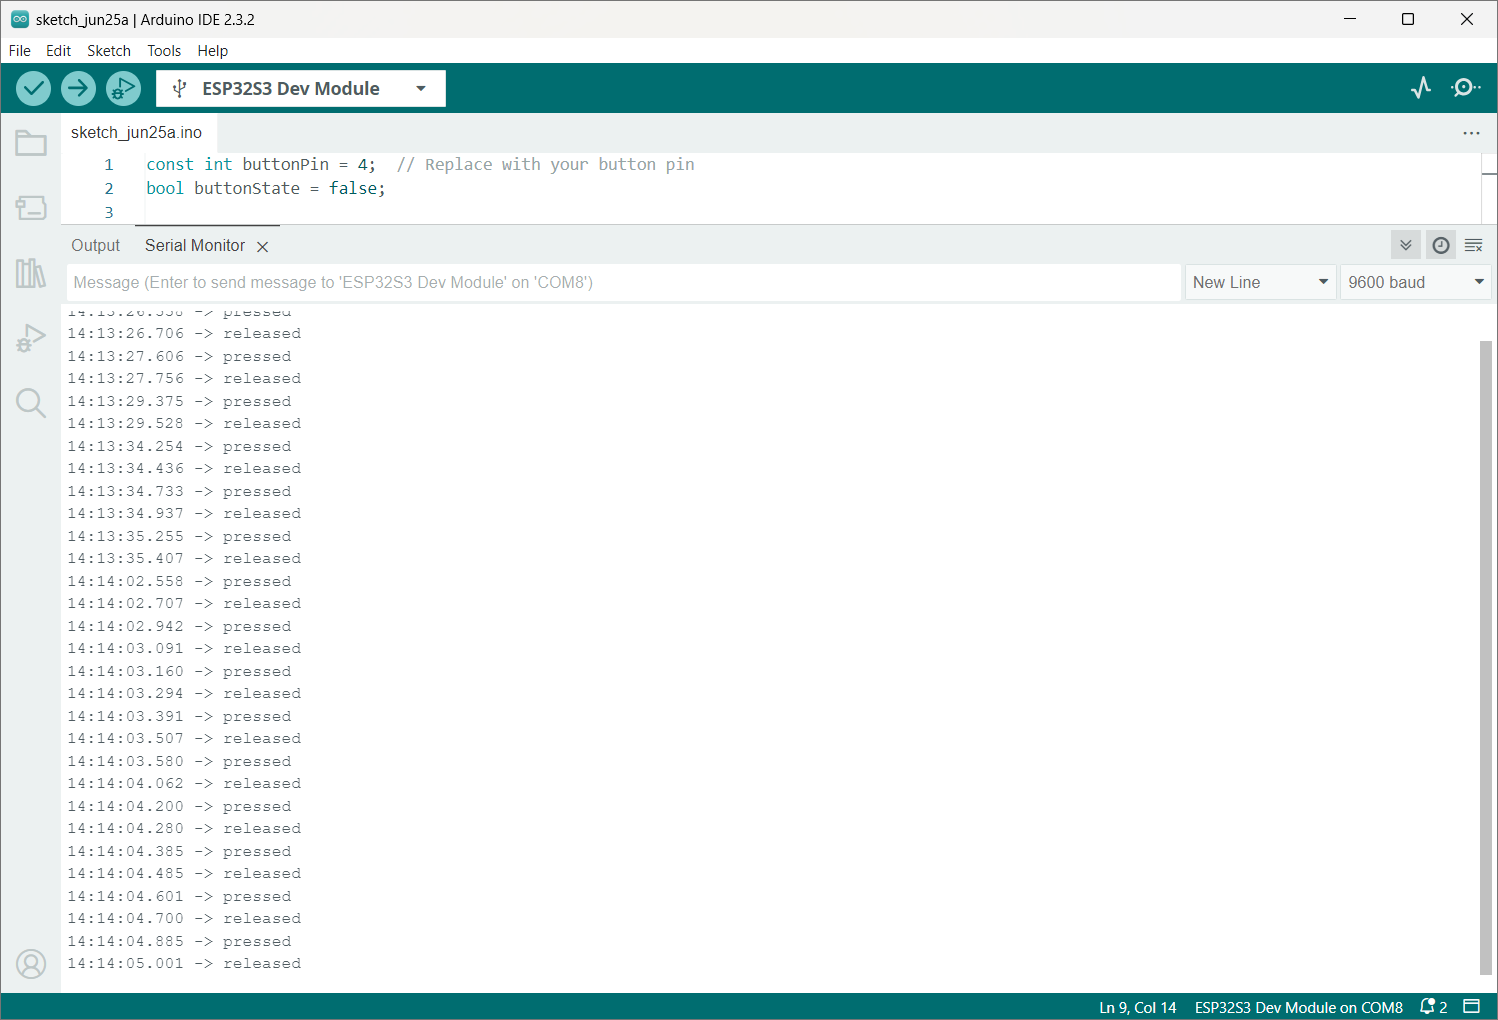
This was my Arduino Code, which I later expanded upon:
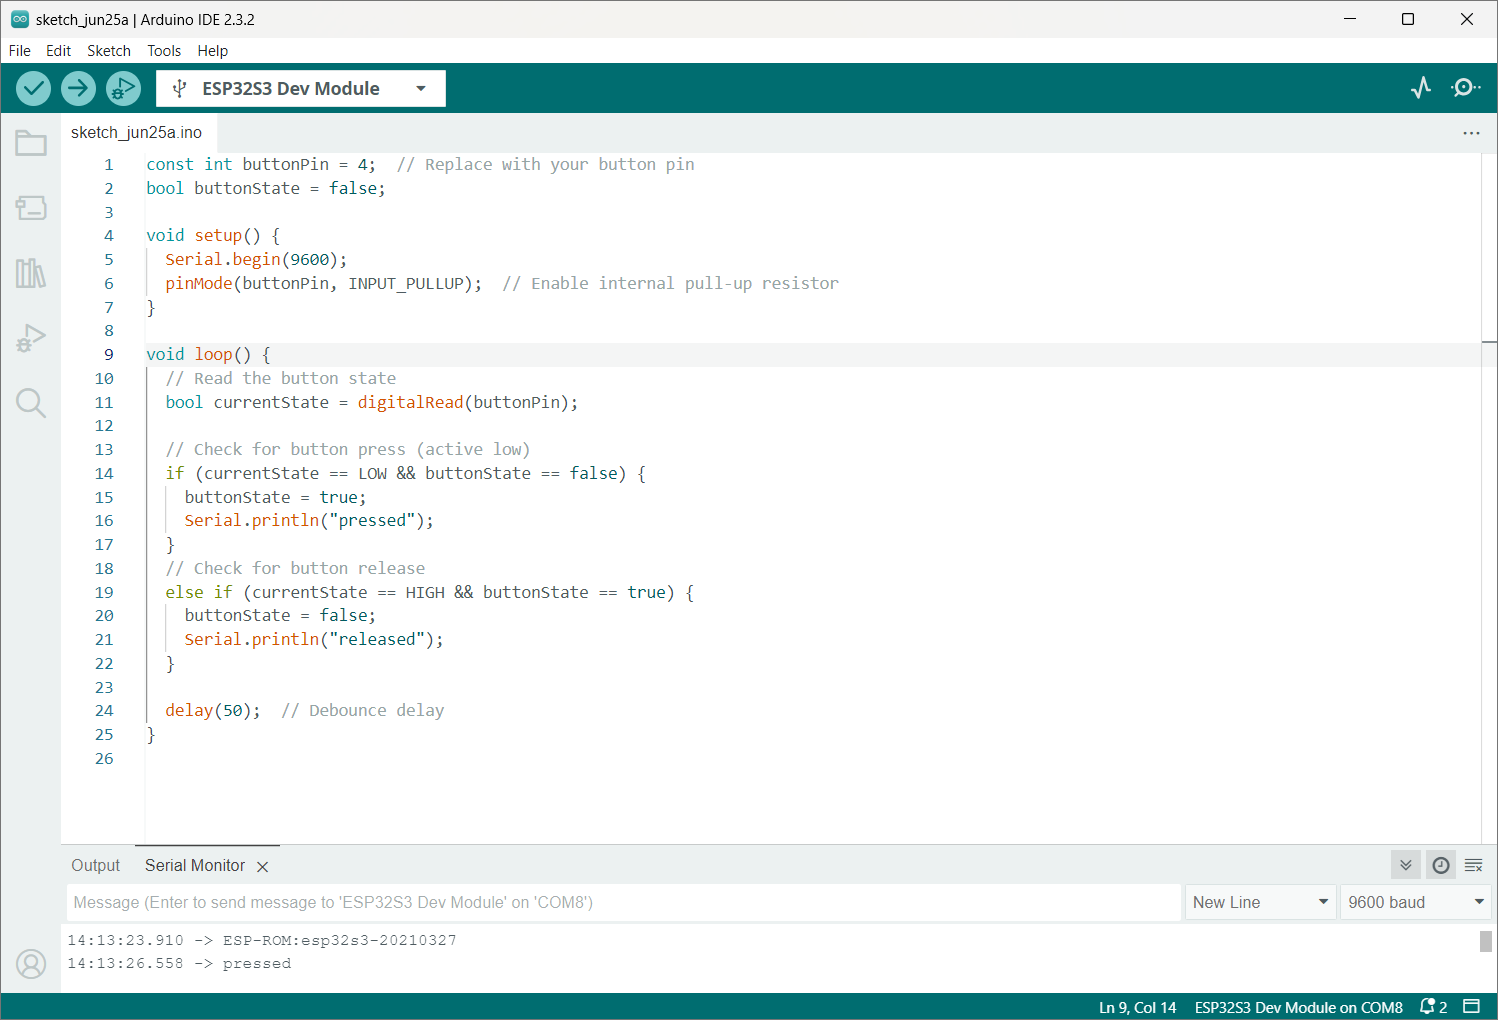
Arduino Code:
        const int buttonPin = 4;  // Replace with your button pin
        bool buttonState = false;

        void setup() {
          Serial.begin(9600);
          pinMode(buttonPin, INPUT_PULLUP);  // Enable internal pull-up resistor
        }

        void loop() {
          // Read the button state
          bool currentState = digitalRead(buttonPin);

          // Check for button press (active low)
          if (currentState == LOW && buttonState == false) {
            buttonState = true;
            Serial.println("pressed");
          }
          // Check for button release
          else if (currentState == HIGH && buttonState == true) {
            buttonState = false;
            Serial.println("released");
          }

          delay(100);  // Debounce delay
        }
Processing code:
  import processing.serial.*;

  Serial myPort;  // Create object from Serial class

  int rectSize = 50;  // Size of the rectangle
  color rectColor = color(255);  // Initial rectangle color

  void setup() {
    size(400, 400);
    println("Available serial ports:");
    println(Serial.list());  // Print available serial ports

    // Replace with your ESP32-S3 WROOM's port name (e.g., "COM3" for Windows, "/dev/ttyUSB0" for Linux)
    myPort = new Serial(this, "COM3", 9600);  // Adjust port name and baud rate

    rectMode(CENTER);
  }

  void draw() {
    background(220);

    // Draw a rectangle that changes color on button press
    fill(rectColor);
    rect(width/2, height/2, rectSize, rectSize);
  }

  void serialEvent(Serial myPort) {
    String inString = myPort.readStringUntil('\n');  // Read serial data until newline
    if (inString != null) {
      inString = trim(inString);  // Remove any whitespace or newline characters
      println("Received: " + inString);

      // Toggle rectangle color on button press
      if (inString.equals("pressed")) {
        if (rectColor == color(255)) {
          rectColor = color(0, 255, 0);  // Change color to green
        } else {
          rectColor = color(255);  // Change color back to white
        }
      }
    }
  }
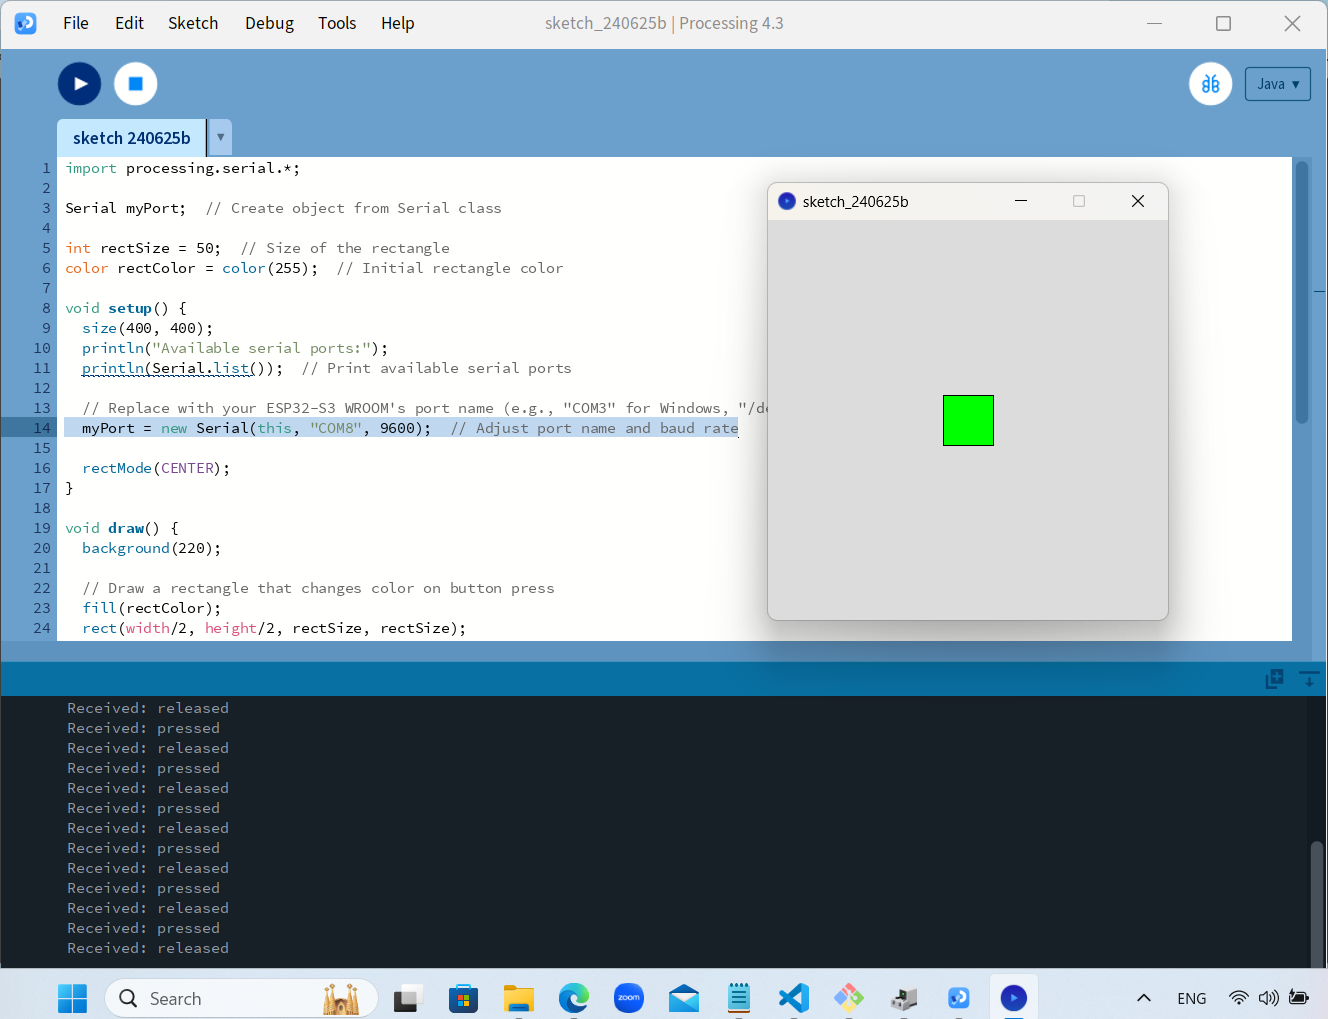
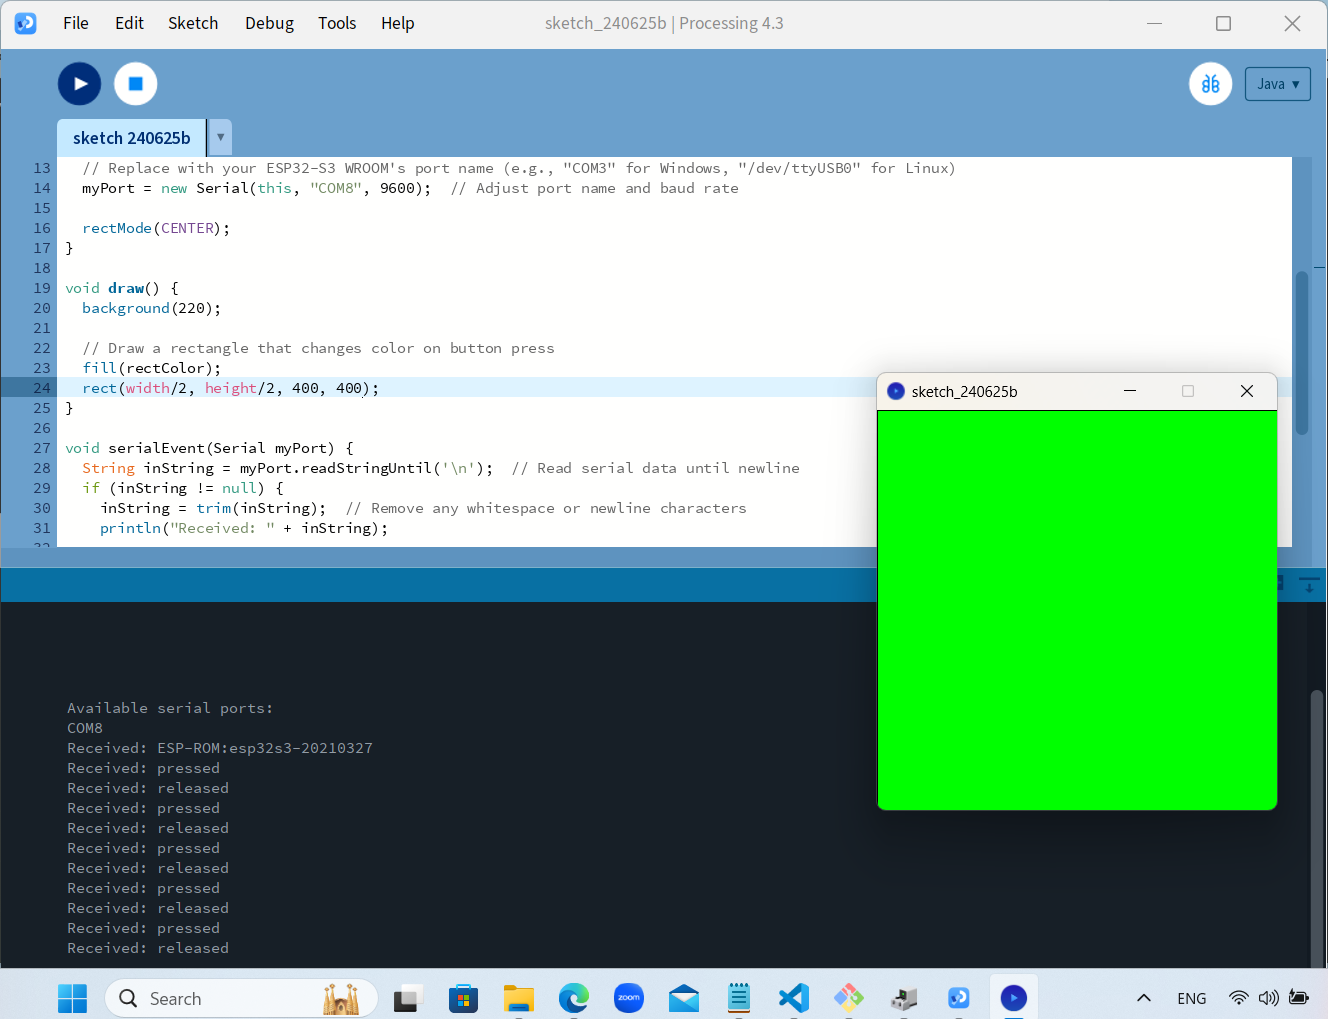
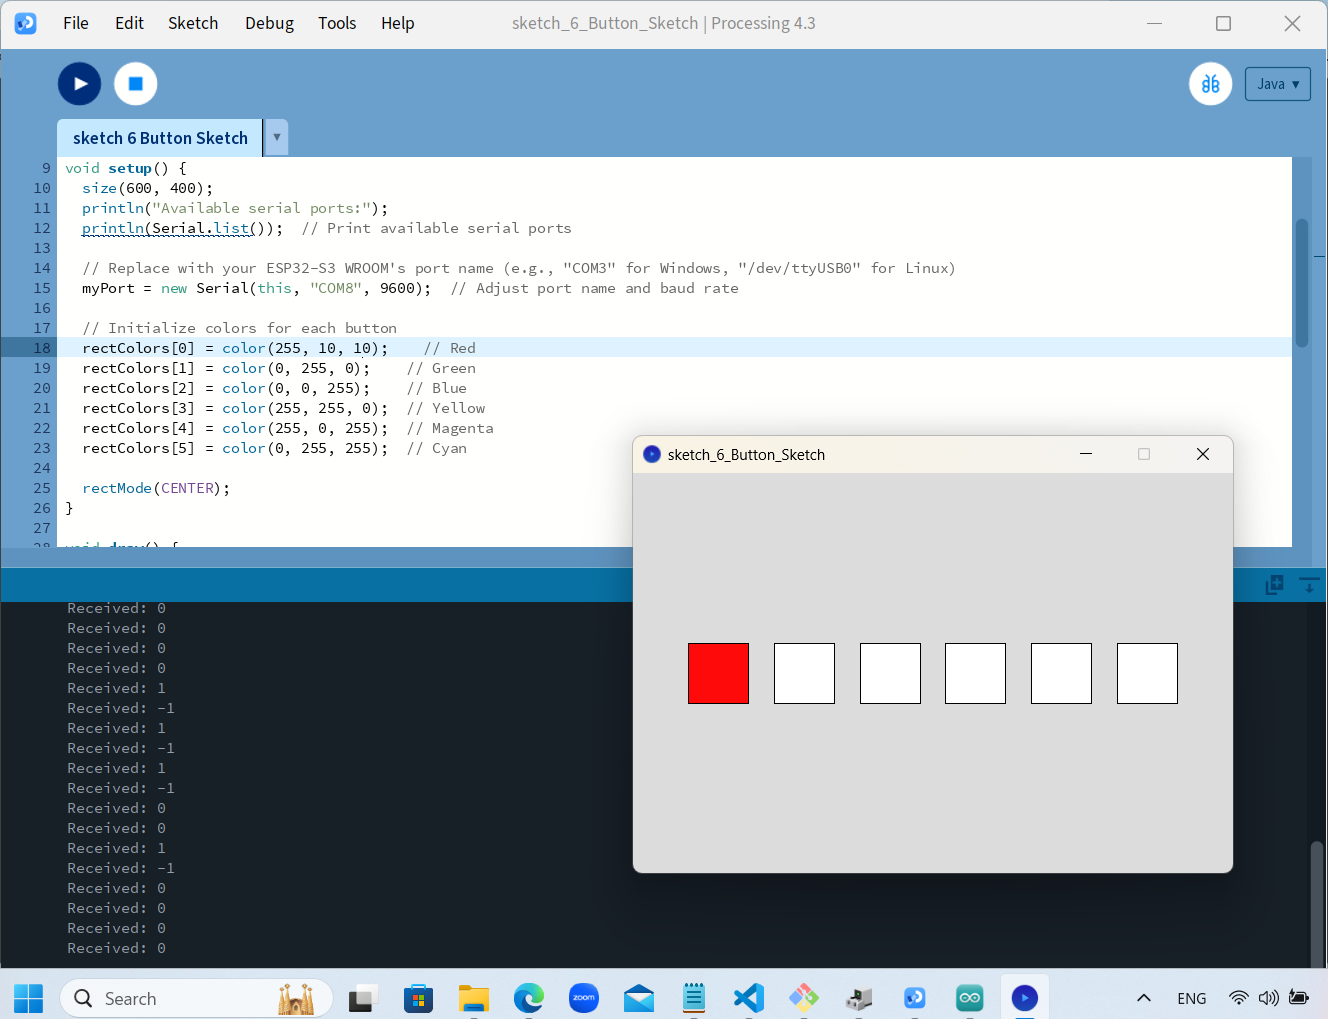
Success! I then modified the code to add 5 more buttons and different colors as well.
Arduino Code:
  const int buttonPins[] = {2, 3, 4, 5, 6, 7}; // Pins for 6 buttons
  bool buttonStates[] = {false, false, false, false, false, false}; // Array to store button states

  void setup() {
    Serial.begin(9600);
    for (int i = 0; i < 6; i++) {
      pinMode(buttonPins[i], INPUT_PULLUP); // Enable internal pull-up resistors
    }
  }

  void loop() {
    for (int i = 0; i < 6; i++) {
      bool currentState = digitalRead(buttonPins[i]);

      // Check for button press (active low)
      if (currentState == LOW && !buttonStates[i]) {
        buttonStates[i] = true;
        Serial.println(i); // Send the index of the pressed button
      }
      // Check for button release
      else if (currentState == HIGH && buttonStates[i]) {
        buttonStates[i] = false;
        Serial.println(-i); // Send the negative index of the released button
      }
    }

    delay(50); // Debounce delay
  }
Processing Code:
  import processing.serial.*;

  Serial myPort;  // Create object from Serial class

  int rectSize = 50;  // Size of the rectangle
  color[] rectColors = new color[6];  // Array to store colors for each button
  boolean[] buttonStates = new boolean[6]; // Array to store button states

  void setup() {
    size(600, 400);
    println("Available serial ports:");
    println(Serial.list());  // Print available serial ports

    // Replace with your ESP32-S3 WROOM's port name (e.g., "COM3" for Windows, "/dev/ttyUSB0" for Linux)
    myPort = new Serial(this, "COM3", 9600);  // Adjust port name and baud rate

    // Initialize colors for each button
    rectColors[0] = color(255, 0, 0);    // Red
    rectColors[1] = color(0, 255, 0);    // Green
    rectColors[2] = color(0, 0, 255);    // Blue
    rectColors[3] = color(255, 255, 0);  // Yellow
    rectColors[4] = color(255, 0, 255);  // Magenta
    rectColors[5] = color(0, 255, 255);  // Cyan

    rectMode(CENTER);
  }

  void draw() {
    background(220);

    // Draw rectangles with colors based on button states
    for (int i = 0; i < 6; i++) {
      fill(buttonStates[i] ? rectColors[i] : color(255)); // Change color if button is pressed
      rect((i + 1) * width / 7, height/2, rectSize, rectSize); // Draw rectangles evenly spaced
    }
  }

  void serialEvent(Serial myPort) {
    String inString = myPort.readStringUntil('\n');  // Read serial data until newline
    if (inString != null) {
      inString = trim(inString);  // Remove any whitespace or newline characters
      println("Received: " + inString);

      int buttonIndex = int(inString); // Convert incoming string to integer

      // Check if the index is valid
      if (buttonIndex >= 0 && buttonIndex < 6) {
        buttonStates[buttonIndex] = true; // Set button state to pressed
      } else if (buttonIndex < 0 && -buttonIndex < 6) {
        buttonStates[-buttonIndex] = false; // Set button state to released
      }
    }
  }