- Assignments
- Group assignment
- 3D scanning
- 3D printing
- Inflatables
- Small scarf
- Infill fabric
- Basketry bowls
- Recycling PLA
- Other experiments
- Files
- Other research
- Lecture notes
3D Scanning and Printing
This week is all about 3D printers and scanners. I have a printer myself, and I’ve experimented with it a lot. I like experimenting with 3D printers to create wearables and textiles. For this week I want to try out the new INFI-20 belt printer, which I haven’t used before. I want to see if it would be possible to use it to print big pattern pieces for garments. I also hope to try out the Voron printer, but it is not up and running yet. Since I know all of the machines apart from the INFI-20 and Voron pretty well, I’m not going to go into too much detail on the step by step process; I’m going to focus on things that I haven’t tried before.
Assignments
| Progress | Task |
|---|---|
| Done | Group assignment: testing the design rules of the printers in the lab |
| Done | Explained what you learned from testing the 3D printers |
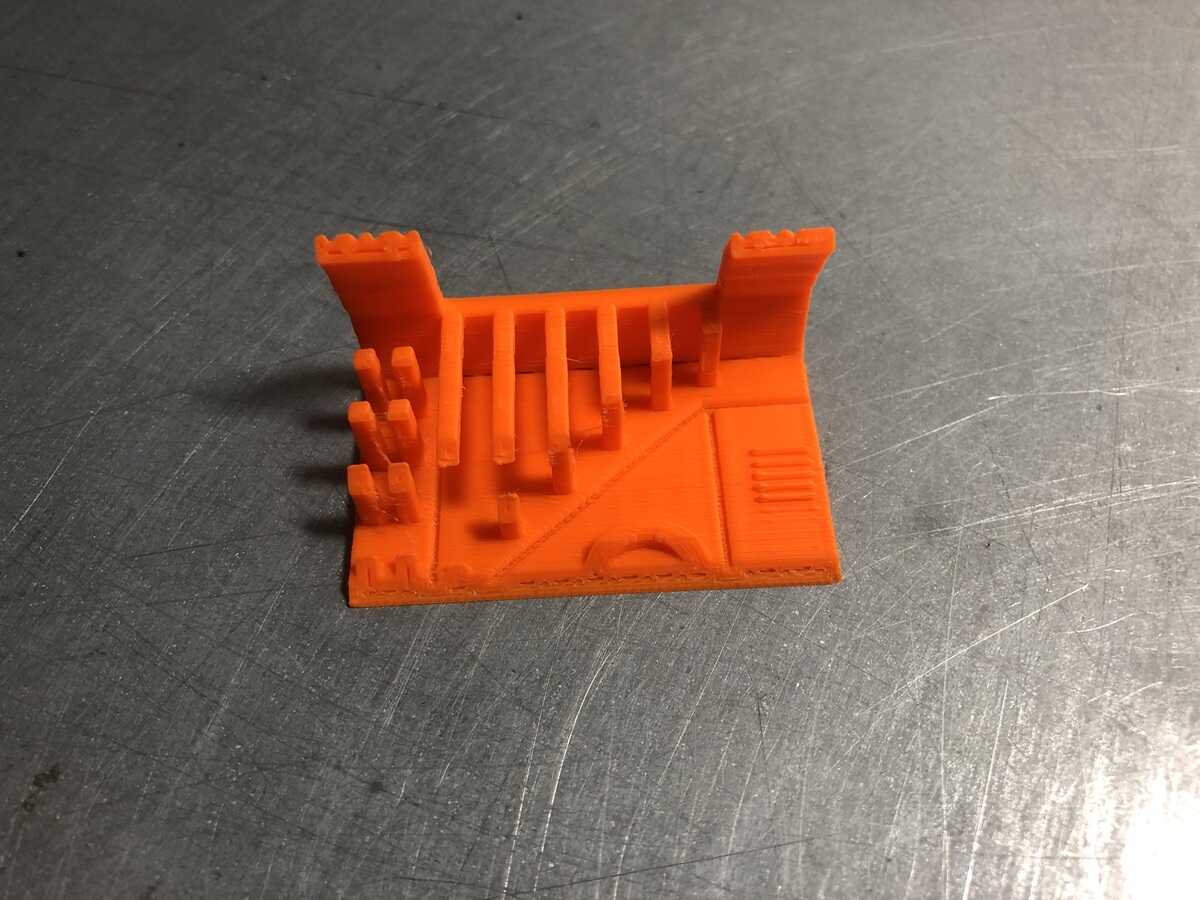
| Done | Documented how you designed and 3D printed your object and explained why it could not be easily made subtractively |
| Done | Documented how you scanned an object |
| Done | Included your original design files for 3D printing |
| Done | Included your hero shots |
Group assignment
For the group assignment we are testing the design rules of the FDM printers in the lab. The printers in the lab that we are testing are:
- Prusa MK3S
- Ultimaker 2+
- SainSmart INFI-20 Belt printer
- Creality Ender
To compare these four printers:
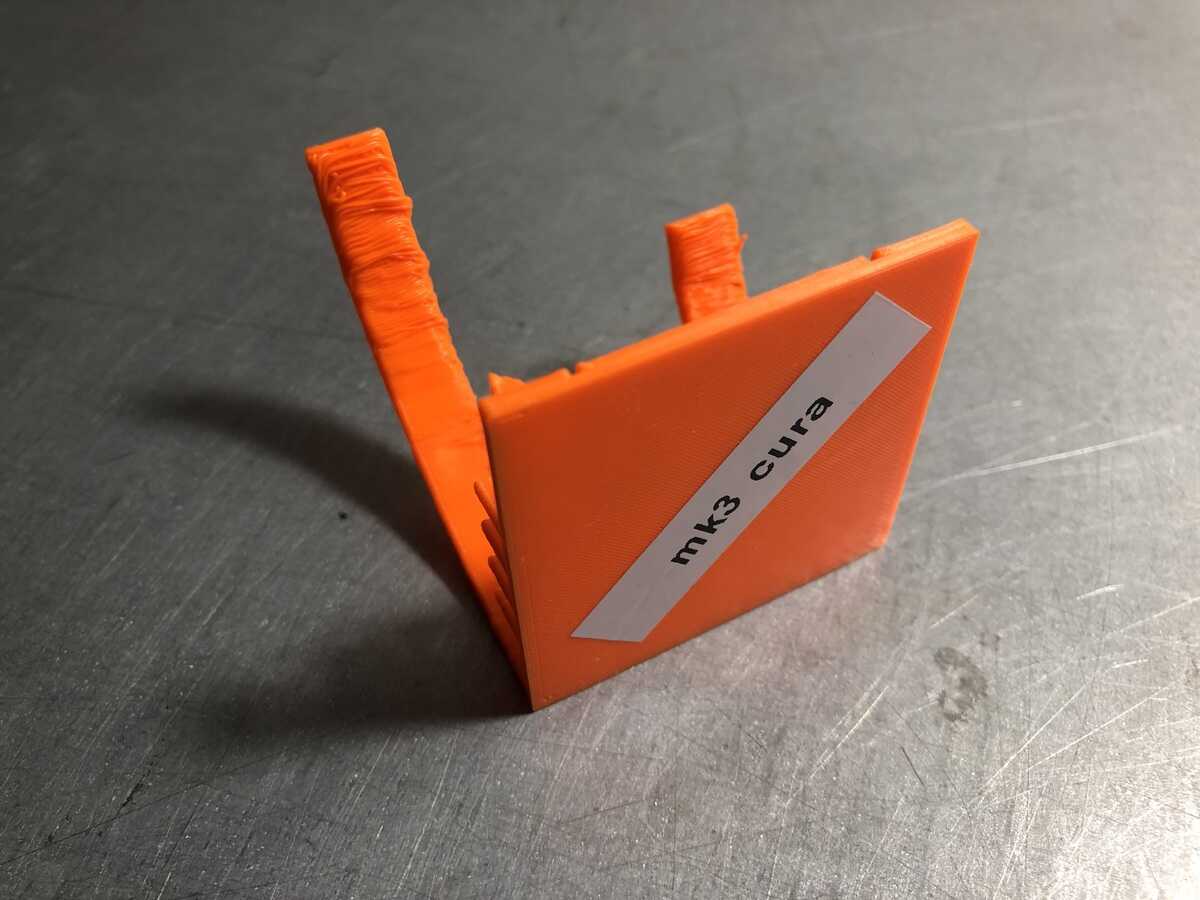
- We are using Ultimaker Cura as slicing software because PrusaSlicer doesn’t have a printer profile for the UM2+ (only the UM2). I have used the UM2 profile without issues plenty of times before, but since it might not be the best comparison we decided to go for Cura.
- For the INFI-20 printer we’re using SainSmart Slicer, which is basically Cura with an infinite print depth.
- We are using layer height 0.2mm for all prints
- We’re printing without support and without brim, but with skirt
- Other than that, we take the regular PLA settings for each machine. Some settings like recommended speeds and infill settings may vary; we’re comparing the parts printed with recommended settings, not how fast each printer can go.
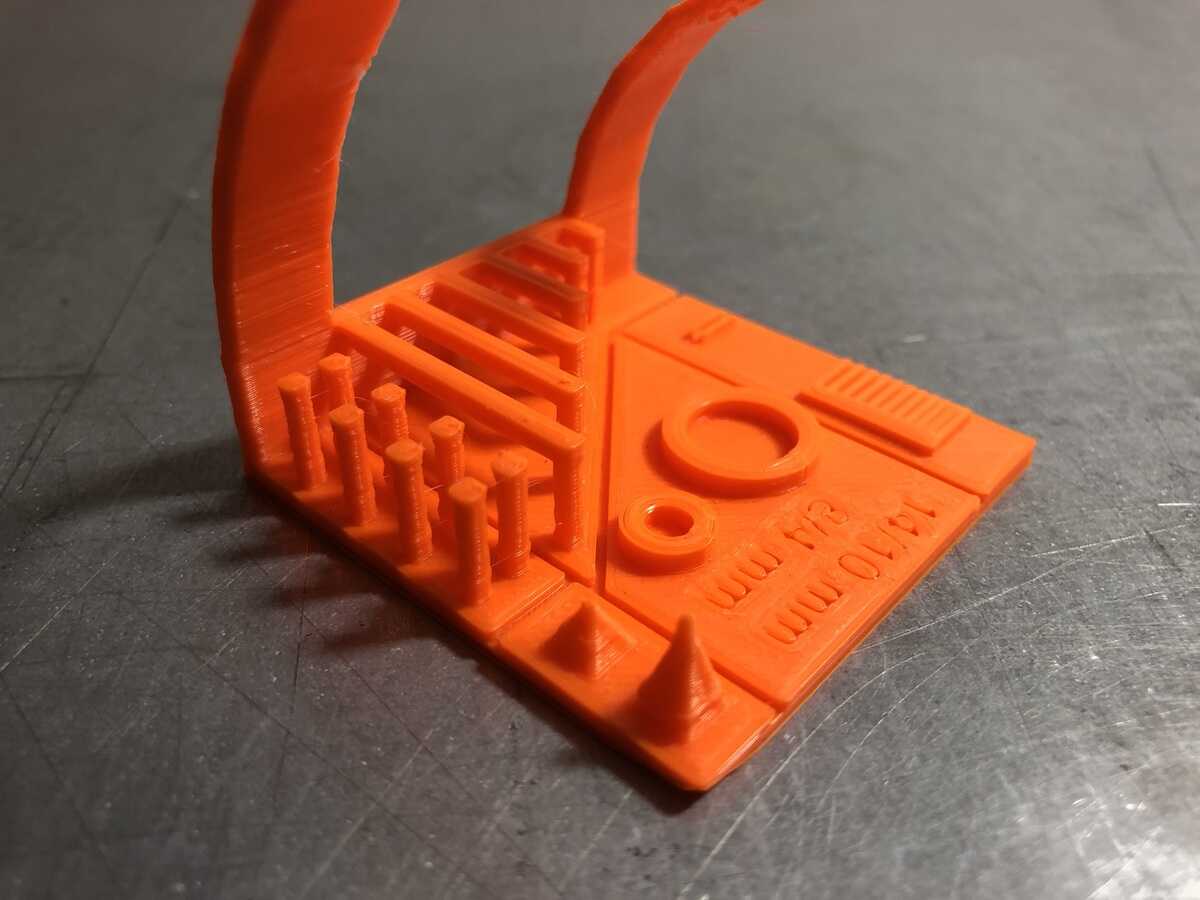
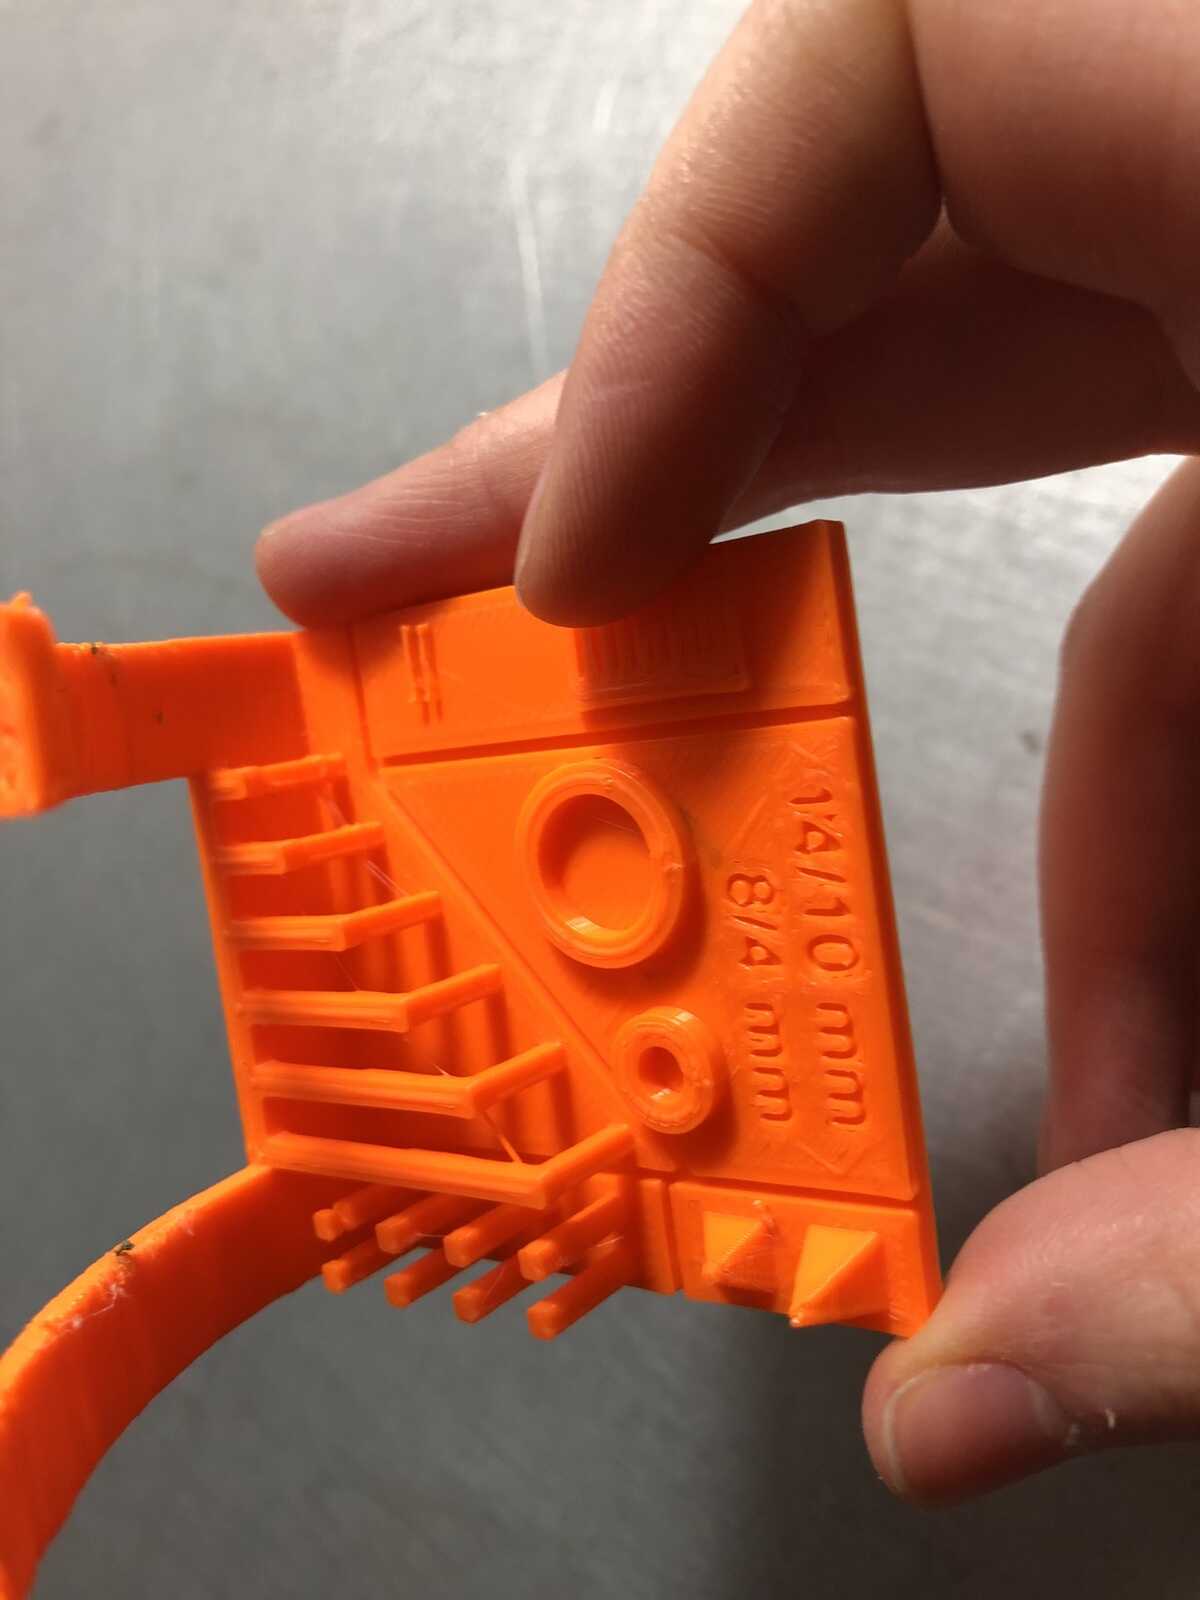
- We are using this all in one printer test from Thingiverse
Features we are comparing:
- overhang
- bridging
- stringing
- sharp-corners
- tolerance
- scale/diameter
We are also comparing workflow and ease of use.

Process
Prusa
The Prusa and the Ultimaker gave us the best and fastest results. It was a matter of loading filament and file, and go. The Prusa did have some old filament stuck to the hot end, which stuck to the print at some point. We also noticed that when printing the overhang, the print bounces around a little.
Ultimaker
The Ultimaker did pretty well after we calibrated the Z axis. The nozzle was printing too far from the bed initially. The calibration process for the Ultimaker is a little annoying, and it doesn’t feel very accurate. You have to wiggle a paper between the nozzle and the bed, and move the bed with the knobs in the front manually. There are only two knobs, so if you have a problem in the back of the bed, there isn’t really a way to fix that easily.
Also, the printer breaks the fourth wall when walking you through the calibration steps:
Printing the overhang looks more stable than printing the overhang on the Prusa.
Ender
The Ender had some issues: Pieter found out that the bed we were printing on wasn’t flat but rather convex. We swapped out the stock bed for a Prusa metal bed, but the issue persisted. In the end we just calibrated it the best we could, printed it and it went pretty okay.
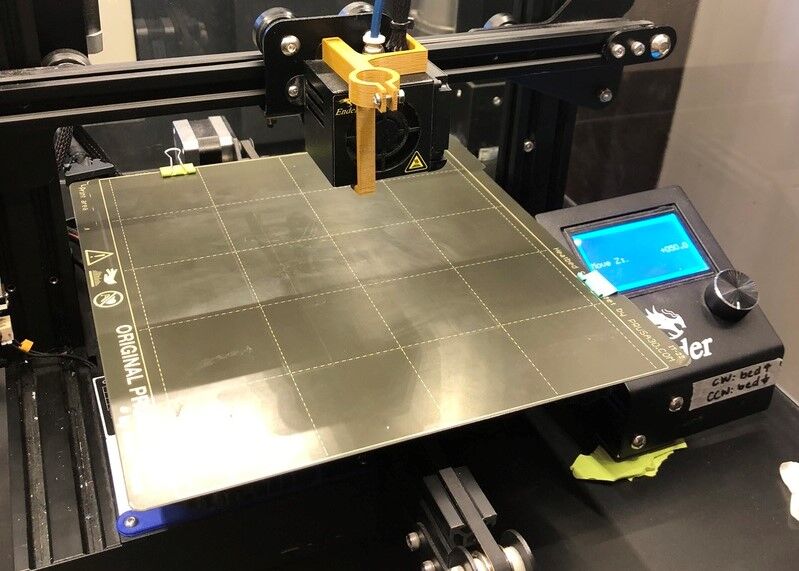
I haven’t really had issues with it in the past so it seems like a new issue. However, when I calibrated the bed again and printed something on the Ender covering the entire bed to see if it had an issue, it printed very regularly on the entire bed, so it seems to me that there is nothing wrong.
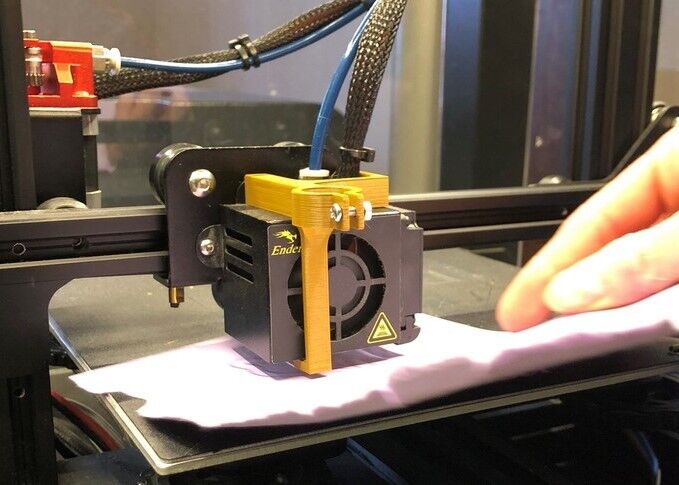
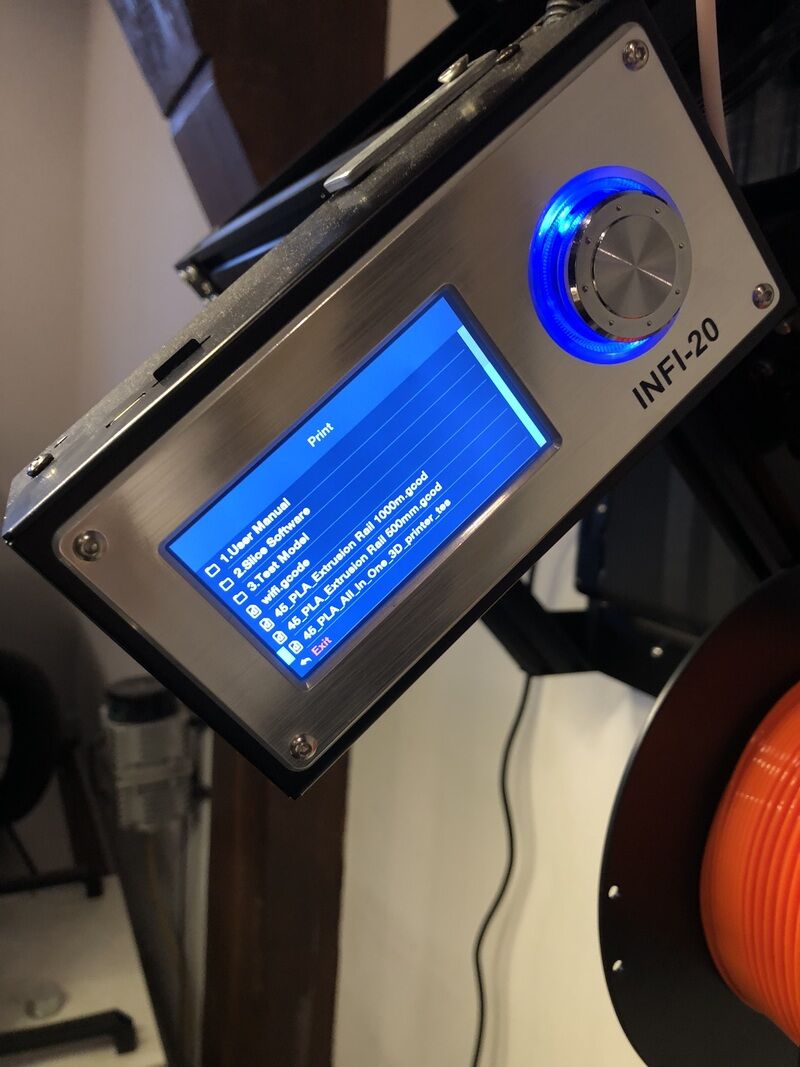
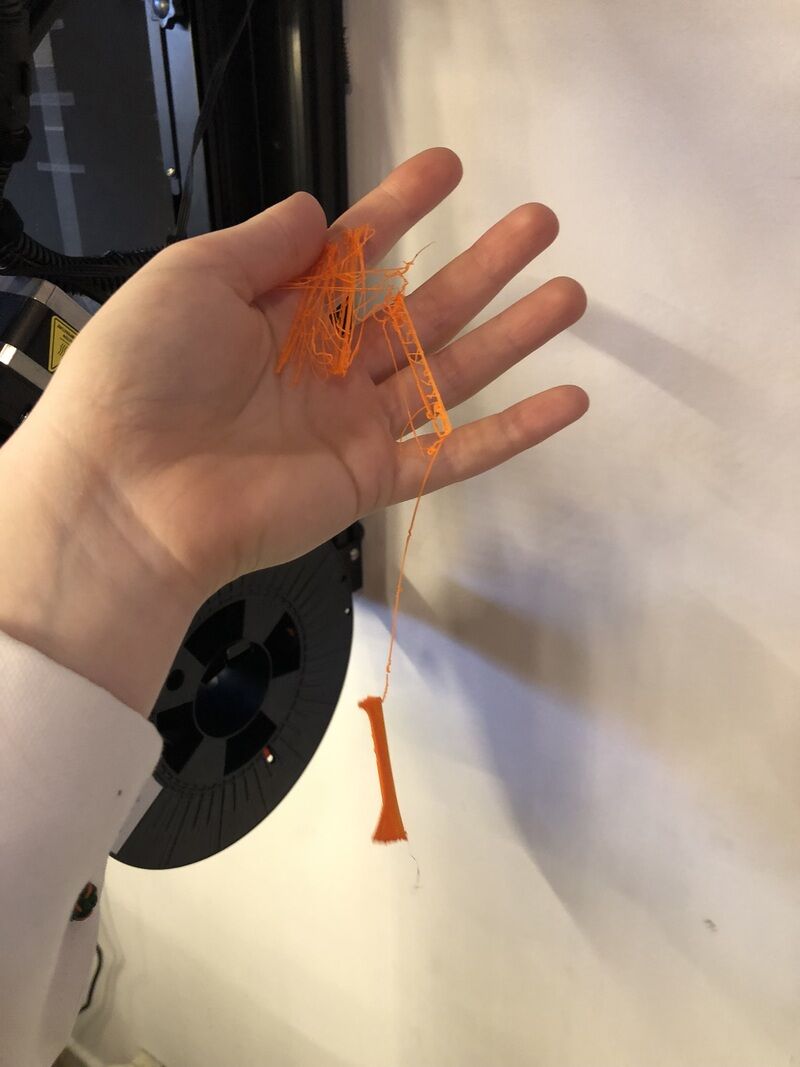
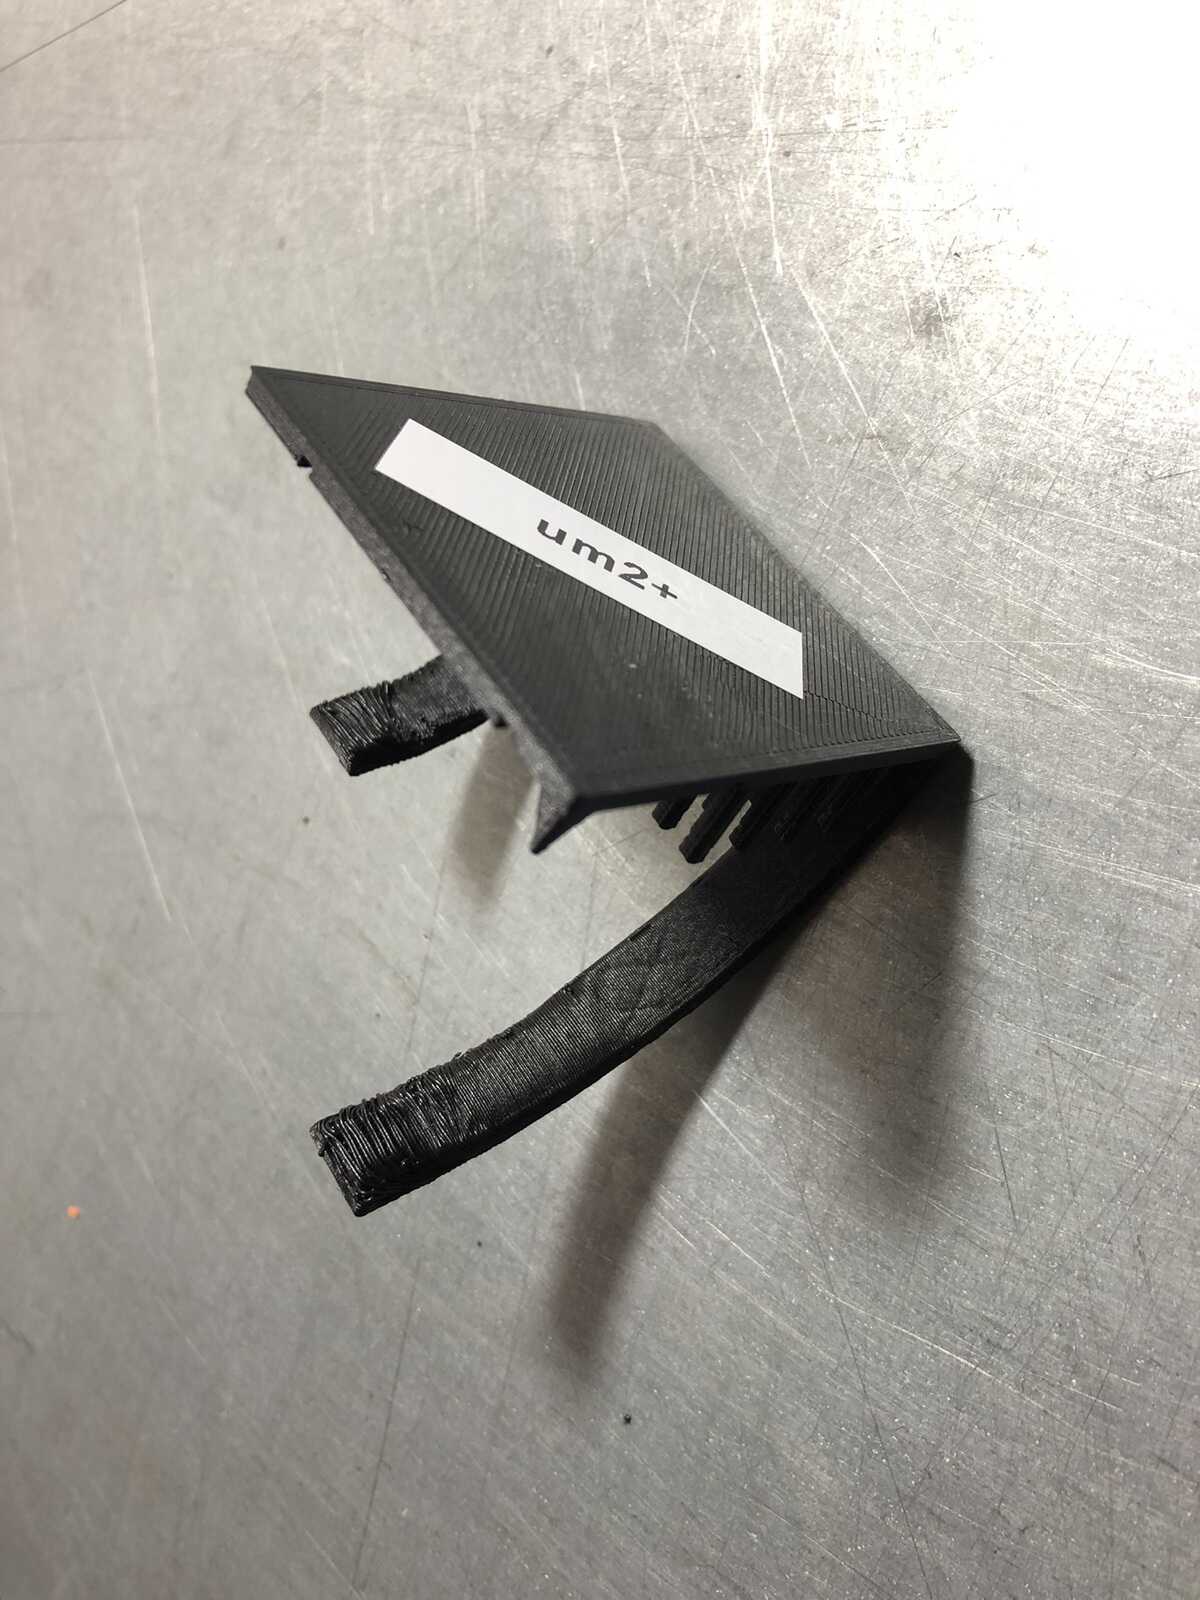
INFI-20
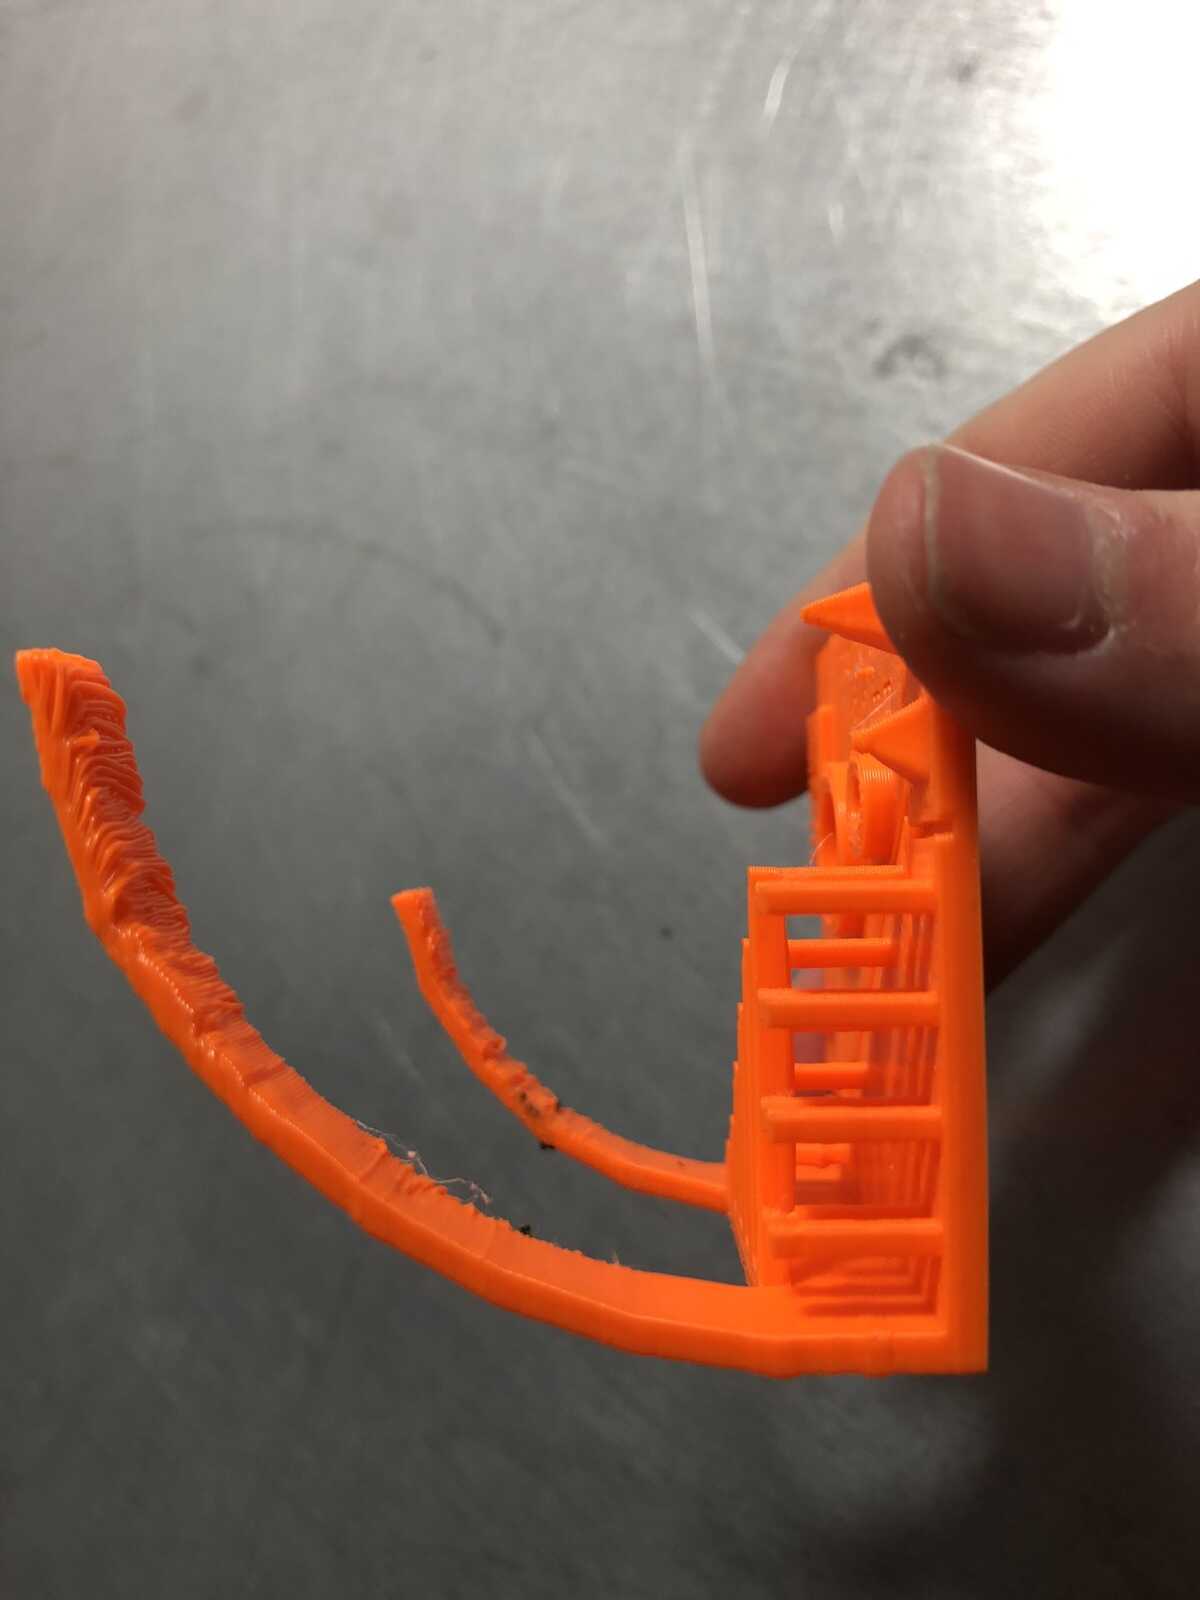
The INFI-20 really didn’t want to work with us. We didn’t manage to get a full print out after 6 tries. The nozzle may have to be slightly calibrated, but we were very surprised to see the deformation of the bottom of the print. After a couple of tries, we decided to leave it out of our comparison, since the results wouldn’t be fair to compare because it’s sliced and printed in a different angle.
The printer itself is very easy to work with though: you move through the menu with the knob just like most other printers, and it has a nice & clear interface. One thing to keep in mind is that you have to confirm the printing temperature when you start a new print, otherwise it doesn’t start heating up.

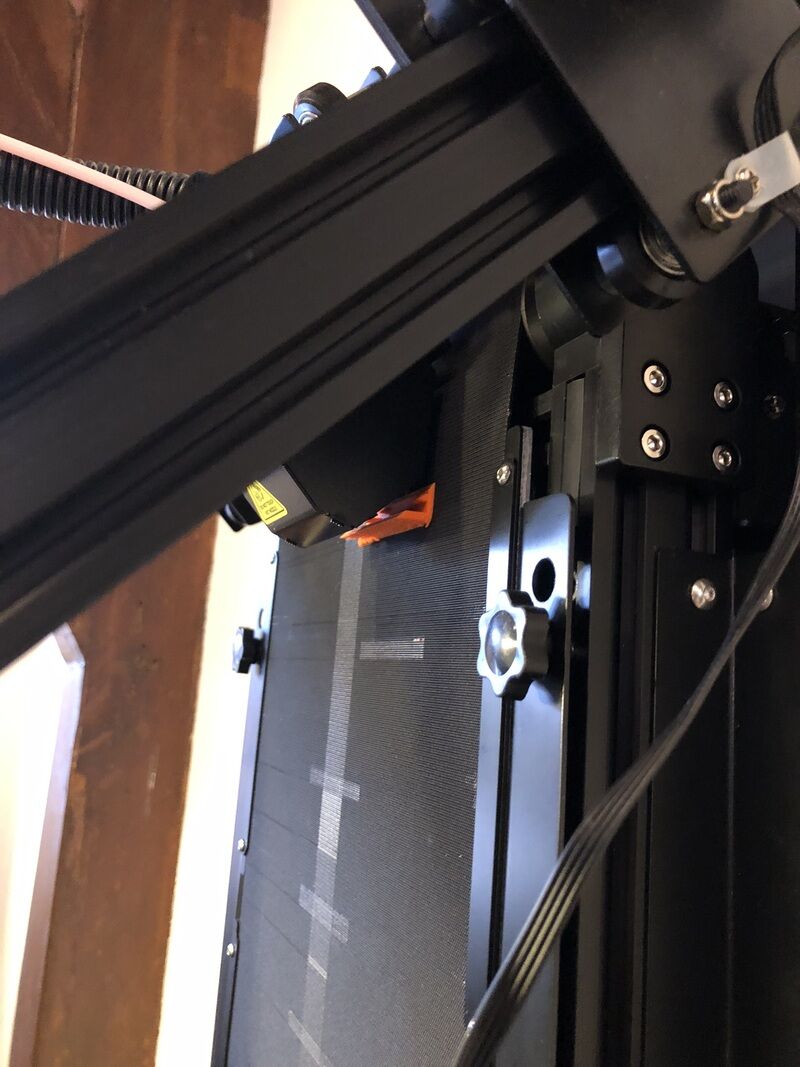
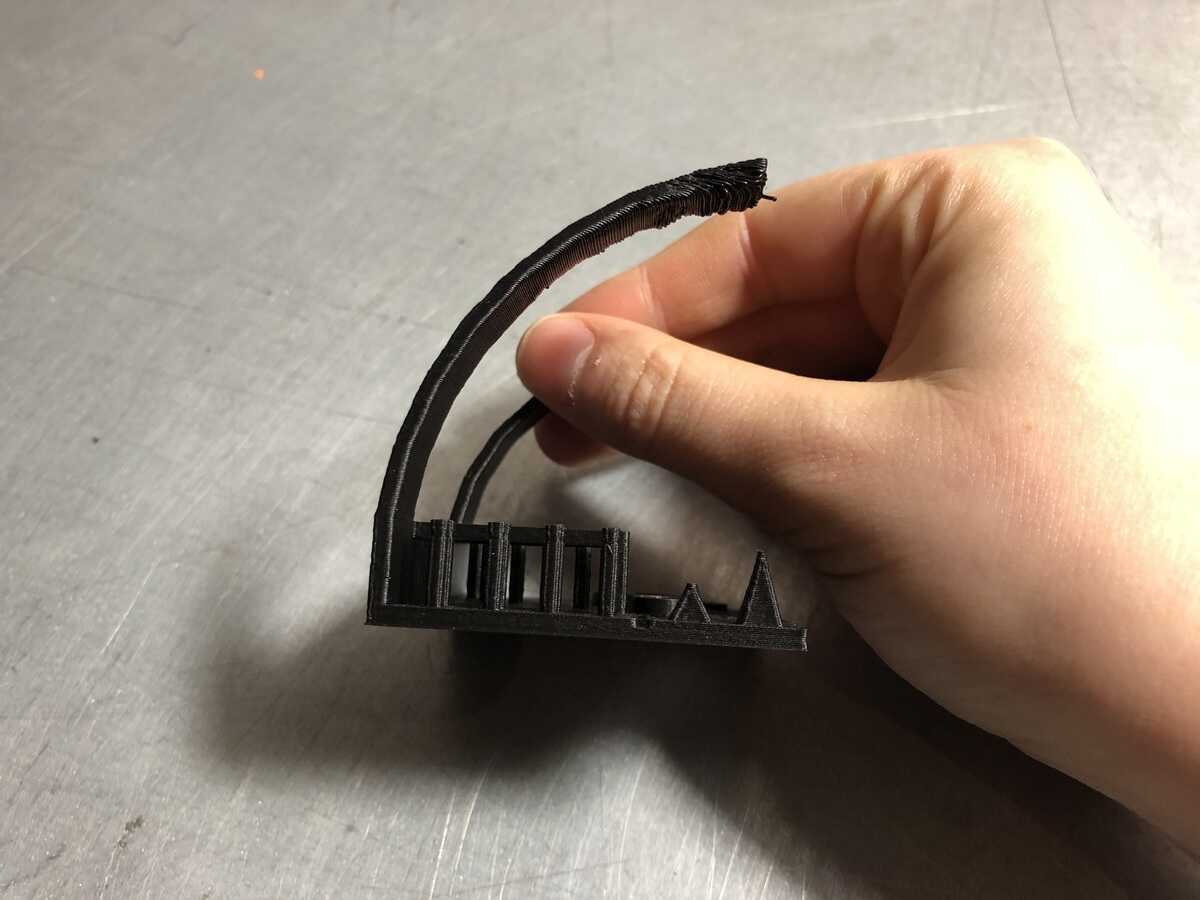
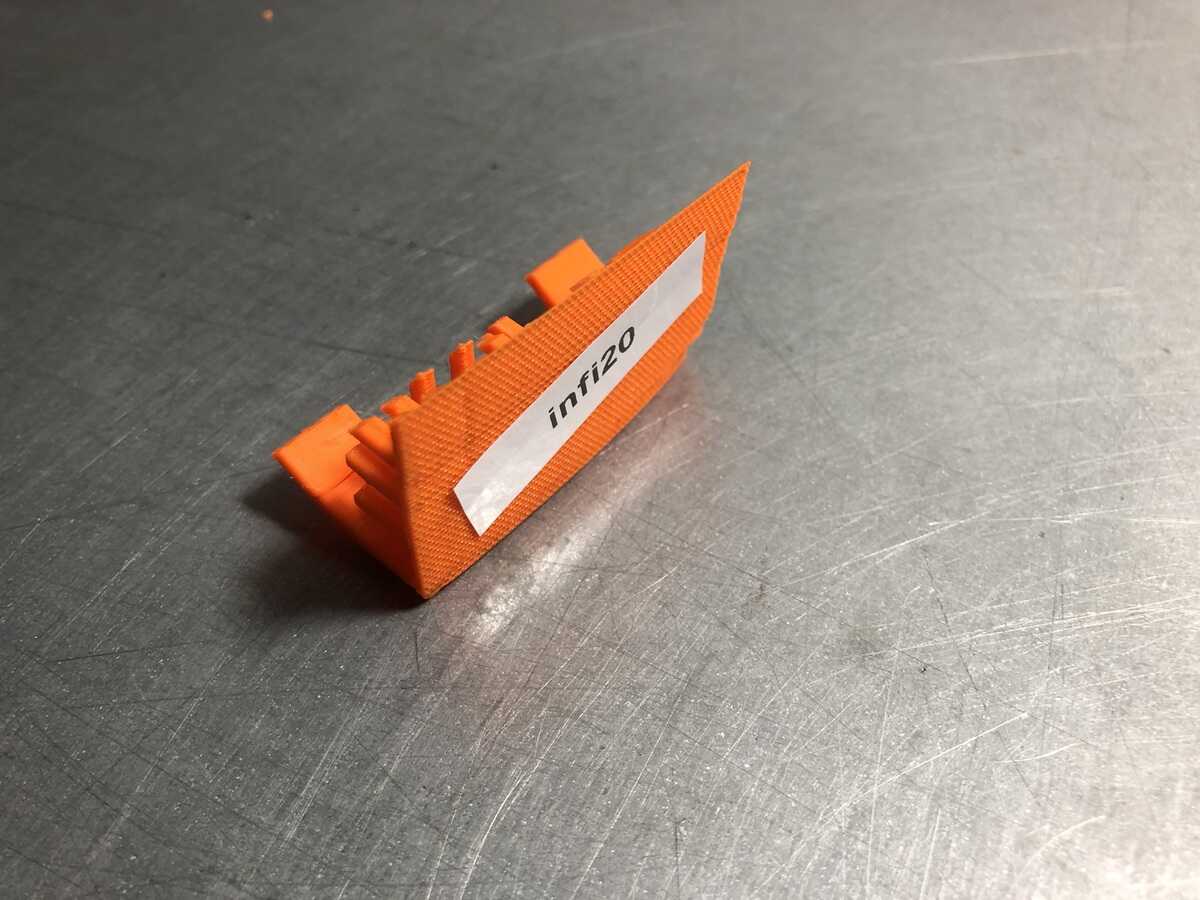
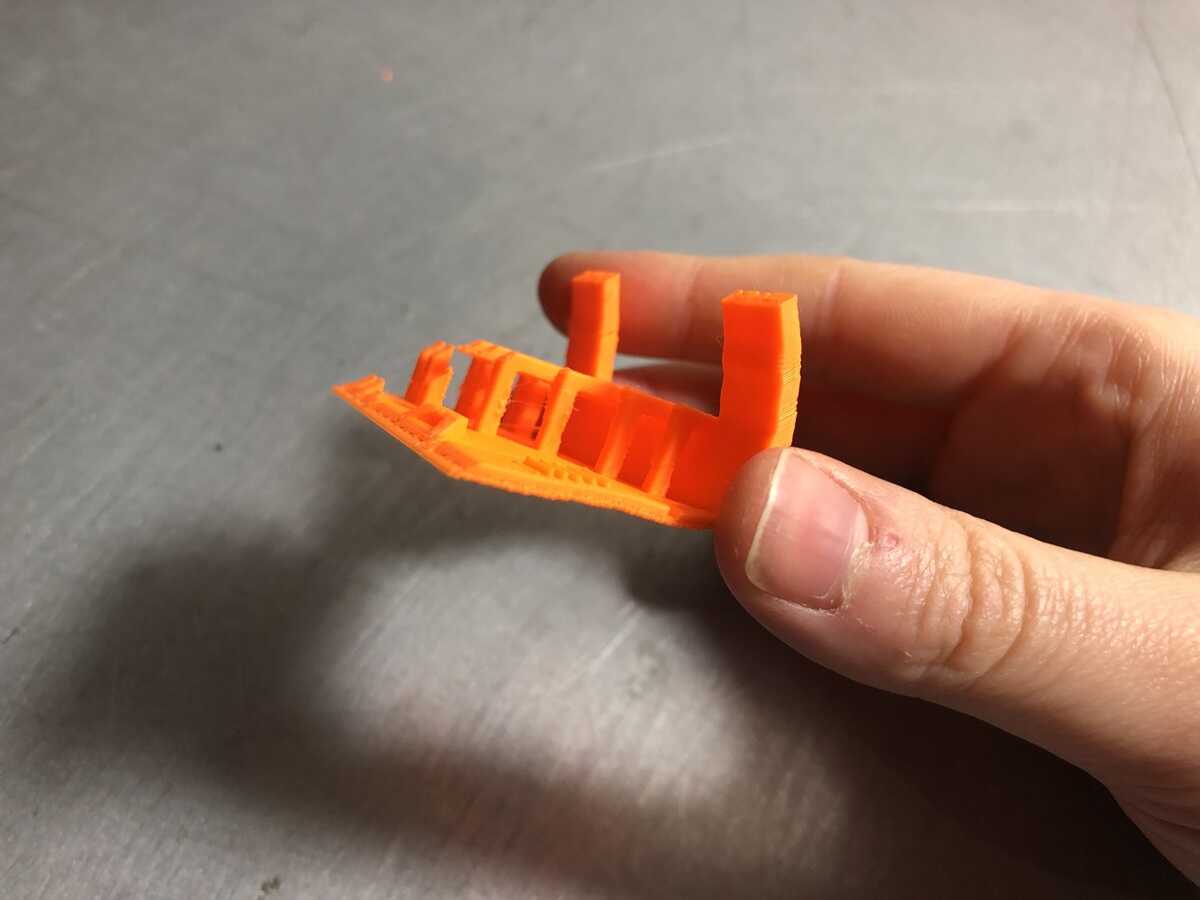
This is how far we got most times with regular settings:
We realized that we didn’t slice it in the best way, somehow we missed the most obvious positioning. This is the better slicing option:
This is a visual summary of working with the INFI-20 for the group assignment:
Results
Ender 3:
Prusa MK3S:
Ultimaker 2+:
INFI-20:
| Actual diameter | Prusa MK3S | Ender 3 | Ultimaker 2+ |
|---|---|---|---|
| 14 | 13,99 | 13,97 | 14,00 |
| 10 | 9,64 | 9,80 | 9,78 |
| 8 | 8,00 | 7,78 | 7,92 |
| 4 | 3,63 | 3,78 | 3,83 |
The results are mixed, they all did pretty well but it seems like the Ultimaker did best with two out of four closest diameters. The Prusa did the worst overhang-wise, which I found surprising. The bridging results were all pretty similar, and there wasn’t a lot of stringing for all prints. The pointy piramid did best on the Ultimaker.
I expected the Prusa to be the clear winner, but the Ultimaker deserves a shared first place. I would still say that the Prusa is my favorite printer, because it has the best interface and generally the best results.
3D scanning
Sense 2
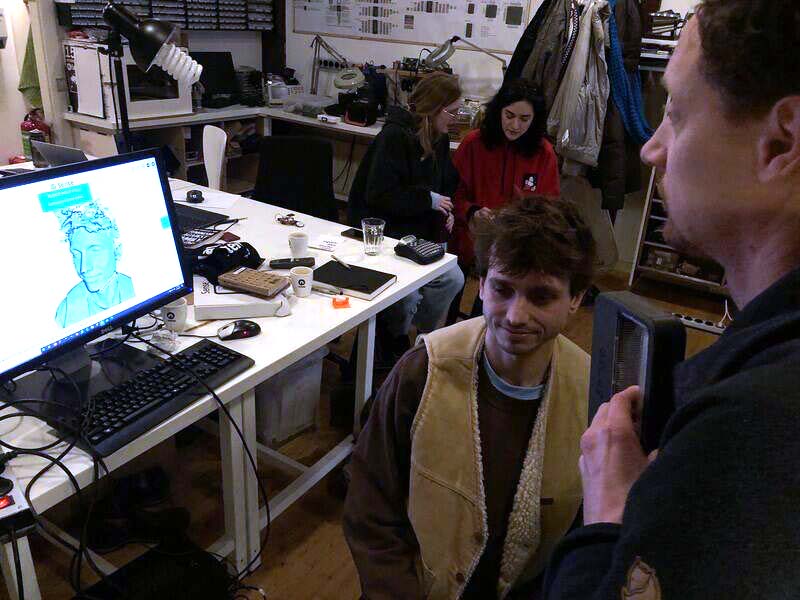
In the lab we have the Sense 2 3d scanner by 3d systems. Two years ago I compared this scanner with a 3D scanning app on my phone called Qlone on my documentation blog. I showed Pieter, Samson and the interns how to use both. Last time I used the Sense scanner, it didn’t want to make a connection anymore to the Sense software, but luckily this time it connected without issues. We all scanned each other with the Sense scanner. The software is pretty straightforward; you can select whether you’re scanning an object, a body or a head, then you have to slowly move around the object or person to catch all of the details. In my experience it works okay with heads and bodies, but not great with objects.
Here is Samsons scan of me:
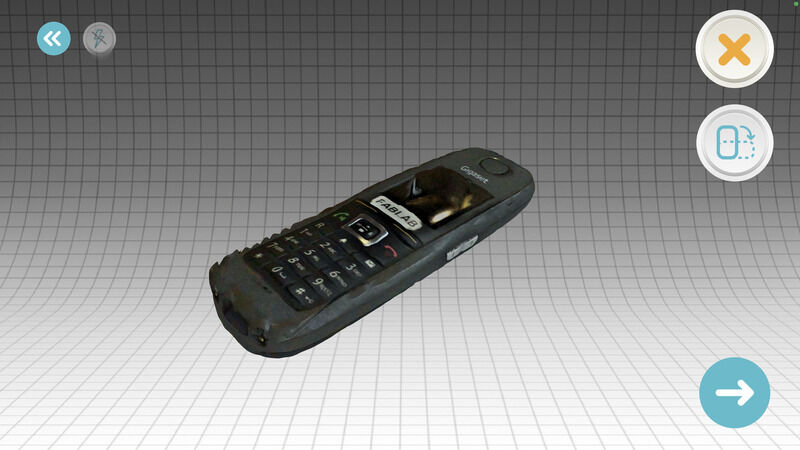
Qlone
Then I scanned a fablab phone in Qlone:
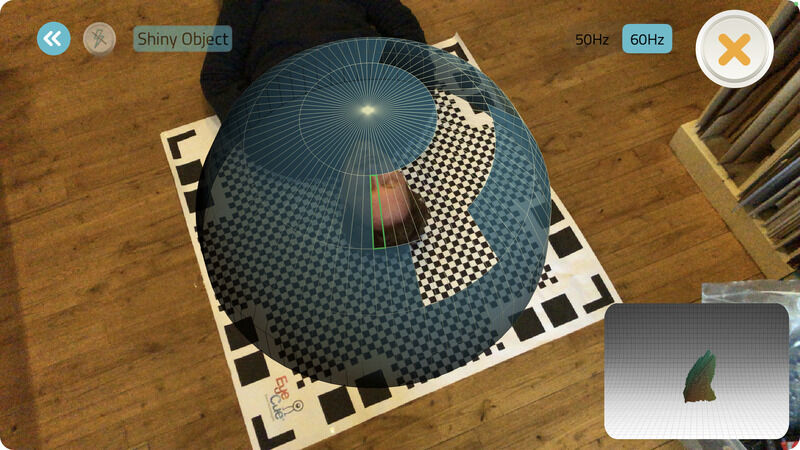
There is an AR feature in Qlone which is strange but fun:
I also tried scanning Pieter with the Qlone app on a big mat I had printed before, but I kept losing connection with the dome around the mat. It’s easier to scan a smaller area. I think it also has to do with the camera on my phone and that I didn’t have enough space to walk around Pieter (the material cupboard on the right was in the way).
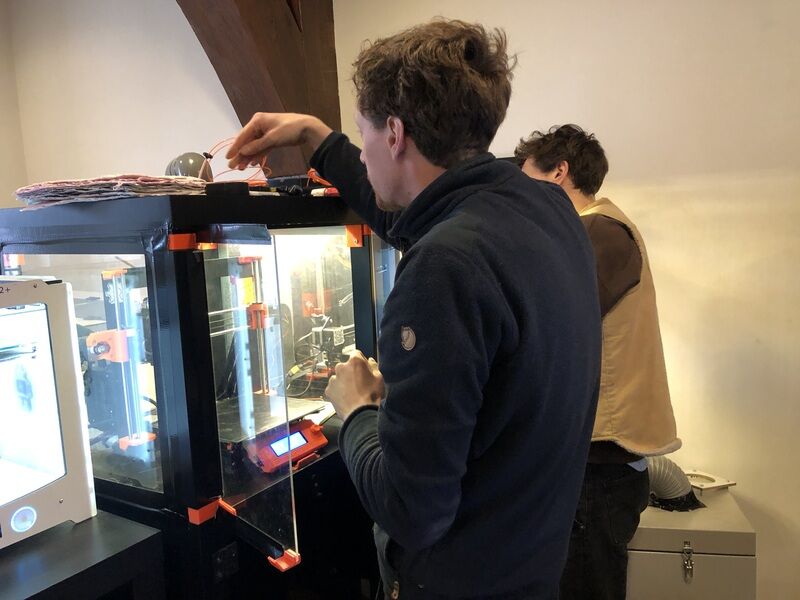
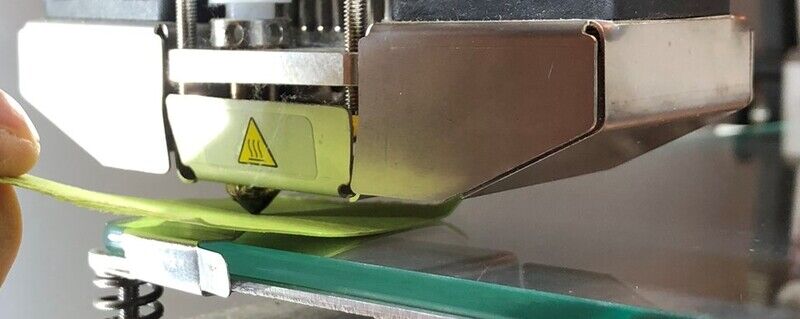
3D printing
Four machines printing at once:
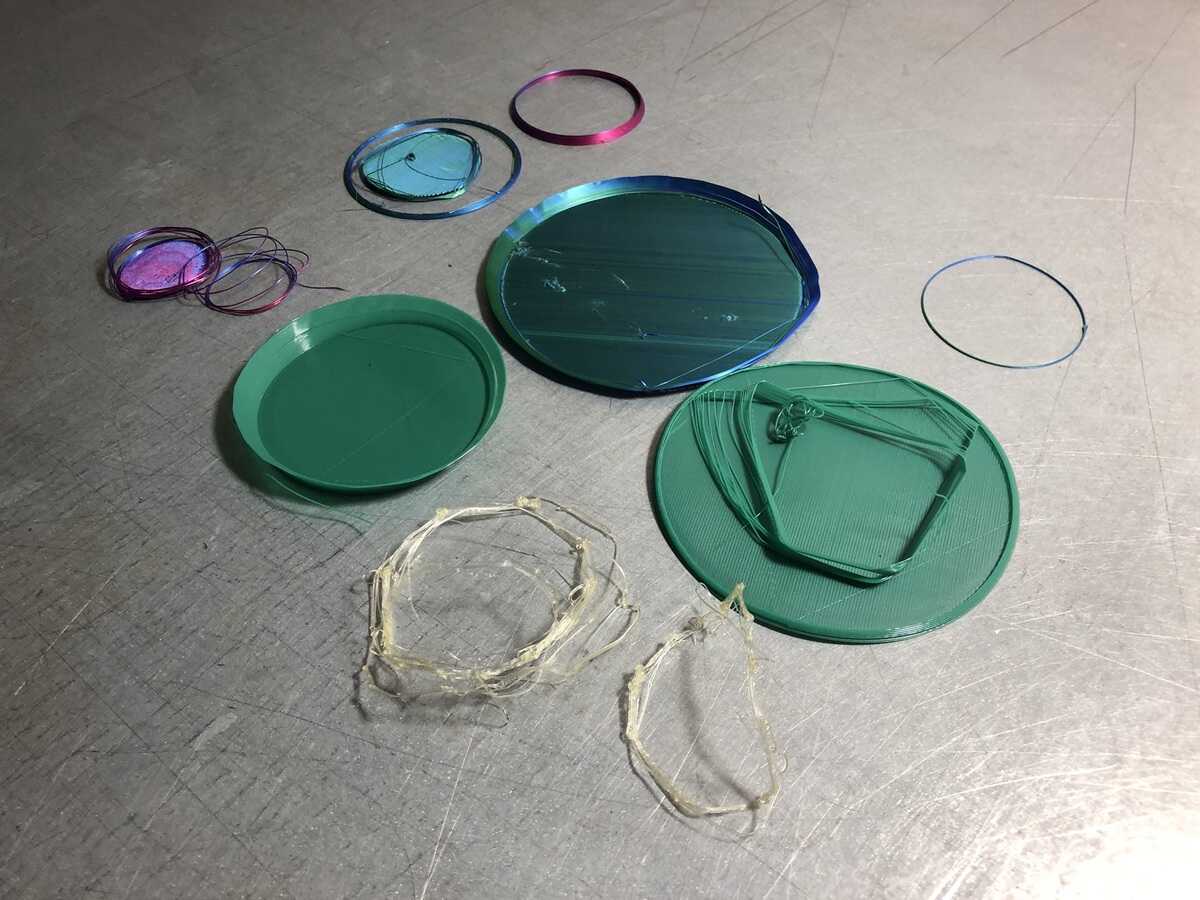
A collection of failed prints as a preview to what is to come (to be added to the recycling PLA pile):
Inflatables
Designing in Grasshopper
Inspired by the inflatables research by Fillip Studios & PI Lab I wanted to try to design and print inflatable 3D prints. I’ve used a heating gun in the past to mold and shape 3D printed hats and other shapes, but it’s always a little tricky. From their documentation I gather that they’re using hot water to get the entire print malleable, which is a smart solution.
I continued my research on inflatables and 3d printing: MIT has done some pretty cool inflatables research & the Fabricademy slides for soft robotics are a great resource as well. I thought about what would be an interesting motion and how to get that with a 3D printed shape.
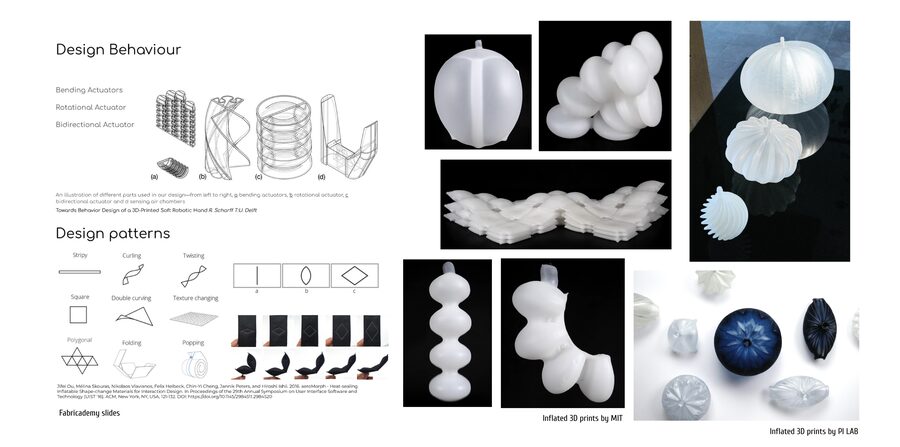
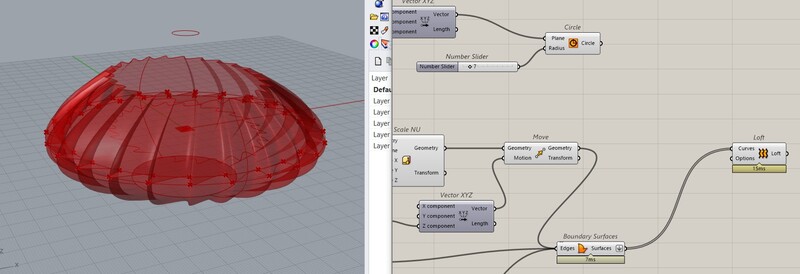
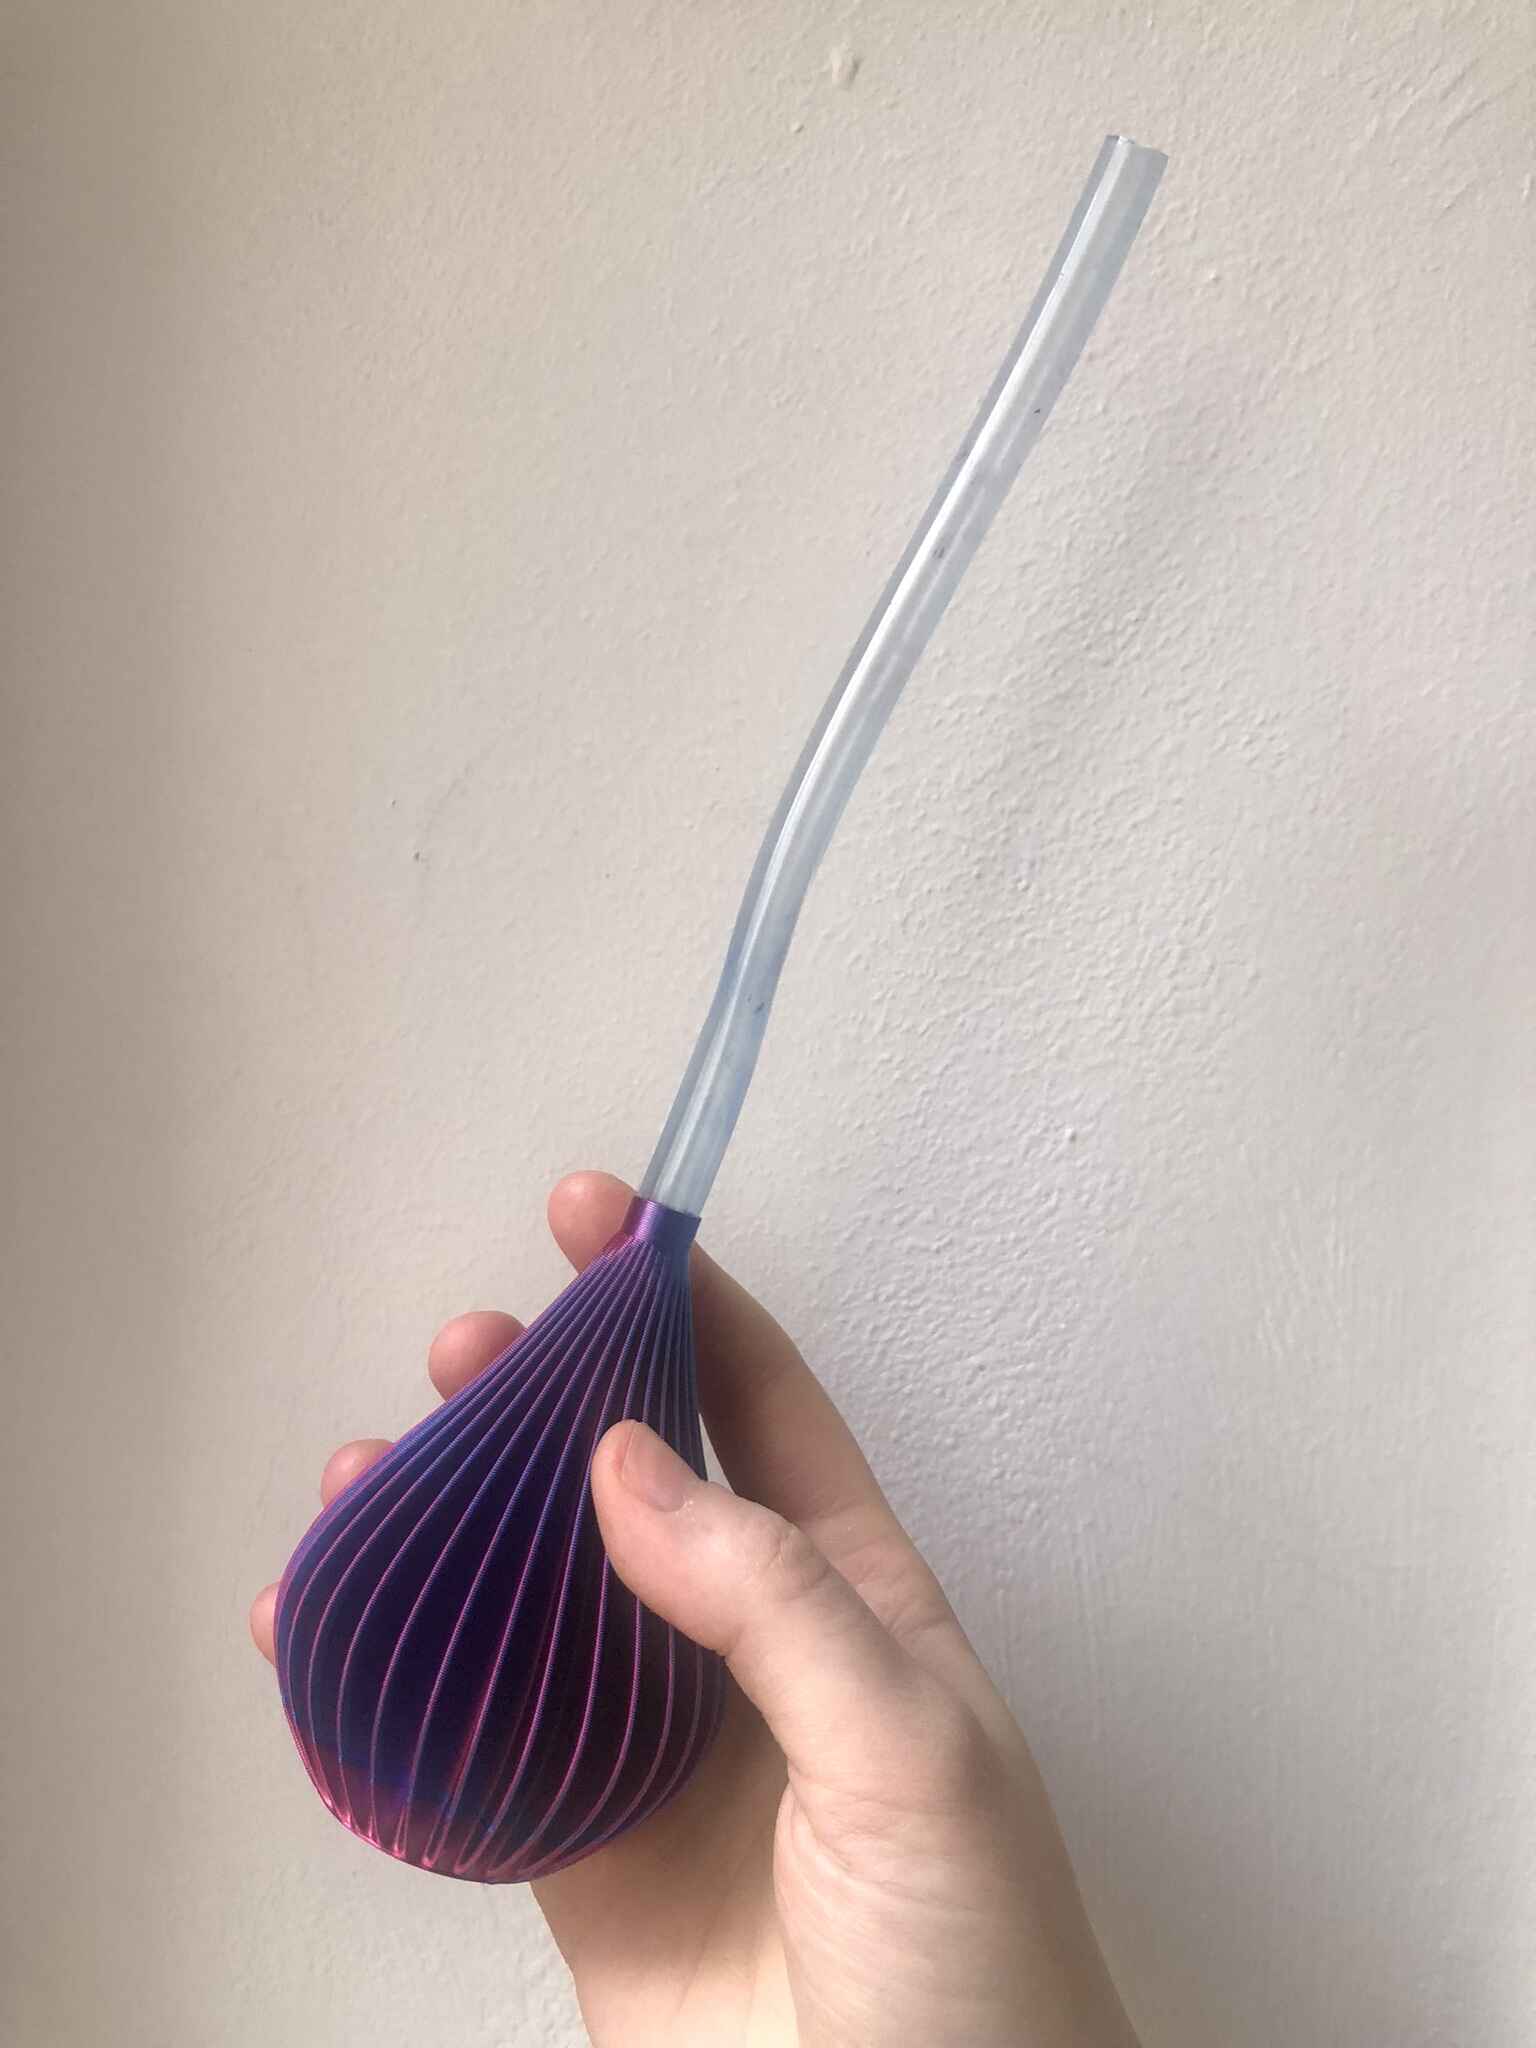
I started by asking Aslı for advice on how to make parametric shapes in Grasshopper like the one on the bottom right in the image above. Aslı had made a twisted tower with Weave and Interpolate in Grasshopper before so she showed me how she did that & shared the file with me so I could see what was going on. Then I started a new file and tried to make it myself which went pretty well: I made a few circles with variable offsets on the Z axis, then offset the circle in the middle towards the center and rotated it slightly. I divided the circles in an equal amount of divisions. Then I used Weave to connect the dividing points of both of those circles (below is before I added more circles; the top circle there has to be on the same level as the bottom circle). With Interpolate I connected those points.
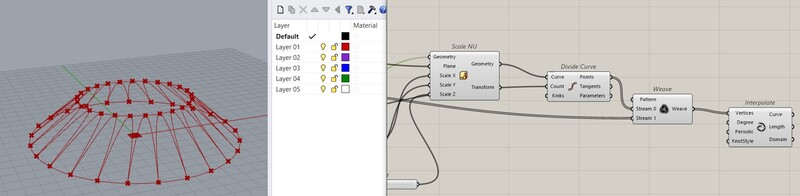
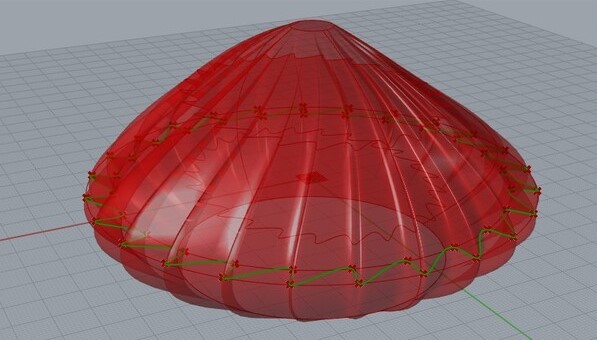
Here the two woven circles are lofted.
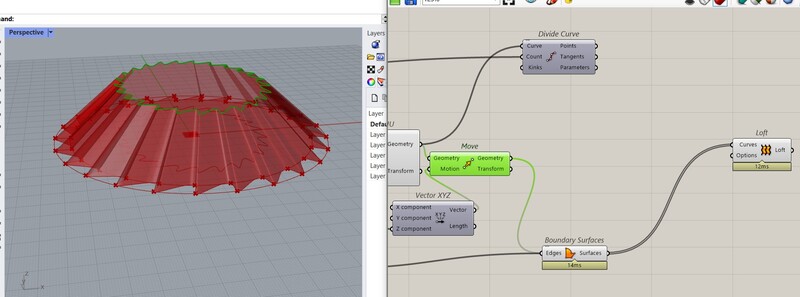
Then I lofted them to a top and bottom circle. I also added a channel at the top to insert the tube.
I created a smaller version too because I figured the original one would take too long to print.
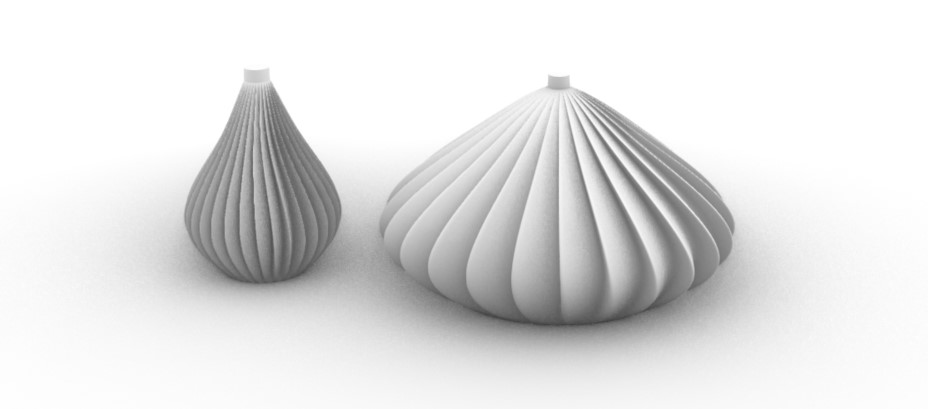
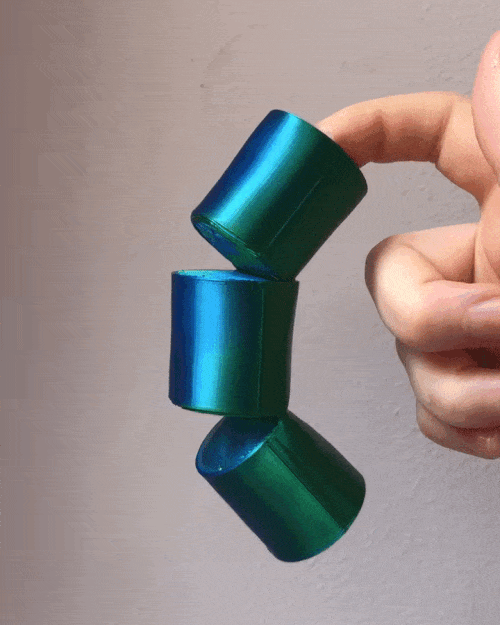
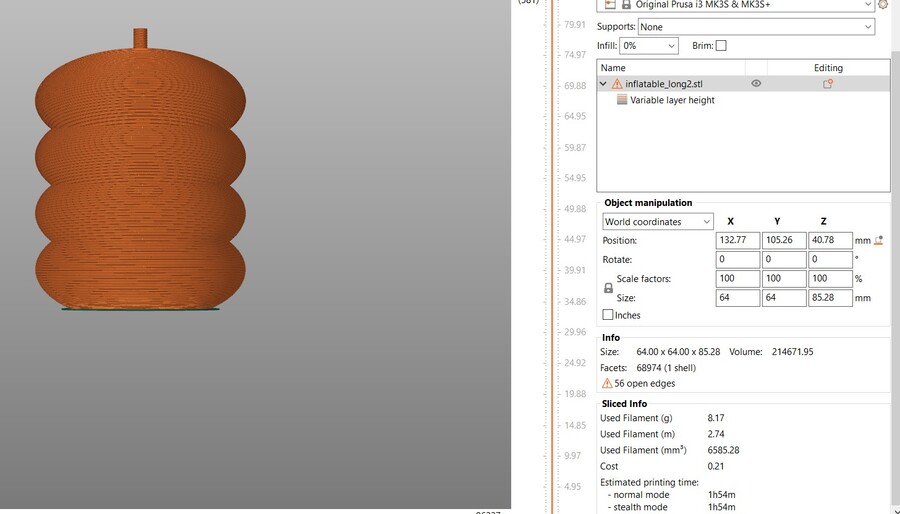
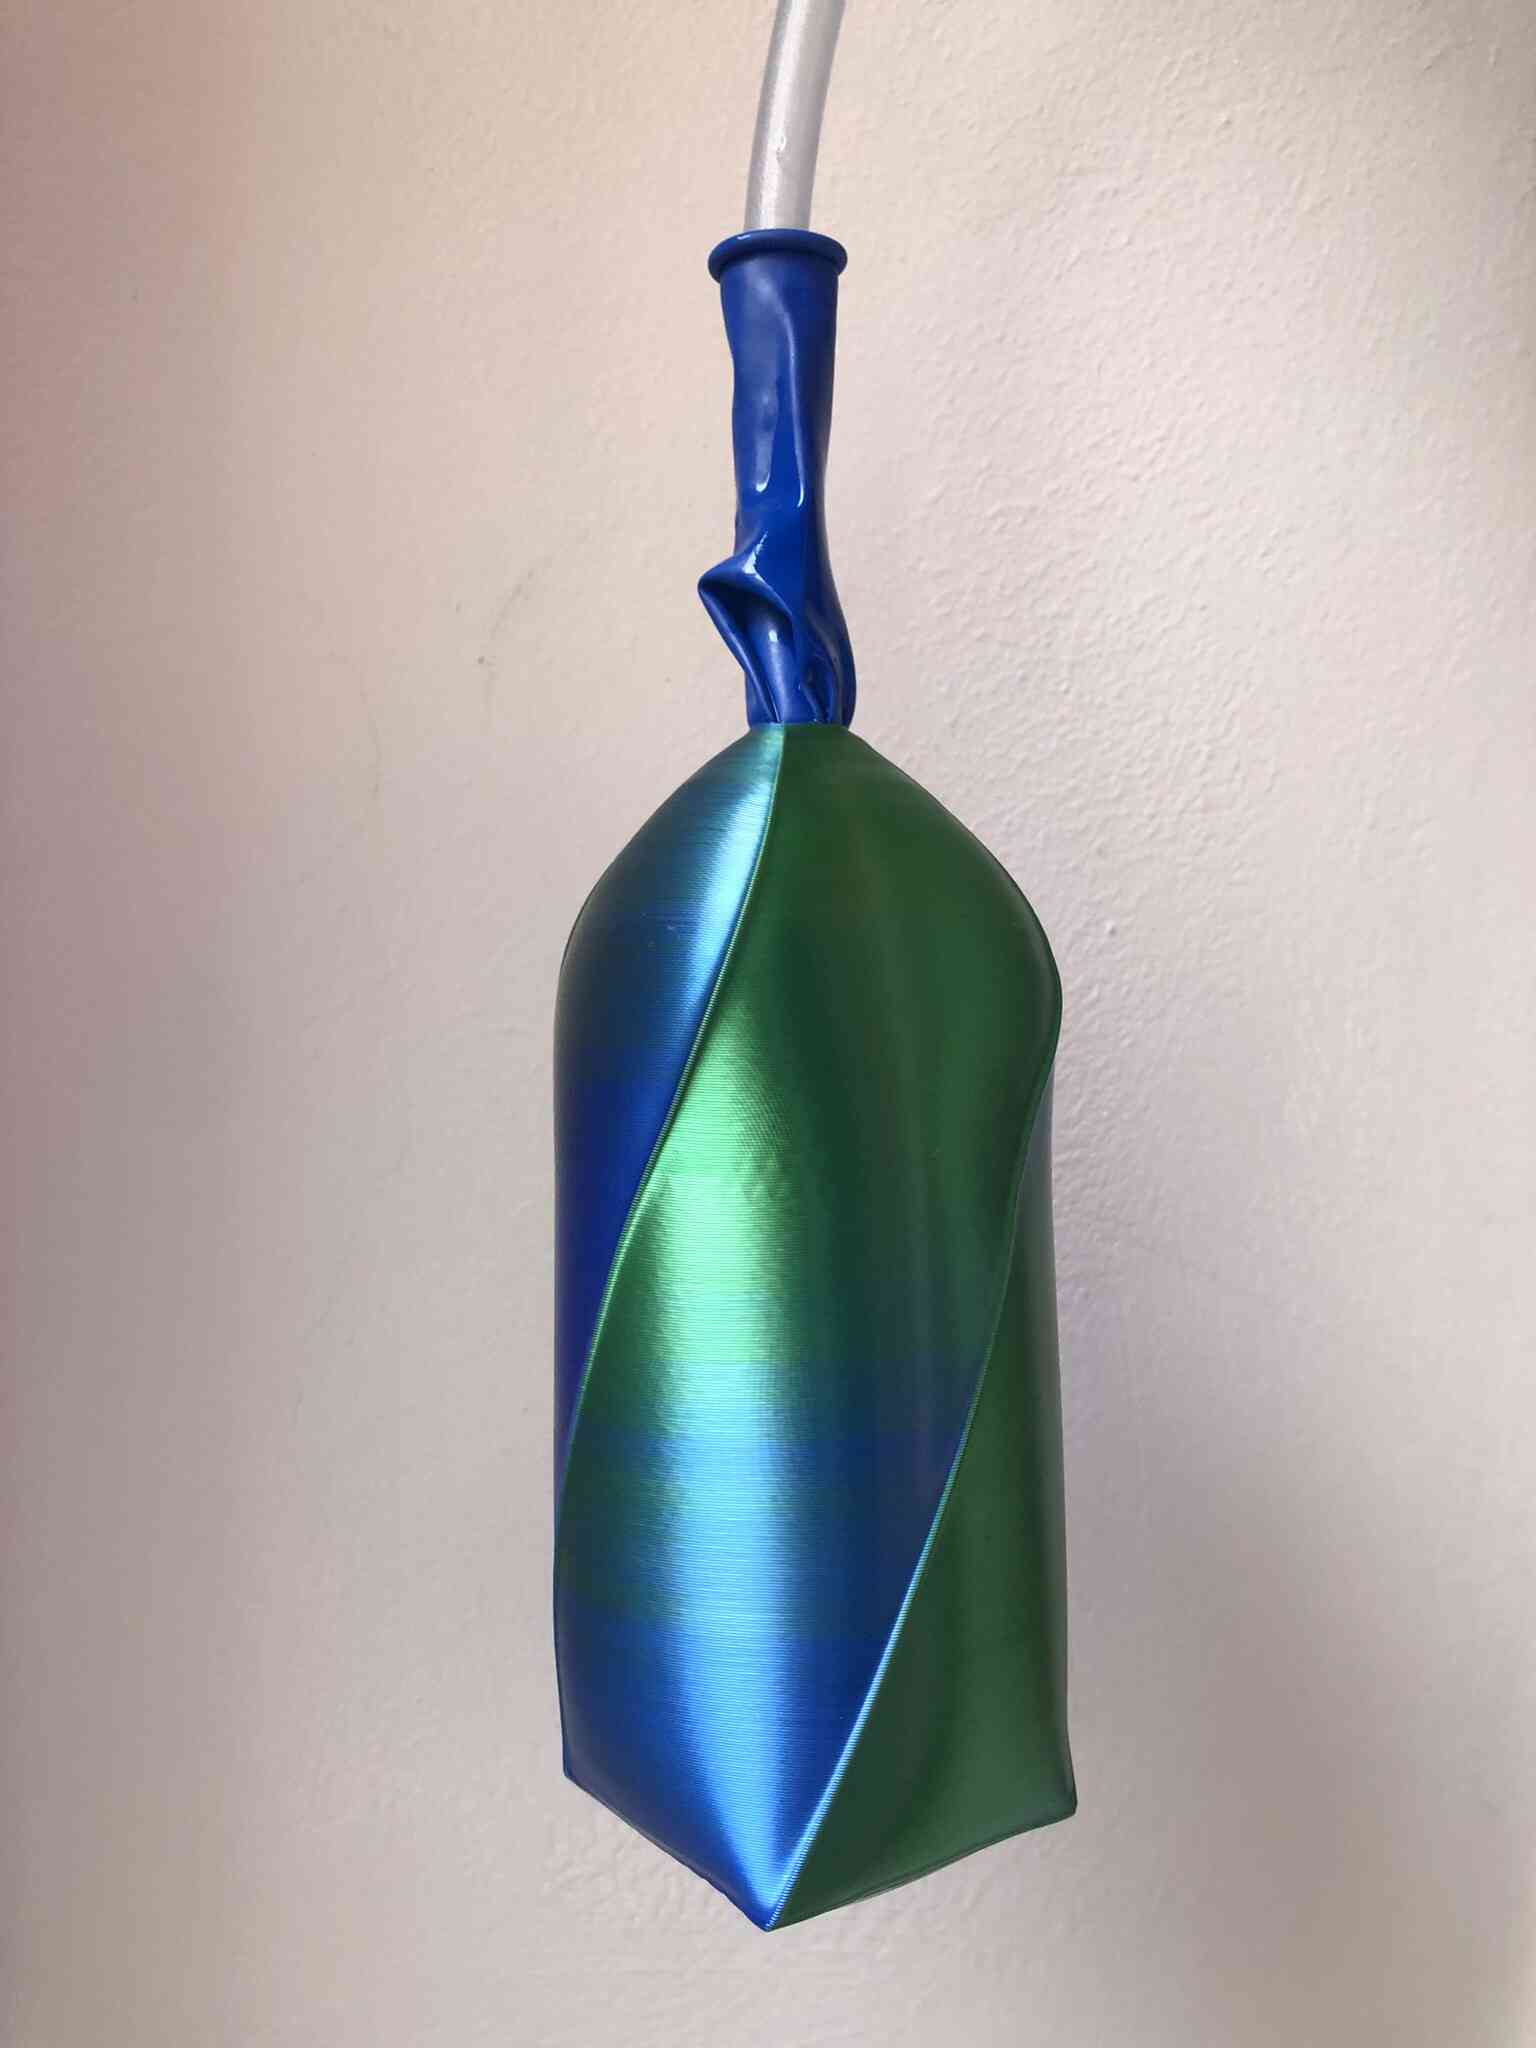
After this, I made another inflatable design based on the inflatable in the MIT video. It was pretty easy to design this shape, I basically just stacked four non-uniform scaled spheres on top of each other and added a tube at the top.
Printing
For the first inflatable, I used spiral vase settings and a layer height of 0.3mm in PrusaSlicer 2.6.0 alpha 4.
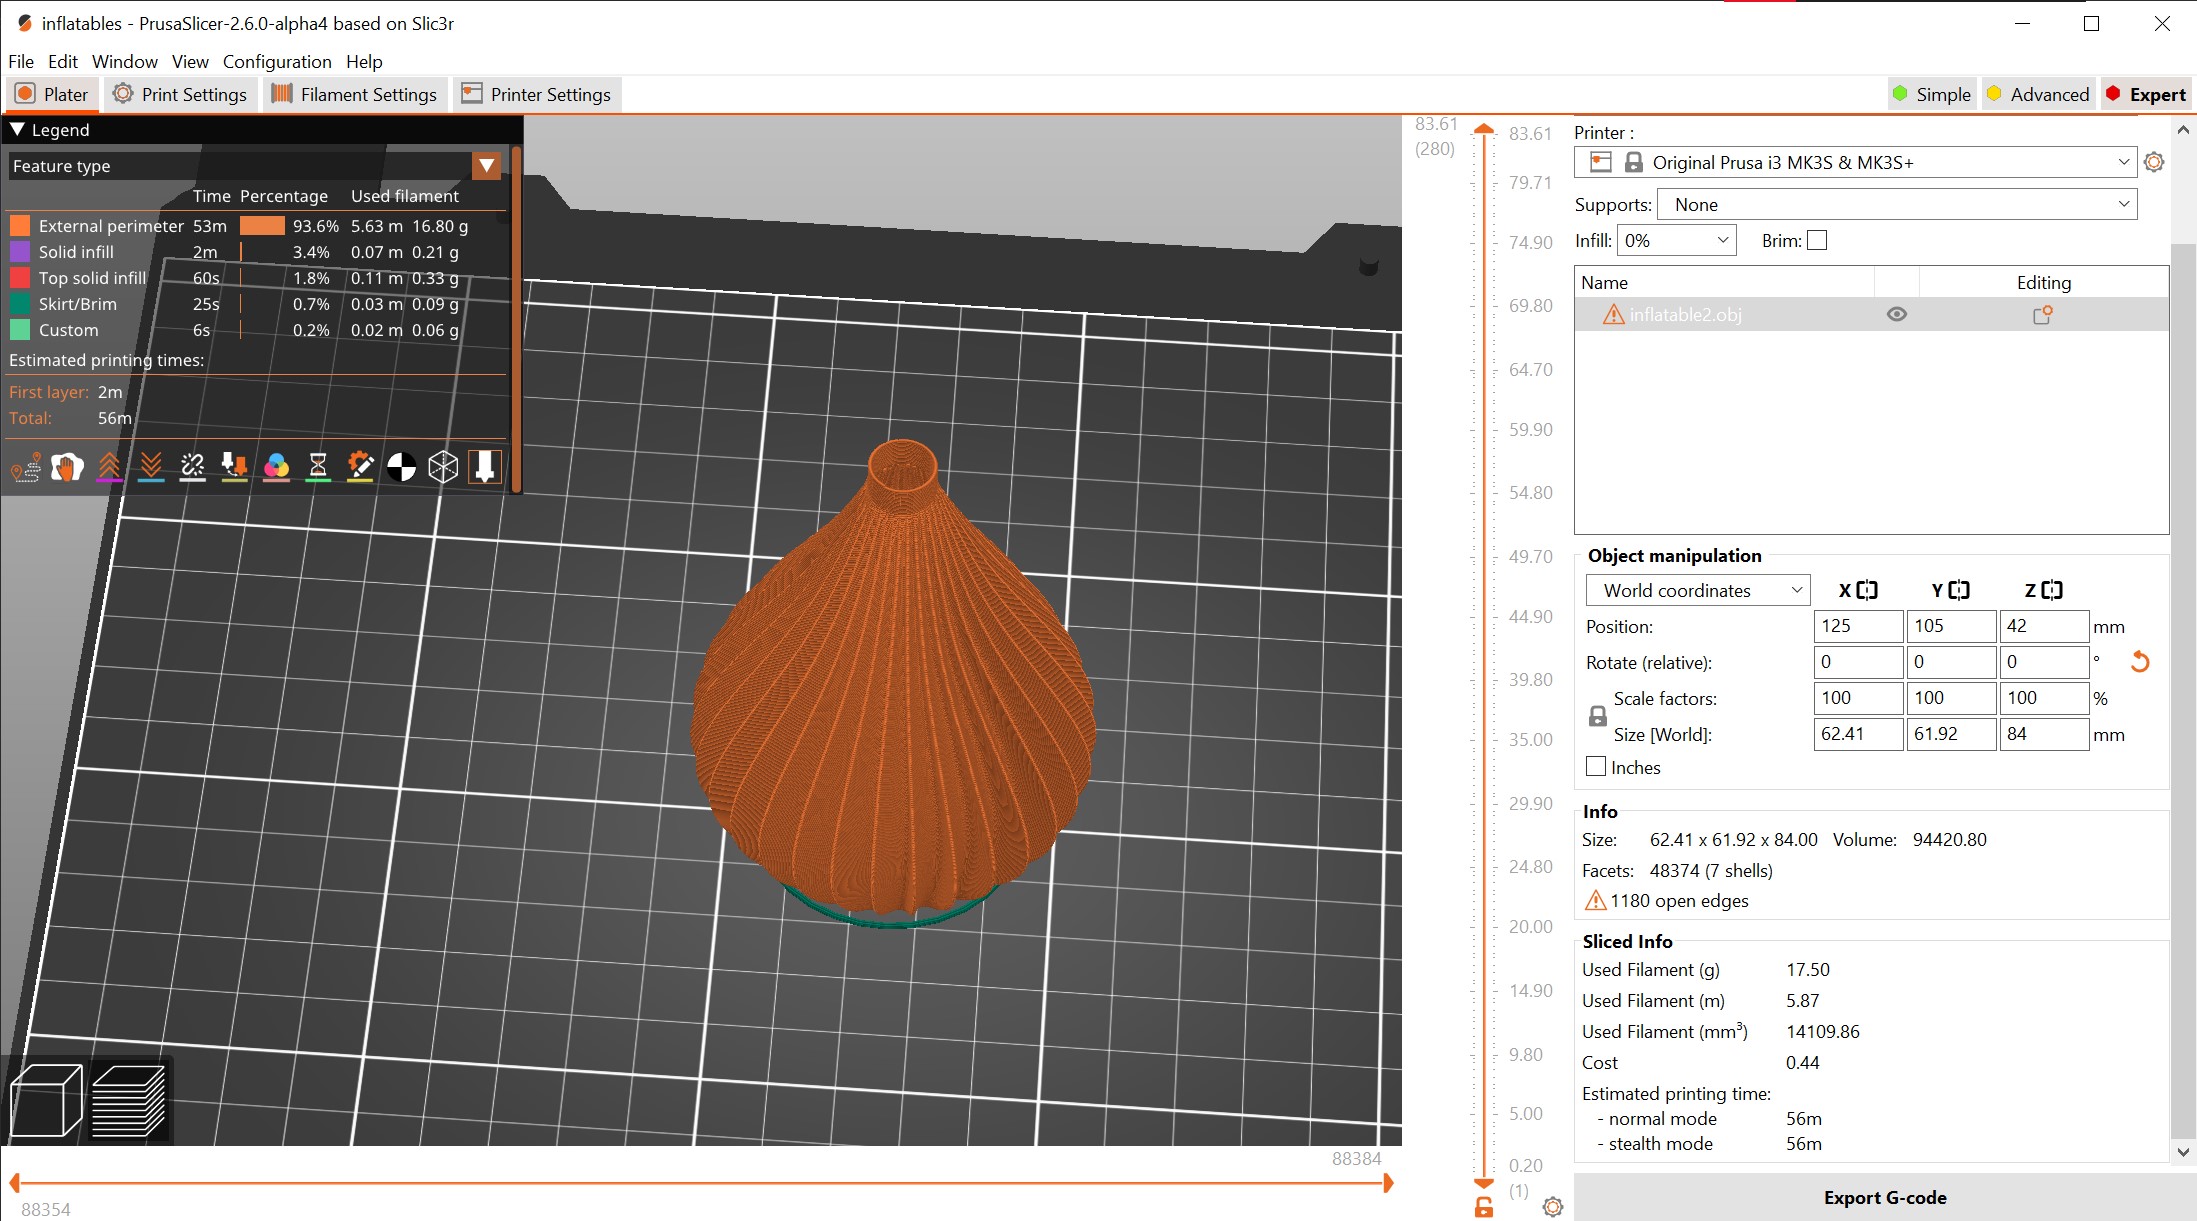
After printing I realized that I made a mistake for the channel at the top: I set the radius parameter with the diameter, so it was too big.
I also tried printing the bigger one (it would take 1h34) but the overhang was too steep which was to be expected.
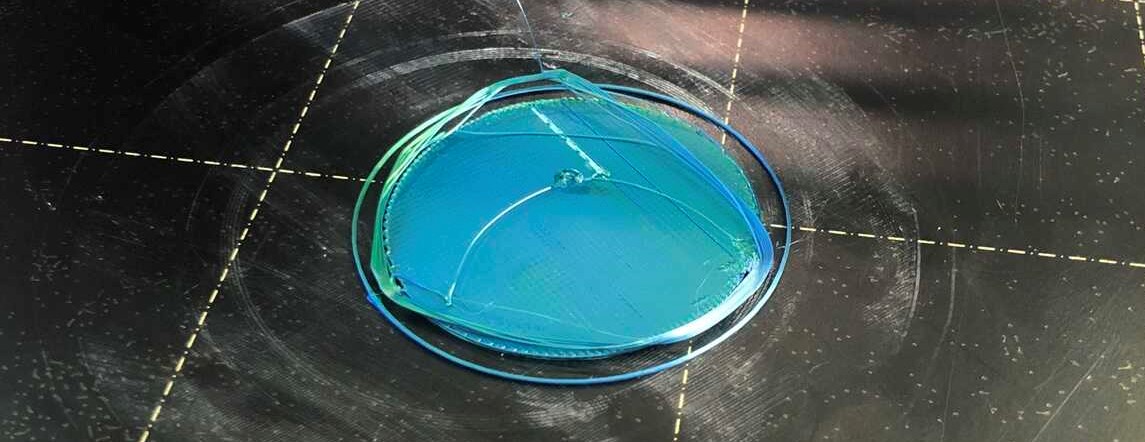
Then I tried the second inflatable: first as a spiral vase without any support, but as you can probably guess that also doesn’t work with this steep angle.
Then I tried it with support on the buildplate only on the Ender, but that went south as soon as it started printing the inner overhang. I can’t print this design with support on the inside, so I think it would be good to try this out on the resin printer at a later point.
I couldn’t get the support off without destroying the print even further.


I also tried slicing it with organic support, but it used a lot of support and I would still have the same issue on the inside of the print. It doesn’t look like the organic support is working as elegantly as in the demo video Henk showed us. I’m either not using the right settings (I did play around with it), or my model isn’t very well suited for organic support.
Results so far:

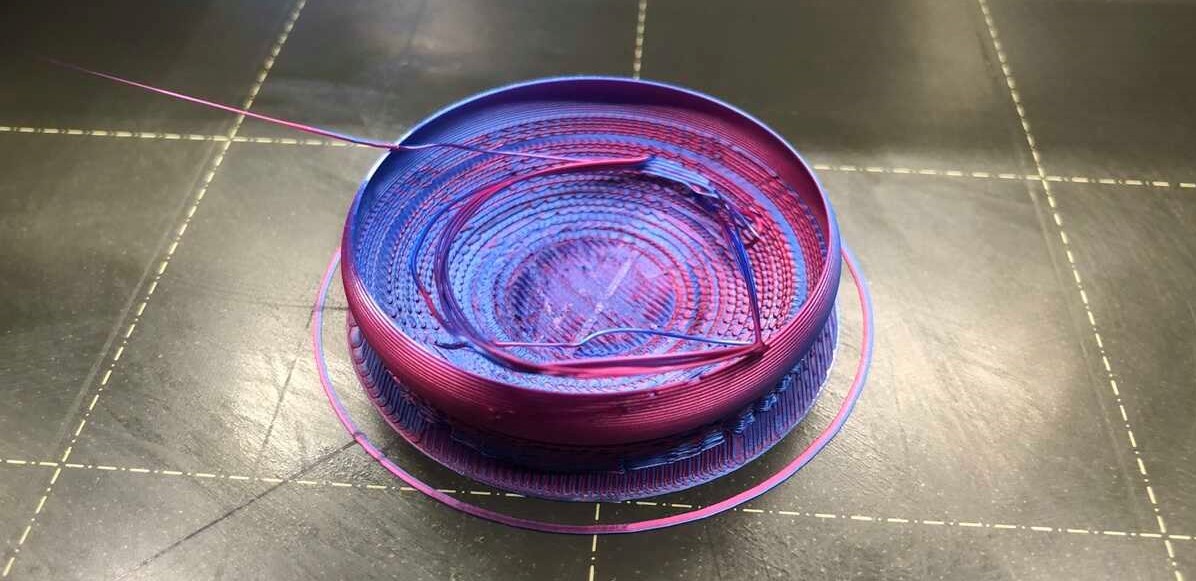
Inflating the print
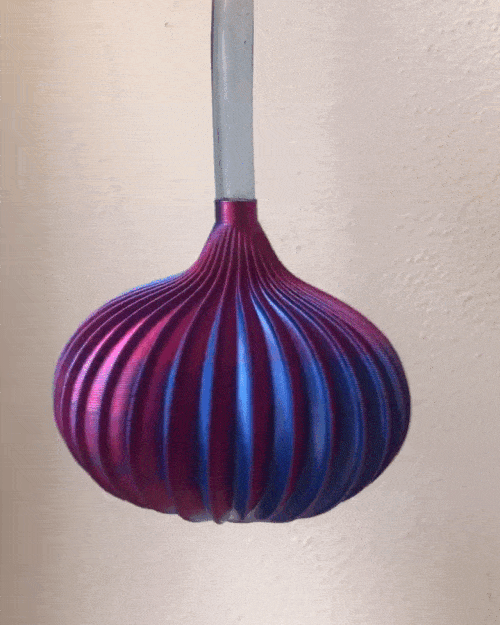
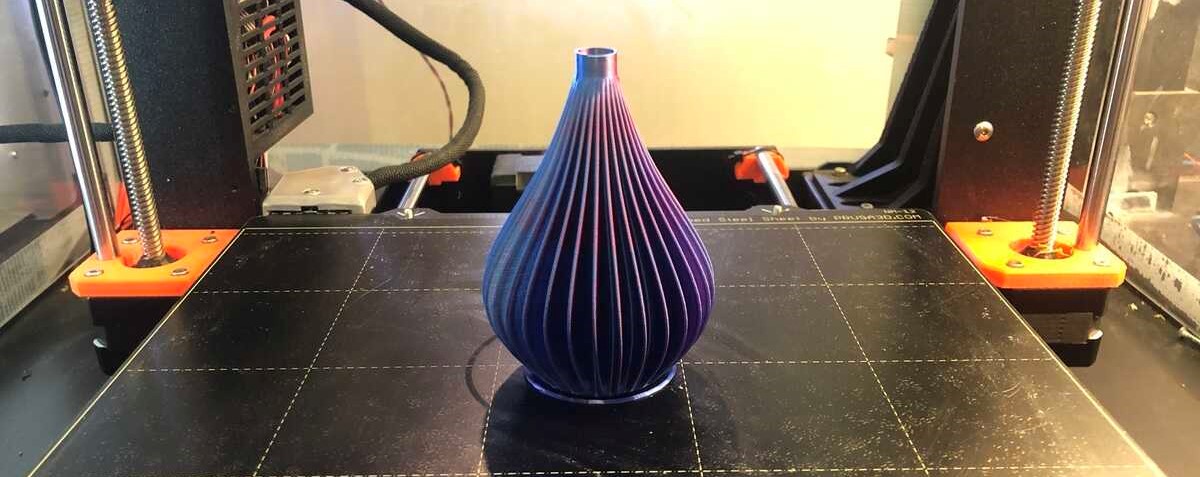
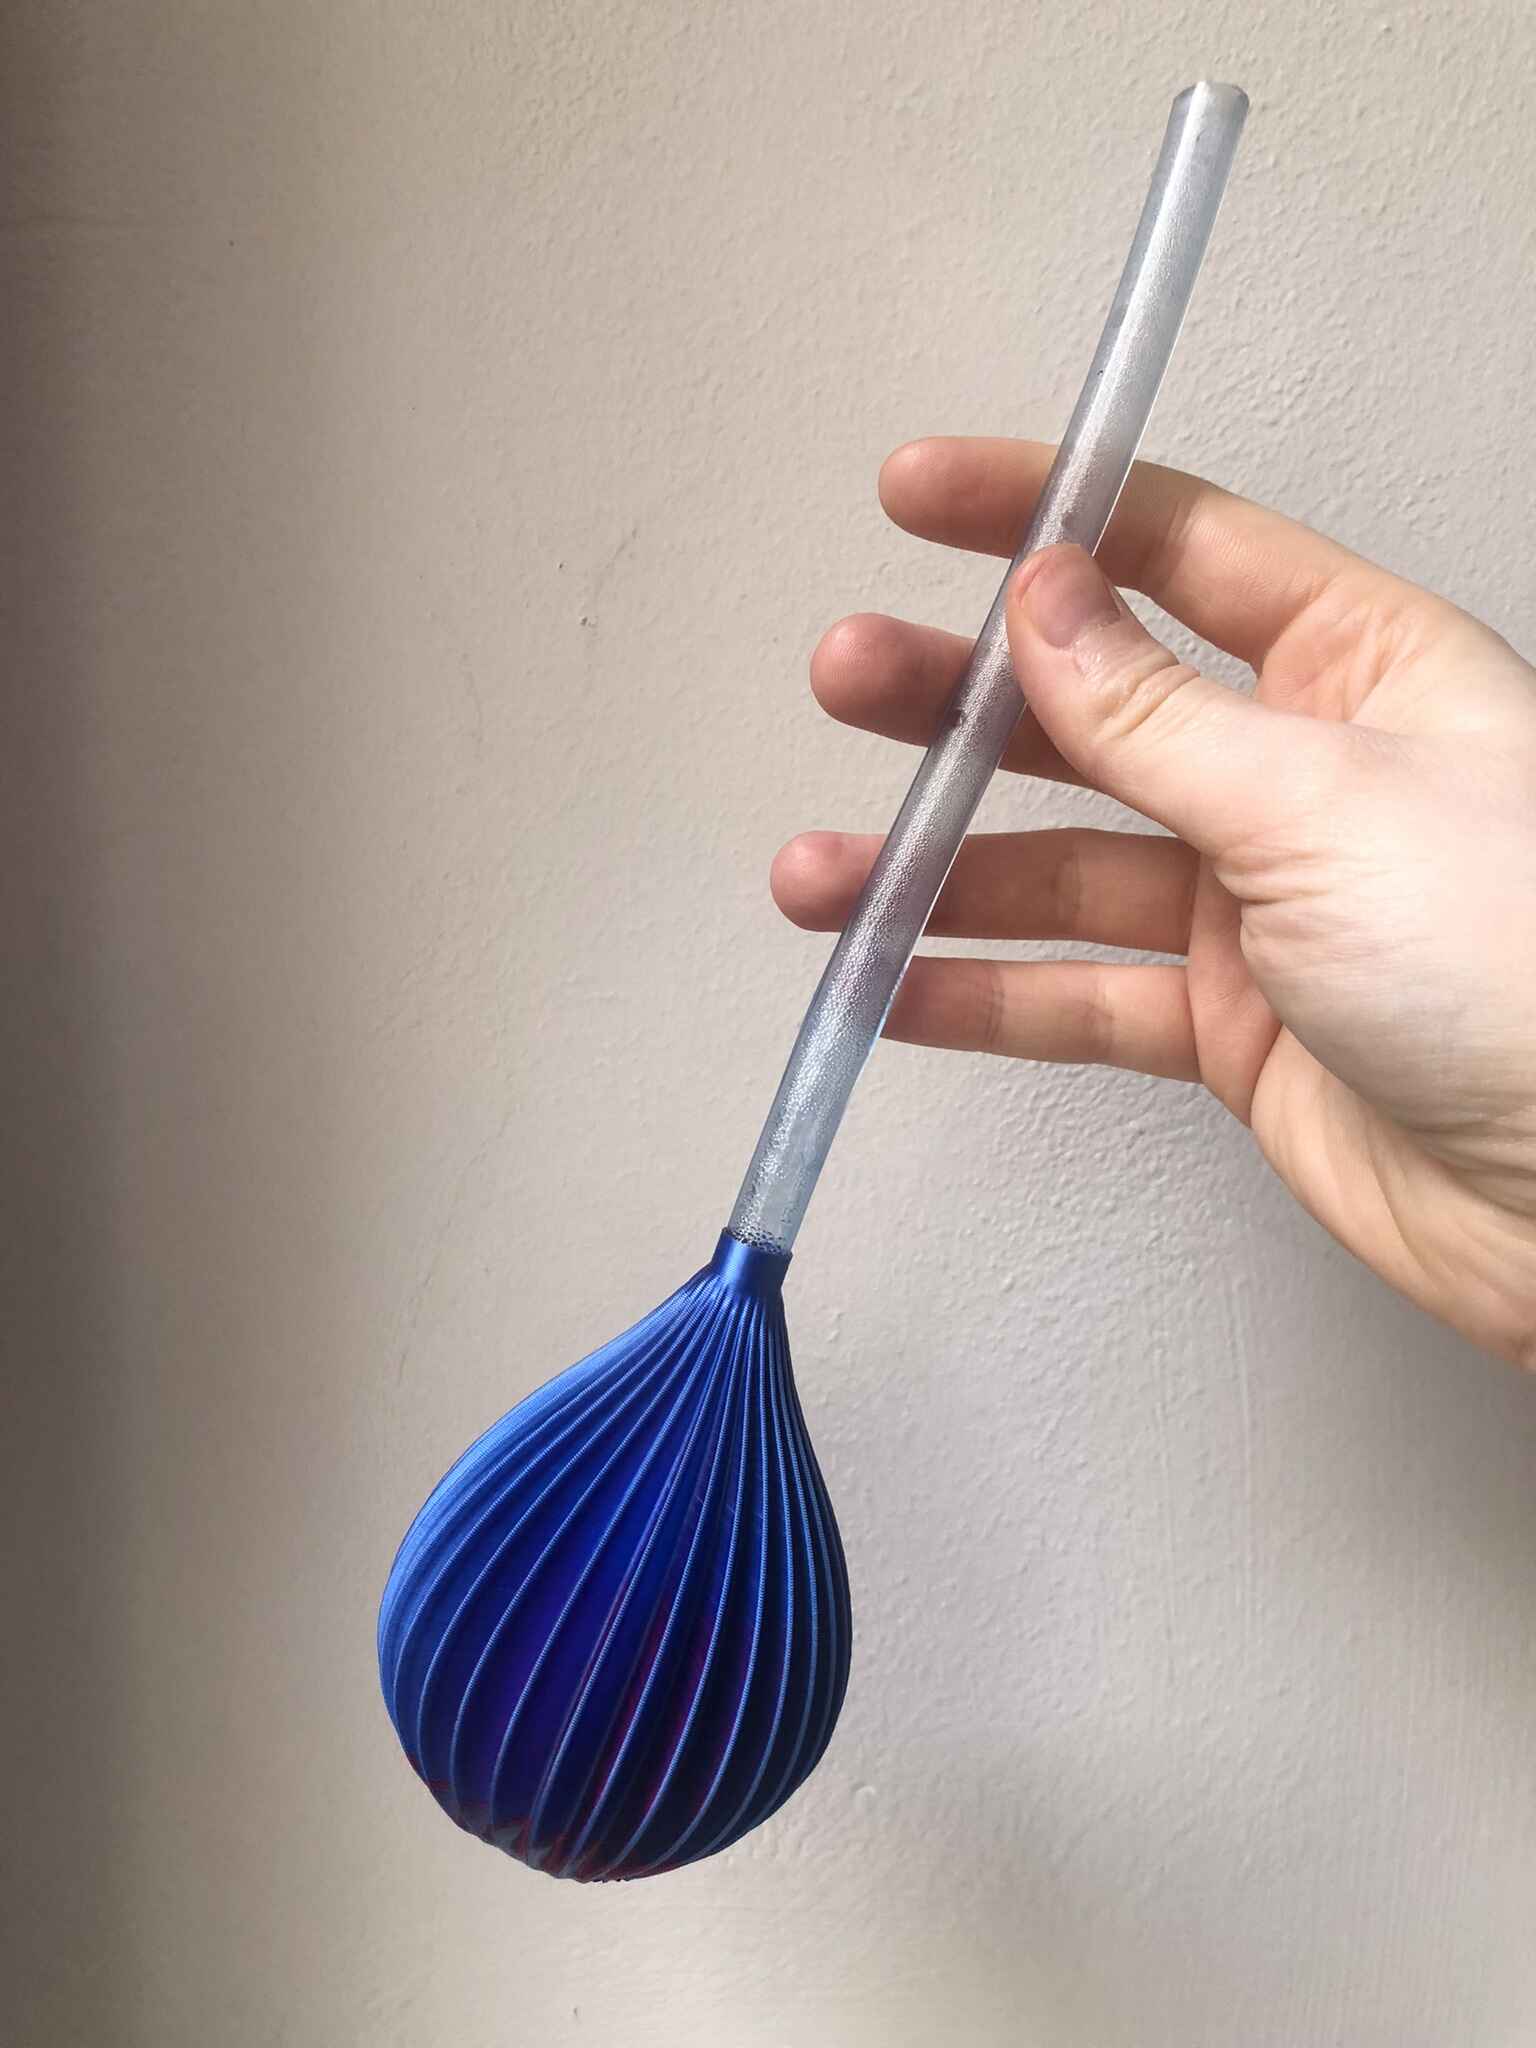
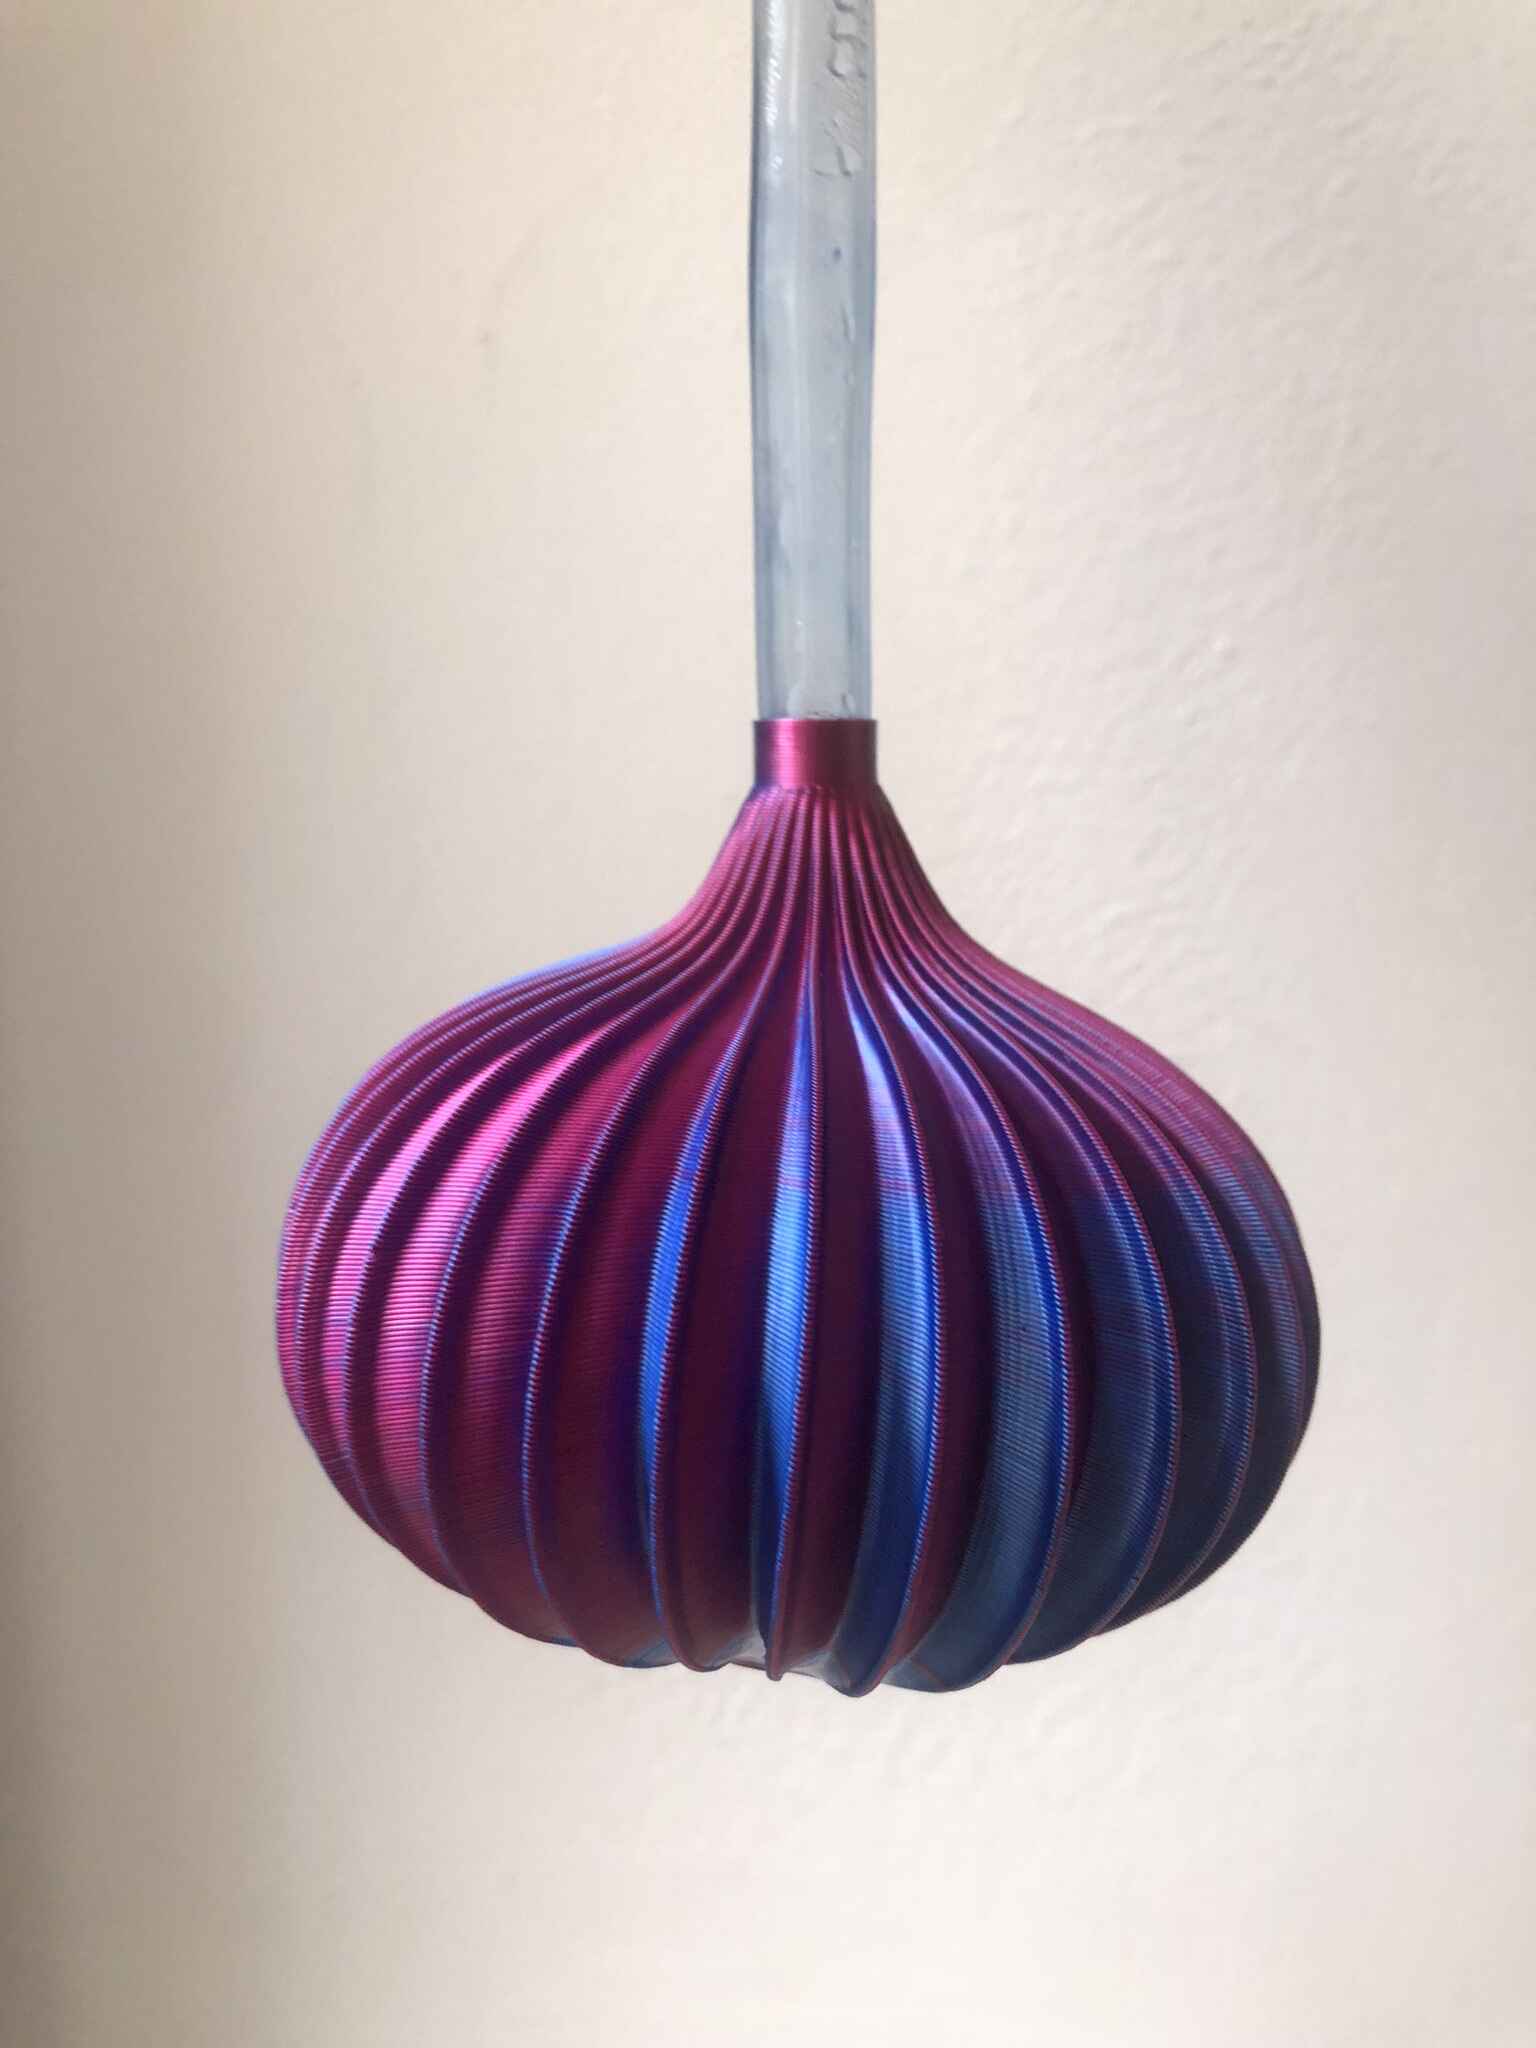
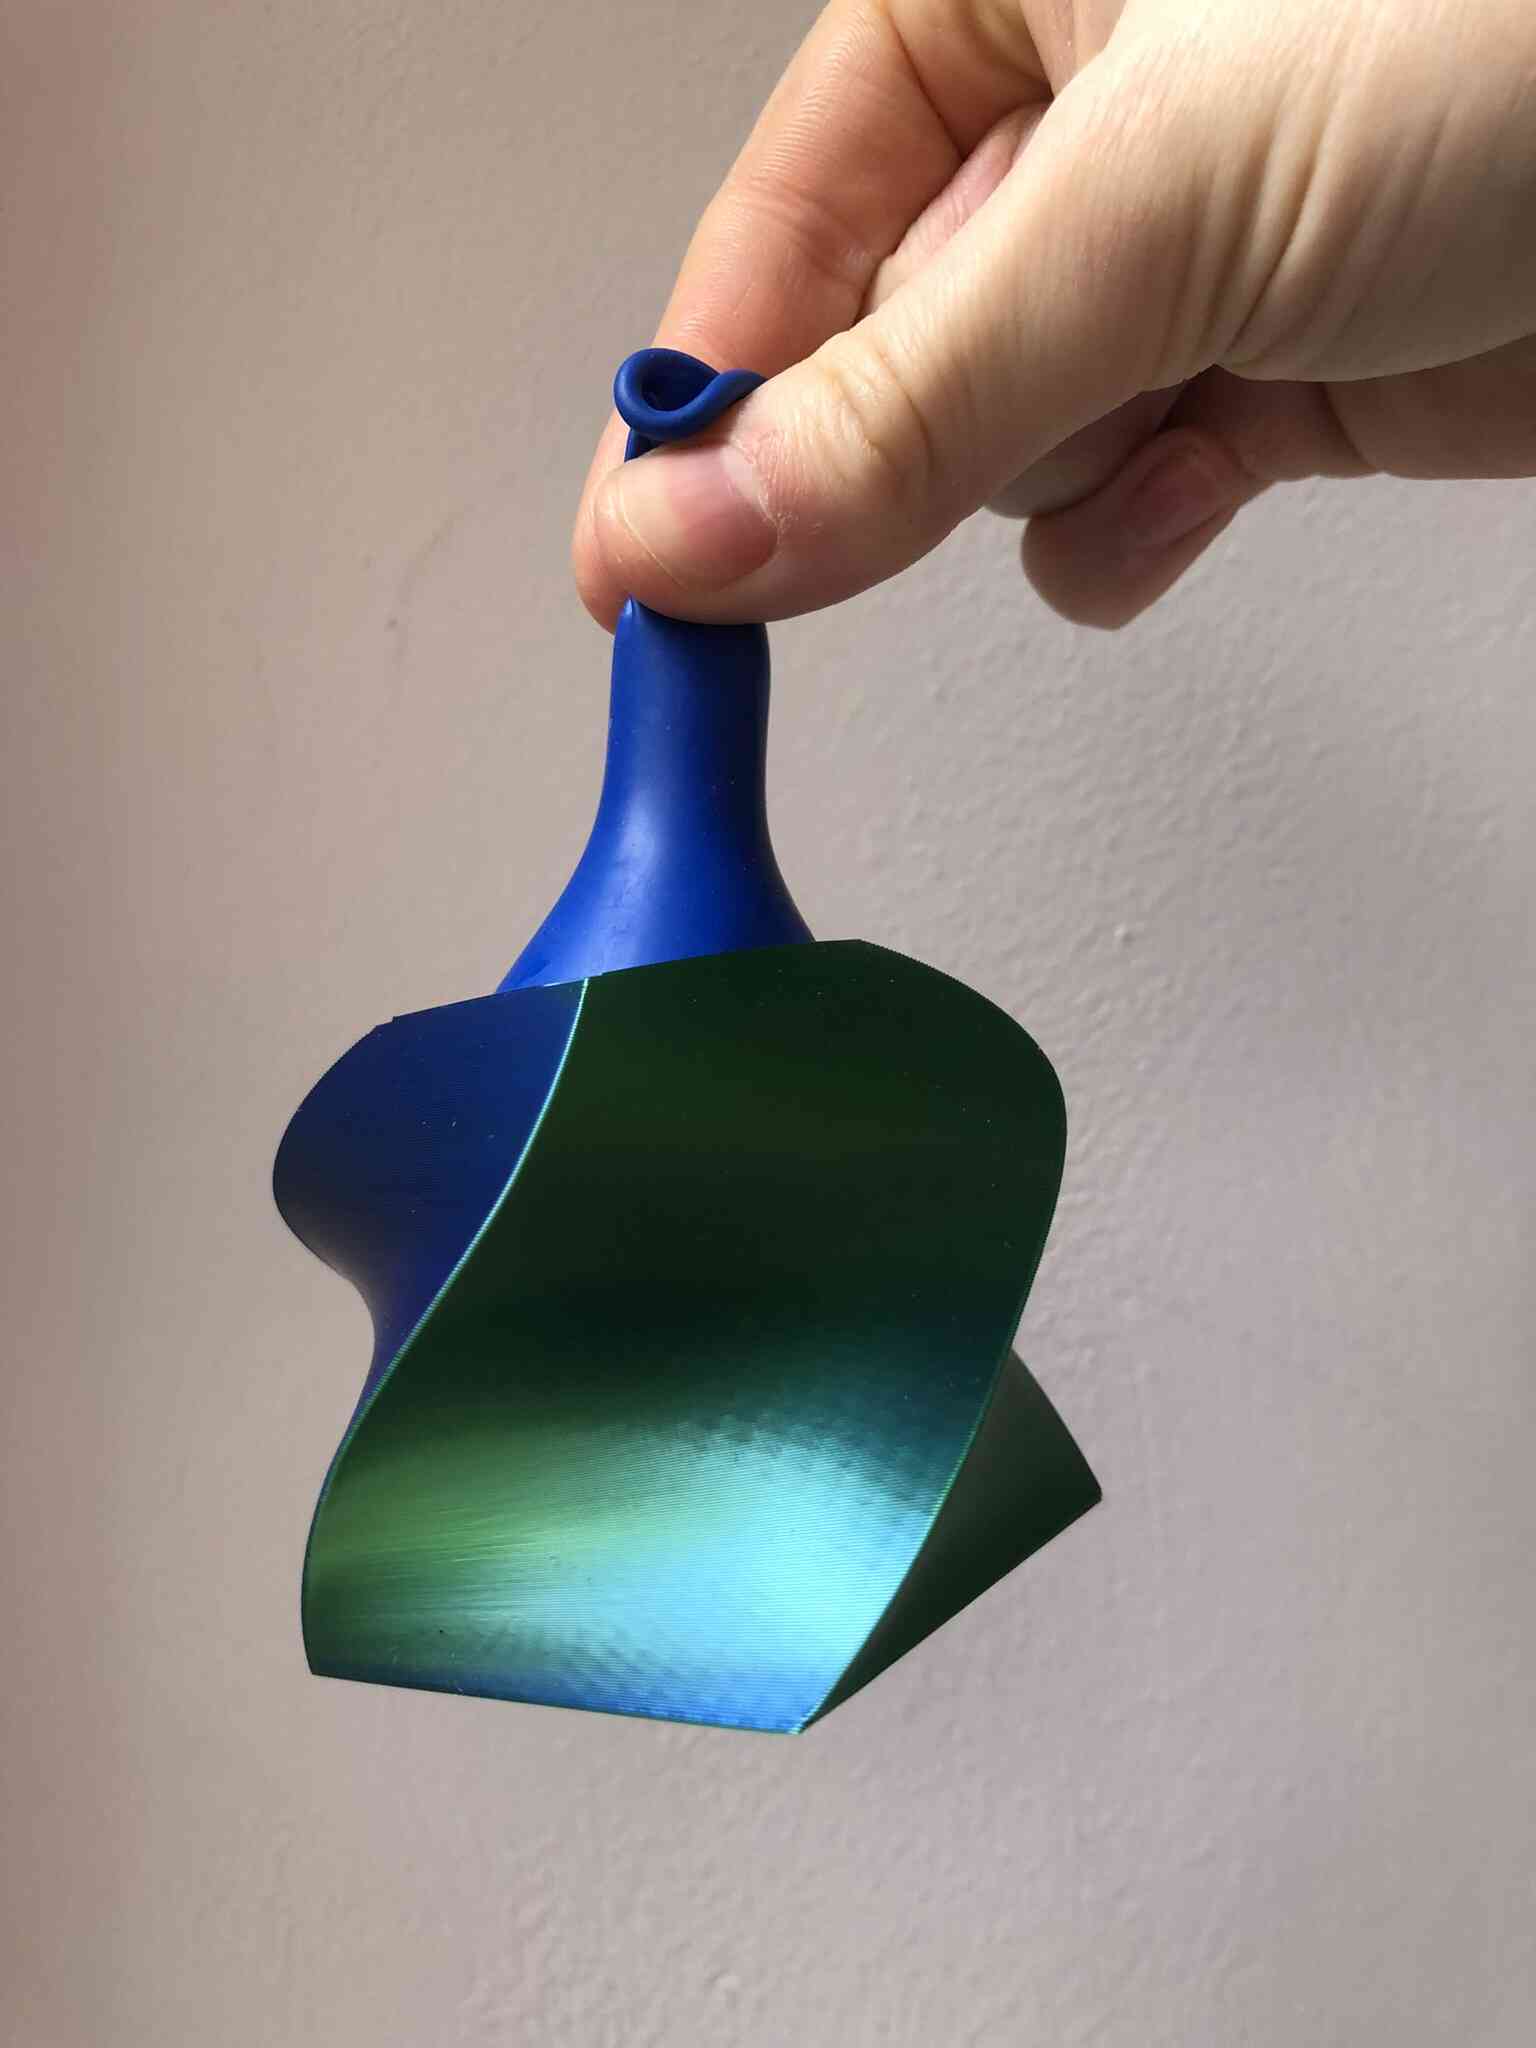
Although I made a mistake with the diameter of the inflatable top, I luckily had some 8mm wide tubing in my chaos cupboard. I saw on Fillip Studios’ website that they inflated their prints in a pot, with what I assume to be hot water. I decided to try out just that, because so far I have only deformed prints with a heat gun and it’s a tricky business. The prints easily get too hot, leaving the print obviously deformed.
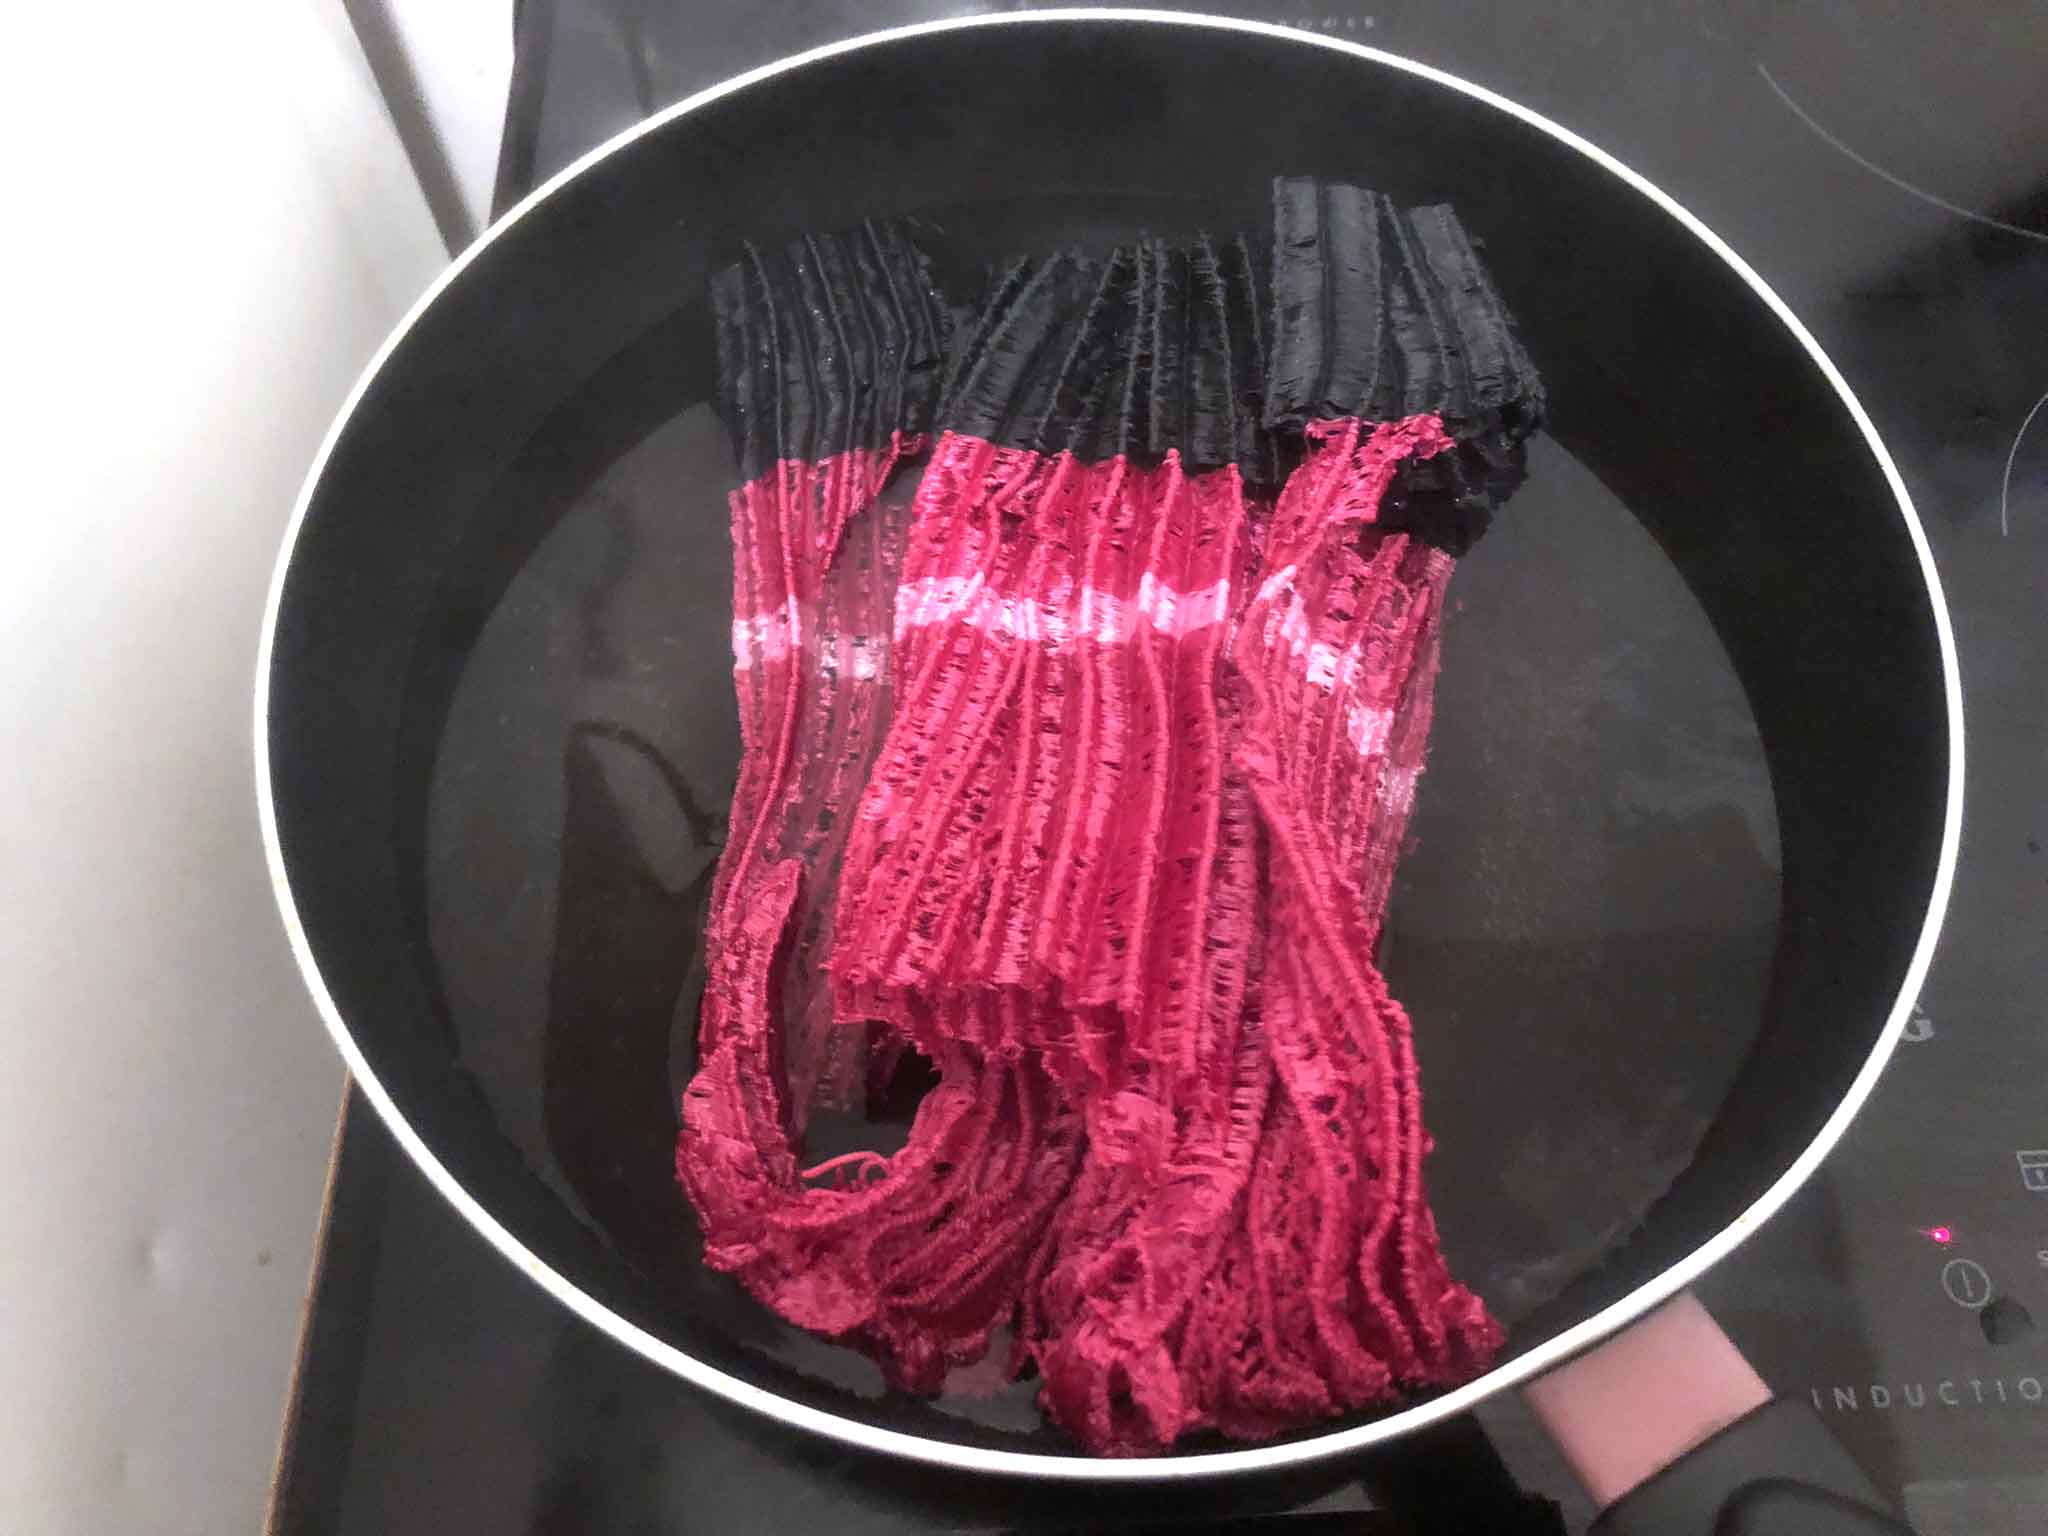
I set up a pot on my induction stove and turned the heat to low settings when it was getting close to a boil. I didn’t measure the temperature because I didn’t know where I had my thermometer but let’s say it was about 80 degrees Celsius. I dunked the print into the hot water and started blowing air into the tube, and the print inflated!
I do have a tiny hole in the bottom of the print, but it doesn’t matter too much when you blow into the print hard enough. If you let it cool down while inflated it keeps its shape, and if you put it back into the hot water it goes back to its original printed shape.
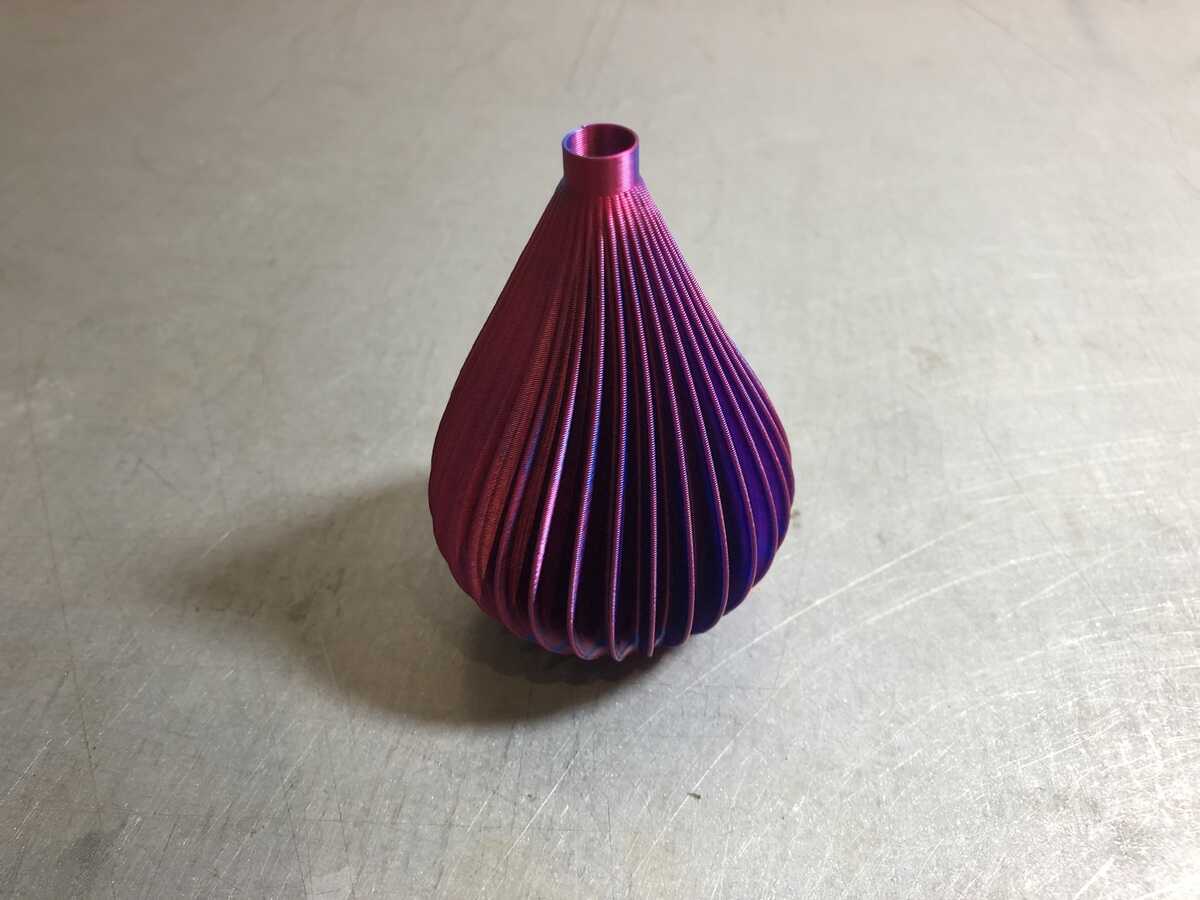
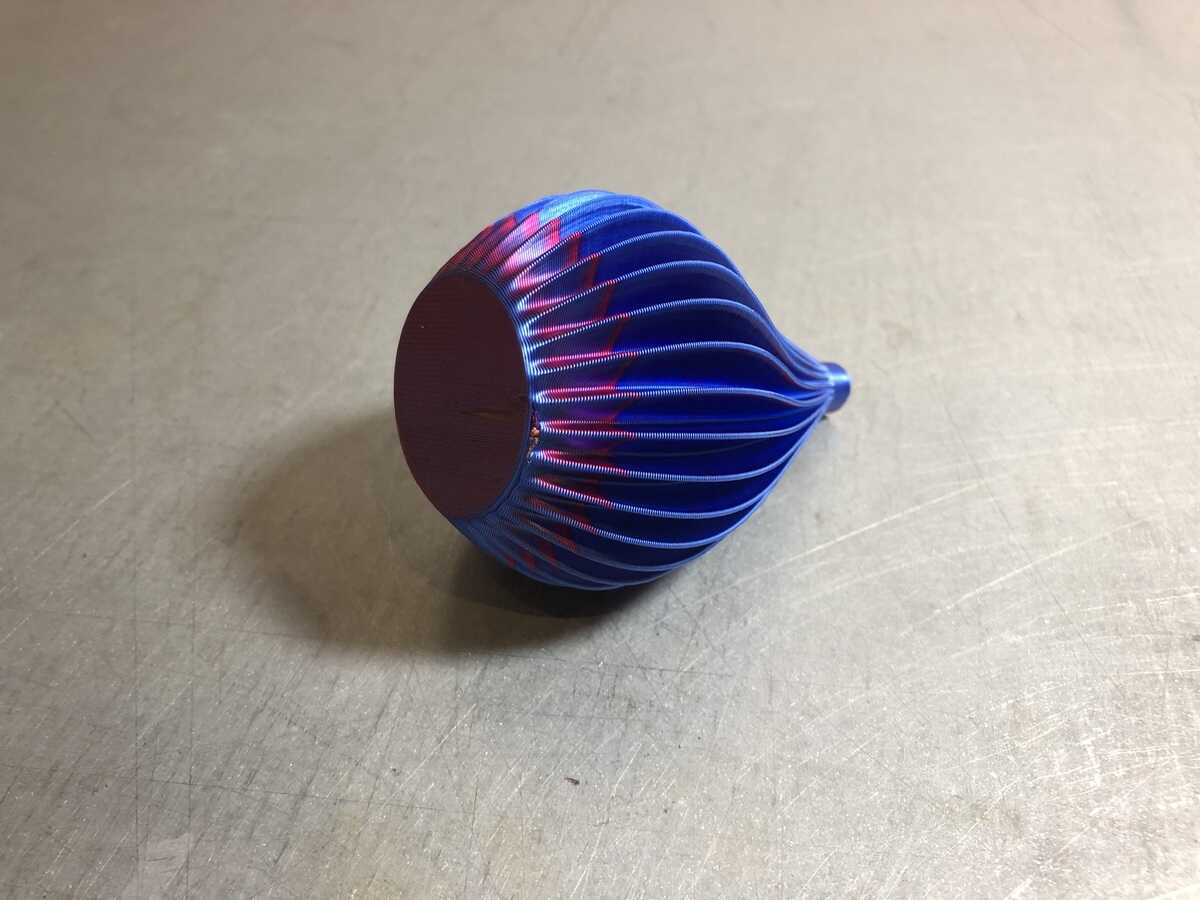
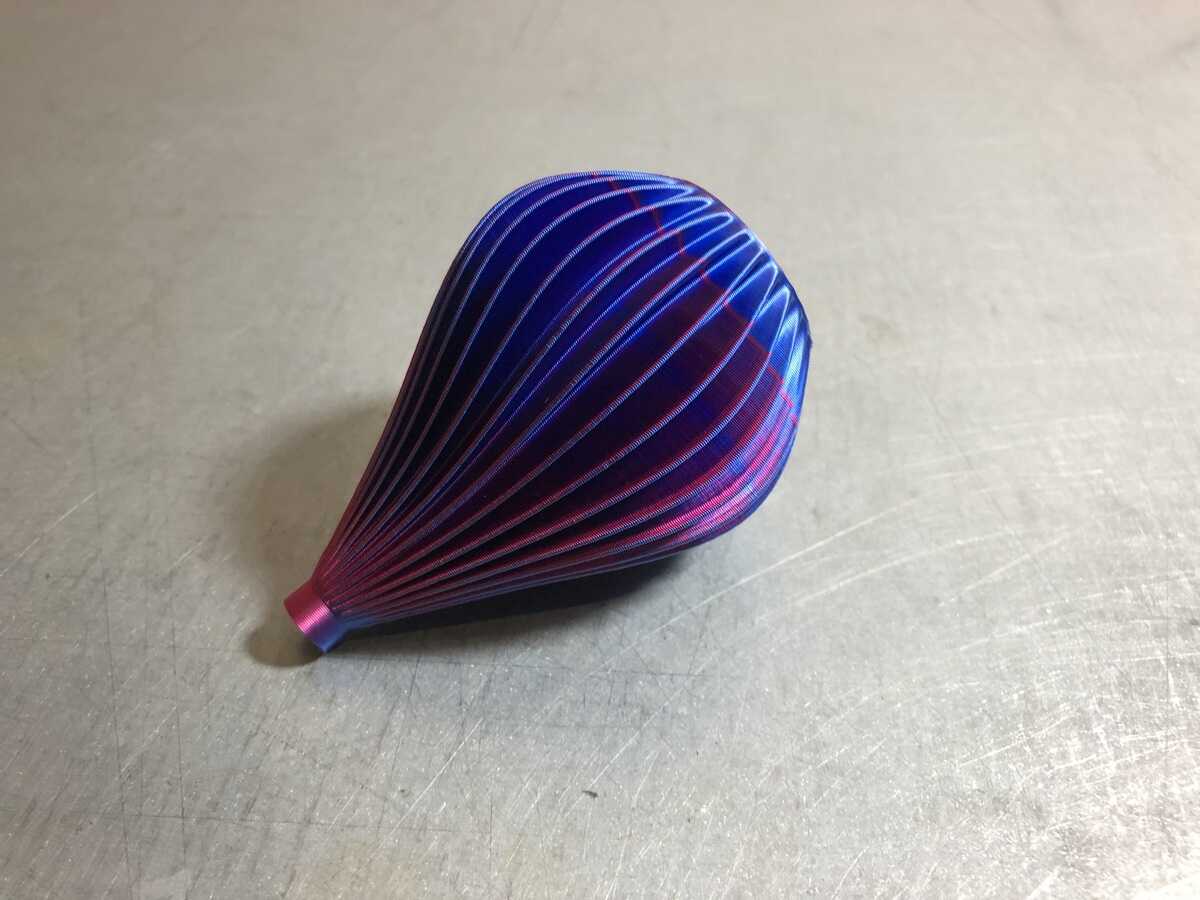
On the left before inflation, on the right very slightly inflated and on the bottom very inflated and cooled down.
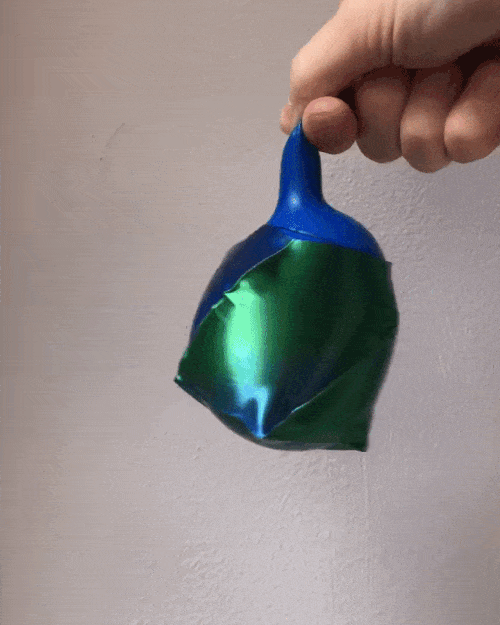
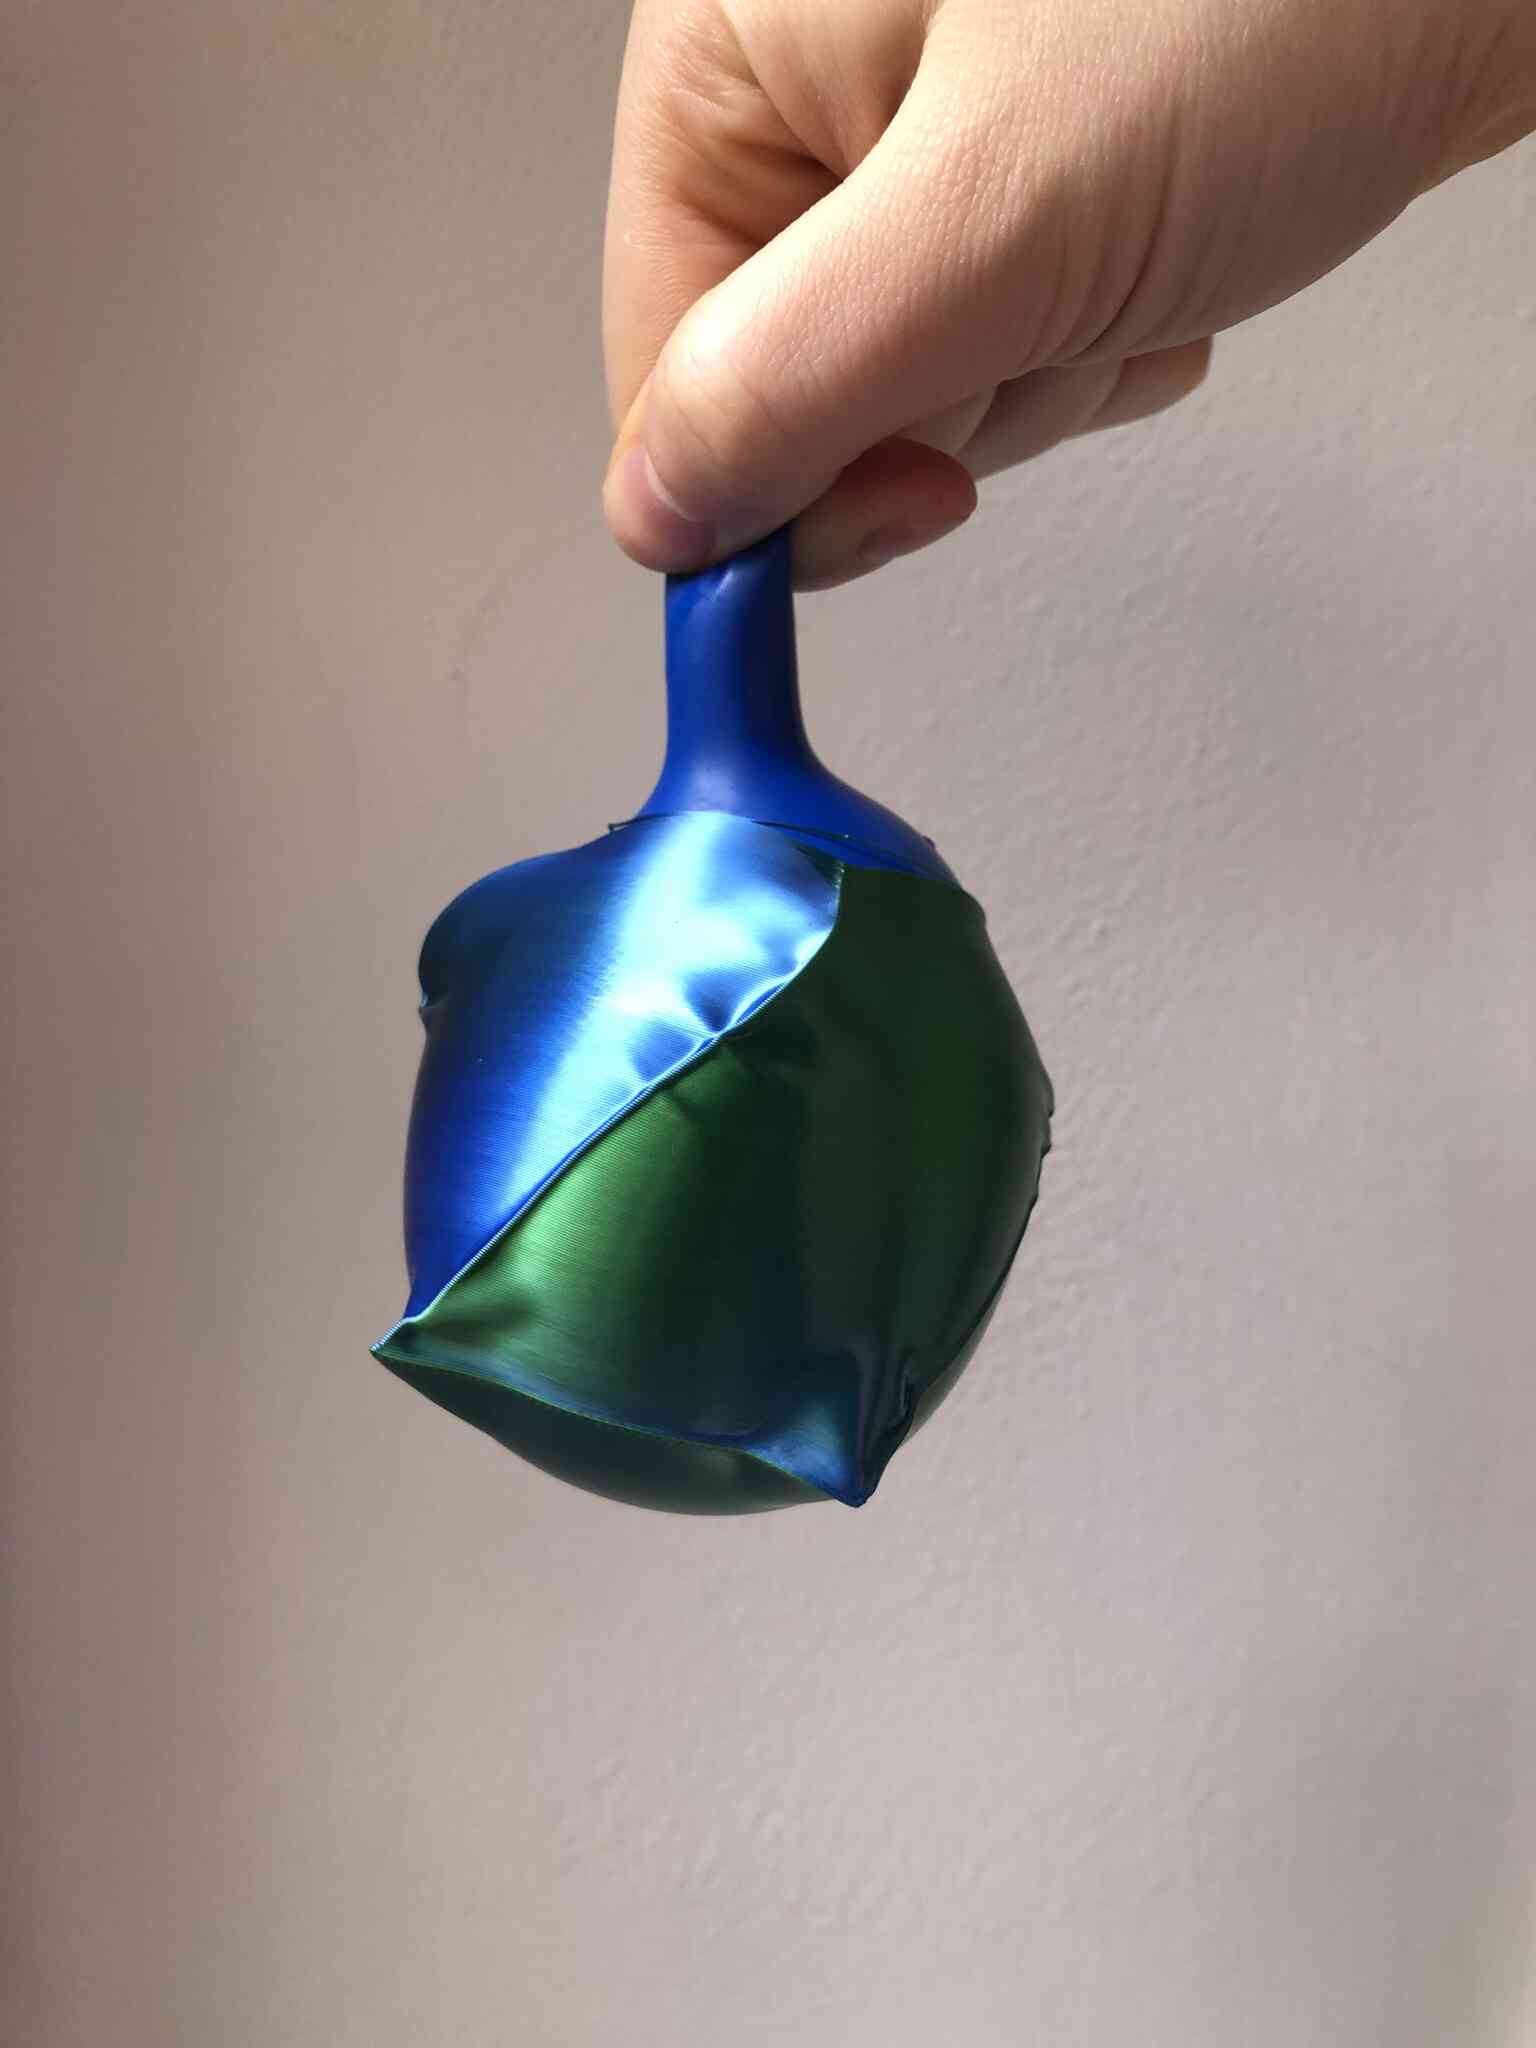
I made a couple more on Tuesday with a quick loft of a few squares. These ones didn’t have a dramatic inflation like the one above. I also broke the top on all of them so I DIY’d something with a balloon that I cut open.
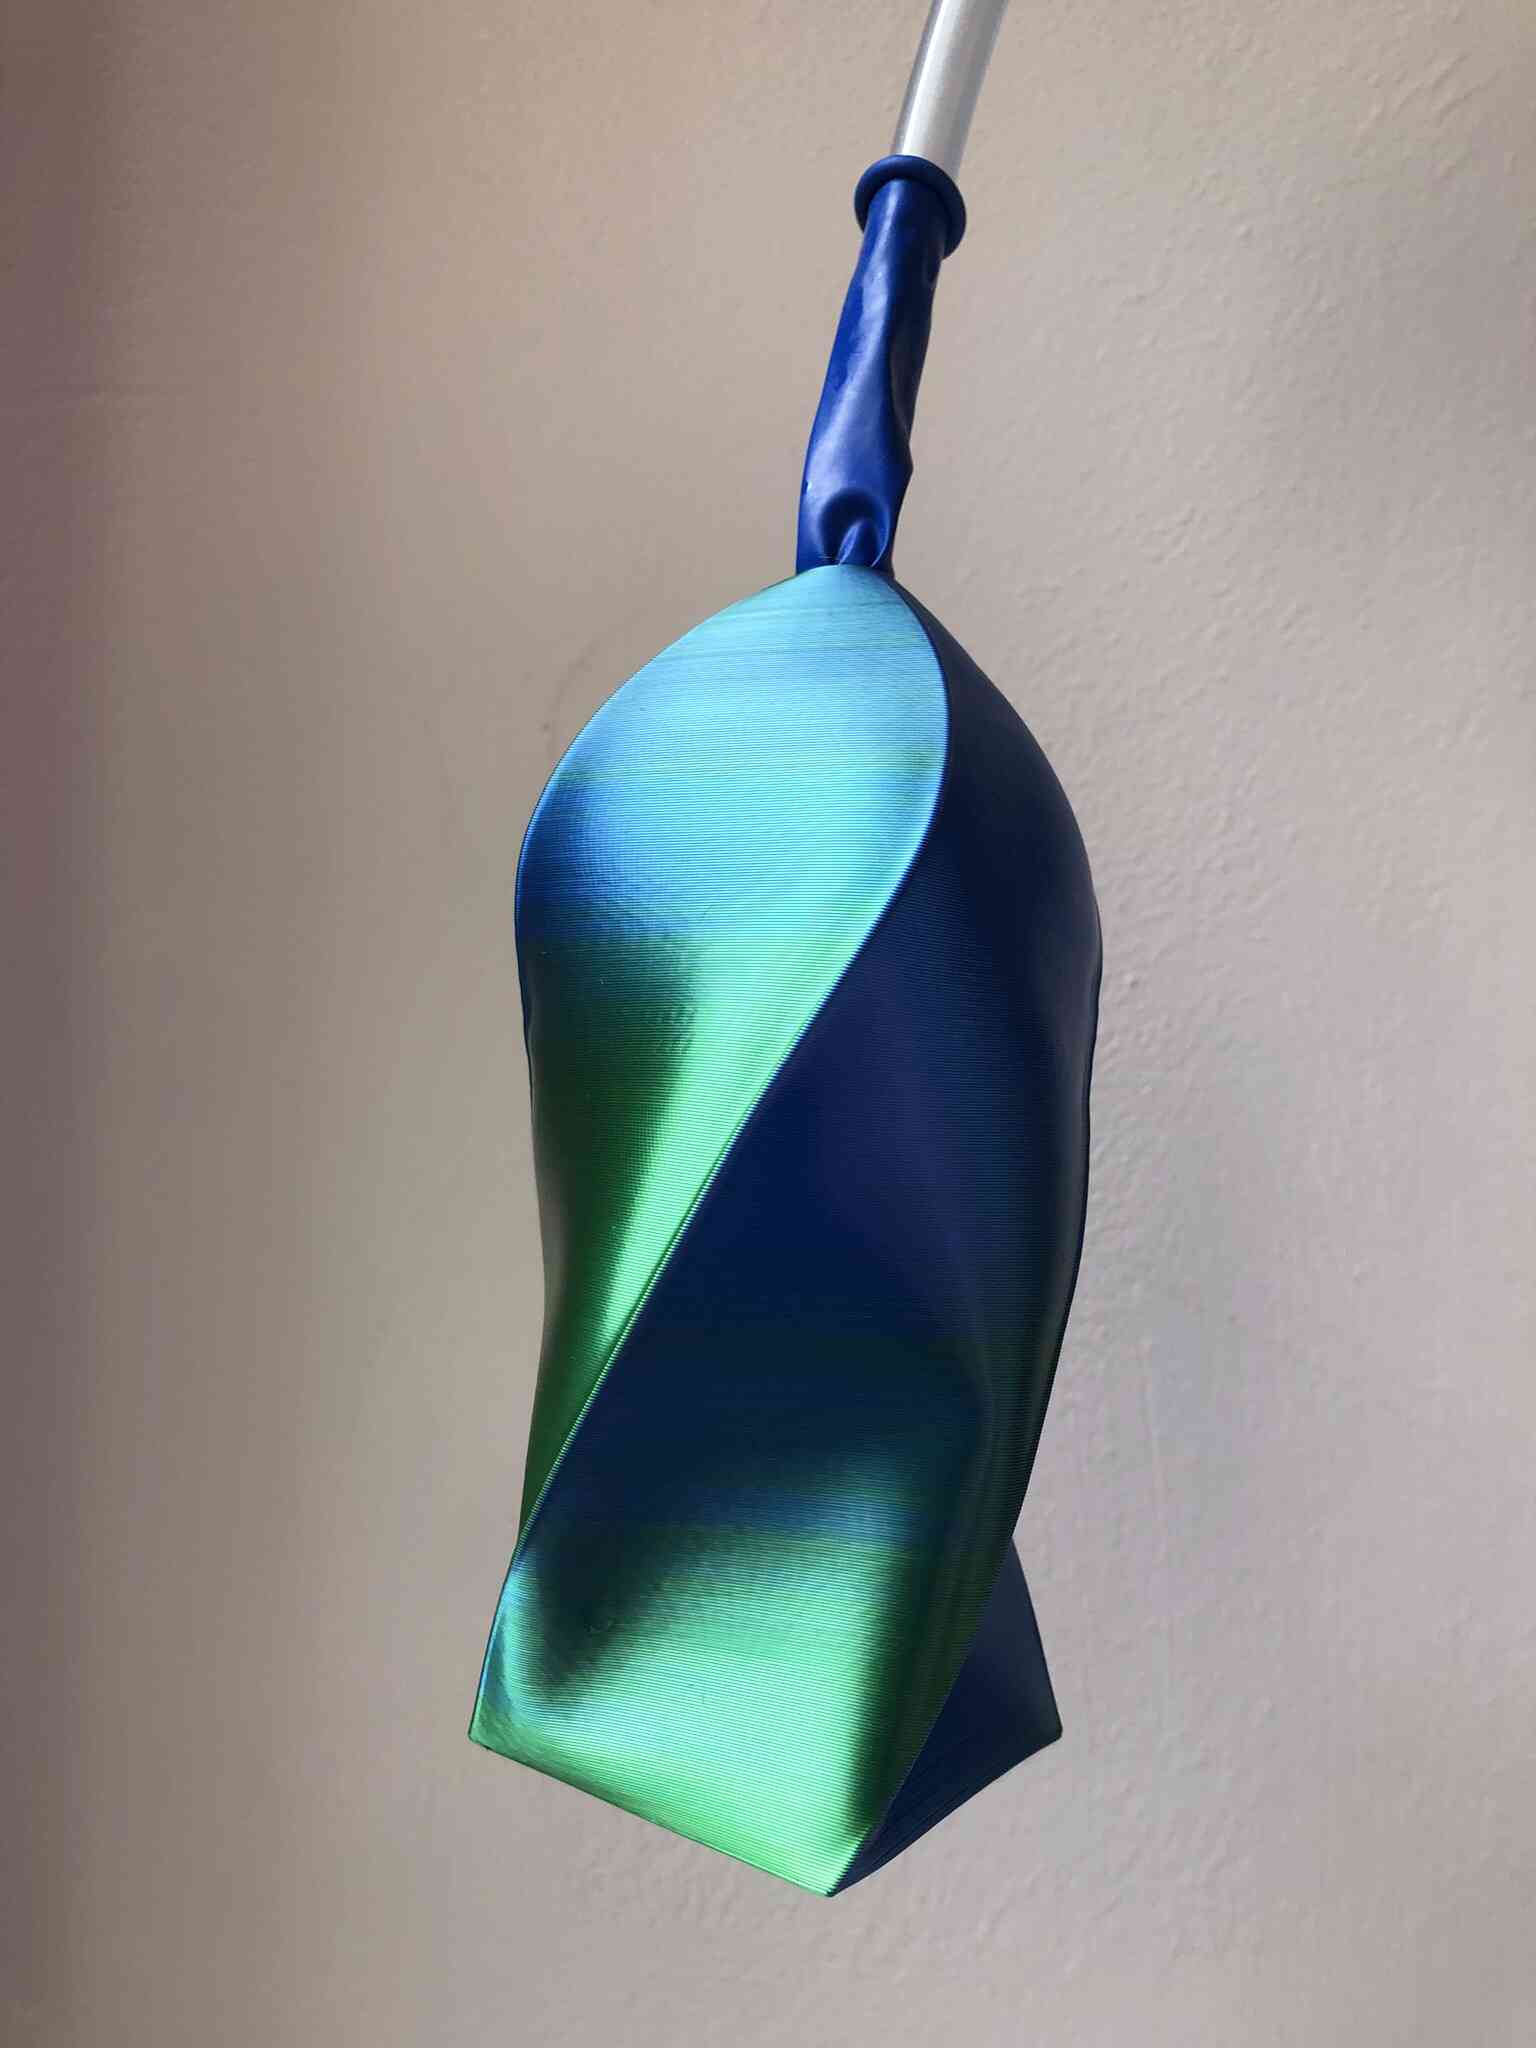
This one is inflated with only a balloon on the inside. This works only with shapes that are somewhat uniform.
This one was supposed to inflate like a finger joint, but too much air could escape. I had to help it a little by bending it manually.
Reflection
These shapes can’t be made subtractively because they are completely hollow and have plenty of overhang. Making them additively in spiral vase mode is also pretty finnicky though. You can’t have too much overhang and they should to be airtight (although with a small hole it also inflates).
I think a shape like this printed with TPU and then filled with a balloon to inflate and deflate (I doubt that TPU alone will be airtight) could be pretty cool as long as there are no sharp edges to the print. Instead of inflating with air I could also inflate transparent prints with colored liquid. And I definitely have to try out flexible resin with the resin printer in the lab.
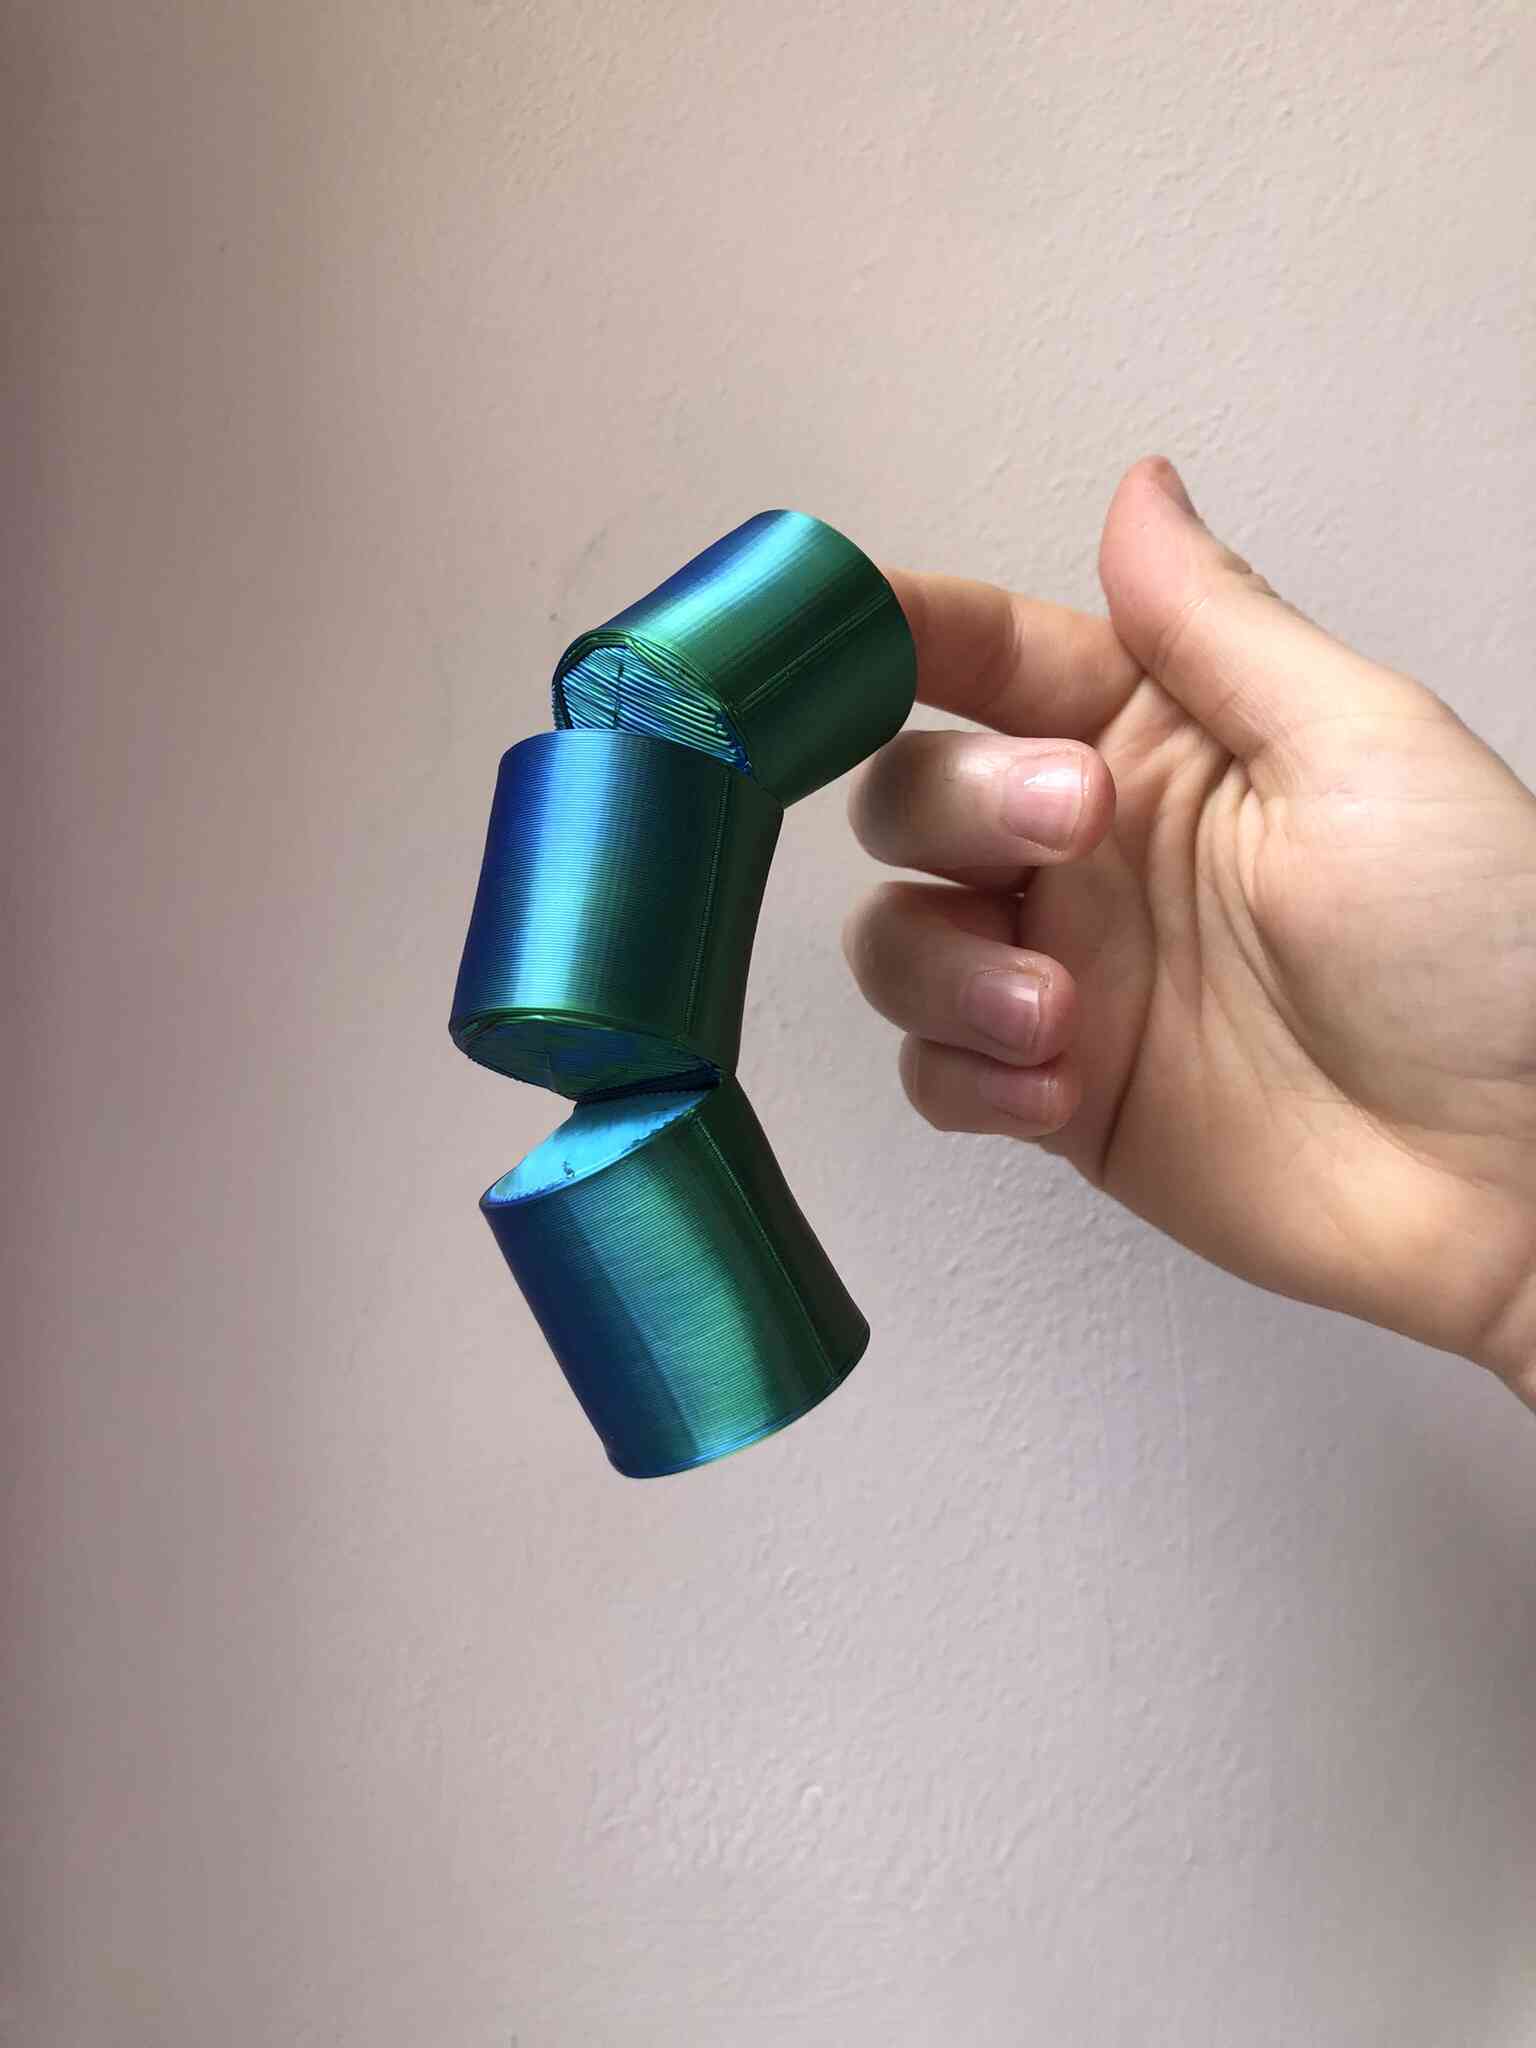
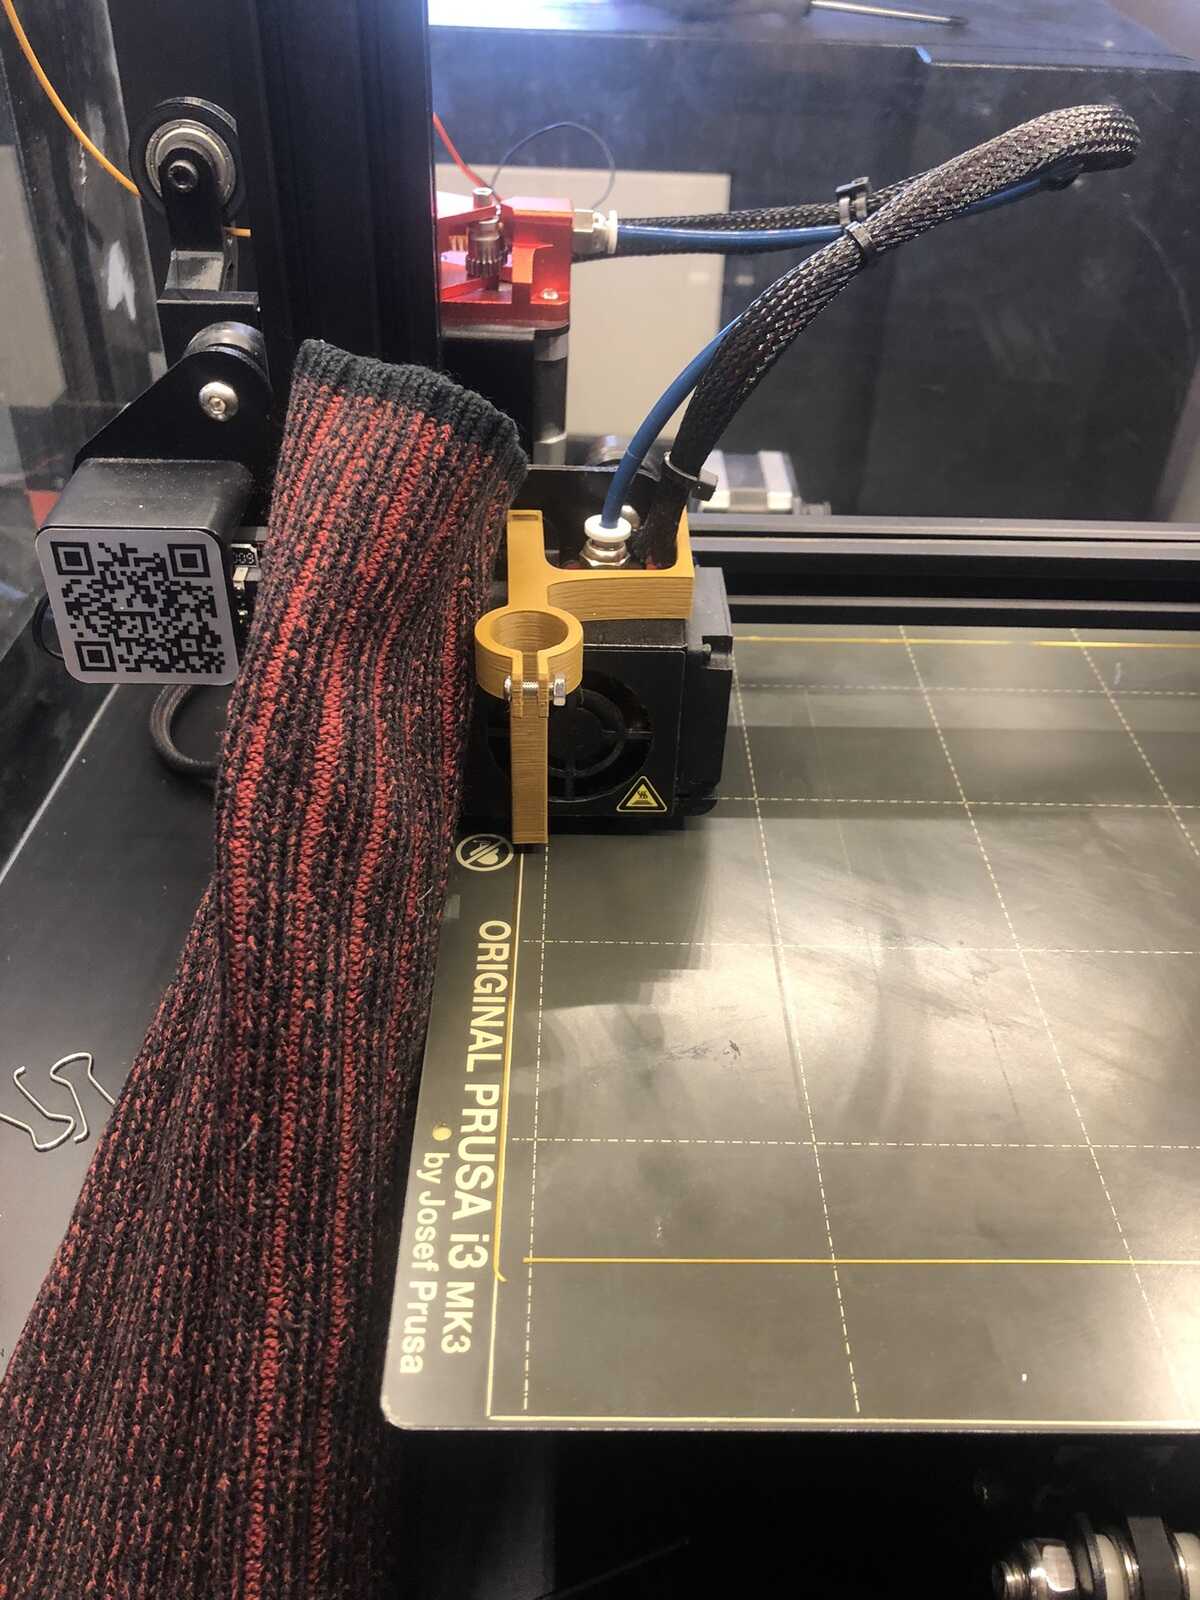
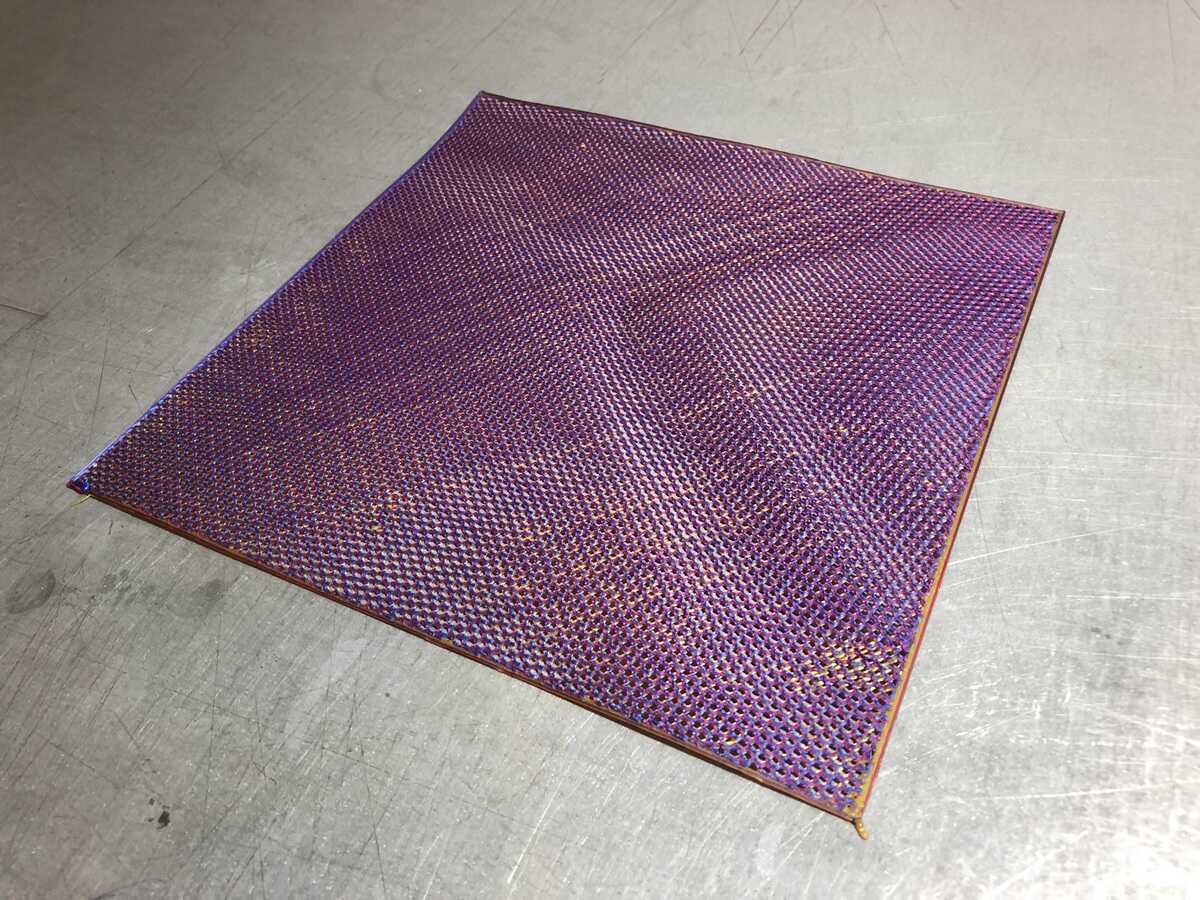
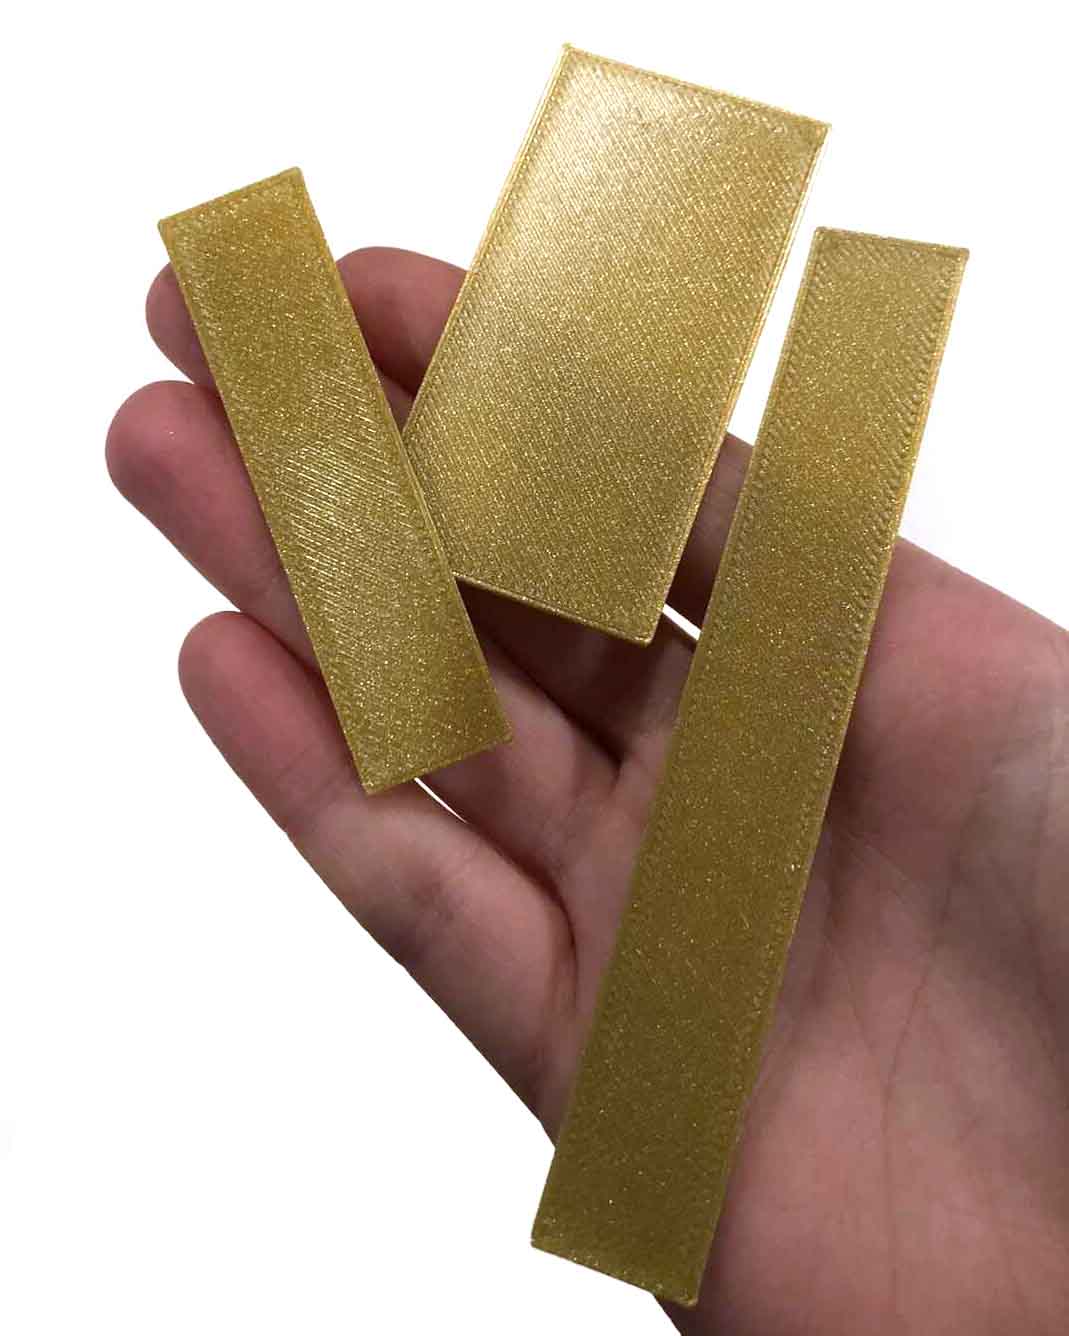
Small scarf
SainSmart Slicer
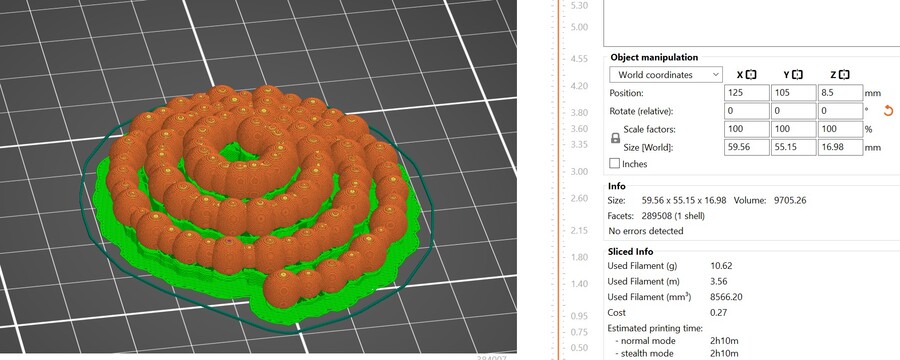
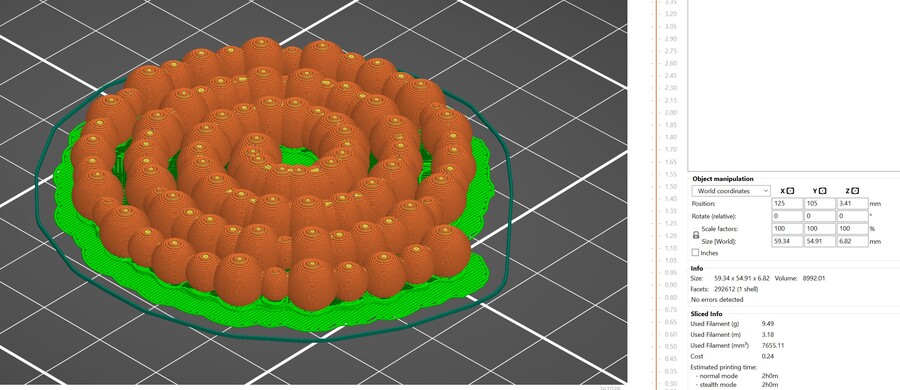
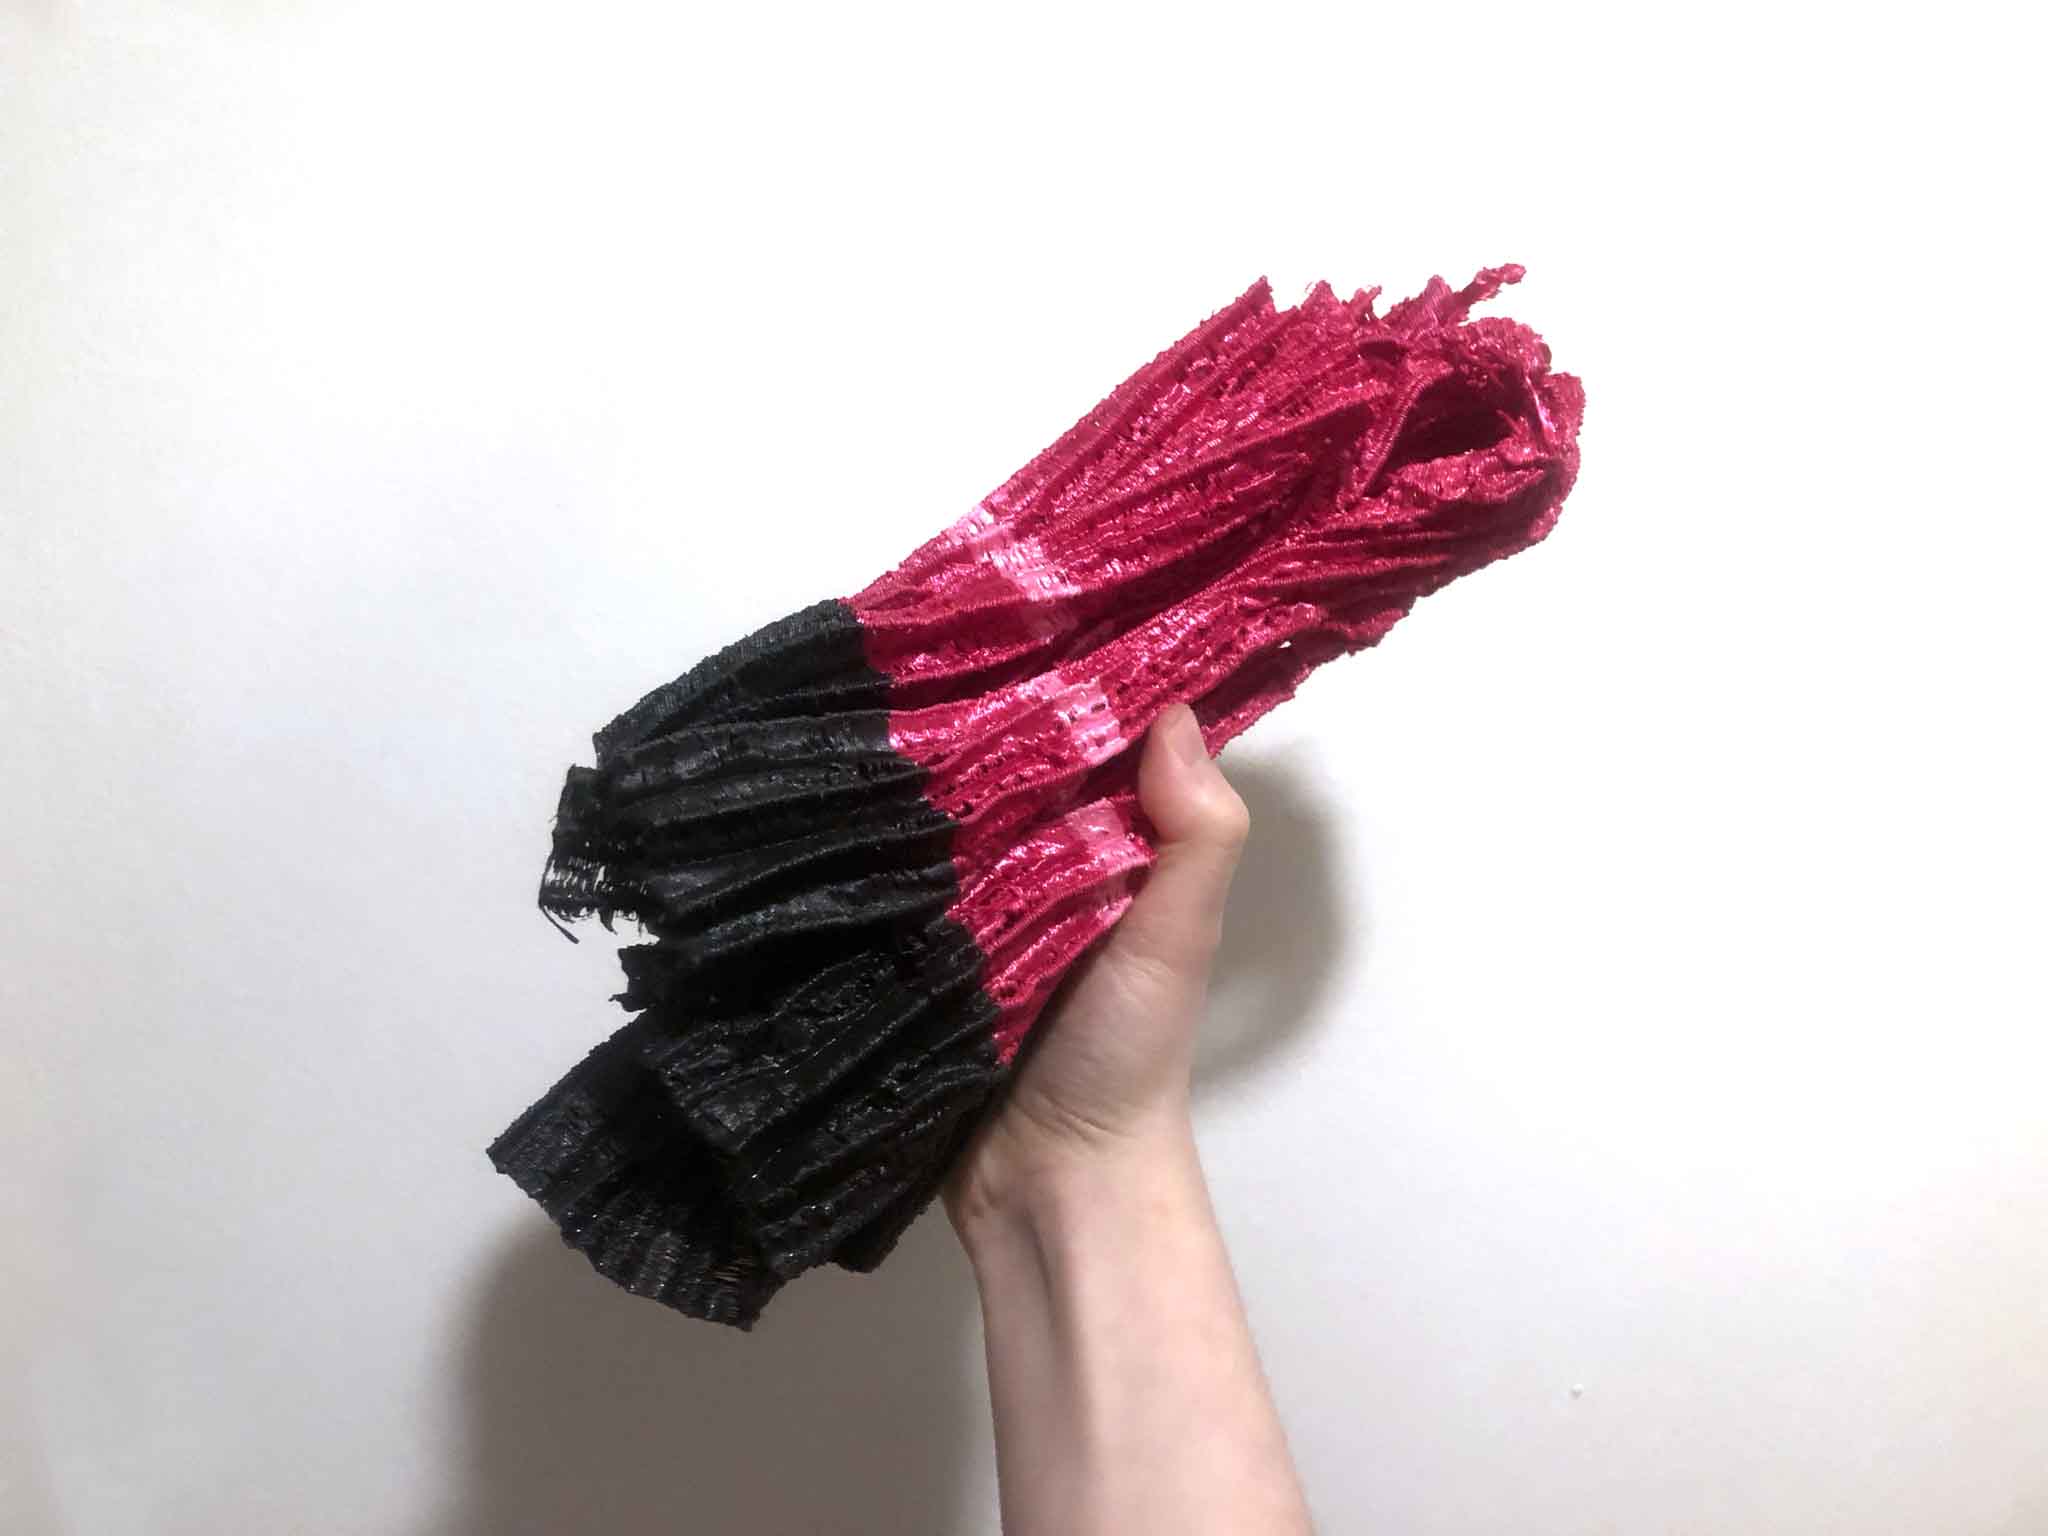
To try out the INFI-20 I wanted to make something that wouldn’t be possible with any of the other printers in the lab. This means it has to be something long. It can’t be too big though, because it needs to be printable within a reasonable time span. At first I wanted to make a hat from flat pattern pieces, but it would take too long and I could also print the parts separately on one of the other printers. I decided on a scarf/tie because it is basically one piece and can be made pretty small. I drew a shape in Illustrator, exported it as SVG, then imported into Rhino and extruded it so it would have some thickness. Then I imported it into SainSmart Slicer (which is basically Cura but with an infinite bed and 45 degrees slicing) and played around with the infill settings.
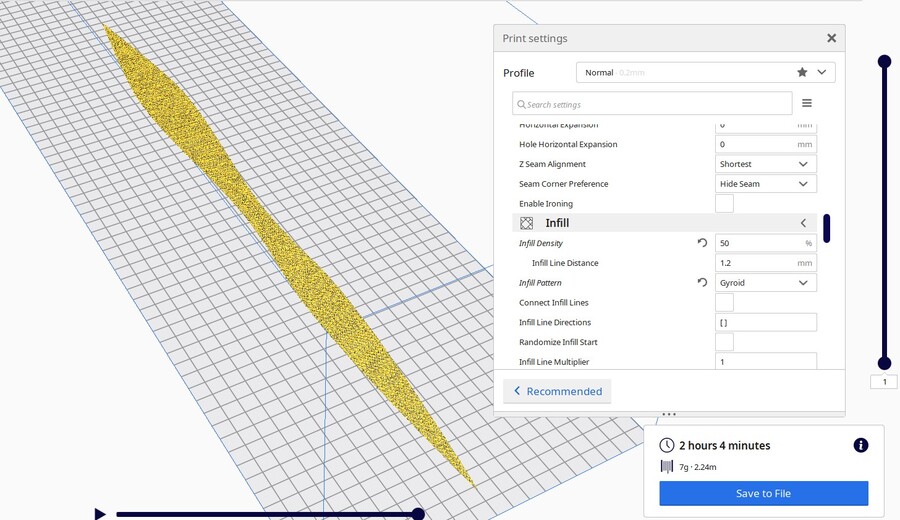
This can’t be made subtractively, because the design is based on using a Gyroid infill which is different on every layer.
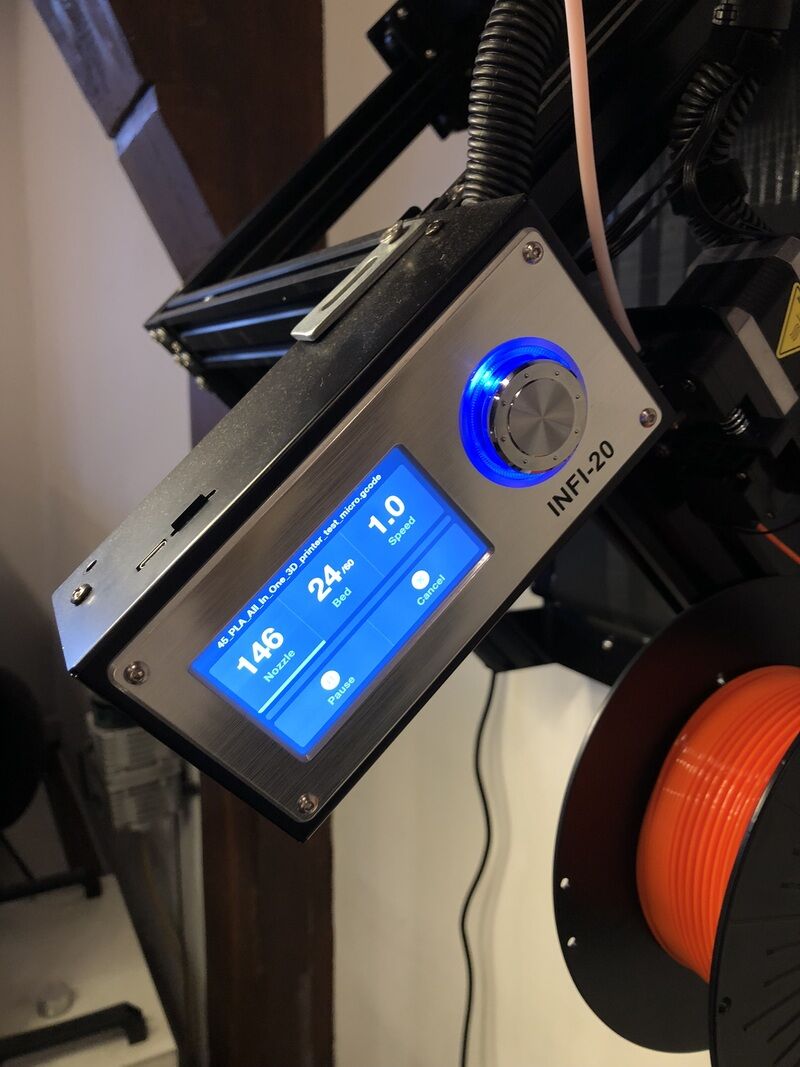
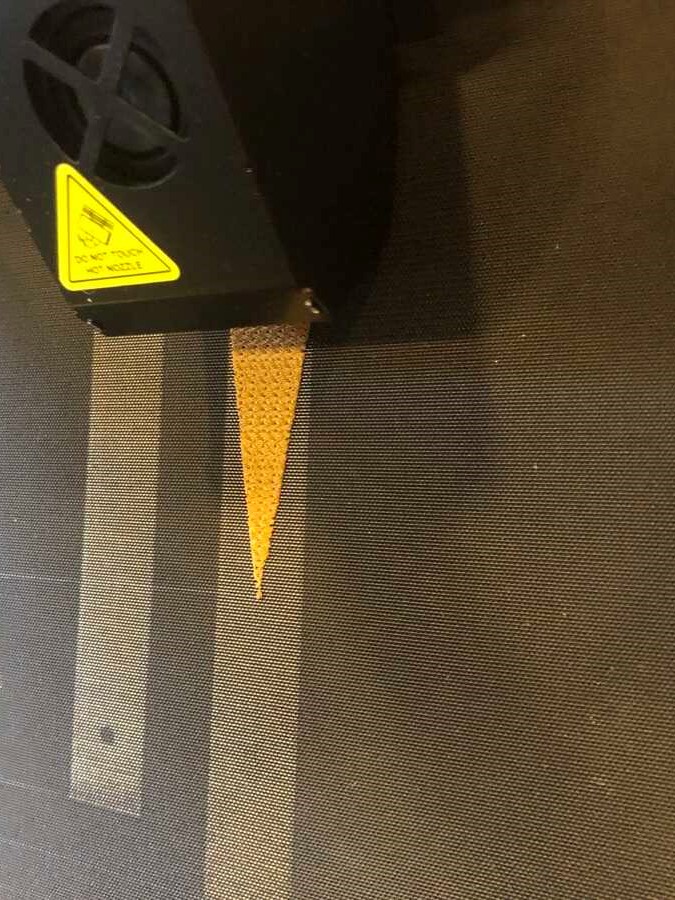
Printing with the INFI-20
Since we had some issues during the group assignment with the INFI-20, I first did a first layer test. It looks and feels just fine, so I decided to print my file.
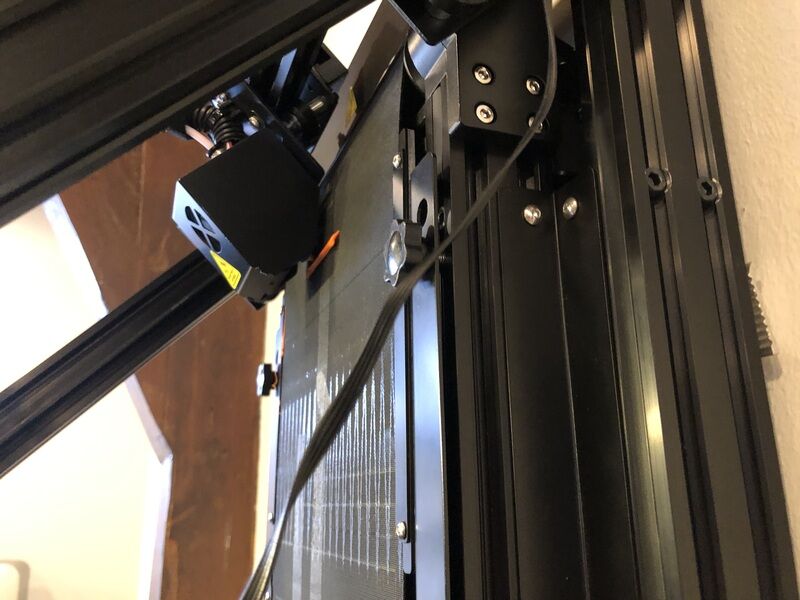
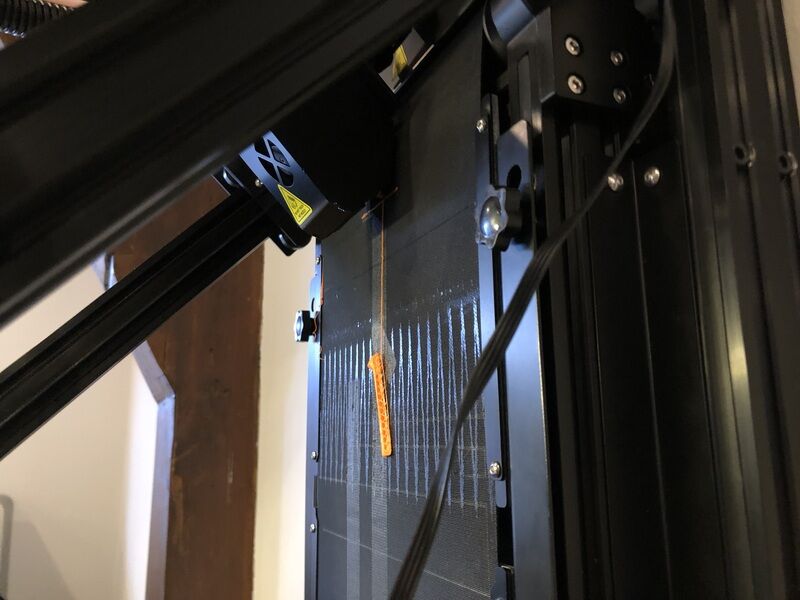
It went really well without any isues; when it was at the point on the left I increased the speed to 1.5x which went just as well. On the right you can see the tip of the scarf lifting from the bed. Since it was so thin, I pulled at the print so it wouldn’t be stuck on the bed anymore when it would reach the bottom.
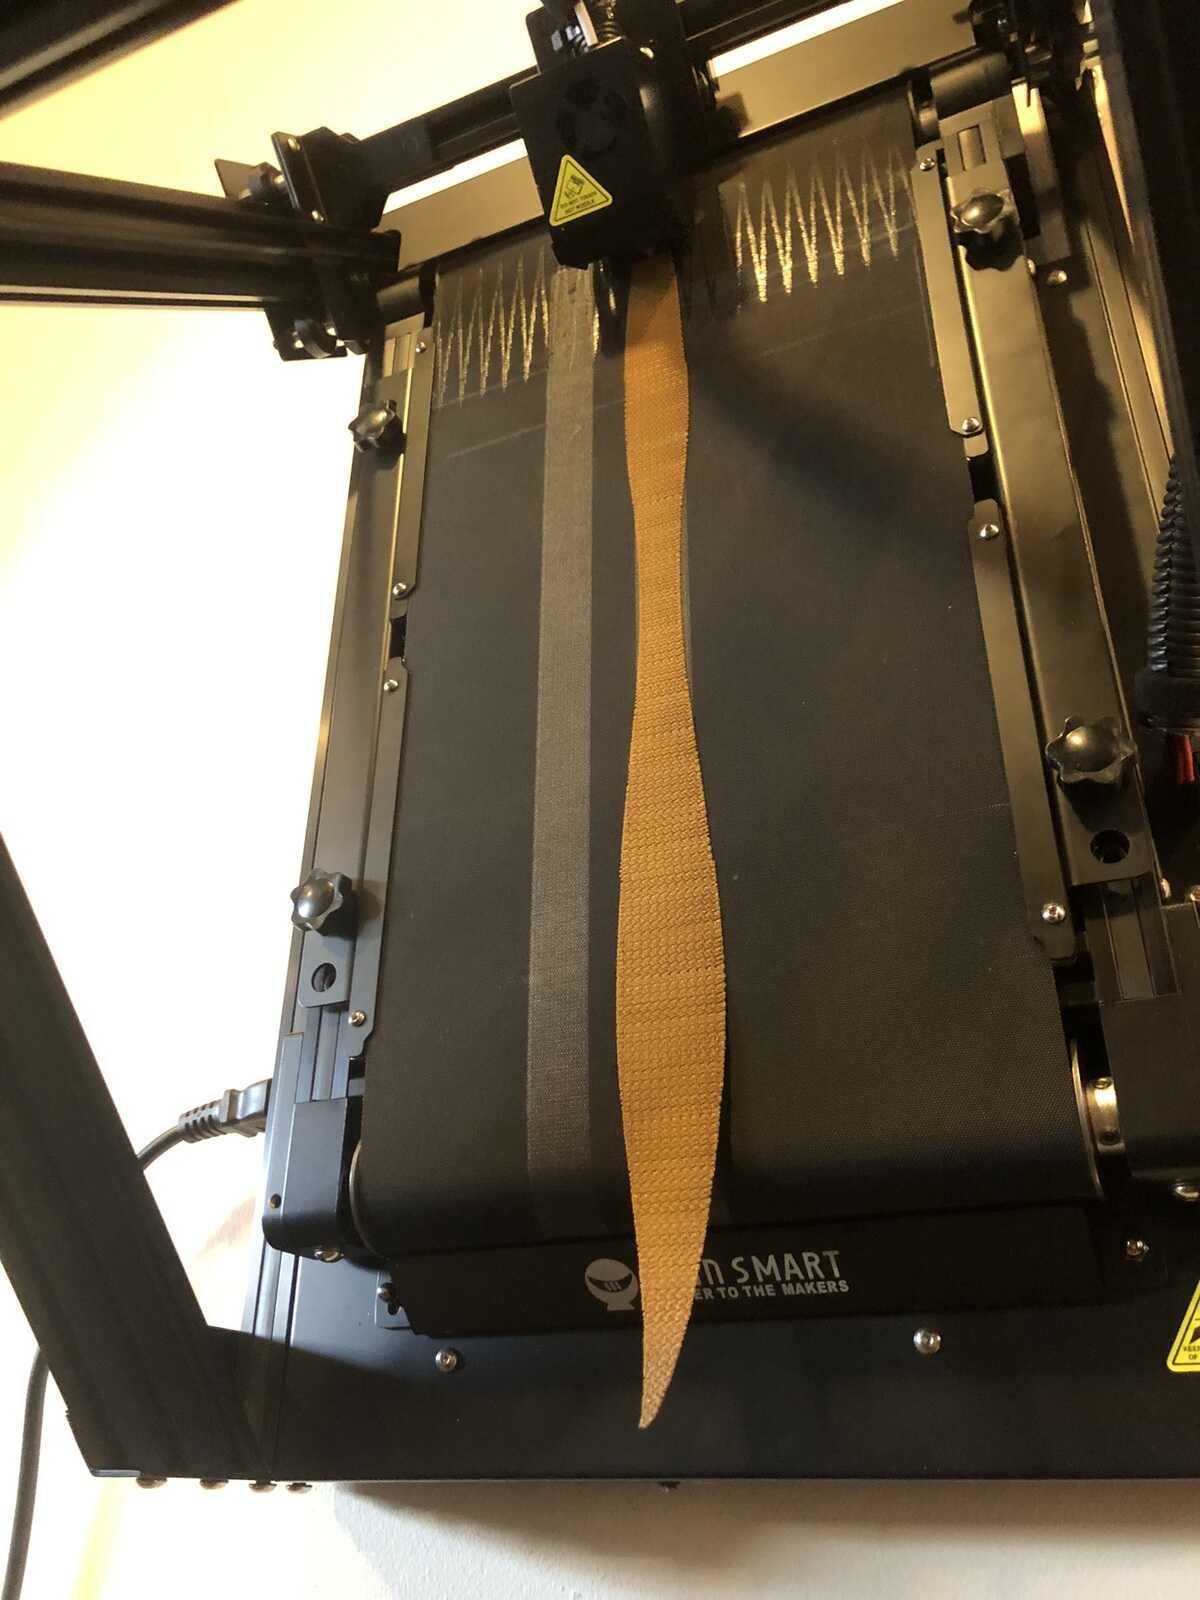
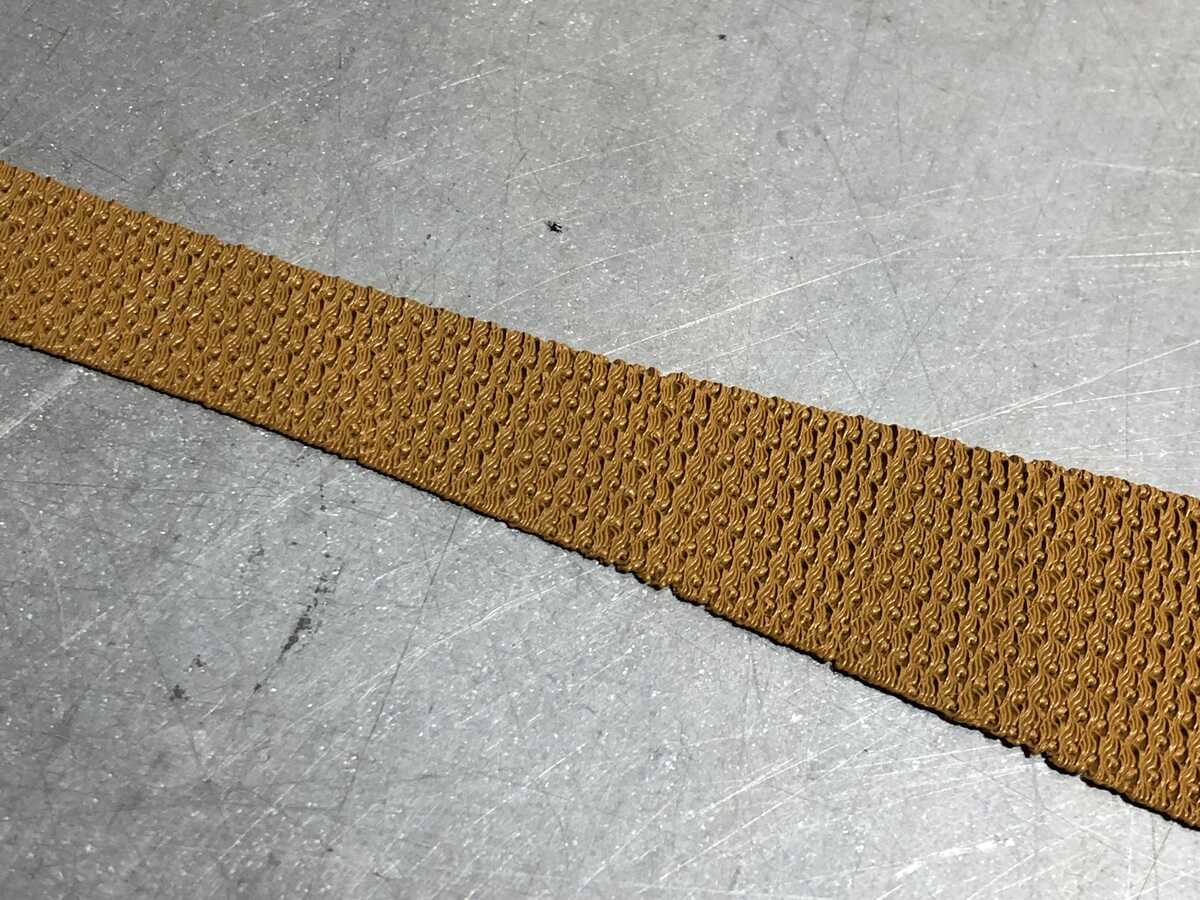
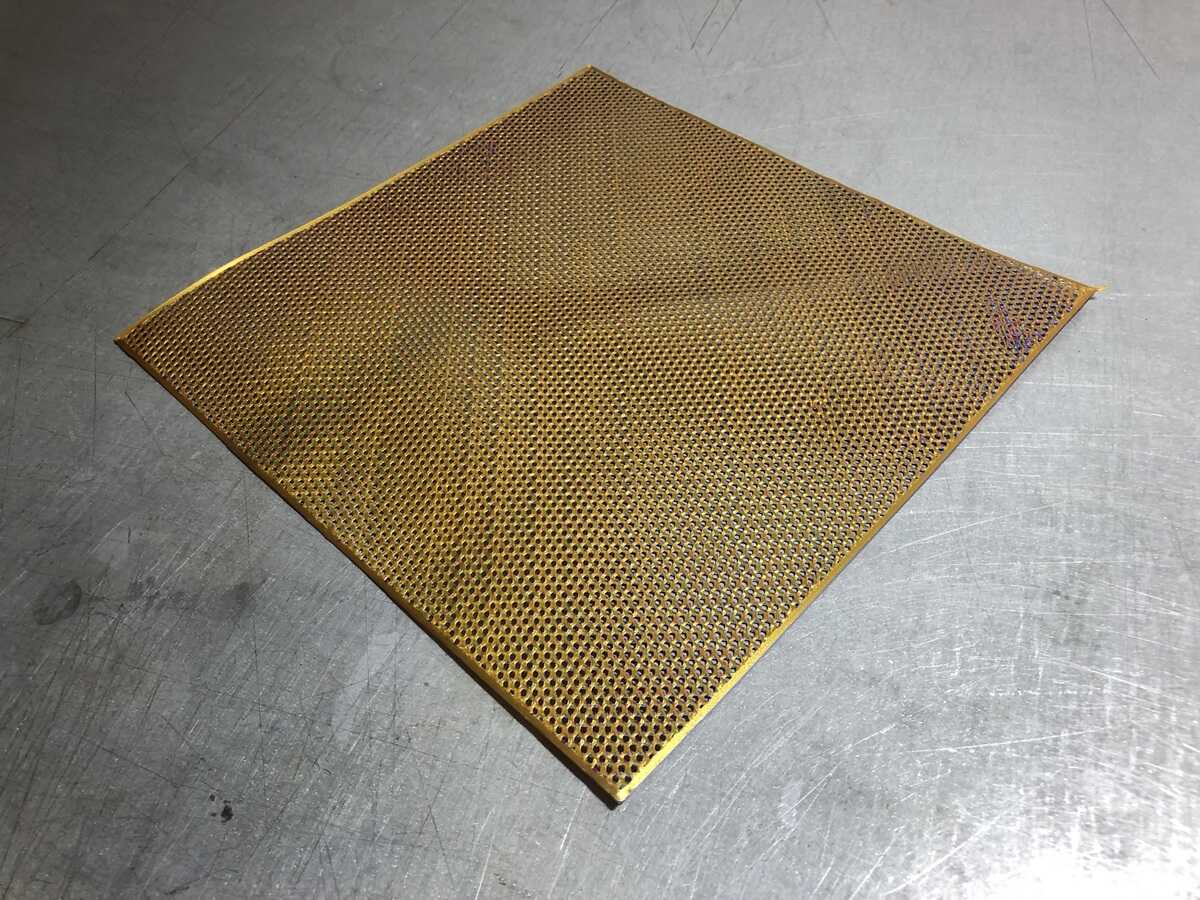
And here the result:
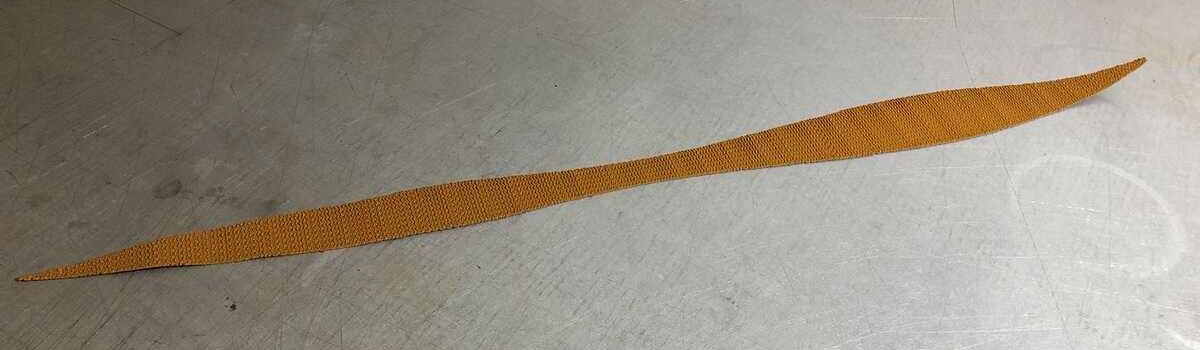
The texture reminds me of a tuck knit and I really like it. The print is really flexible without feeling brittle. The belt leaves a textured imprint on the bottom, which works well for a fabric-like piece like this. One thing that is annoying about the belt is that where the ends of the belt connect, there is a sticky zigzag-shaped area. The print really sticks to that area, and when you pull it off there are some black spots stuck to the print. Hopefully this becomes less of an issue after printing more often with it.
This is what it looks like worn (it would’ve been better if it were twice as long, but then it would’ve taken 4-5h instead of 2h):

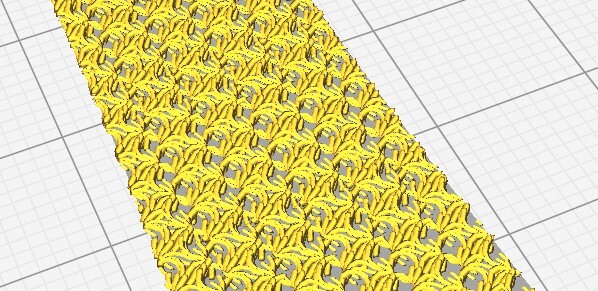
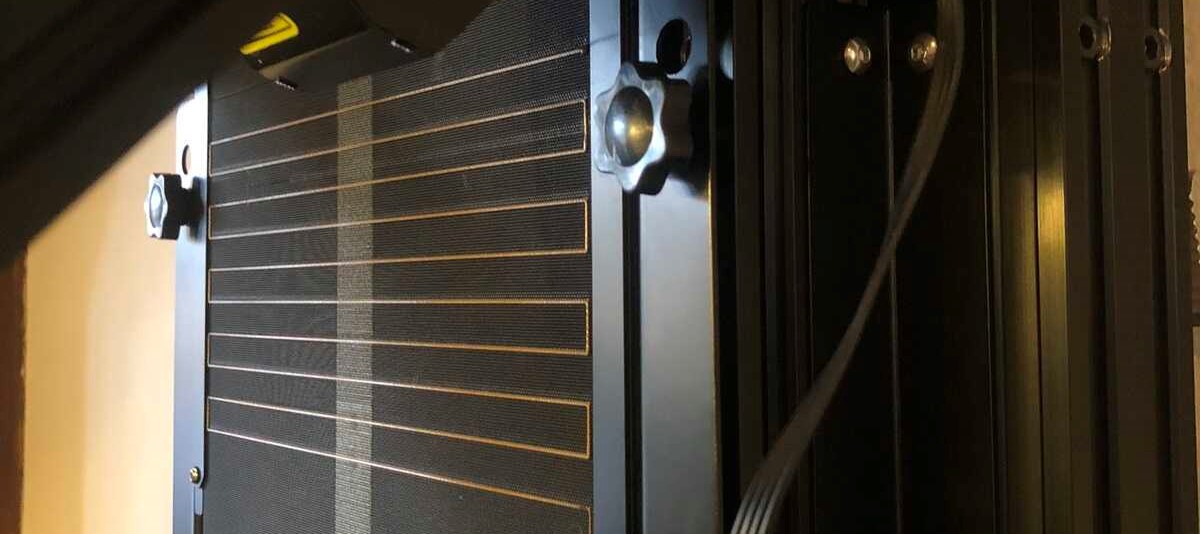
Infill fabric
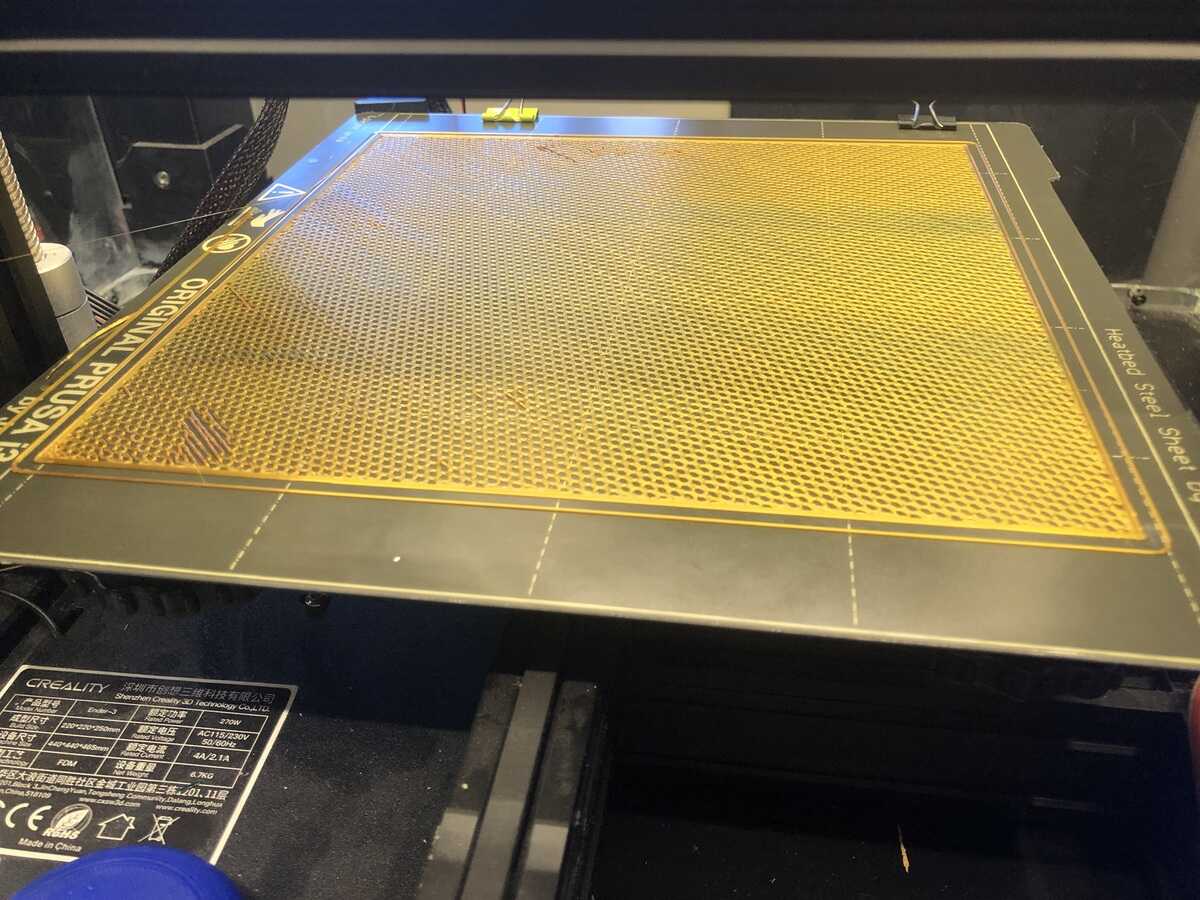
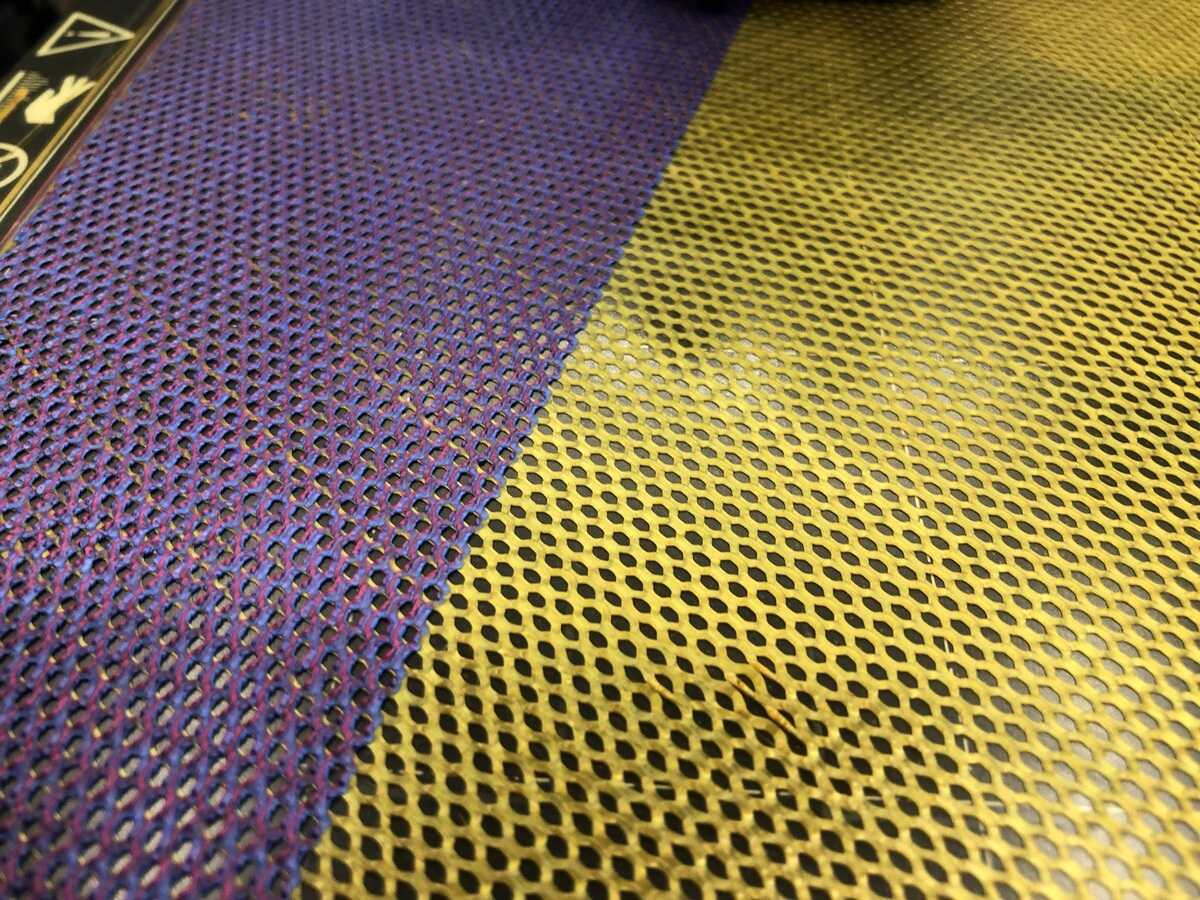
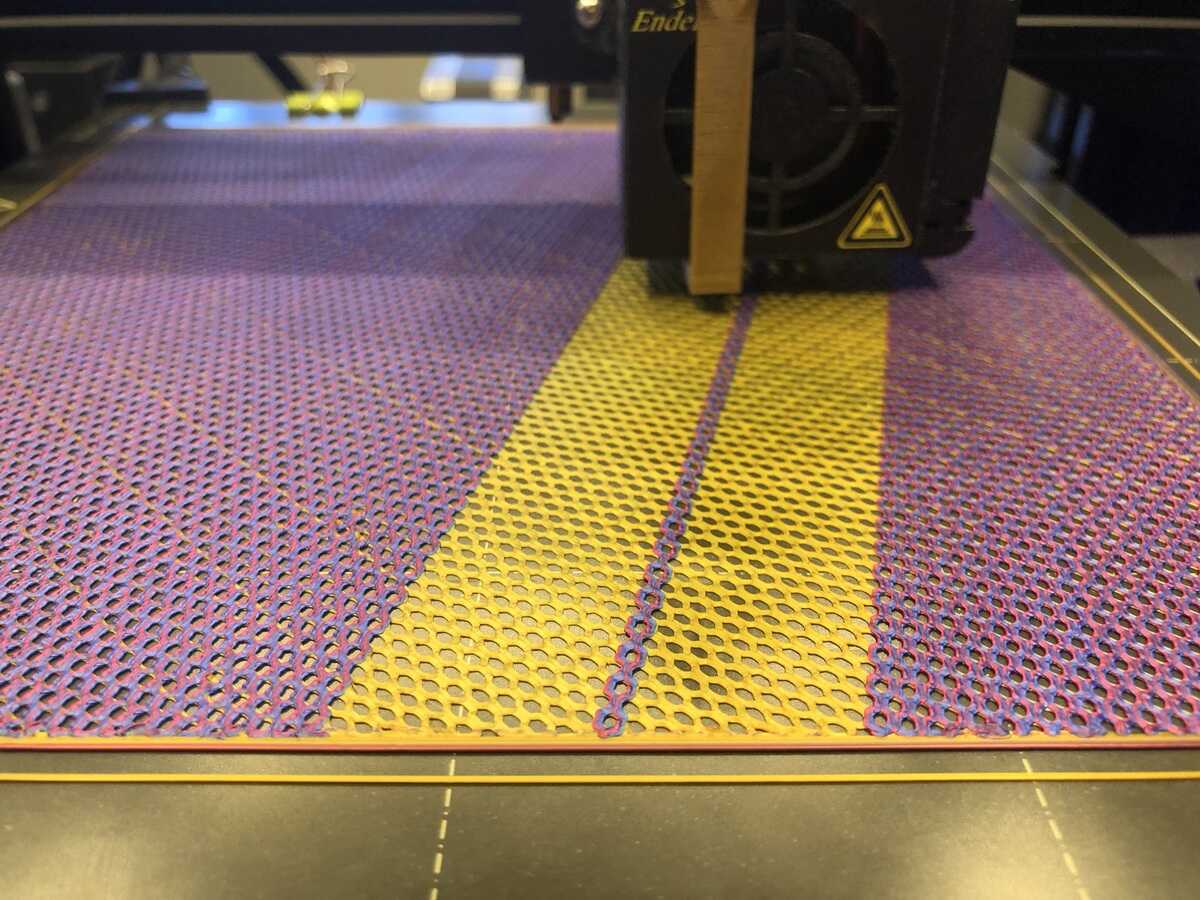
Printing with the Ender 3
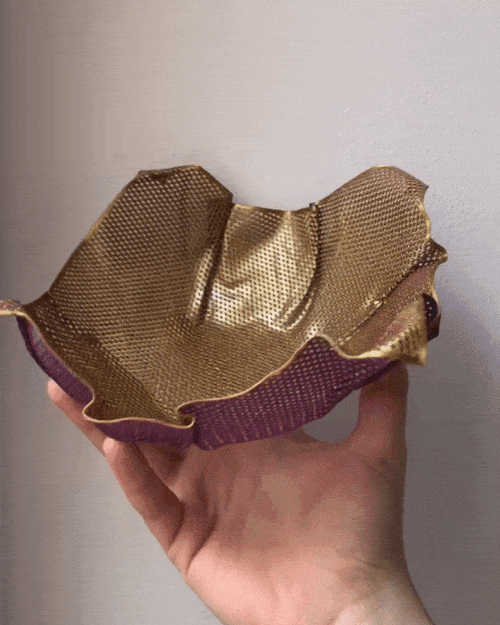
We found out that the Ender 3 bed wasn’t flat, so I wanted to do a test print on the entire bed to figure out how bad the problem was. For this I placed a box on the PrusaSlicer Ender bed, scaled it to 200x200mm and 0.9mm high, and disabled top and bottom layers. I set it to a honeycomb infill with 30% infill. This gave me a fabric-like structure covering most of the bed.
The first error I ran into was one that I caused myself. I panicked for a second because the Ender doens’t have a reset button, but aborting the print works just as well. I had to leave my sweater attached to the printer while getting my phone to document this moment.
The first layer seemed to be doing just fine after I calibrated the bed with the four knobs; the parts where the honeycomb doesn’t connect aren’t a big deal because infill gets printed way faster and with less precision. I lowered the speed slightly to counter this.
For the second layer, I manually changed filament to get a duotone material (or actually tritone because the second filament is duotone); this makes it a material that you can’t make subtractively (unless you fuse material together).
The reveal:
The result is a pretty flexible PLA ‘fabric’. It also shows no significant differences in height or bed adhesion, so it seems that the bed is flat and fine.
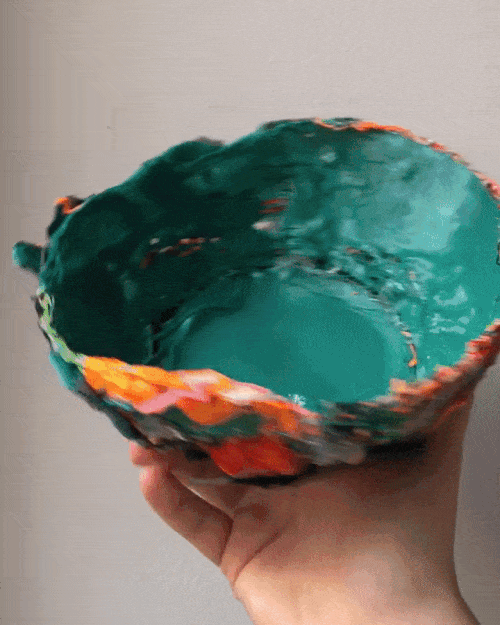
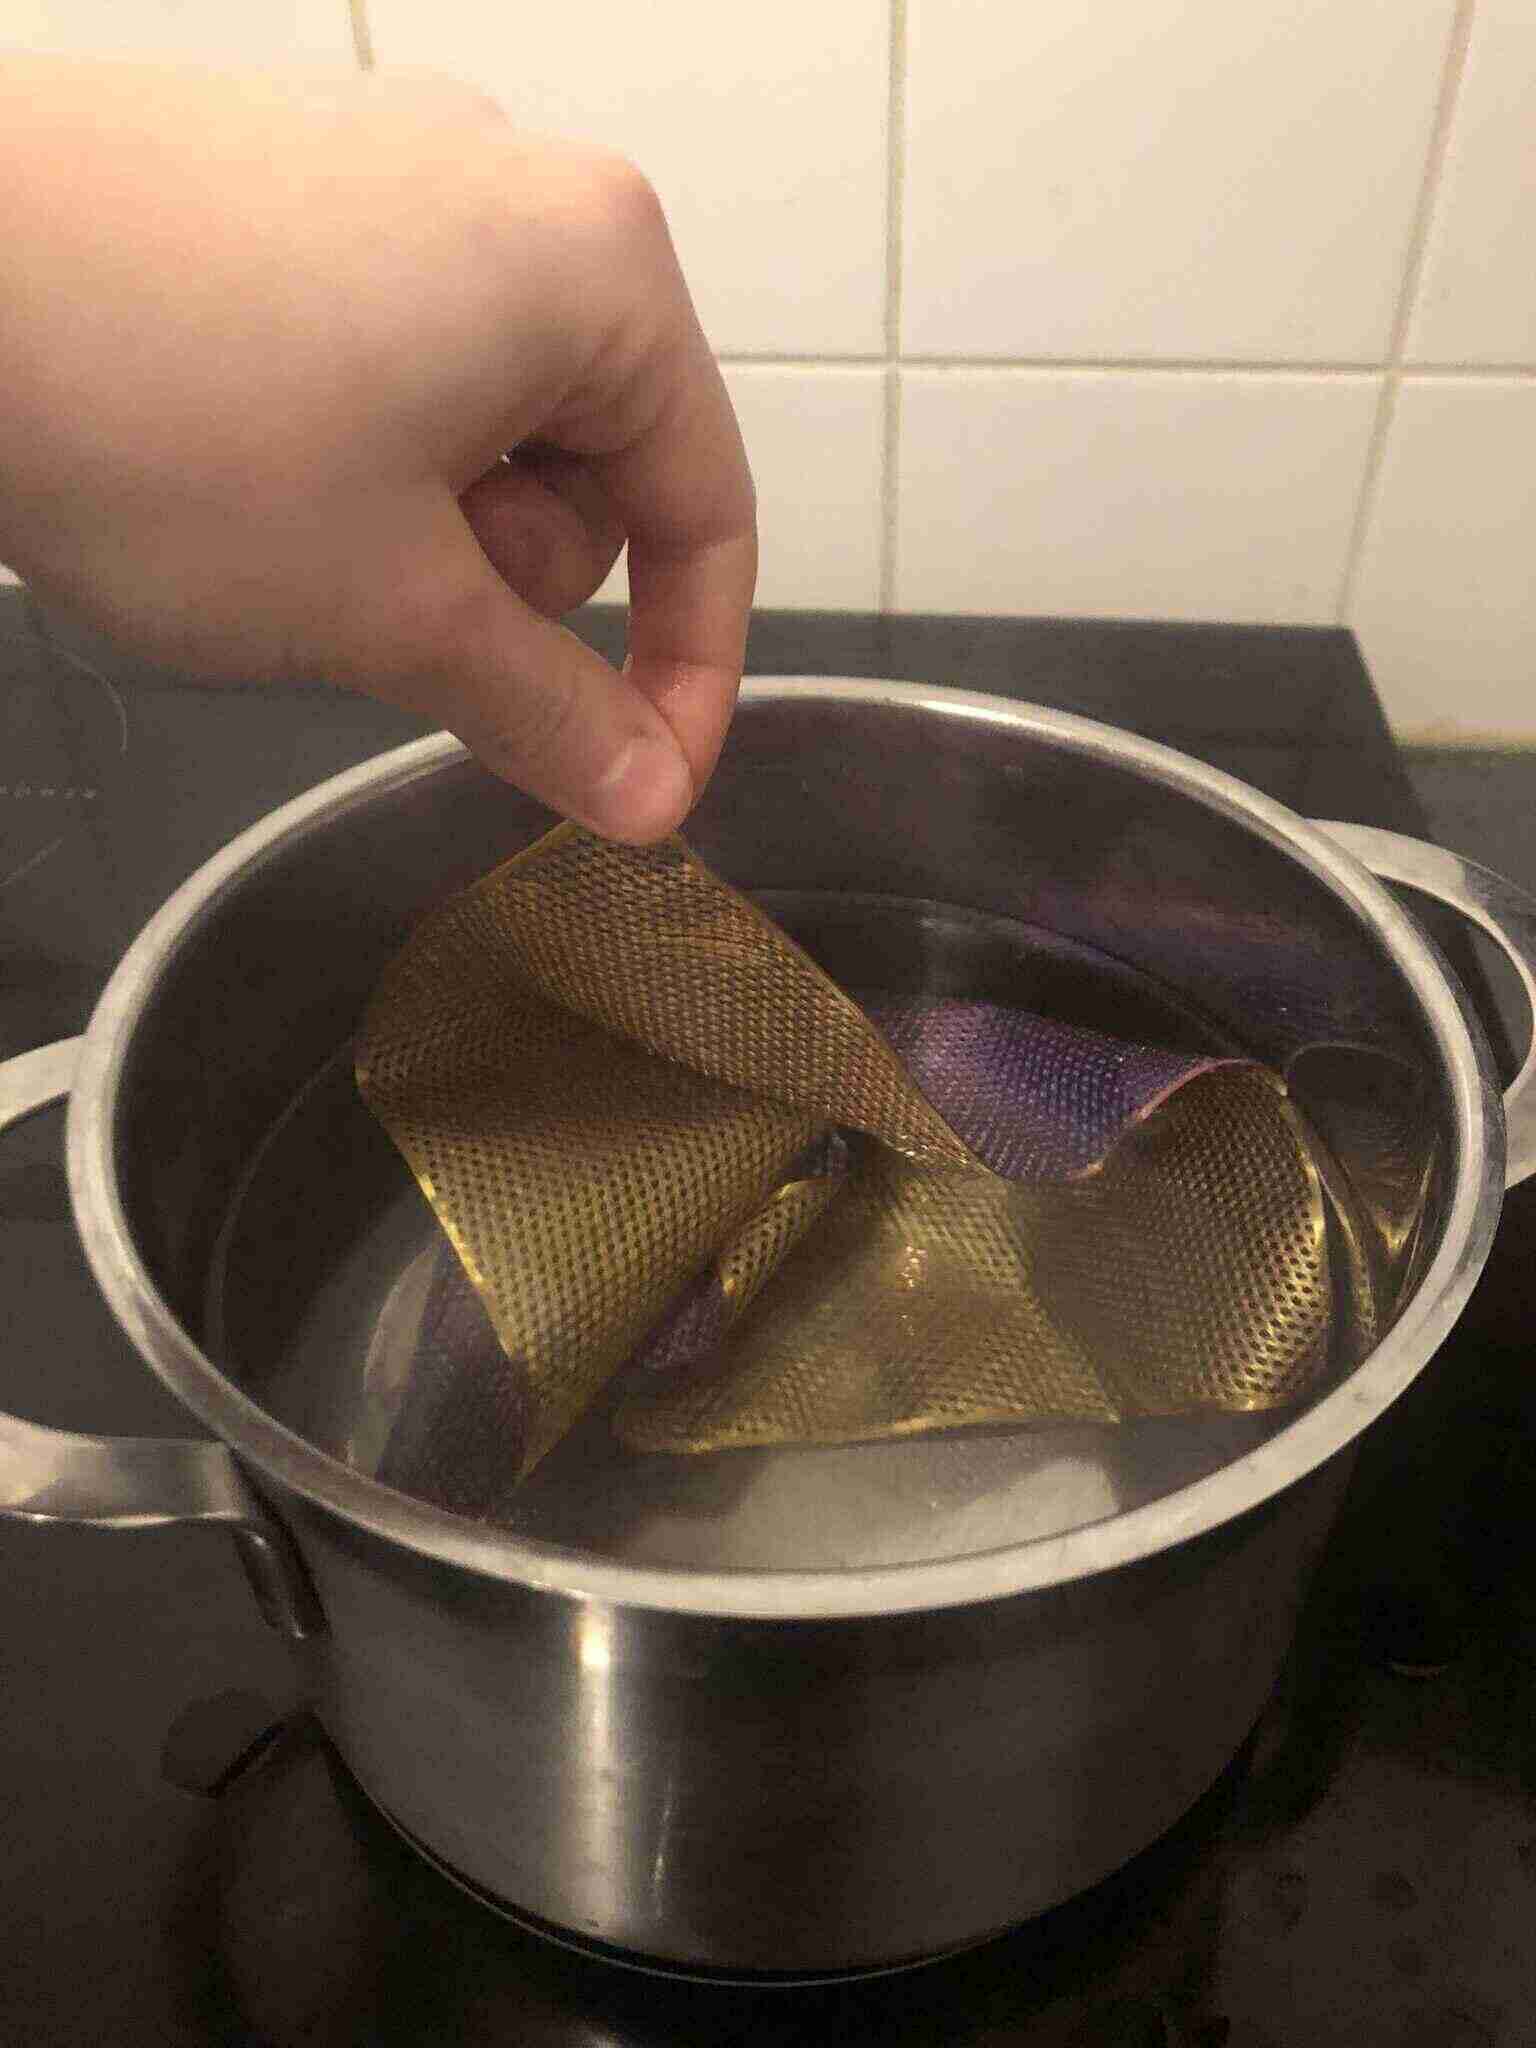
Shaping the fabric into a bowl
I then used a styrofoam bowl that I had to turn the print into a bowl. I used the water that was still hot from the inflatable experiment to make the print malleable. You dip it into the water for a few seconds, take it out and mold it onto the shape within two seconds. I did this a couple of times until I liked the shape. I then dipped the bottom of the bowl into the water again to make a flat bottom so it would be stable.
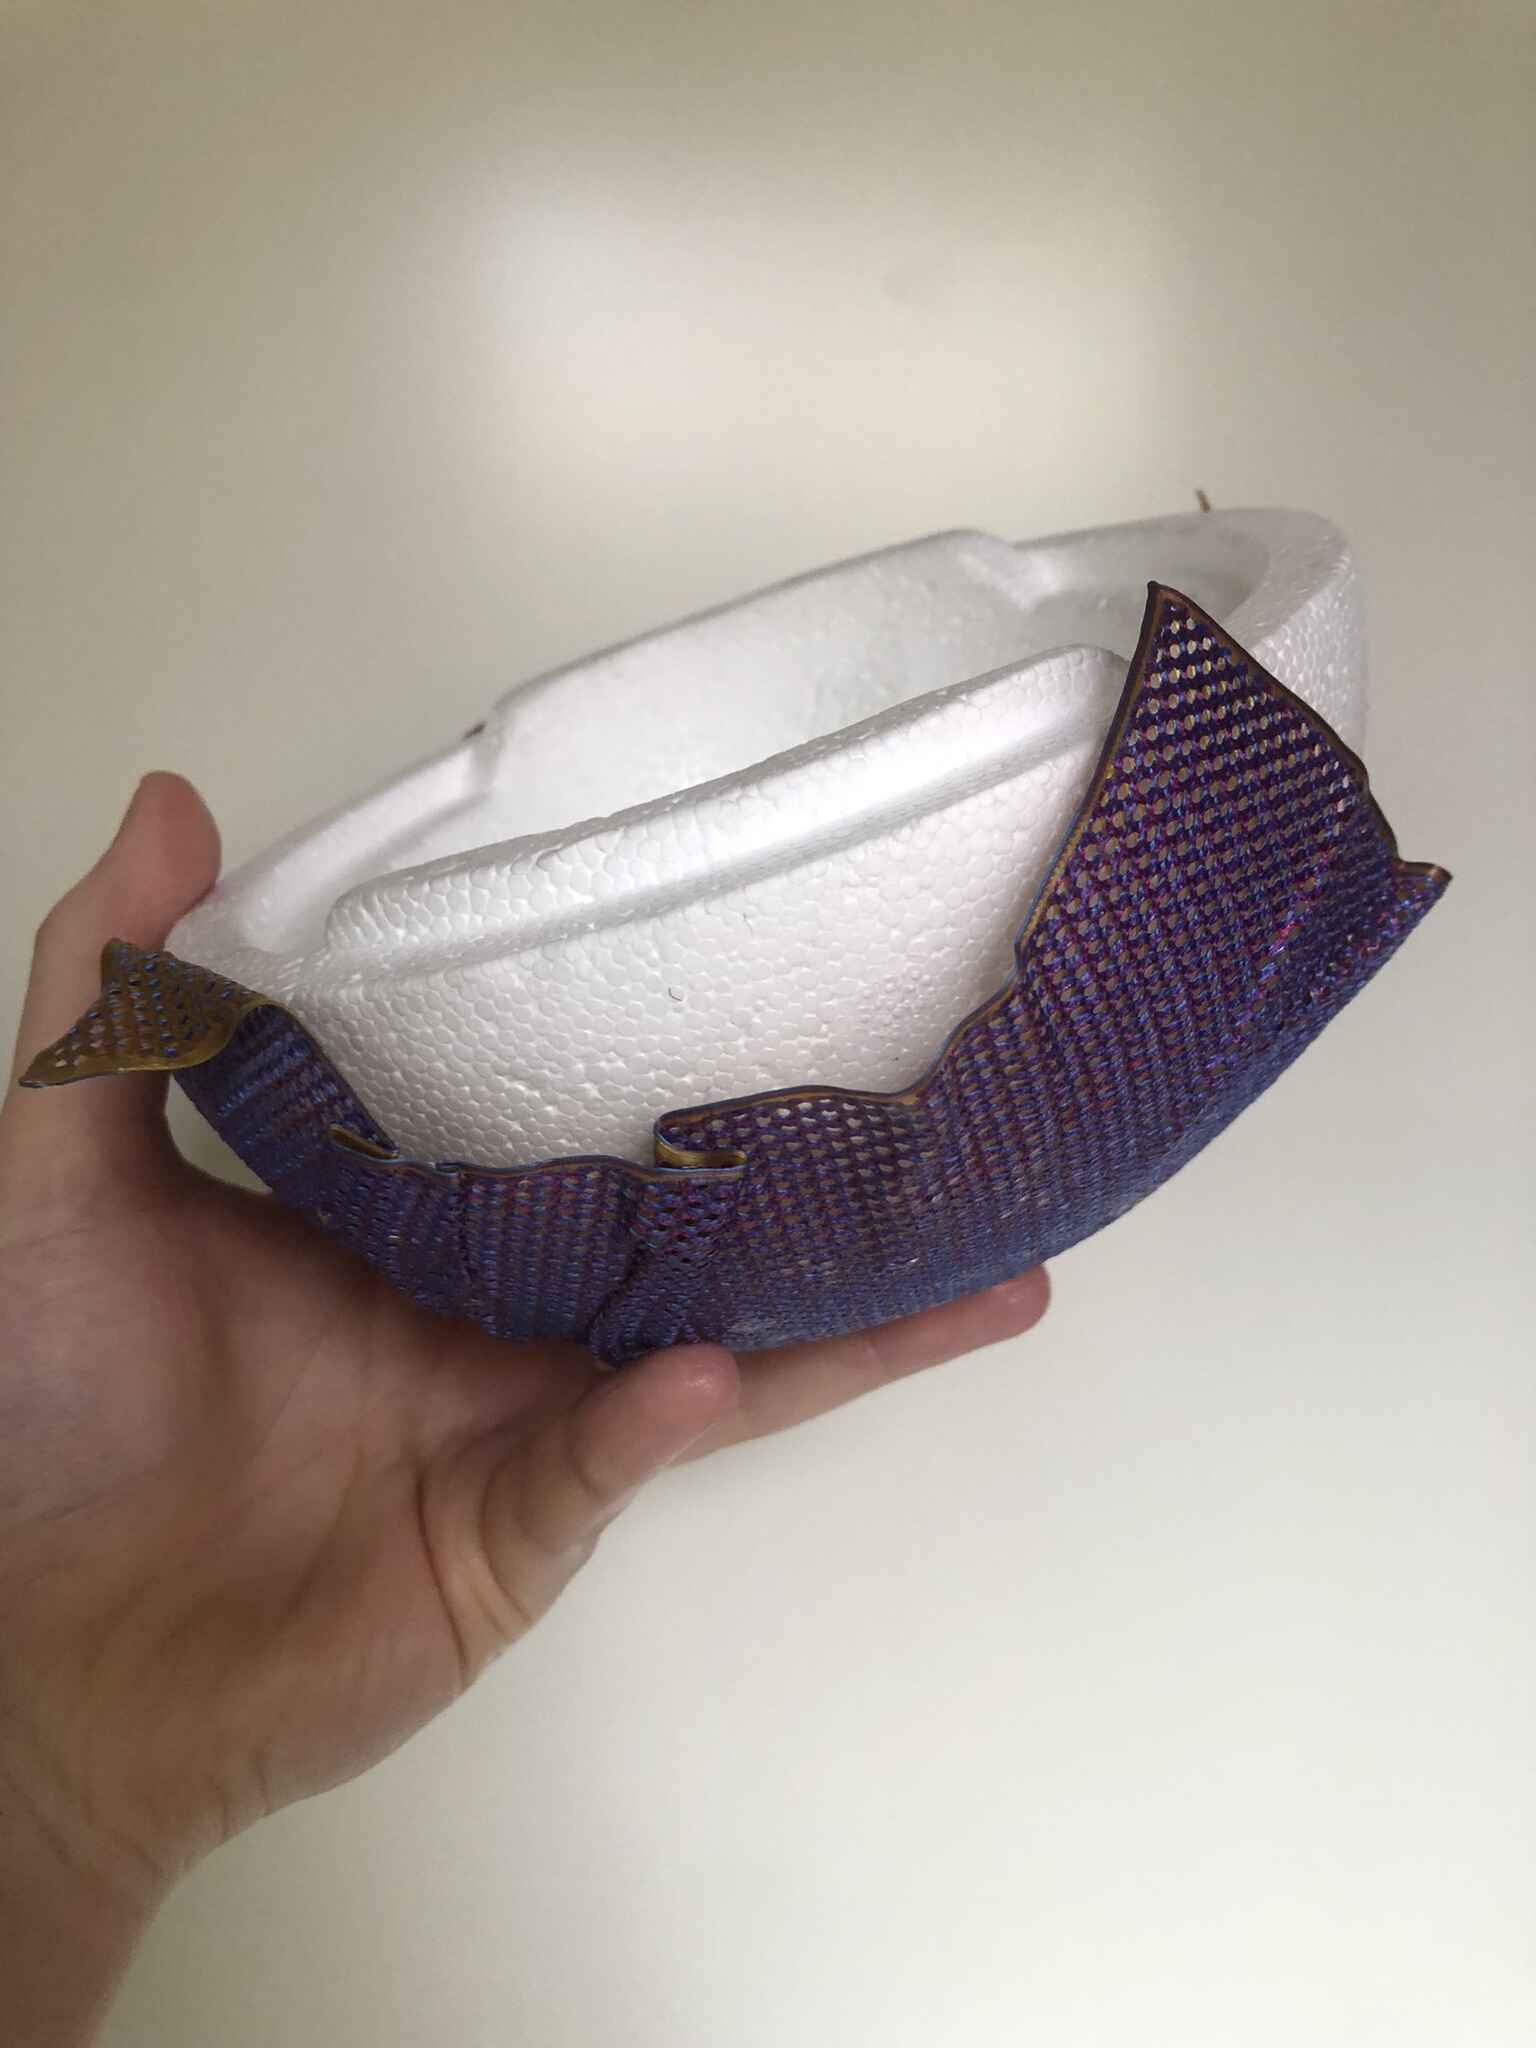
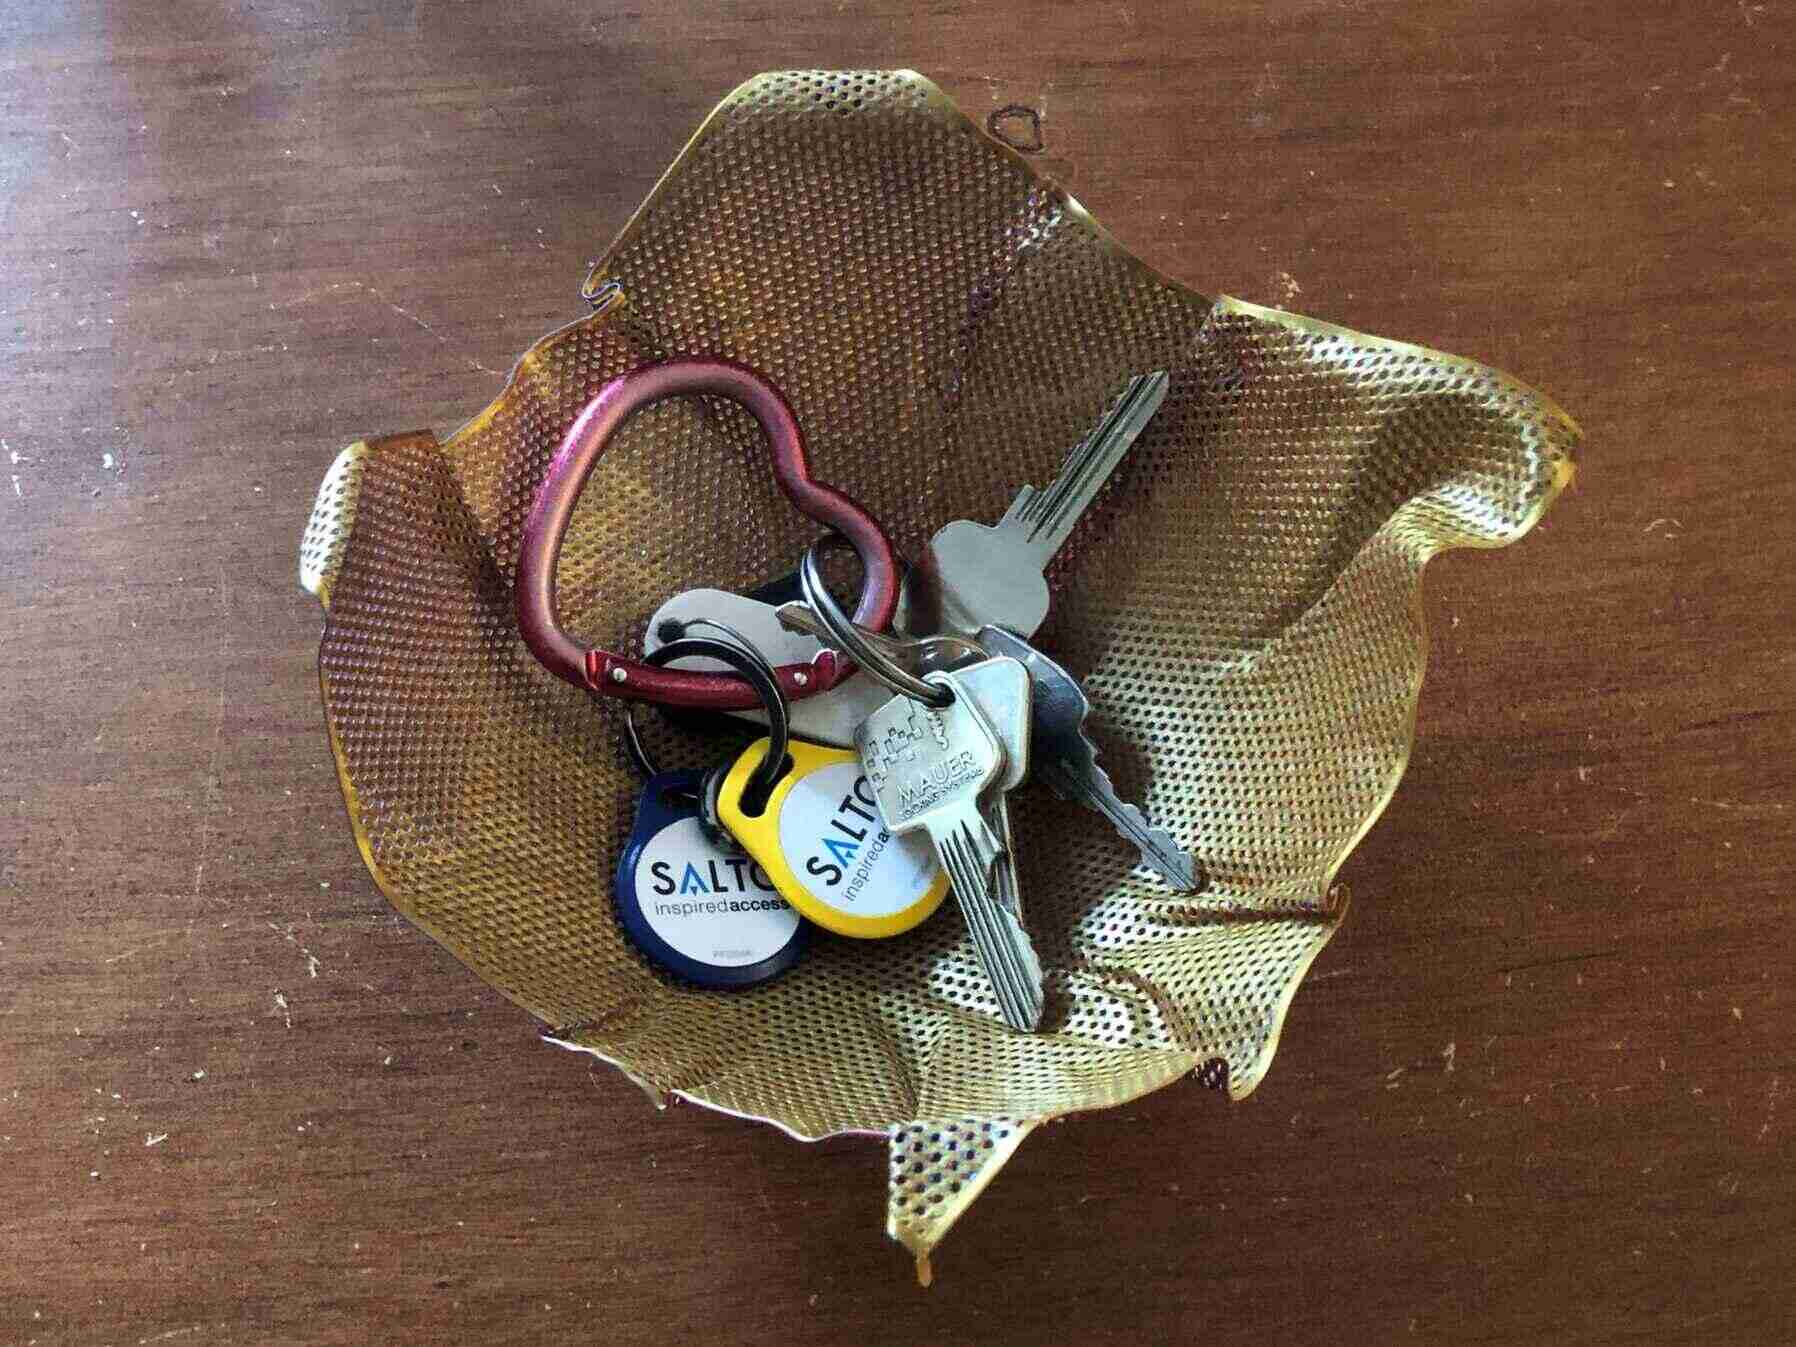
Here as a functional bowl for my keys:
Basketry bowls
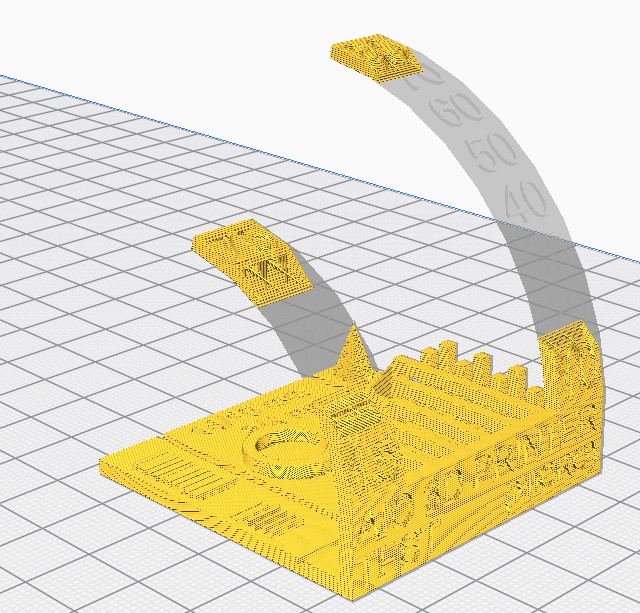
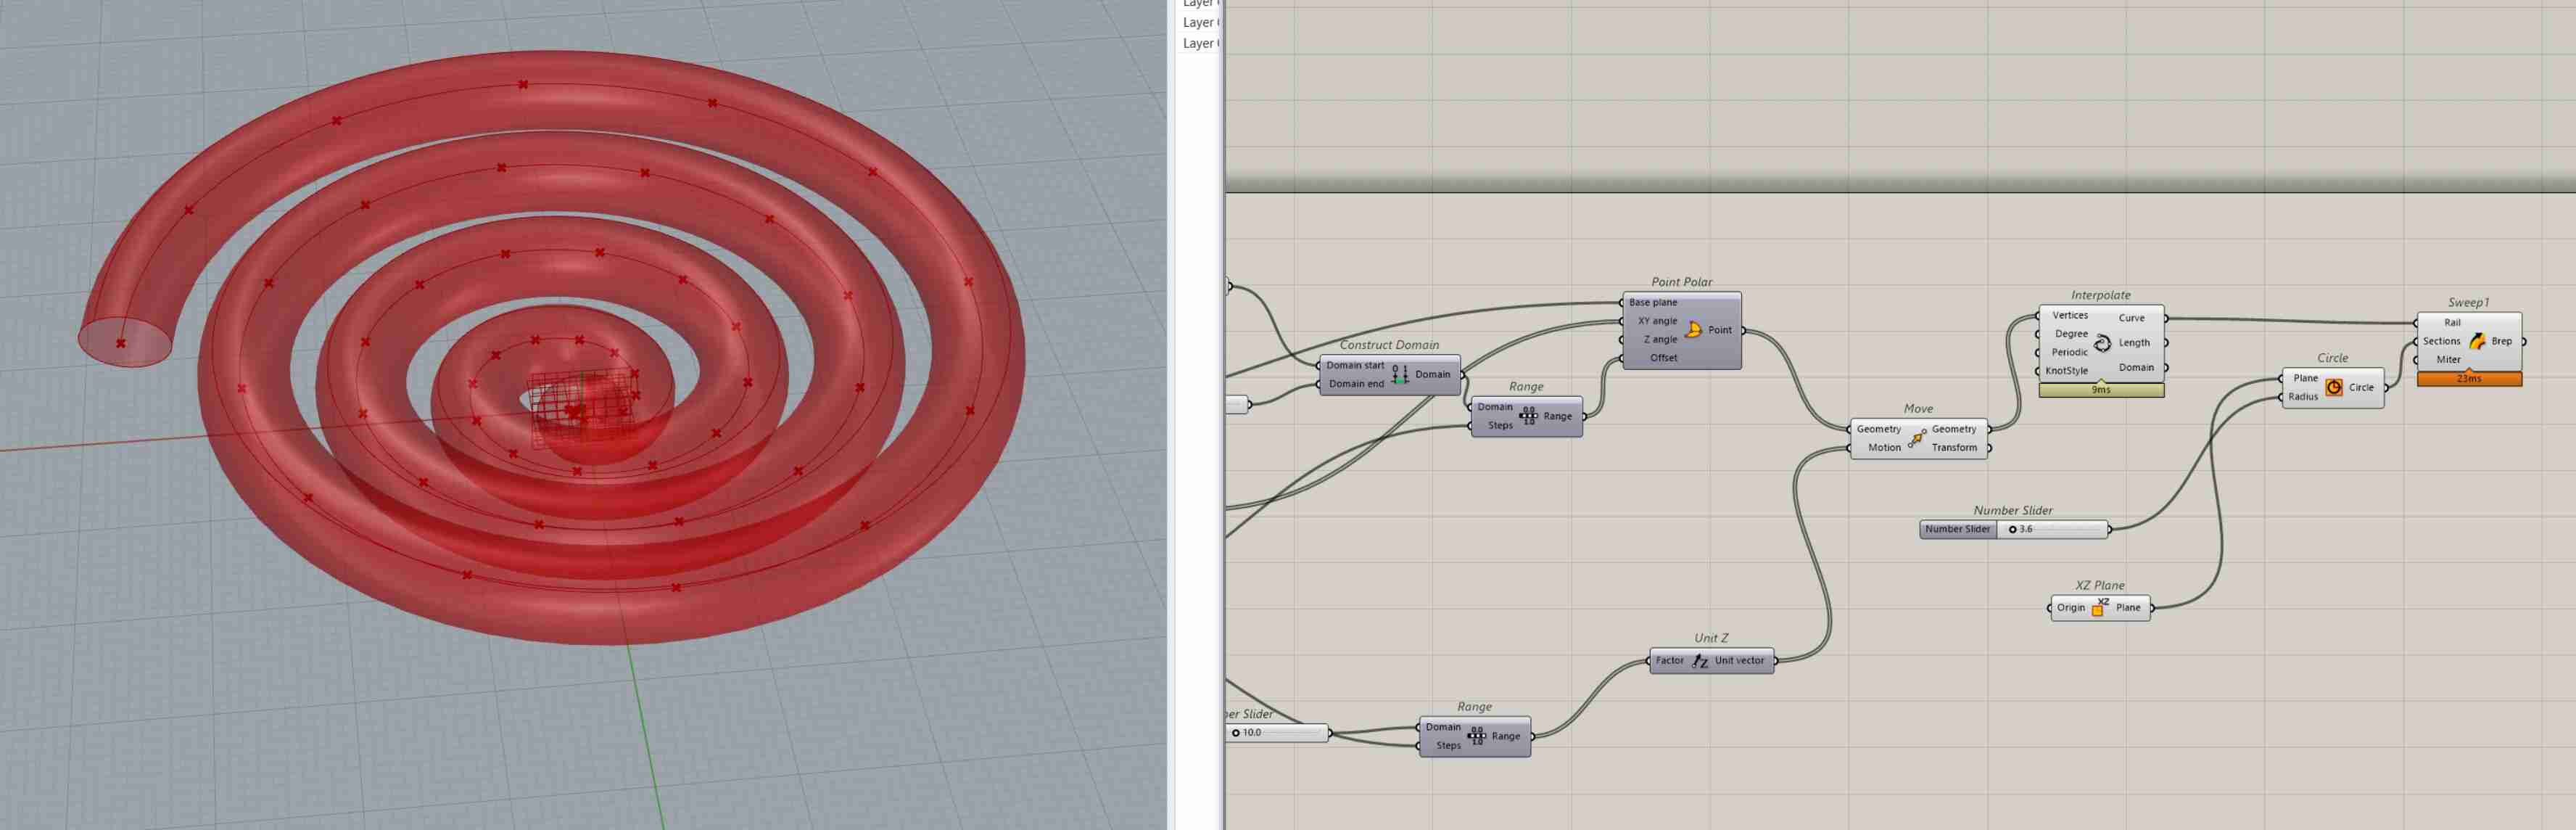
Designing the inflatable shape in Grasshopper went faster than I expected (especially after my struggles during the laser cutting week), so I thought about other things that I wanted to try (the tie and the fabric were quick designs made about ten minutes before printing them). I was thinking about a shape with cut-outs spiraling along the surface that you could weave through, so you can combine basketry with 3D printing (two things that I like very much). I followed along with this tutorial to learn more about creating spirals in Grasshopper.
Spiraling along a cylinder
I started out with a circle on which I drew a Point Polar with a number slider.
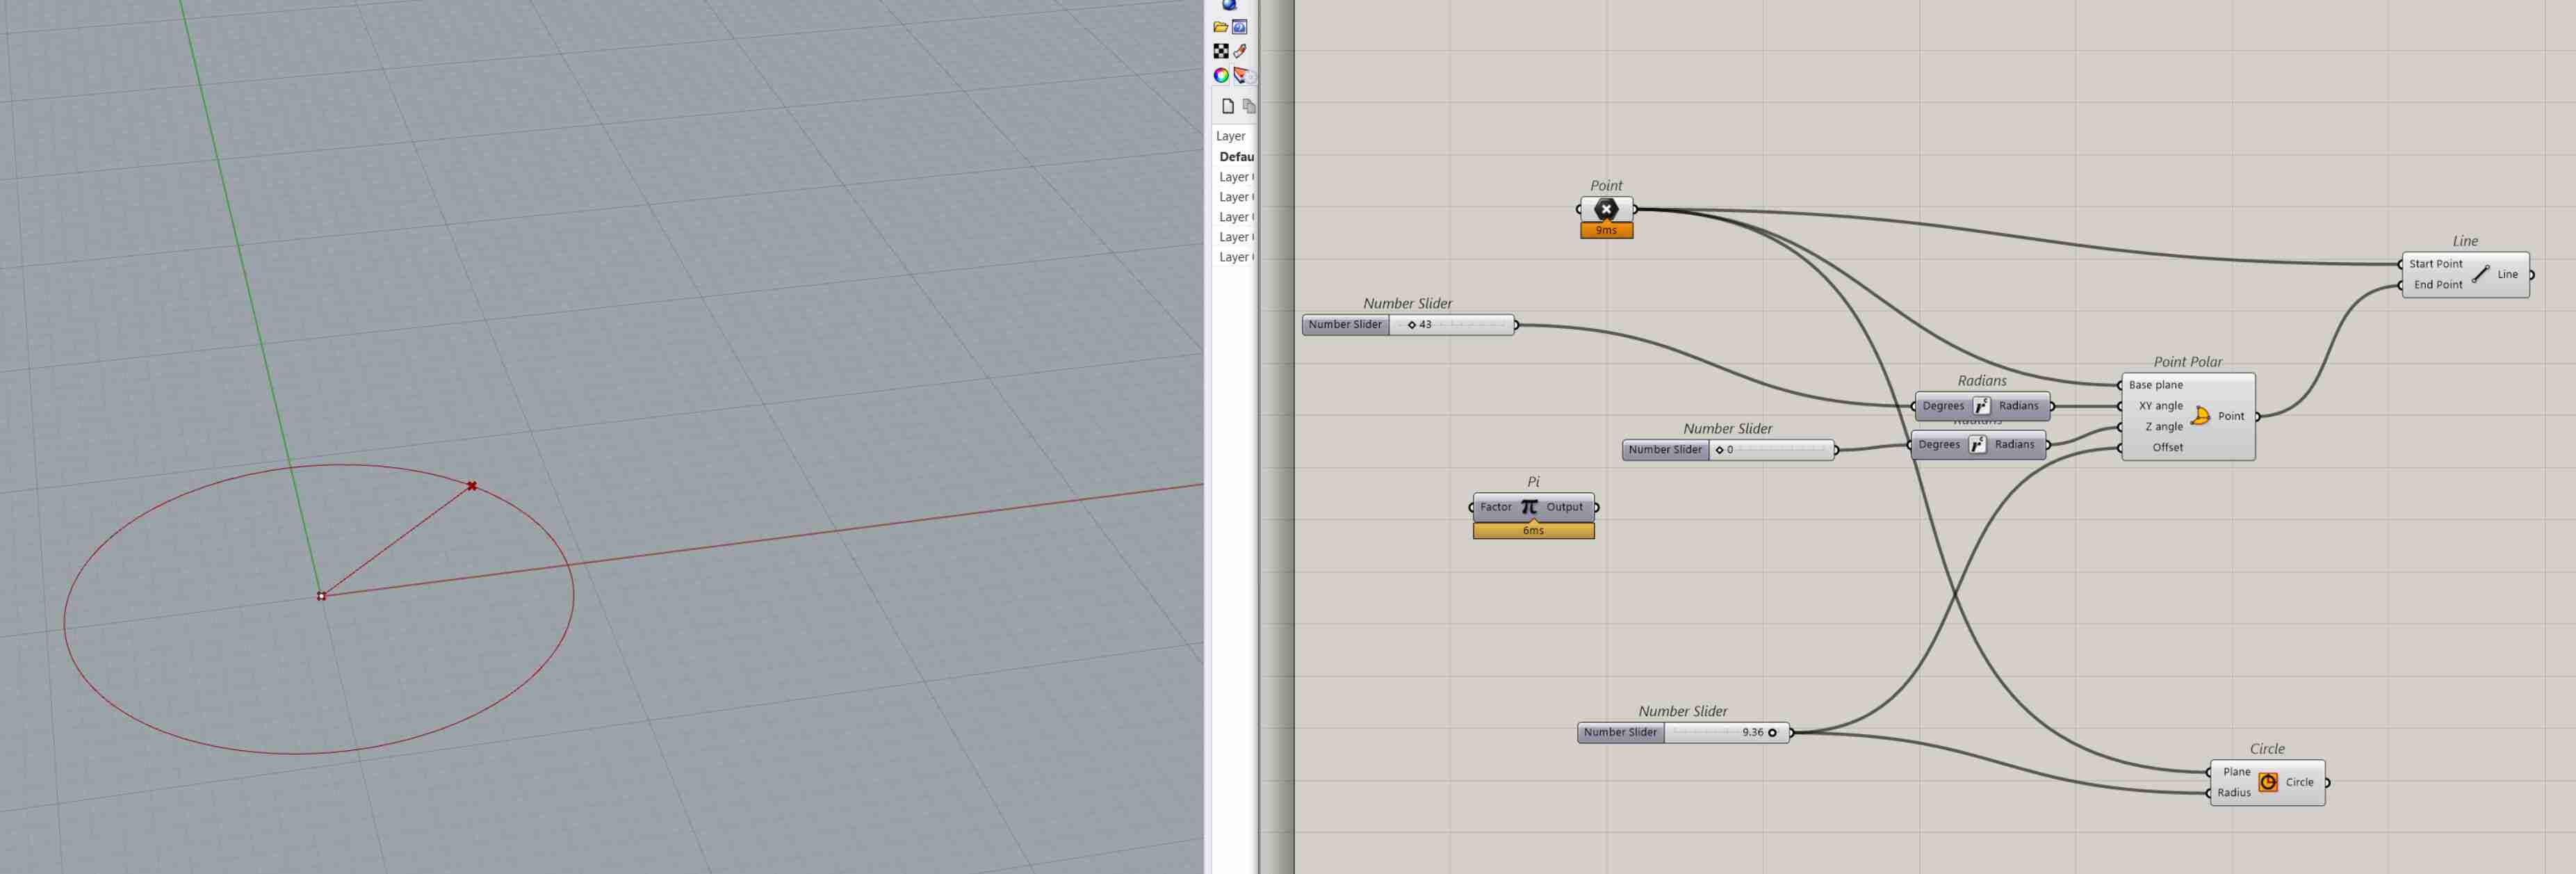
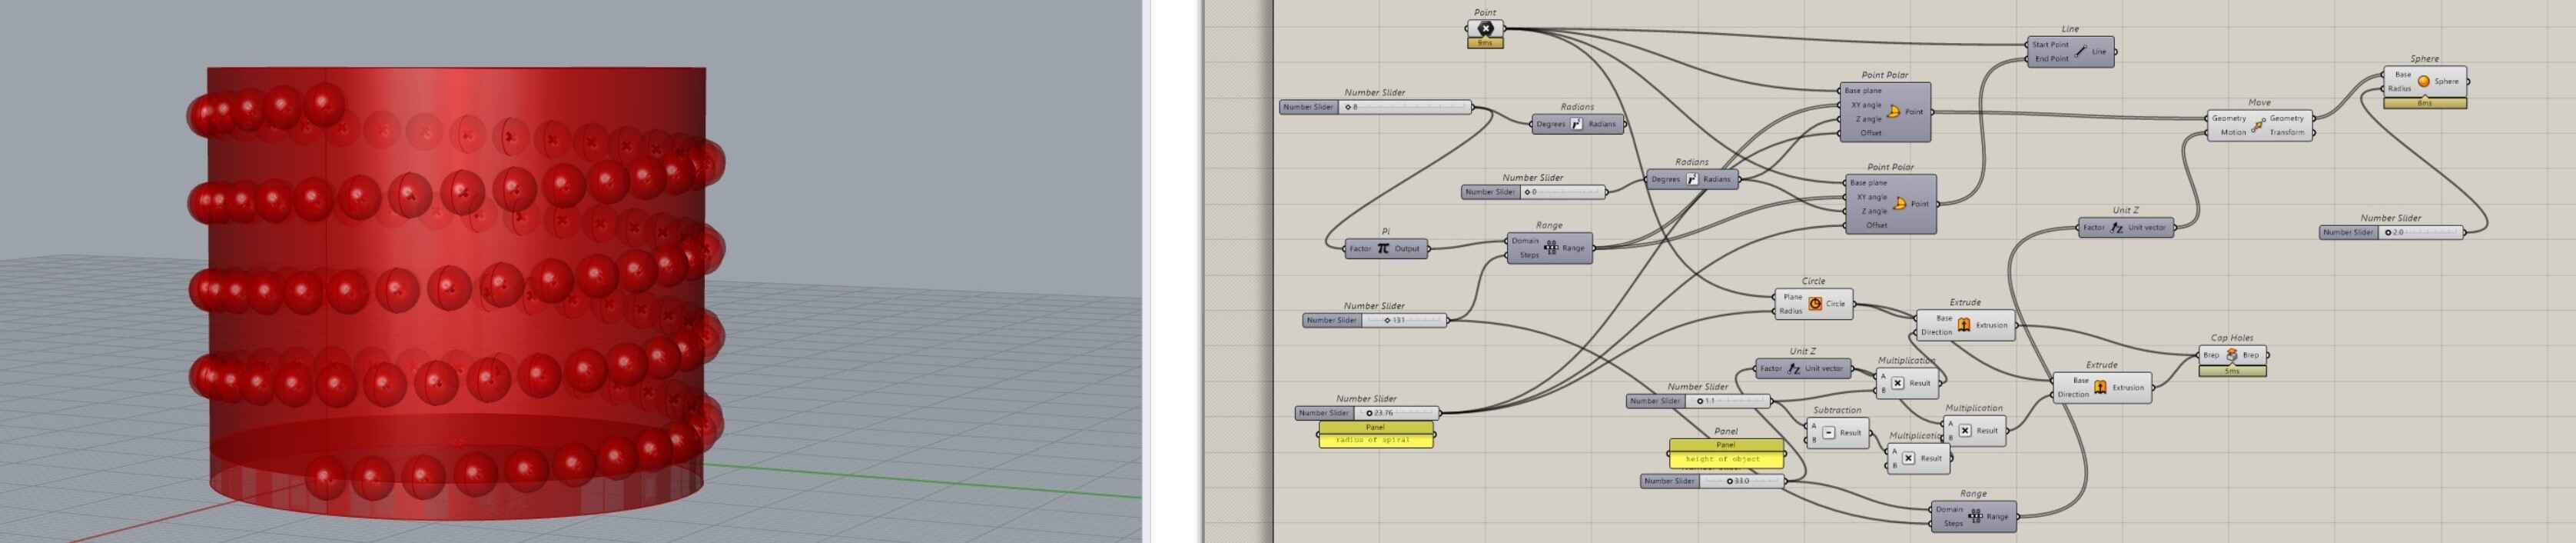
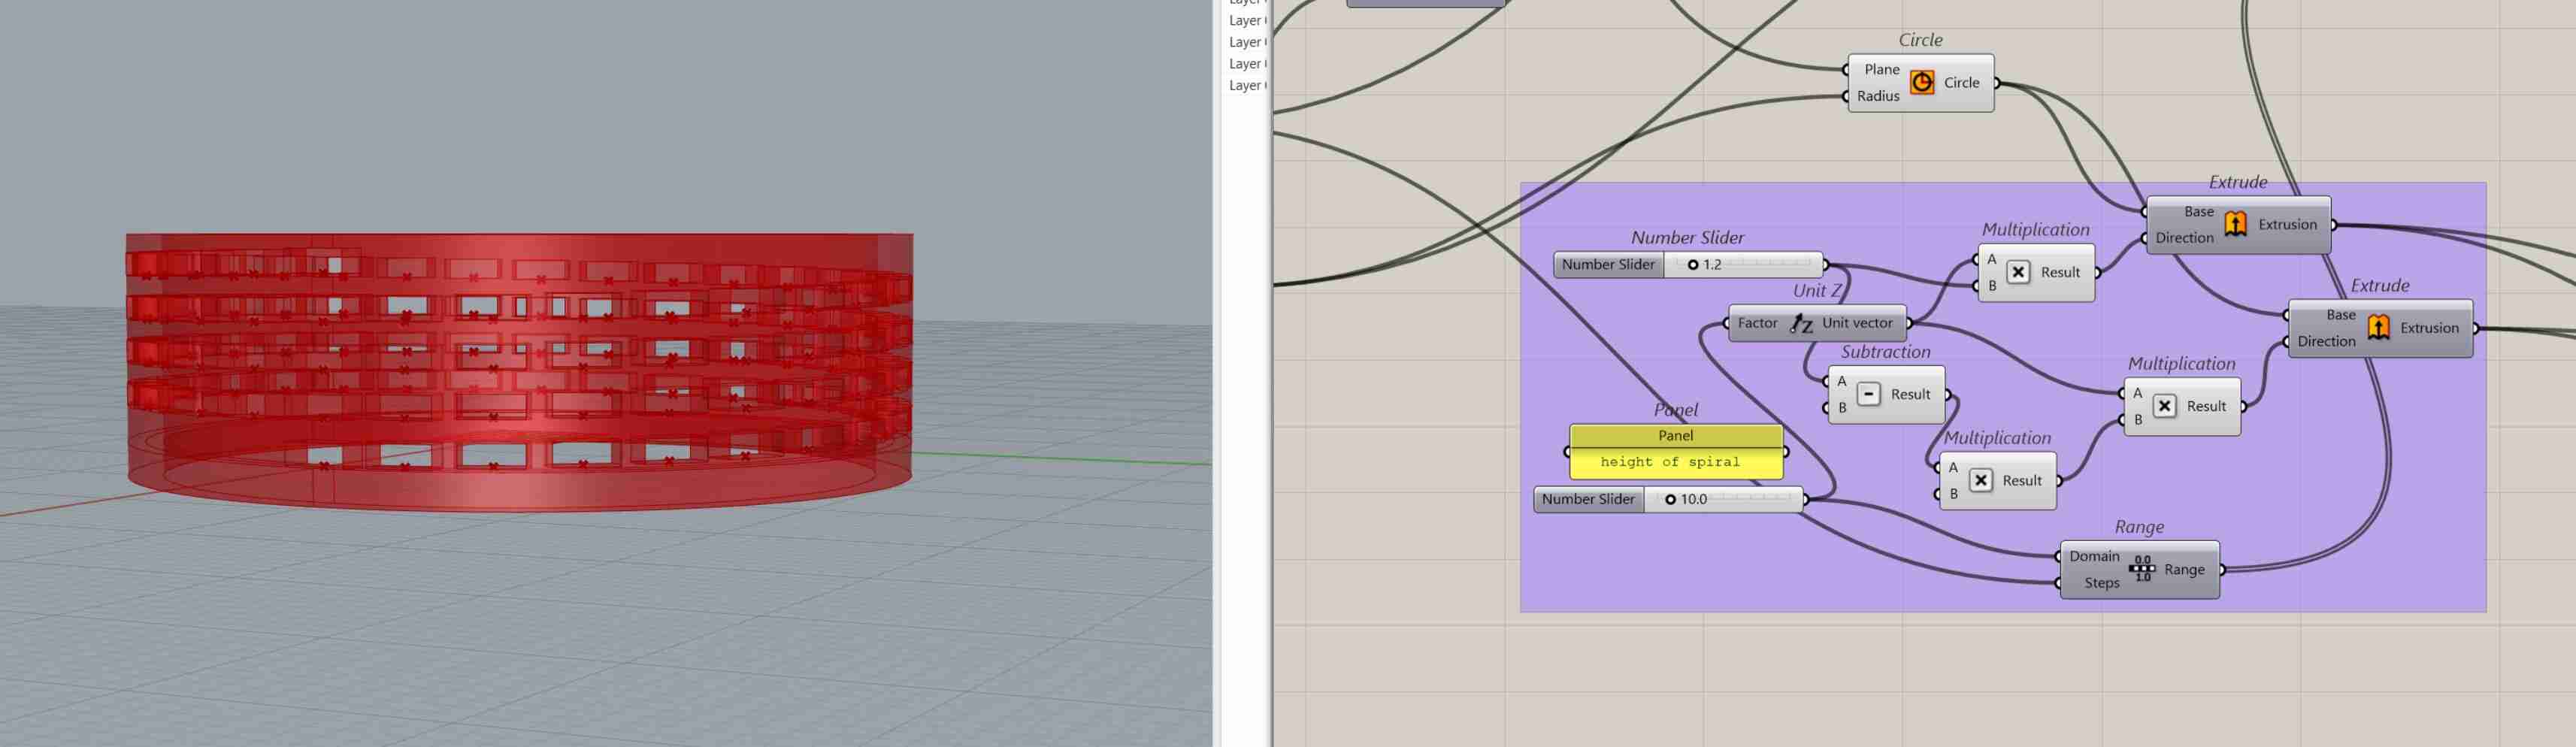
Then I made a range with a number slider and pi as an input for the XY angle of the Point Polar. A range is made by taking the domain and then dividing it by a specified amount of steps. By then moving the Z (not with offset in point polar) with a range determined by the final height of the spiral, you can create a spiral. I drew a sphere on every point of the spiral here. I also extruded a circle to slightly above and slightly below the spiral.
I replaced the spheres with cylinders and tried to cut the cylinders out of the base cylinder with Split Brep. That didn’t do what I hoped.
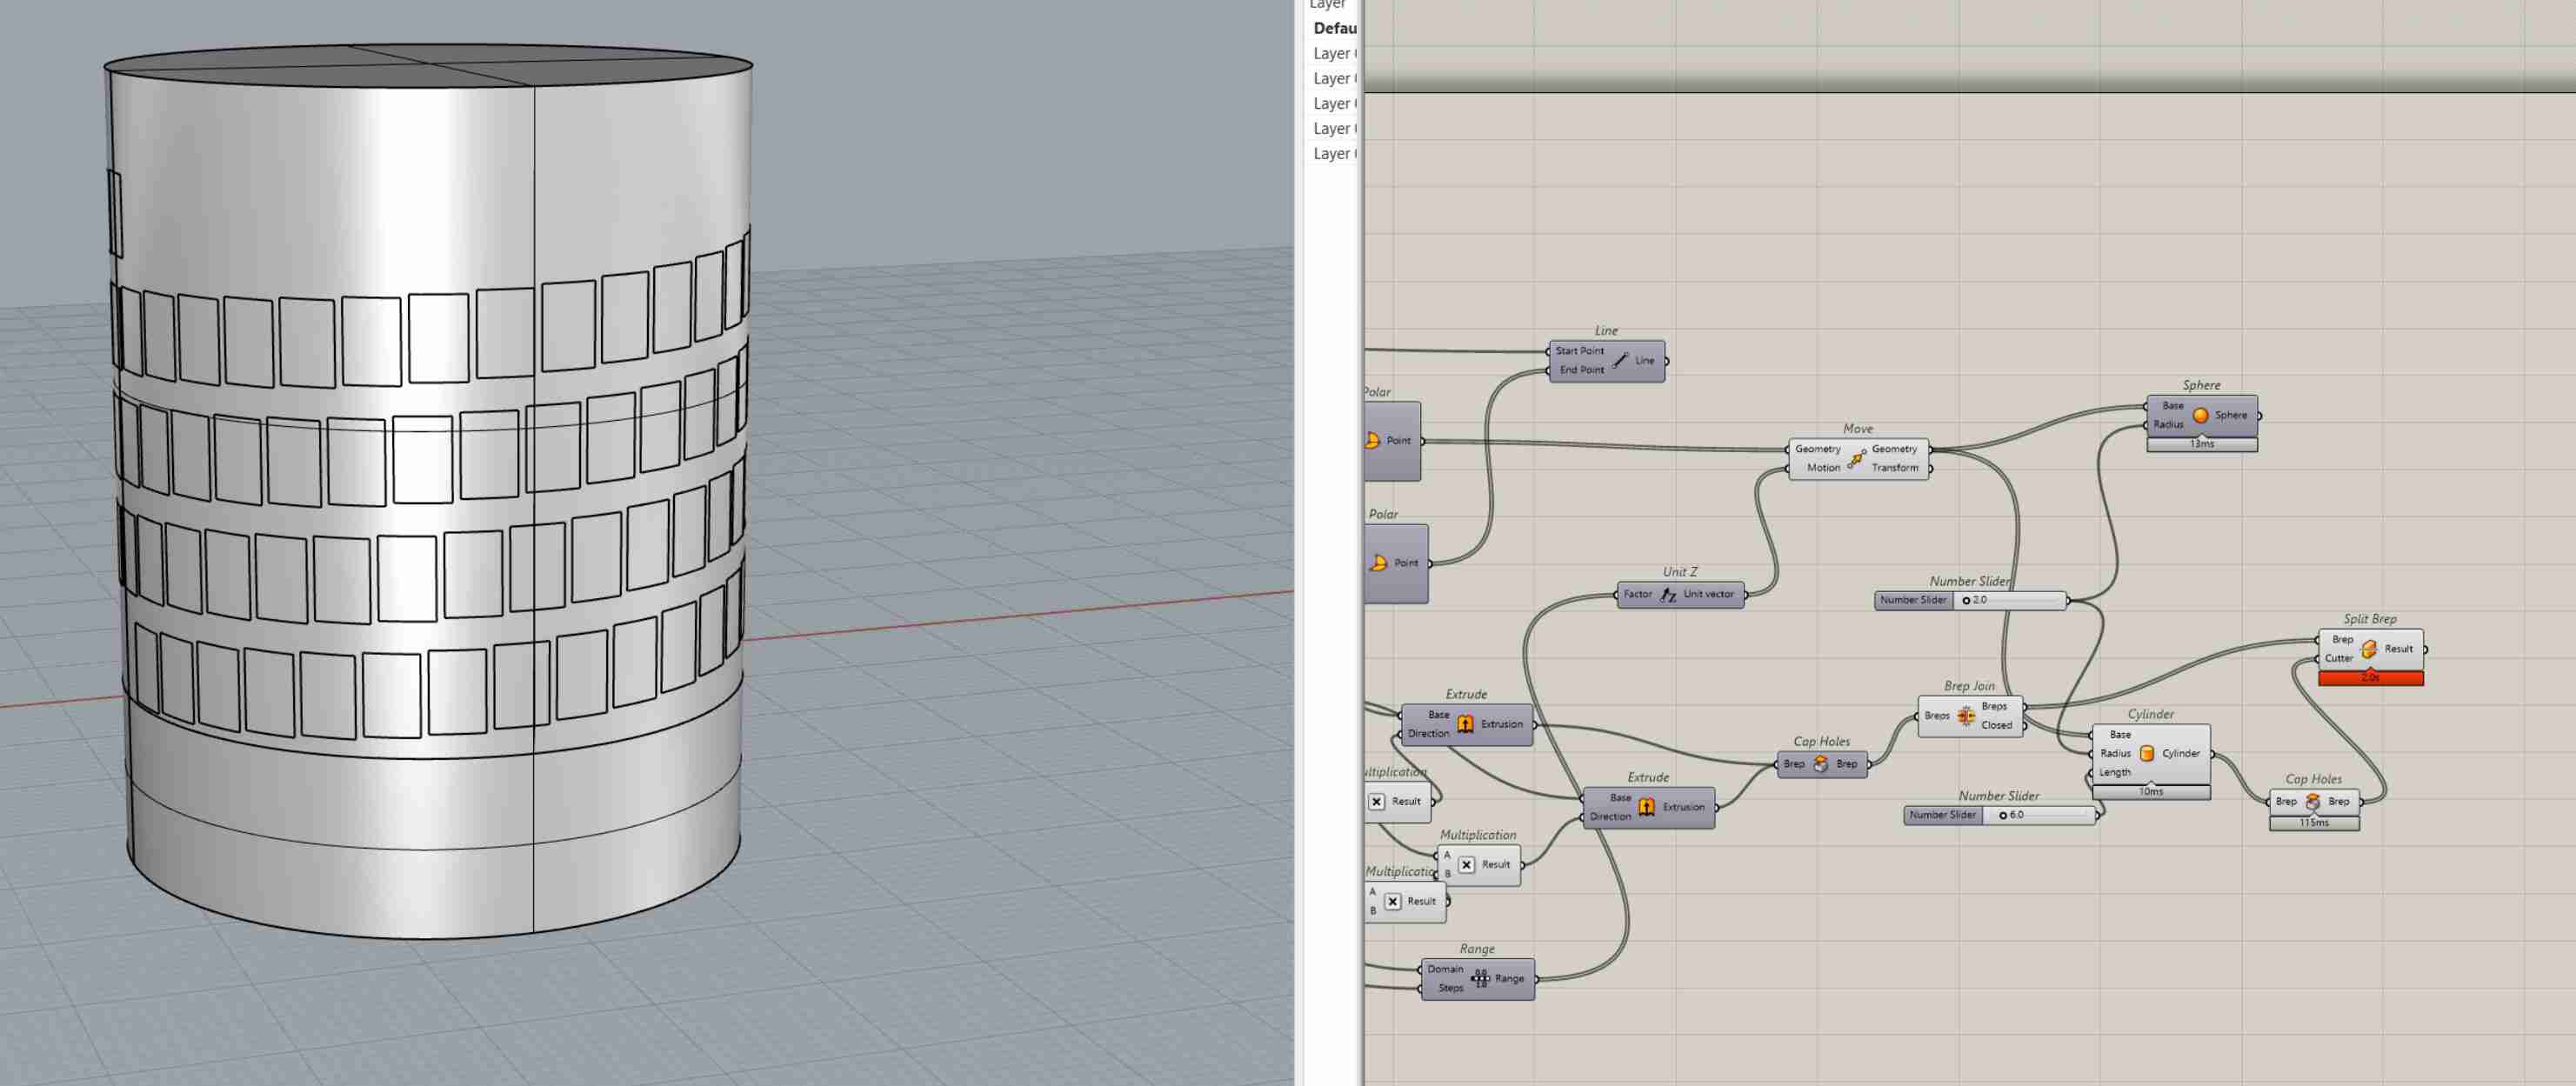
After some trial and error, I figured it out; it had to be Solid Difference.
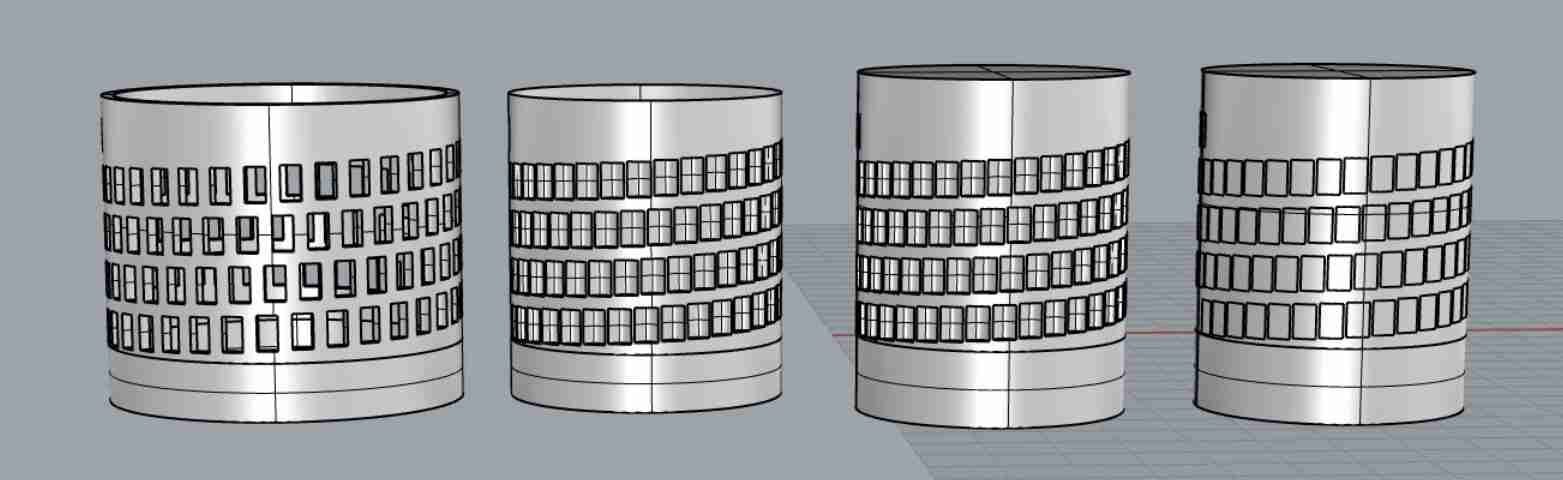
Here I fixed the height of the extrusion so it would be exactly one cylinder height above and below the spiral.
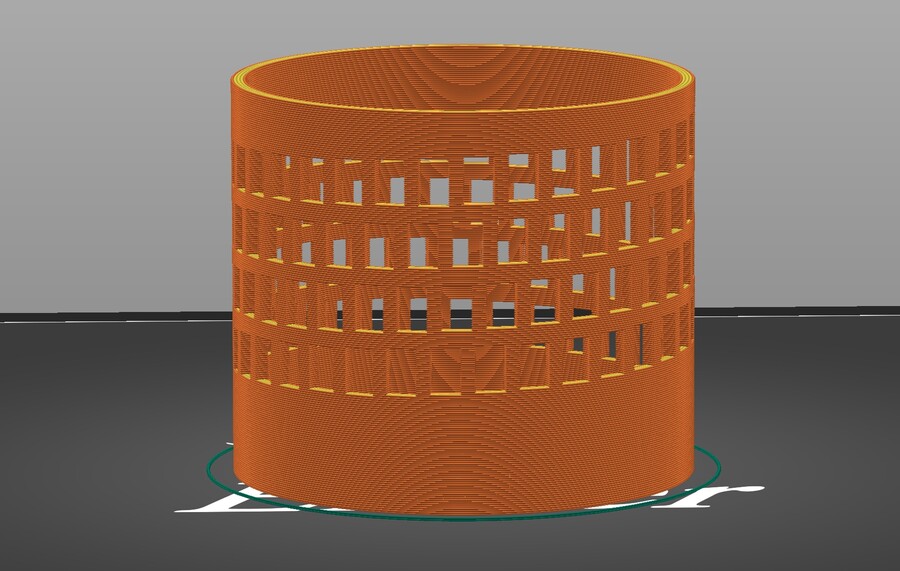
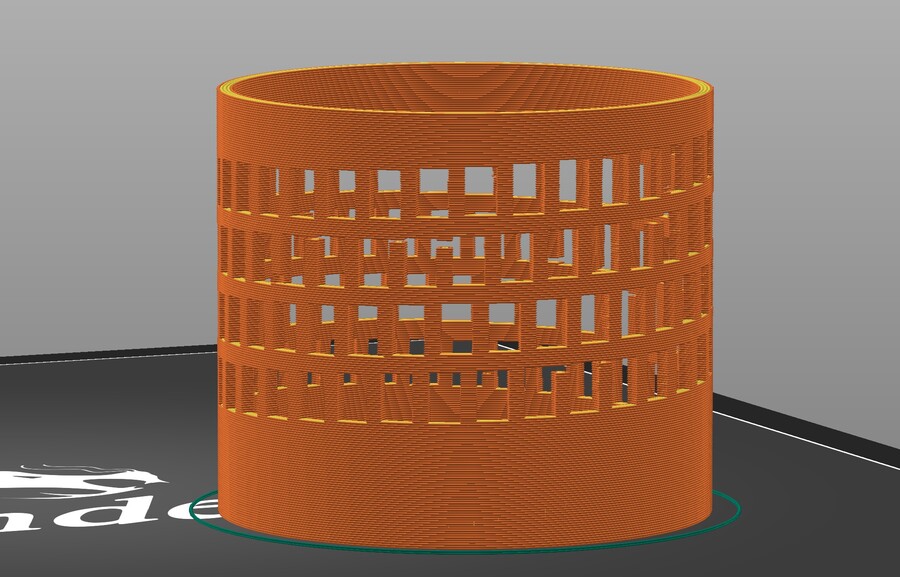
I learned that STL (on the left) works better than OBJ (on the right) when exporting from Rhino. You can see parts where the print is missing some pieces in the sliced OBJ.
I sliced the model, but I didn’t print it in the end because I thought it was pretty boring.
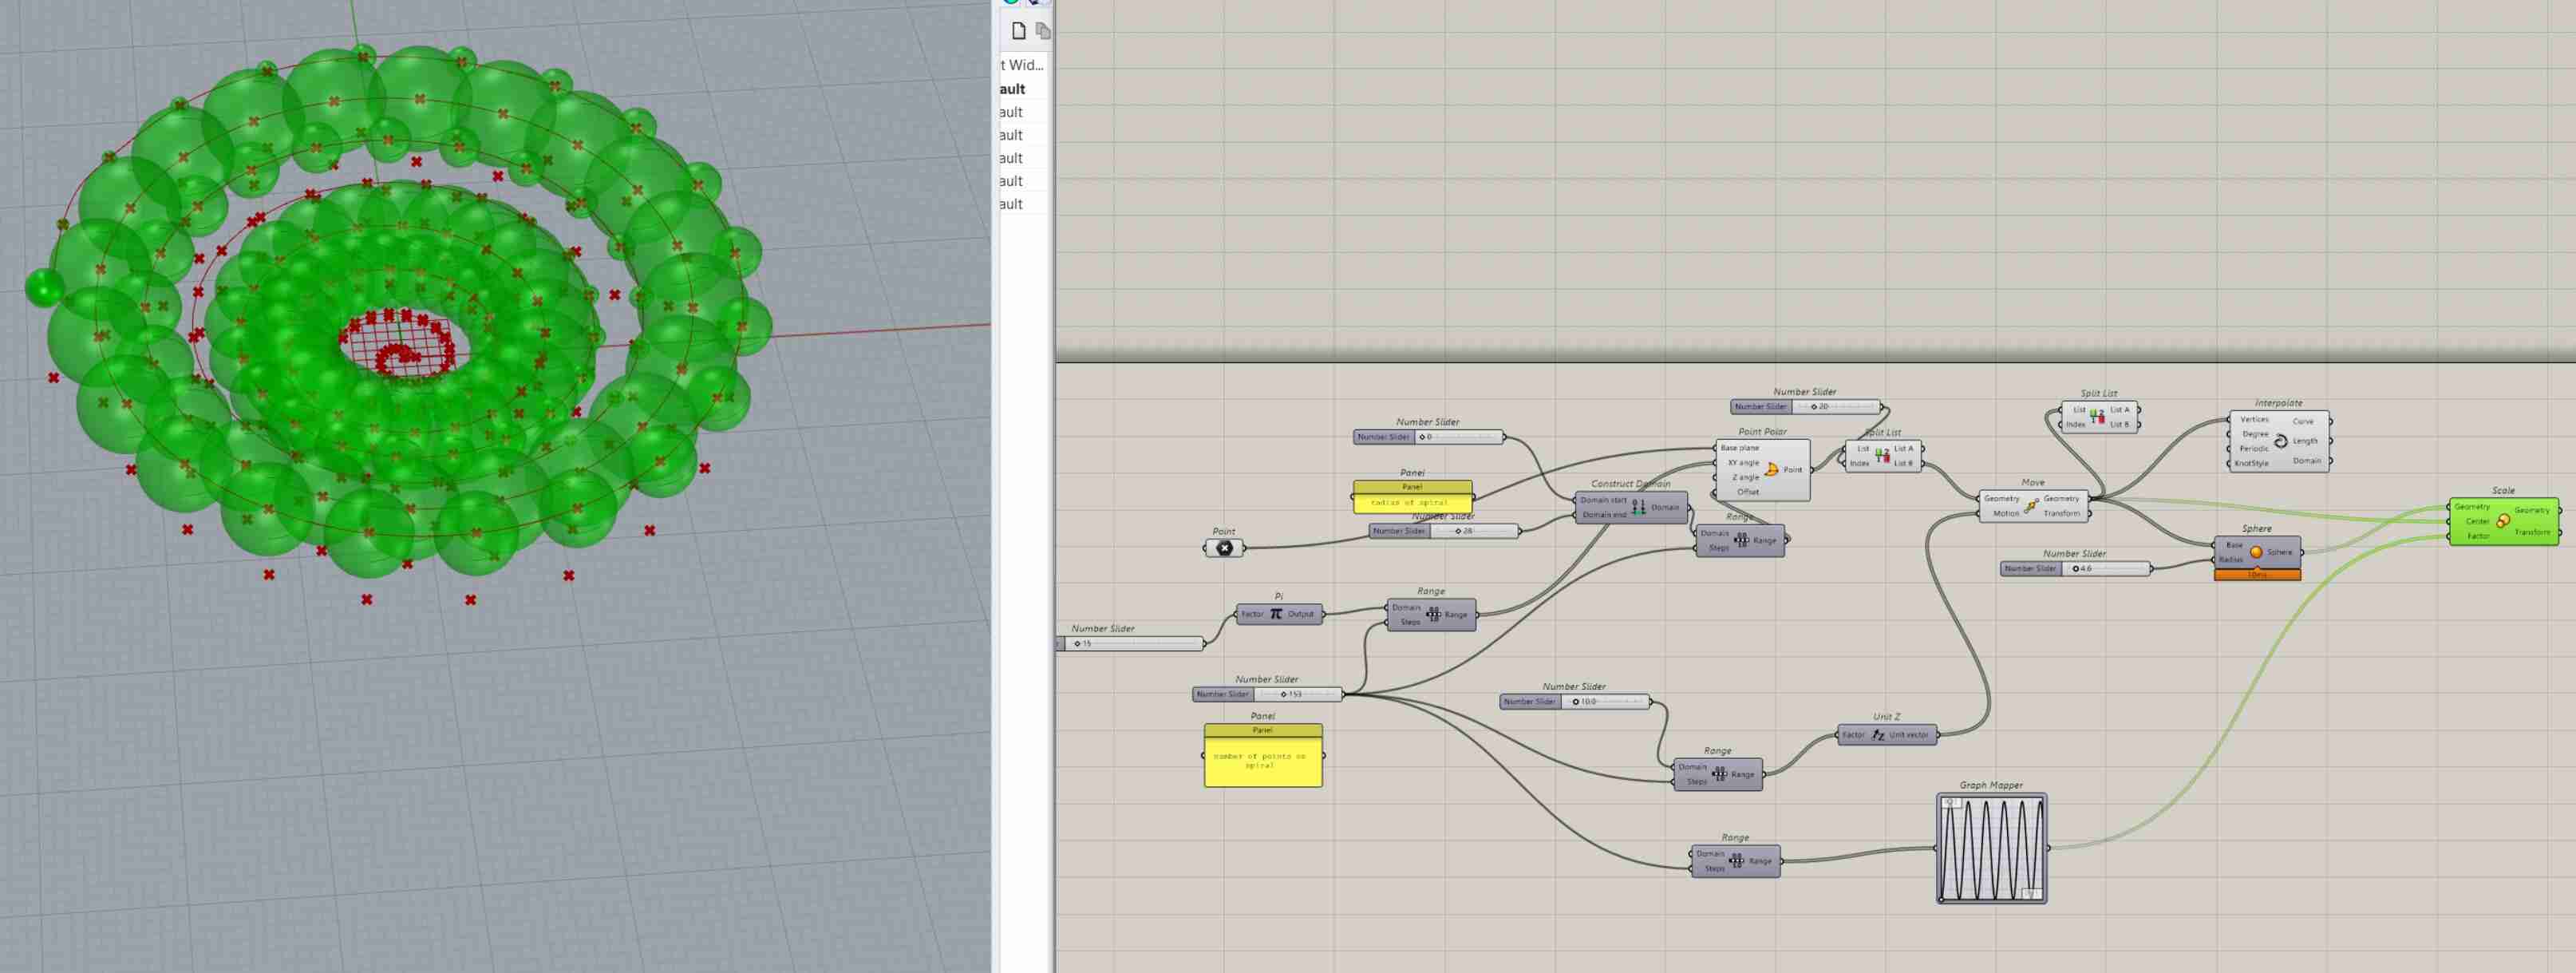
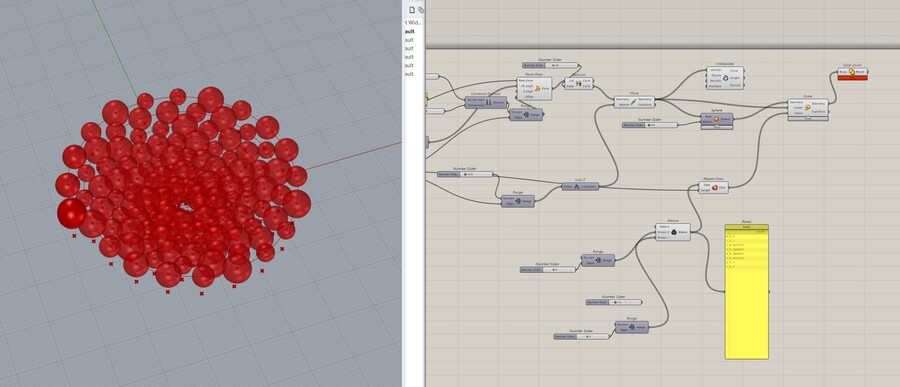
Spiraling spheres
I also explored spirals made from points moved along an offset of Point Polar. I then interpolated the points and used sweep with a circle on the line. I wanted to scale the circle in a sine-like motion, but I couldn’t get the plane of the circle to align to the center of the spiral, so at some point I gave up on that.
Then I played around with scaling spheres instead; my computer was not a fan. It took a while before I figured out how to use the Graph Mapper, but I think it’s pretty fun.
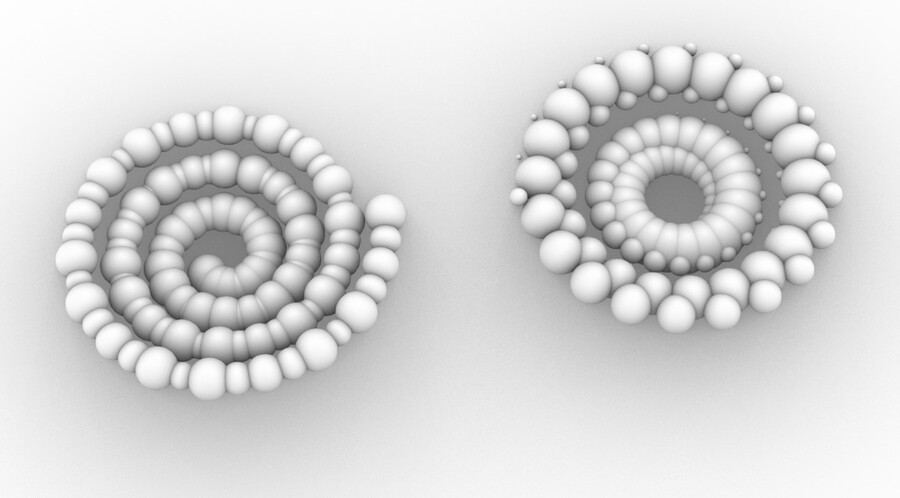
The one on the right is two parts with one part floating so not great for 3D printing. The one on the right is one part but it would need a lot of support.
Here I tried organic support (new feature in PrusaSlicer 2.6 alpha 4) on the spiral shape. It was supposed to be way less support, but it didn’t work out in my case.
I tried to slice the flat version of the spiral, but it still took 2 hours.
Voronoi vase
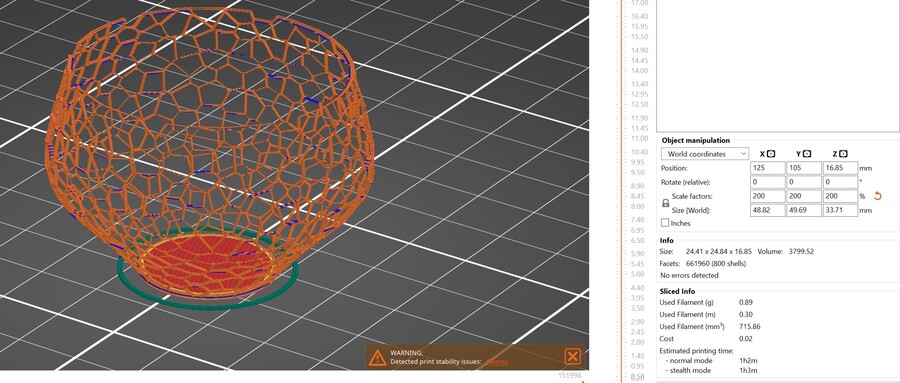
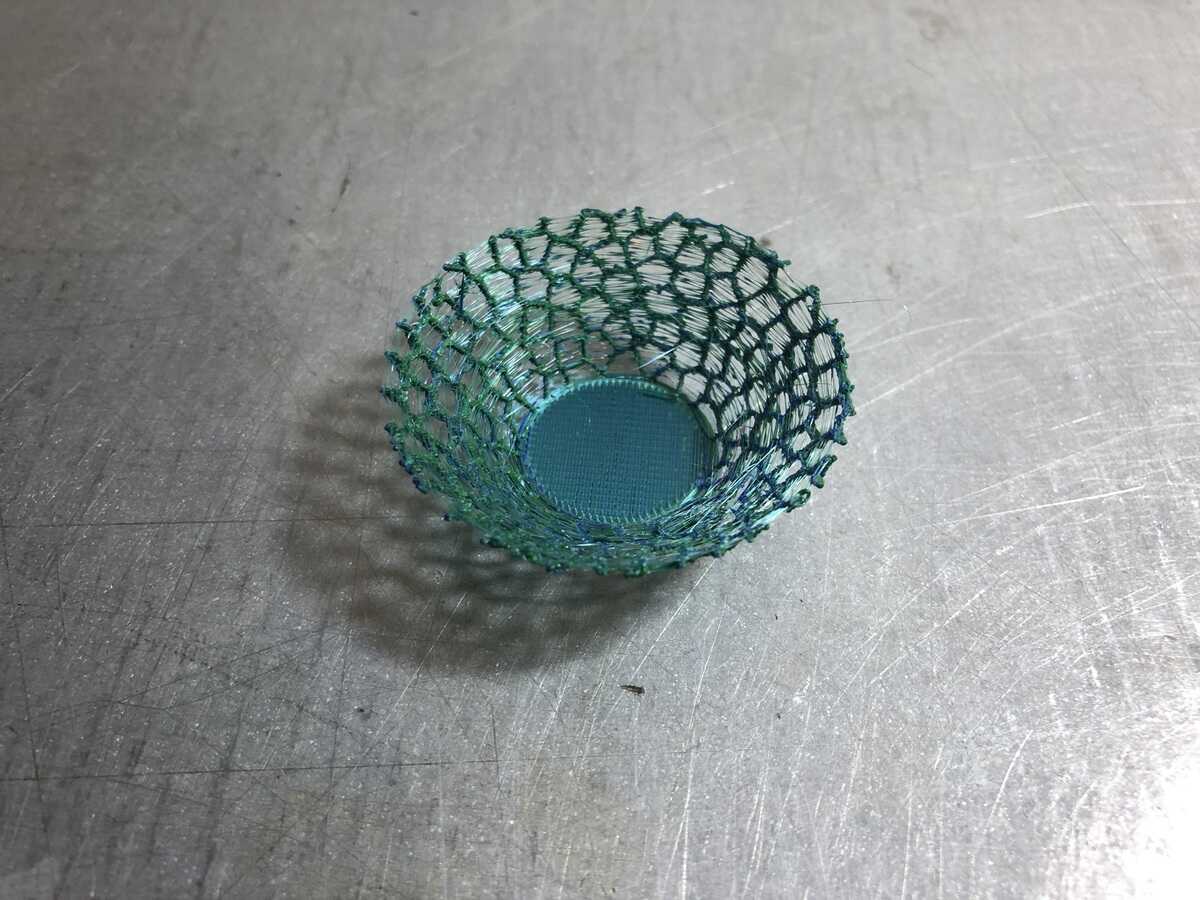
At this point I dropped the idea of the spiral, because it made no sense. I was making these spiral based shapes, but then I realized that if I wanted to do random weaving, a voronoi pattern like I’ve done in week 2 may be way more suitable. So I applied the voronoi structure from that week to a vase shape drawn in Rhino.
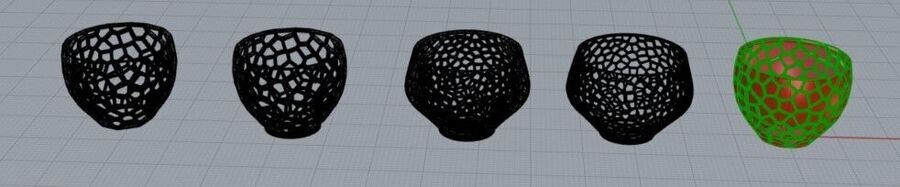
I first printed it really small; it has a lot of stringing and it’s not too stable, but it looks cute. The stringing looks like a very thin woven structure. This print was stopped halfway through because I wanted to print it larger, but I had some issues with my file exported from Rhino. Rhino works with surfaces, and even when you create a solid, it’s not actually solid, so the slicing didn’t do too well. I still printed it though.
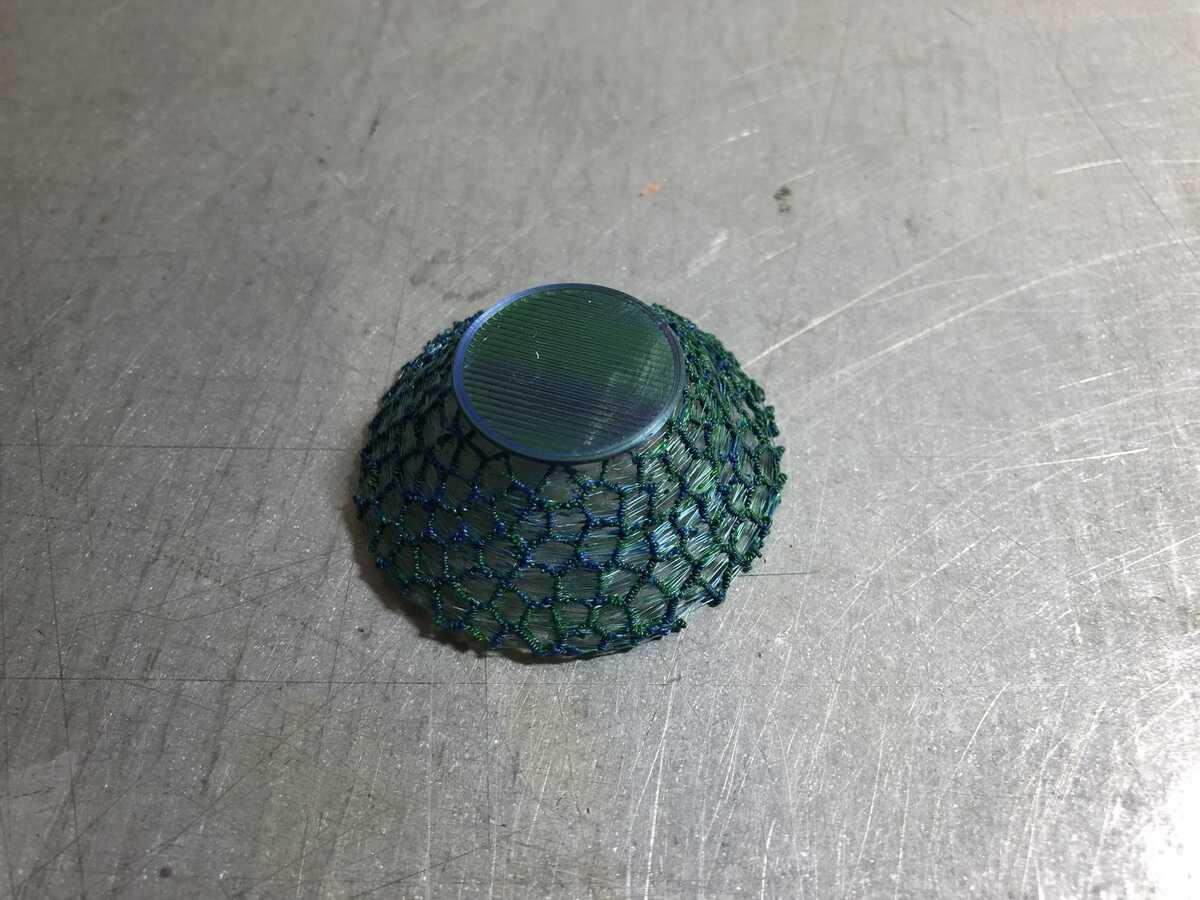
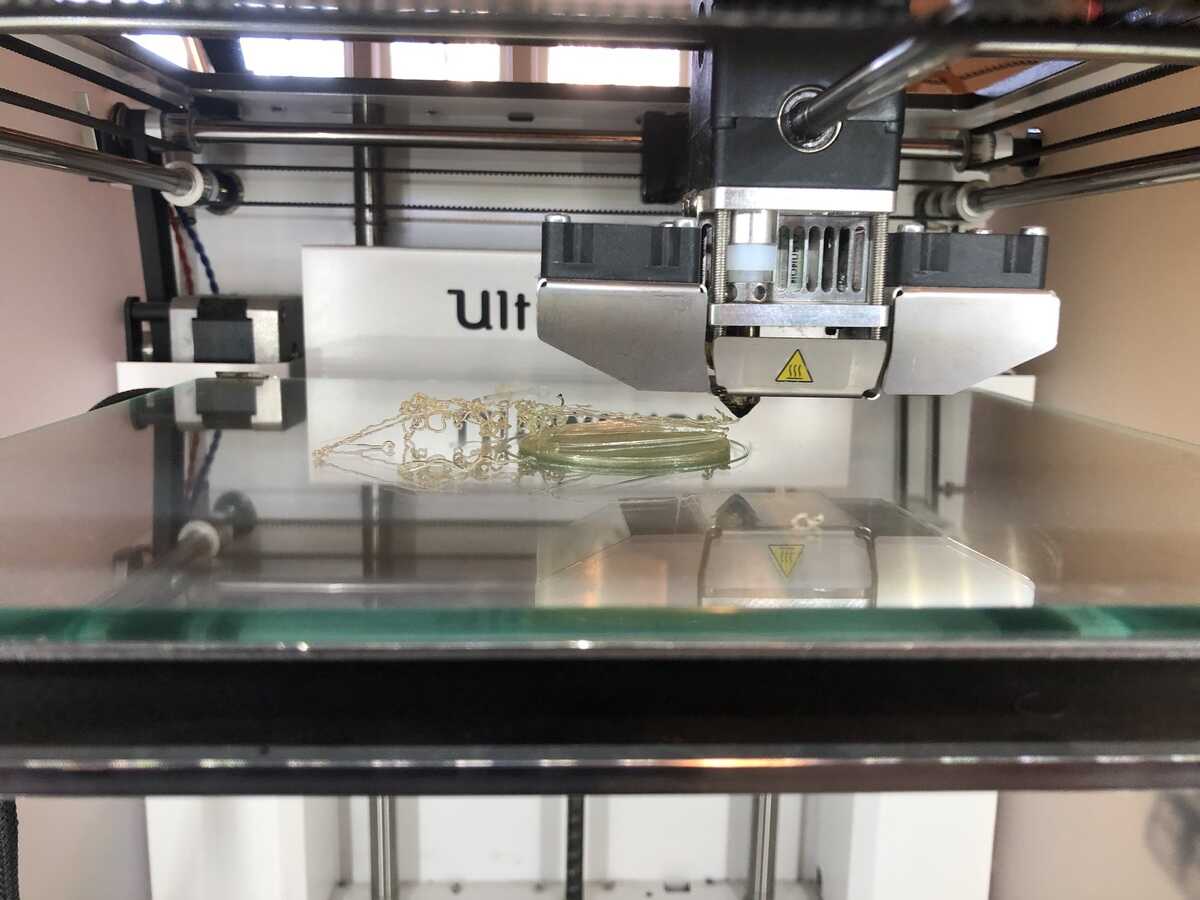
I didn’t print it larger than this because I ran out of time; I tried to print it with the Ultimaker using Aquasolve, but the prints kept failing.
I also made this shape when playing around with the spirals earlier. I call it a bubble bowl. I really like it, but I forgot about it when I was printing everything, so maybe I’ll print it another time.
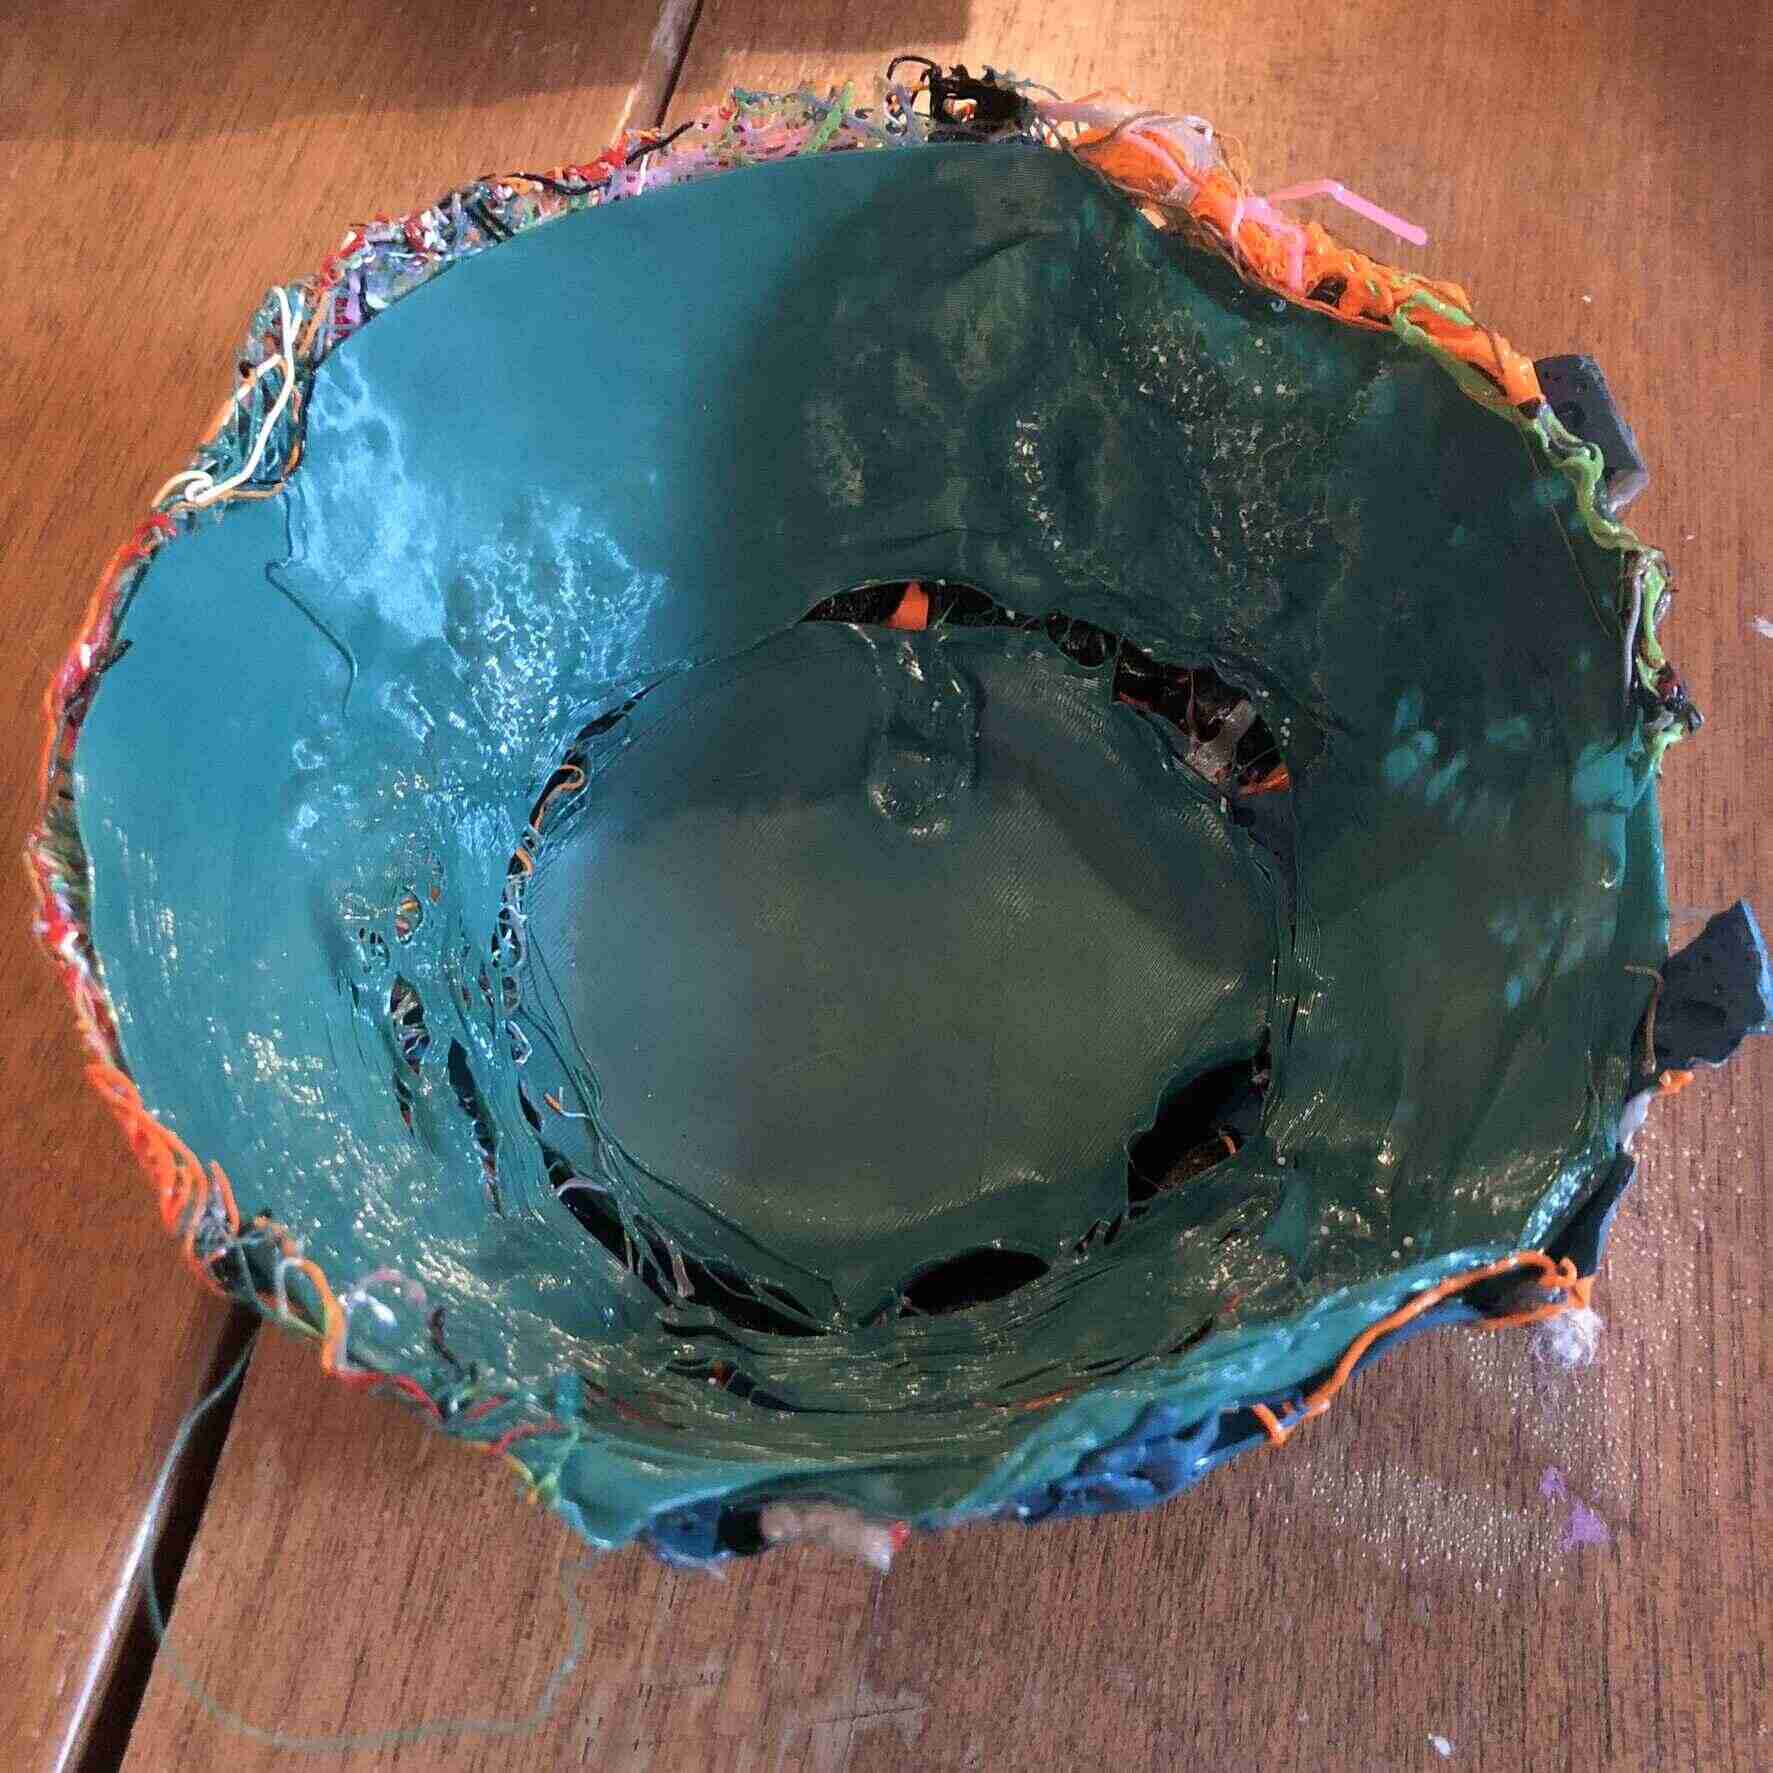
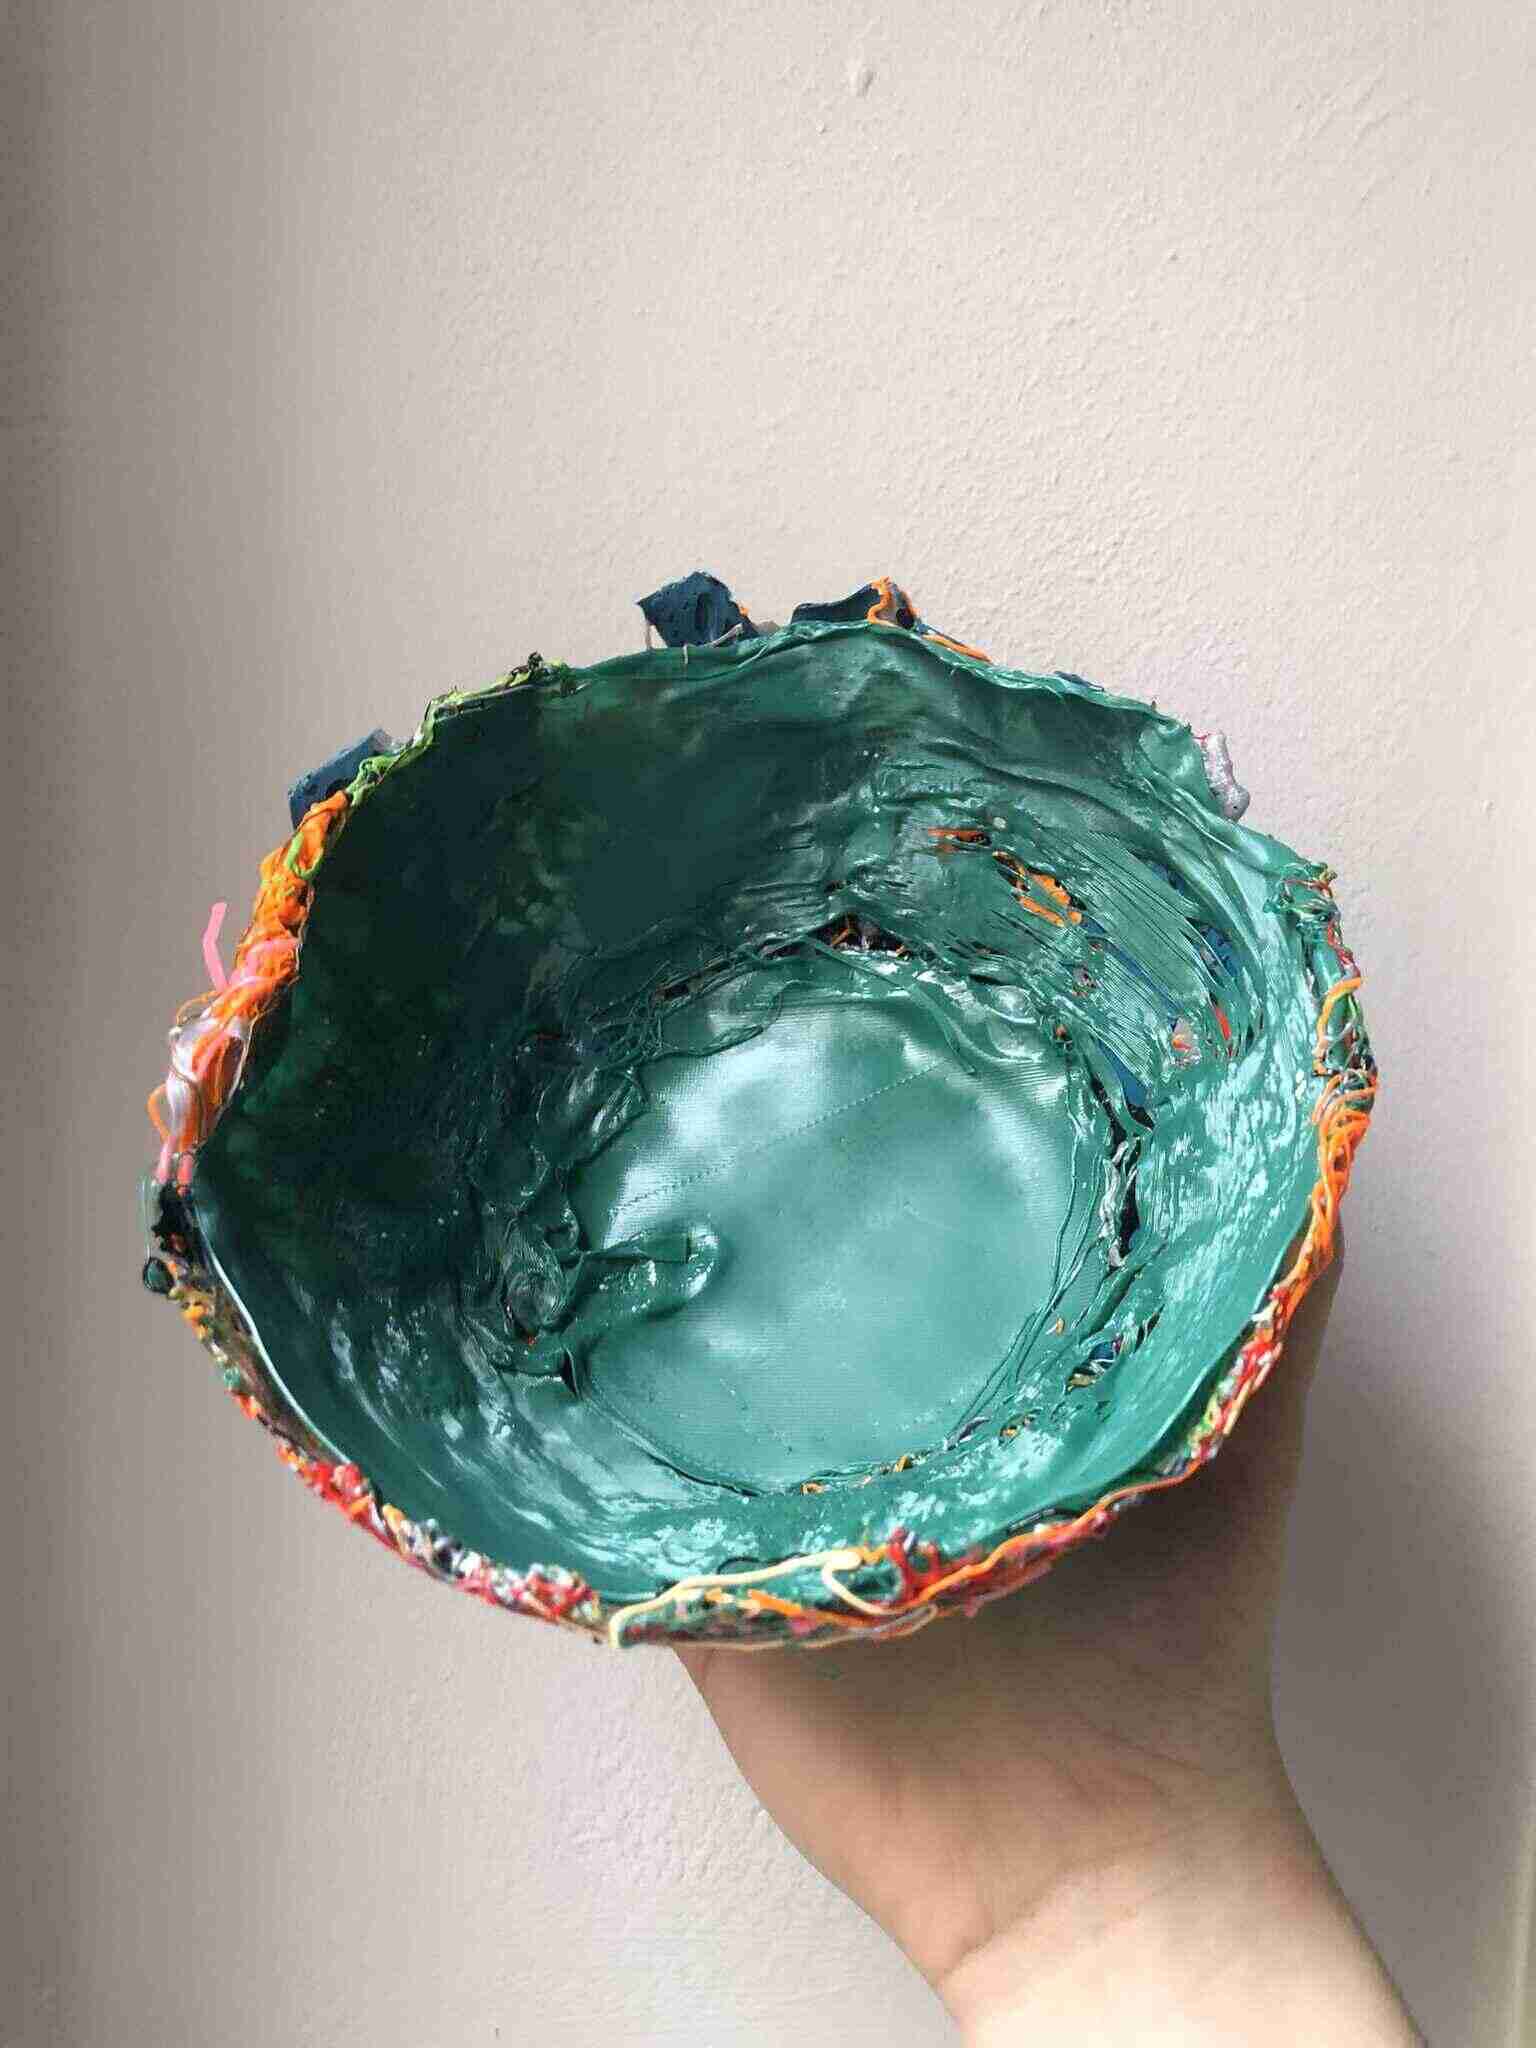
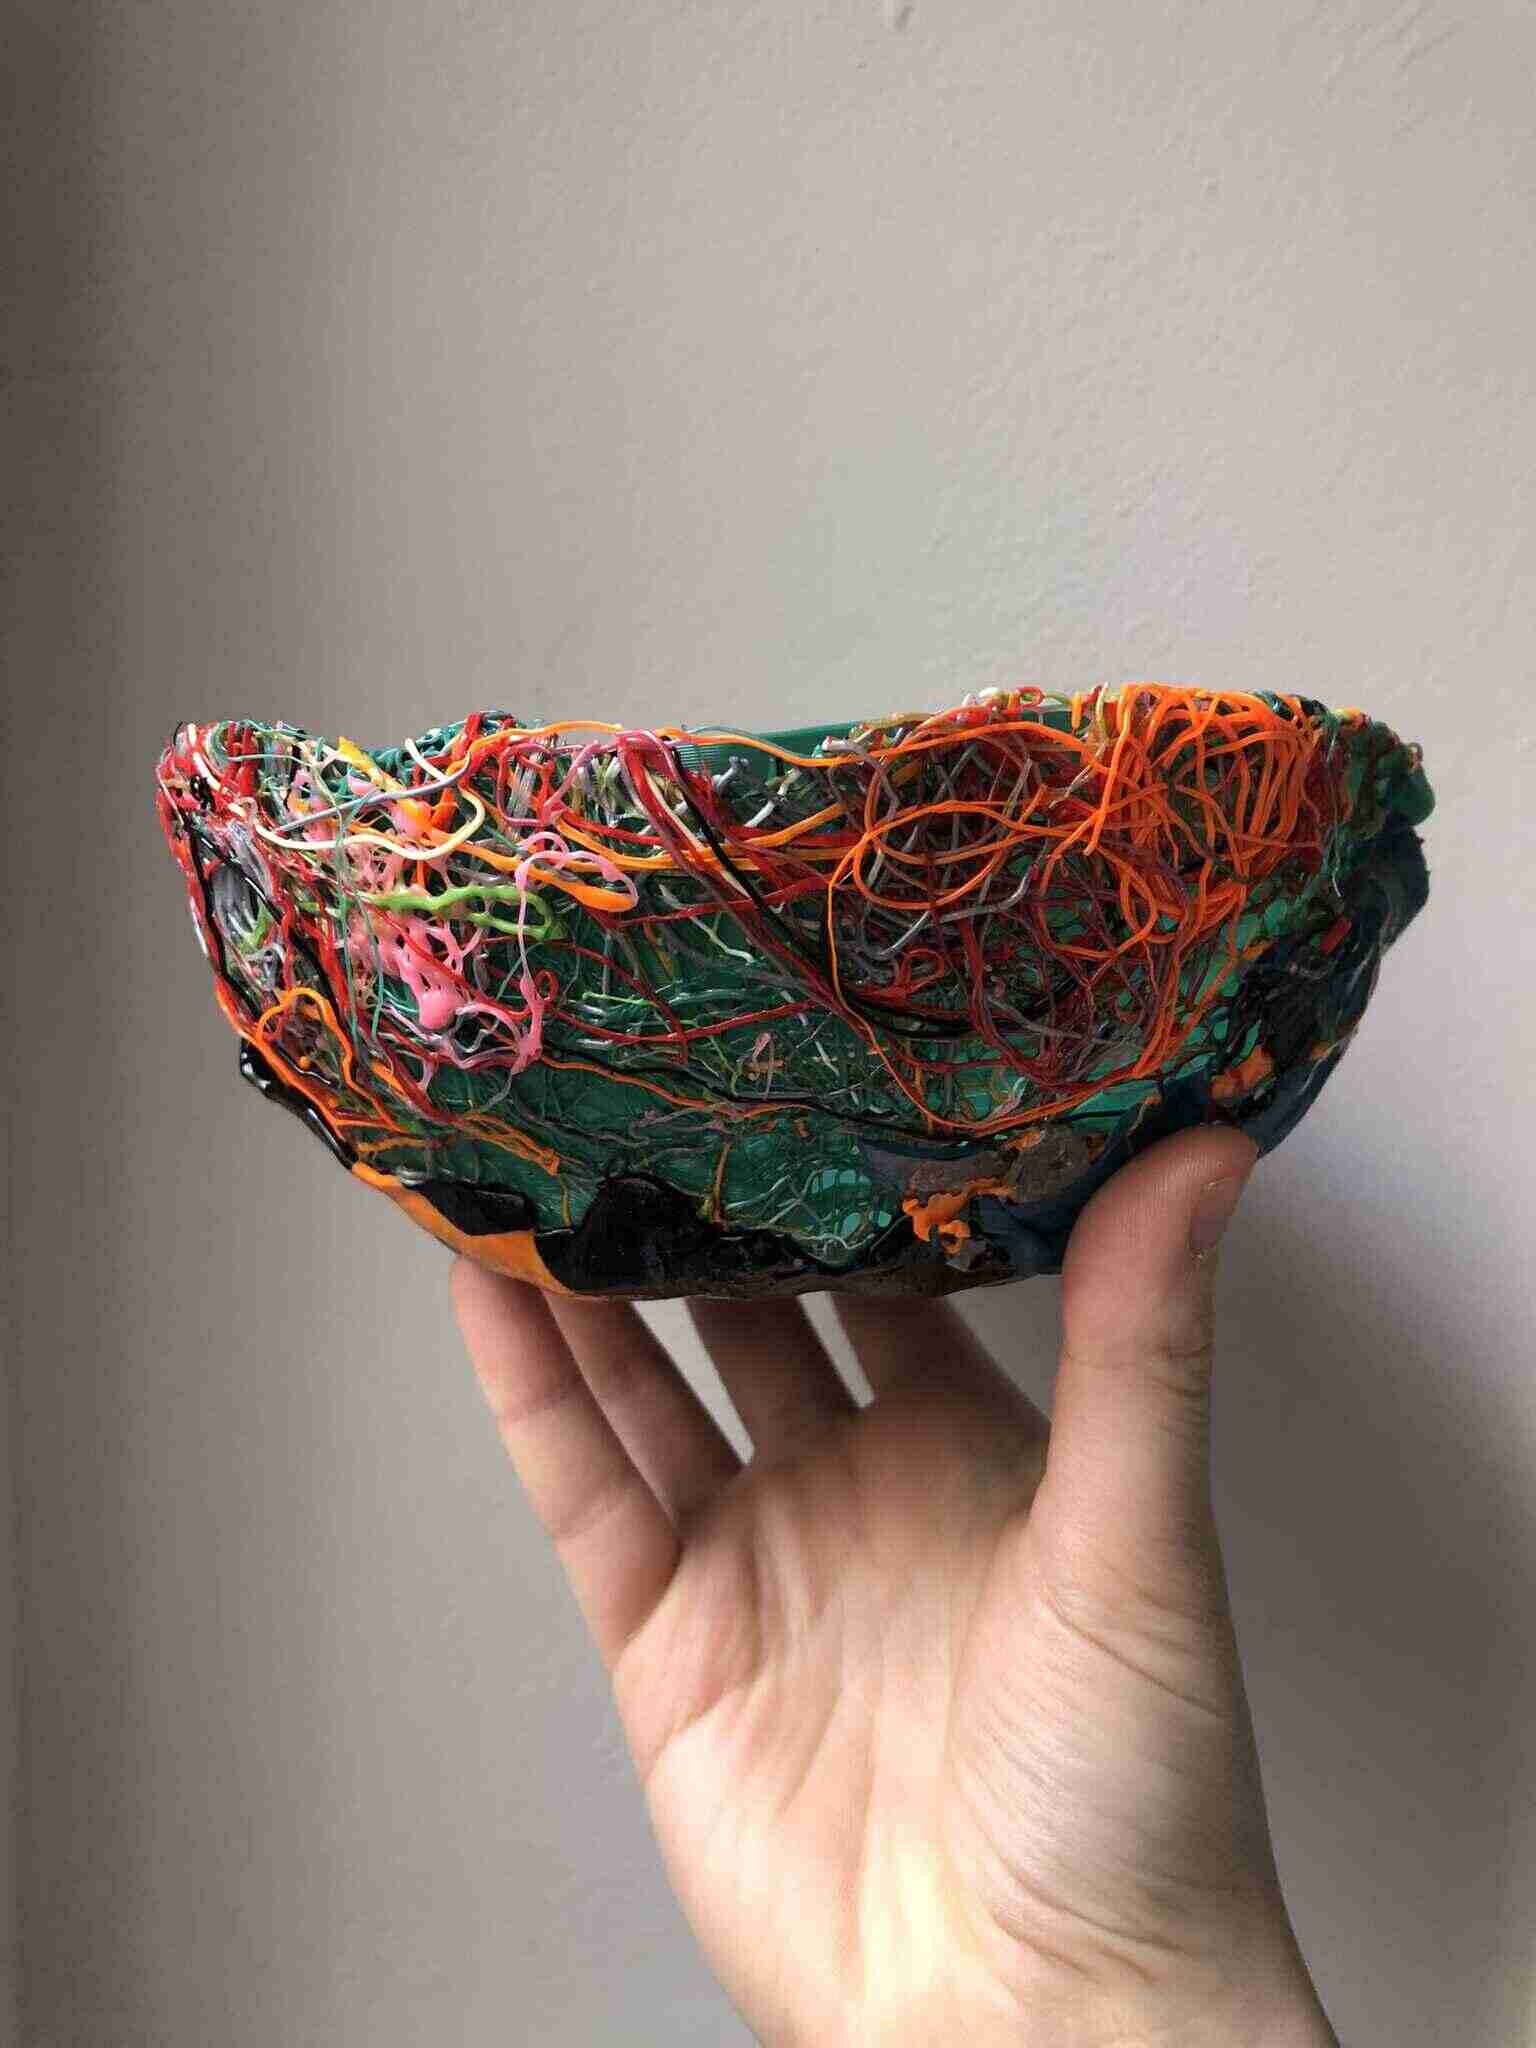
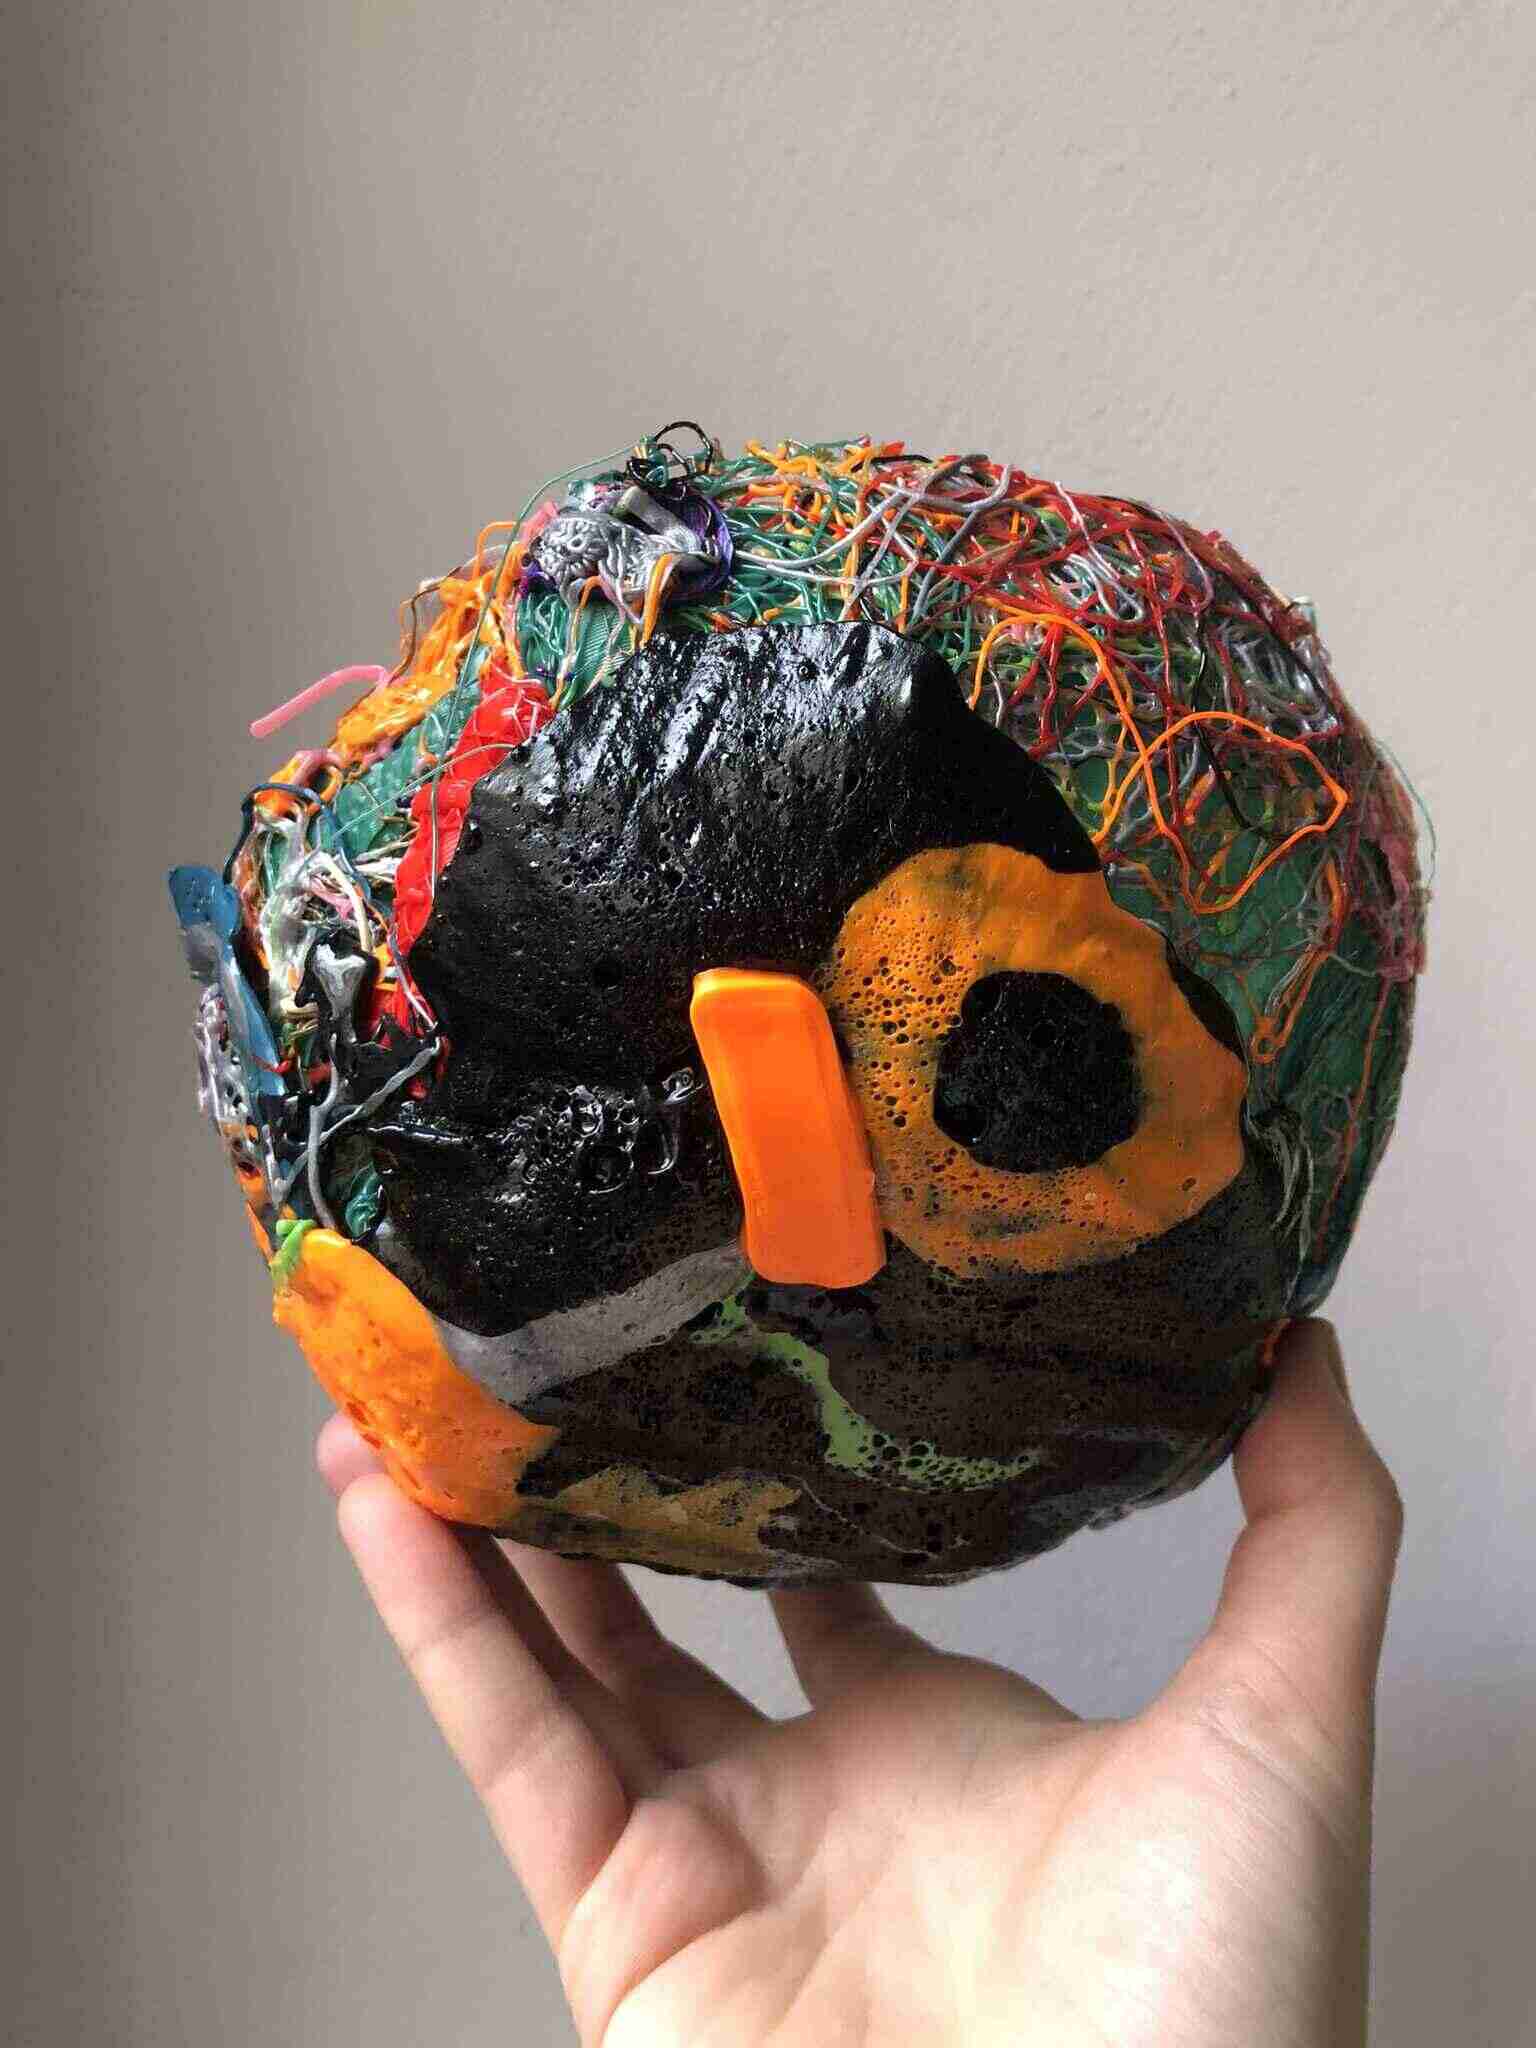
Recycling PLA
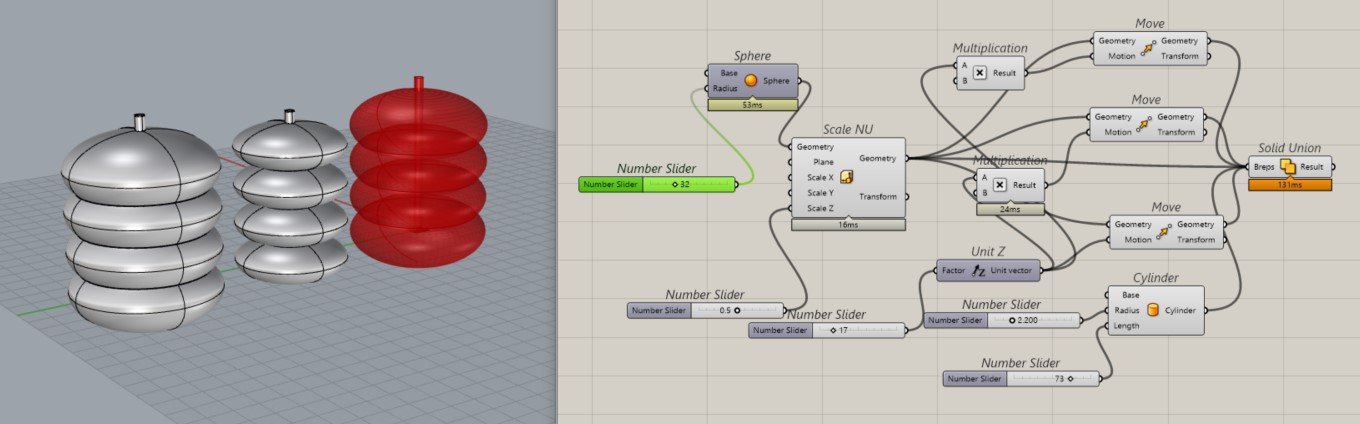
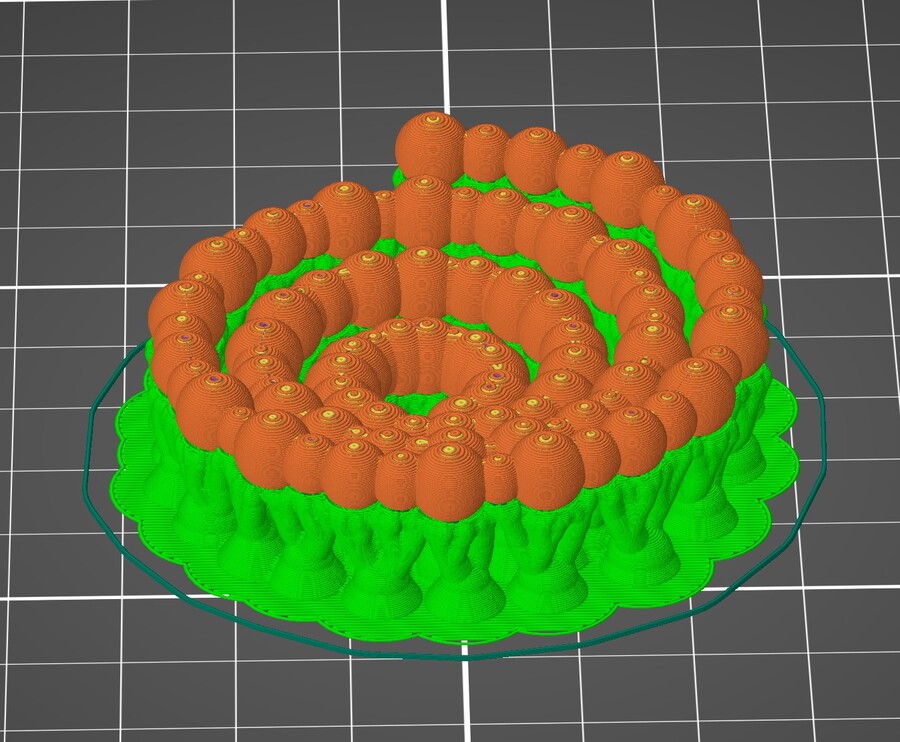
I think it would be fun to find other means for the shredded PLA I have so far because my plan to build a filament extruder is on hold for a while. When PLA is heated, it becomes malleable, so you can fuse shredded parts together and bring them into a shape. I was thinking of making bowls with a smooth spiral vase printed inside, then heat up the vase and the shredded parts and stick the shreds onto the base vase as a sort of texture glaze. If you just use the 3D printed waste, the inside of the bowl is very irregular and the whole structure is kind of weak.
Printing with the UM2+
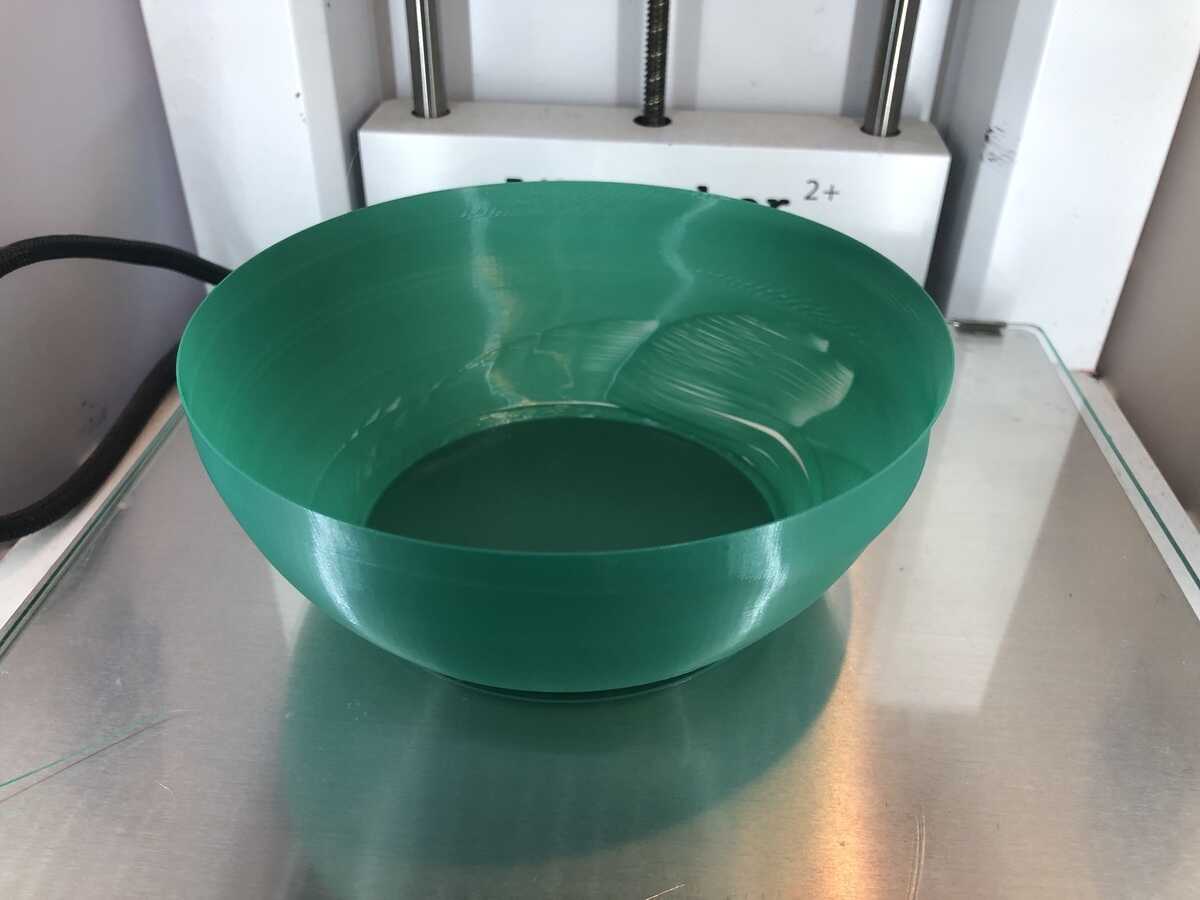
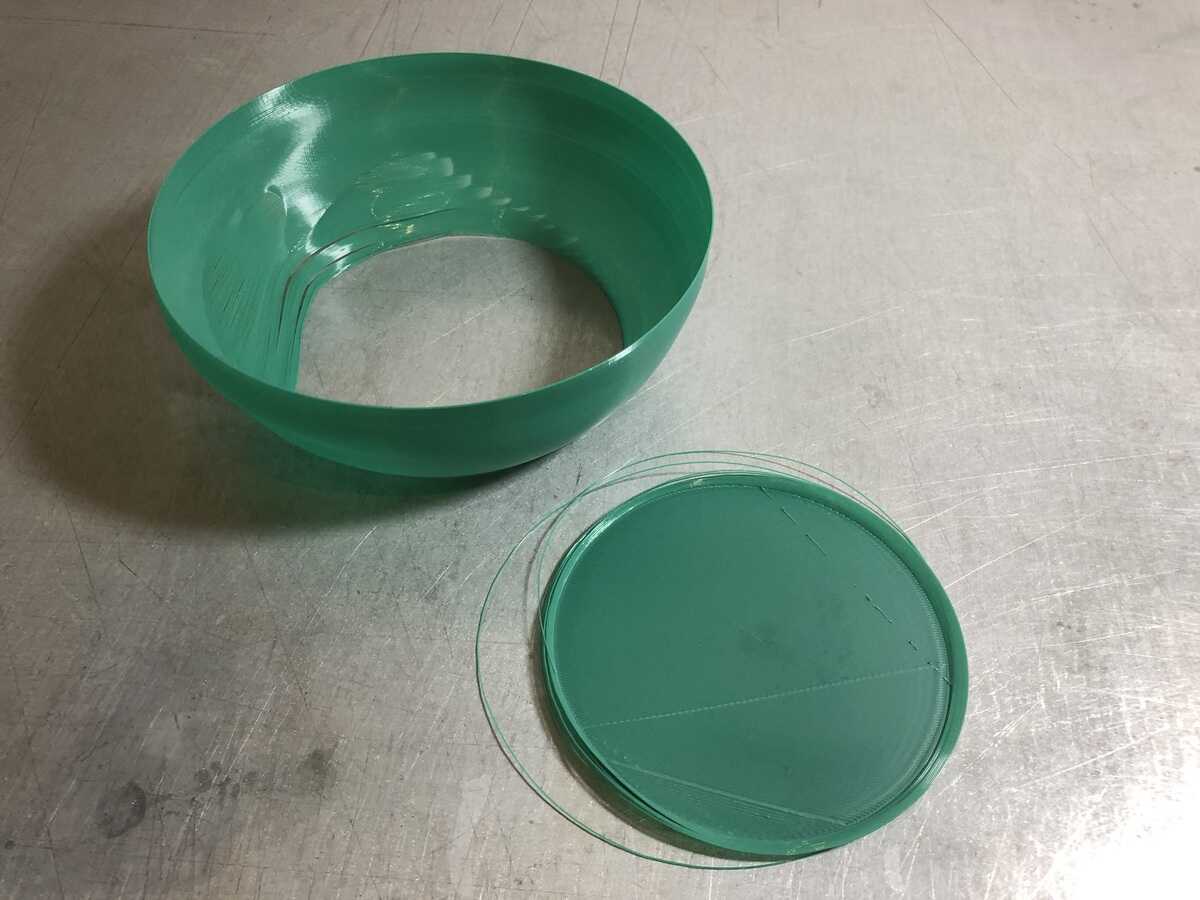
I had a bowl with a diameter of 15cm so I wanted to print a spiral vase bowl that would fit around it, so I could push against the printed bowl; printed as a spiral vase it would be very weak. I drew a quick bowl with a base in Rhino but it’s corners were too steep (a common theme now). I tried printing it on the Ultimaker really slowly and with overextrusion but it didn’t help. I also tried removing the base by moving the model down in Cura, until the preview showed no problem areas anymore.
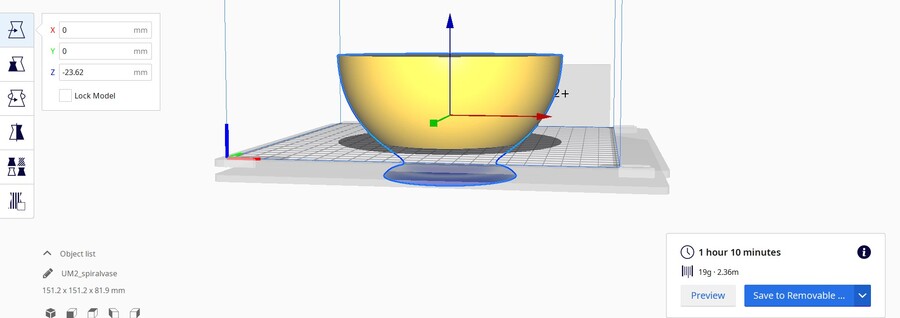
That didn’t help much either, but I still let the print finish because even a messy bowl can function as a base for the PLA scraps.
Here is the heat gun to bowl transformation visualized. It definitely didn’t turn out cute at all. The styrofoam base didn’t keep it’s shape, which I kind of knew would happen because last time I used a foam base I also deformed it.
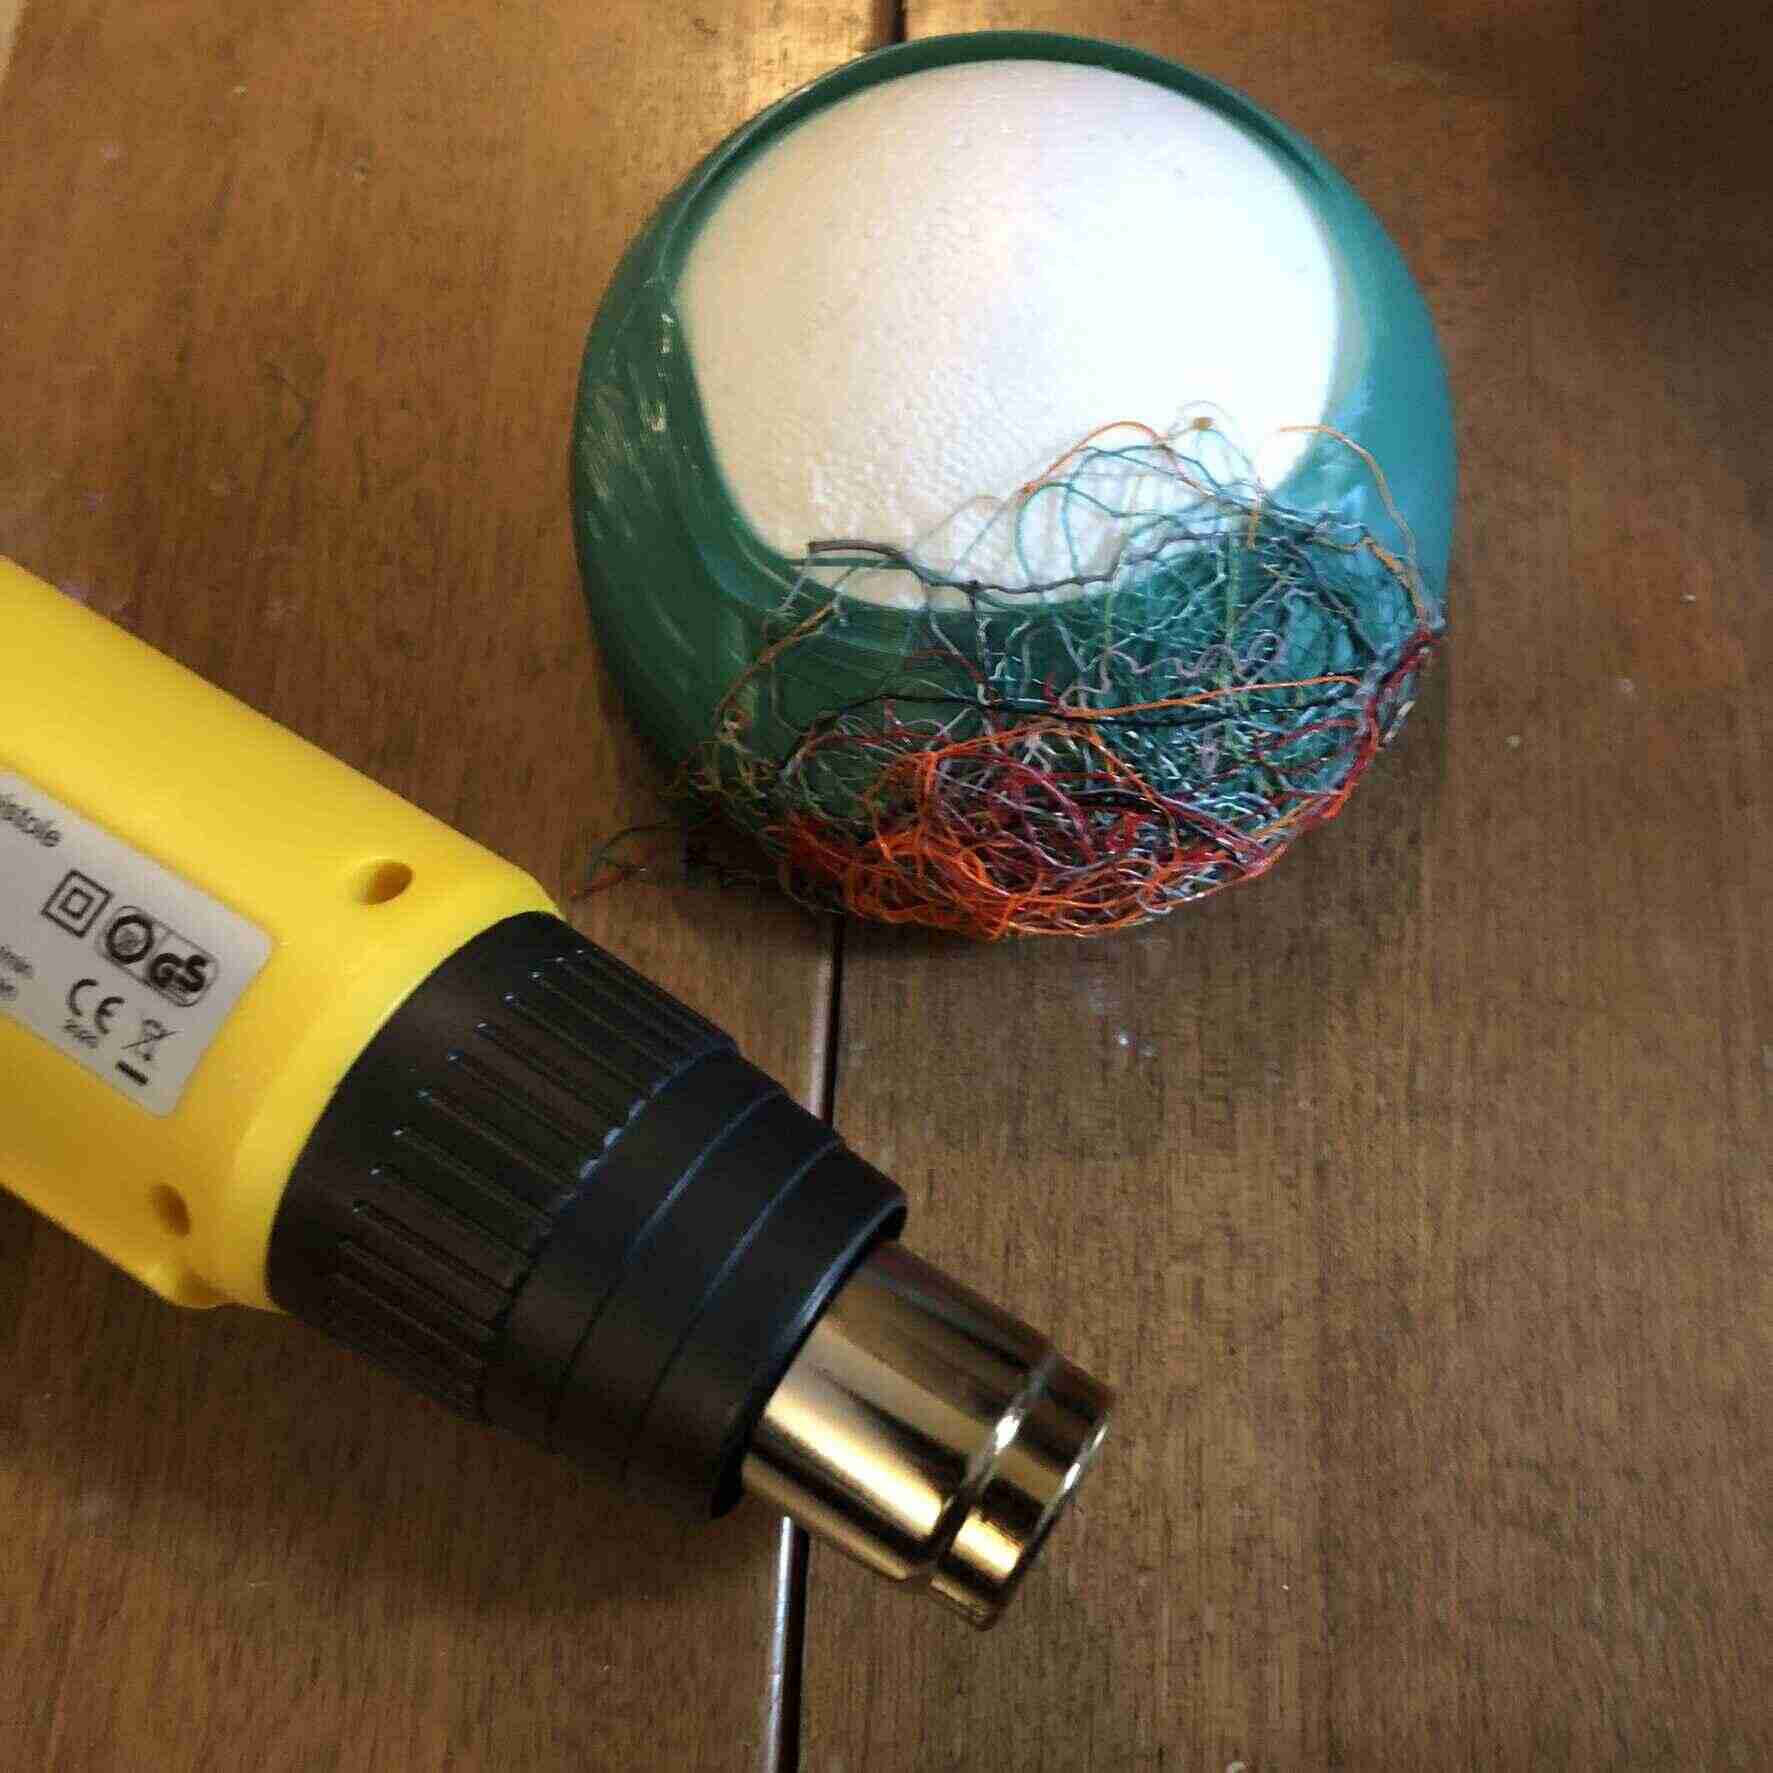

Still, as a first try-out I would say it’s a success. I should use prettier color combinations next time, and also stick to either just small parts or big parts, not everything at once. I also need a sturdier base that doesn’t deform because of some heat.
Another technique could be to print a flat surface or auxetic surface and wrap it around a base while heated, similar to the molding around the hand mold that I’ve done before. Or I need a positive and negative mold and press the recycled materials into shape but that’s something for molding and casting week I think.
Other experiments
Since I got sick on Friday I couldn’t use the 3d printers (my personal printer is also in the lab). Instead I decided to look further into conductive 3D prints, electroplating, and recycling PLA. I also expanded a print that I had made a couple of months ago with a heatgun. Then I got distracted by designing a basket with spiralized cut-outs, and got even more distracted by making an irregular bubble-like shape that could be used as an inflatable or as a bowl (both described above). When I got it to work it was 1 in the morning and I wondered what the point of that literal spiral was.
Conductive 3D prints
I’ve seen conductive 3d printing filaments, but they are very expensive and I’ve read that they aren’t very reliable if you want the circuit to be bendable (bend sensors, wearable applications). So I figured it would be fun to to look into making 3d prints conductive. I did some research into electroplating 3d prints and it seems very interesting, but also very expensive, messy and not great for the environment. Then I did some research into the conductivity of metal sprays for bikes (still considering buying it but it’s 20 euros for a spray bottle) and zinc alu sprays but they only work on metal surfaces; then I figured making my own conductive paint might be the best economic and sustainable option (spray paints aren’t great).
DIY conductive paint
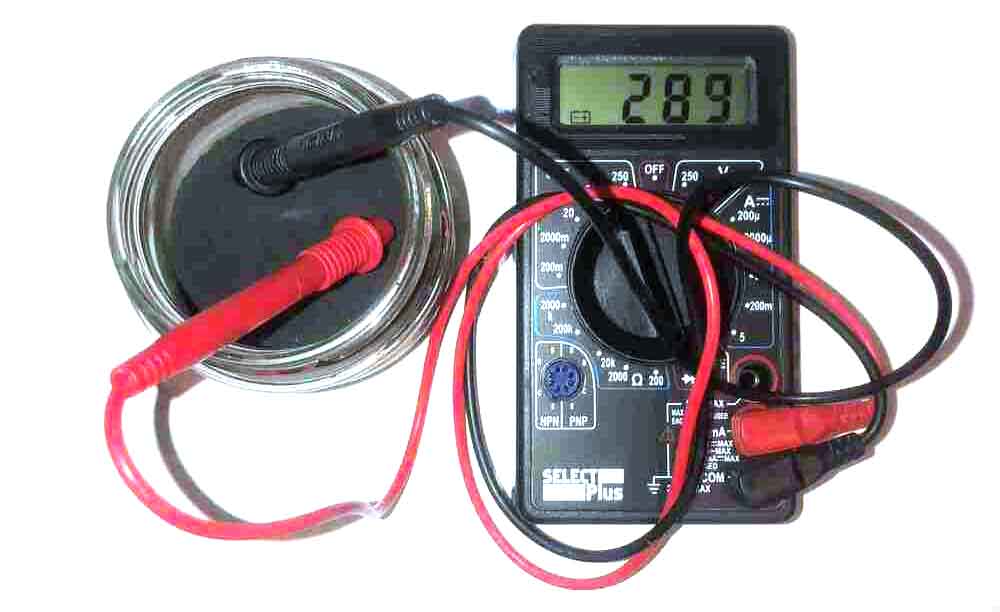
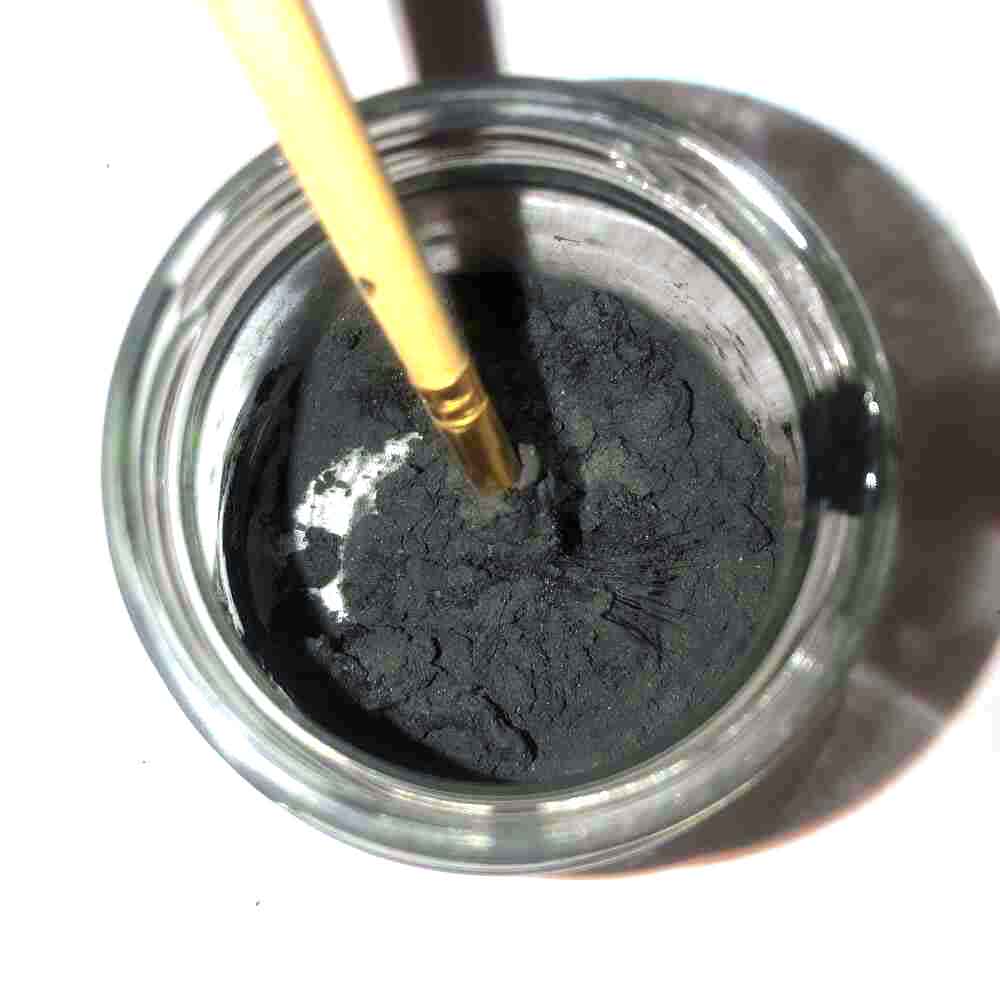
So I ordered 2,5kg of graphite powder (it was a good deal) to make my own conductive paint. I do realize this doesn’t really have much to do with 3D printing anymore, but I got a little carried away. I might move this to a separate page with random projects later. I printed some rectangles as a base for painting and gathered everything.

The resistance of just graphite powder ranges from 250-350 ohm at a distance of about 30mm in a layer of two spoons of graphite.
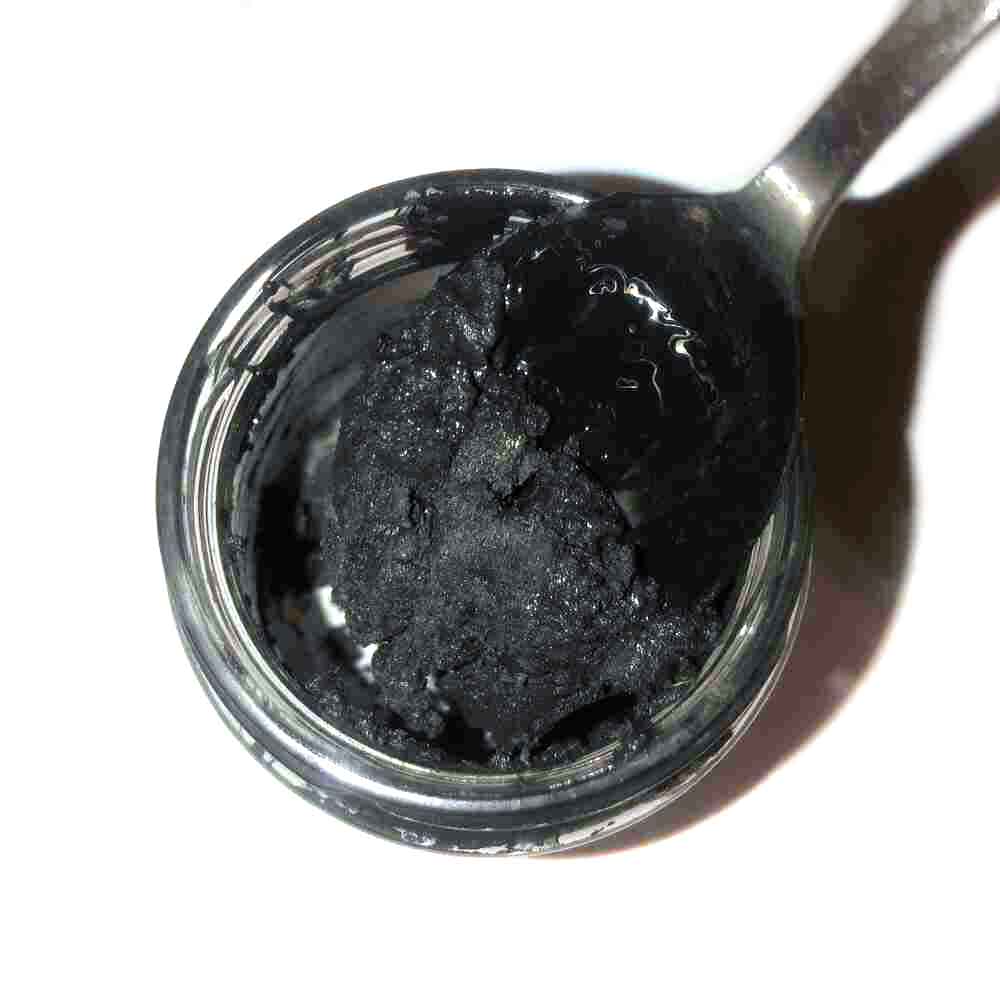
I started with the bare conductives recipe: 2:1 spoons of graphite to black acrylic paint. That didn’t work at all, so I added a spoon of water. That also didn’t help so I added another spoon of paint. Then I finally had a paintable substance.

Here I test the three painted samples:
As you can see in the video, the measurements aren’t very stable but they do show a clear difference between being in rest and being bent. When bent, the conductivity decreases which makes sense because the graphite particles make less contact. This behavior is opposite to bending with a DIY velostat bend sensor, so combining them into a project could be interesting.
Links:
- https://www.instructables.com/Conductive-Paint/
- https://www.bareconductive.com/blogs/resources/how-to-make-conductive-paint
Expanding a 3D printed top
This is a top that I’ve printed before that I hadn’t expanded yet because I was afraid I was going to ruin it (I did).
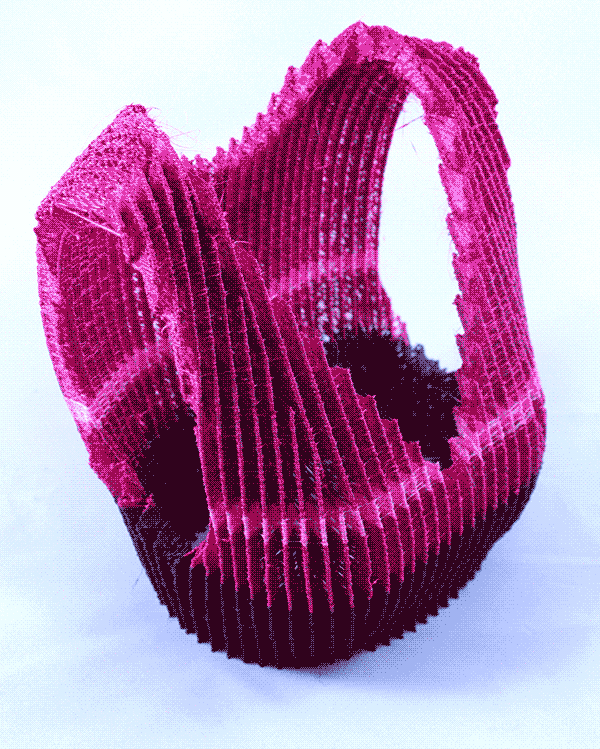
And here it is expanded with a heat gun:
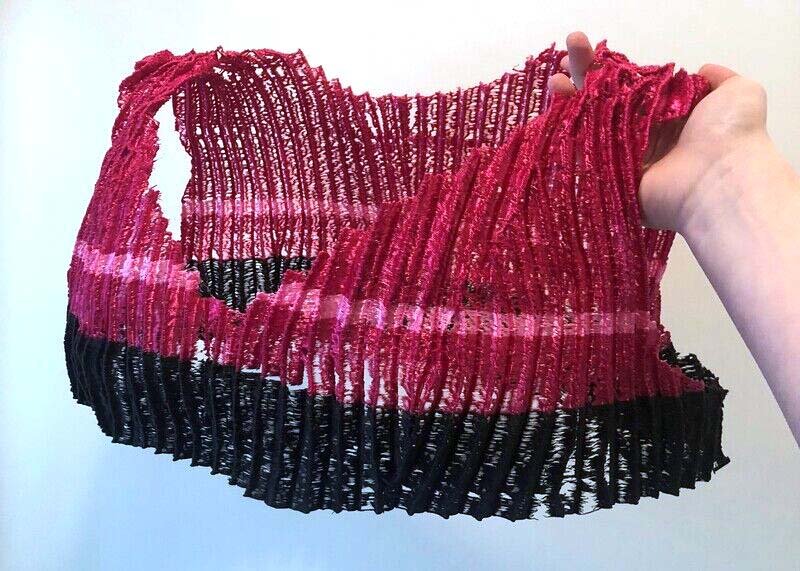
From 19cm wide and a circumference of 60cm at the widest part to 37cm wide and a circumference of 102cm, while still having the pleated look. At first I liked the open weave look of the print, but with the heat gun it got a little messed up. It also really doesn’t fit. After cutting it open on the sides I could wear it but it was a terrible fit. This is because I couldn’t print much higher than this on my Ender.
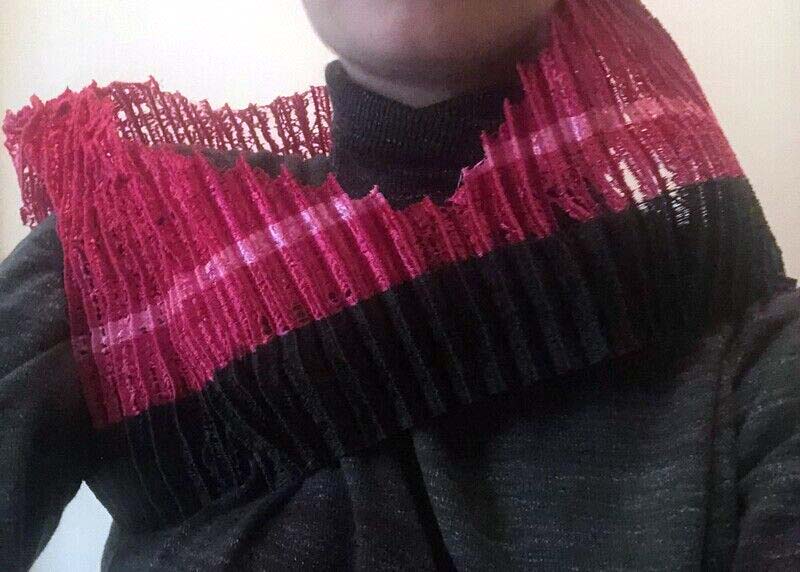
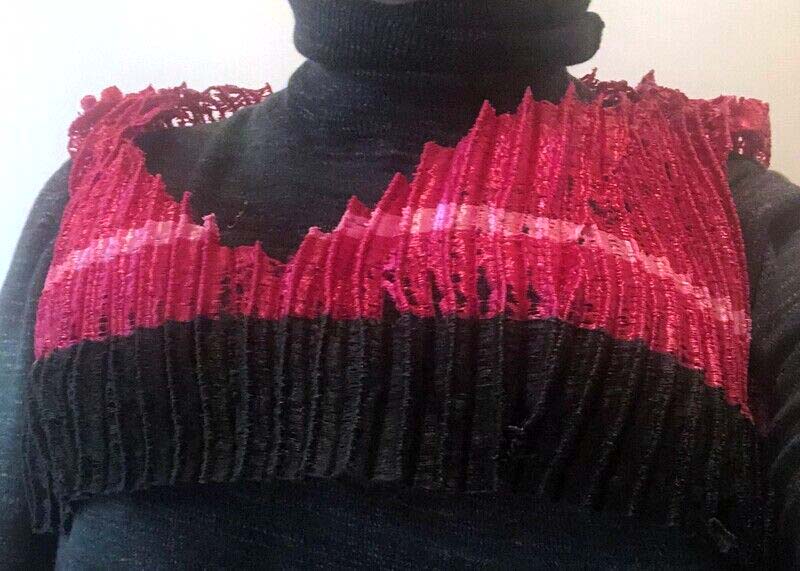
After this I was thinking it would’ve been nicer if I hadn’t expanded it, but the whole point of printing it was to try and see if I could make a top that would fit, so I kind of had to try. It was also now taking up a lot of space and hard to store. Then I realized I could also try to fold it back using the same principle as the inflatable that shrank back to its original shape after being put into hot water. So that’s what I tried next:
So now I can actually store it somewhere, and unfold it with heat if I need it in the future (although it isn’t in the best shape anymore since I used the heatgun before).
Files
- UM2_spiralvase.zip (gcode for UM2+)
- 3D-files.zip (inflatables)
- Fabric bed test (infill settings done in slicer)
- Grasshopper files
Scarf (infill settings done in the slicer directly):
Voronoi cup:
Other research
- 3D printing auxetics: https://parametrichouse.com/3d-printing-auxetic-materials/
- Curved surfaces via programmable auxetics
- Gcode generation with Grasshopper by Aslı
Lecture notes
- Nice 3D printing visualizing gifs
- PLA & PHA are office friendly; for all other materials you would want filters and enclosures
- Really cool method of printing textiles (printed with a powder bed): https://n-e-r-v-o-u-s.com/projects/albums/kinematics-link/
- Clearance of parts is important
- Most prints are anisotropic meaning that it has properties that differ based on the direction of measurement (layer direction)
- Electroplating 3D prints is useful and cool: https://formlabs.com/blog/electroplating-3d-printed-parts-high-performance-antennas/
- https://3dprintedart.stratasys.com/