17. Applications and implications
The assignment for the week:
Propose a final project masterpiece that integrates the range of units covered.
Your project should incorporate:
The questions to be answered:
What will it do?
Who has done what beforehand?
What will you design?
What materials and components will be used?
Where will they come from?
How much will they cost?
What parts and systems will be made?
What processes will be used?
What questions need to be answered?
How will it be evaluated?
Go to:
The Project Plan
My Final Project is a reaction time game. The background of the idea you can read from my Final Project page.
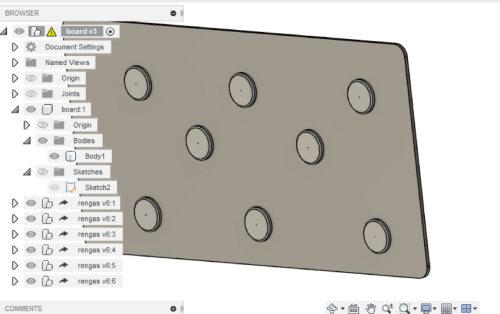
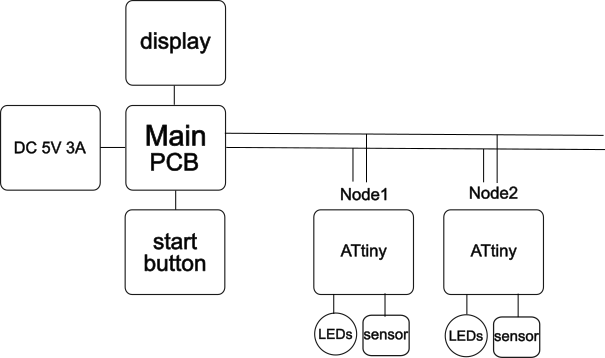
There will be 6-8 LED rings over a 1,2 meter board that is on the wall. When you press the start button, the device fires the LED rings in a random order. In each ring there's a distance sensor, and when a hand comes over it the LEDs of that ring are deactivated. After one ring deactivates, the next one fires up and so on. Every round goes on for 30 seconds. The number of succesfull touches is counted. After the 3o second round, the result screen shows you your score.
The idea is to test out your reaction time. The game will be used at KBT gym by kickboxers. You could observe what happens to your reaction time after a hard training session, or in weeks or months of time.
Who has done what beforehand?
There are loads of reaction time games available. Some of them are professionally made and sold, but there are also hobbyist projects. Some of them share their making procedure and files.
Most of the project are very simple and include something like Arduino Nano, jumper wires, bread board, push buttons and LEDs. And they look like a bundle of stuff. But after searching, I found an interesting one that is resembling my plan quite a bit. It is on Autodesk Instructables.
The idea is the same, althoug in the project it was made to a two player game. It uses Arduino Mega, and has buttons instead of the LED rings I'm planning. It loops for 31 seconds, updating the time, turning on a single LED, and waiting for the appropriate button to be pressed. When the appropriate button has been pressed, it increments the score, randomly choses a different button and repeats.
I might use some of the information of this project, especially I will be looking into the code. I think there will be parts that can teach me how to use certain functions.
My design
My plan is to design and make:
Materials and components
The evaluation
The success of my project is evaluated by:
To Be Resolved
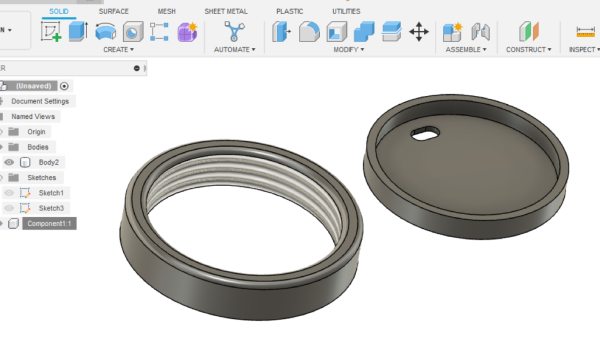
The idea for the casing is that yhere would be an inner part that I can attach the PCB in. On top of it comes the 3D printed casing, and the acrylic plate is secured in the outer casing.
Bill Of Materials, first draft
The final BOM is found at the final project page.
| Material | Evaluated cost, € |
|---|---|
| The board, leftover plywood from lab | 41,90 (K-rauta) |
| Material for the casing MDF | 15,80 (Levypalvelu) |
| Acrylic from the lab | 43e/m2 = 4,3 |
| Filament, 0,5 kg | 26 = about 10(Gigantti) |
| Xiao Seeed RP2040 | 9,90 (Partco) |
| ATTINY412-SSFRCT-ND(as an example) | 0,42 x 8 = 3,36 |
| LED strip | 40e/5m = 8e/m(Lumise) |
| VL53L1X - Light, 3D Time-of-Flight (ToF) Sensor Evaluation Board | 11,95 x 8 (Digikey) |
| OLED display | 5pcs 22,99 = 4,58 piece(Amazon) |
| Power source USB | 12,30 (Elektrolinna) |
| Button, left over from old projects | 1,80 (SP-elektroniikka) |
| In total | Evaluated cost, 200 € (VL53L1X taking half of this) |