Fab Academy
Arthur DEFRAIN

Week 7 
​Computer-Controlled Machining

Goal

​Group assignment:
​Complete your lab's safety training
Test runout, alignment, speeds, feeds, and toolpaths for your machine
Document your work to the group work page and reflect on your individual page what you learned

Individual assignments:
​Make (design+mill+assemble) something big

​Learning outcomes

​Demonstrate 2D design development for CNC production
Describe workflows for CNC production

Sample Headline

​​Linked to the group assignment page
Documented how you designed your object (something big)
Documented how you made your CAM-toolpath
Documented how you made something BIG (setting up the machine, using fixings, testing joints, adjusting feeds and speeds, depth of cut etc.)
Described problems and how you fixed them
Included your design files and ‘hero shot’ photos of final object

​Groupe Assignment

Here we will pass trought the safety aspect to use propely the CNC machine.

​Safety equipment .

Like in the industry or for other manual activity we need to wear a bounch of different equipement to be protected.

Protection against the noise

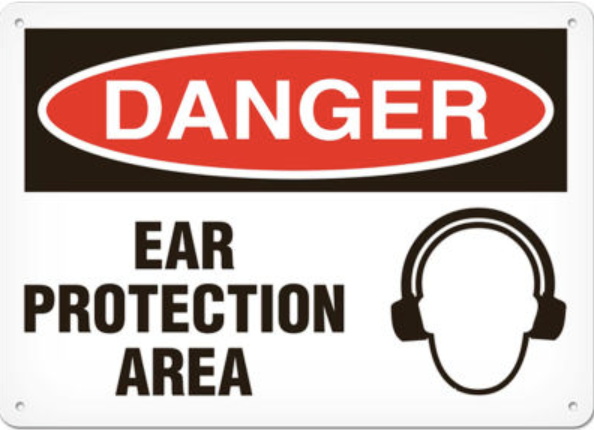
The most tricky danger is the noise, that dont harm you directly, but in the time.
A CNC can generate noise over 85 dB, the legal limit (depending of the contry) for a work evironement. So we need conter-action to limite that.
The first action we can have is to use ear protection, but that only protect who wear them. In my lab we place the machine in a seperat room. this way the noise is reduce outside of the room and you wear ear protection only if you go inside.

​Eye protection

The CNC remove some material, with a lot of power and creat chips of different material, depending of what you cut.
Those are project all arrond even if you have a good dust collection. you still have the risk that a big chips fly out and hurt you.
So its mandatory to une safety glasses, not just the regular one. cause safety glasses protect to front and the edge of you eyes.

Remember we have only 2 eyes, if we lost one that don't come back.

​Gloves or not? That's the question.

For manutention and ect we recomended to use gloves, its very good against the cut or sharp edge.
But with the CNC is different, you don't use gloves, cause its a turning tool.
Because the spindle turn very fast, if your glove is catch, your full hand will be take by the CNC.
So for the CNC is glove when is not power off, to put the material. But when is on , its glove off. 

​Individual work

​Step #1 prepare the design

The idea was to creat a chair, but with a twist , no clue and no screw.
Just using the press fit principle from the laser cutter week. 

but to have a good fit i need to make my connection between two pieces a little bit diffrerent. We use bits to cut he wood, they are rond so we can't make sharp edge. 

like we can see in this drawing, the black line is what we want, the red the stock wood and in purple the end mill with the traject.

To conter that we ue the technique of the dog bones, it consist to brake the edge with a round shape the bit can machine.

After the design we need to set up the CNC program, it's like the slicer step for a 3d print. we pass from a 3D object to list of instruction for the CNC. I will use Fusion 360 because its already inclued in the program, i don't need to export to an other software, and if I update the design it will be also updated in the CNC part.

We first need to flat our design, do do that i follow this video that explain step by step the process to arrange the model for a CNC.
If is the first time you used Fusion 360 to control a CNC you need to add your CNC and your tools to the library of the software.

​After that i can set up my job.
to do that we need to creat a new set up 

Selection of the machine  

Type of operation  

 Size of the stock wood

Orientation  

 How its align 

What you want to cut  

After that we need to set the reference point, the coordonate {X0;Y0;Z0}
to do that we can select the plane of two different axis, this way we can find the third and place it at the right place. this step its important ause if the reference point is not the same as the machine, the g-code is totaly buged. 

​Step #2 The "Toolpath

​Just as in the PCB production week, we need to give the tool the "path" to make the cut.
This "path" is calculated by the computer-aided manufacturing (CAM) software. Here I'll be using Fusion 360 to do just that.

After setting up the parts, I'll need to select different tools, or cutters, to cut my wood.

​Knowing that there are no complex parts, I mean straight parts, with no degradation in height. I can therefore use a simple straight cutter to cut the part. To do this, I use the 2D Contour tool.

​Focus on cutting parameters

​Each cutter has its own cutting parameters, depending on the material, thickness and other factors.

The most important are:

-Cutting speed, how fast the cutter advances through the material

-Feed per tooth, how much material per "tooth" of the cutter

-Plunge speed, how fast the cutter plunges into the material.

​Once you've chosen the cutter, you need to tell the software what profile you want to cut.

​Here, I'm starting with the internal parts, because the plywood is well held in place by the fact that no other cuts have been made.

​Then I'll cut the contours of the chair parts, using the same tool and the same cutter.

​But if I cut the parts directly, they'll become detached from the rest during cutting, and this is dangerous and/or can damage the part or the machine.

That's why I'm going to tell the software to use tenons. small parts that the software leaves to hold the part in place.

​Once you've made the various passes, you can check with the simulation tool

​Step #3 on the machine

​After adding a sheet of plywood to the CNC and securing it. We can now start work

​Result