“Auto heated Vest, what warms body , warms the heart too”😍 💗
Presentation slide

Presentation video
Final process(Physical fabrication), concept , electronic programming.

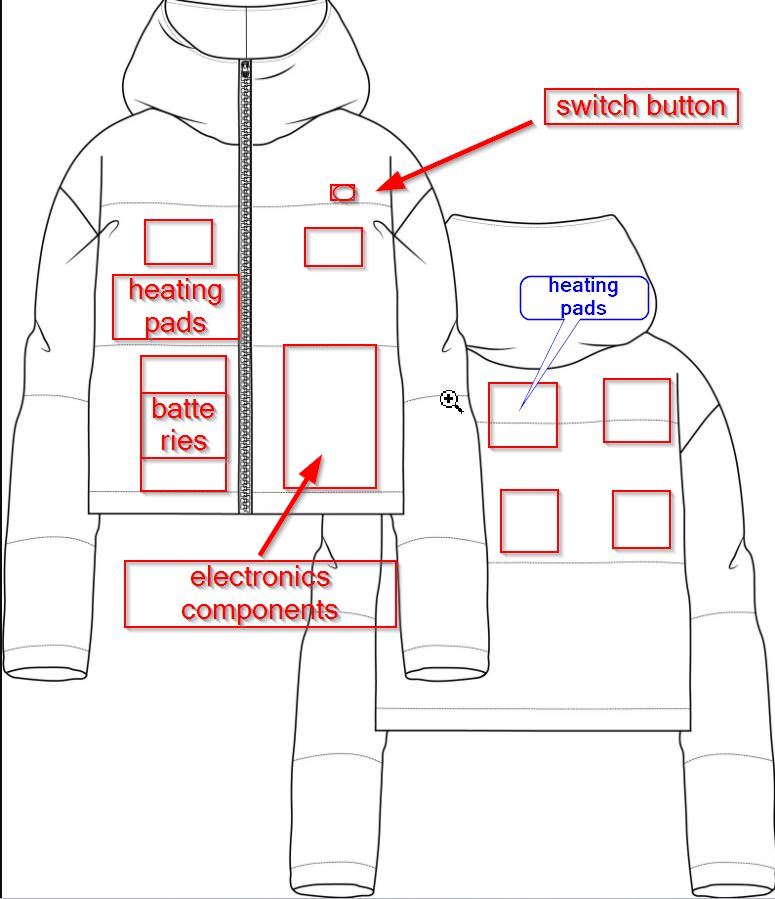
I decided to choose heater jacket with sensor as a final project because during extreme weather heater jacket with sensor would be essential since it can be helpful to those who are doing duties in northern highland.(mostly Dessups and military people of our country) The sensor in the heater jacket can sense the temperature and help to maintain balance heat to the body. It can be commercialize in the market as well after the prototype is successful .Durning pandemic in winter Dessup and military doing duties had tough time with the weather and the snow so I thought of making heater jacket with sensor. it can also be helpful to those who are doing northern border duties.for my final project i added this picture since after the mock challenge i got this idea to place my components and the number of required heating pads. i even added the 2d and 3d files to my fp and the screenshots. as sir suggested me to add the youtube link i added the link for my references, since in the video he uses the arduino lily pad i thought of designing a attiny1614 board. so for the input week, i tired to brain storm the whole final project in a paragraph but I need to do more research and design a board first and try using heating pads and for this week assignment I thought of using temperature sensor for my fp and pir for the weekly assignment requirement.
Circuit Diagram & Layout.
How it works.
The two 9V batteries act as a power supply to all the heating pads , the board, and to the sensor as well. The batteries which is running in parallel supplies or regulates for the MCU but the voltage is regulated by the voltage regulator. The mosfet in the circuit board boost the voltage for the heating pads. The sensor will receive the information of the temperature outside and then tells the MCU after that the mcu will pass the message to the heating pads to turn on and produce heat when it is below the thresh hold. Last time in the mock challenge i did the layout but only with cardboard and this time i made a little changes with the board, I made my own heating pads which was bit challenging since the normal wire made the batteries heated up rather than using the normal wire i used the nichrome wire. and i am waiting for the mosfet and the voltage regulator in order to make a circuit board to regulate the voltage and boost voltage according to the requirement.
The components I am going to use are
Switch button to turn on/off the whole system when you are not using the jacket
The input can be DS18B20 sensor
And the micro controller is Attiny1614
For 3D printing as i have mentioned below is the simple case for the component and switch button. and for 2D design I am going to use vinyl cutter for the logo.For the trade mark and copy rights.
So I am going to use temperature sensor that is DS18B20 sensor which can sense the outside temperature which ranges from 50 to 123 degree. for the output i am using my own made heating pads since the heating pads that i have ordered has not come yet and my final project dateline is coming near and near so I madE emy own heating pads. I am using 18v of batteries which are rechargeable. so when the temperature outside gets below or higher the threshold the temperature will send message to the MCU and it will supply current from the batteries to the heating pads. I am using one switch button which can turn on and off the whole system when you are not using. And the main brain of my project is i am using attiny 1614 where there is 3 header pin for output (Heating pads ) and 3 header pin for input (Sensor DS182B20)
# Final Project Components
Physical Fabrication
Subtractive: Trade mark logo for my jacket or vest.Additive:switch button design.
Electronics & Power
Programming > Modules
Input(s) - temperature sensor DS182B20 Output(s)- Heating pads Aggregation Logic plan for plenty of Debugging- My only worry is that batteries in the lab is not rechargeable and if my power source runs out i need to change the batteries time and again.Project Assembly
Wires heating pads batteries foam for heat supply temperature sensorCopy right and licensing
The creative commons copyright licenses and tools forge a balance inside the traditional “all rights reserved” setting that copyright law creates . Our tools give everyone from individual creators to large companies and institutions a simple, standardized way to grant copyright permissions to their creative work.

This license lets others remix, adapt, and build upon your work non-commercially, and although their new works must also acknowledge you and be non-commercial, they don’t have to license their derivative works on the same terms.
Here is the Attribution-NoDerivatives 4.0 International(Licenses deed )
Here is the Attribution-NoDerivatives 4.0 International(Legal code)

Item list
| Item name | Cost | Country available |
|---|---|---|
| 1.Mosfet | Rs:180 x 1 = 180 | India(Amazon) |
| 2. Voltage Regulator | Rs:180 x 1 = 180 | India (Amazon) |
| 3. 2-Meter cloth piece | Rs: 425x 2 = 850 | Local(Tailor shop) |
| 4. Nichrome wire | Rs :40 x 1 = 40 | Local (Hardware shops) |
| 5.wire cover | Rs: 100 x 1 = 100 | Local (Hardware shop) |
| 6. 9v Dura cell batteries | 1 packet Rs: 259 x 1 = 259 | Local (Hardware shops) |
| 7. Attiny1614 MCU | 76 x 1 = 76 | India (Amazon) |
| 8.DS18B20 sensor | Rs 202 x 1 = 202 | Amazon (India) |
| Total= 1,887 RS | ||