1. Computer-Aided Design
Task for Week 2
- Modelling (raster, vector, 2D, 3D, render, animate, simulate, ...) a possible final project,
- Compressing your images and videos using different softwares and apps.
- Posting a description with your design files on your class page
2D Designing and Editing
Before I started exploring using 2D softwares and designing, I first learnt about the two type of images/files i.e Raster and Vector.
- Raster
- - These are images build from Pixels, tiny color squares that in great quantity can form highly detailed images such as Photographs.
- - The more pixels an image has, the higher the quality it will possess.
- - It has wider array of colors, permits greater color editing but it loses the quality of image when resized.
- - Raster files are generally of larger in size then vector files.
- -File types are .jpg, .png, .gif, .bmp, .tiff, .psd.
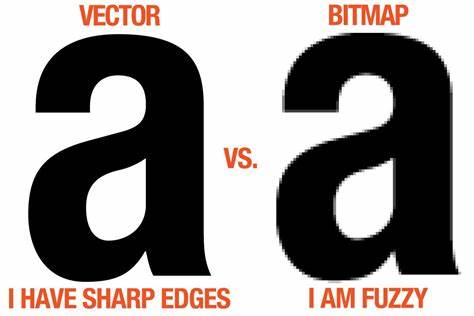
- Vector
- - These files uses mathematical equations, lines and curves with fixed points on the grid to produce an image.
- - There are no Pixels in a vector file.
- - We can rescale,resize,reshape vectors infinitely without impacting its quality.
- - Much more Lightweight than Raster.
- - File types are .svg, .eps, .ai, .dae, .ps, .emf.
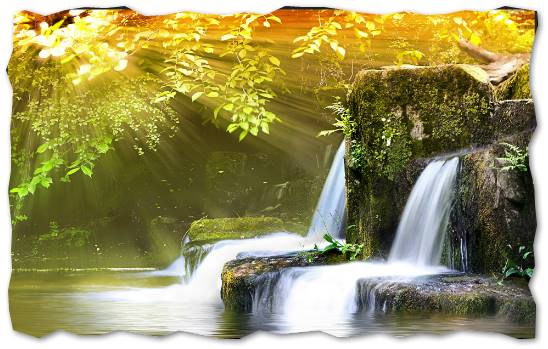
Desgining Logo for My Final Project using Inkscape
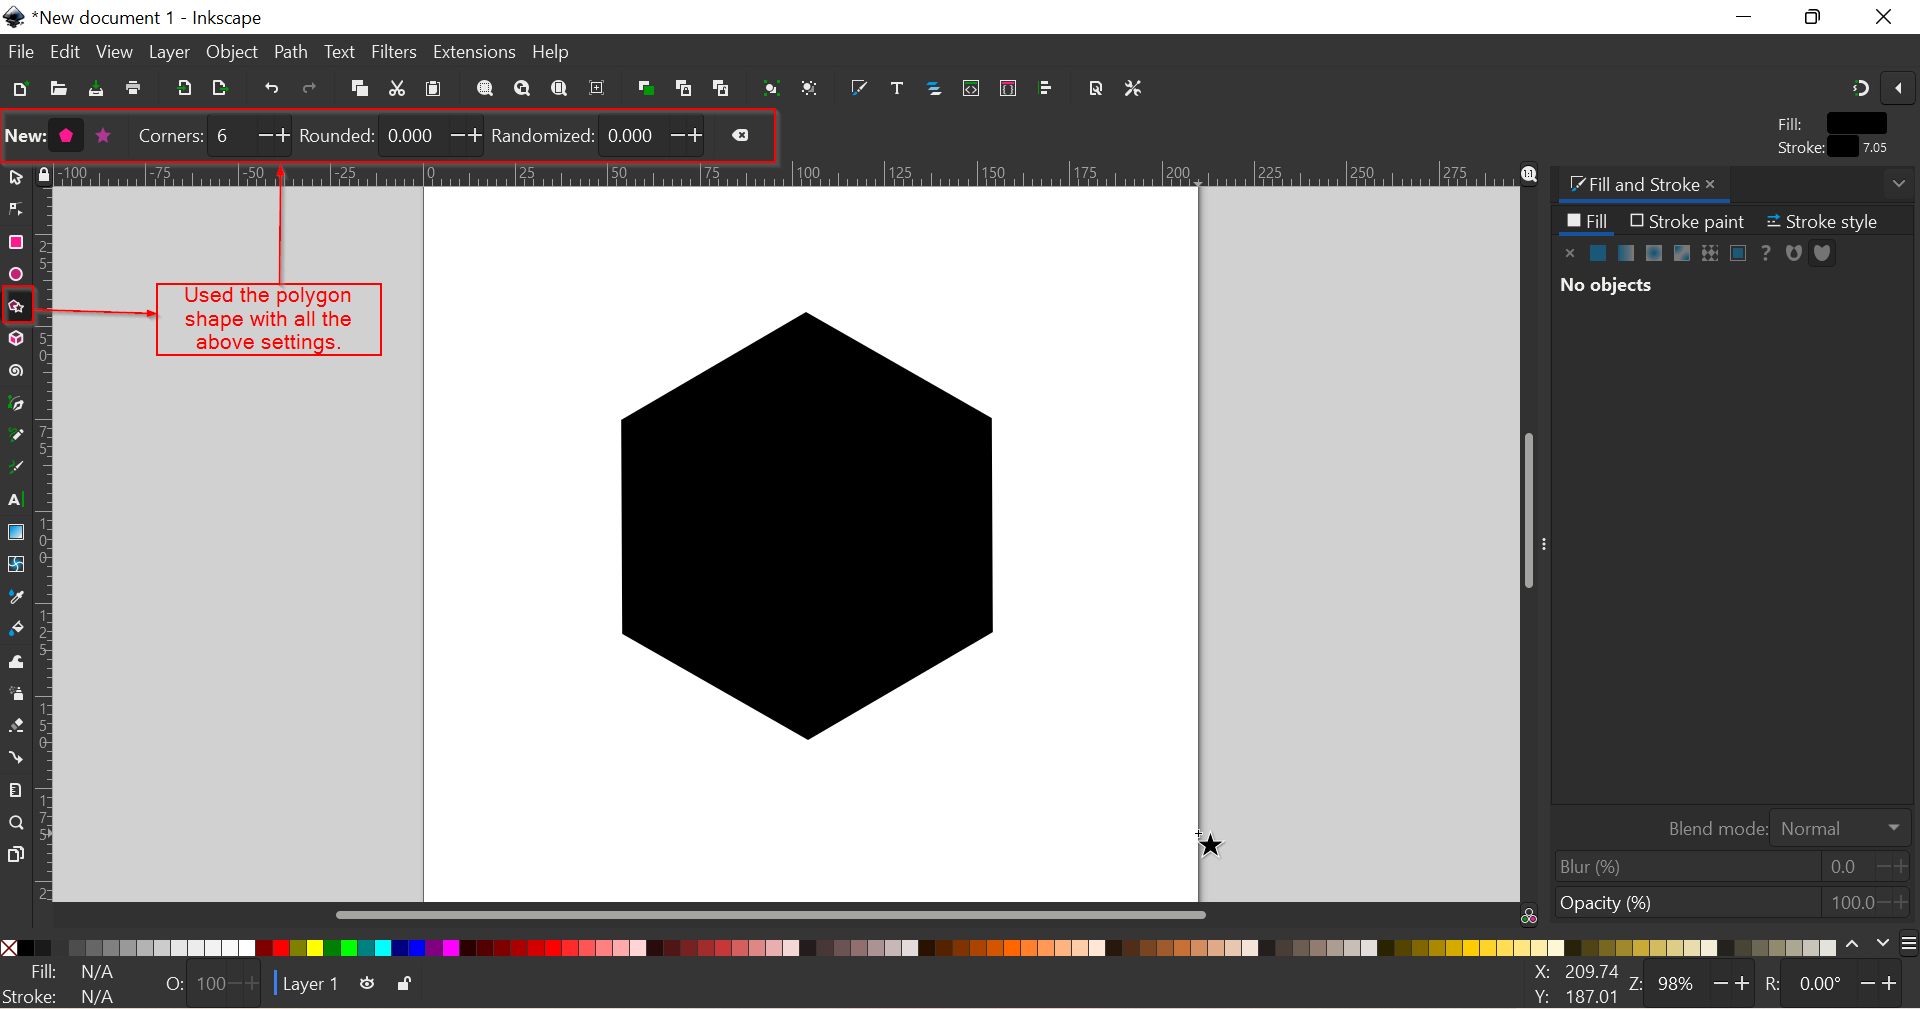
- Create a New document. I selected the Polygon shape with six corners. Arranged the shape so that its in the middle of the work page.
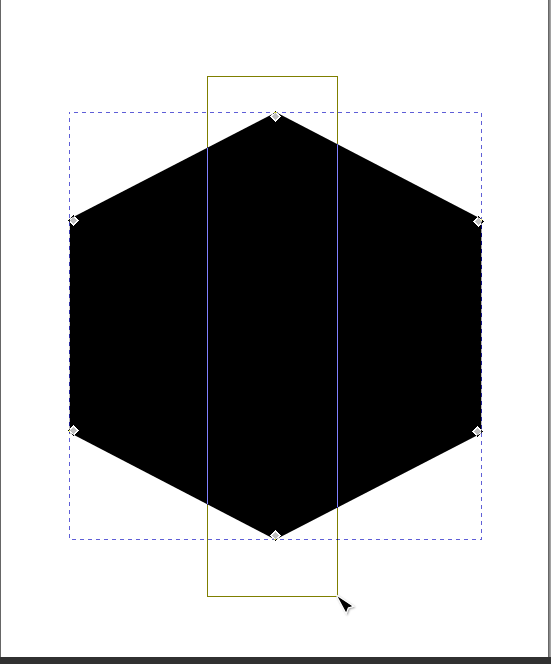
- Selected the shape and converted it to Path by going to Path, then selected Object to Path option.
- I grabed the "Edit path by nodes" tool, selected the two nodes in the middle and enabled the transformation handles to scale these nodes down a little bit to get my desired shape.
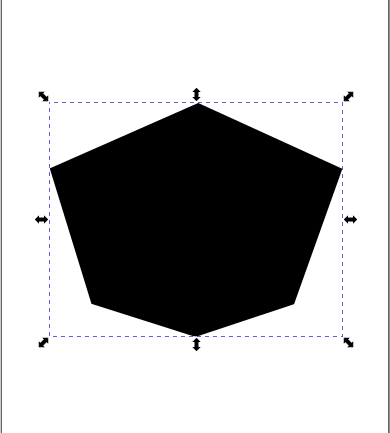
- Did the same with the bottom corner nodes to get my desired shape for my Logo.
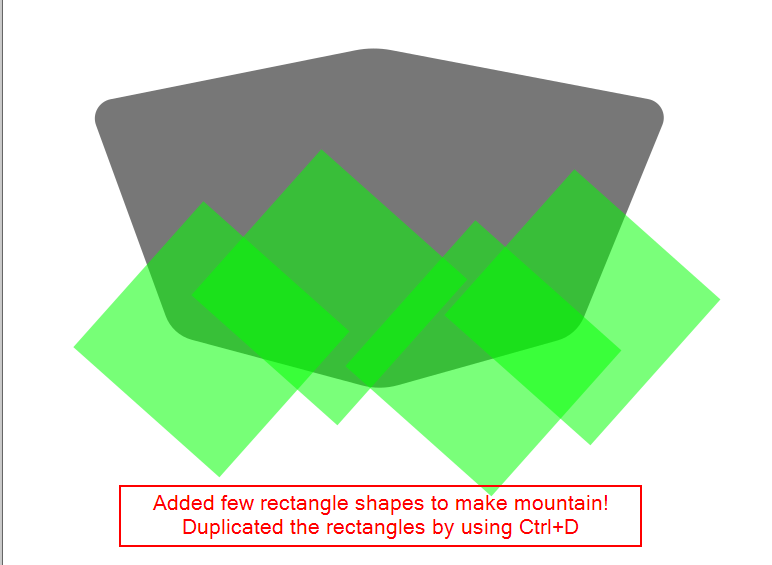
- To create some mountains for the background, added rectangle shape and duplicated it.
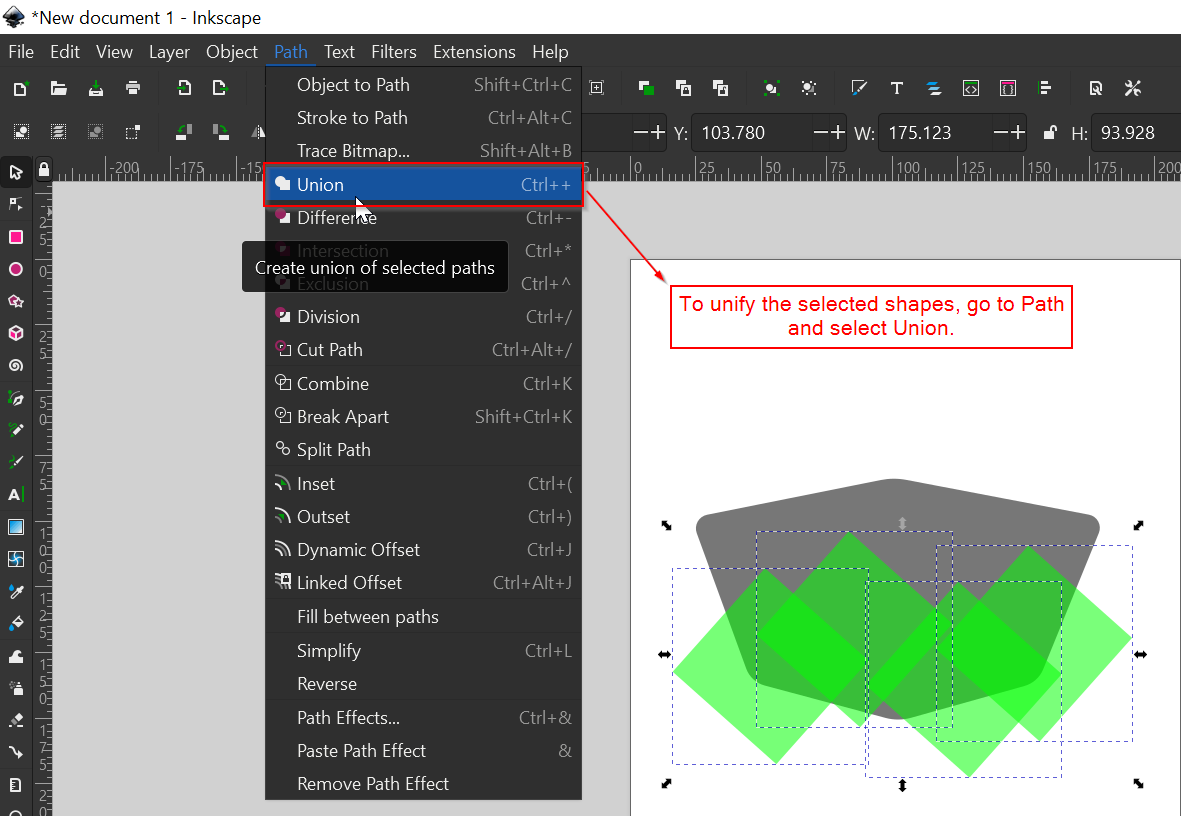
- Selected all the duplicated shapes (Shift+Click) and unify them all together by going to path and Select "Union"
- Then selected the images to be intersected and intersected the images.
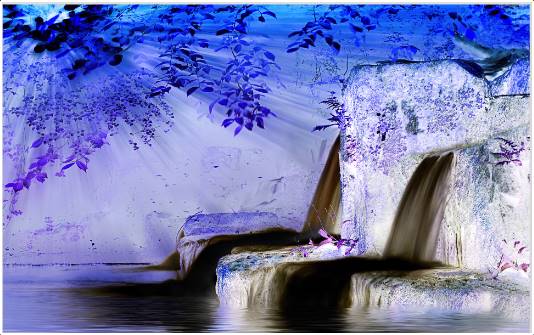
- Like wise used several tools like "Path Effects","Difference","Trace Bitmap","Text", played with the textures and filters. Finally got the design I wanted.


Using Greenshot Image Editor
- I've been using "greenshot" to take screenshots for my documentation and its very easy to use.
- Greenshot is a free software for taking screenshots on Windows or MacOS computer.
- After taking screenshots, we can use it to resize the image, change the contrast of the image, add vector shapes like text and marquees.
- This software can also be used as vector graphic editor. It also offers some pixel-based filters.
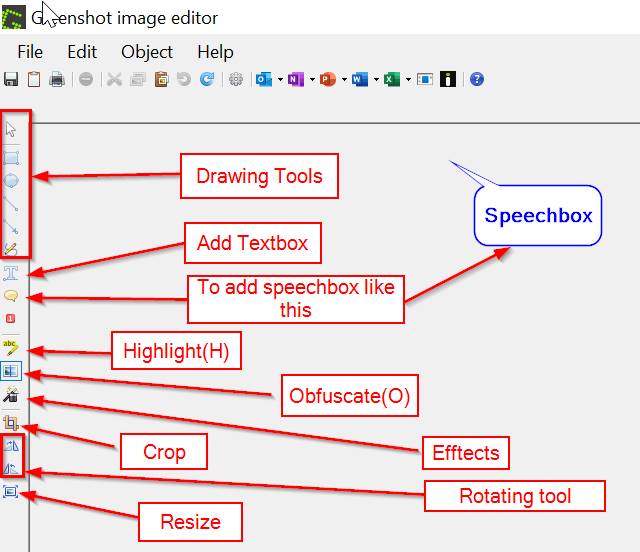
- These are some of tools we can find in greenshot.
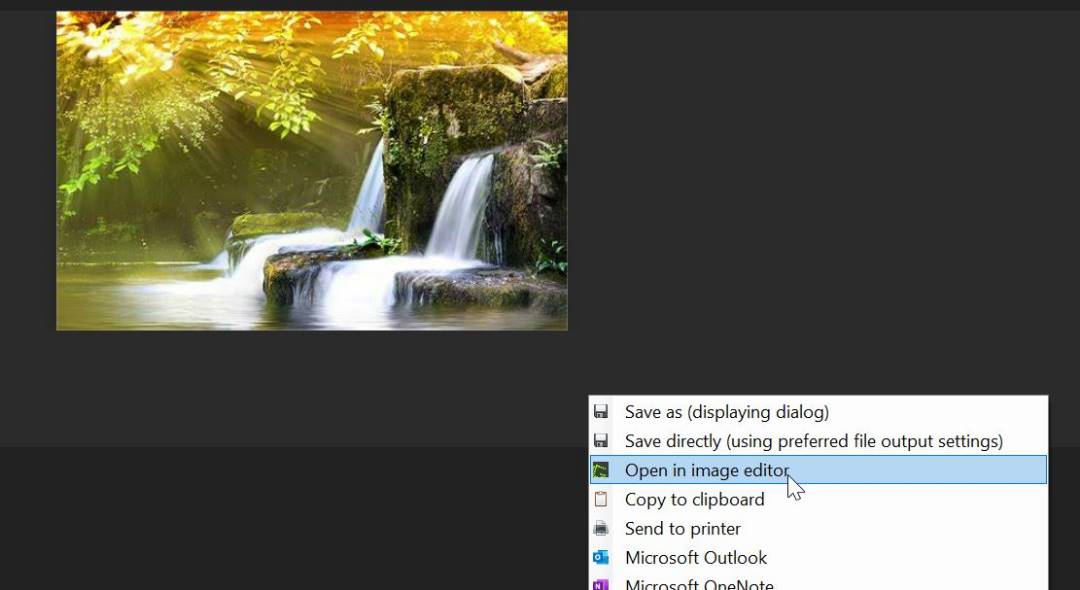
- To use it in the windows, use the "PrtSc" button on the keypad. For example I've chosen the image I wanted to edit. Open in image editor.
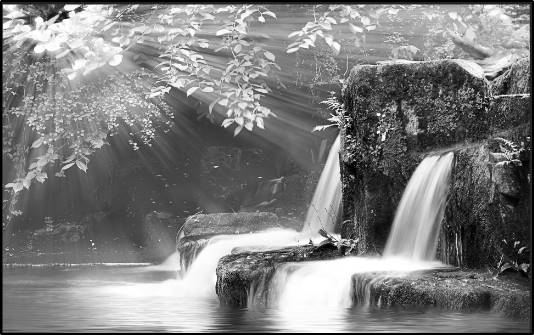
- Some of the tools I've used to show the difference. Used the Obfuscate(o) tool to make the image blur and used different effects.
- Greenshot has been my go to app for documenting my progress in Fab Academy assignments. It is very easy to use and the tools are also very user friendly.
3D Designing
I enjoyed exploring about the 3D designing as I could design anything like shapes, figures even cartoon characters using 3D designing softwares. Since I'm just getting familarized with 3D designing, I found Tinkercad to be really helpful in understanding how 3D design works. I tried making a name card for myself using Tinkercad and I designed a prototype for my Final Project using Fusion 360.
Tinkercad
Tinkercad is a free web app for 3D design, electronics and coding. Most shapes are pre made, making it easy for a beginner to drop what they need in the workspace and begin their design.
I've designed a simple Name tag for myself which can be used as a key chain.
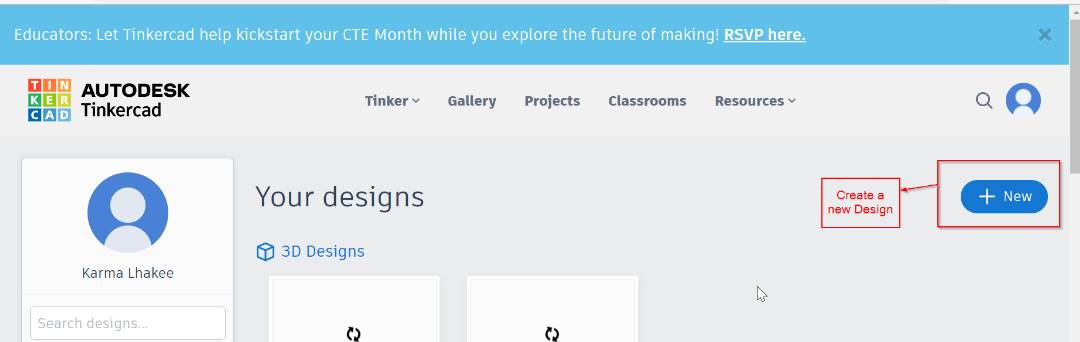
- First I opened the Tinkercad in the browser. Then opened a New 3D design.
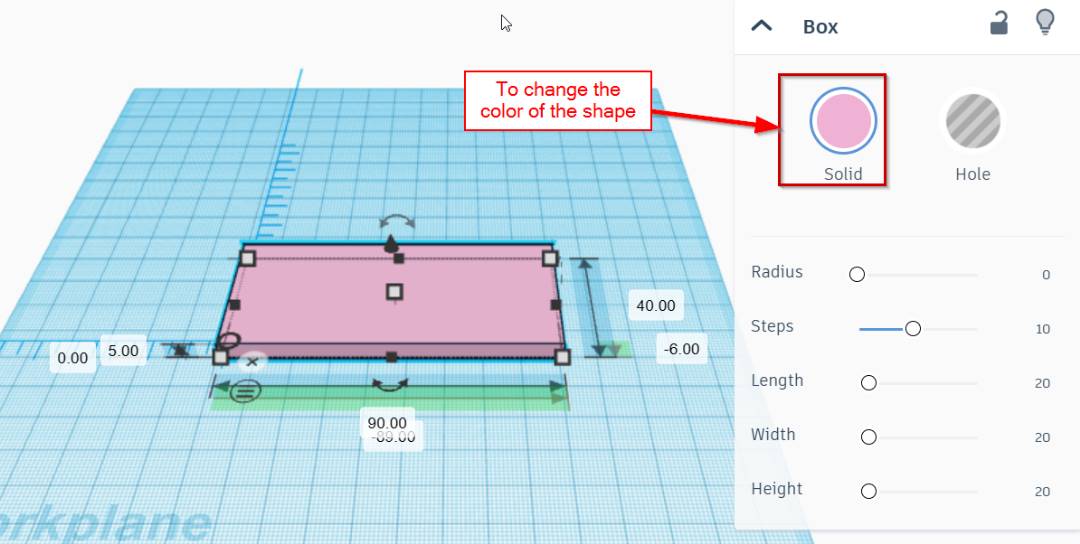
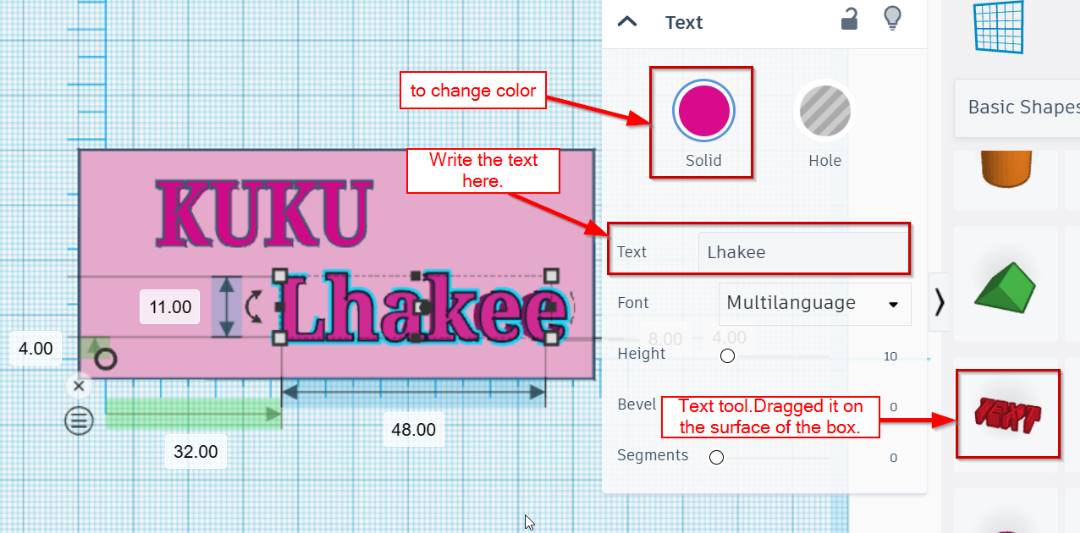
- Drag and dropped the required shape, in my case since I'm designing a name tag, I chose the "Box". Changed the color of the box and provided the dimensions too.
- Then to write my name, I dragged the "Text" tool and wrote my name, extruded the height so that it will be visible.
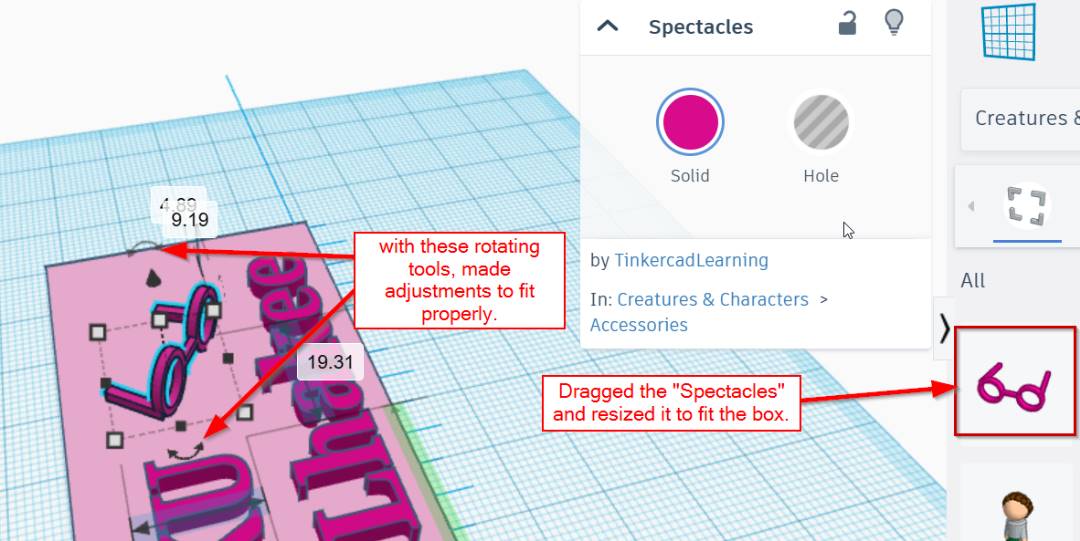
- Then to make the design look more presonalized, since I wear spectacles, decided to add "Spectacles" from Creatures and Characters library and made adjustments to fit the box.
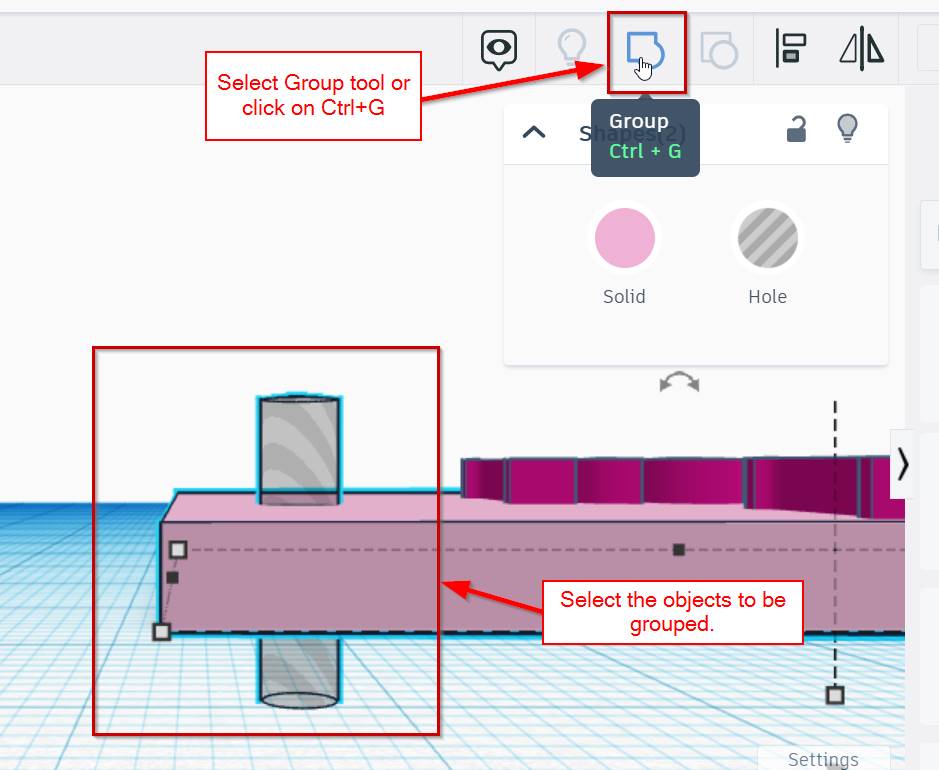
- My design looked fine now. Needed to create a hole, provision for a key chain so to do that used the "Group" tool. To use the group tool, first select the box and the cylinder hole then Click on the Group tool or simply click "Ctrl + G".
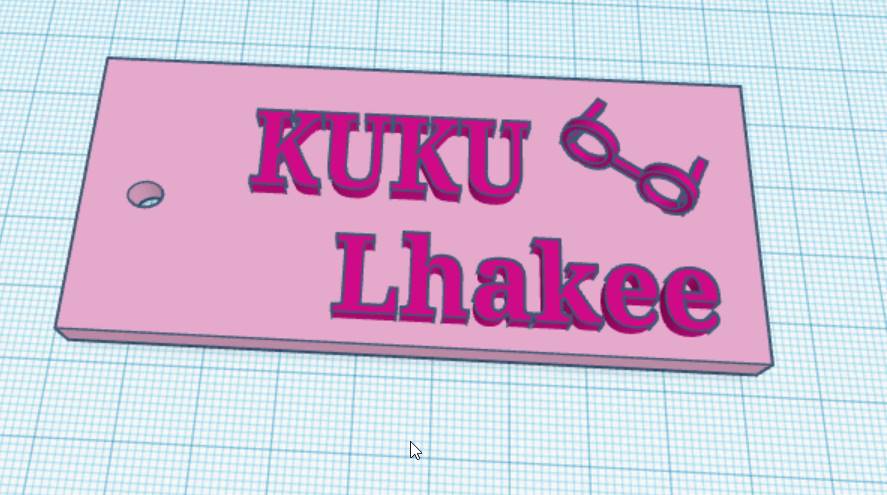
- So here is the keychain that I designed.
Fusion 360
Fusion 360 is a cloud modeling tool, which means we can share our design to our trusted ones and every design we do can be saved in the cloud without losing our design.
We can create 3D designs, collaborate, manage data, create toolpaths, run stimulation to validate your designs and much more.
I designed the head of my Scarecrow using Fusion 360 for my final project.
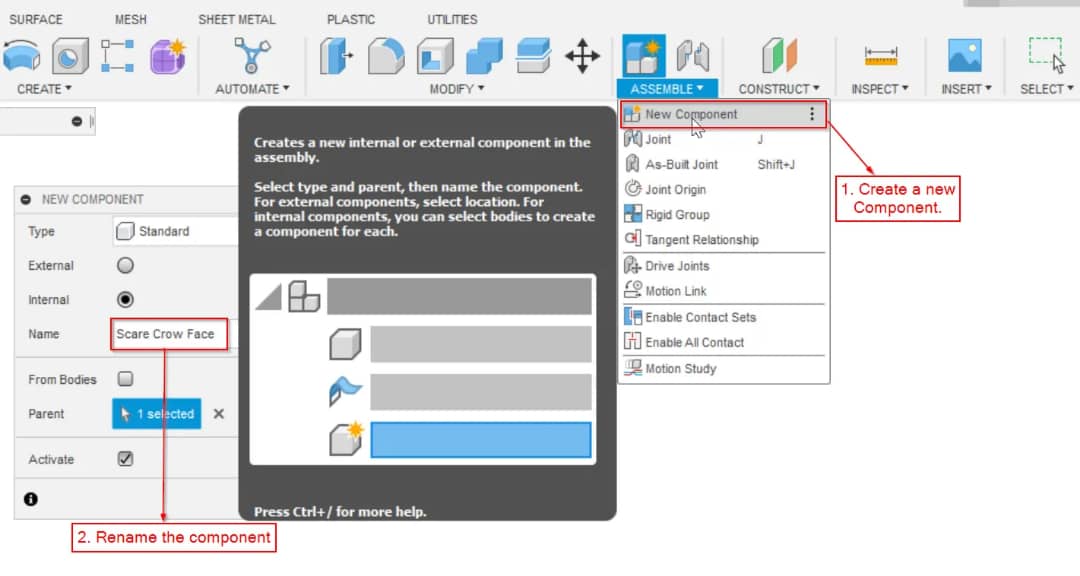
- First clicked on the new component and renamed the component.This will help keep the files organised and easier to manage.
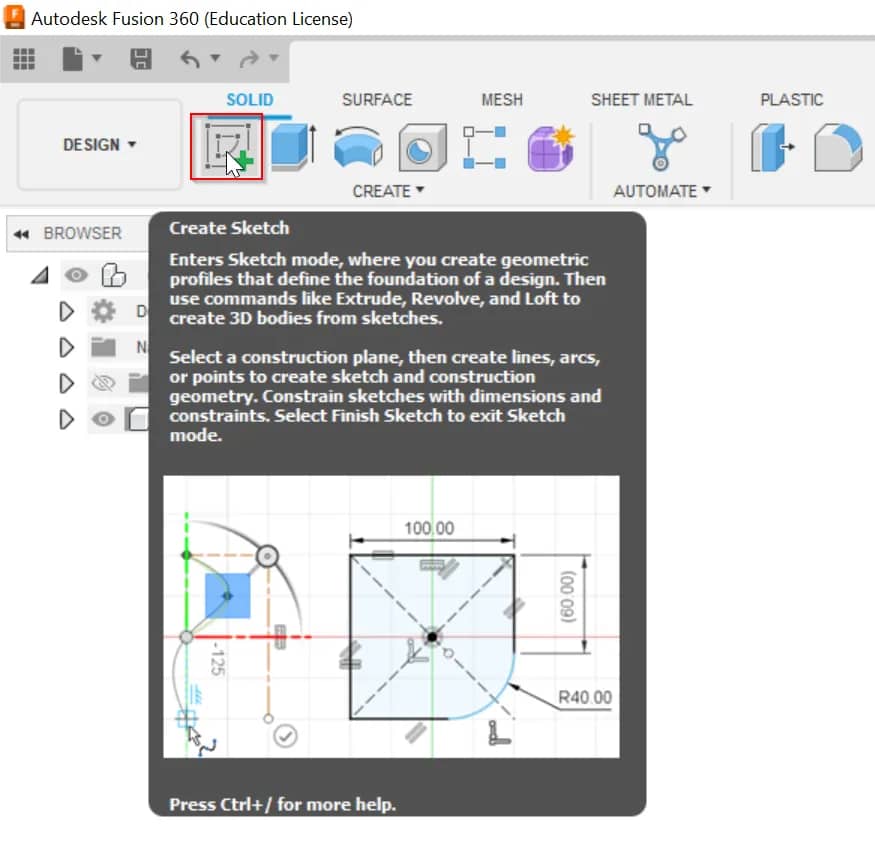
- For most Fusion 360 workflows, we'll have to start by creating a 2D sketch that is turned into a 3D body. I started new 2D sketches with the "Create Sketch" feature located in the toolbar or the Create Menu.
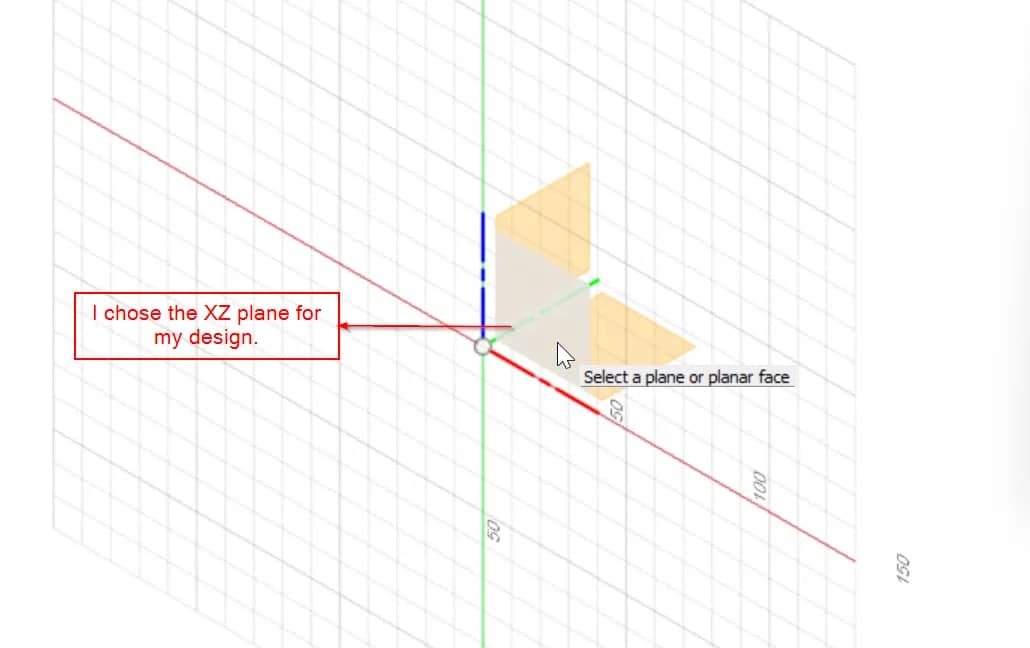
- We are then promted to select one of the origin planes. These origin planes correspond to our X,Y and Z axis.In this case i selected the bottom XY origin plane.
- We'll see that our view is automatically reoriented to look directly at the sketch. We will now see a Sketch tab in the toolbar. The sketch tools are contextual and will only appear while in an active sketch environment.
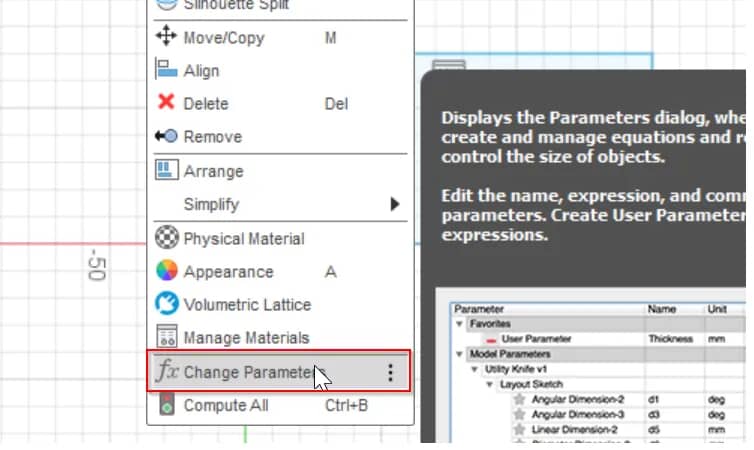
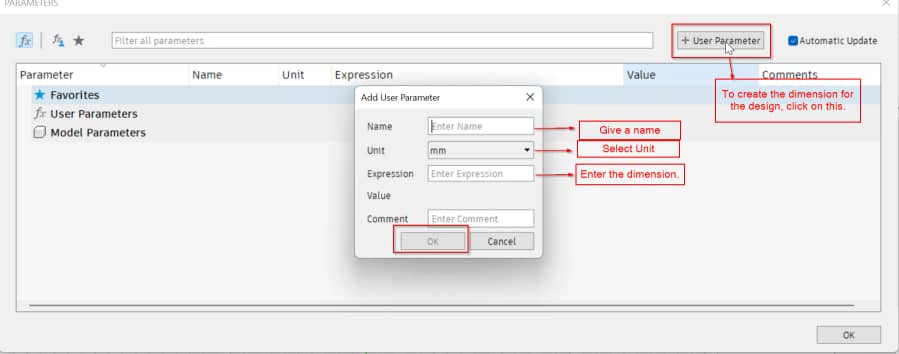
- Before I started sketching, First I set the Parameters by choosing the "Change Parameters" from the tool barr.
- To create the Parameter, click on the "User Parameter" and start naming the parameter and giving dimensions.
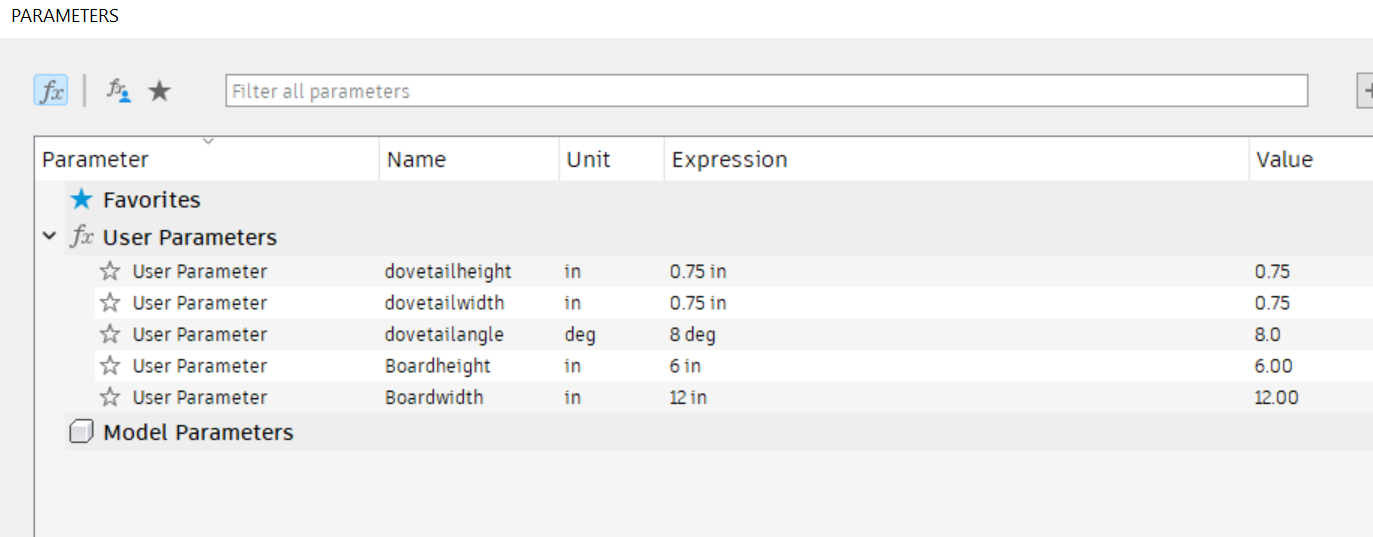
- Shown below is the Parameter that i decided to use. Setting parameters make designing much easier.
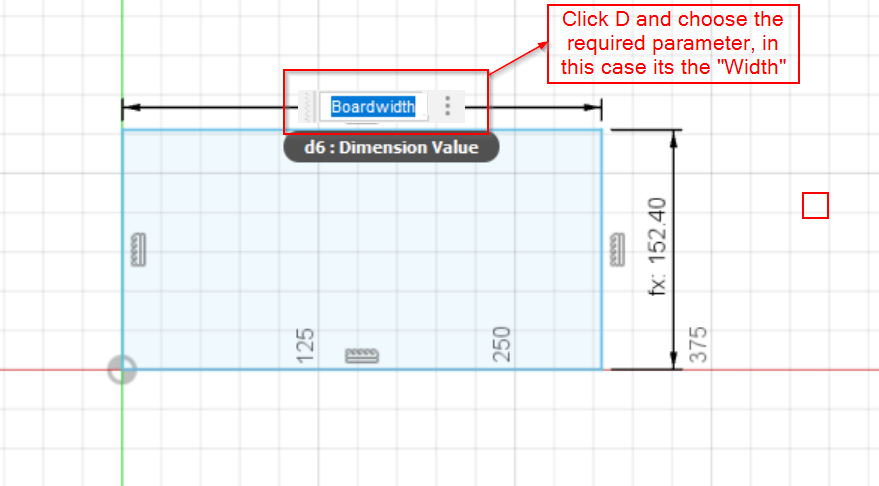
- After setting parameters, I started sketching by choosing the recatangle tool. Then gave the dimensions using Parameters.
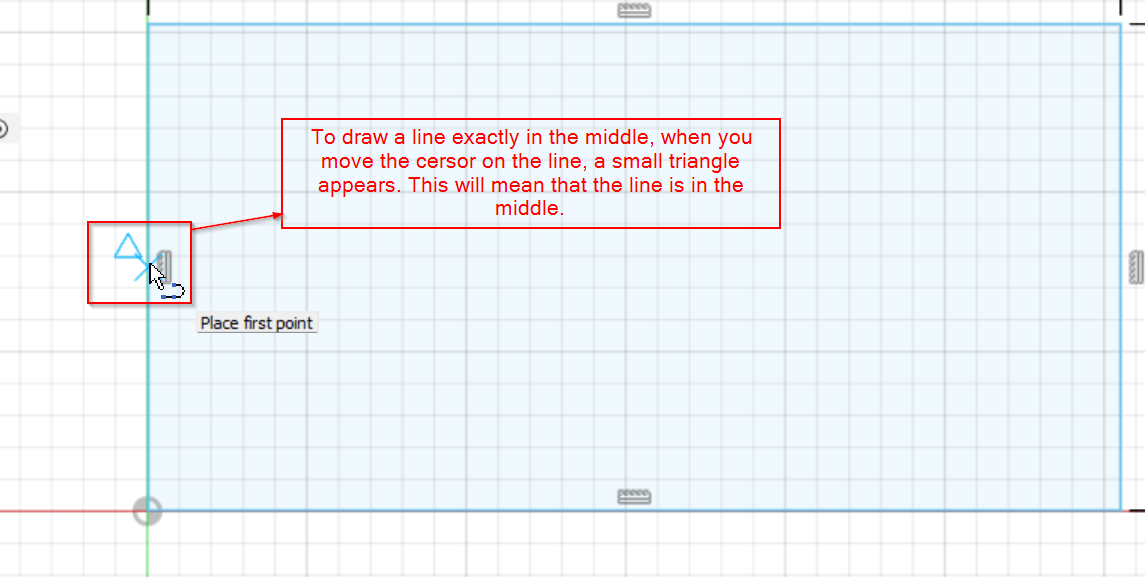
- Then I drew a line in the centre for reference to draw the dovetail joint.
- Then used the "Line" tool to draw the dovetail. Assigned the dimensions of the dovetail by using the parameter
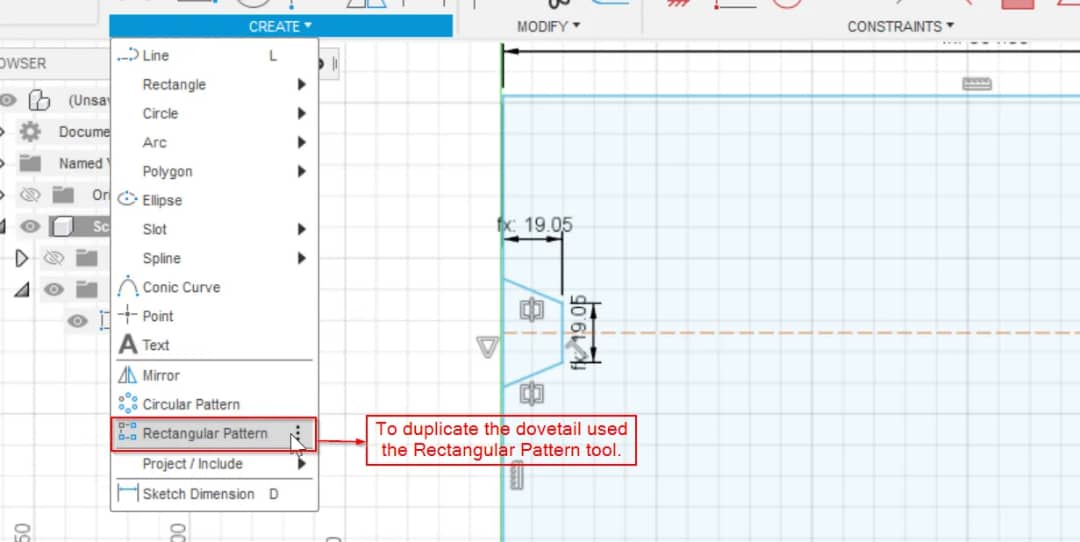
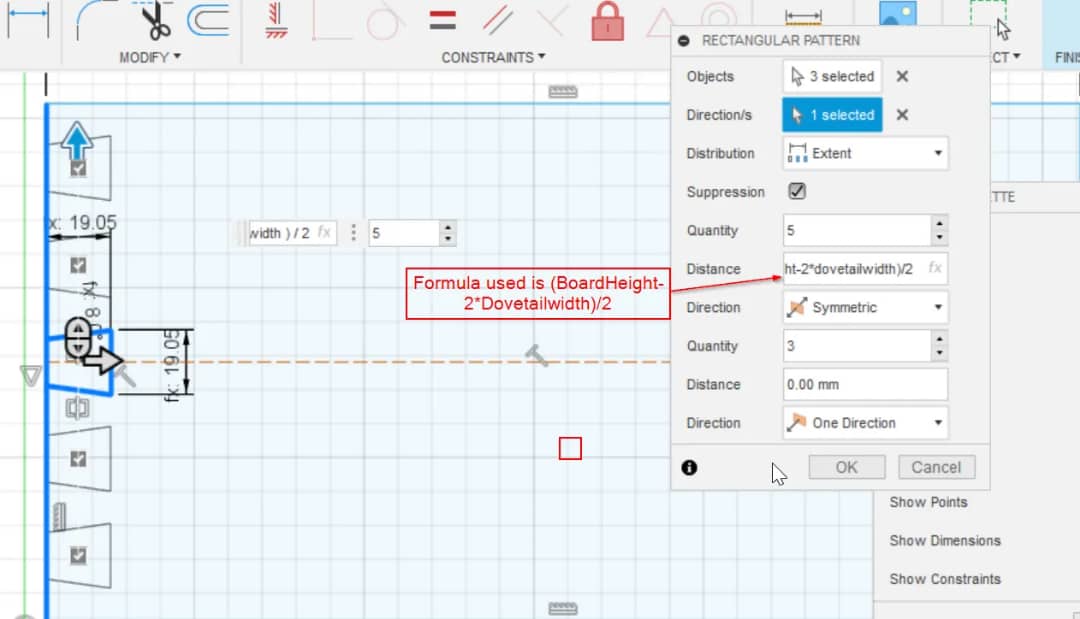
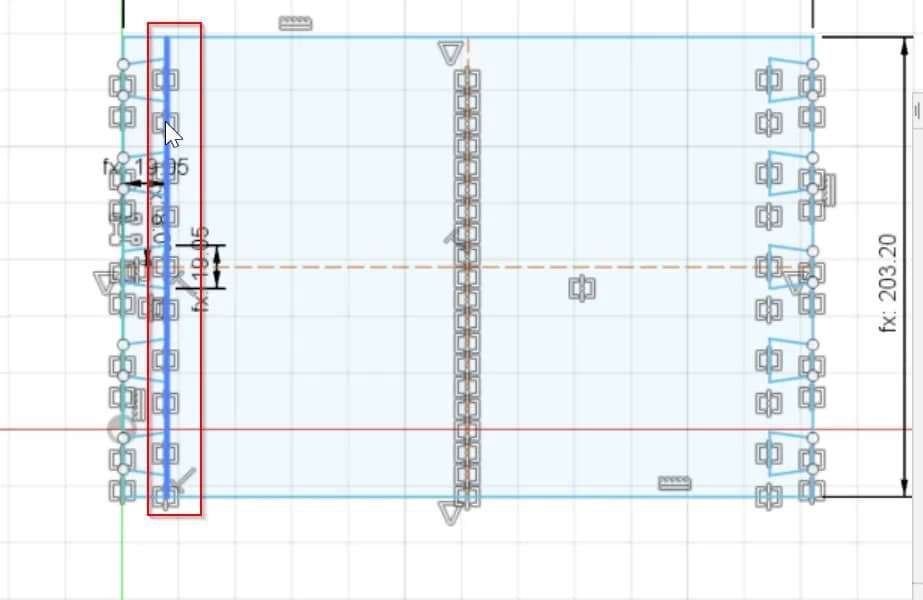
- After that needed to duplicate the dovetail so used the "Rectangle Pattern".
- To make my design comfortable and easier to work with, I set a formula for duplicating the dovetail.
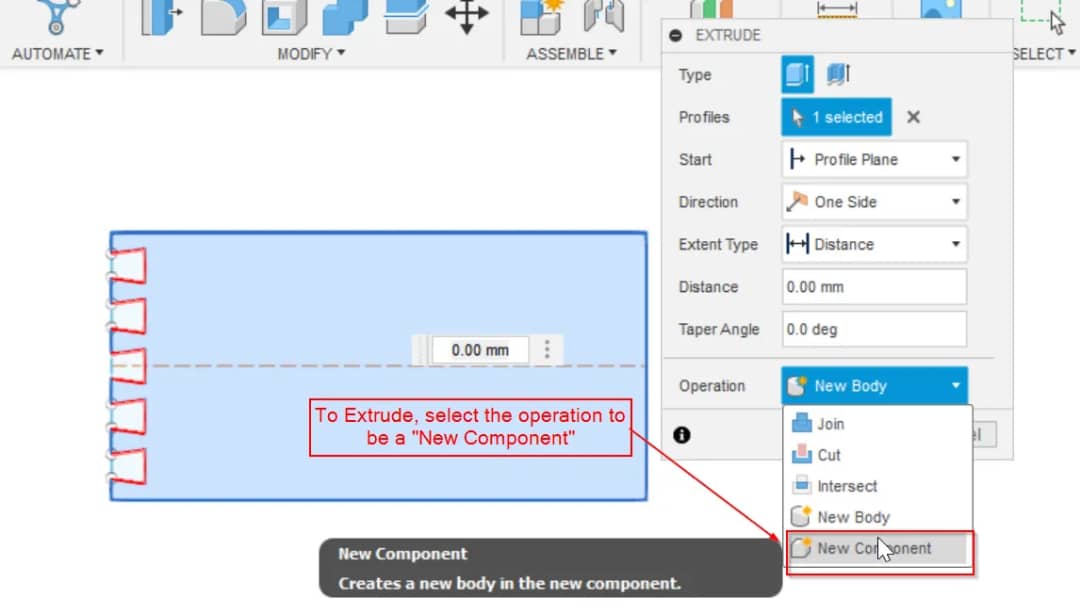
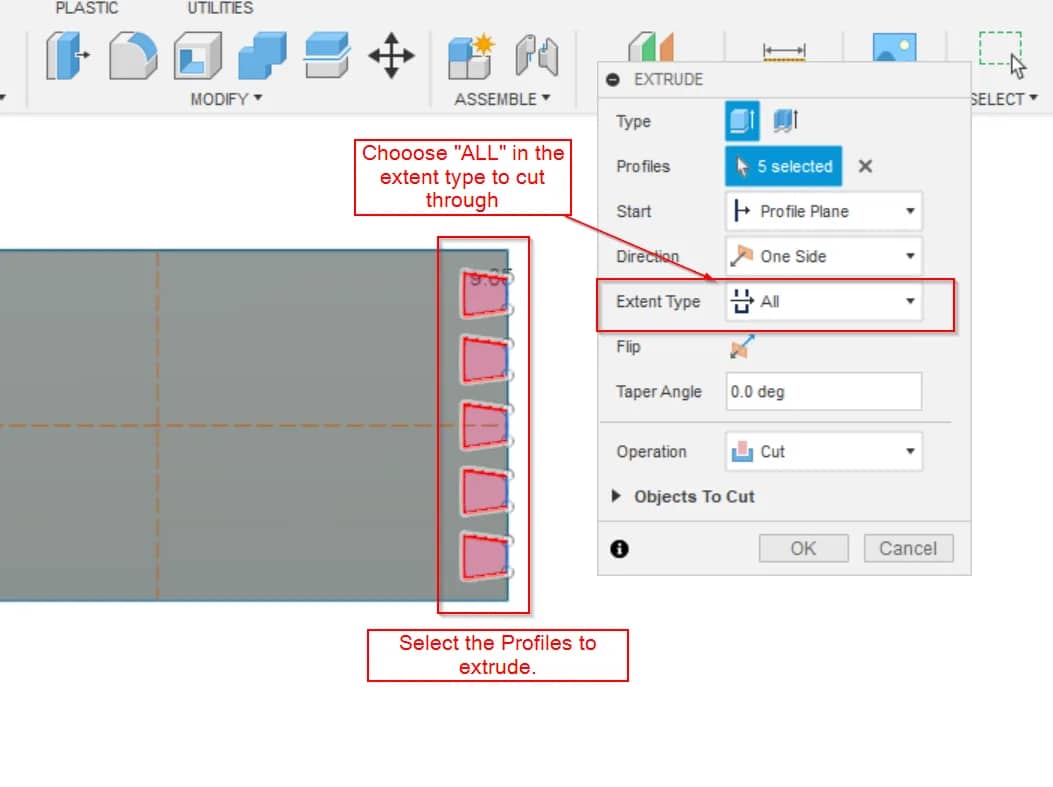
- After duplicating the dovetail, I click on "finish sketch". Then used the "Extrude" coommand to see the 3D sketch.
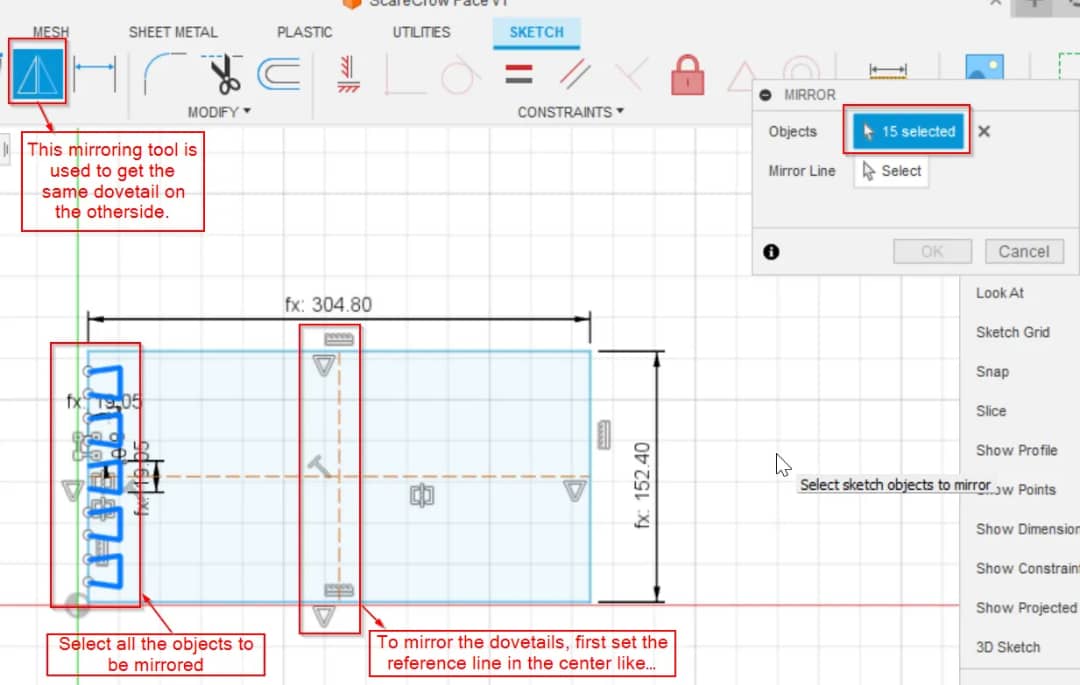
- Needed the dovetail in the otherside of the plane. To do so used the "Mirror" tool.
- Then used the "Extrude" tool on the other side of the dovertail too.
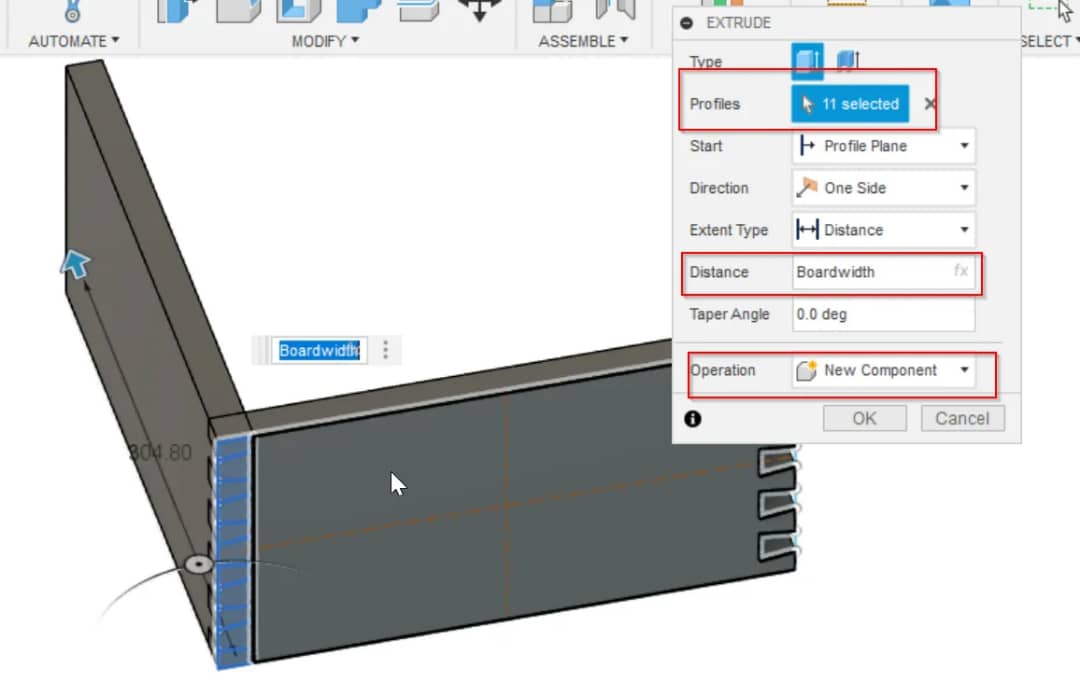
- Now for the Pinboard, I went back to the Sketch and drew a line.
- Then I used the "extrude" command for the Pinboard and used parameters to give the dimensions.
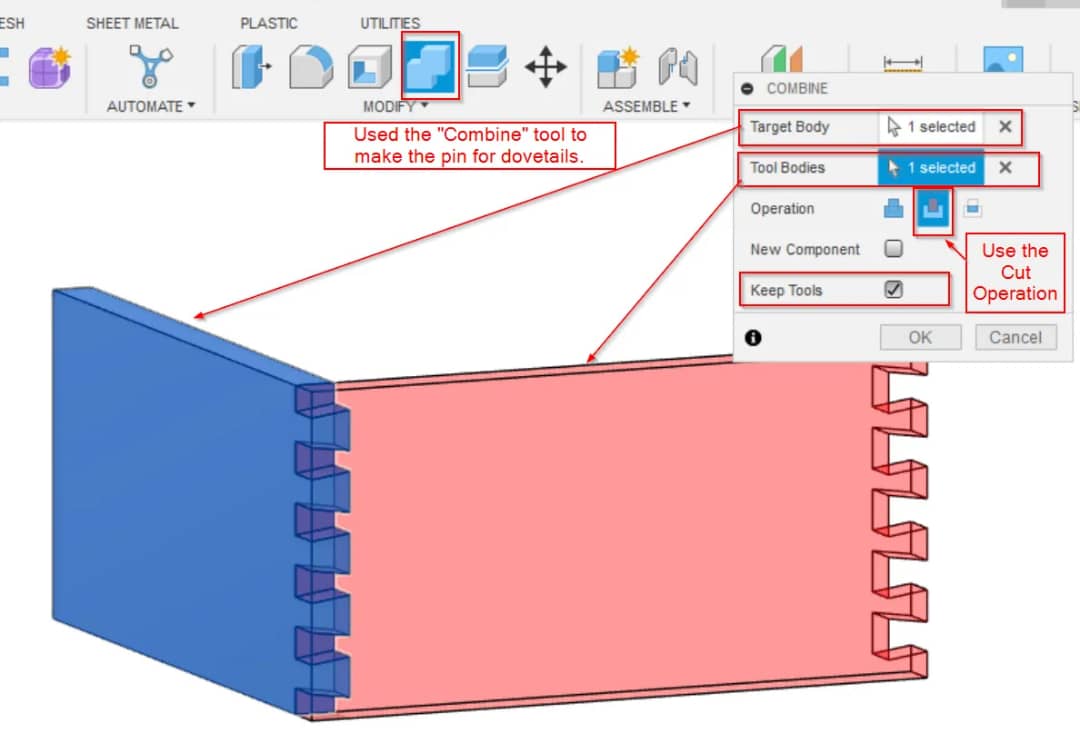
- Used the "Combine" tool to get the joints in the pinboard.
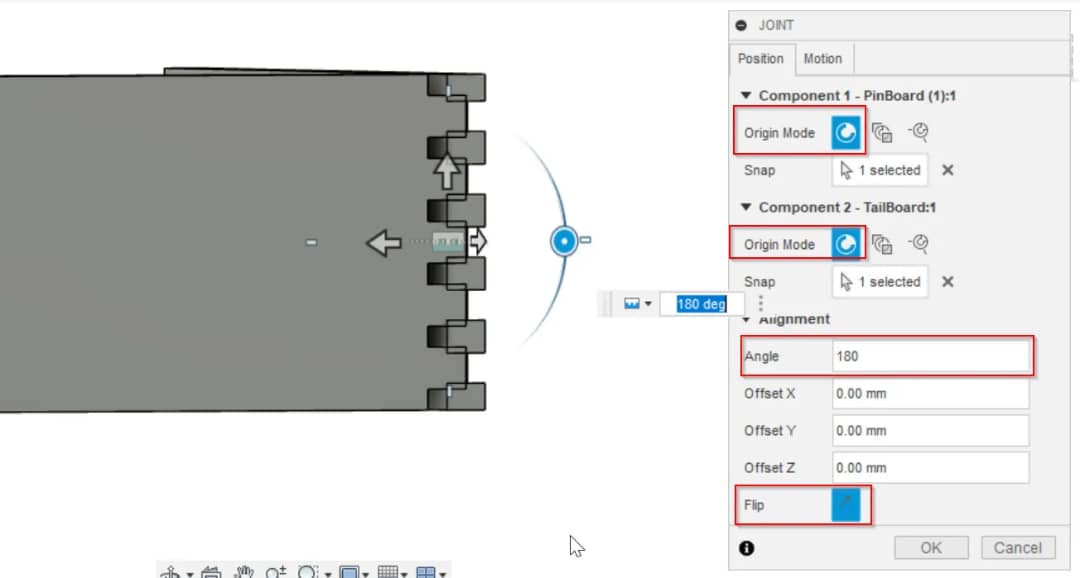
- Then I used the "Joint" tool to get the other plane of the Pinboard.
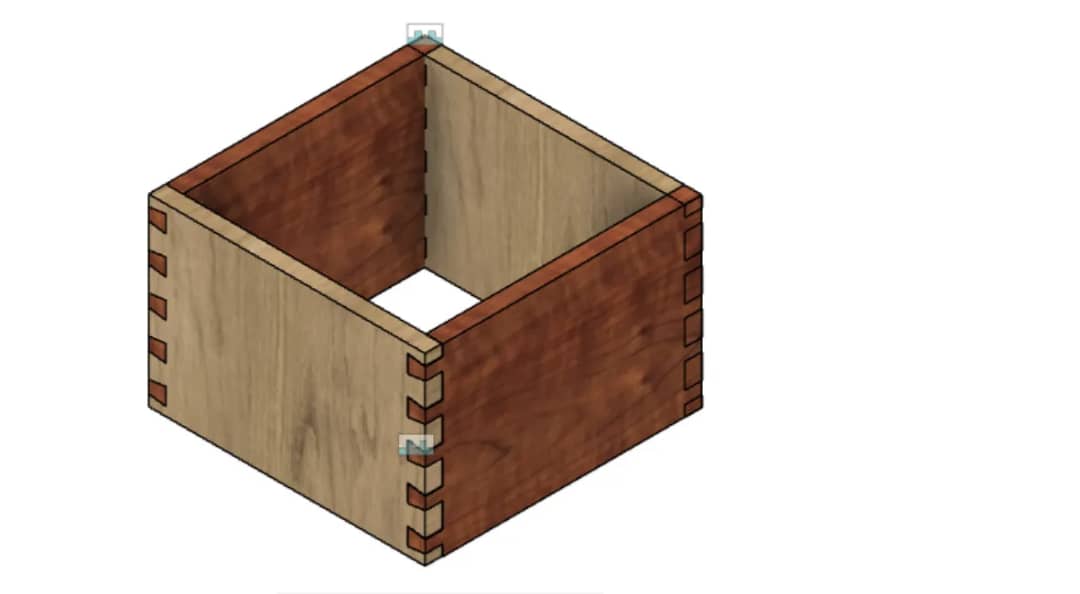
- Did the same for the Dovetail Board. Hence I could achieve the 4 sides of the Box.
- A short video of how I did the designing.

Compressing Images and Videos
We were instructed by the Instructors to use less than 100 to 150kB image sizes for our Documentation. But I had pictures that had sizes upto 2MB which was too large. I tried different Apps and softwares to compress my images in the first week.
Compressing Image using Gimp(First Failure)
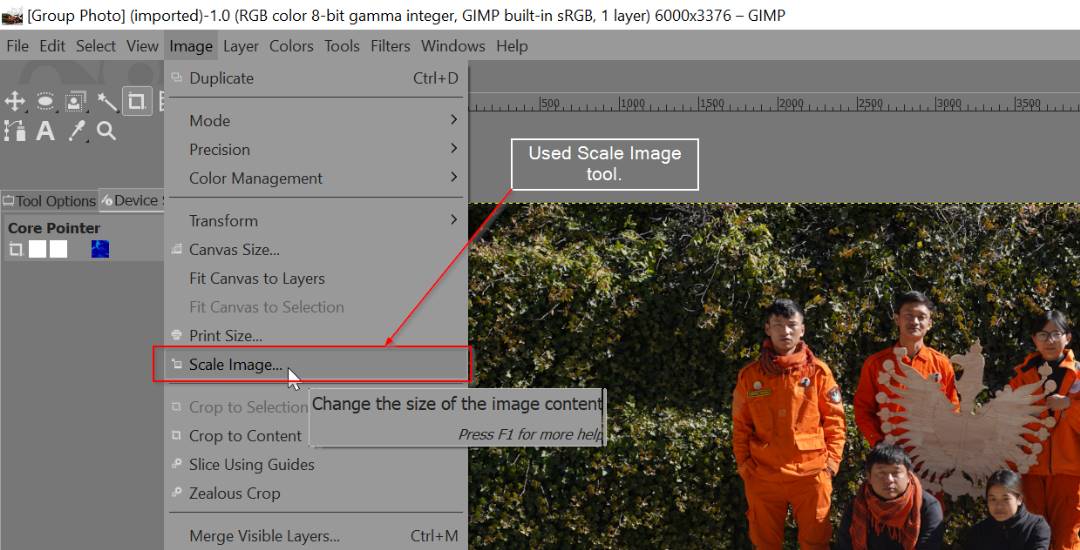
Since the Image for my Home page was very large, I tried Compressing the image by using Gimp.
- First I opened my Group Image using Gimp. Used the "Scale Image" tool.
- Changed the unit to be resized into Percent(%) and change it from 100% to 30%. Then Clicked on "Scale" and "Apply"
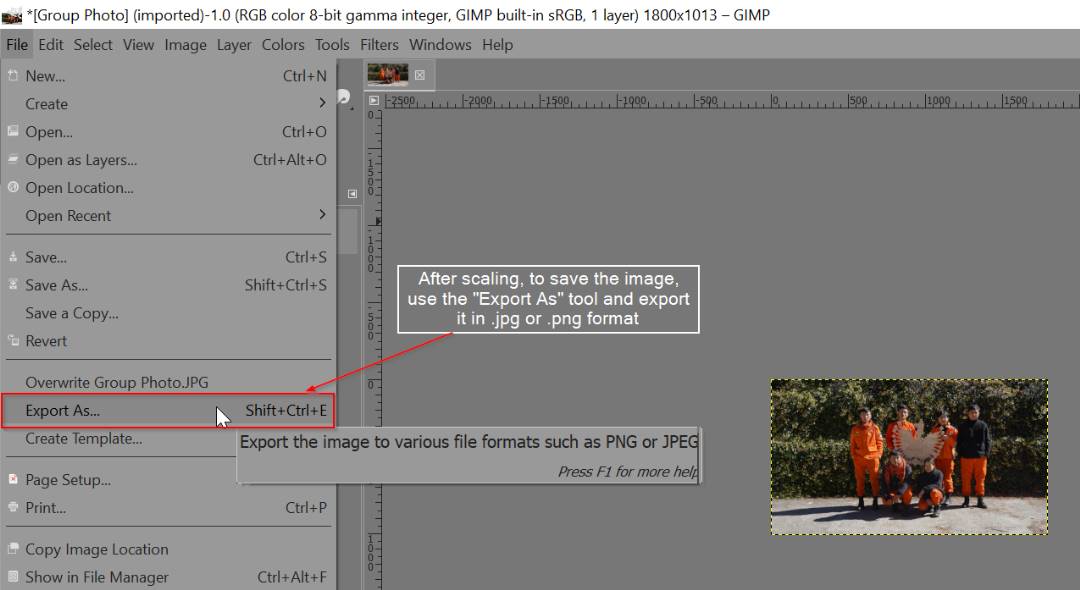
- After scaling and resizing the image, to save the new image, Used the "Export As" command. Changed the file type into .png and Saved it in the required folder.
- As you can see in the image below, the File size of the image was reduced drastically. Which was a relive for me but it was still more than what we ever suppose to use for documentation.
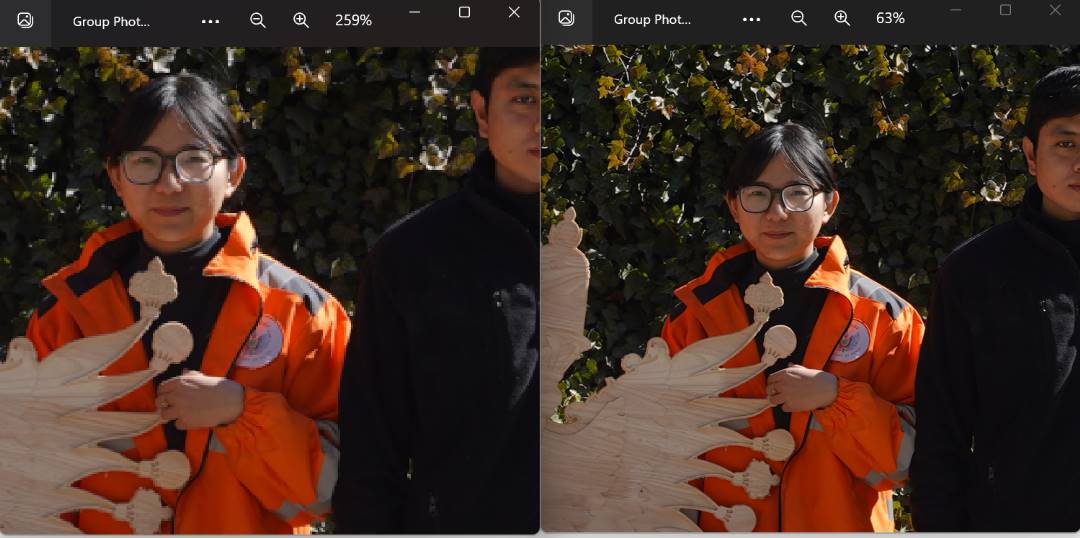
- While opening the resized image, to my dissapointment I noticed that the quality of the image was reduced and blurred. So my operation was a Failure.As we can see in the Image below, the comparison of the pictures.


Compressing Image using Online Compressor(Second Failure)
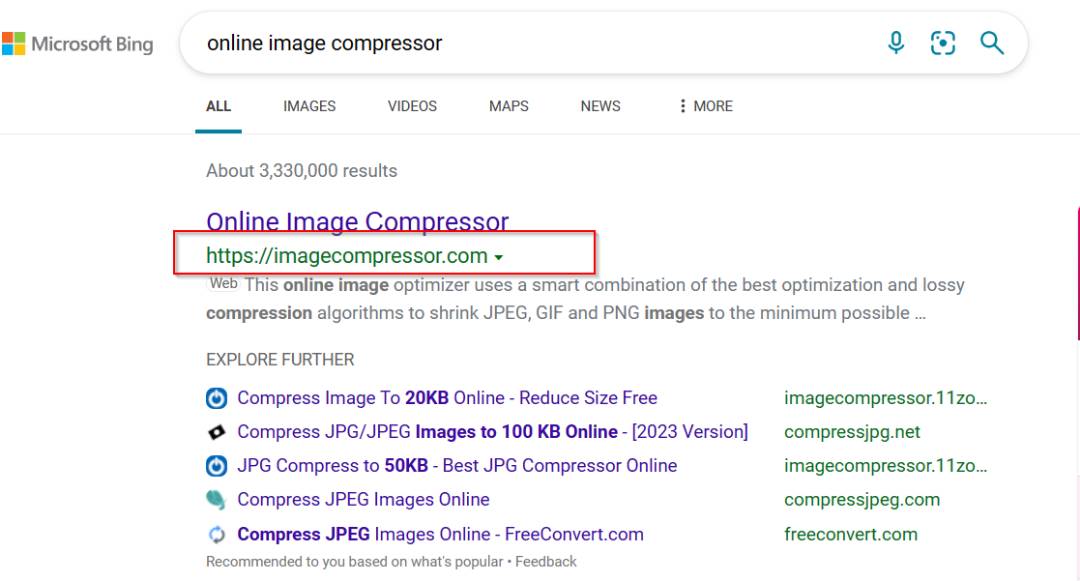
- First searched Online Image Compressor on the browser.
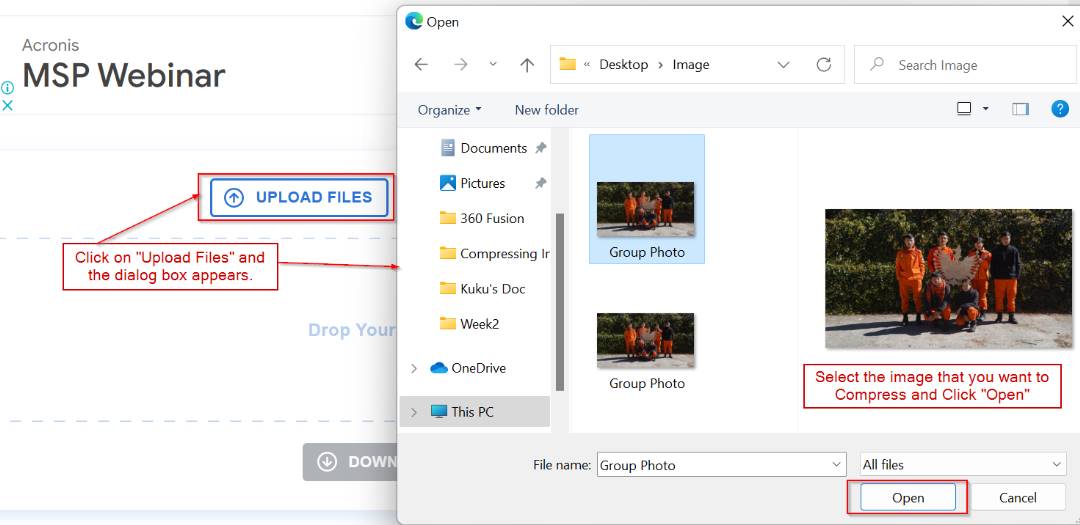
- After opening the webpage, Clicked on the "Upload File", choose the Image to be compressed and Click "open"
- After uploading, the compression process is carried out automatically.Then after compression is done, Just have to Download the image.
- The image was compressed from 17MB to 2MB, which was great but still the image size was too big to be used for Documentation.
- Suprisngly the image quality was fine compared to Gimp but still the size of the file was too large for my documentation. Hence another failure.


Using Messenger as a Image Compresser
As I was getting impatient, I was advised by my Pre-Fab Instructors to try using a very simple method to do the Compression. When i Shared it with my friends and Instructors, they found it funny yet impressed by the Idea. So the Idea was to use "Messenger" app which is the chatting app for Facebook users.
All i had to do was sent my image to a friend.Then use my phone to download the image again. And transfer the downloaded image in my PC. You would be surpirsed to know that the size of my image was reduced from 17MB to 300KB.Hence Messenger Saved the day!

The file size was still a problem since it was exceeding 150KB but the good part was that the quality of image wasnt compromised.So I went ahead with it.
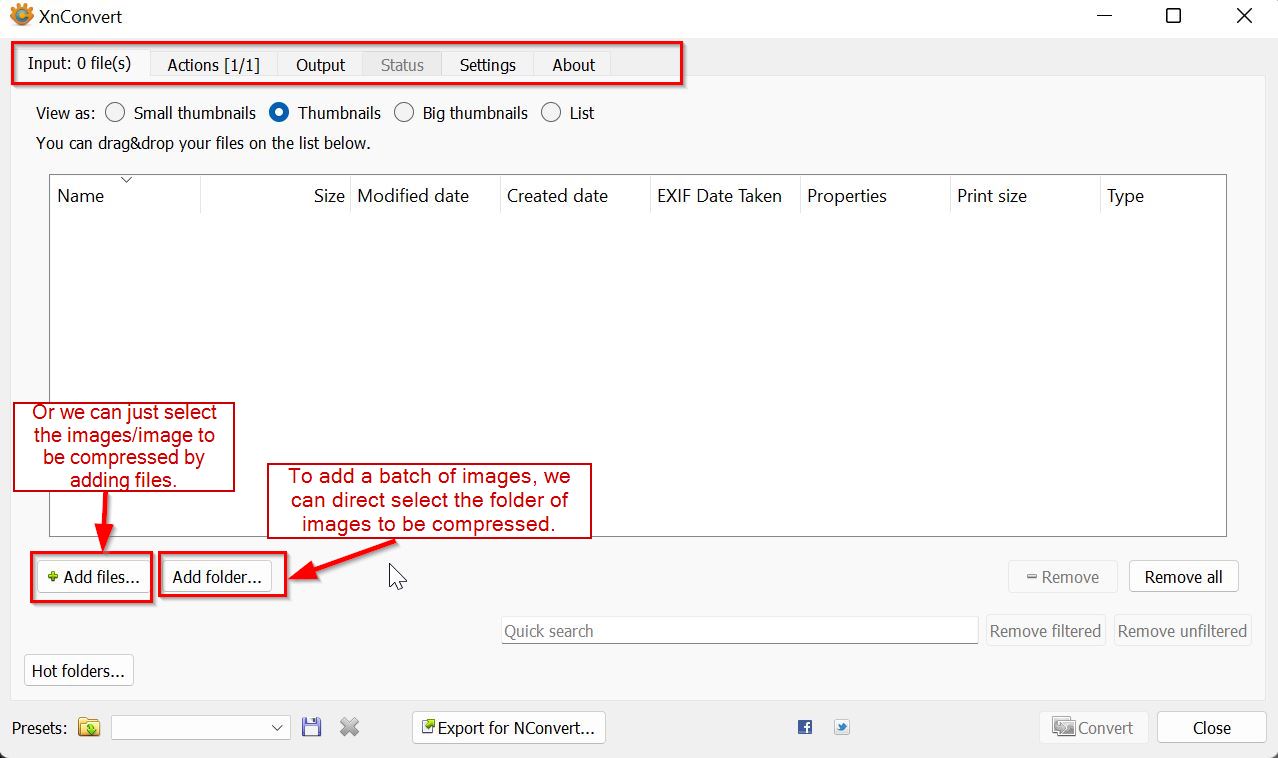
Using XnConvert to compress Images.
- Xnconvert is a free image converter software which converts/compresses images in a batch(group of images).
- It is fast i.e it converts batches of images in a very short period of time(in seconds).
- It was very user friendly.
- It has many features like resize,crop, colour adjustments, filter, and so on.
- Here is a link to download the software.
- We can directly select a folder of images to be converted or just select images.
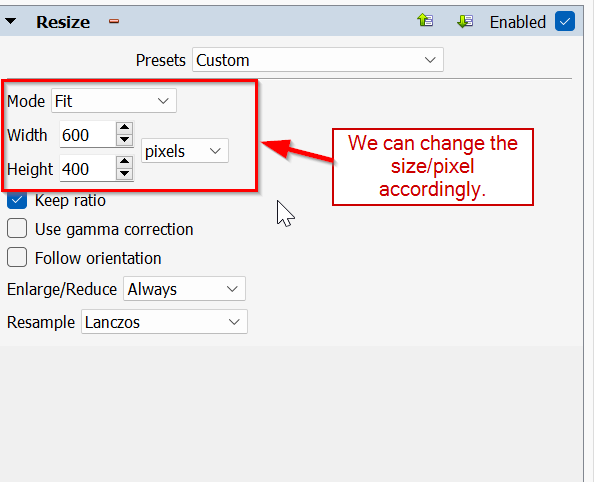
- After selecting the images, then in "Action", we can change the size of the image that we want.
- Then in "Output", we can select the location where we want the converted images to be.
- After selecting the location, we can now proceed to convert the images
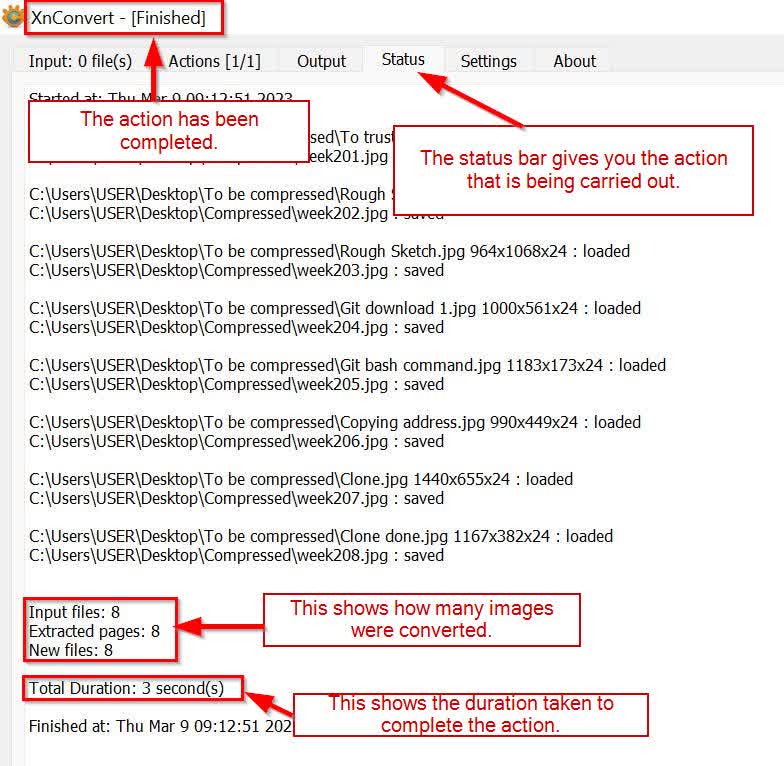
- Then in "Status", the action thats being carried out will be shown. It will give us the time taken to complete the conversion. Then we can close the XnConvert.
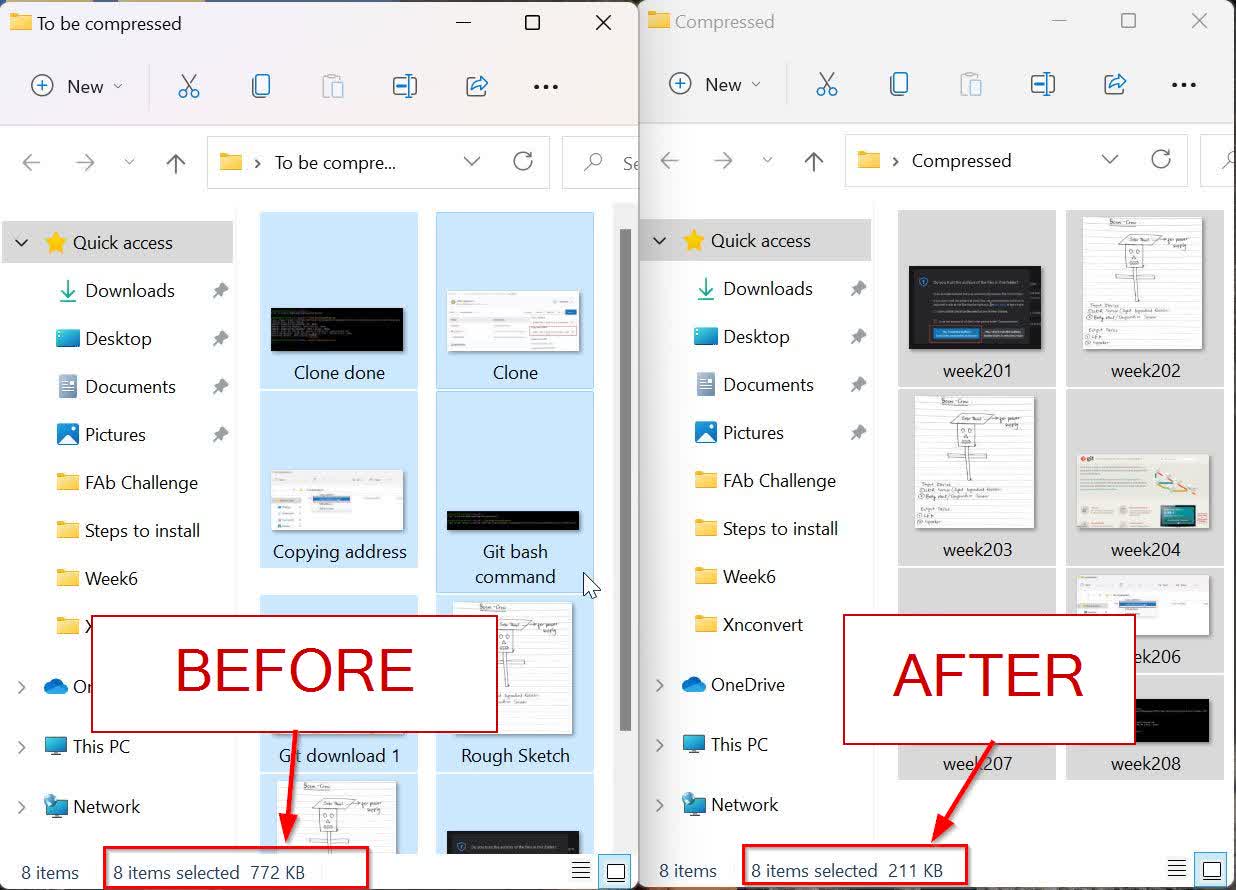
- We can see the "Before" and "After" of the file size.
- The quality of the images were compromised but the end result was satisfying.


Video Compressing
For video compressing I used a shortcut. Since Chatting Apps were working for compressing my images, I tried compressing my videos using the same technique.
I was not sure weather it will work or not but it was worth the try.
- First i send the video that i wanted to compress to my friend on Whatsapp.
- After that i redownloaded the video from Whatsapp and Saved it in a folder.
- To my surprise, the size of the video was also hugely reduced.As you can see in the image below.

Using Ffmpeg As Video Compressor
- To be completely honest, I wasn't really excited to use Ffmpeg since it wasn't a easy download and use kind of software.
- First didnt know where to go for download, and even when I found the file, it couldn't be opened since the file type wasn't umdetstood by the Windows.
- Anyways I didnt give up since I've heard priases about Ffmpeg from my Instructor and friends.
- Finally came across a Youtube tutorial which helped me download, convert the zipped folder and install ffmpeg.
- First go to the link todownload
- Then to install the files for windows, select any of the two options. I went with the first one.
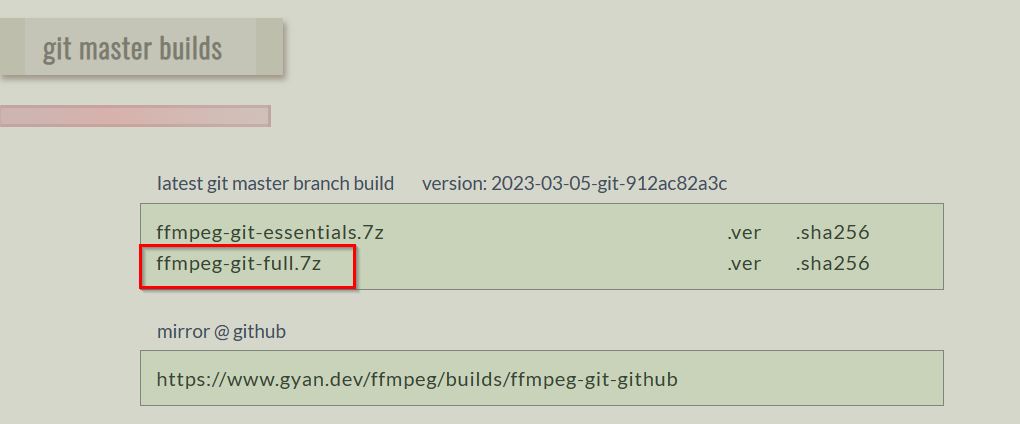
- Then under git master builds, I went ahead and downloaded the full build.
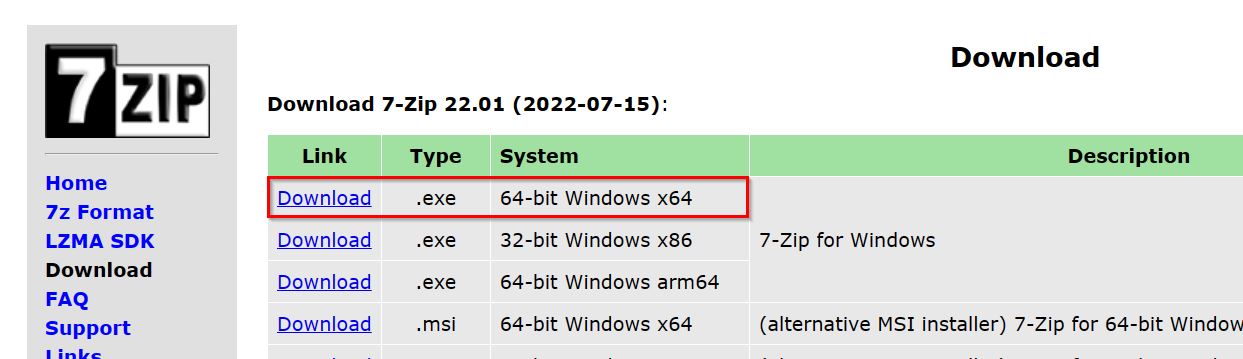
- The files comes in 8.7z file and windows doesn't quite know what it is. This is similar to zip or rar archive so we need a special tool to open it up called 7-zip. There are other types also but I went ahead and downloaded 7-zip. Then installed it.
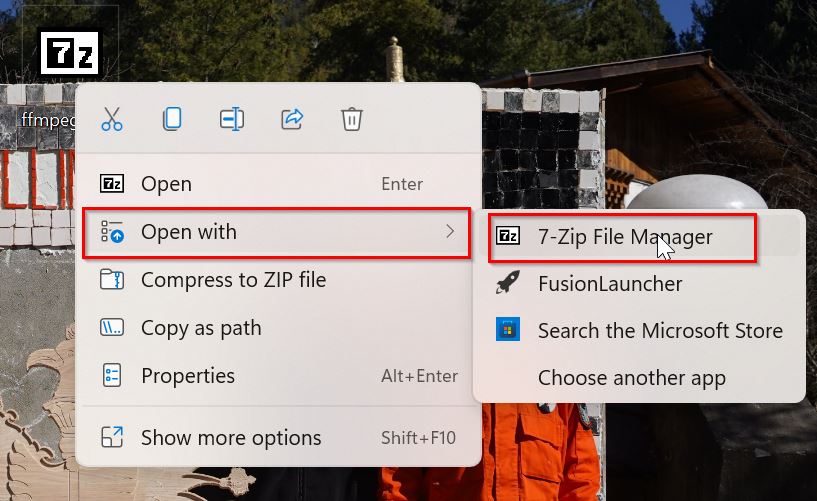
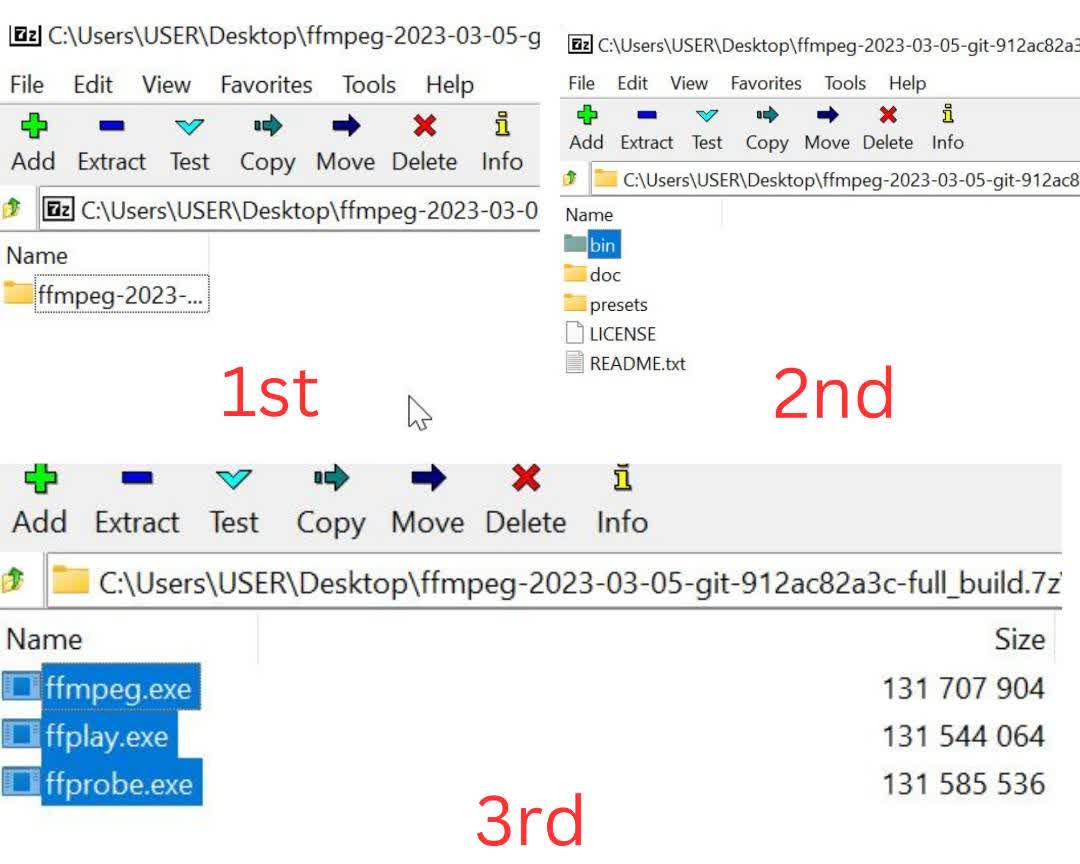
- After downloading the build file, opened it with 7-zip.Hence the folder was upzipped.
- Then opened the file, opened "Bin" and here we can find all the exe file that we need.
- Then go to Window(C) of your PC and create a new folder and rename it. And add all the 3 exe files in here.
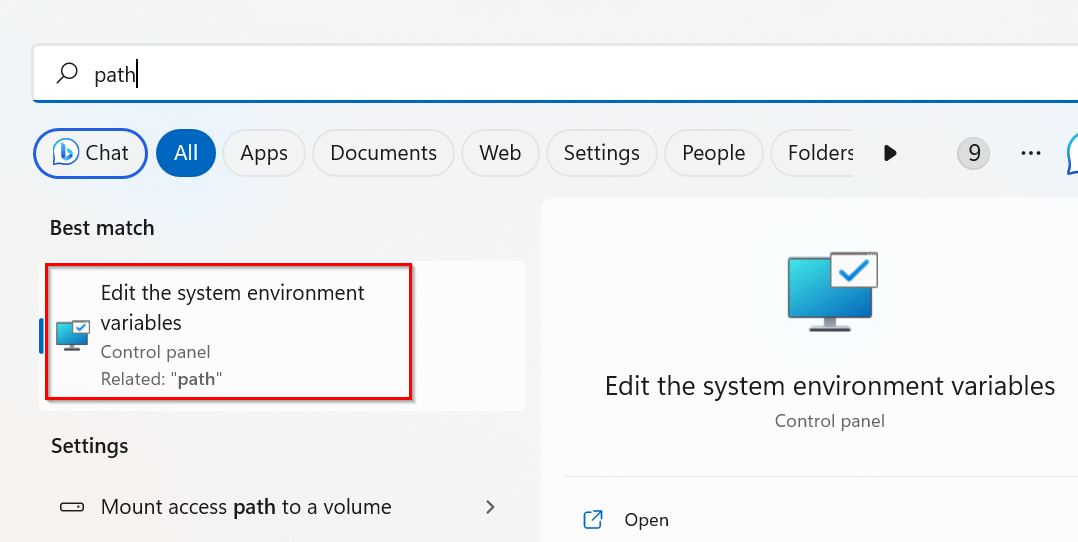
- Then to let window know where the ffmpeg file is, first search for Path.
- Then go to "Environment Variables" in the bottom left corner, then open "Path".
- In "Path", select "New" and paste the path/address to the folder where you added all the exe files.
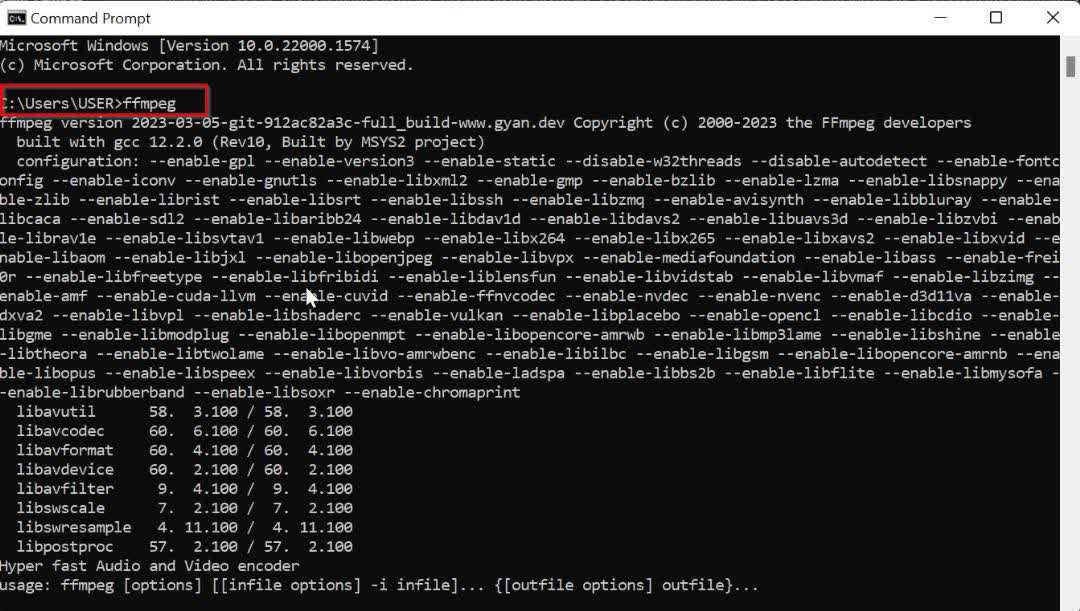
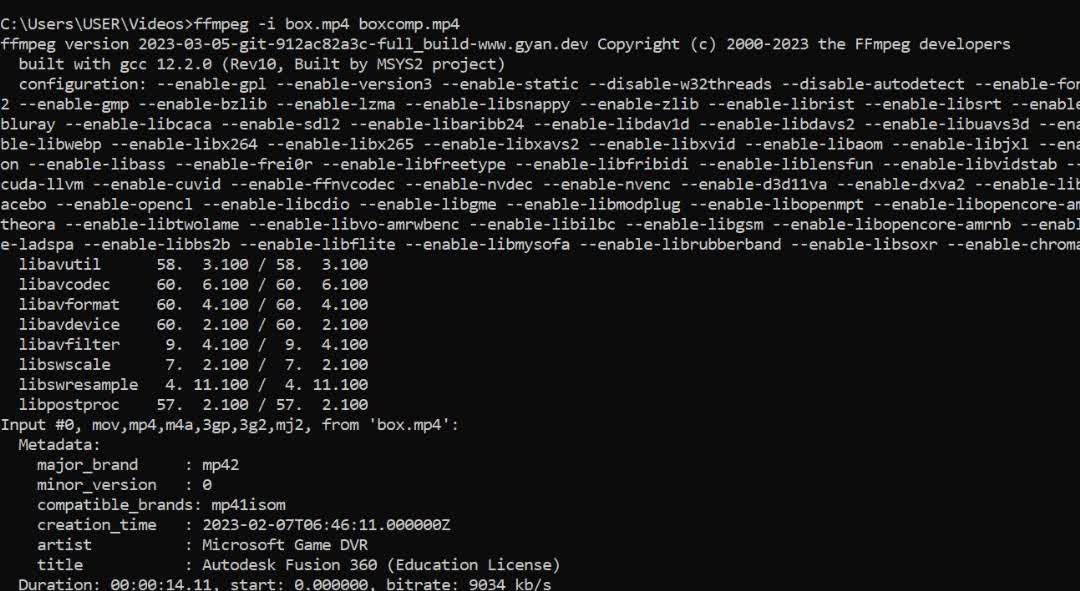
- The installation is complete and to see whether is was a success or not, go to "Command Prompt" and type "ffmpeg". If the result comes as follows, then the installation is a Sucess.
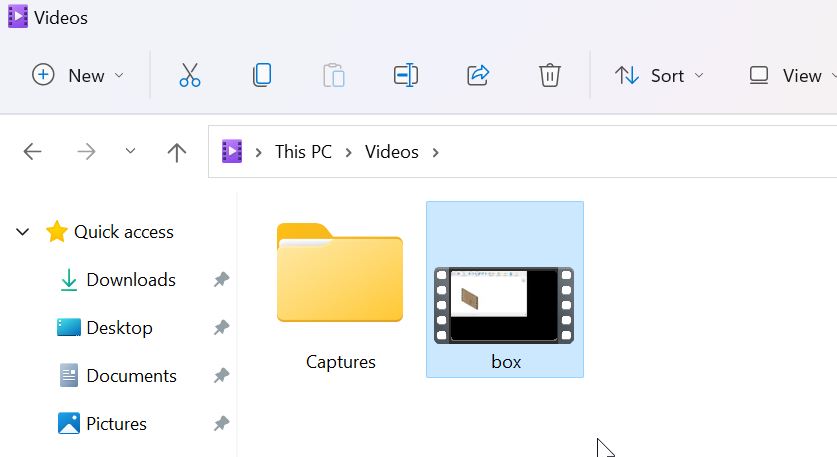
- Now to proceed with compressing a video, first make sure to have all the videos you want to compress in the Videos folder of the PC. This is to reduce any confusions with running the command.
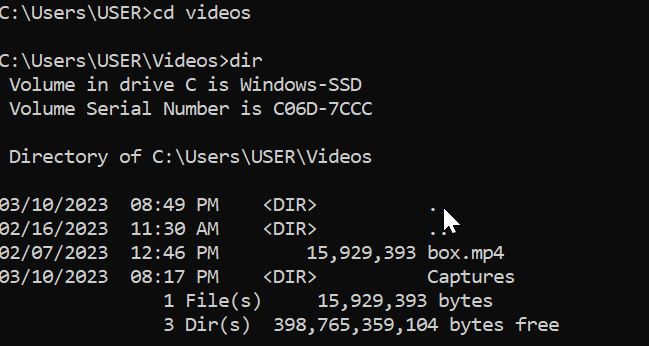
- To run the command, open the Command prompt. Then go to videos folder by typing "cd videos". This will take the command to the location of the video.
- Then open the directory of Videos which will show all the videos in the folder. To do so type "dir", I can find the video I want to compress, i.e box
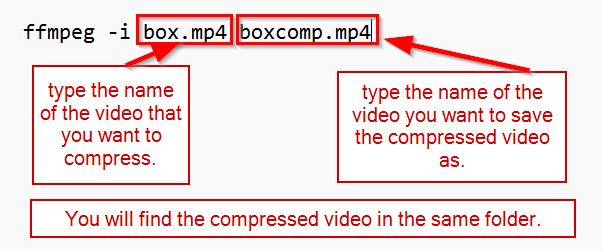
- Then to compress the video, type the following command
- This is a simple command which compresses the video and also maintains the quality of the video.
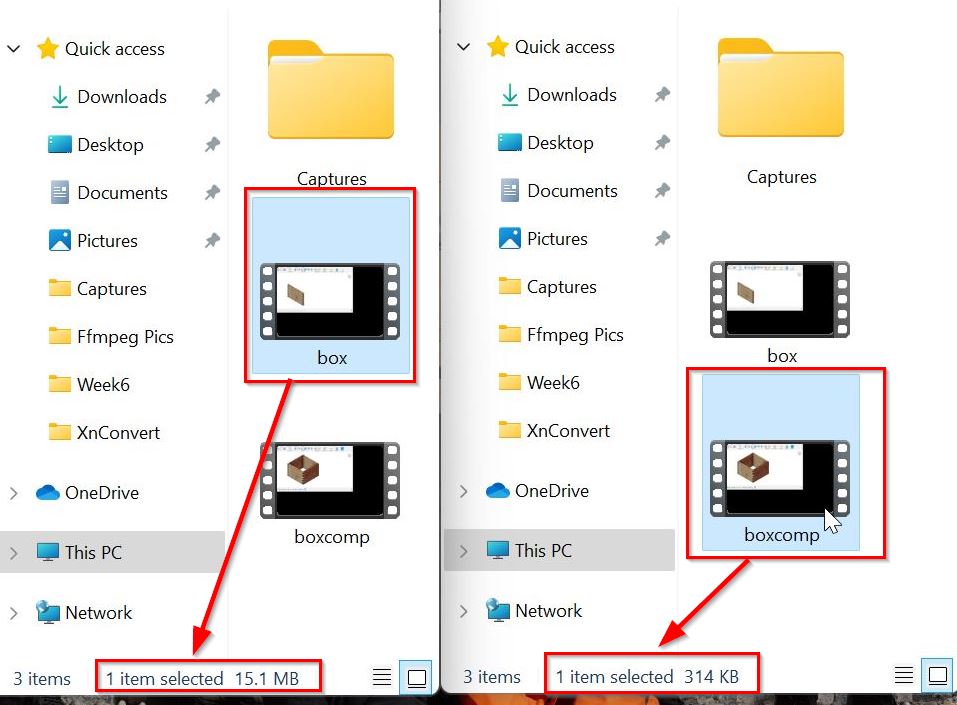
- After the operation has been completed, then we can go to the "Videos" folder and see the compressed video.
- The video size has been compressed sucessfully.
- Now that I've learnt to use ffmpeg, I find it easier and less time comsuming. Thank God I tired ffmpeg.