Week 3. Computer Controlled Cutting
Introduction 🖊
This week relates to the laser cutting and vinyl machines. Our first “hands on” week! I was looking forward to it 😀 We’ll also start with the group assignments - a good way to learn the machine’s basics with your fellows while playing with its parameters.
Fab Assignments 📚
- Group Assignment: Characterize your lasercutter’s focus, power, speed, rate, kerf, joint clearance and types. ✔️
- Individual Assignment:
- Cut something on the vinylcutter. ✔️
- Design, lasercut, and document a parametric construction kit, accounting for the lasercutter kerf, which can be assembled in multiple ways, and for extra credit include elements that aren’t flat. ✔️
My Goals 🎯
-
What I think I already know:
- I already have experience with fiber lasers cutters because of my previous work. But I never used the C02 laser cutting machine.
- Regarding the vinyl cutting, I used it in school to make some stickers (mono-color) for personal projects, but I never used the machine in an advanced/experimenting way.
-
What I want to learn related to the laser cutter machine:
- Try out different kind of joints with: cardboard, wood & thick plastic.
- Try out “living hinges” with: cardboard, wood & thick plastic. ✔️
- Try to make my firt bioplastic. ✔️
- Upcycling project 1: make a lampshade with a parametric design for the lamp that I found close by my place in Amsterdam. ✔️
-
What I want to learn related to the laser vynil machine:
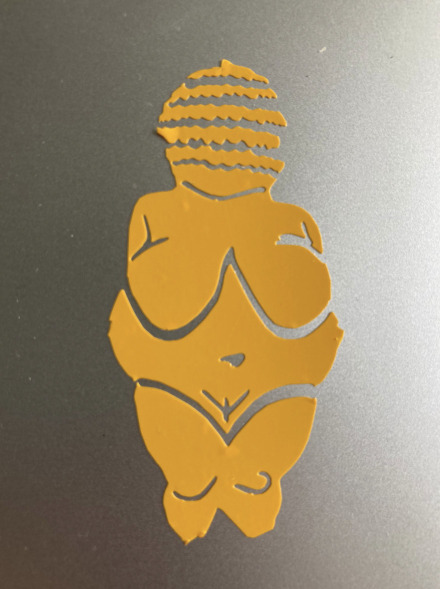
- Try to make a sticker with the “Venus of Willendorf” design. ✔️
- Upcycling project: make a cool design to print on the blue coffee cup that I found.
Files 📂
| Name | Description | Link |
|---|---|---|
| File 0 | Lampshade 3D - Fusion 360 | Link |
| File 1 | Lampshade 3D - File ready for Laser cutting | Link |
| File 2 | Venus - File ready to use with the Vynil Cutter Machine | [Link](https://gitlab.fabcloud.org/academany/fabacademy/2022/labs/waag/students/paola-zanchetta/-/blob/master/static/week3/WEEK_3%20_2.stl.svg |
Results 🖖
Parametric fit kit
Lampshade scale 1:3
Venus of Willendorf sticker
Laser Cutting
This week we have been introduced to two machines. The first one is the laser cutter machine, which is one of the most used machines within the Fablab world - and also one of the most dangerous since is easy to make fire with it!.
I still remember very existed about my first laser creation in School, We had to develop this “Christmas ball”! A nice project to start experimenting about parametric design.
General Intructions
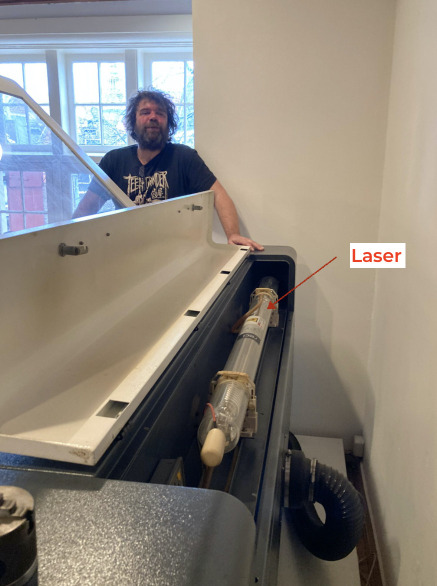
At the “Waag” we have a big CO2 BRM machine, which takes up a huge space of the Fablab. Even if it’s a 10 yeard old machine, Henk hack it with a new controller and electronics in order to be able to use it with the latest software! Thanks for that, you make our life much easier 👍
The C02 BRM machine works in 2 axes ( X and Y) and you can fix the Z-axis to a fixed point. This is handy to be able to work with different kinds of materials.
The max material surface we can use is: 1600 x 1200 mm.

The machine’s laser is located in its back part. In order to cool down the laser, there is an air ventilation system that should be turned on before using the machine - it sounds like a loud monster.
Also, there is a water system to cool down the laser which automatically activates when the laser is active.
There are three mirrors used to guide the laser beam into the head. Once in a while, they need to be cleaned, Henk showed us how to clean them with alcohol and ear swabs. We also learned how to put back the lenses - in case of future needs. The curve side of the lenses needs to be on the bottom in order to focus corectly!
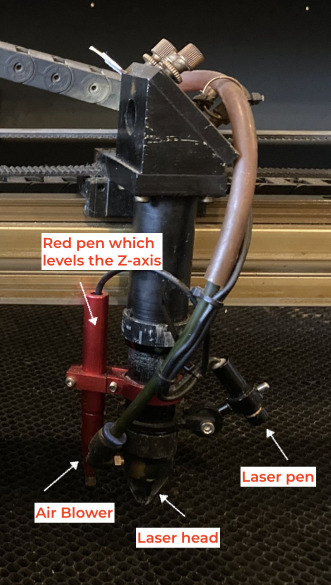
The laser beam is finally guided into a smaller beam with a lens located in the head. Connected to the laser head, there are a few important parts:
- A laser pen light that points to the origin on the material.
- A red pen that levels the Z-axis.
- An Air blower pointing to the laser head.
In order to start working with the laser machine, it should be on before using the software.
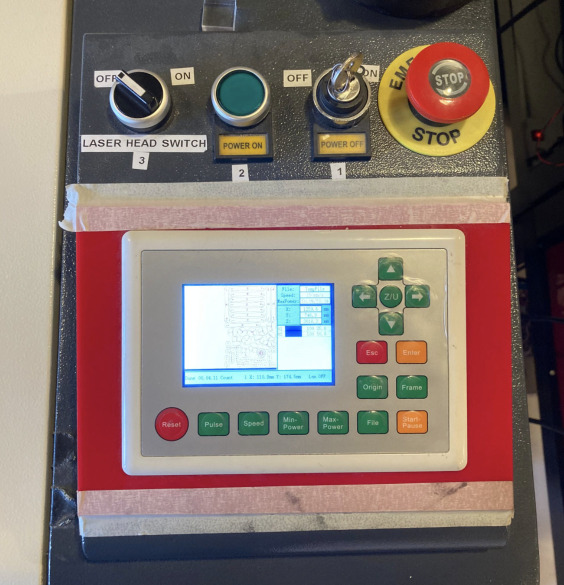
The new controller installed by Henk is located on the right side of the machine. There are three main buttons, starting from right to left:
- Red Big Button: emergency button, use it when you want to completely stop the machine in case of danger.
- Key: use it to turn on / off the laser machine.
- Green button: tap it to turn on the machine.
- Black button: use it to switch on / off the laser head.
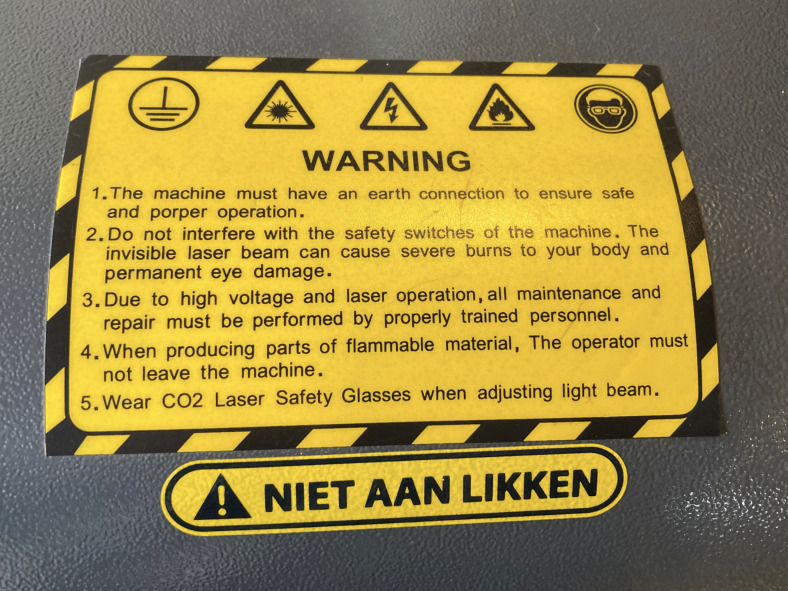
Safe instructions
Since the laser cutter machine can be sometimes a bit dangerous, there are a few rules which we need to follow in order to ensure safery in the Fablab:
Operating with the Laser machine
Once you followed the previous steps to turn the laser on - always carrying about your safty - you will be ready to set up your filds and material to make precious laser cuttings!
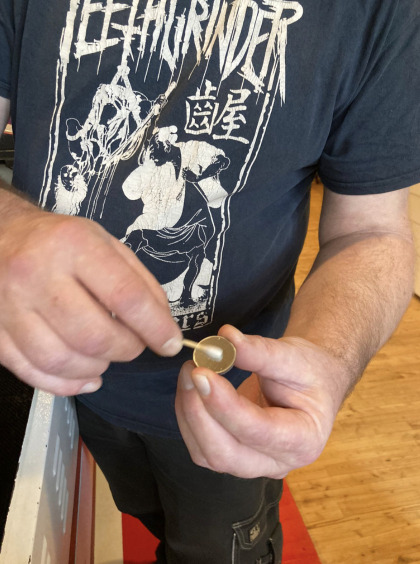
In order to correctly locate the material, you will need to put it on the board and calibrate the distance between it and the laser head. To do that, you can use the “wood calibrator” next to the laser.
When I talk about “calibrate” I mean fixing the distance between the material and the laser head. In this way you will be able to follow the Power and Speed intructions that Michelle prepare for the Waag fabLab students - Thanks for that! :)
Group Assignment Process 🏊♀️ 🏊🏾 🏊🏽♀️
I did my group assignment with Joany. We characterized the Waag lasercutter’s parameters for “grayboard”.
- Power & Speed
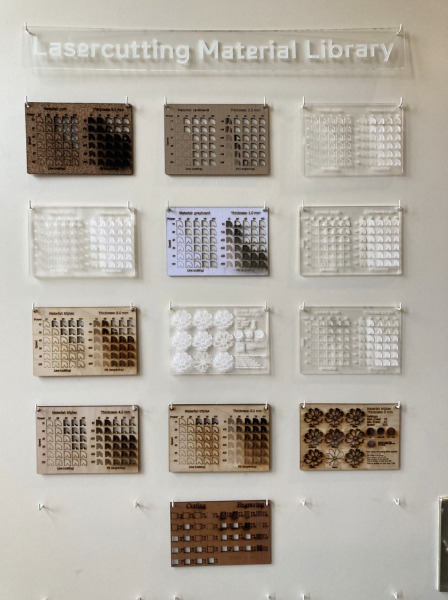
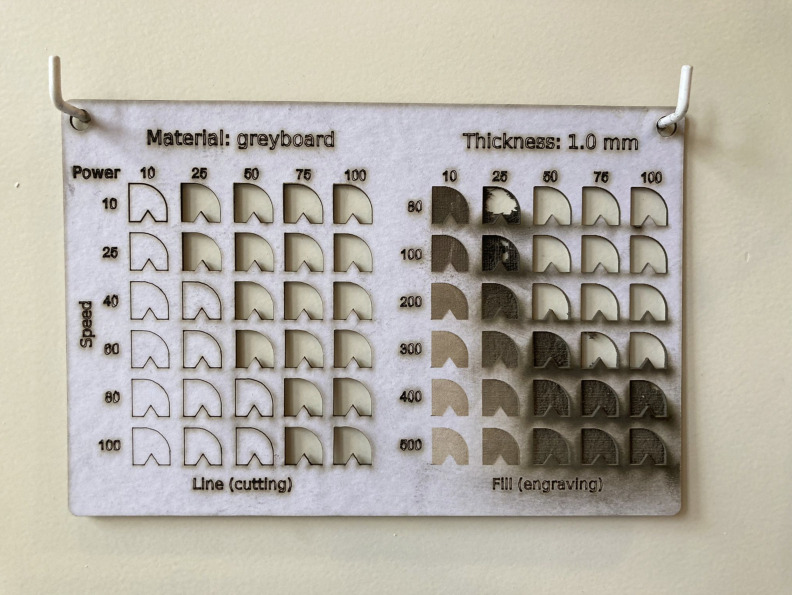
In order to understand Speen and Power, Michelle prepared for the Fablab students a “Lasercutter Material Library” for each material. In this way, understanding what they mean and which are the right parameters for grayboard and other materials have been quite easy task!
There are a few things which we should take into account when we talk about Speed and Power:
-
You always need to variant the Power and Speed when using different materials. Also when you use the same material you may need to change the parameters, depending on the kerf and the material thickness.
-
The most efficient way of working is looking for the max Speed and the less Power needed to cut the material. In this way, it goes faster.
-
The power has 2 different parameters. One for the lines = max power, and a second one for the corners = min power.
Joany and I used the following parameters in other to cut our first pieces of grayboard:
| Parameters | Number |
|---|---|
| Speed | 20 |
| Power Max | 50 |
| Power min | 45 |
It was to less power, so Id didn’t cut the material and we had to try again modifing max Power to 75.
| Parameters | Number |
|---|---|
| Speed | 20 |
| Power Max | 75 |
| Power min | 65 |
This time it worked out!
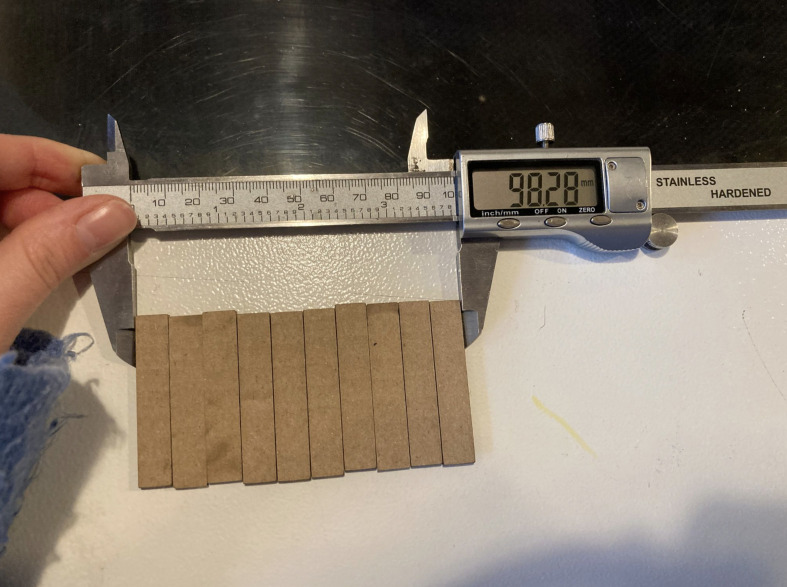
- Kerf
The next step was finding the material’s “Kerf”. This is the % that the machine cuts out when cutting a draw. In fact, the laser cutter eats materials on both sides of each draw’s line.
In order to calculate it, we drew directly in the “LightBurn” program 10 rectangles which we could use to calculate the space left the cuts.
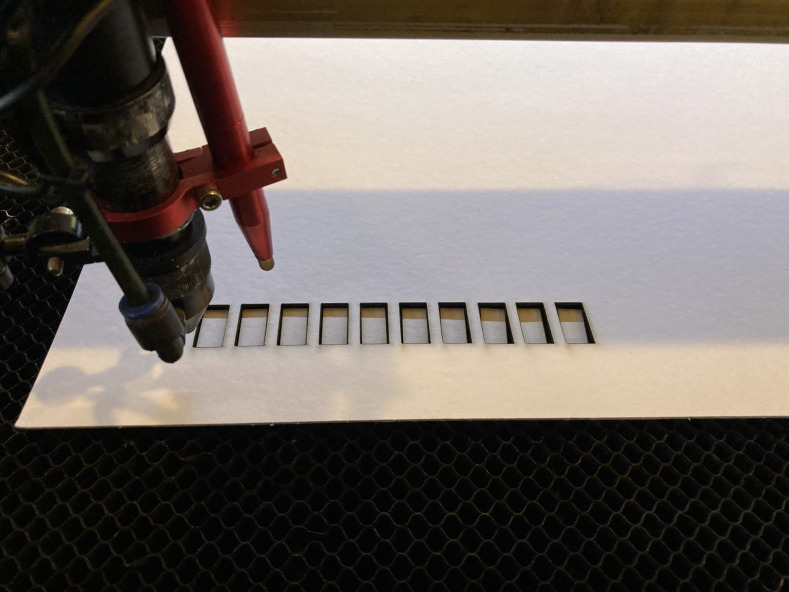
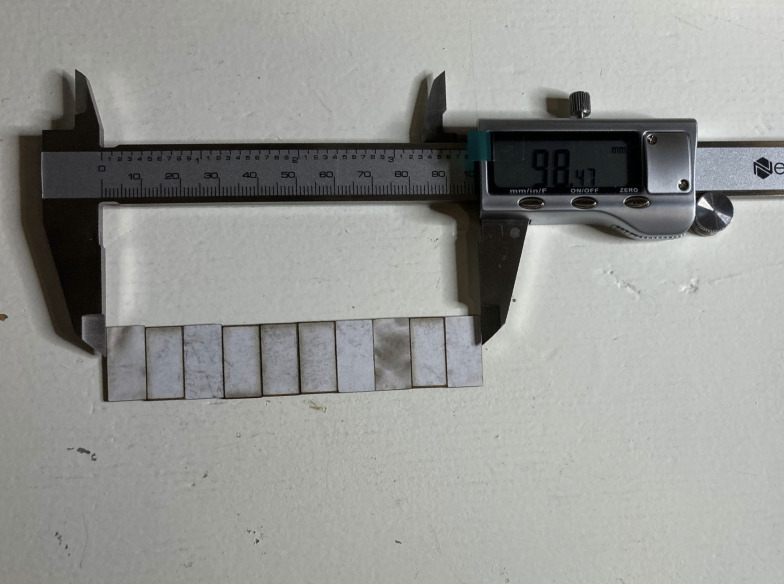
The result of the grayboard kerf was = 0.14
Now we can use this parameter within the LightBurn program for our next creations.
In order to have some practice with the lasercutter, I tried out to engrave lines on a square of the grayboard. The idea was to try if I could do origami maybe in the future using the laser cutter with some flexible materials, engraving the lines where I have to do the folds.
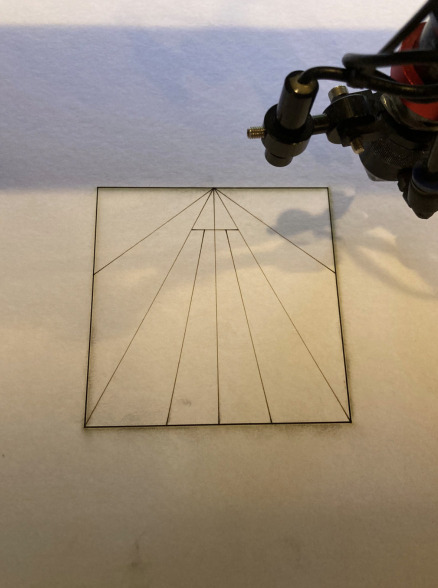
This are the parameters I used to engrave the material:
| Parameters | Number |
|---|---|
| Thickness | 2.5 mm |
| Speed | 20 |
| Power Max | 25 |
| Power min | 20 |
This was too short, I needed lower the Power to this one, whic actually worked out:
| Parameters | Number |
|---|---|
| Thickness | 2.5 mm |
| Speed | 20 |
| Power Max | 50 |
| Power min | 40 |
Since I wanted to do a kind of “origami plane” with the material, I find out that I could actually try to engrave both surfaces in order to be able to fold them in different directions.
- Trying out some living hirges with different materials:
I have been always very curious about the behavior of “living hinges”. Before starting the course, I had some ideas of projects I could do with this technic but I never used it before.
The laser cutting week seam like the perfect moment to try it out!
I tried some of them in different materials. I wanted to understand why for example I never found projects using it with Plastics - I could imagine is because of the material breaking easily - or Why I never saw examples in cardboard.
Here you can find some photos, the parameters I used, and comments of the experiments I run with the Living hinges:
- Cardboard:
| Parameters | Number |
|---|---|
| Thickness | |
| Speed | 20 |
| Power Max | 75 |
| Power min | 65 |
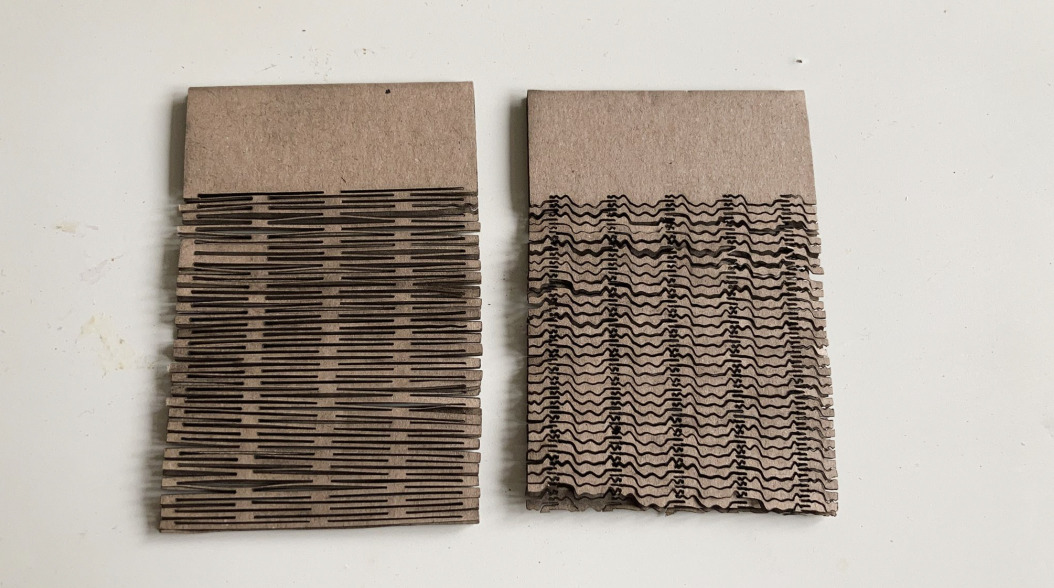
The results are not very functional, I think It may be because the pattern should have less density of lines and be bigger. The pattern on the left could work in a bigger dimension.
- Play-Wood:
| Parameters | Number |
|---|---|
| Thickness | 3 mm |
| Speed | 10 |
| Power Max | 100 |
| Power min | 90 |
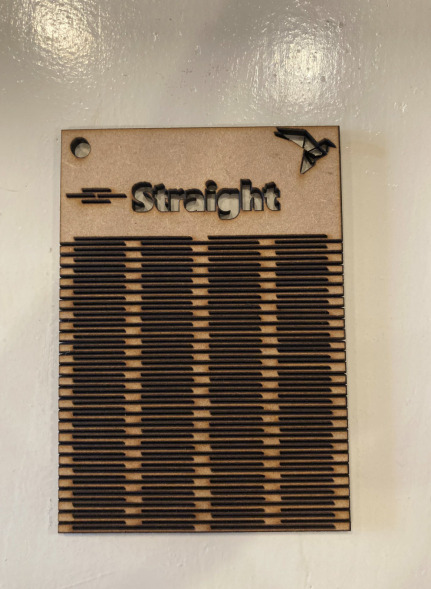
The results are functional, but the front part seamsn burn and the back is not perfectly cutted. This is probably because the speed is too low and the material may be out of focus.
- Thick Plastic:
| Parameters | Number |
|---|---|
| Thickness | 2 mm |
| Speed | 15 |
| Power Max | 100 |
| Power min | 80 |
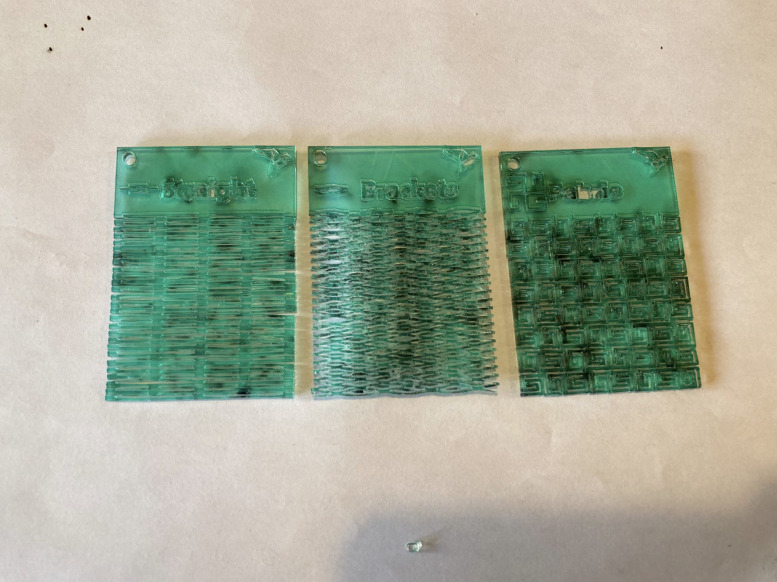
I tried 3 different patterns. The one which works the better is the one on the left. Is the most flexible one, the one in the middle is not flexible at all, it brakes instantly, the one on the right is not very flexible but it doesn’t brakes that easily.
- Looking for the Power, Speed & Kerf of the cardboard
Since we need to make our personal assigment using Cardboard, me and Benjamin worked together to find out the Power, Speed and Kerf needed.
Those are the results of our experiments, we followed the same methods explained before for the Grayboard:
| Parameters | Number |
|---|---|
| Thickness | 2.5 mm |
| Speed | 100 |
| Power Max | 50 |
| Power min | 40 |
| Kerf | 0.21 |
Personal Assignment Process 🏊♀️
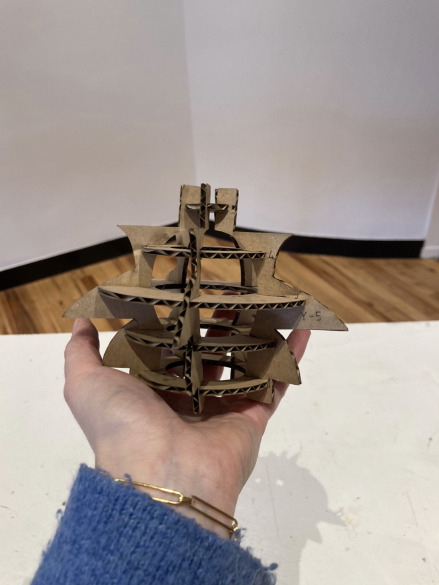
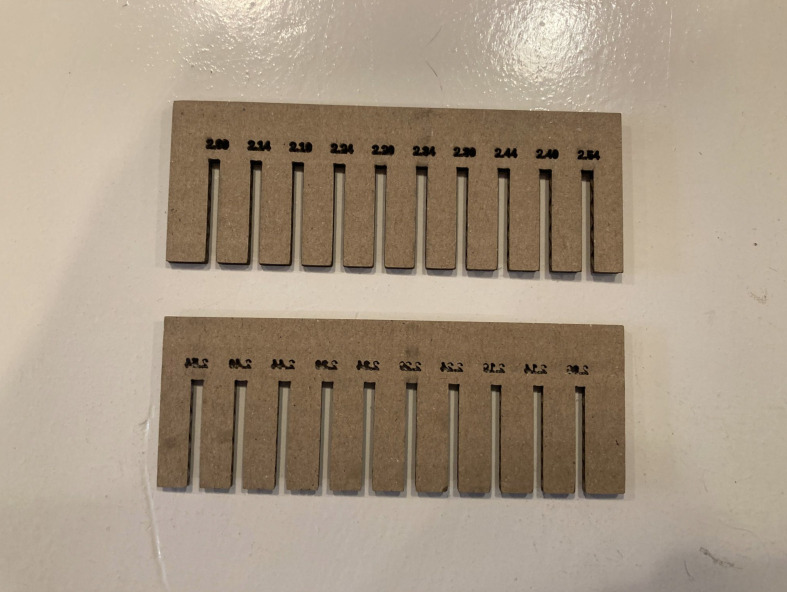
- Parametric construction kit:
-
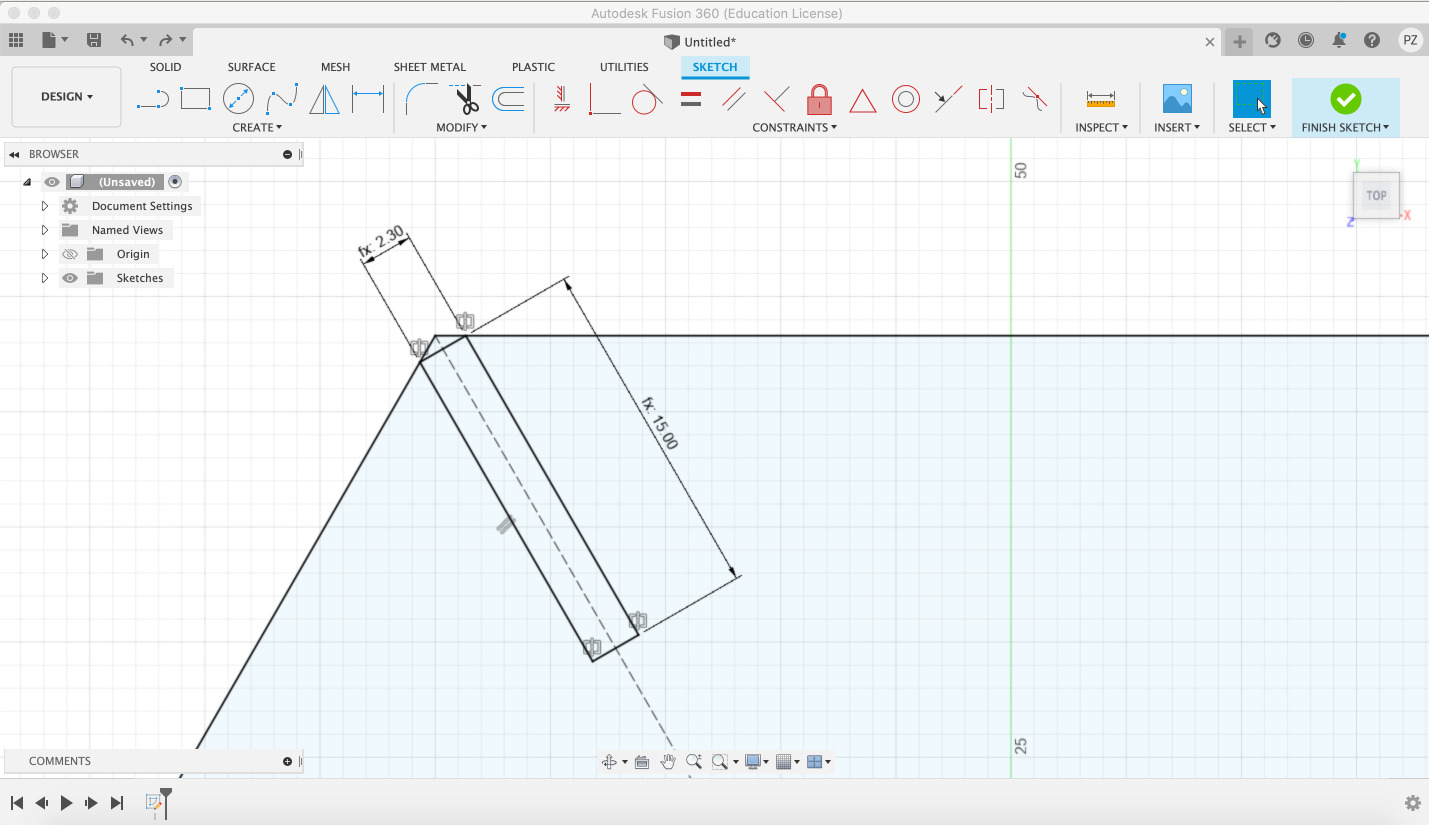
Draw my parametric fit kit with its parameters.
-
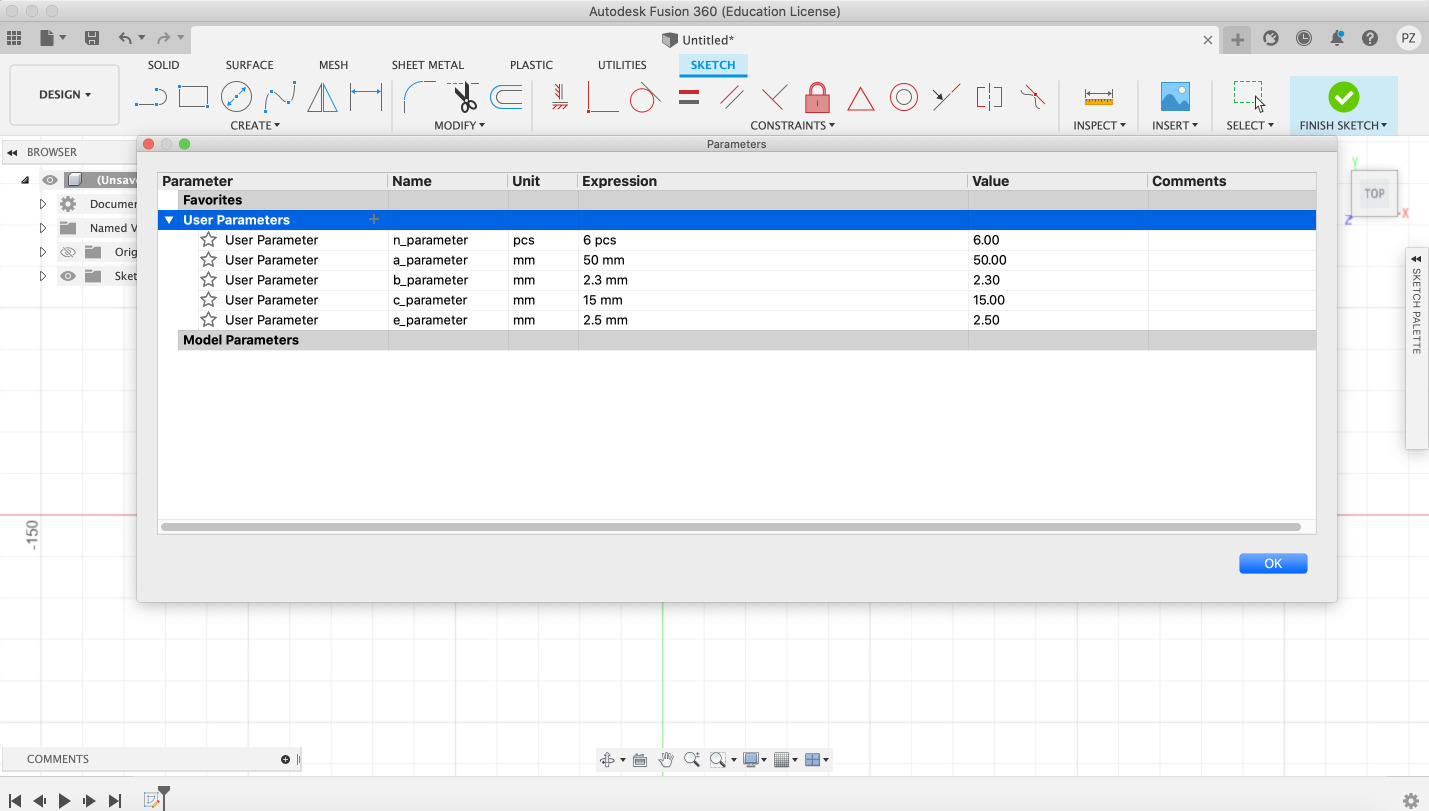
Open fusion 360. Start a Sketch and Add parameters.
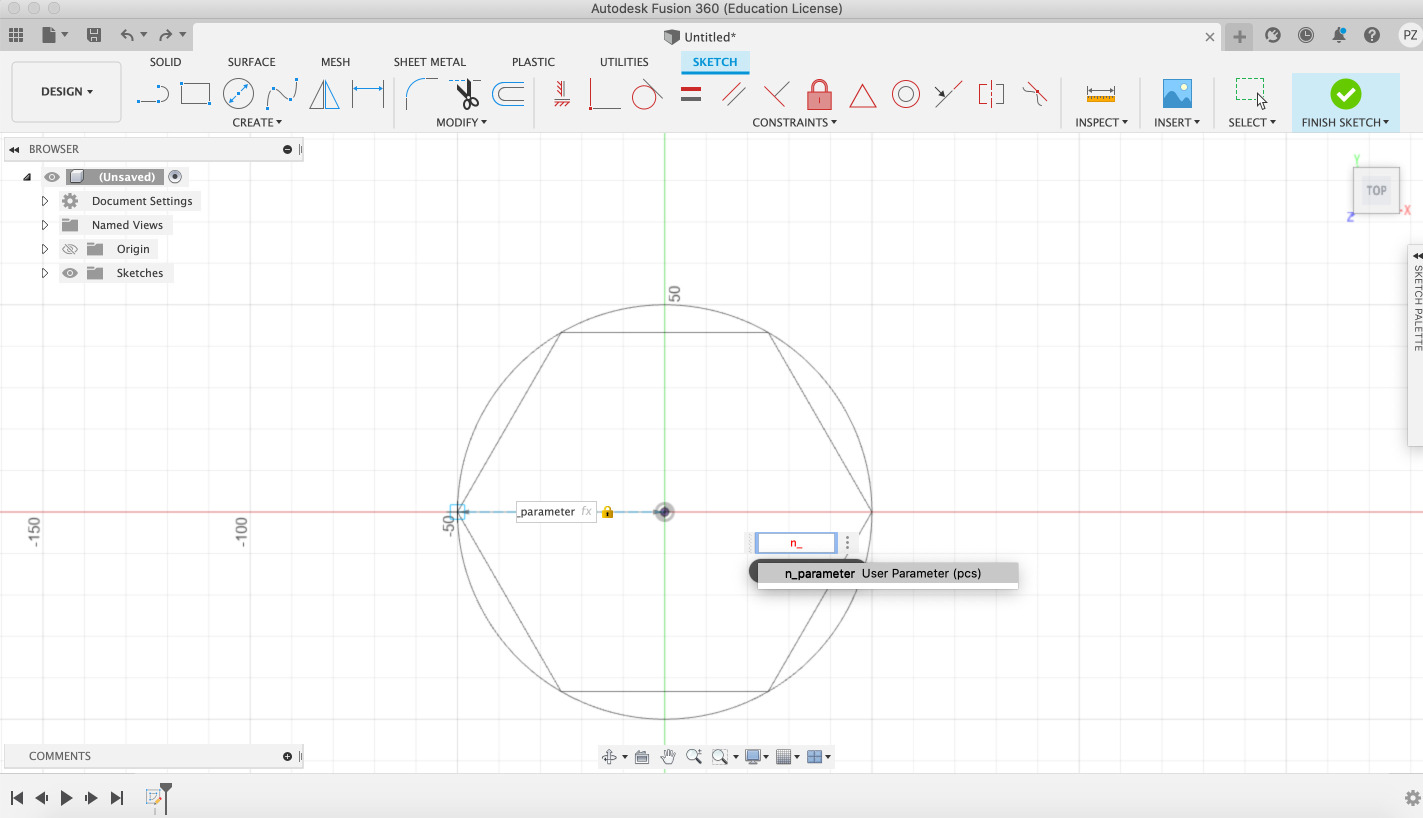
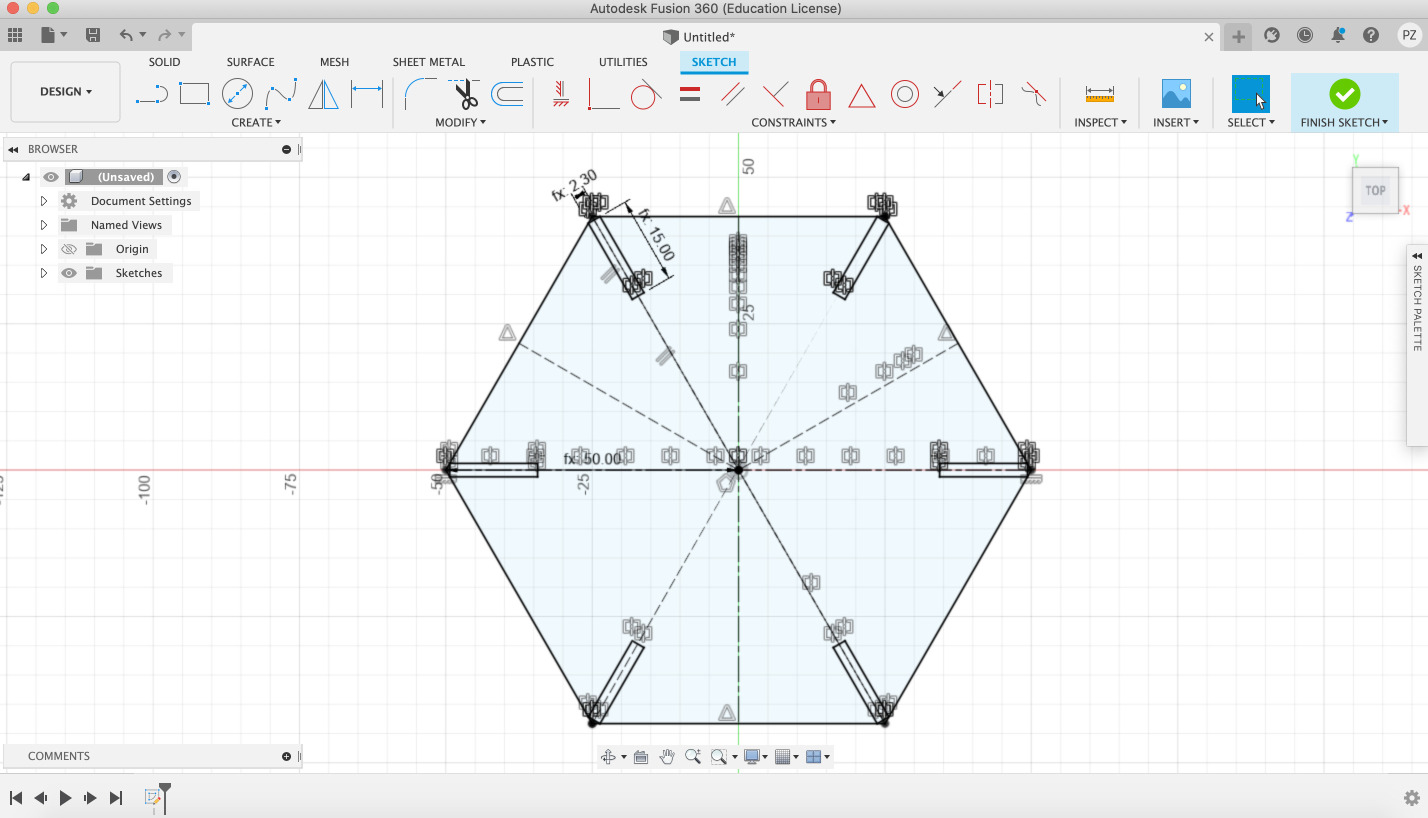
- Add inscribed 6 sides polygon using the parameters and add constructions.
- Draw the join of the fit kit using the parameters and constrictions (symmetry and coincident).
- Make a polar matrix with the joins, maintaining the constrictions.
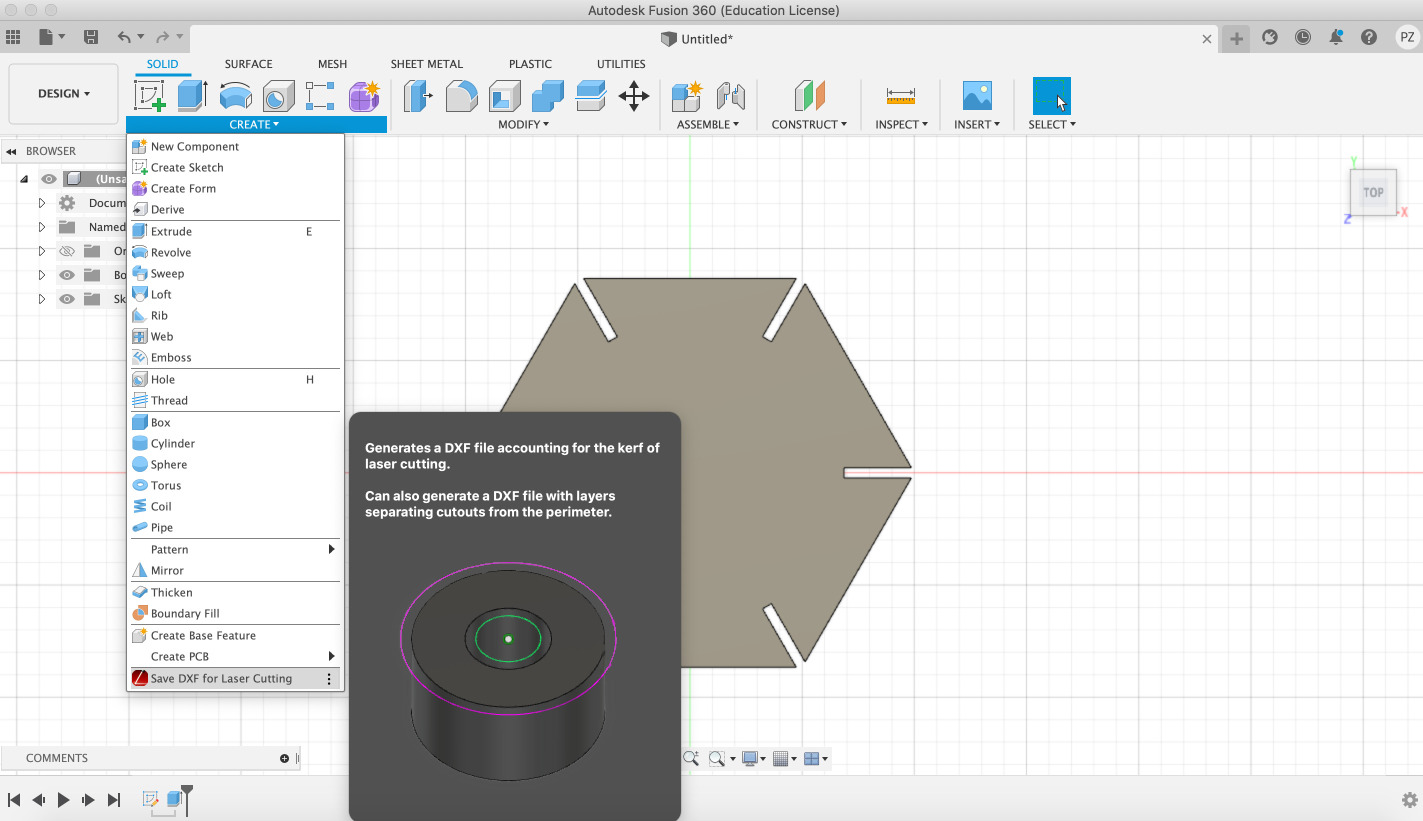
- Extrude the polygon with the material thickness.
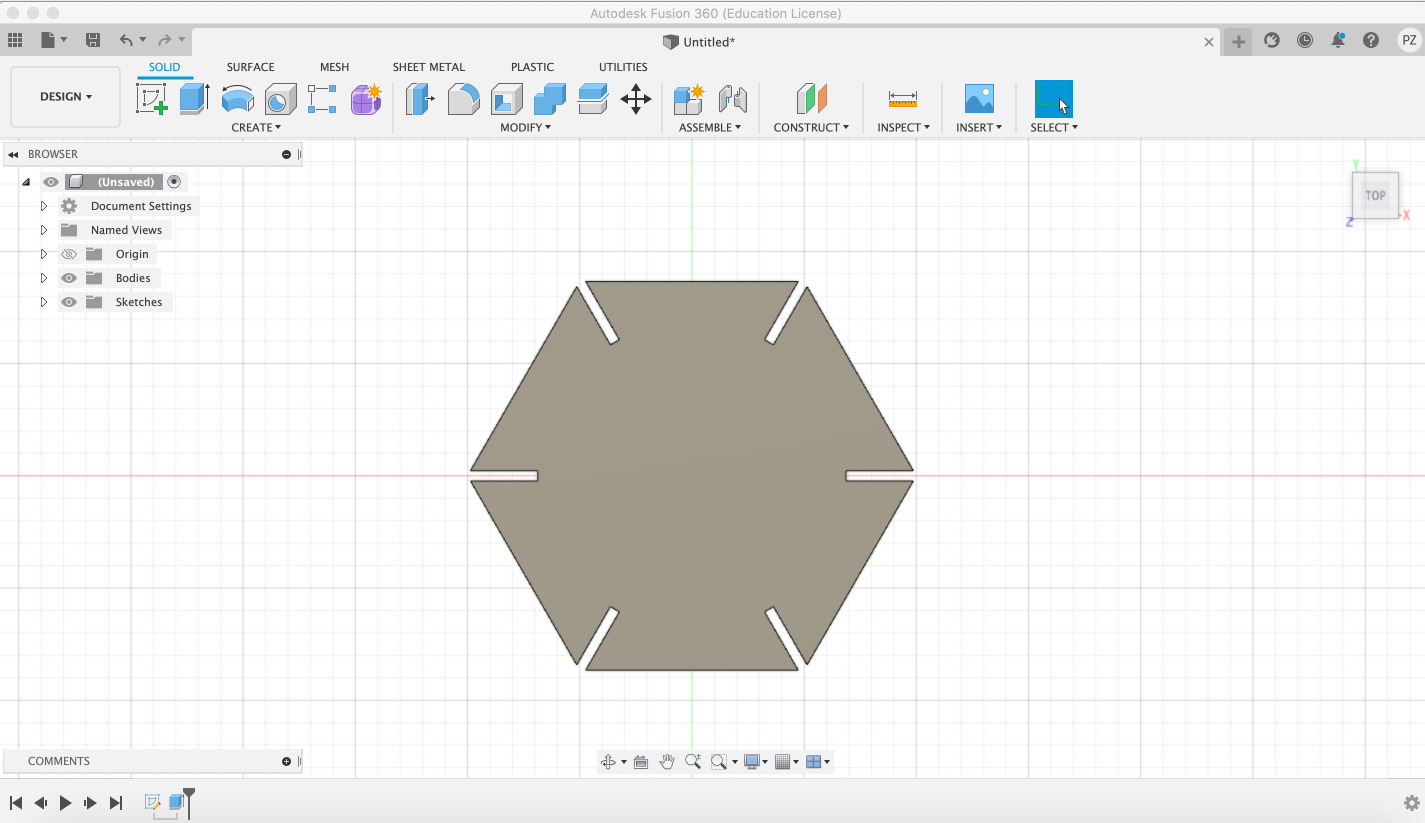
- Now my fit kit is ready. I can export it using an extension to work with Fusion 360 and Illustrator which Joany shared with me.
You can find the link to download the extension (here)[https://apps.autodesk.com/FUSION/en/Detail/Index?id=7634902334100976871&appLang=en&os=Mac&autostart=true].
- here you can see an example of the result. It looks like a nice decorative construction to have at home.
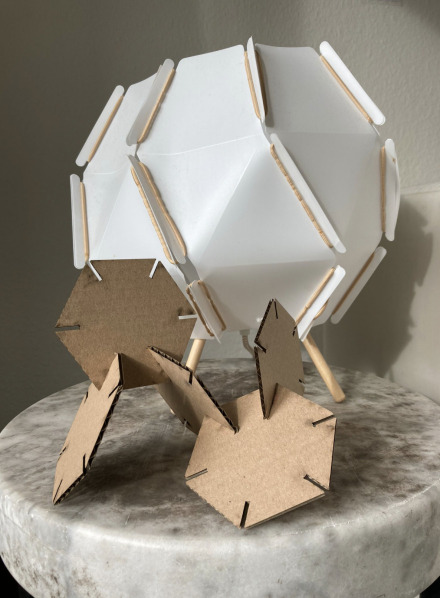
- Upcycling LampShade:
When I had the idea of doing the upcycling Lampshade, very different designs came up to my mind. I first started developing a parametric design with Fusion 360, but in the end, I decided that I wanted to use a shape that I could export to “Slicer for Fusion 360” in order to try out the features of the program.
This is the skeleton of the lamp which I found in from of my house here in Amsterdam.
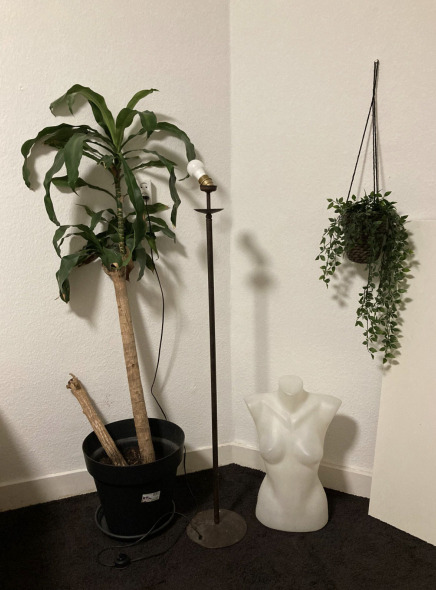
I draw it in Fusion 360 to be able to then locate the Lampshade on top of it.
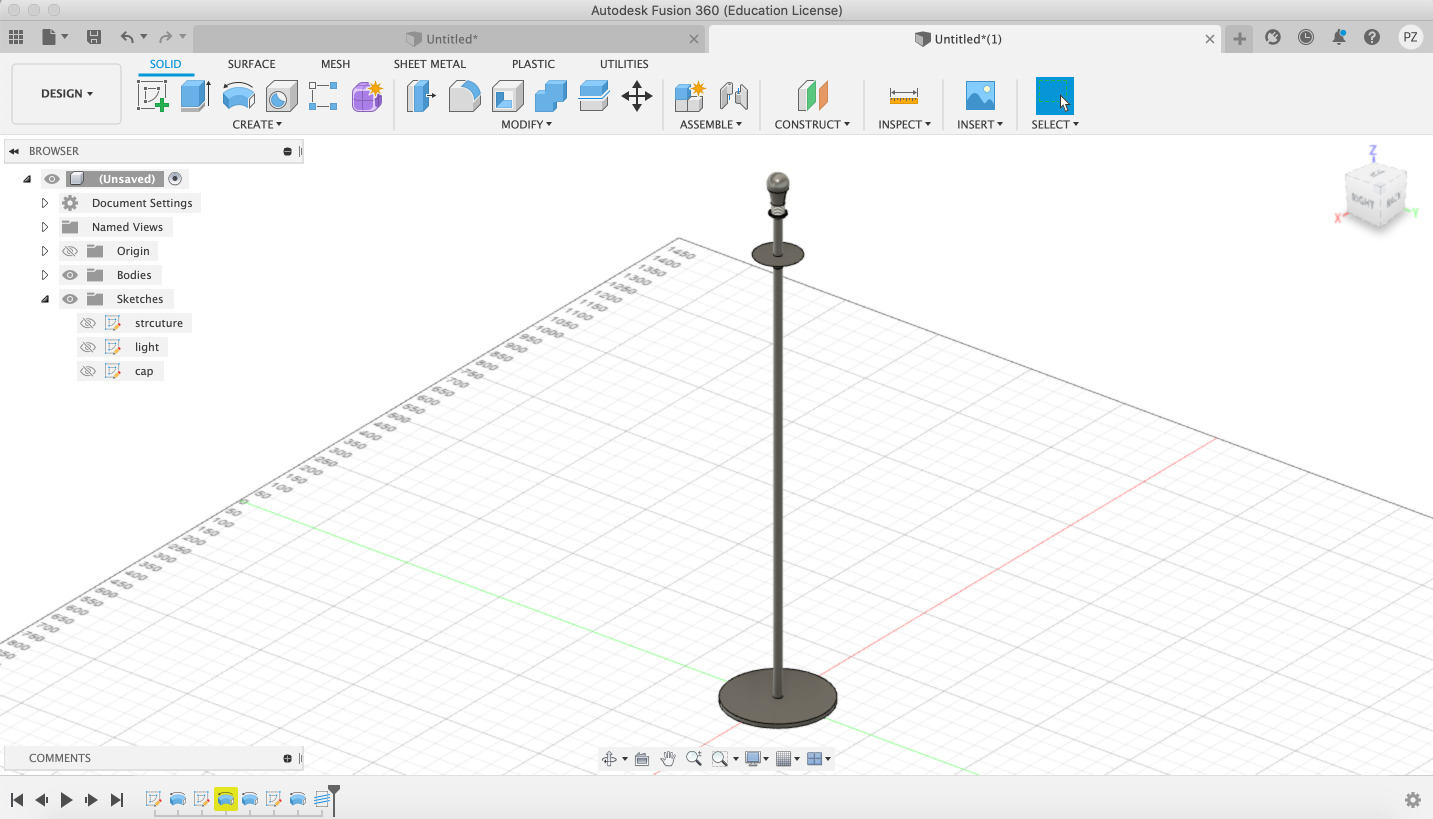
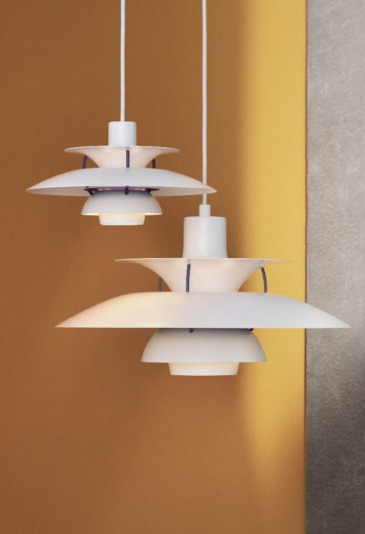
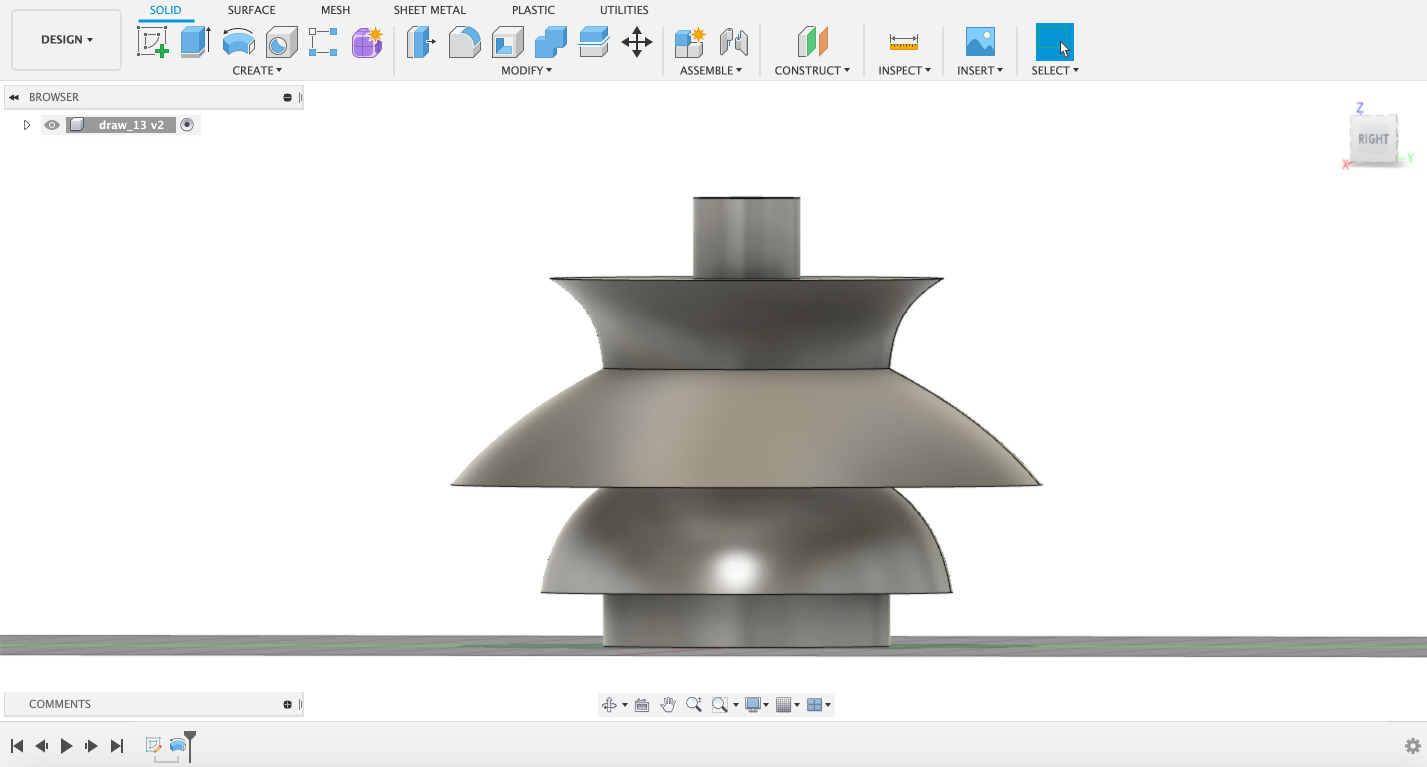
I want to recreate the shape of the lamps which I like the most: Louis Poulsen - PH 5 Hanglamp.
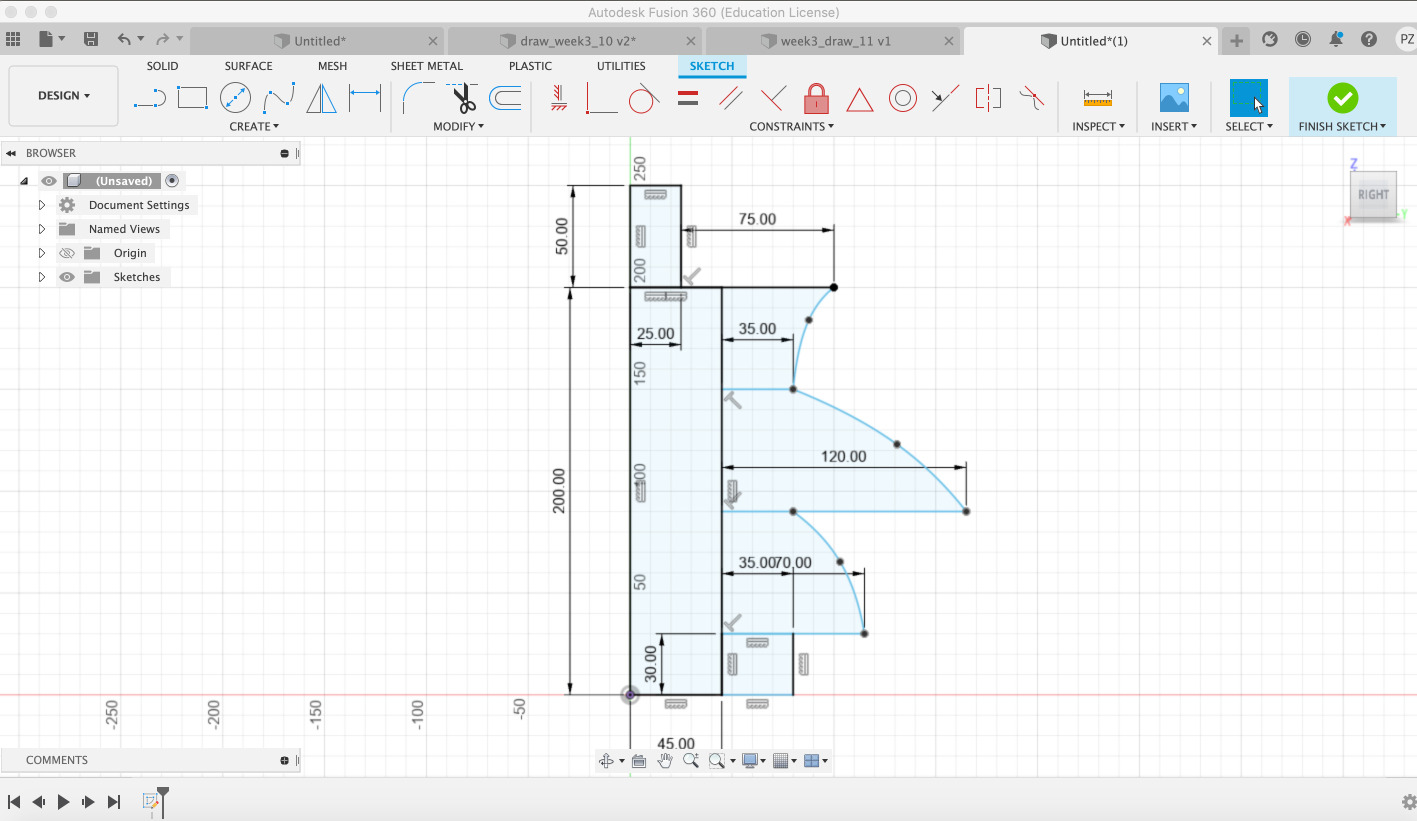
In order to do that, I followed these steps:
- Start a sketch on Fusion 360 with the Lampshade profile, in this way I can make a 360 revolution with it.
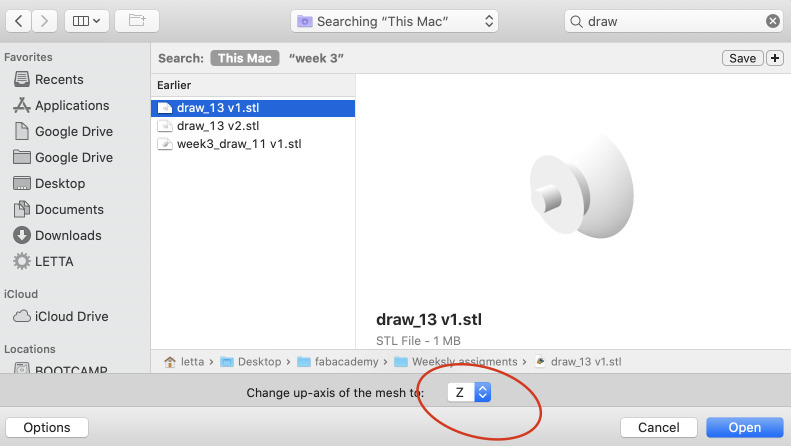
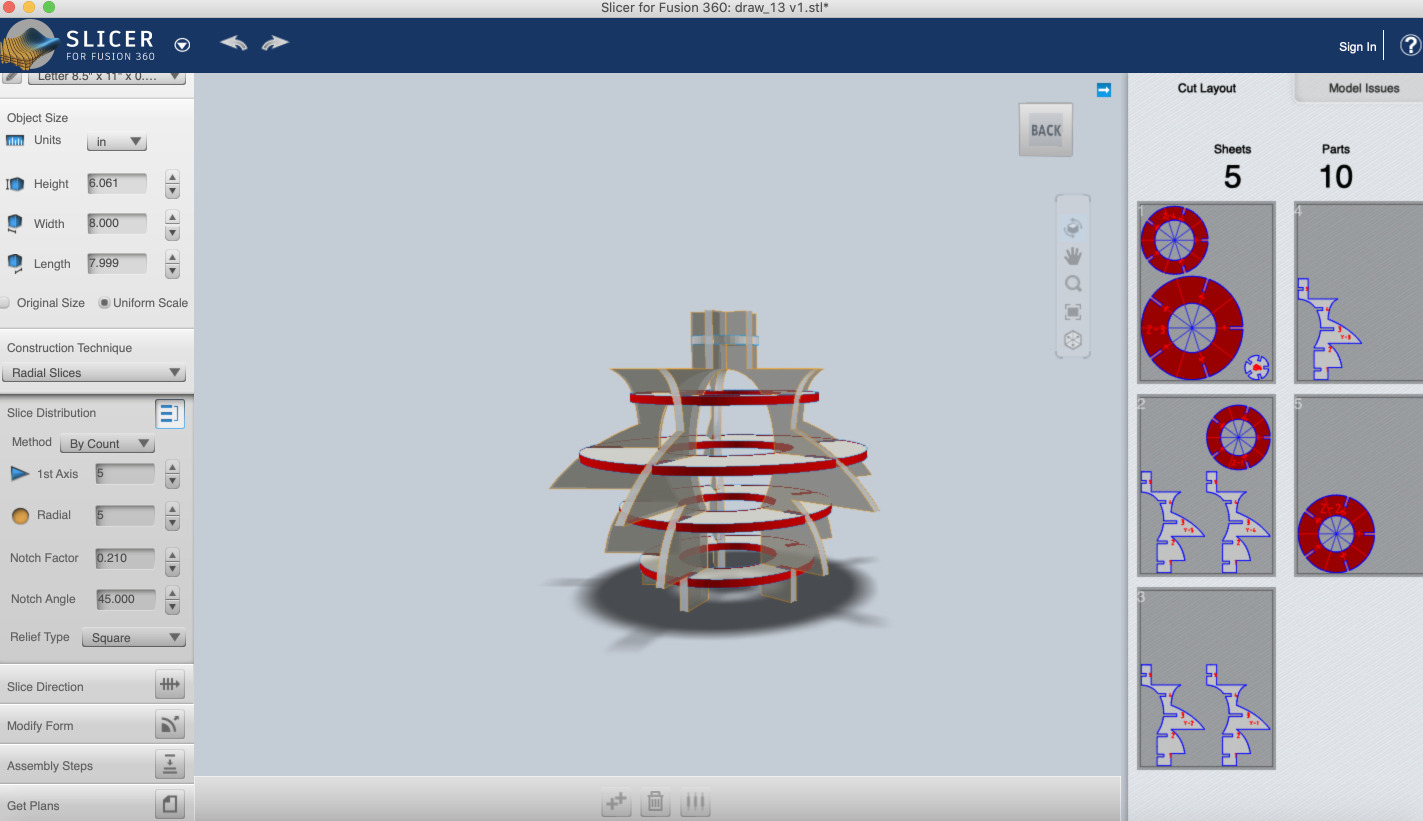
- Open the design with the Slicer. Normally the program opens the field with the Y-axis, but you can change it to the Z.
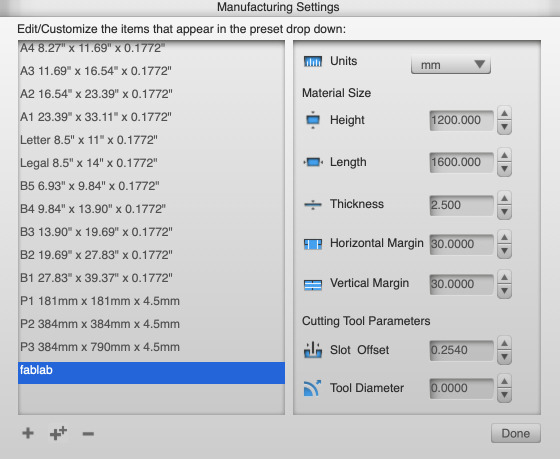
- I created a new “manufacturing settings” profile with the measures and material thickness supported by our laser cutter.
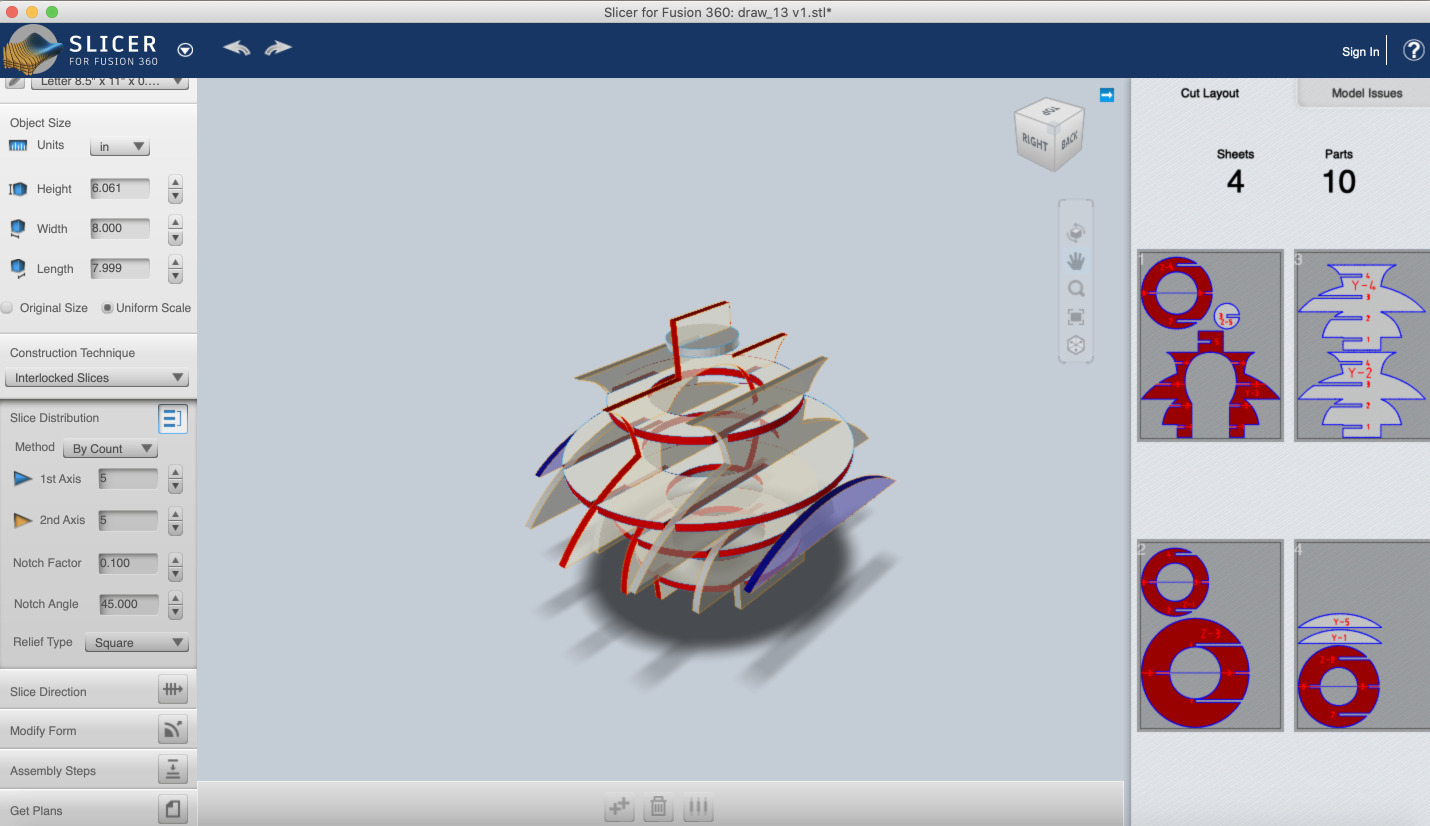
- Firstly I tried a design using the “interlocked slices” 5 x 5 on both axes. When I cut it with the laser and assembled it, I had some troubles because it was too small the design, also because the profile of the design is not appropriate to use with this kind of slicer option.
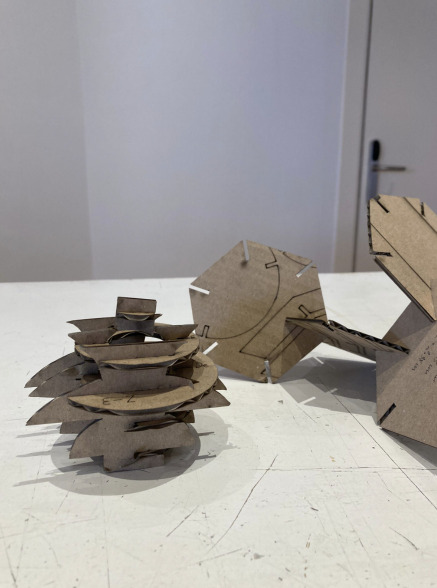
- Secondly, I tried to do the design, this time using the “radial slices” 5 x 5 on both axes. I cut it and assemble it and It works out perfectly! This time I did the design 10% bigger rather than the last time, in order to have more facilities when assembling it.
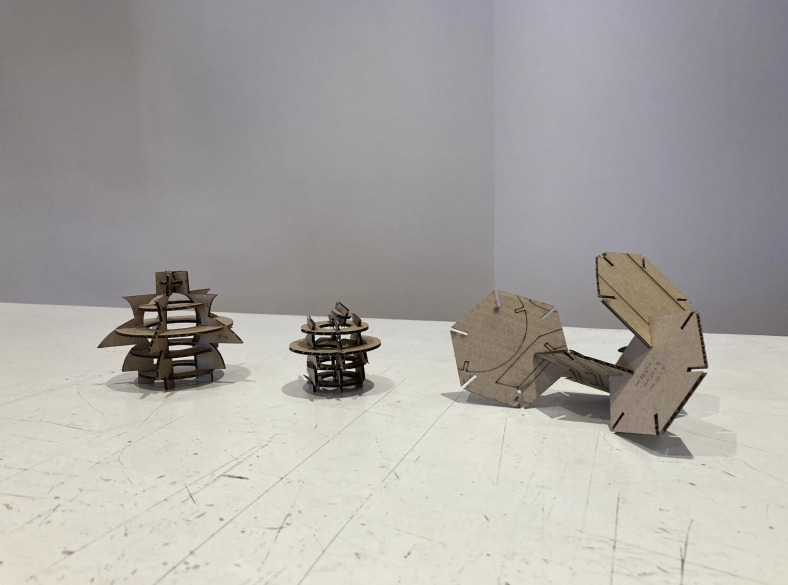
- Next step is to build up the Lampshade in 1:1 Scale. I want to first try with cardboard to make the prototype, and maybe in a few weeks trying to make it with another colored material like plastic.
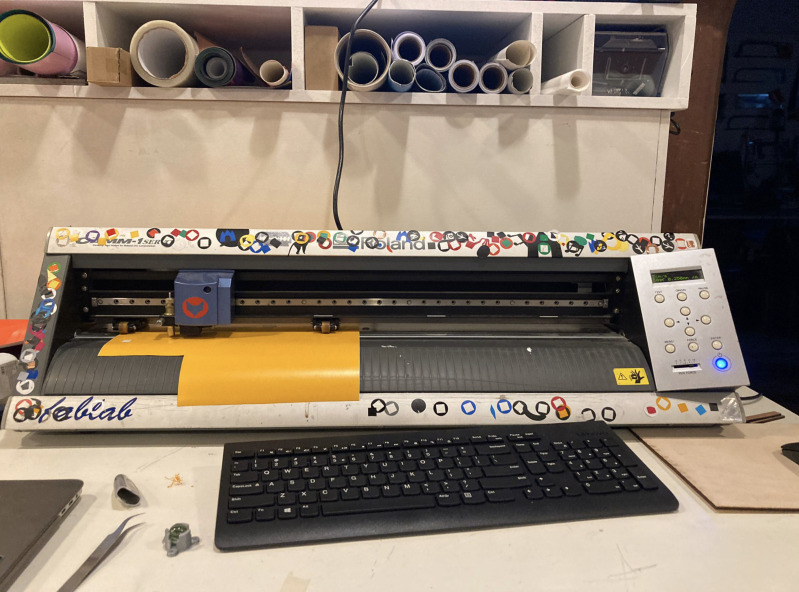
Vynil machine
The Waag’s vinyl is a Roland GX-24. The program in use to work with it si called (mods)[http://modsproject.org/]. In order to use it, you will need to:
- Select with Right click: Programs > Open program > Cut
Now the cutting skeleton opens and you can both upload an .PNG or an .SVG.
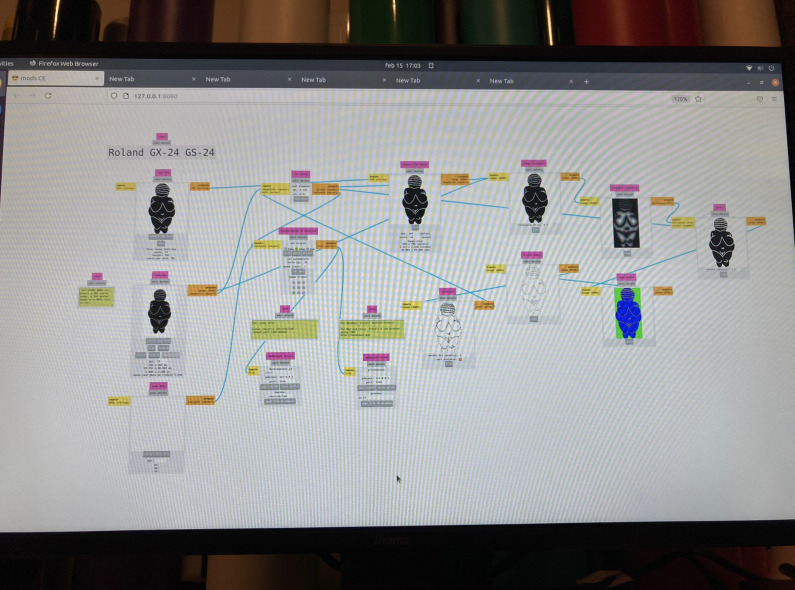
I had some problems opening my .SVG. The program was not reading it size, I found the solution at (Nadia’s fabacademy website)[https://fabacademy.org/2021/labs/waag/students/nadieh-bremer/blog/week-3/].
What i needed to do is open the photo with a Text editor, add the size and save it.
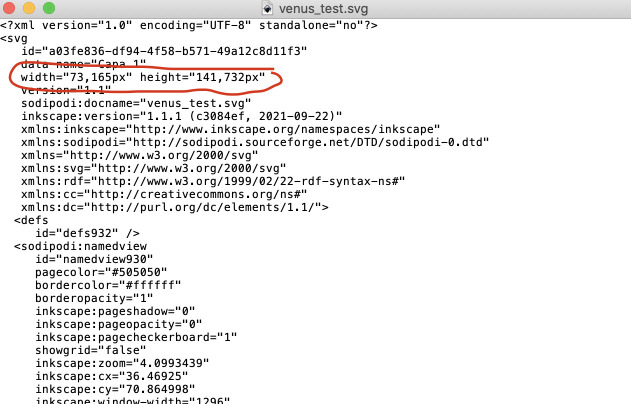
Now I can open the .SVG with Mods and do my sticker. This is the result:
Retrospective 🤔
This week resulted in being very Creative and Fun at the same time. It was our very first-week learning all-around laser cutting and the vinyl machines. We had the opportunity to learn how materials behave within the laser cutting context, how broad can be the outcomes of both machines, and how endless can be put creativity when especially working with the laser cutting machine.
The outcome of this week was not exactly what I had in mind. My purpose was to create a lampshade to upcycle lamps that I found. And I just had the time to make a scale prototype of it. I did not have the time to make both because of the learning curve with the machine, and the lab’s resources. We are a group of 8 people, so we just have the opportunity to make our individual assignments. There is not much time possible to be creative and experiment, since everybody needs to use the machine.
Even if I did not accomplish my personal purpose, I know that I learned the skills required to work on this project on my own when the FabAcademy will be over. And I am already looking forward to that moment arriving!