WEEK 09: MOULDING AND CASTING
For this seventh group assigment, my "fabmate" Jon Merino and I, plan our time management for the following achievements:
- Review satefy sheets for each of our moulding and casting materials.
- Compare test casts (at the end of the repository).
- Extra: Do a first design and 3-axis mill test.
- For the INDIVIDUAL ASSIGNMENT , my planning will be:
- Design something to mill taking into account my stock and tooling used.
- Casts parts.
GROUP ASSIGNMENT
3-AXIS MILL TEST-RUN
As on the 7th week, were are going to use our Alarsis FR210 milling machine, but this time to perform a 3 axis mill test. In order to do so, our instructor Aberto, explains to us how to set the tooling for a 3 axis milling in RhinoCAM. Program that we already used in the Computer Controlled Machining week. This time, we divide the setting in two different steps, first prepare the stock and tooling for an: Horizontal Roughing, and after, a paralel finishing. It´s important to remember that it has to be programmed in RhinoCAM in this order, amd the file type that we´re going to work with is different. So, this is what we did:
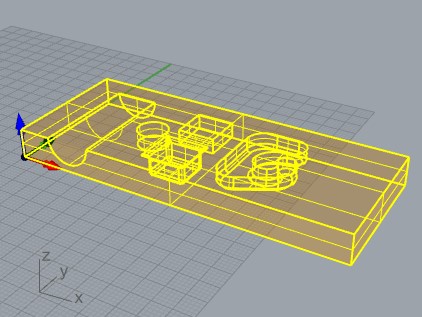
| Open RhinoCAM plug-in in Rhino software. upload your .step file design. In our case we designed different shapes and sizes, with and without chamfers to see how they come out. |
| Introduce the material positioning. This time, we will create a rectangle that will have the size of our design, and that is what weré going to select in the control geometry region. |
| Make sure that we are in the MILL module. Open 3-AXIS ADV -> Horizontal Roughing and set the parameters. |
| once you´ve got all the parameters set it´s mandatory to simulate and check your toolpath and time duration. There´s high risk of shank collision! |
| If, everything is ok with the horizontal roughing, it´s time to set the Paralel Finishing. |
| Once we check that the settings are correct, and that the toolpath is Ok: We post both files and export it in order to open it in our CNC Machine. |
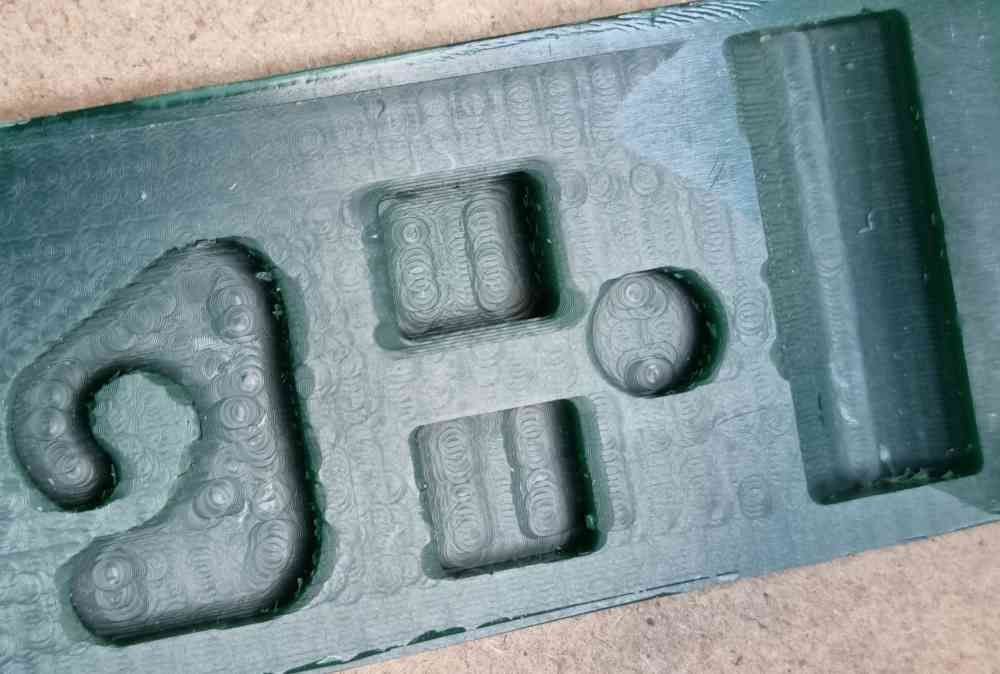
Here you can check the Horizontal Rough and paralel finishing settings:
 Box stock.
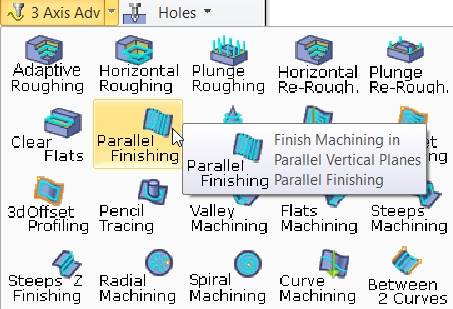 3-Axis options.
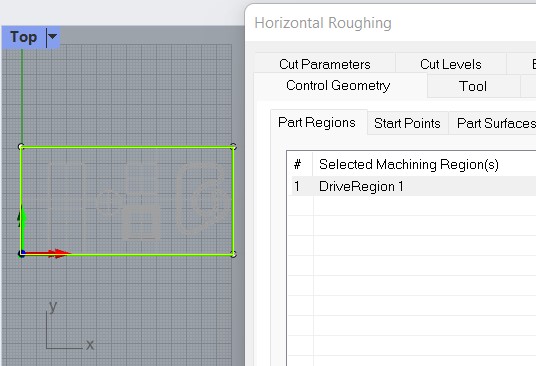 Control Geometry.
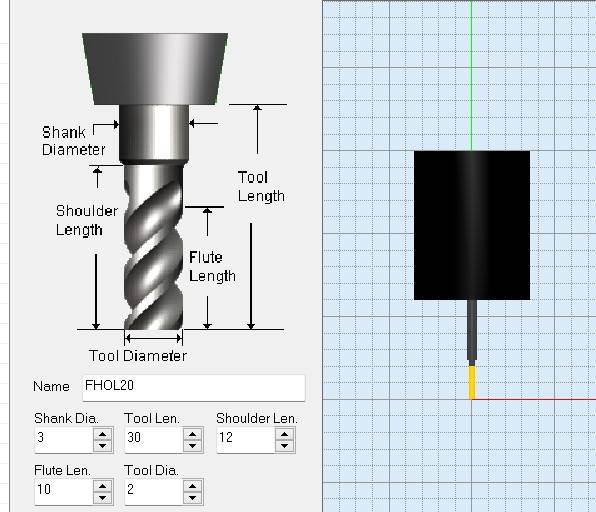 Tool.
Tool.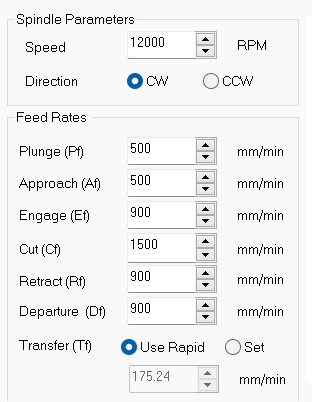 Feeds and speeds.
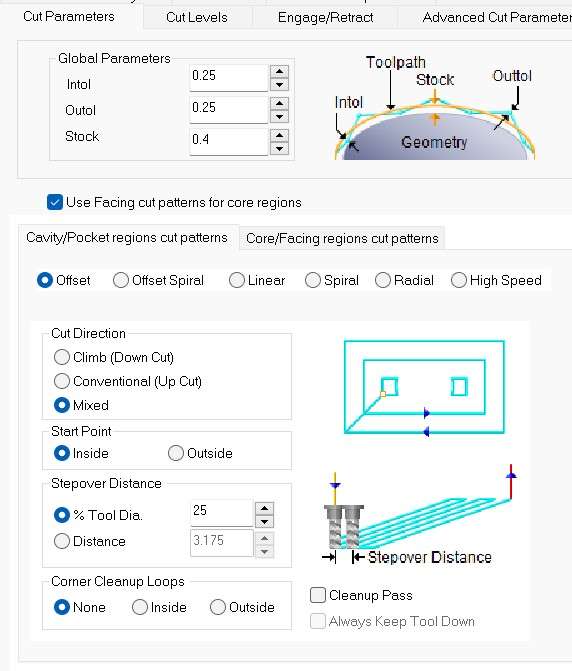 Cut parameters.
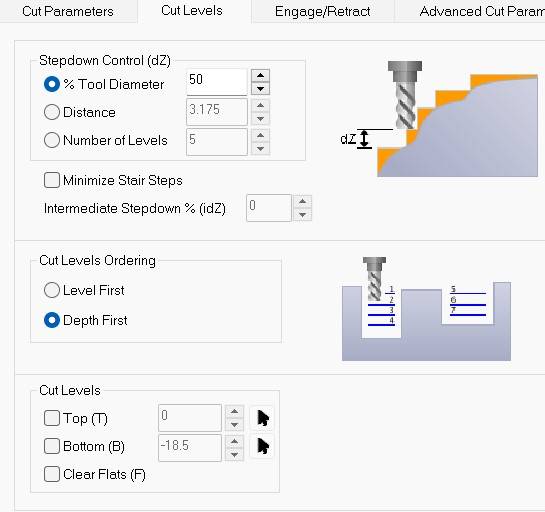 Cut level.
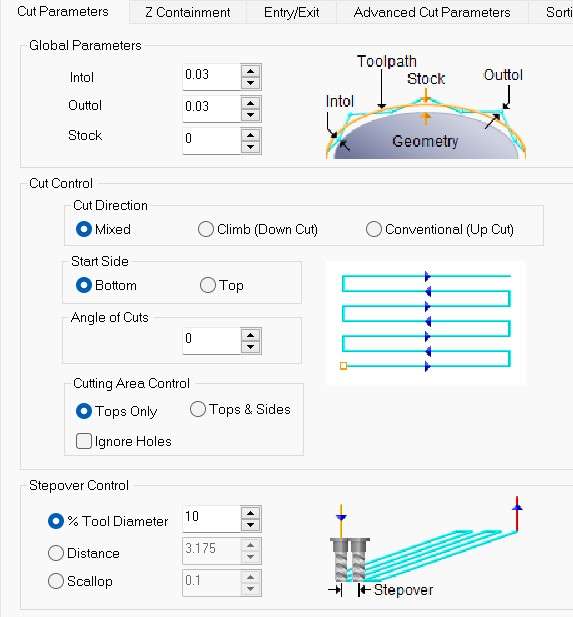 Paralel cut level.
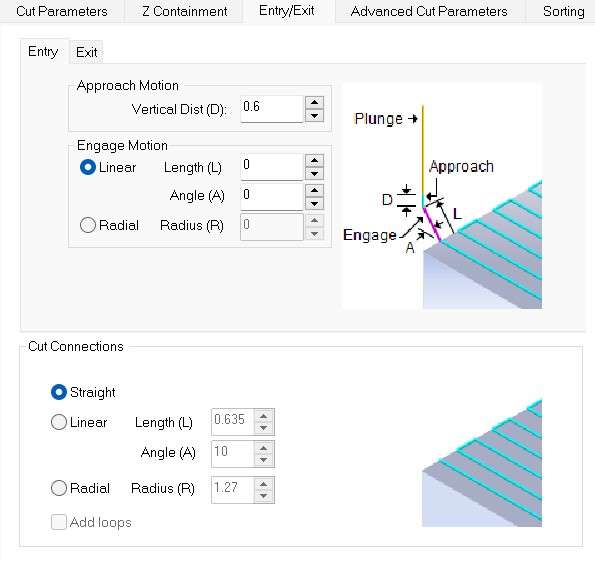 Paralel entry/exito stock.
For this 3-AXIS test milling we used a 2 mm diameter tool, after checking that the toolpaths and the time duration was OK, we prepared the CNC to mill our test. To do so, we followed our CNC proccedure as documented in the Computer Controlled Machining week. With the difference that in this case, we didn´t use clamps, instead, we securely glued our wax block to to a rigid wooden base, which was clamped to the CNC:
- Cut feed: 1500mm/min.
- Horizontal roughing time: 7.19 min.
- Paralel finishing: 5.05 min.
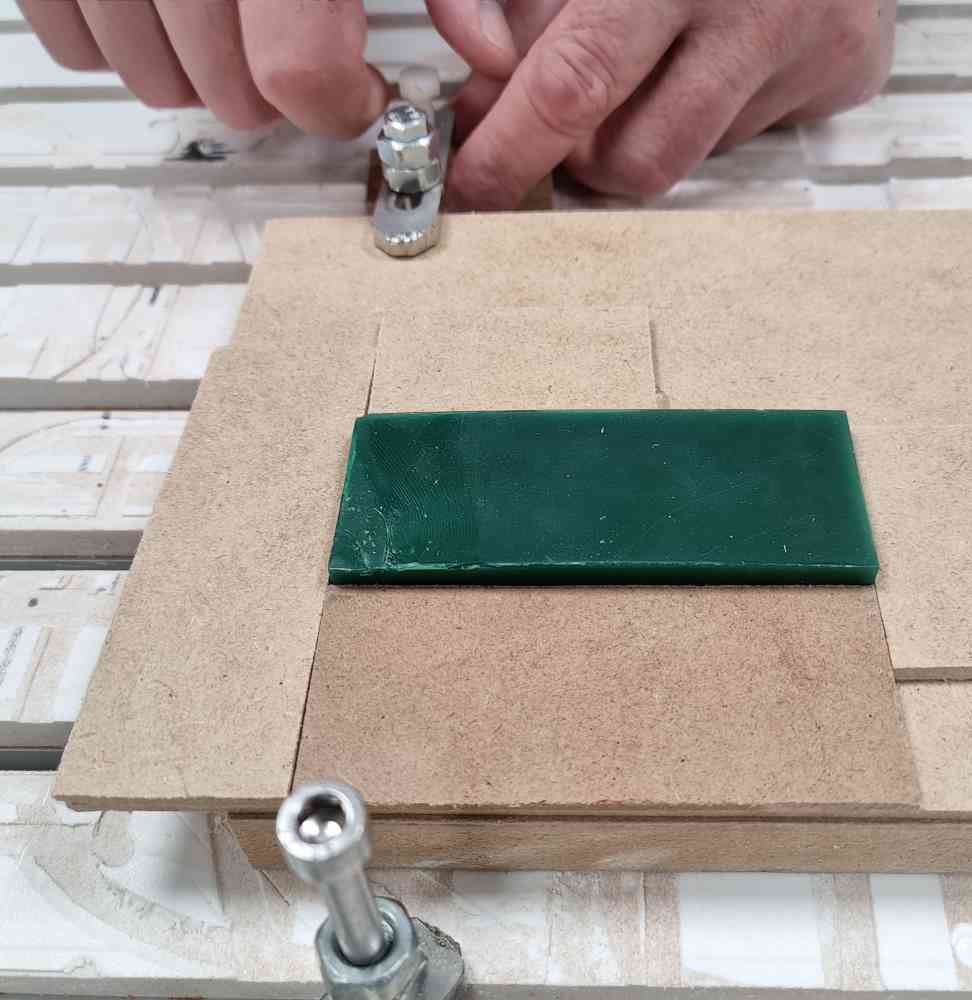 Clamping.
 Changing cone and milling tool.
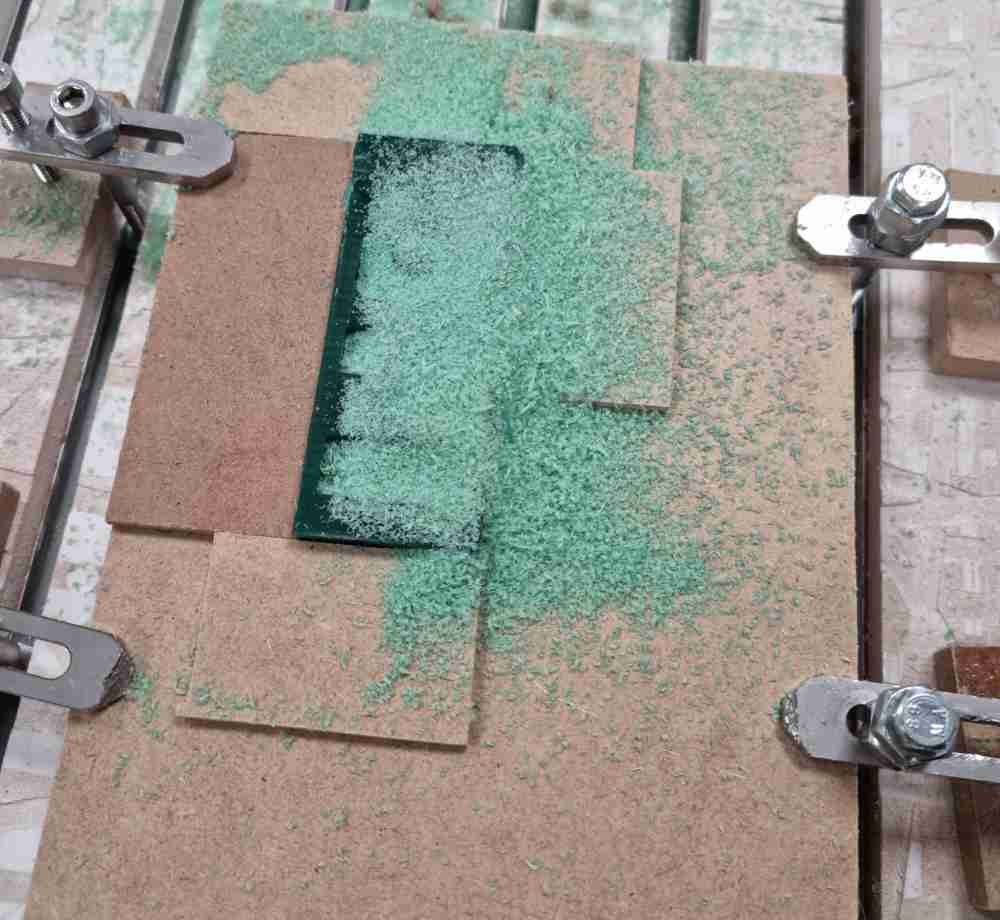 After milling.
 Final test result
As you can see from the images of our test-cut, it went well. You can observe that the square with chamfers resulted in better milling trough the edges. This 2mm diameter tool works very well, but on the contrary it´s quite small, and will limitate the height of our designs. Now that we´ve practiced the workflow it´s time to make our own designs.
GROUP ASSIGNMENT -part 2
MOULDING AND CASTING MATERIALS SAFETY SHEETS
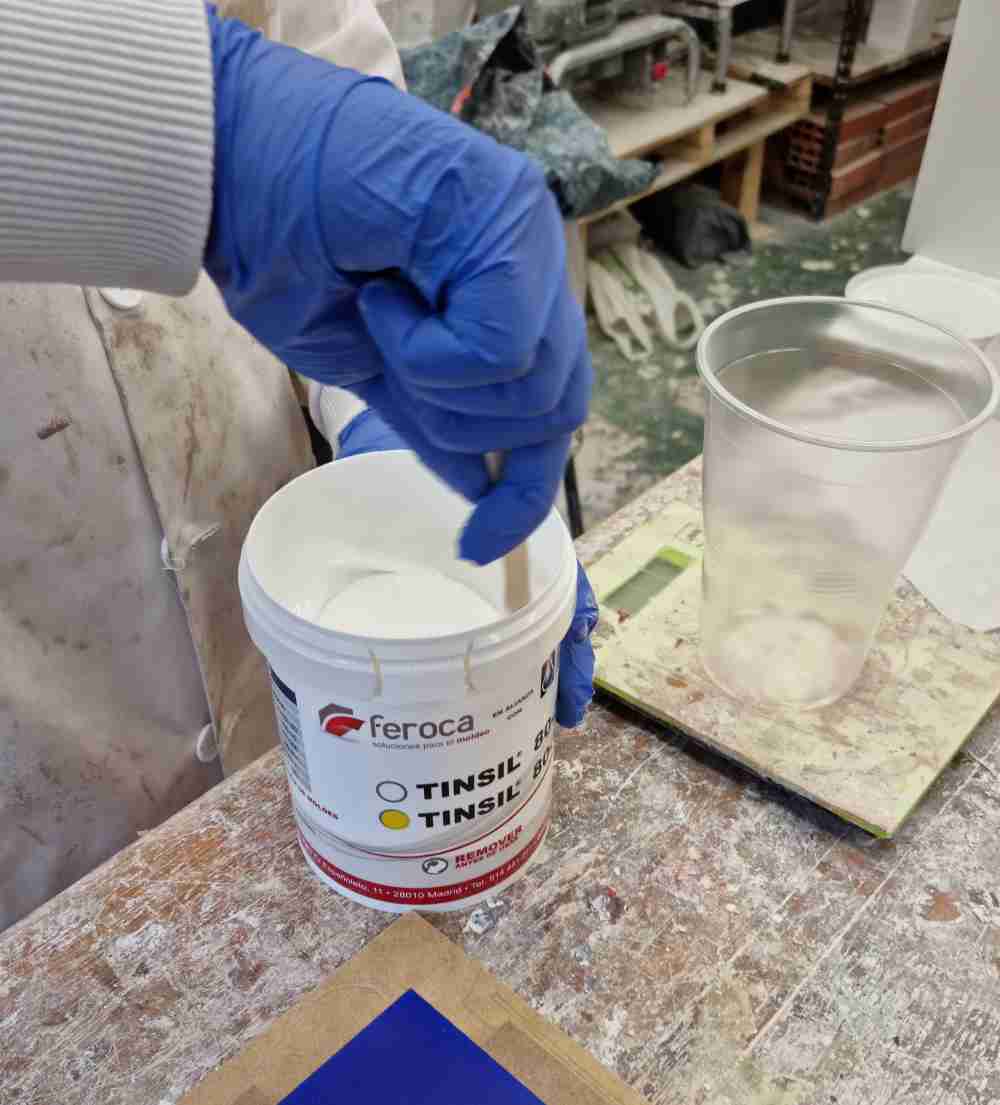
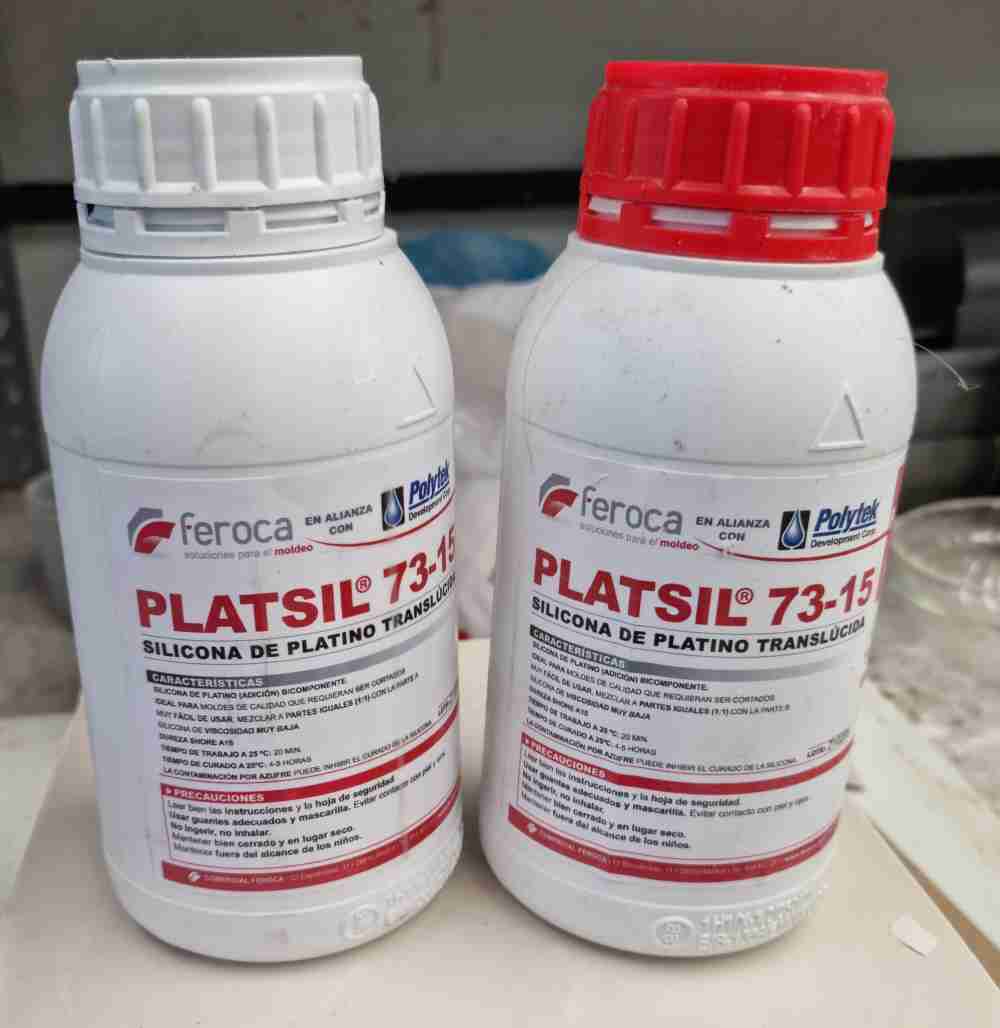
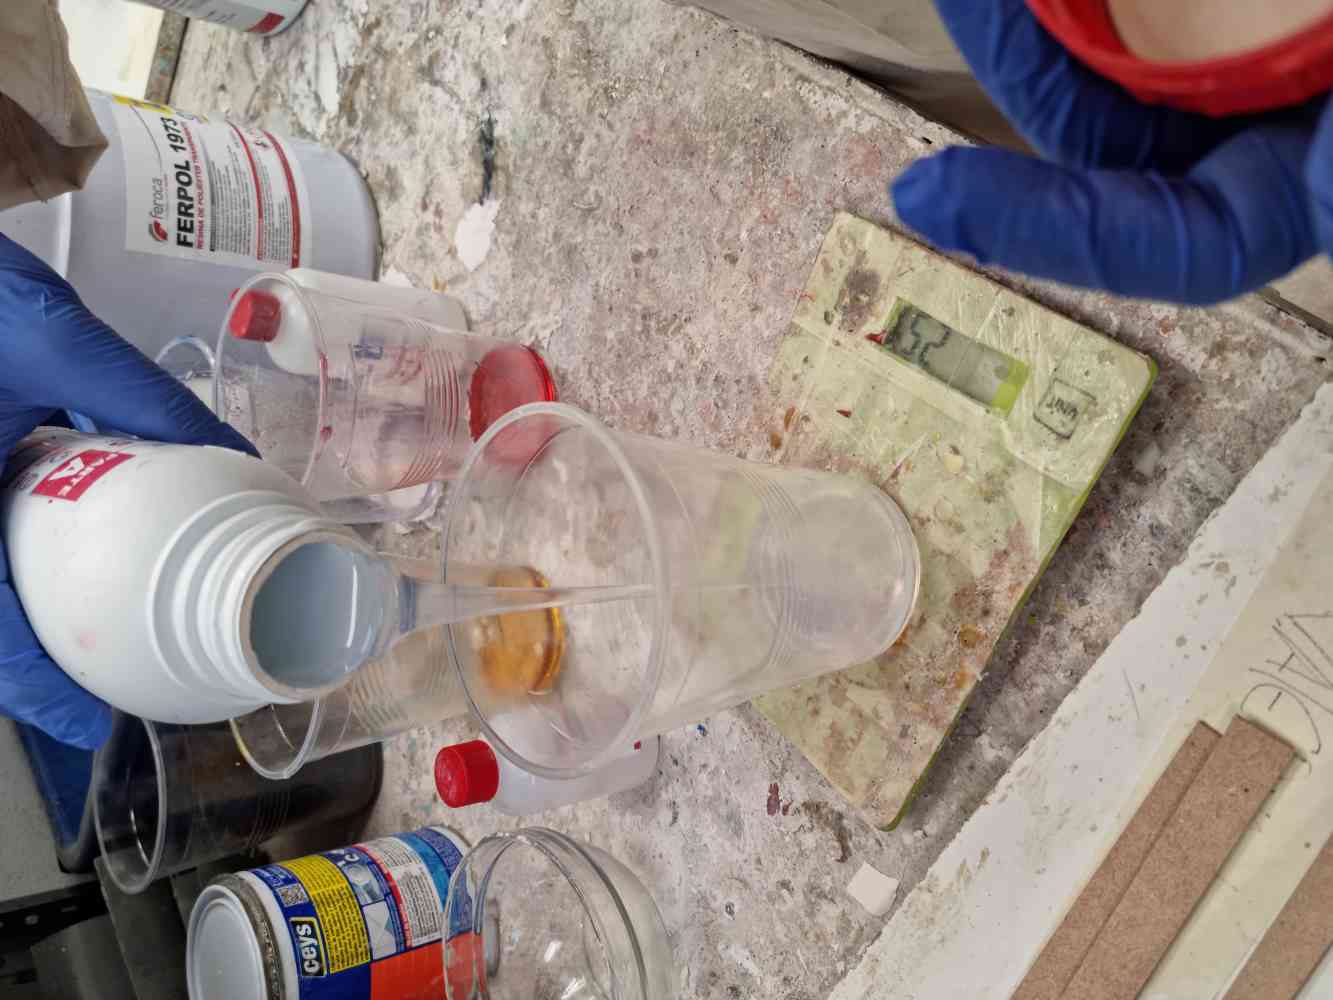
For the MOULDING PROCESS, we are going to use the TinSil 80-15 Silicone for molds. In my case, it´s the first time I get my hands on a molding product, so again, a new experience! TinSil 80-15 silicone uses a tin catalyst and cures until a flexible rubber of medium and soft hardness is obtained. The web´s information indicates that it has high tear resistance, good release properties, high temperature resistance, and excellent chemical resistance.
Here you can check the TECHNICAL DATA:
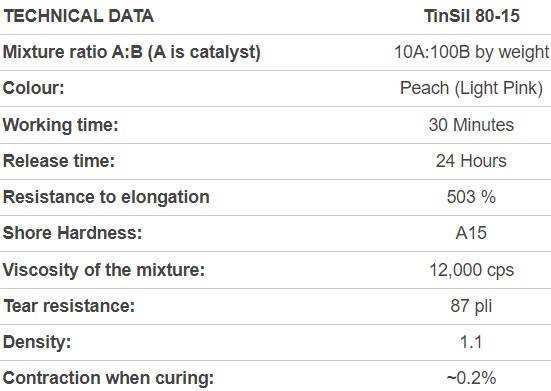
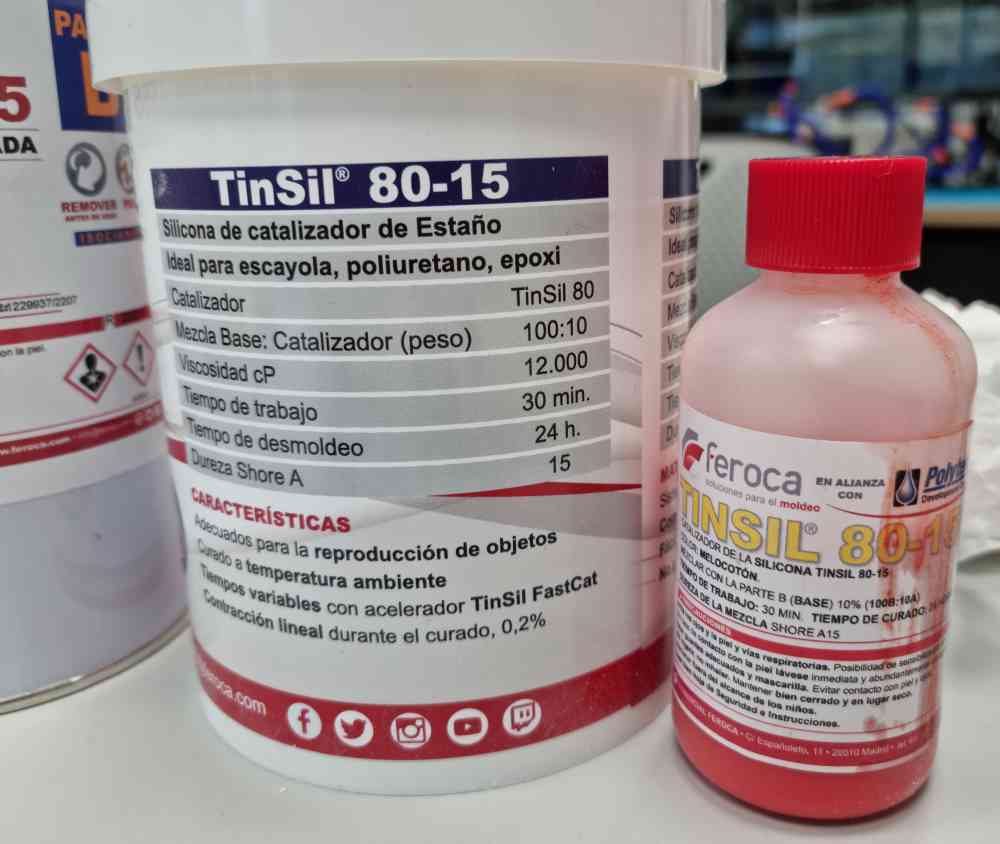
As we learnt today, this silicone needs a 10:1 base mixture with the catalyzer, has a 30 minutes work time and 24 hours of demolding time. That´s a lot of time, condisering we´ve have a week for the assignment. The catalyzer is red, which helps to ensure that the mixing between the silicone and the catalyst is done completely, adquiring a final peach color. So, lets see how we manage later in the week.
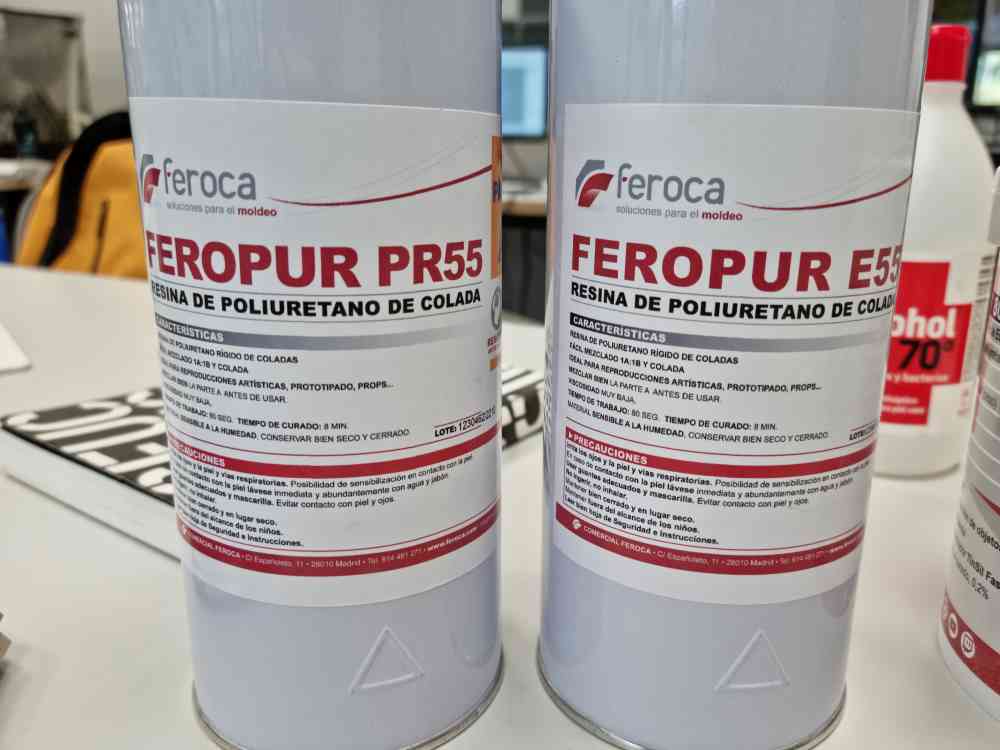
For the CASTING PROCESS, we are going to use a rigid polyuretane resine, the Feropur PR55 + E55. A bicomponent fast polyurethane that hardens at room temperature to work by casting.
In order to use properly this resine, we have to strongly shake the resin in order to homogenize it before use, we need to mix the exact quantities of each of the components until we homogenize the mixture and afterwards, proceed to the casting of the resin into the mold:
- Work time: 80 seconds.
- Curing time: 8 minutes.

Finally, but more important.in relation to general precautions we have to take while handling these type of products, these are the main issues to handle:
- Protect eyes, skin and respiratory system.
- Handle with appropriate gloves and mask.
- In case of contact with skin: wash with plenty of water.
INDIVIDUAL ASSIGNMENT
As the test-cut went pretty well, I had high expectations on my designing and milling, >but.. as you already know, there are no easy weeks in fabacademy.. You can´t imagine how many hours i´ve invested in designing something properly with fusion 360. It´s incredible how hours go by, but you advance very very slowly. I know it´s a learning curve I have to pass due to my lack of experience but, it can get frustrating when you get stuck in a part that it even isn´t the priority in the weeks assignments. So, to all of you that suffer and struggle with design programs, I hear you!
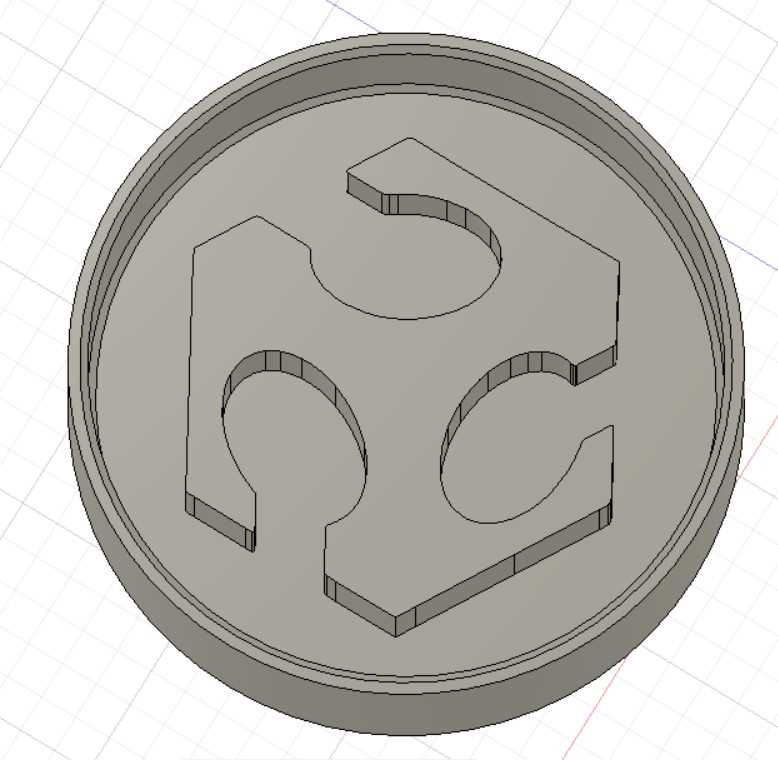
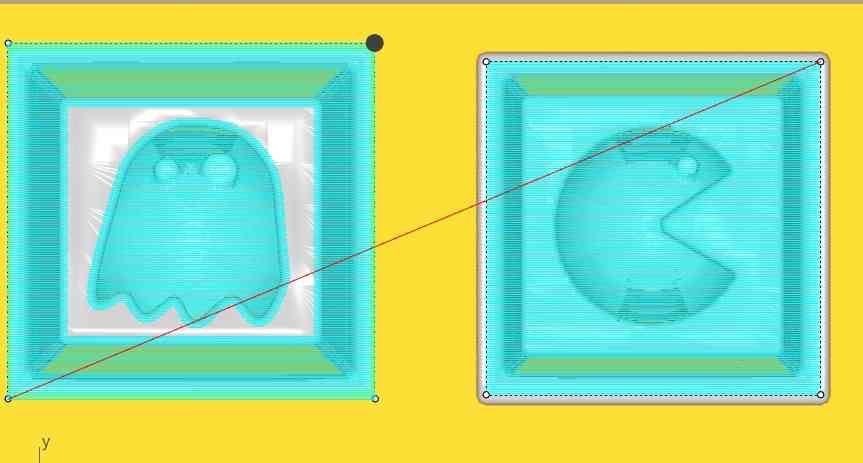
As you can imagine, I had to put in many hours to be able to handle myself properly in fusion 360. Once you work things out, it´s easy, but until you manage to do it.. oh.. my. Designing in fusion, taking into account your stock and tool properties can be very challenging, so in order to carry it out I worked simultaneously with Fusion 360 and RhinoCAM, to check in the simulations that my design fitted the requirements of the tool selected. I started with a vertebra design that looked very simple, and even imported it as a .stl file in fusion in order to simplify it, but the object´s design wasn´t the best fit for milling. So, I changed to plan B. C and D. Two "easier" designs that could help me achieve my fisrt spiral, helping me adjust parameters and trying out different settings in order to get the best milling results. Plan B is a maze, and plan C is the fab academy logo adapted and D is a retro-remember design.
So, once I got familiar extruding "boxes" around my designs, checking heights and widths, and adding fillets and chamfers I created designed my B, C and eved D options, during the weekend, in case any of them didn´t work on monday. In order to help any future student with the experience I have with design programs, here´s what I did:
| How to "box" your design in FUSION: Once you´ve got your design ready, make a new sketch around it, and in the same sketch make another one a little bigger or smaller, as you preffer. Now, you can extrude your box wall and floor to the size needed. |
| IMPORTANT:Your design will probably be bigger than your wax block, so check carefully. Your "box" walls will occupy a lot of space, so you´ll need extra margin space. |
| Don´t forget to check continuosly the space (width) in your design objects, and final height: You can have shank erros in your milling program simulations. |
| Don´t forget to make your box wall higher that your object: If not, you won´t have a base for your object once you cast it. And don´t forget to leave enough space between the box walls and your design. |
| Include FILLETS: To help your tool do a smoother work. |
| Include CHAMFERS in your box wall: To help remove the molding product. |
| You can easily IMPORT .svg files to FUSION 360: And edit them as you wish. It will open a lot of nice designs to work with. |
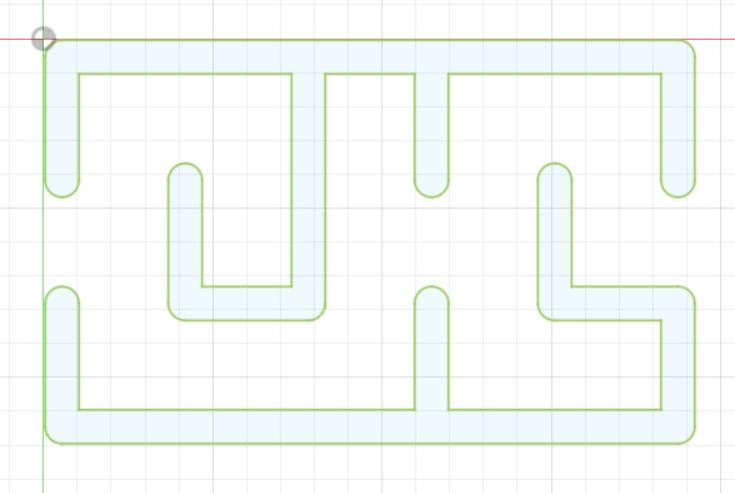 Designing in fusion a maze.
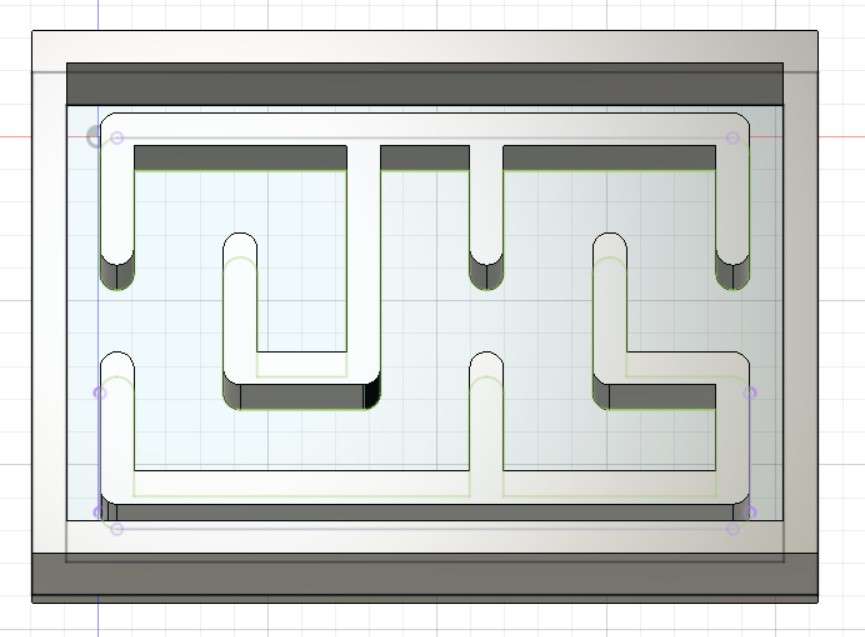 Working out the box.
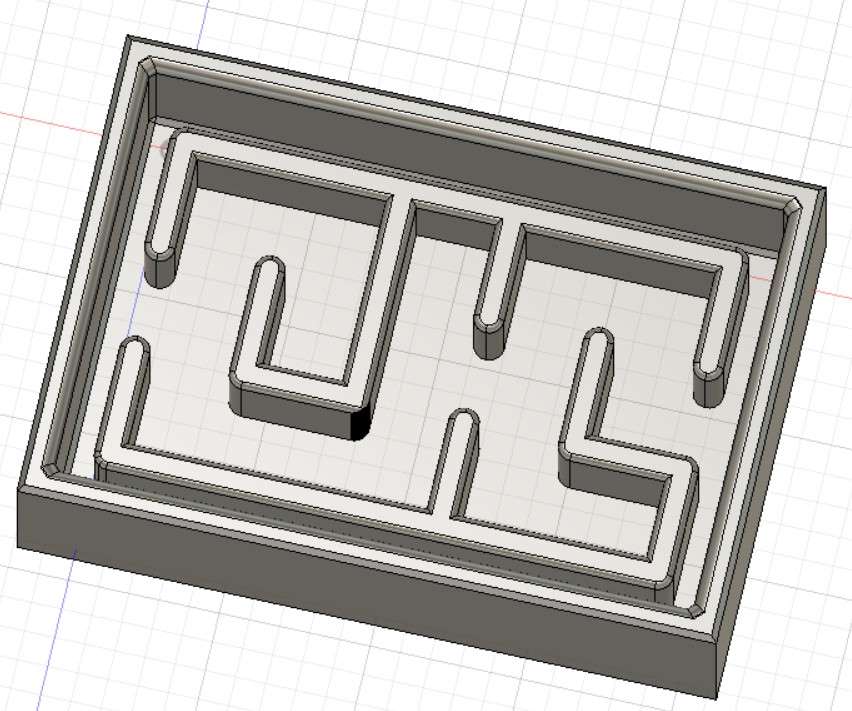 Adding fillets and chamfers.
So, yes, as expected I had some issues with my maze design, In a moment of insight while sleeping, I realized that I hadn´t designed the walls that ment to support the base of my maze.. now I understand what Neil ment with "some of you will get the positive and negative molds wrong". Luckily I had prepared other designs just in case. If I have time, i´ll correct my maze later in the week. Here below are the other examples of my designs:
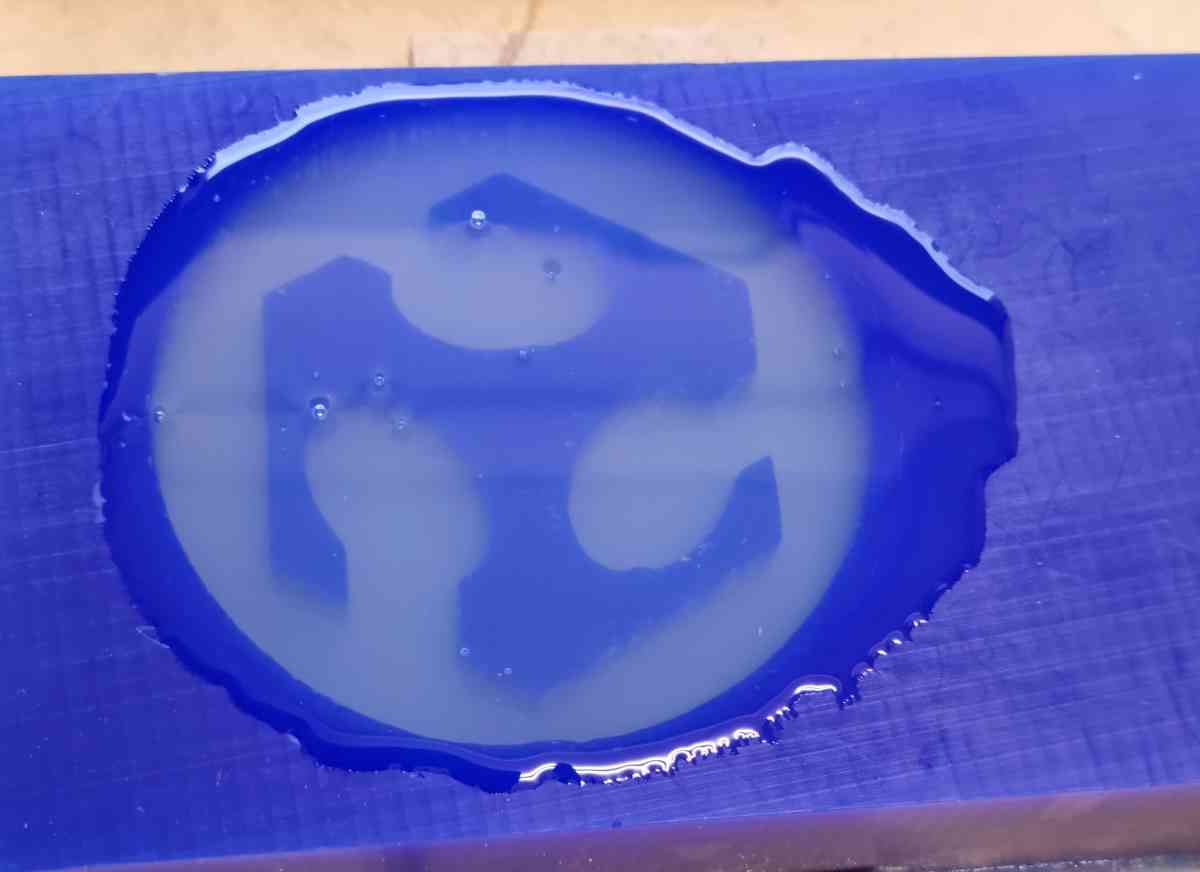
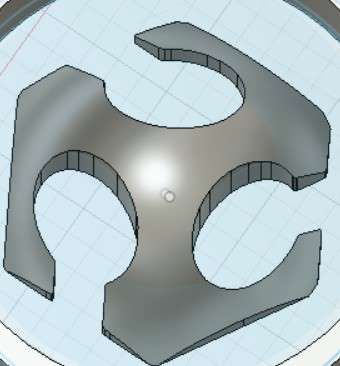
 Fabacademy logo design.
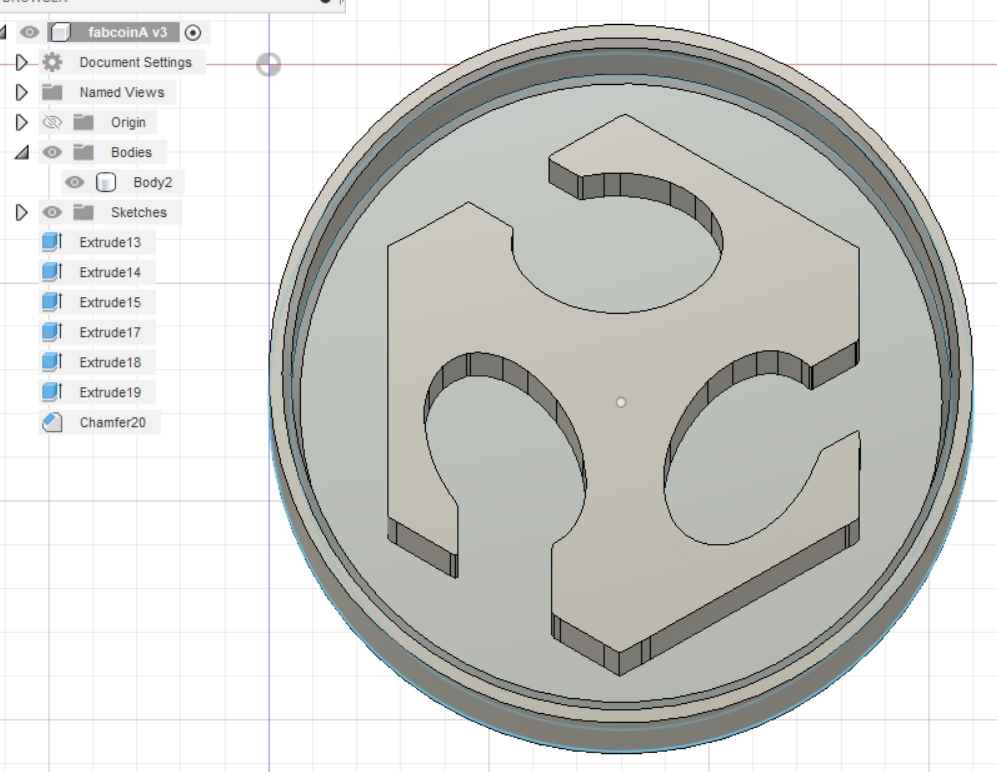 Fabacademy adapted logo.
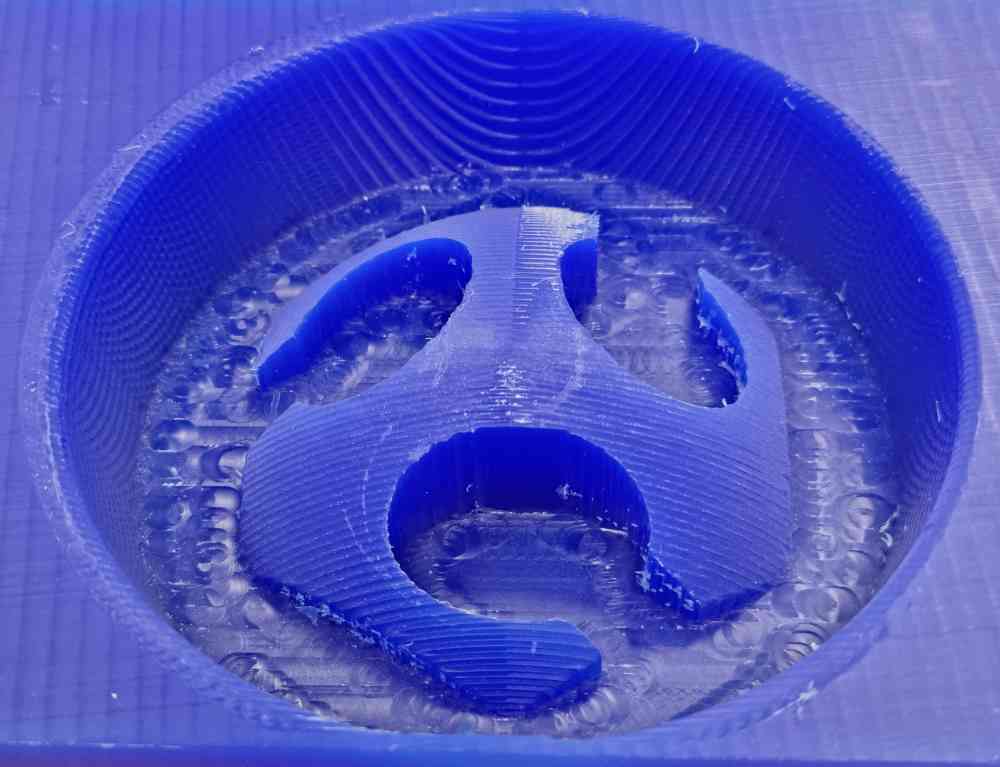
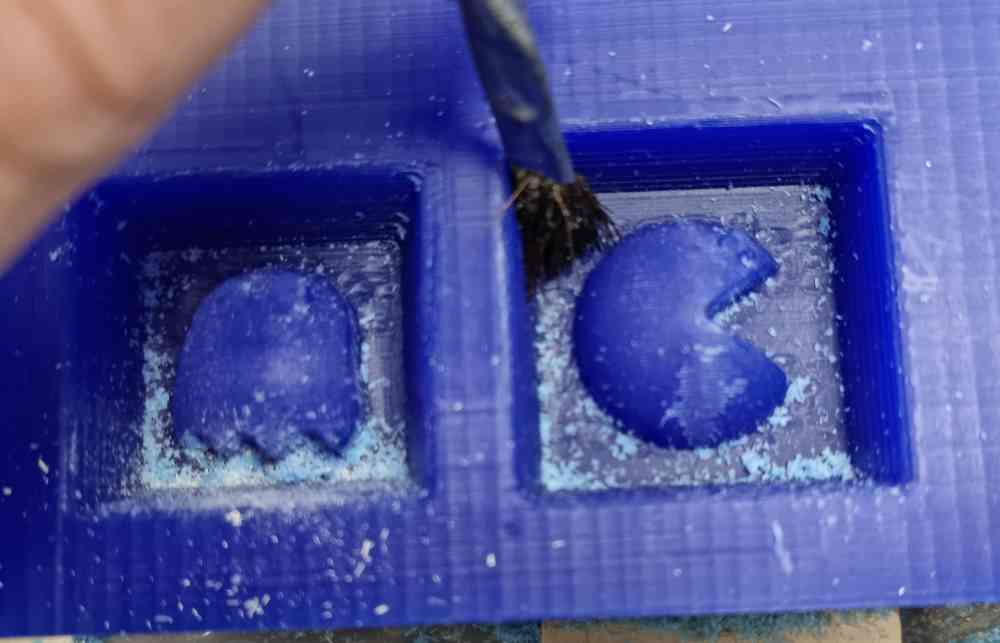
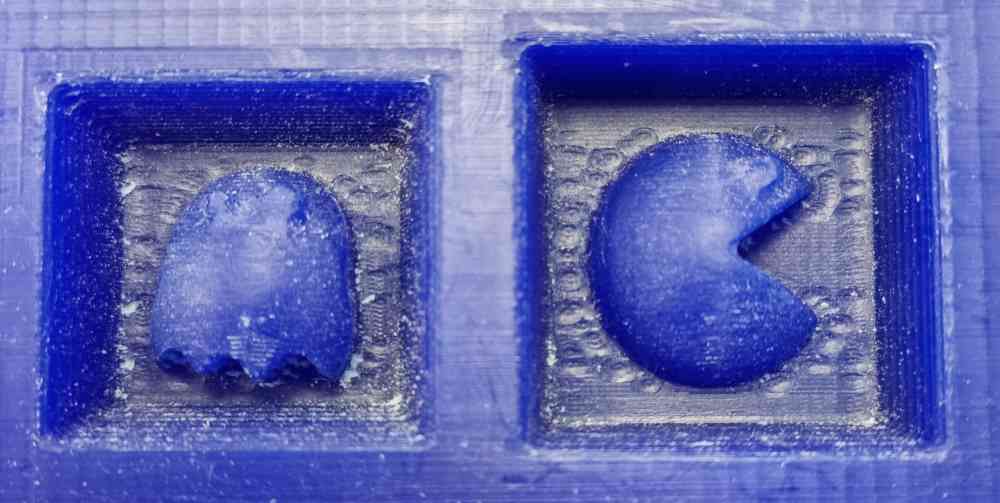
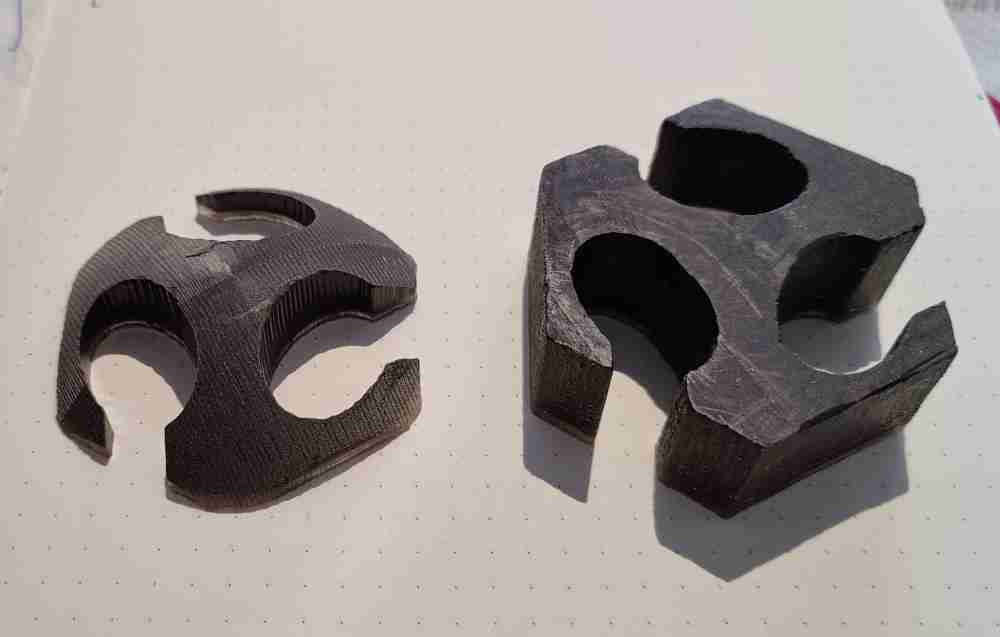
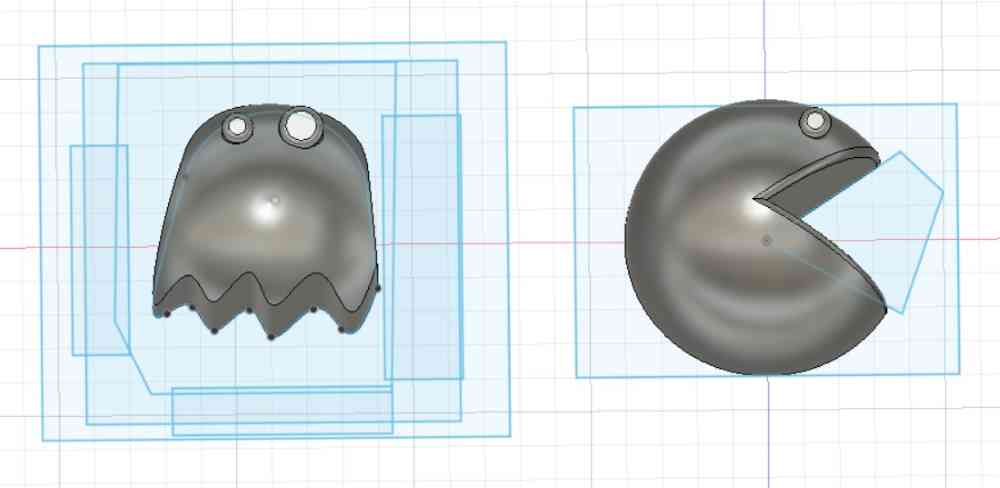 Pac-man design.
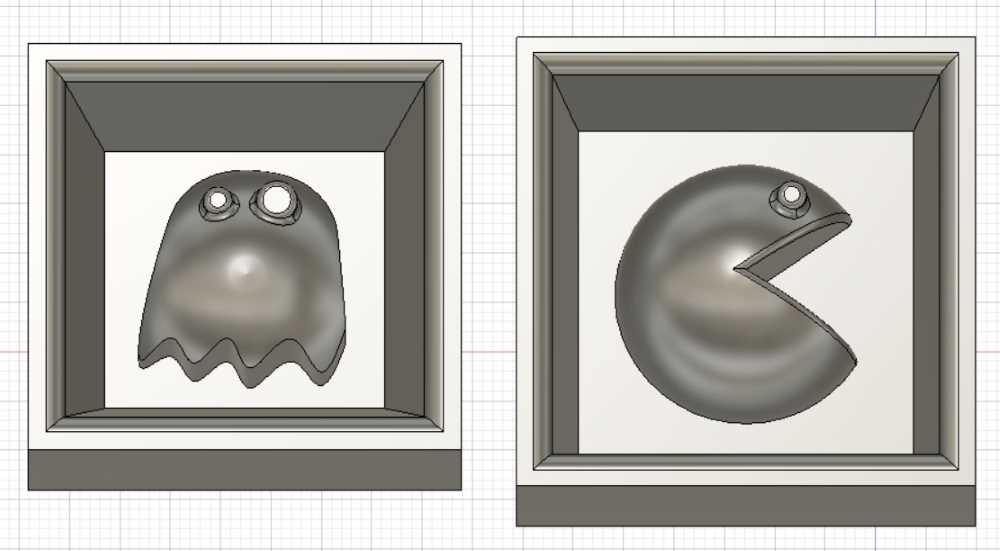 Pac man final.
Now, it´s time to mill. To do so, I use the same process as the test cut, but with the following changes:
- Wax block dimensions: 140x90x35 mm..
- Used a 3mm diameter tool with 30mm tool length.
- Paralel finishing step over = 10%.
Here below, you can check the steps of the whole process:
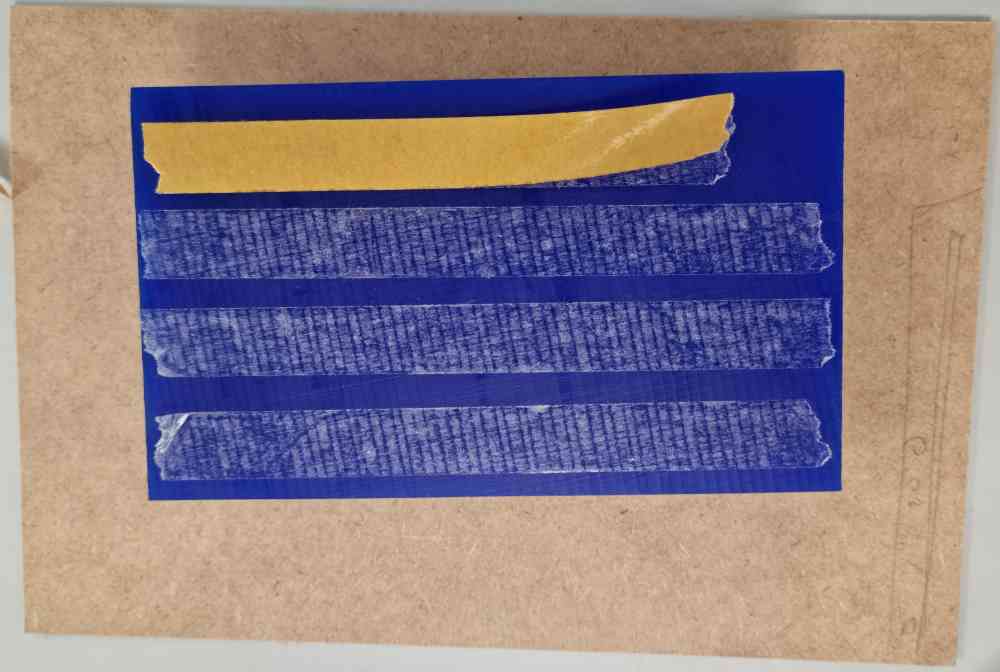 Preparing the wax block.
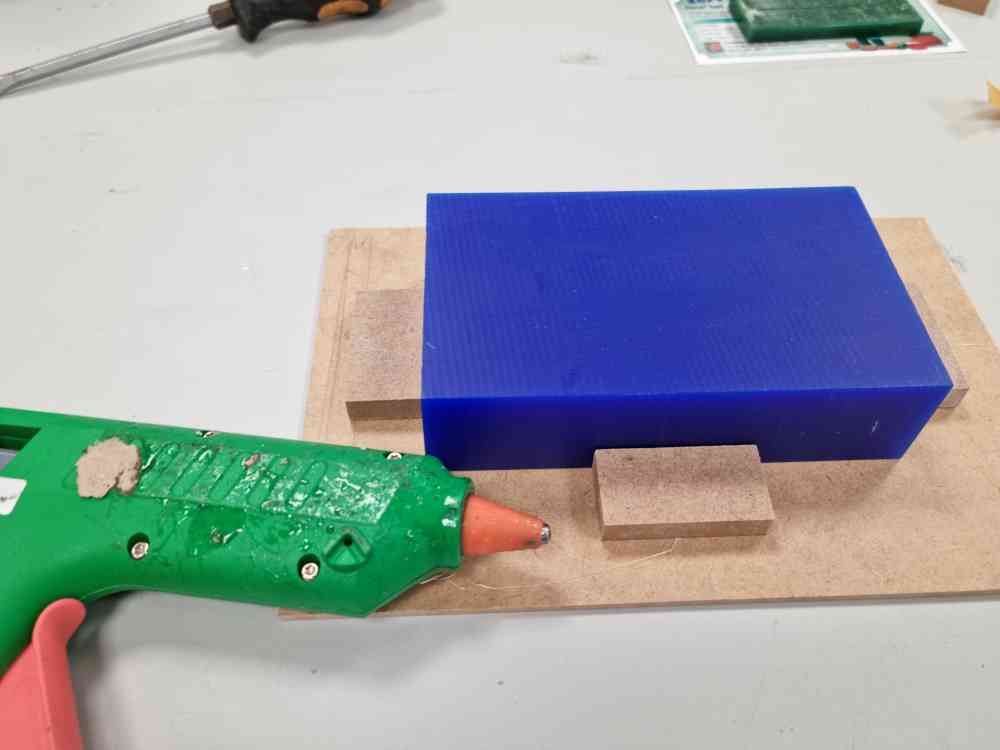 Glueing it to the wooden base.
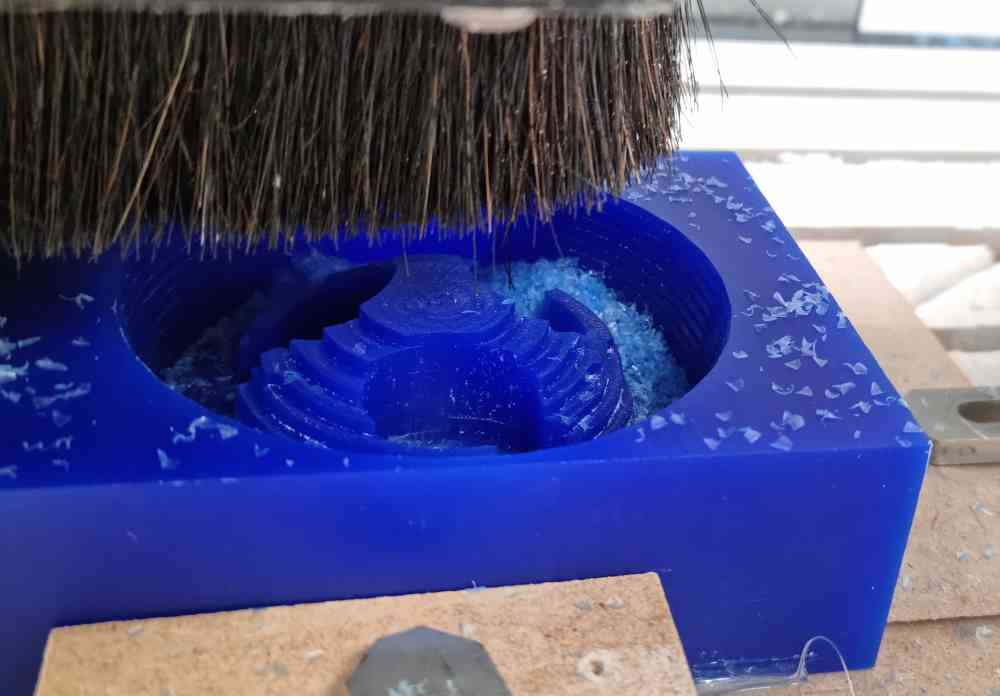
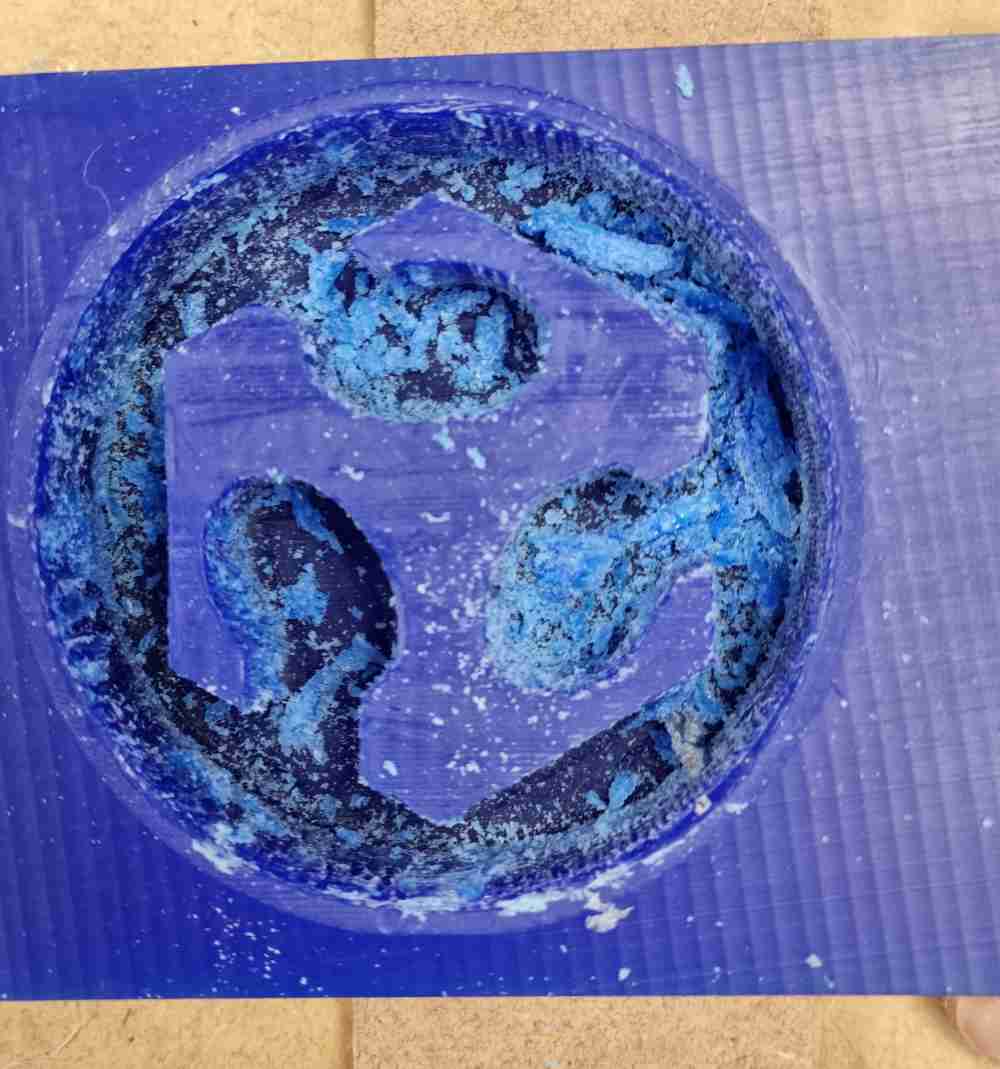 After the milling process.
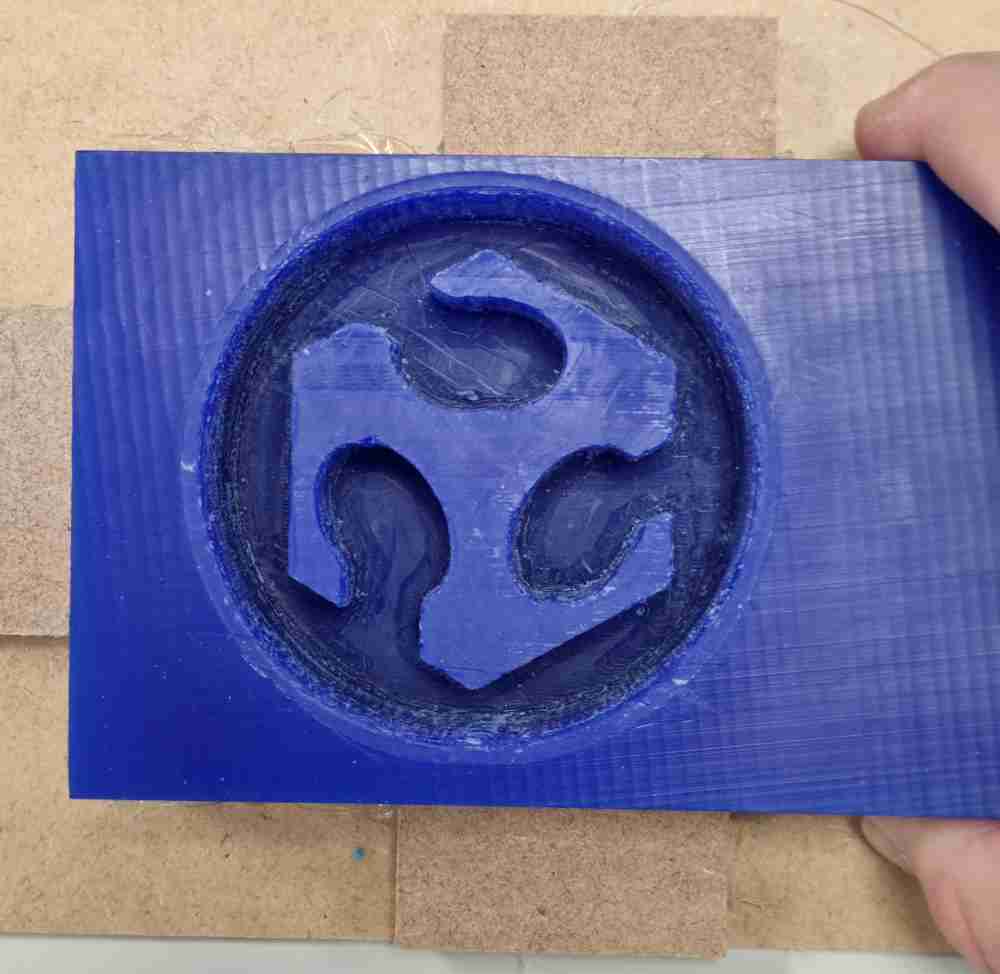 Once cleaned.
After the regional review, I found out that this design wasn´t really 3D milling, and hadn´t not even one nice curve, but after the difficulties with Fusion I jsut wanted to move on with the molding, while preparing the other design. What I´ve learned from this first milling is that the 3mm tool we have is not the best for this type of milling. Wax got stuck really easily and affects the final result. Also it looks like we´ve been milling at too high speed (1500 mm/min) that probably melted the wax and made it get stuck in the design, so I´ve been recomemended to test with lower rates.
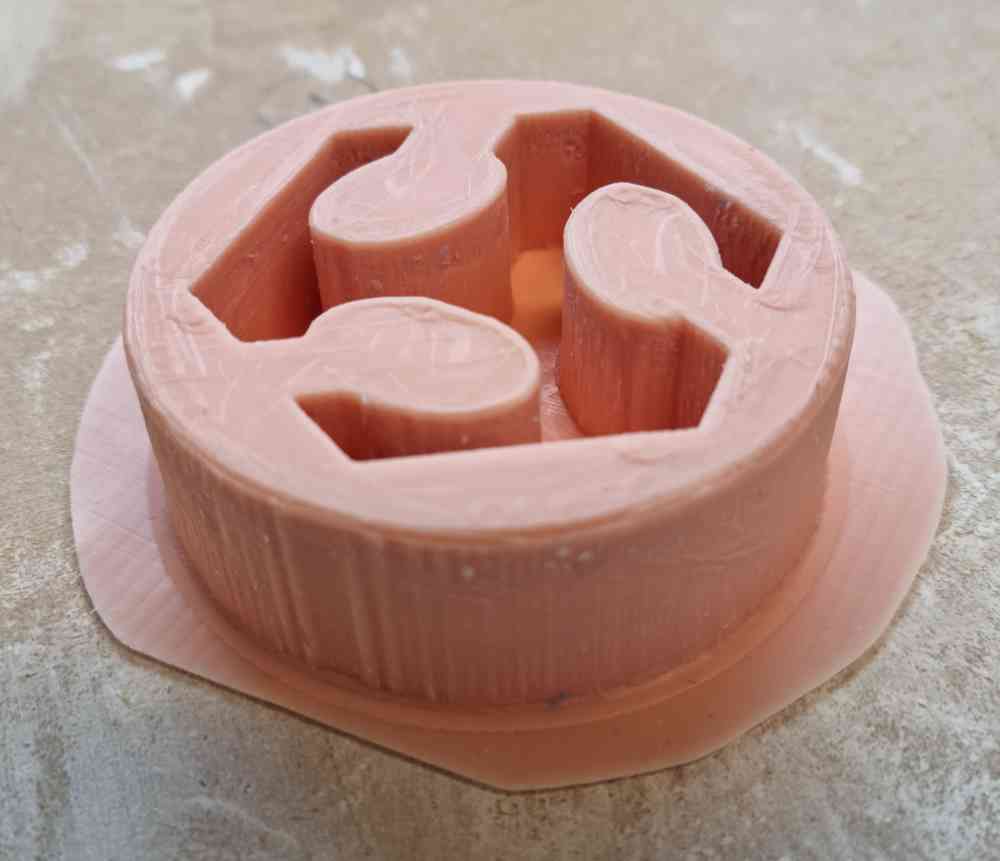
So, after a great information obtained from this first experience, I did a modification, combining it with a sphere to give it a round shape. This time I changed the cut speed and used a flat 4mm tool. I would have loved to use a round end tool for the finishing but we don´t have any in our lab.
- Cut feed: 900mm/min.
- Tool: flat end 4mm tool..
- Separated first the horizontal roughing, cleaned and after ran the paralel finishing.
- Roughing stepover = 40%, paralell stepover = 10%.
- Added:1mm fillet and 10º demould angle.
 Roughing.
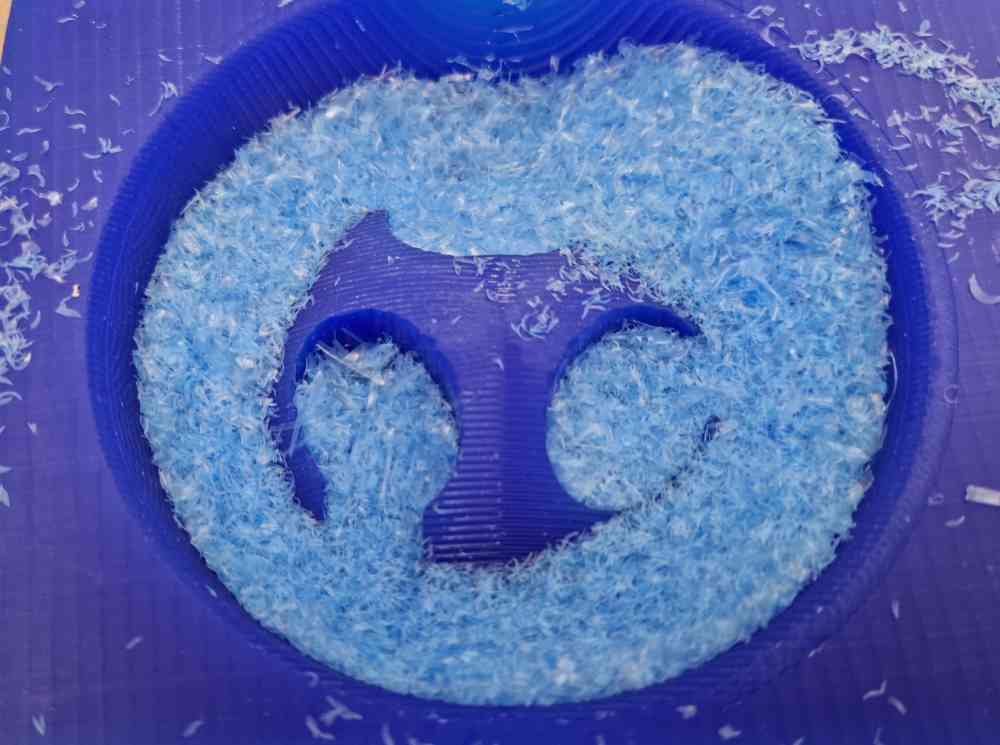 After finishing.
 Final finishing.
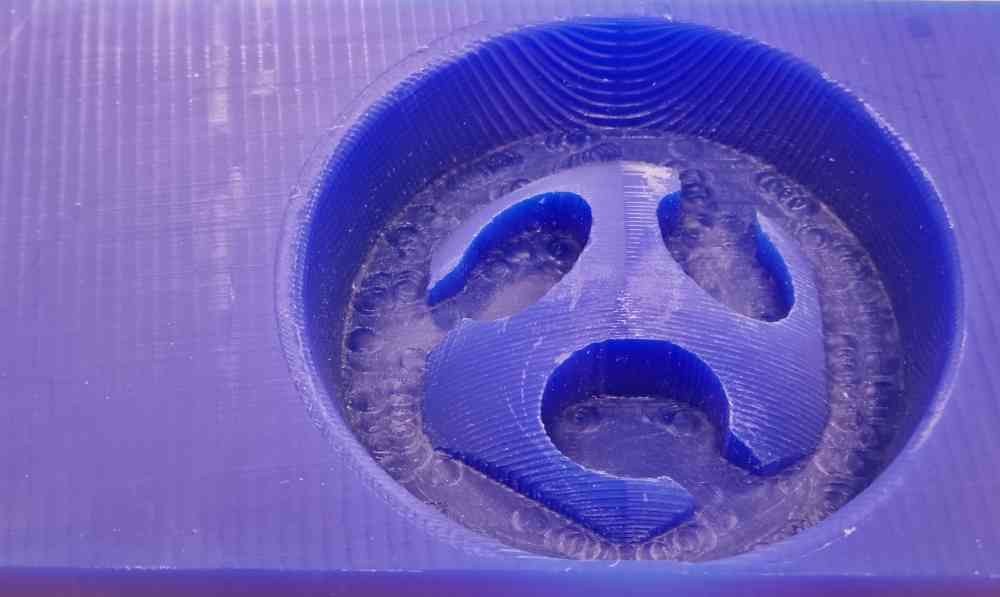 After cleaning
As we can see we solved all the problems encountered in the fist mill. We had no wax stuck and only brushed lightly the piece. Probably the finishing would have been better with a ball end tool. We will try to find one and test it!
Afterwards, in order to continue practicing the milling settings, I did another design, (the pacman design), but now I wanted to use a 2mm tool to do the job. This tool made me redesing my object, and finally had to scale resulting in a smaller size than I expected. I also did the milling in two separate parts, first the horizontal roughing, cleaned the material and after the paralel finishing. For this second milling process I used the following settings:
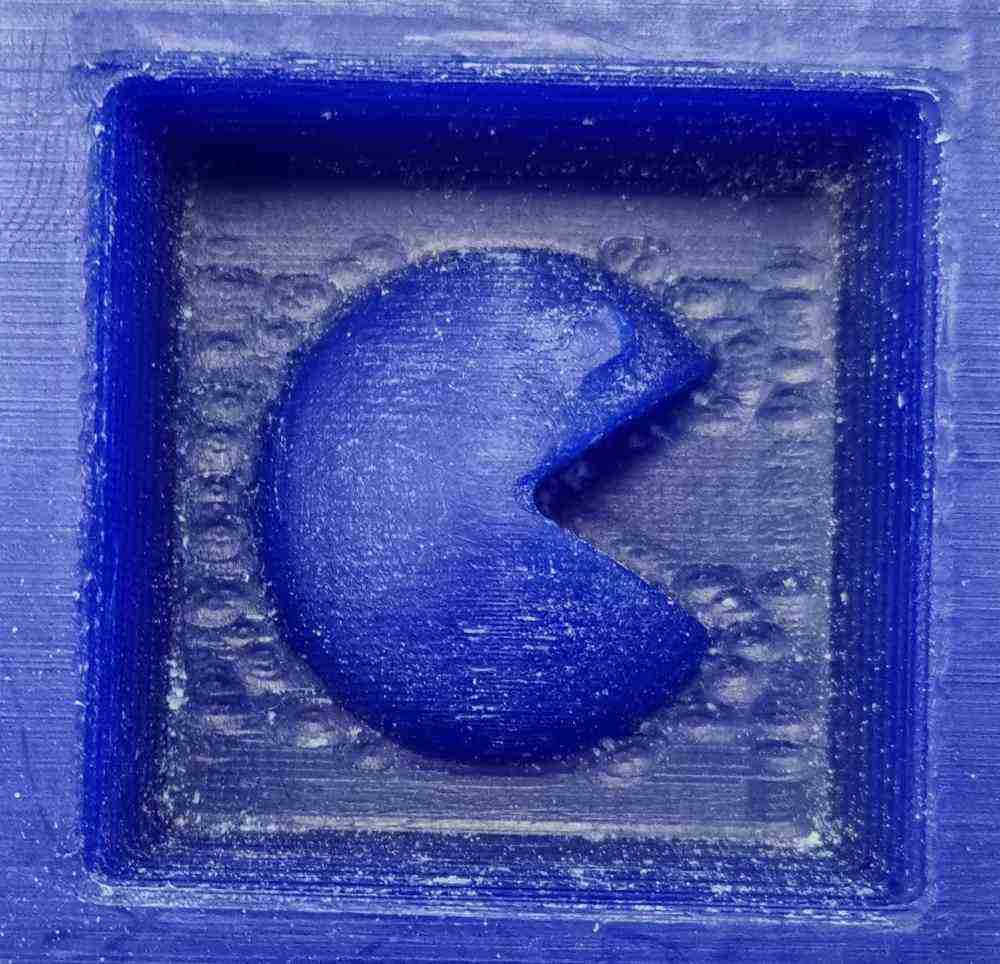
- Cut feed: 900mm/min.
- Tool: flat ended 2mm tool..
- Separated first the horizontal roughing, cleaned and after ran the paralel finishing.
- Roughing stepover = 40%, paralel stepover = 10%.
Here you can see the part of the process:
 Roughing simulation.
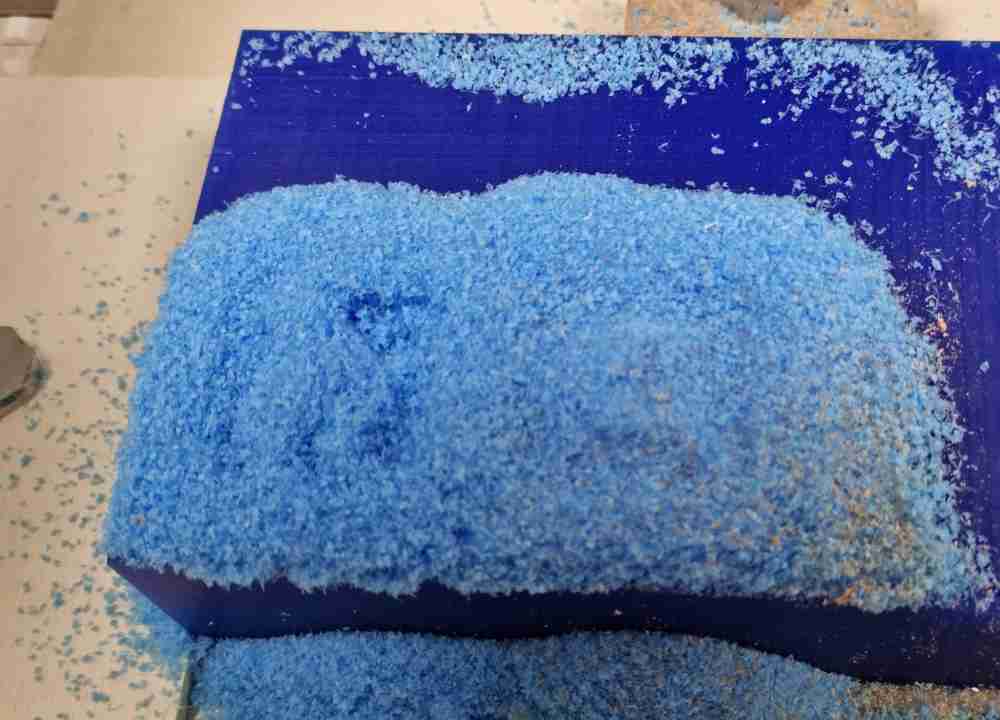 After the milling.
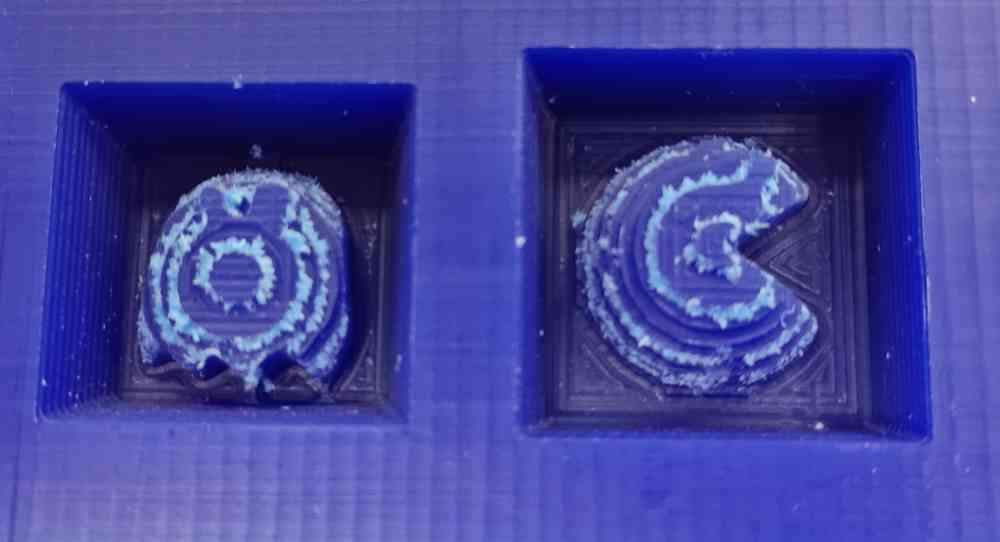 Cleaning the material.
 Paralell simulation.
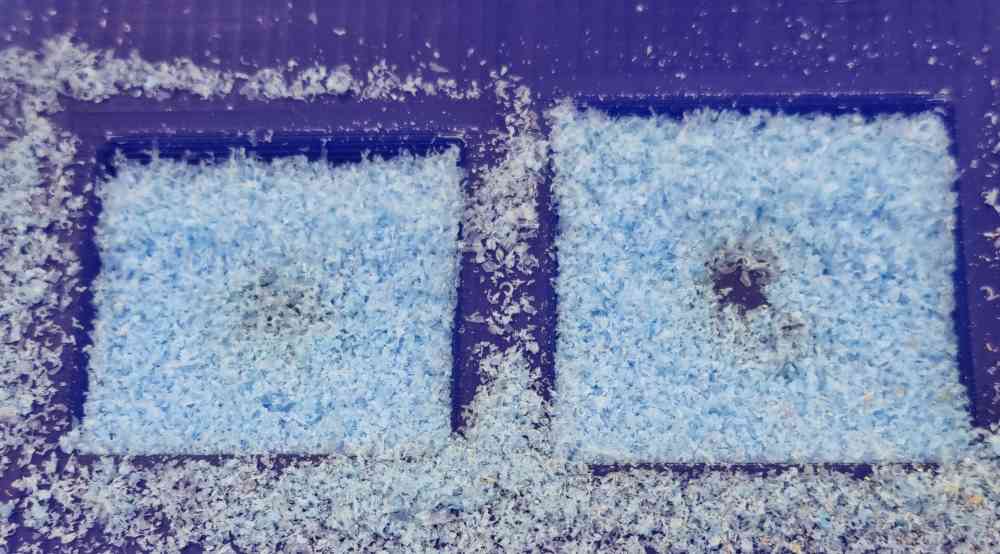 After the milling.
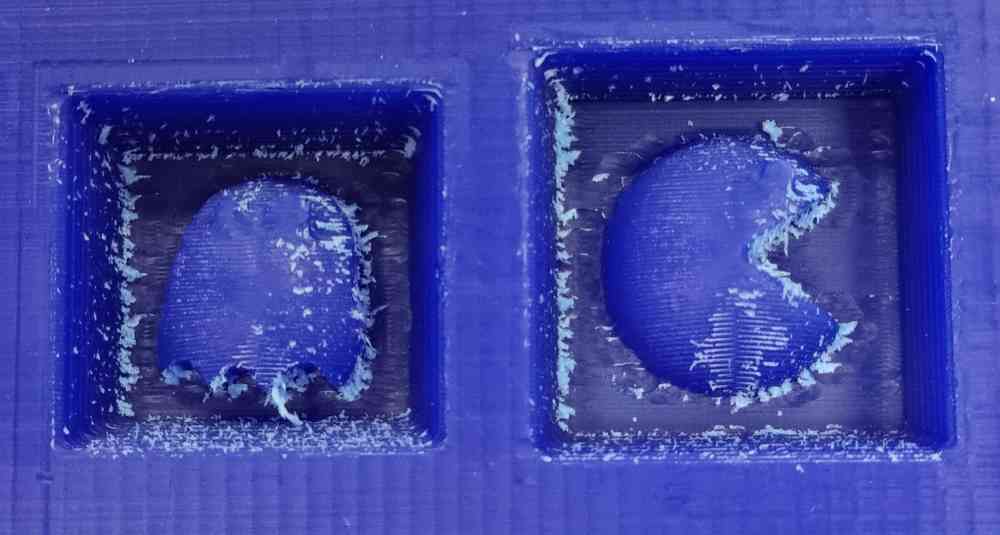 Cleaning the material.
This second time the milling process went better. No wax got stuck in the tool, and either in the material, so I only had to clean it a little bit with a brush. The only thing is that it resulted in a smaller size that expected, so I´ll mill it again, as i´m not happy with the result, but this time I´ll change to a 4mm tool to mantain the original size. Meanwhile, i´ve got another design to mold and cast.
Download Fusion files: fabcoinflat.f3d, fabcoinround.f3d, pacman.f3d
INDIVIDUAL ASSIGNMENT - part 2:
Now that we´ve milled our designs, it´s time to do the molding process, taking into account what we´ve read in the data sheets and safety procedures. I did this first molding before having my second design.
- SILICONE TYPE:Tin catalyst silicone.
- Work time: 30 minutes..
- Curating time: 24 hours.
So, this are the steps I took:
| Calculate volume: 75mm x 75 mm x 20 mm. |
| 10:1 ratio mixture of silicone and catalyst |
| Remove until the mixture is uniform. The catalyst colour facilitates this process. |
| Put into de vacuum machine: 10 minutes at 0.85 bars to release the air bubbles. |
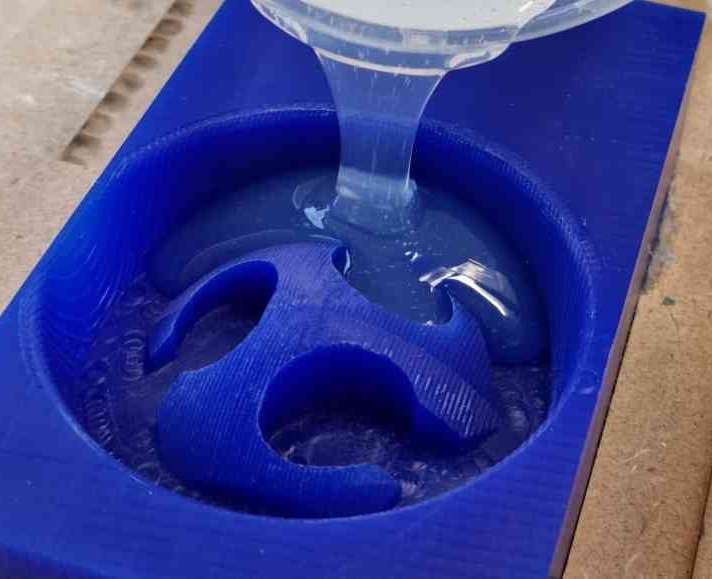
| Pour into the wax mould: Slowly, and always in the same spot, without moving. |
| Once it´s completely filled, add a littel more to help release the mold after. |
| Whait 24 hours! |
Here you can check some images of the process:
 Preparing the silicone.
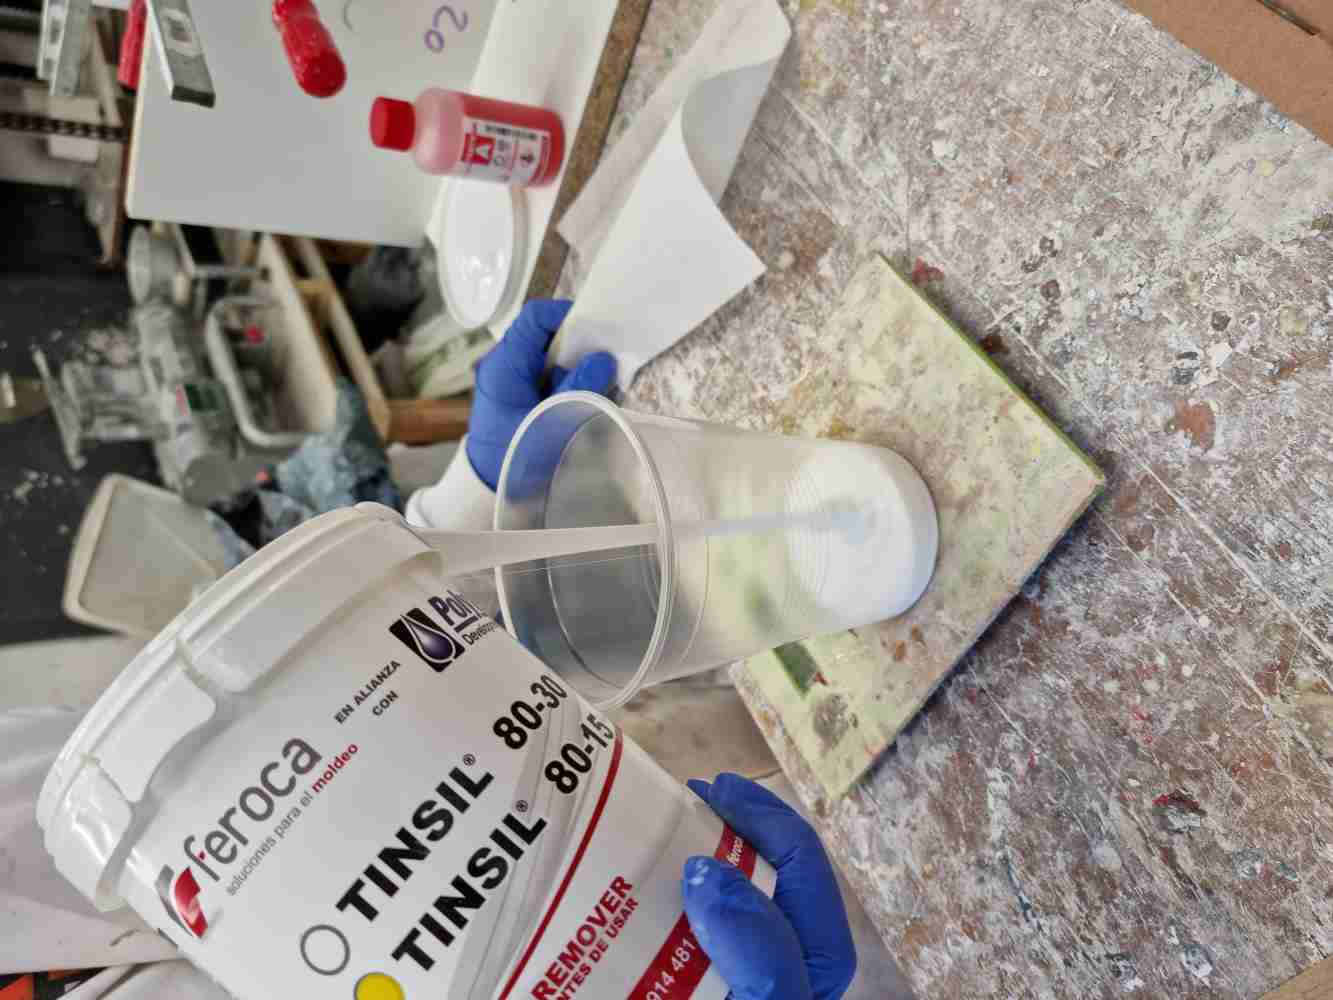 Weighting our material.
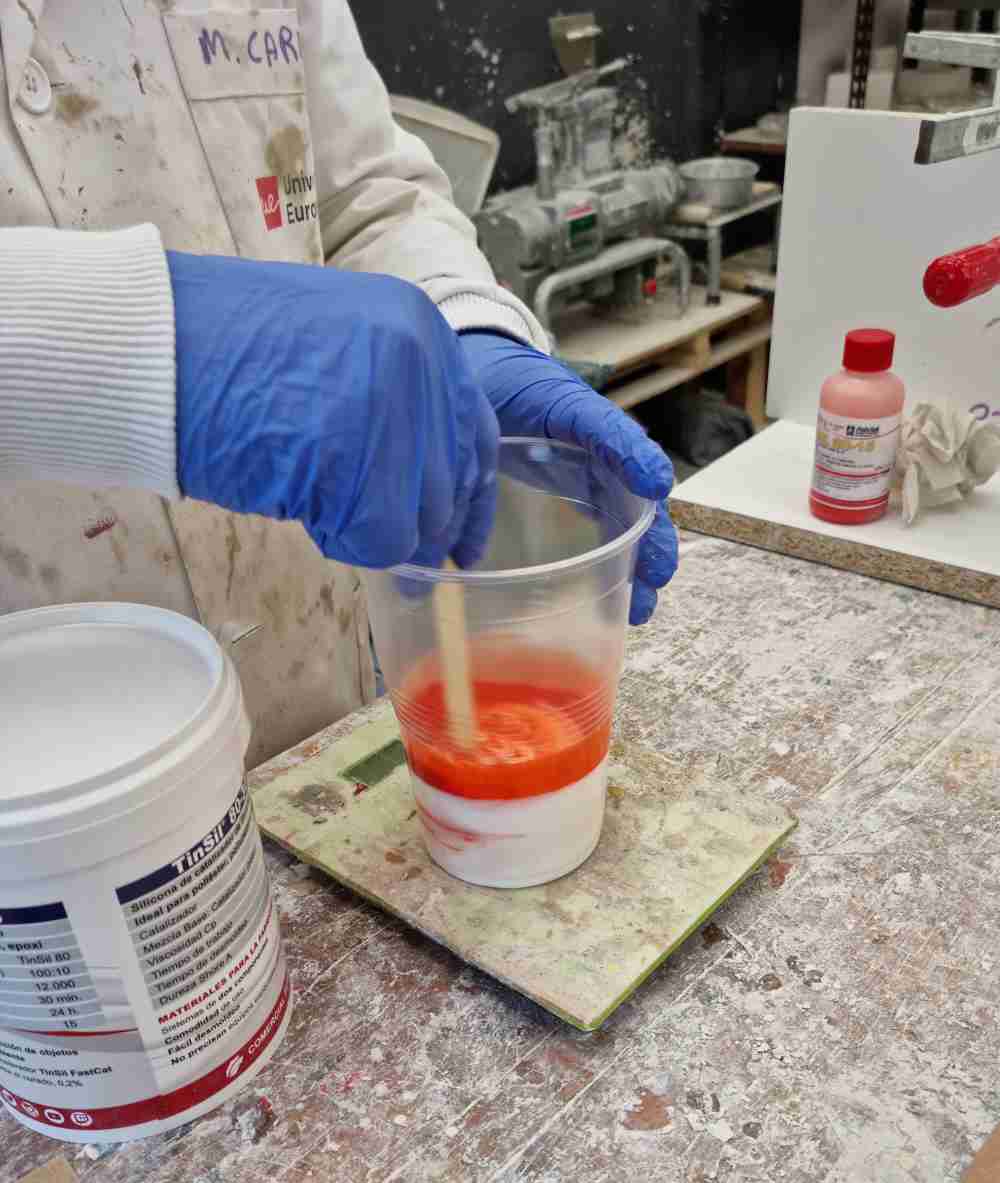 Mixing the catalyzer.
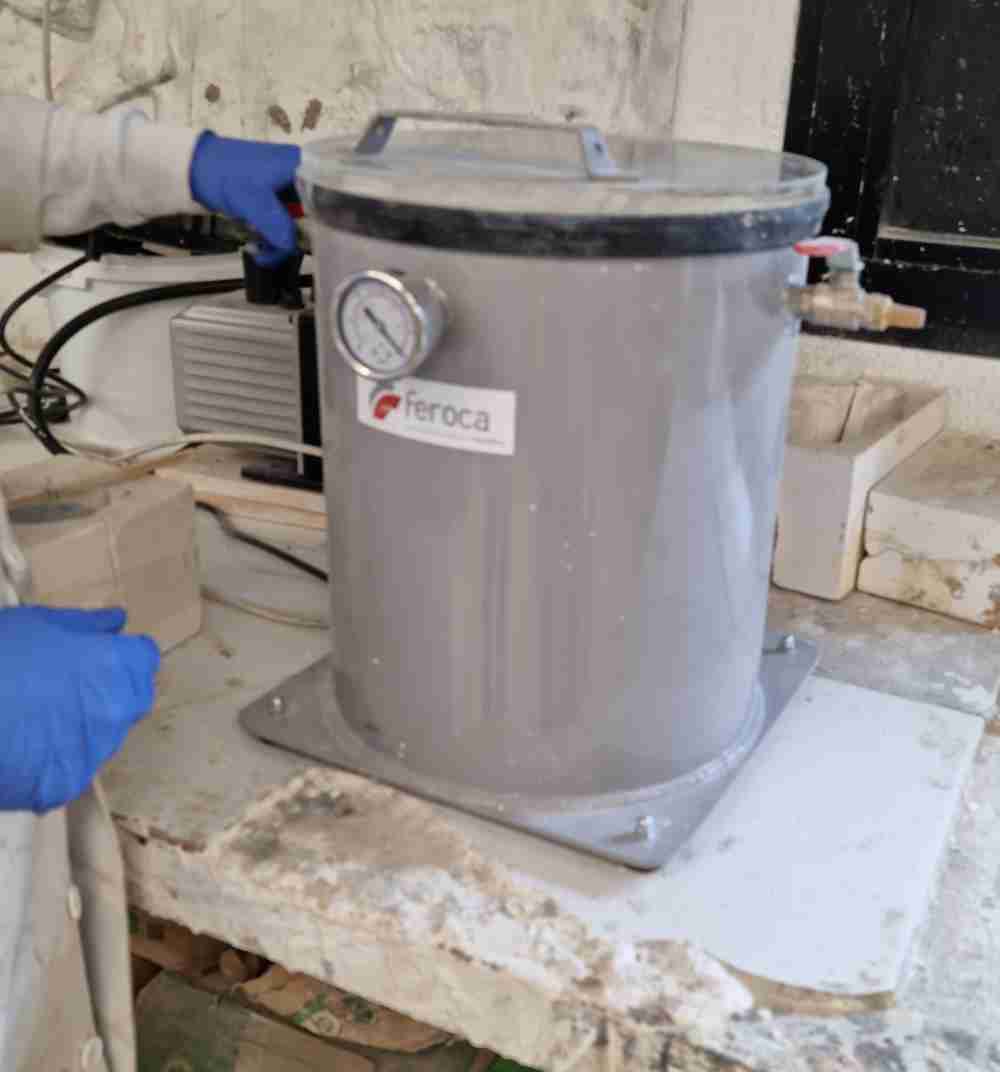 Vacuum machine.
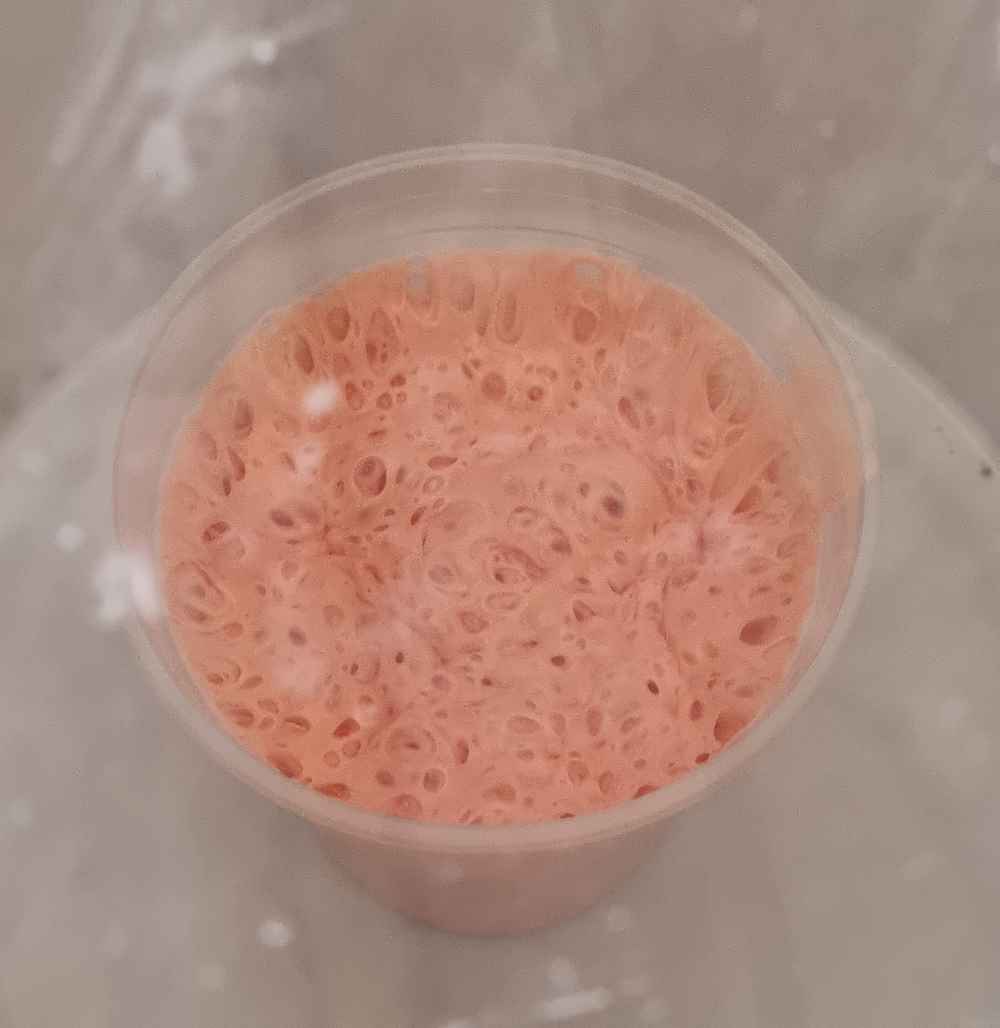 Extracting air bubbles.
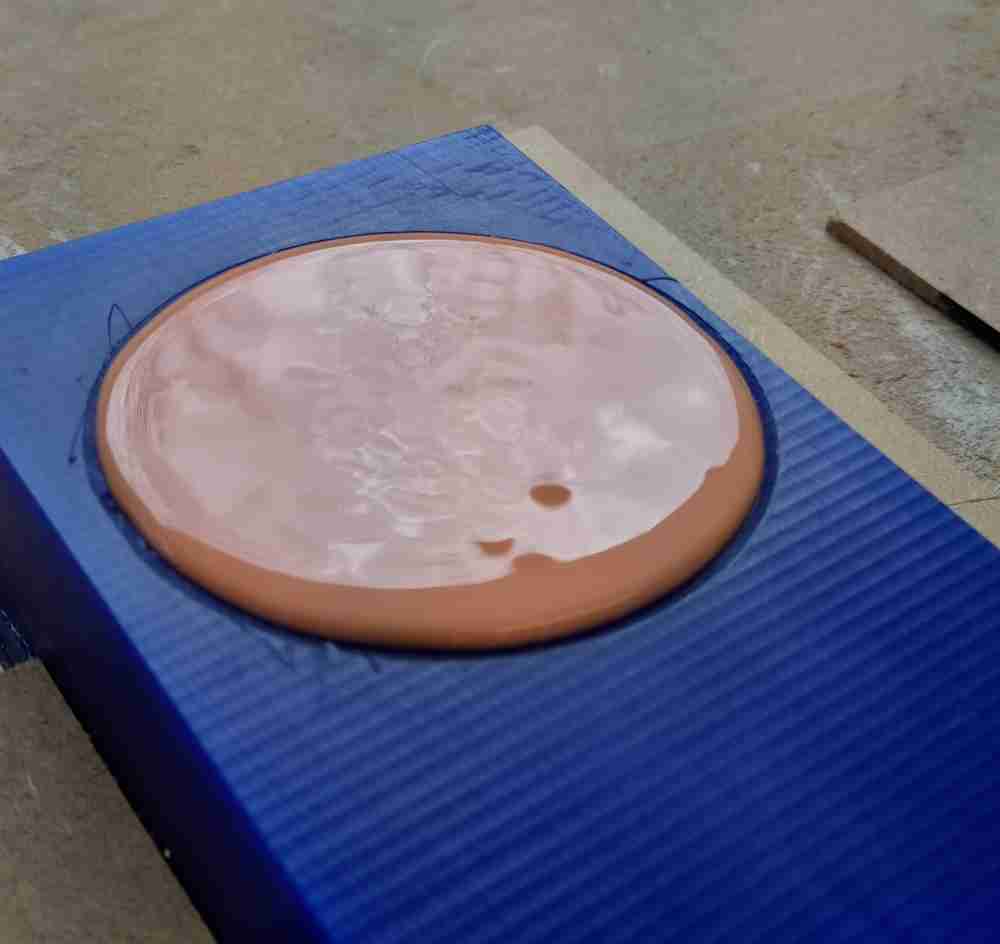 24 hours to unmould.
At tuesday afternoon, more than 24 hours had past, but after checking the mold, it didn´t look as it was prepared for demolding, so unfortunately we have to wait until wednesday morning. I don´t like having to postpone it but there´s no other option. On wednesday morning, we will have the oportunity to use another silicone, which only takes 3 hours to curate, so lets see if we have better luck.
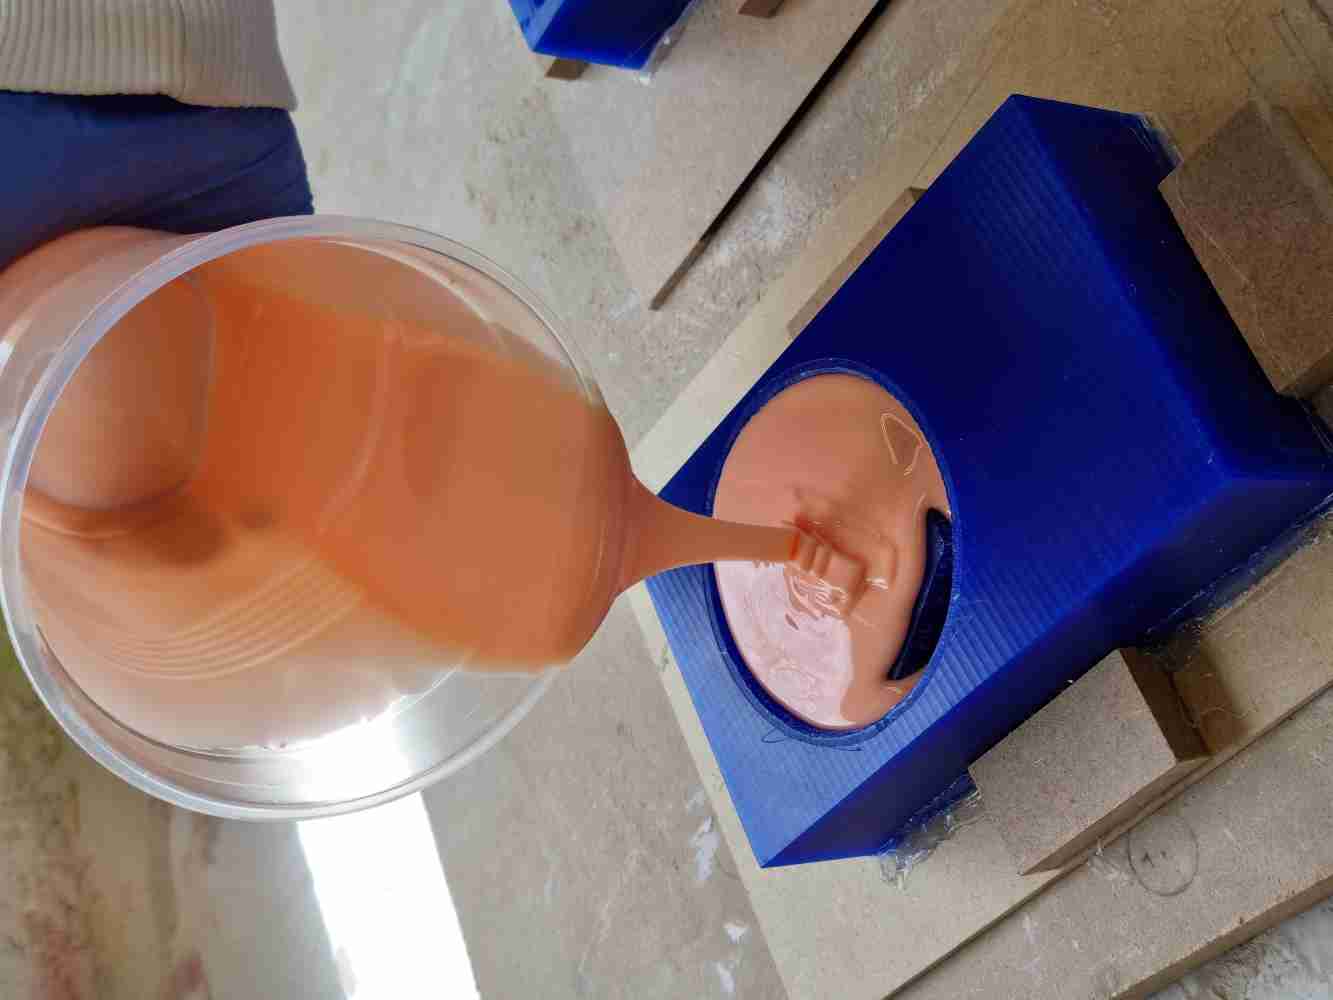
Luckily on wednesday the silicone curated properly, so I proceeded to desmold the silicone and prepared the resine to use for the casting process:
- RESINE:Rigid poliuretane resine.
- Work time: 80 seconds..
- Release time: 8 minutes.
- Volume needed: 29 grams.
Mixing ratio: 50% A + 50% B.
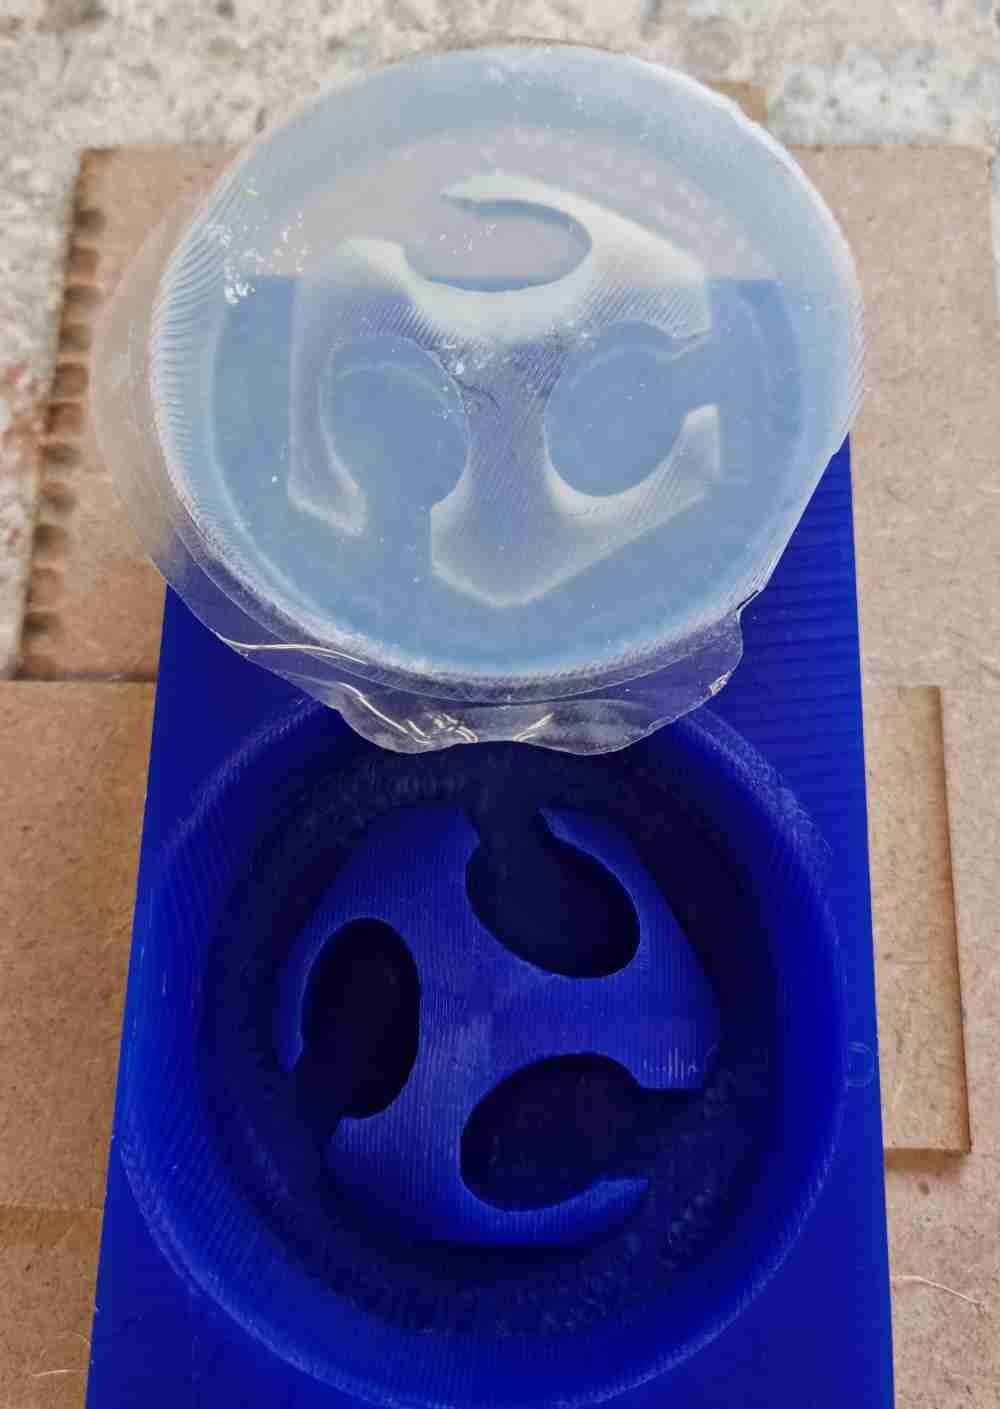
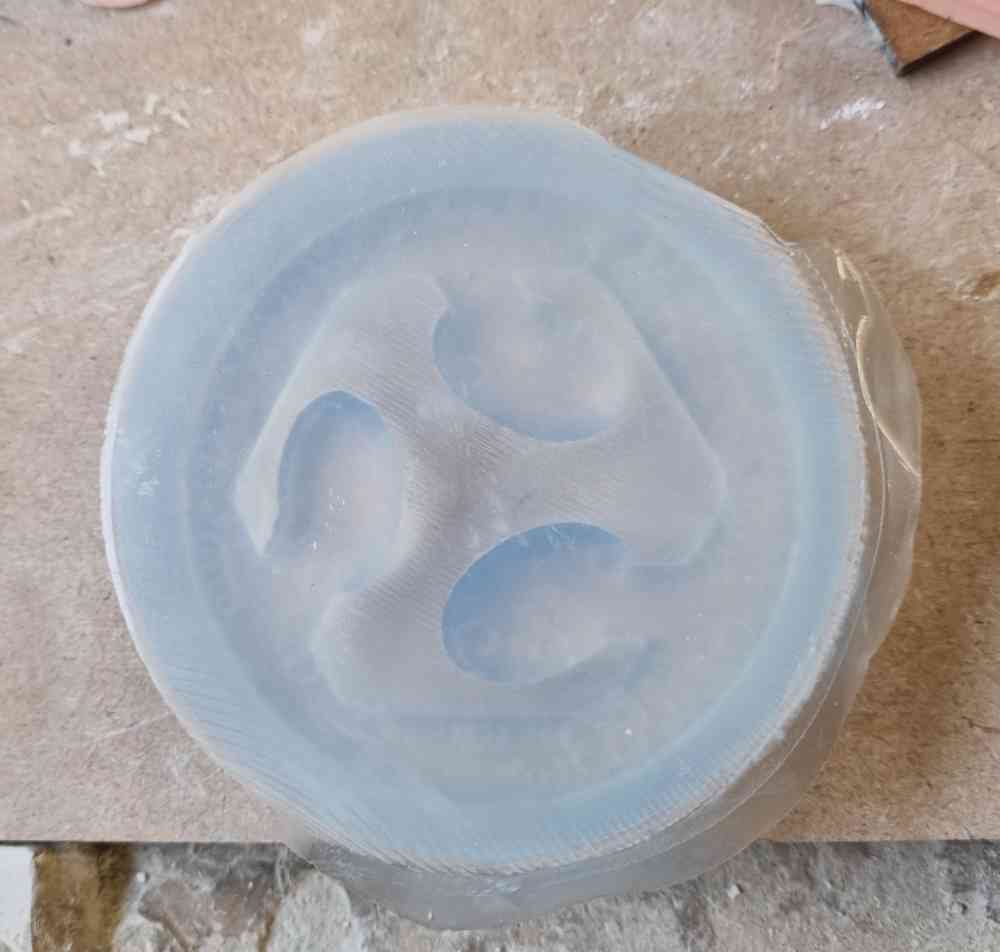
 Final silicone mold.
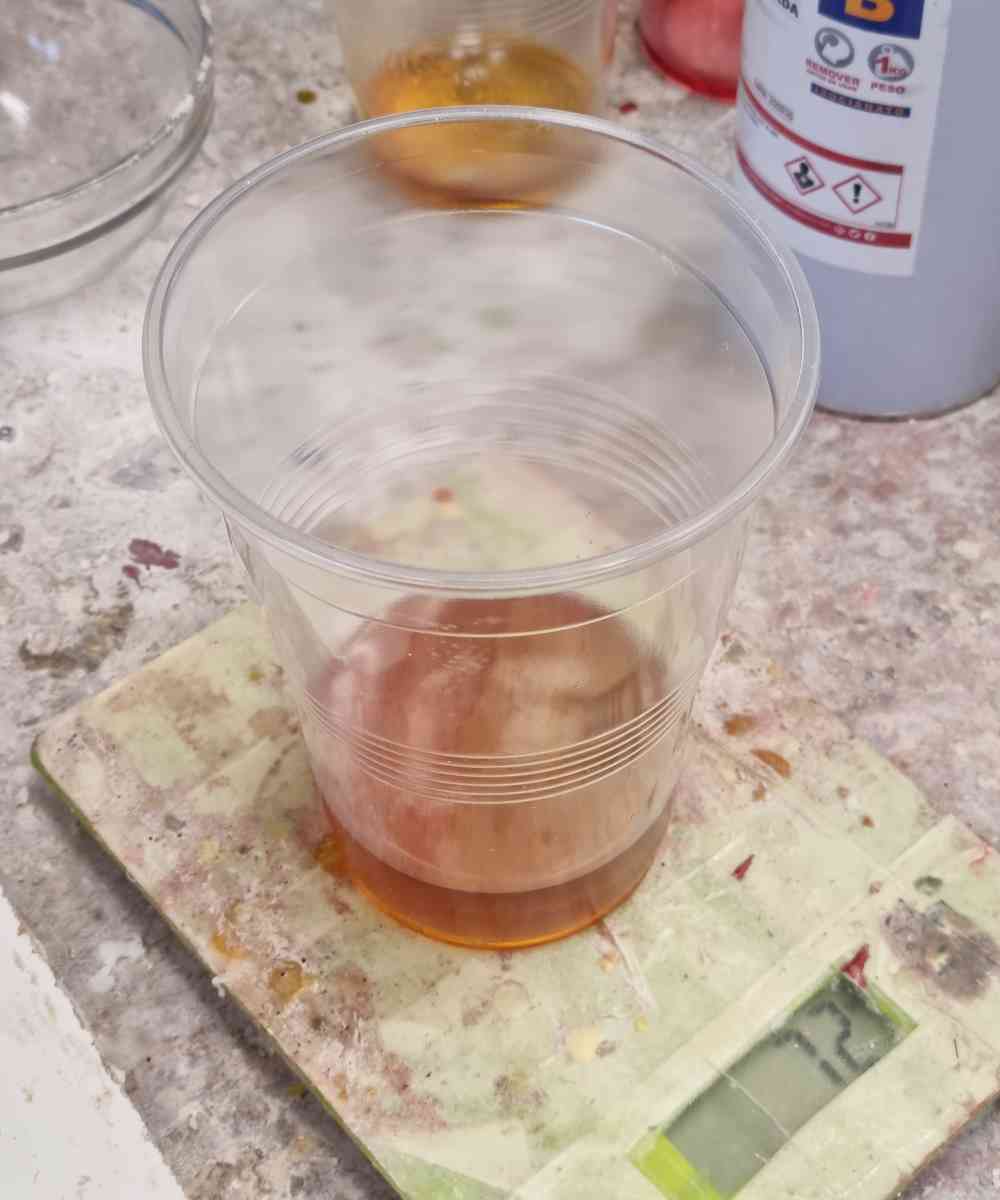 Weighting our material.
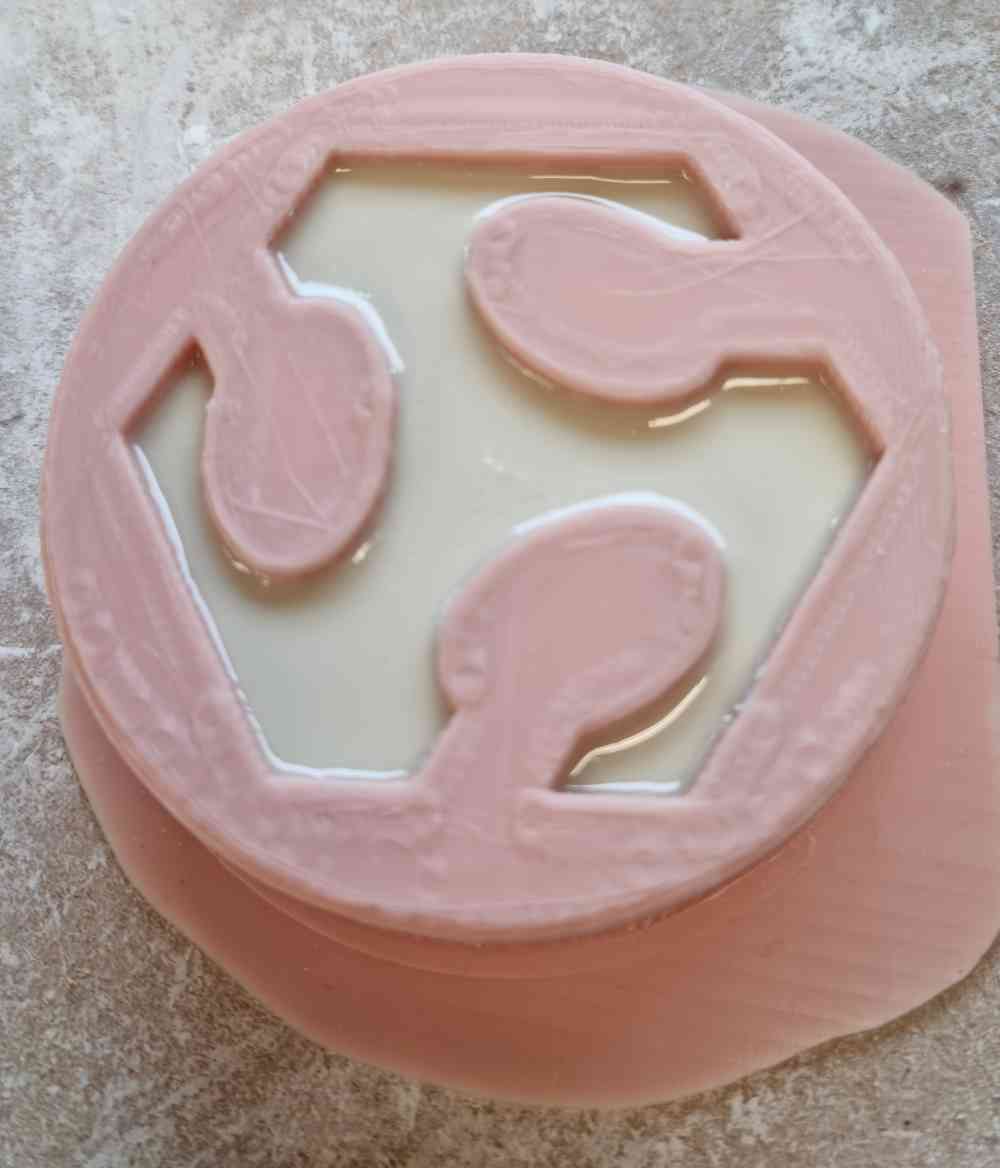
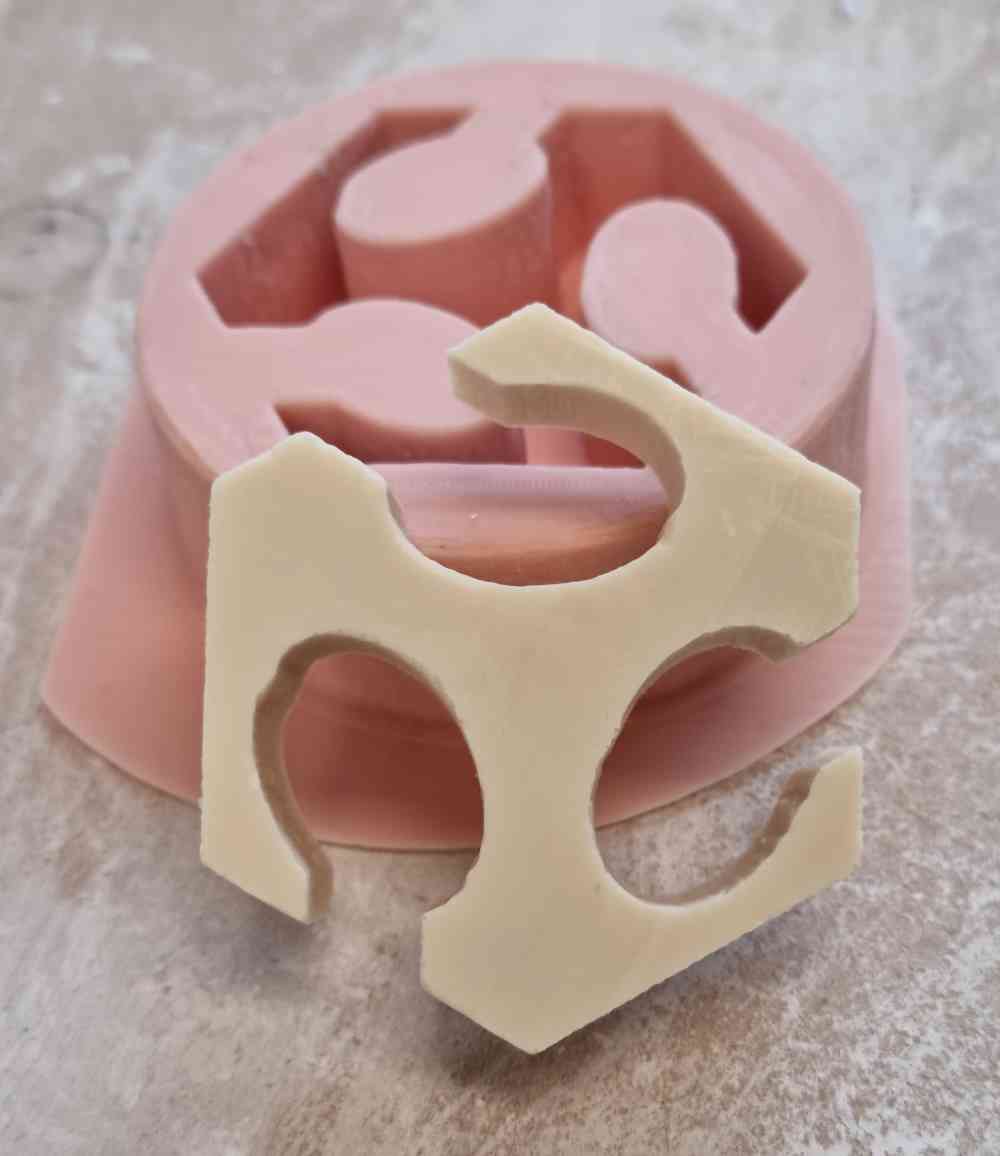 Casting result.
As we can see in the images above, the silicone mold came out cleanly and with no traces on air bubbles, so really happy with that. Now that we have it ready, we prepare 50-50 ratio of poliuretane resine, mix it thoroughly, extract the air bubbles with the vacuum machine again and pour it to our silicone mold. After 10 minutes or so, we demold and get our first piece. The piece went out very good, and you can clearly see the defects of the milling with our 3mm tool. But on the contrary I had no problems with the casting.
Now, I tried out a different resine, this time a transparent polyester resin:
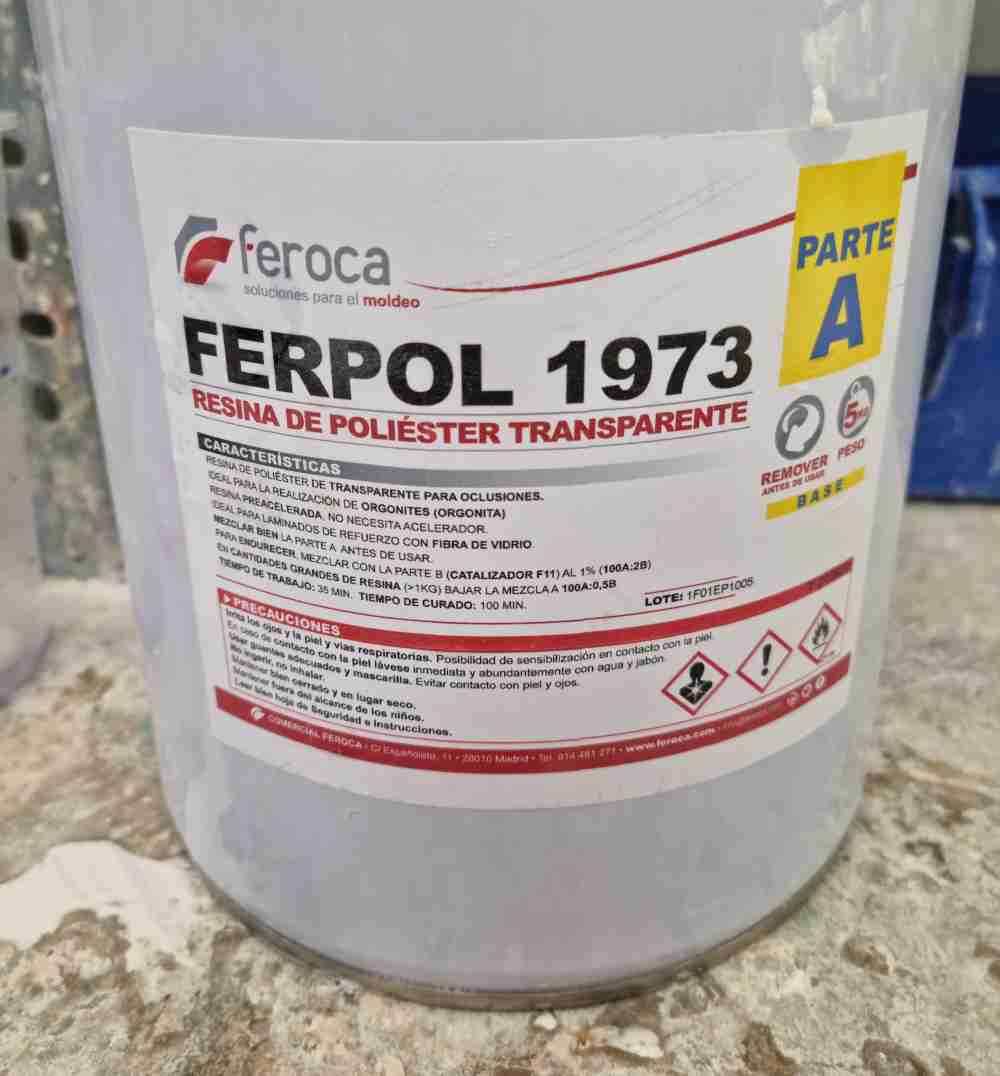
- RESINE: Transparent polyester resin.
- Work time: 35 minutes..
- Release time: 100 minutes.
- Volume needed: 29 grams.
Mixing ratio: Mix with catalyzer in a ratio 100:2.
 mixing the catalyzer.
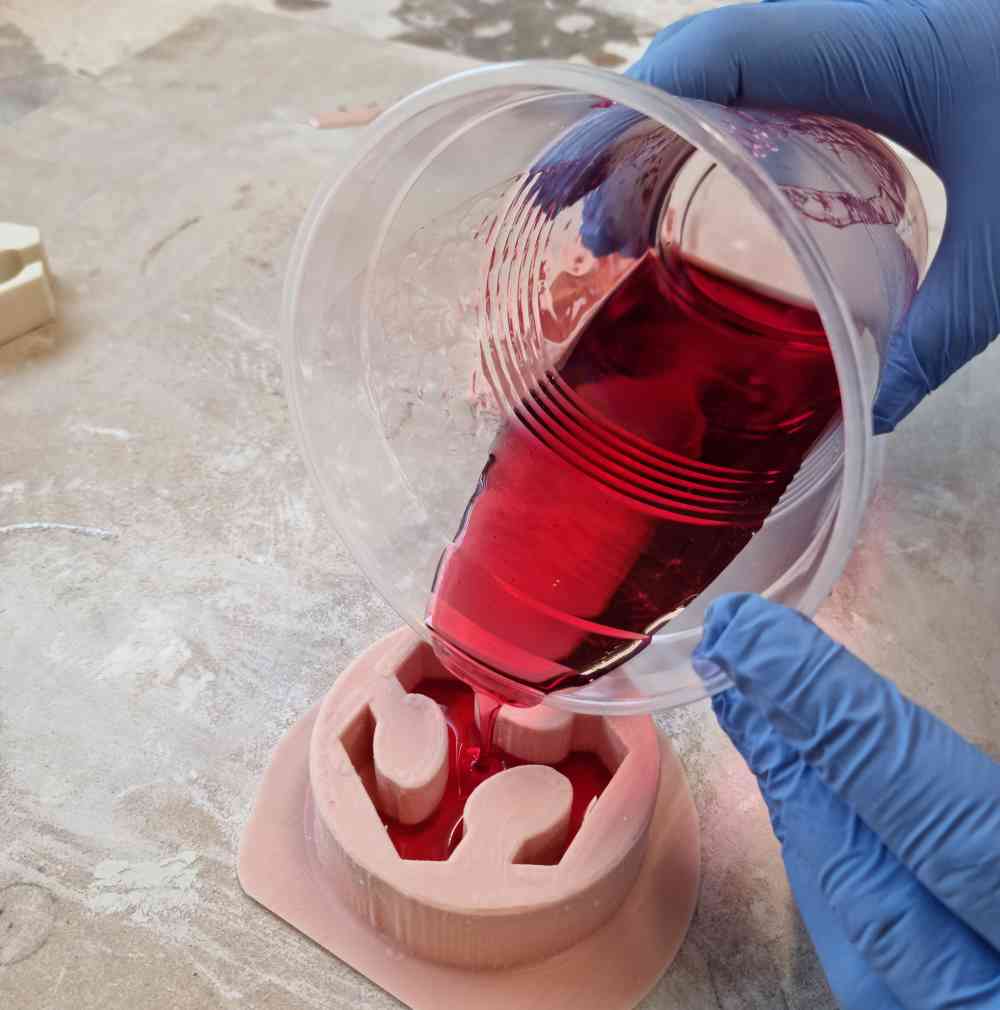 casting.
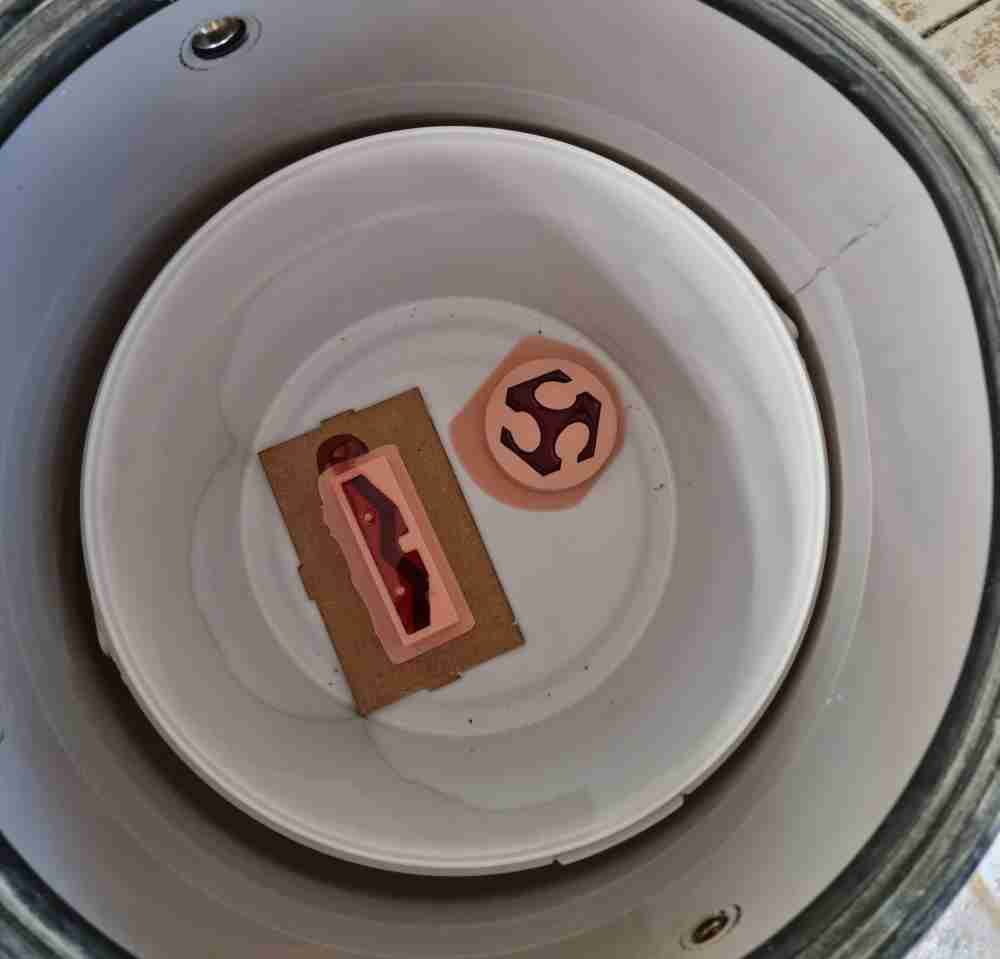 in the vacuum.
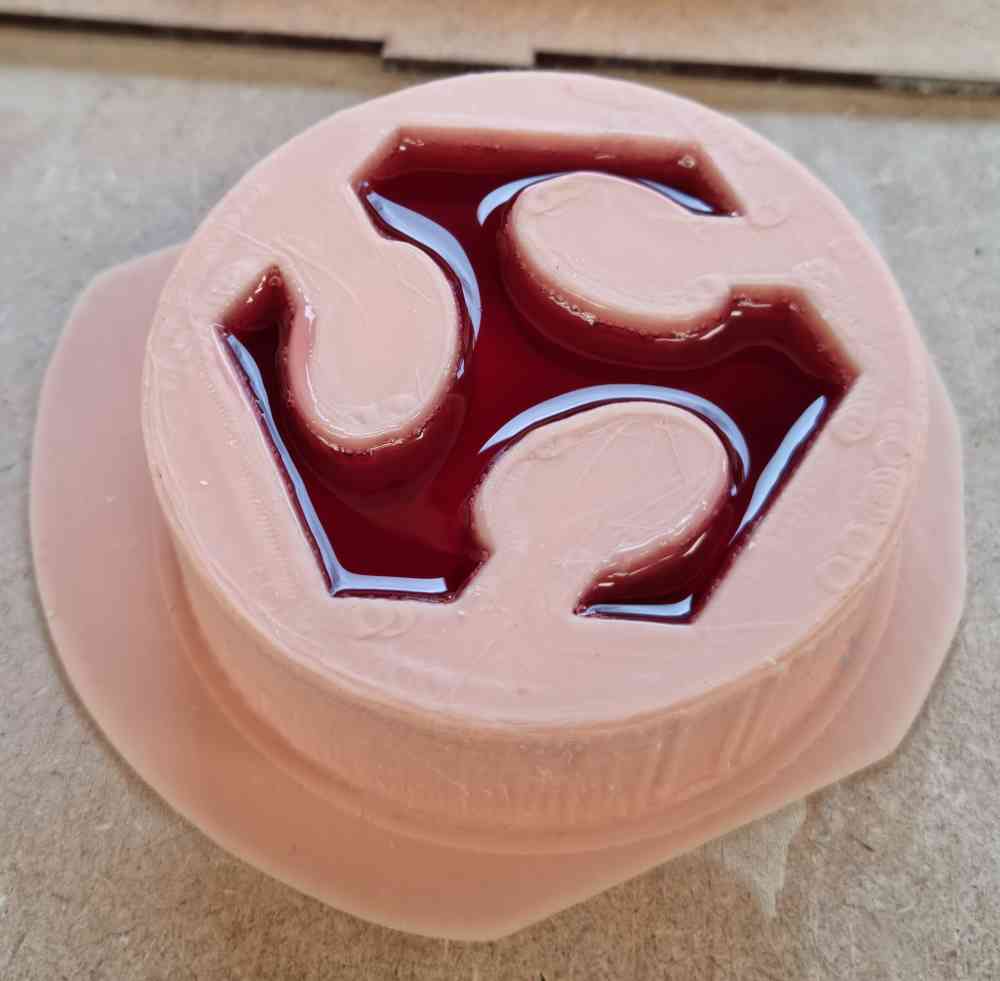
For this resine, we used the air vacumm before adding the resine to our mold, and after (to try out). In this case you have to be very careful, because the negative pressure affects, not only the resine, but also the silicone, so you have the risk of having your resine coming out of your mold. We had it a couple of minutes, and it took our a good quantity of air bubbles. Really happy of how the casting process is going, it´s nice to have things going on well after a slow and difficult start of the week. But unfortunately its taking more time than expected to curate, and can´t document the result on time, so i´ll do it later in the week.
A couple of days after the week finished, I managed to have my design properly casted, as you can see in the following images. When touching it, you can appreciate that the feeling is that is more rigid and durable material than the poliuretane resine.
 Polyester resine.
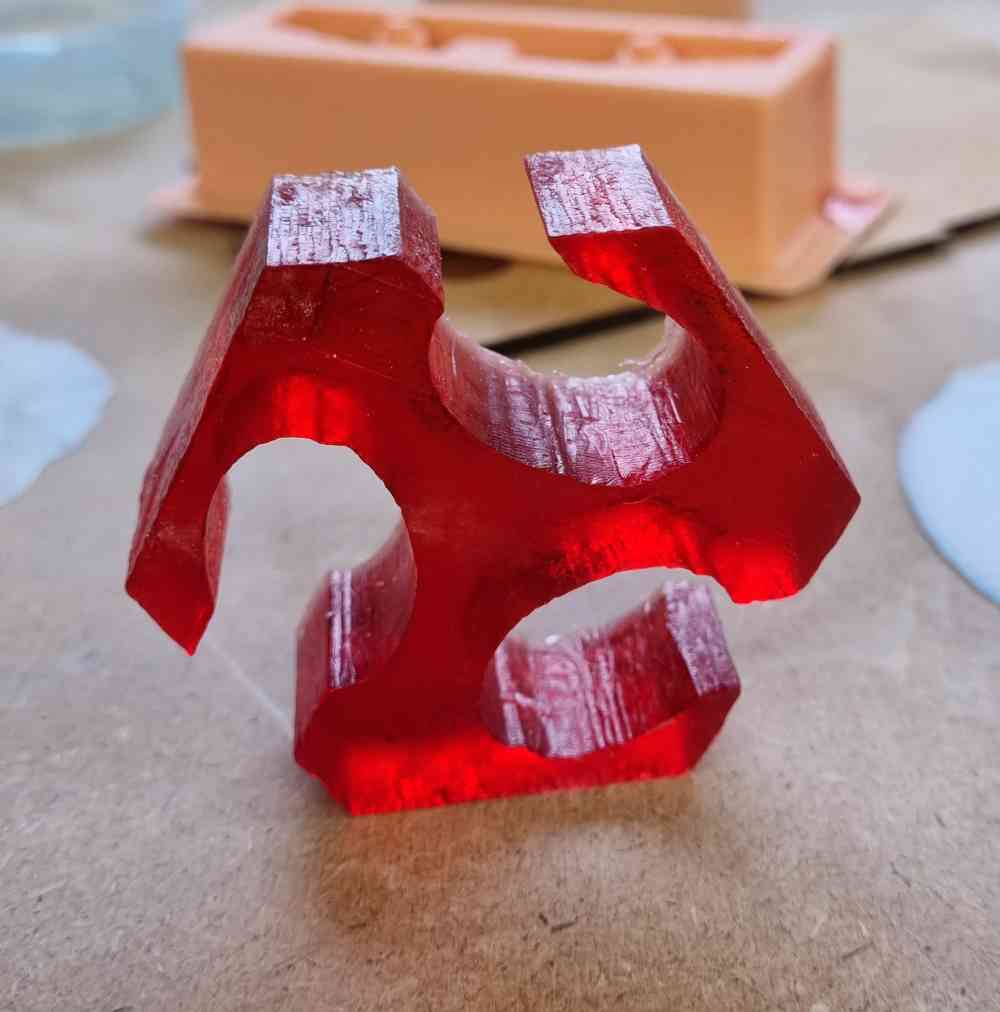
Finally, and before running out of time this week, I did the casting on the second design (the curved one!), but this time with another silicone, a transparent platinum silicone, or also known as silicone for food. I won´t have time to show final pictures of it, or apply resine, but I´ll document it in the following days.
- SILICONE: Translucent platinum silicone.
- Work time: 20 minutes..
- Release time: 4-5 hours.
- Volume needed: 29 grams.
Mixing ratio: Mix 1:1 ratio.
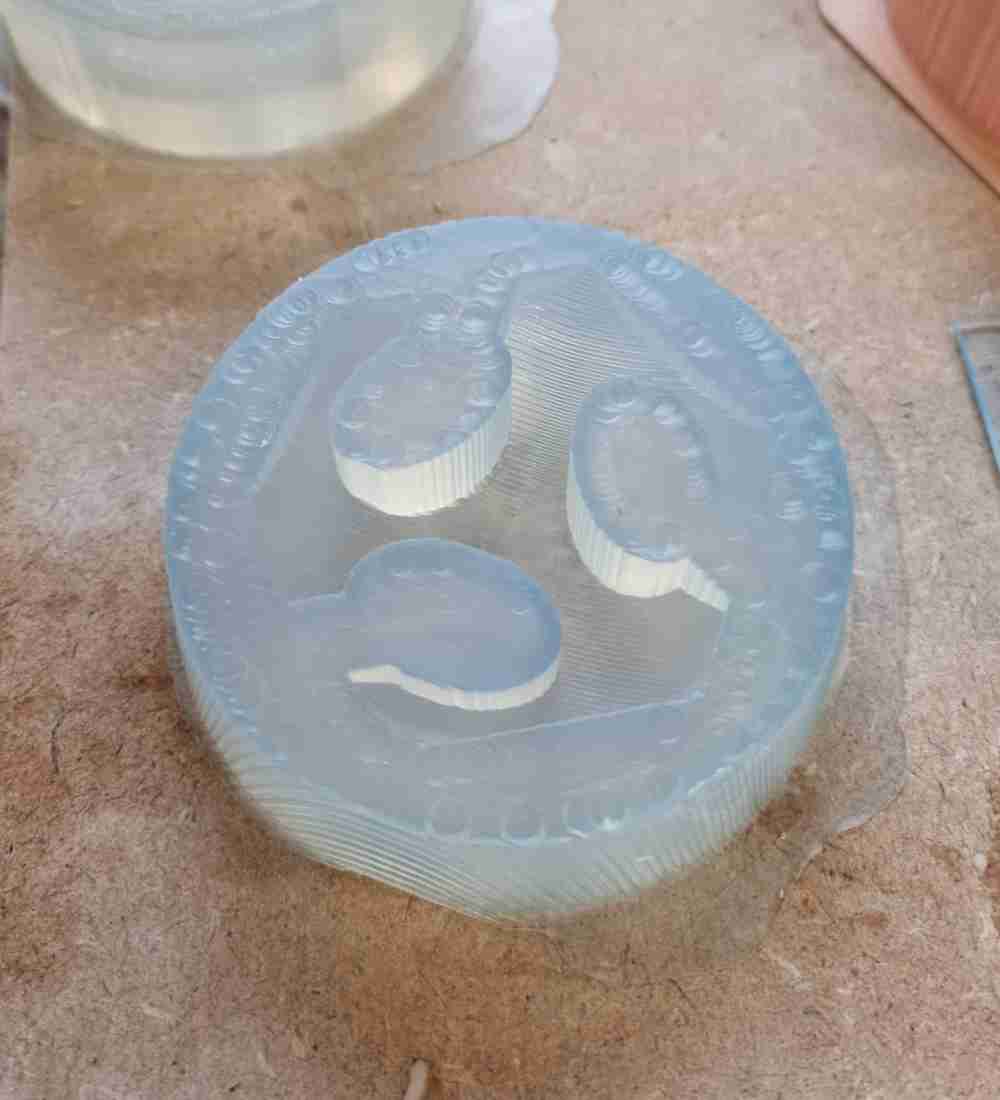
A couple of days later, we had our translucent platinum silicone ready to use, after checking that it came out really well, with no bubbles:
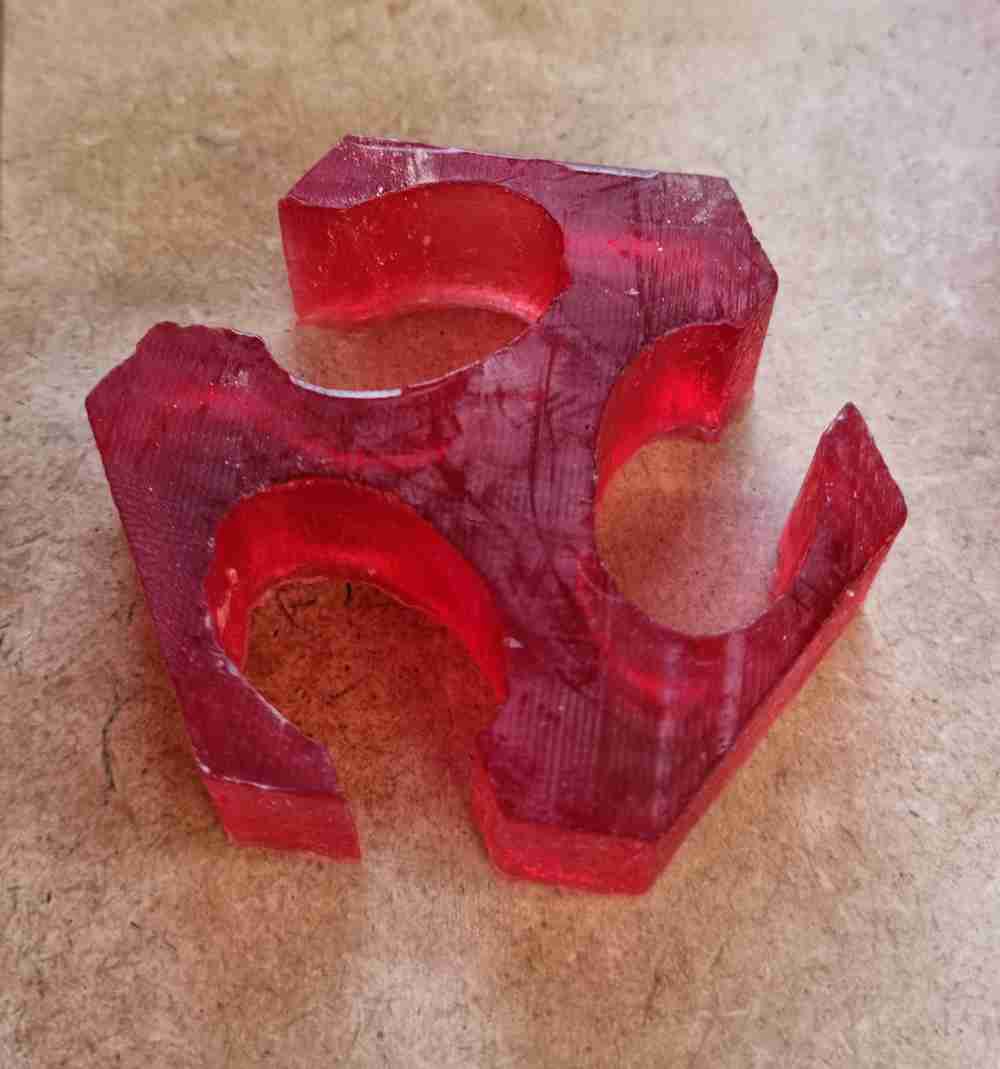
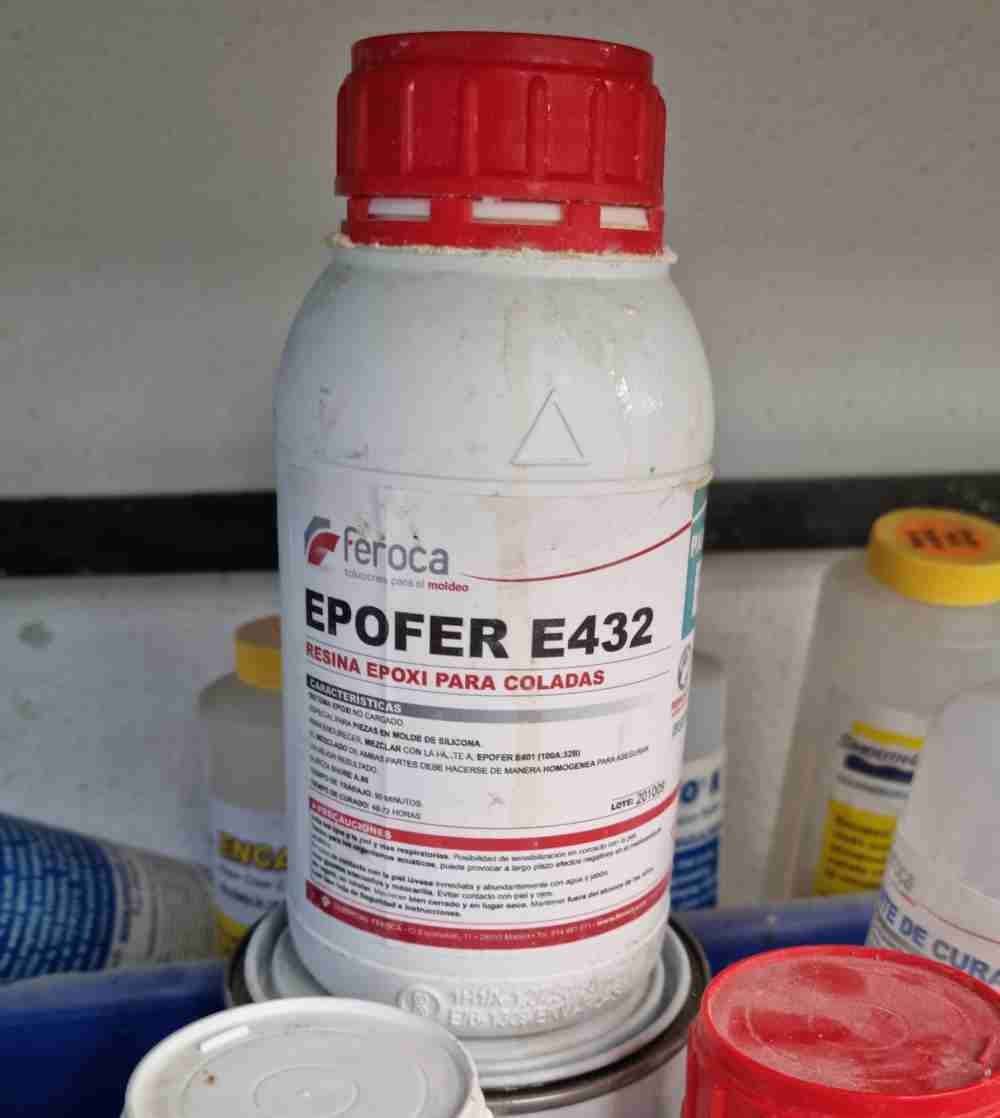
Now that we´ve got our new platinum silicone mold ready, we tested it by using a different resine. This time, we tested an epoxi resin with a 50% of cement load!
- Mixing Ratio 100% part A, and 32% part B.
- Working time: 90 minutes.
- Curating time: 48-72h.
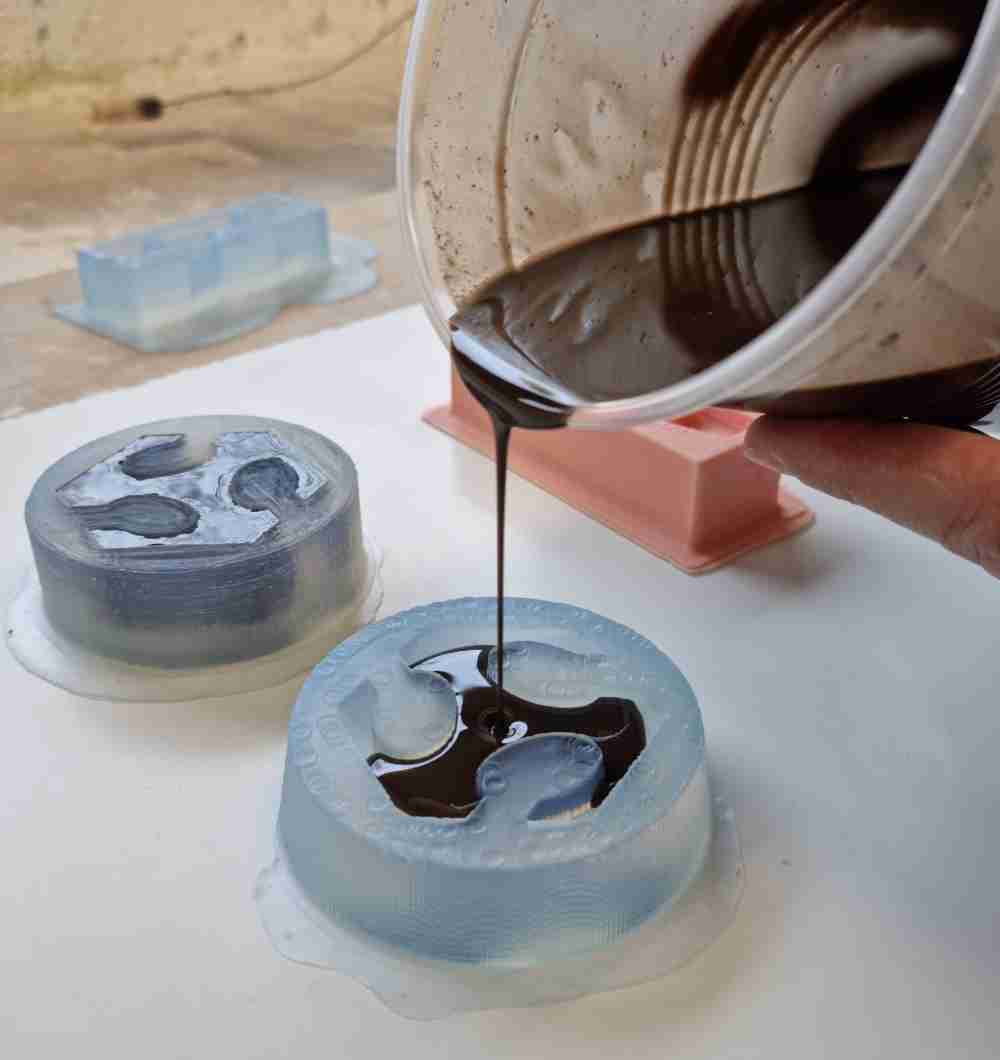
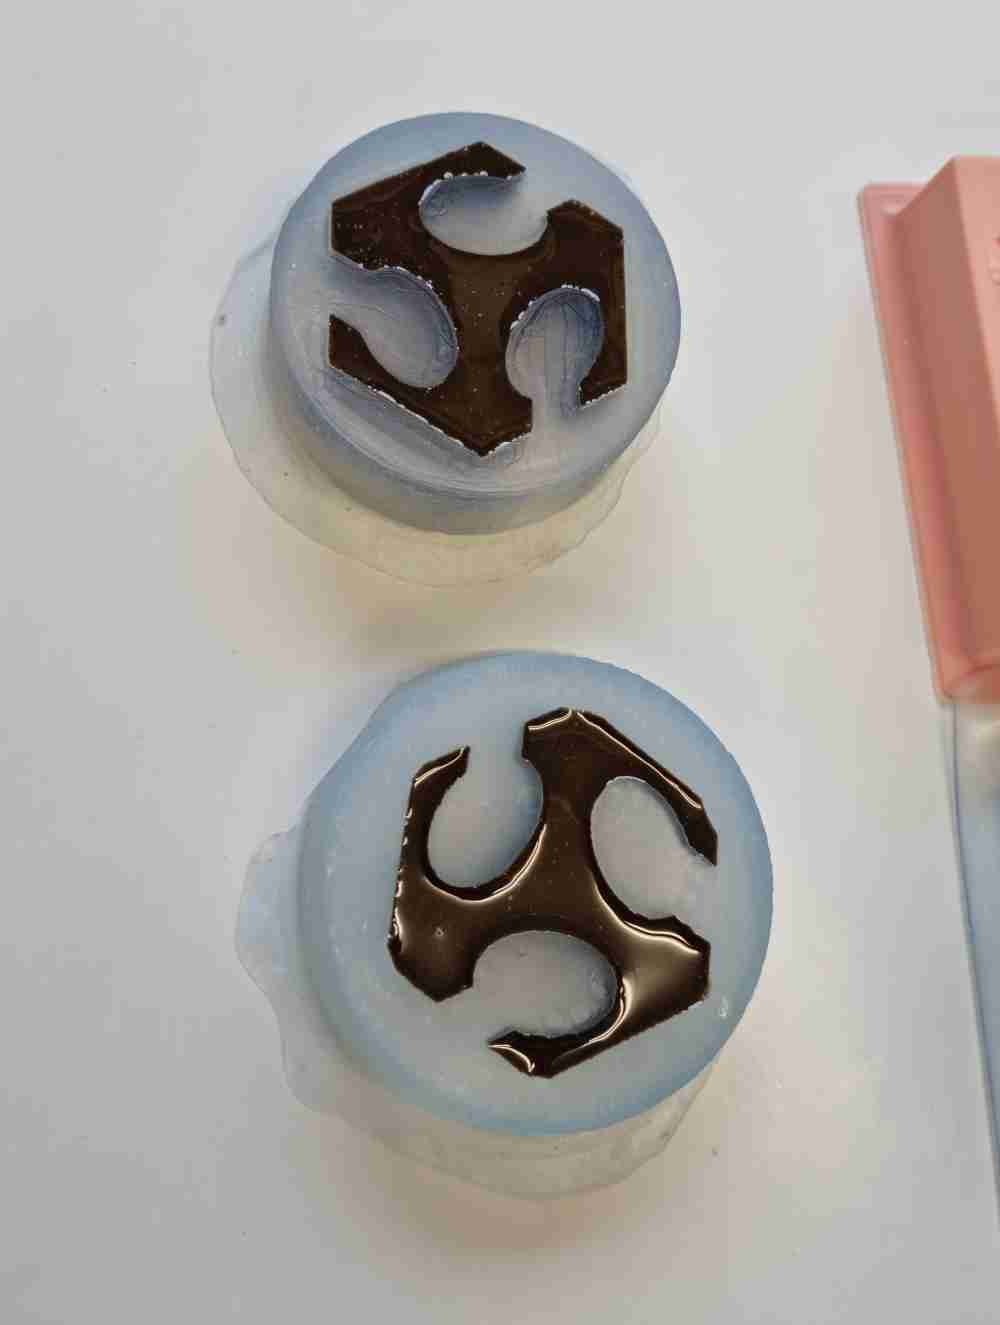
Finally, you can see in the next images the results of the epoxi resin with 50% of cement load, were you can appreciate de dark colour. We´re surprised of how well it came out, because after mixing the load with the resin, we had to work a lot with the vacuum to take as many air bubbles as possible. It´s amazing how you can load the resines with different materials, and you can appreciate in the last image the change of colour regarding were does the cement load ends, as it weights more.


For this weeks final thoughts, it´s been a huge roller coaster ride. I needed to invest a lot of time in managing properly (and knowing what i´m doing) Fusion and RhinoCAM, that in some times really got me struggling. Also invested a lot of time in testing and milling with different tools and CNC settings, until we got the best performance possible with the tools that we had. This made me go a little bit behind in my week plan, but despite this, as its usual in fabacademy, suddenly in a few hours you get everything running and going fine. I also had the disadvantage of our silicone curating time, 24 hours is too much for a weeks assignment. Thanks to Miguel Carmona manager of the sculpture laboratory, we had the possibility to use different silicones and resines and learned a lot in a few days. Thank´s Miguel! I´m happy with what we´ve achieved.
Back to top