Cloning Fabcloud account from Gitlab
This section will explain the synchronization of the fabcloud account in Gitlab for the cloning of our website through Visual Studio Code for version control.
A version control system (or VCS), also known as a revision or source control system, is a software tool that monitors and manages changes to a file system. There are some VCS available:
1) Git is one of the best version control tools available on the market today. It is a distributed repository model compatible with existing systems and protocols like HTTP, FTP, SSH and is capable of efficiently handling small to large projects.
2) CVS: is another very popular version control system. It is a client-server repository model where multiple developers can work on the same project in parallel. The CVS client will keep the working copy of the file up to date and requires manual intervention only when an edit conflict occurs.
3) Apache Subversion (SVN): Abbreviated as SVN, it aims to be the most suitable successor. It is a client-server repository model where directories are versioned along with copy, delete, move, and rename operations.
4) Mercurial is a distributed version control tool that is written in Python and intended for software developers. The operating systems it supports are similar to Unix, Windows, and macOS. It has high performance and scalability with advanced branching and merging capabilities and fully distributed collaborative development. In addition, it has an integrated web interface.
5) Monotone: It is written in C++ and is a tool for distributed version control. The supported operating system includes Unix, Linux, BSD, Mac OS X, and Windows. Provides good support for internationalization and localization. Furthermore, it uses a very efficient and robust custom protocol called Netsync.
STEP 1:
GIT:
Git is a free and open source distributed version control system designed to handle everything from small to very large projects with speed and efficiency.
Git is easy to learn and has a tiny footprint with lightning fast performance. It outclasses SCM tools like Subversion, CVS, Perforce, and ClearCase with features like cheap local branching, convenient staging areas, and multiple workflows.
We downloaded and installed gitlab (https://git-scm.com/download/win)

STEP 2:
STEP 2:
VSCodium, the closest alternative to VSCode This is an open source text editor based on VSCode but keeping all its virtues and offering compatibility with all its extensions so that we can have an experience similar to the Microsoft tool. All Microsoft telemetry and other tools like the C# code debugger have also been excluded, so we'll end up with a cleaner app. This excellent editor comes with built-in support for JavaScript, Git, TypeScript, and Node.js, and supports more than 100 programming languages. With it, we will be able to debug the code directly and it allows syntax highlighting. Through the use of plugins, we will have support for C++, Go, Java, C#, PHP, Python, etc. Its main drawback is that it has limitations at the level of updates.
Sublime Text, complete text editing tool Another of the great alternatives to VSCode is Sublime Text, a software that has become one of the best options for editing text, especially suitable for programming, given its compatibility with a wide variety of languages. It has important features such as its ability to highlight code, skip strings or symbols, do splits, and define various syntaxes.
This program has a total customization of the interface and includes 23 themes. Although it is an application that can be somewhat complex, it will increase our productivity once we master it. To help us, it has keyboard shortcuts and commands that will allow us to obtain significant savings during our programming tasks. Sublime Text is a free application, compatible with Windows, Linux, and macOS that we can download this program from its page. It also has a paid version, aimed at users who want to take full advantage of all its features.
Atom, one of the most popular text editors It is a very popular tool among programming text editors. It is open source and free, being compatible with both Windows, macOS and Linux. It has been designed to be used by all types of users, although those with more advanced knowledge are the ones who will get the most out of it. This editor has compatibility with the most used programming languages such as JavaScript, C++, HTML and PHP among others. Its features include contextual autocompletion utilities, language autodetection and syntax highlighting. In addition, it allows you to use different panels simultaneously so it will be easier for us to organize our projects by folders.
VISUAL STUDIO CODE:
Visual Studio Code is a source-code editor made by Microsoft for Windows, Linux and macOS. Features include support for debugging, syntax highlighting, intelligent code completion, snippets, code refactoring, and embedded Git. Users can change the theme, keyboard shortcuts, preferences, and install extensions that add additional functionality.
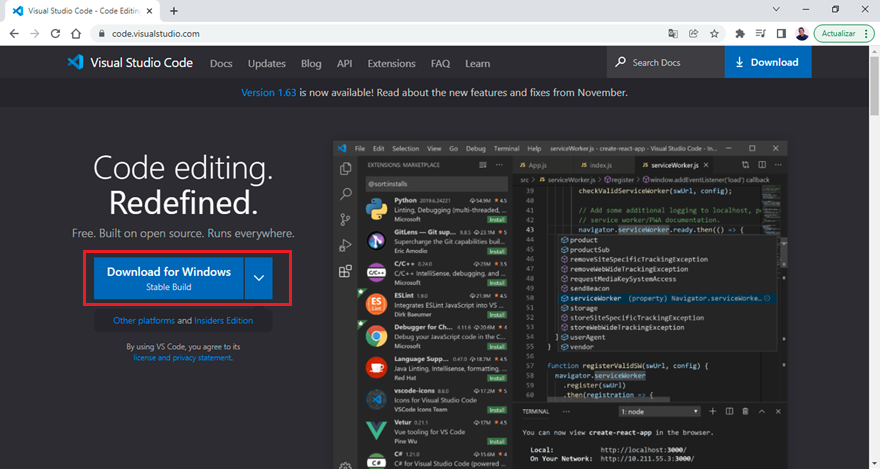
We downloaded and installed visual studio code (https://code.visualstudio.com/download)
STEP 3:
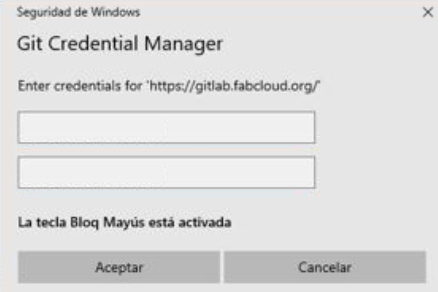
In gitlab app we type some commands to auth account (name and email)


STEP 4:
Clone visual studio code website account. Enter my repository:
https://gitlab.fabcloud.org/academany/fabacademy/2022/labs/ucontinental/students/joseangel-palomares.git
And copy the https URL.

STEP 5:
Then, in visual Studio Code, I clicked on CLONE GIT REPOSITORY. Next, I indicate the folder where I am going to clone.


STEP 6:
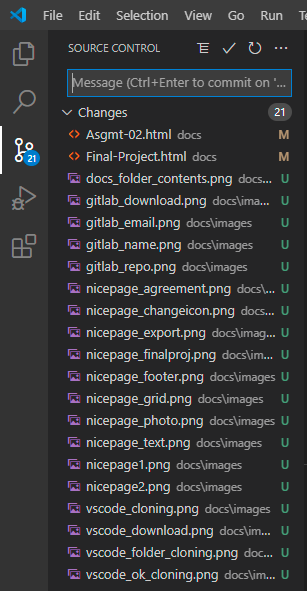
On the left side of Visual Studio Code will appear my name which means it's already cloned. All my gitlab information is on my PC.


 STEP 2: