Molding and Casting
Design a mold around the stock and tooling that you'll be using,
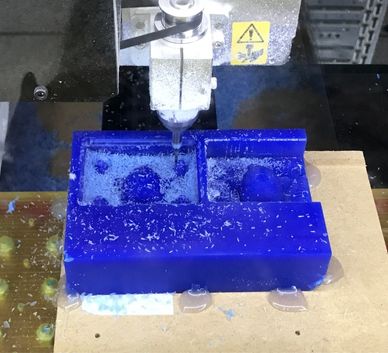
mill it (rough cut + three-axis finish cut),
and use it to cast parts
Group assignment:
Group assignment
The molding and casting materials I used for this assignment summed up:
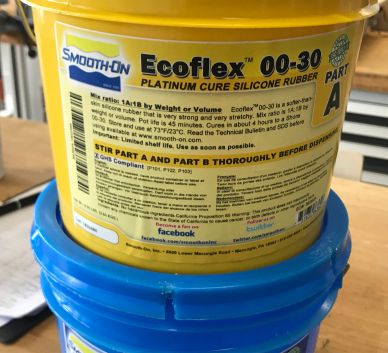
Smooth-On Ecoflex 00-30
Ecoflex 00-30 is a platinum-catalyzed silicone rubber that is soft, strong, and stretchy. It is
mixed 1A:1B by weight or volume and cures at room temperature (negligible shrinkage). It is
translucent and can be
pigmented for color effects. Ecoflex is suitable for making prosthetic appliances, orthotic
cushioning, and special effects applications. It is also certified as skin safe.
Here's a summary of the main points for using Ecoflex 00-30 silicone rubber :
- Use in a properly ventilated area and wear safety gear.
- Cure inhibition may occur with certain contaminants, so test compatibility with a small-scale application.
- Applying a clear acrylic lacquer or release agent can help prevent inhibition and make demolding easier.
- Mix Part B thoroughly before starting. Combine Parts A and B in a mixing container at a 1A:1B ratio by weight or volume. Mix for 3 minutes, scraping the sides and bottom of the container.
- Vacuum degassing is recommended to remove air bubbles. Use a vacuum pump that can pull at least 1 Bar / 100 KPa and leave space for material expansion. Continue vacuuming until the material rises, breaks, and falls. Vacuum for 1 additional minute after the material falls.
- Pour the mixture in a single spot at the lowest point of the containment field and let it seek its level over the model.
- Cure at room temperature (23°C, never less than 18°C) and post cure for attaining maximum performance properties quicker (After curing at room temperature, expose the rubber to 80°C for 2 hours and 100°C for one hour).
- If using as a mold, no release agent is necessary when casting wax or gypsum, but a release agent is recommended when casting polyurethane, polyester, and epoxy resins.
- THI-VEX can be used to thicken Ecoflex for vertical surface application, and Silicone Thinner can be used to lower the viscosity for easier pouring.
- Clean and dry the mold before storing it on a leveled surface in a cool, dry environment.
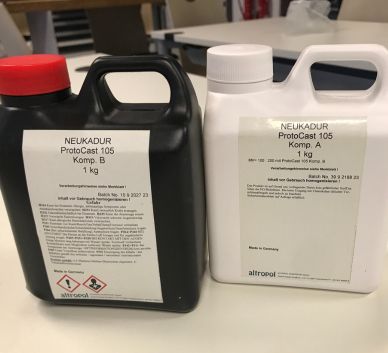
NEUKADUR ProtoCast 105
Main characteristics
- Very good flowability
- Very impact resistant
- Very good colorability
- High heat resistance
- Cures to white color
- Only suitable for vacuum casting
| Component | Color | Mixing Ratio by Weight | Density (20°C) g/cm³ | Viscosity (25°C) mPa∙s |
|---|---|---|---|---|
| NEUKADUR ProtoCast 105 Component A | Slightly yellowish | 100 | 1.05 | 650 |
| NEUKADUR ProtoCast 105 Component B | Slightly yellowish | 200 | 1.16 | 160 |
| Mixture Properties (approximate values) | PC 105 A / PC 105 B |
|---|---|
| Mixing Viscosity (25°C) mPa∙s | 325 |
| Density (20°C) g/cm³ DIN 53479 | 1.13 |
| Processing Time (25°C) Minutes | 5 |
| Demolding Time (70°C) Minutes | 60 |
| Hardness Shore D DIN 53505 after storage 2 Hours at 70°C | 82 |
| Cured Color | White |
| Recommended Layer Thickness mm | 5 |
Processing Instructions:
NEUKADUR ProtoCast 105 Component A must be thoroughly homogenized prior to processing. The
containers must be carefully sealed after each use. After 30-60 minutes, the cured material has
not
yet achieved its full impact resistance (which is achieved only after approximately 1-2 hours at
70°C), so cautious demolding, especially for thin parts, is recommended. It's recommend pouring
NEUKADUR ProtoCast 105 Component A/B into preheated molds at 70°C (e.g., made of ProtoSil RTV
245)
and tempering for at least 1 hour at 70°C before demolding. Recommended casting thickness: up to
a
maximum of 5mm.
It's recommended evacuating NEUKADUR ProtoCast 105 Component A for 15 minutes at the highest
possible vacuum, then relaxing to 20-25 mbar before adding NEUKADUR ProtoCast 105 Component B.
If the vacuum drops below 20 mbar, severe foaming may occur when both components are mixed.
 Luma!
Luma!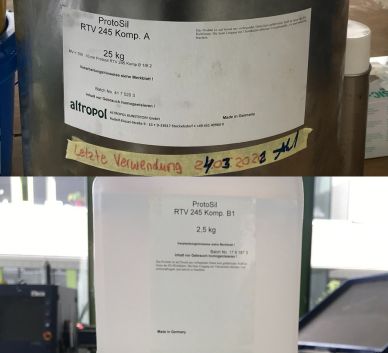
ProtoSil RTV 245
Main features
- Shore hardness A 40
- very good flow properties, translucent
- shrinkage-free vulcanization at room temperature
- can be made thixotropic
- high resistance to initial tearing and tear propagation
| Properties in the non-crosslinked state | ProtoSil RTV 245 Comp. A | ProtoSil RTV 245 Comp. B 1 (dry surface) |
ProtoSil RTV 245 Comp. B 2 (oily surface) |
NEUKASIL Thixotropic Agent SN 200 |
|---|---|---|---|---|
| Colour | colourless | colourless | colourless | colourless |
| Mixing ratio p.b.w. | 100 | 10 | 10 | 0.1 – 0.3 |
| Density 20 °C (approx.) g/cm3 | 1.1 | 0.95 | 0.96 | 0.98 |
| Viscosity 20 °C (approx.) mPa·s | 60,000 | 320 | 400 | 1,000 |
| Properties of the mixture (approx. values) | Mixture A/B |
|---|---|
| Mixed viscosity | 35,000 mPa·s |
| Pot life (1000 g) | 80 minutes |
| Demouldable after | 12 hours |
| Shore A hardness points | DIN 53505 40 |
| Service temperature | 200 °C |
Minimize air incorporation during stirring. To achieve a bubble-free vulcanized material, evacuate the crosslinker-containing formulation prior to processing. Expect the mixture to expand 3-4 times its original volume and form bubbles during vacuum creation. Processing is complete once the bubbles have collapsed and the mixture returns to its original volume. Pour the prepared material over the object to be cast with care.
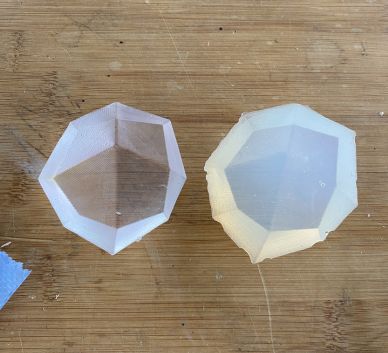 Test cast of Protosil (right) compared to the following test
cast of Epodex (left)
Test cast of Protosil (right) compared to the following test
cast of Epodex (left) 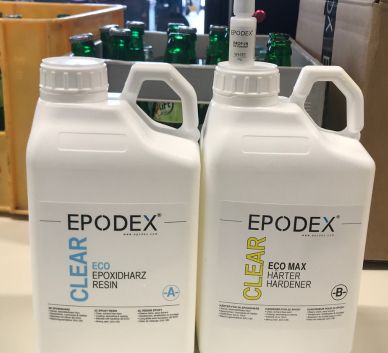
- Evacuate component A for 15 minutes at maximum vacuum and then relax to 20-25 mbar before dosing component B.
- Mix NEUKADUR ProtoCast 105 components A and B together at the recommended ratio (2:1 by weight).
- Make sure that the mixing is done as thoroughly as possible.
- After casting, allow the material to cure at 70°C for at least 1 hour before demolding.
- For thin sections, use caution during demolding, as the material may not have achieved its full toughness yet.
- Recommended casting thickness is up to 10cm.
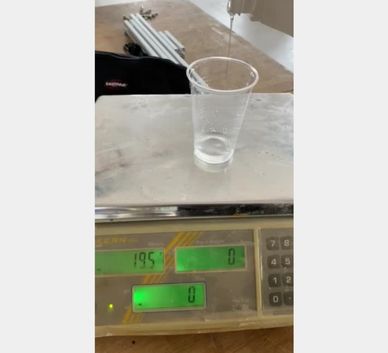 20g of component
A.
20g of component
A. Vacuum component
A (no bubbling occurs)
Vacuum component
A (no bubbling occurs)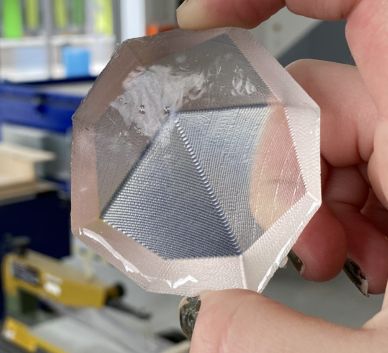 The result: very clear cast, still not completely
stone-hard, but almost.
The result: very clear cast, still not completely
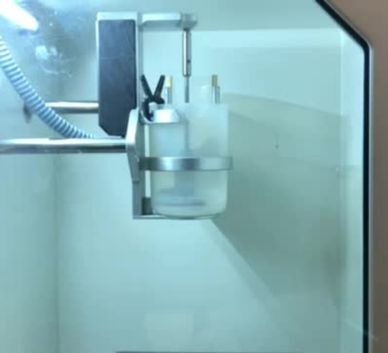
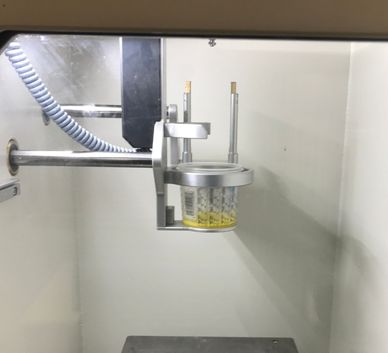
stone-hard, but almost.Operating the vacuum chamber
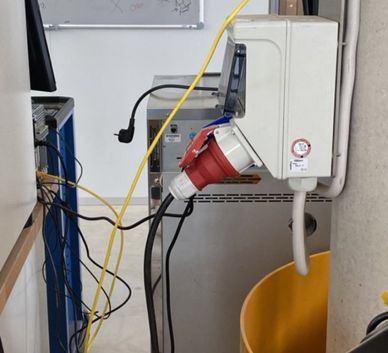 Connect
it's
power adapter to a power outlet.
Connect
it's
power adapter to a power outlet.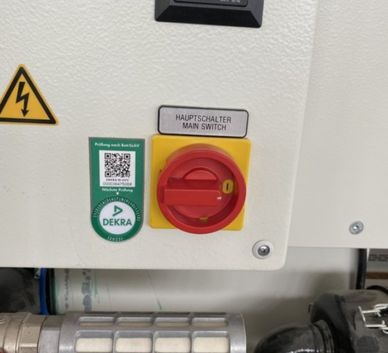 Turn
on
the
main switch.
Turn
on
the
main switch. Turn
on
the
vacuuming by turning this switch.
Turn
on
the
vacuuming by turning this switch.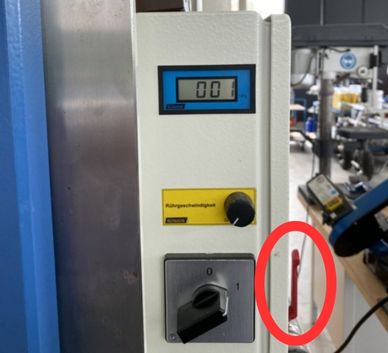 Wait
until
the
air pressure (in hPa) drops to one or zero. Please note that it takes exponentially
longer
the
lower the air pressure already is.
Wait
until
the
air pressure (in hPa) drops to one or zero. Please note that it takes exponentially
longer
the
lower the air pressure already is. Use
these
two
black handles to tip over the platforms inside, if you need to. This is needed when
you
have
to
mix the epoxy/resin under vacuum.
Use
these
two
black handles to tip over the platforms inside, if you need to. This is needed when
you
have
to
mix the epoxy/resin under vacuum. 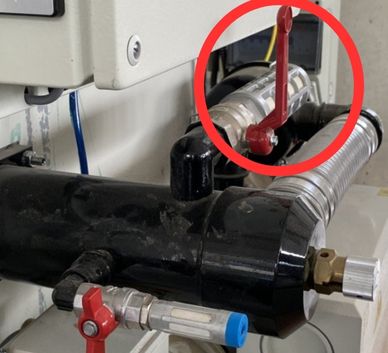 Pull
this
lever towards you to let the air back in. And you're done!
Pull
this
lever towards you to let the air back in. And you're done!Designing a mold in Fusion360
Download my Fusion project file I decided to make a
Luma keychain (from Super Mario Galaxy) for this weeks assignment.
For the Luma model I used a design
from
models-resource.com.
I decided to make a
Luma keychain (from Super Mario Galaxy) for this weeks assignment.
For the Luma model I used a design
from
models-resource.com.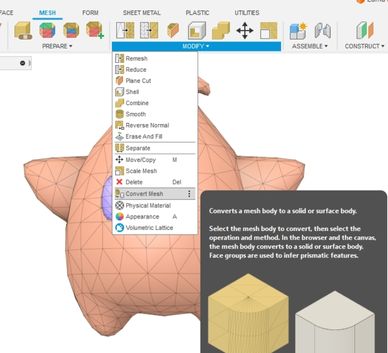 This model was a
mesh though, so I first had to convert it to a
solid body in Fusion. Right
click on
the mesh in the browser and choose Convert.
This model was a
mesh though, so I first had to convert it to a
solid body in Fusion. Right
click on
the mesh in the browser and choose Convert.
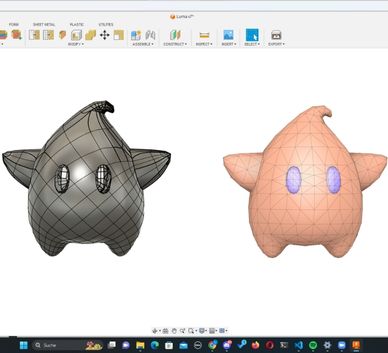 Mesh (right) vs
solid body (left).
Mesh (right) vs
solid body (left).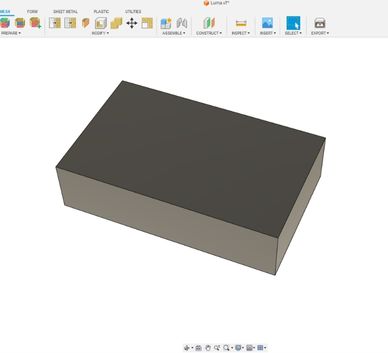 I created a box that
is the exact same size as my stock.
I created a box that
is the exact same size as my stock.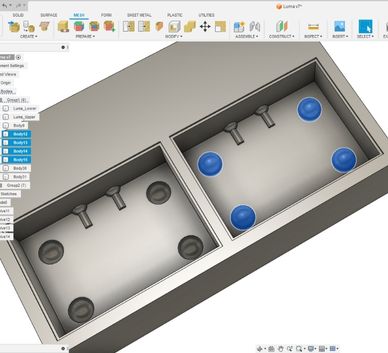 At the places where
I wanted my negative mold to be, I cut smaller boxes into the big box. I added a
few spheres as the registration pins used to really make the
mold stay in place when casting. I also created a small step surrounding each
box, so the mold will be easier to remove later on.
(Even though this got milled away more or less, because of a collision of the
end mill with the
wax)
At the places where
I wanted my negative mold to be, I cut smaller boxes into the big box. I added a
few spheres as the registration pins used to really make the
mold stay in place when casting. I also created a small step surrounding each
box, so the mold will be easier to remove later on.
(Even though this got milled away more or less, because of a collision of the
end mill with the
wax)
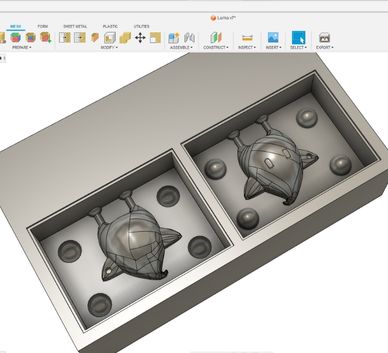 Now I used the split
body tool to cut the solid Luma model in half to have one side for each
part of the mold (two part mold).
After placing one half of Luma in each shell, I used one of Lumas feet as the
place to pour in the resin while the other one is used to let
the air out. I added small tubes to the legs to create a connection to the
outside.
Now I used the split
body tool to cut the solid Luma model in half to have one side for each
part of the mold (two part mold).
After placing one half of Luma in each shell, I used one of Lumas feet as the
place to pour in the resin while the other one is used to let
the air out. I added small tubes to the legs to create a connection to the
outside.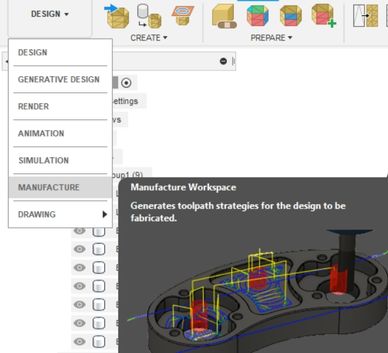 Head over to the
Manufacture workspace.
Head over to the
Manufacture workspace.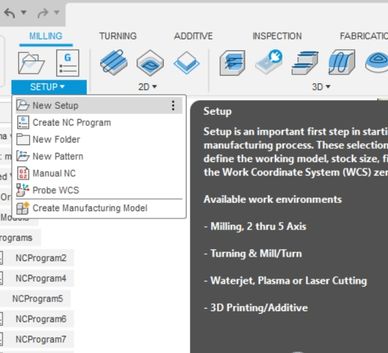 First, create a new
setup.
First, create a new
setup.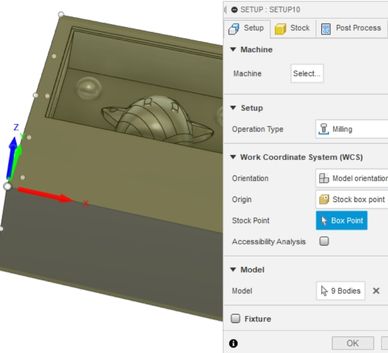 Select all the
bodies. Make sure the stock point is on one of the
upper points of the box.
You might want to check which axis is which on your CNC.
Select all the
bodies. Make sure the stock point is on one of the
upper points of the box.
You might want to check which axis is which on your CNC.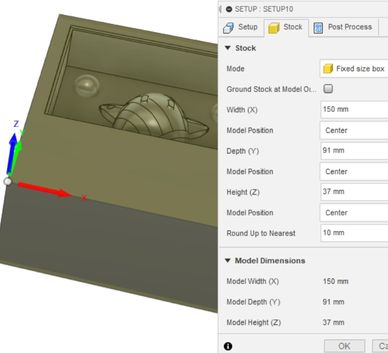 Make it a fixed
sized box. It is also very important to have the
lower edge of you model to be at the bttom of the stock box. I gave my box the
dimensions of my actual wax block, so it was automatically at the bottom.
Make it a fixed
sized box. It is also very important to have the
lower edge of you model to be at the bttom of the stock box. I gave my box the
dimensions of my actual wax block, so it was automatically at the bottom.
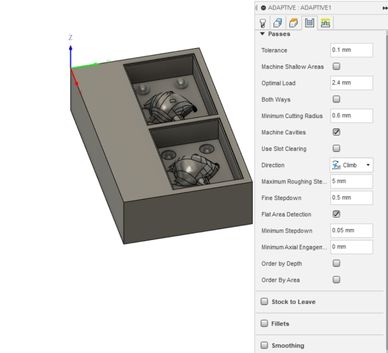
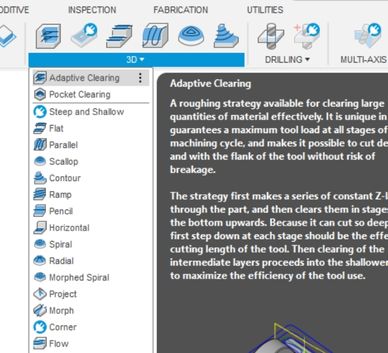 After you are done
with your setup settings, you can start with
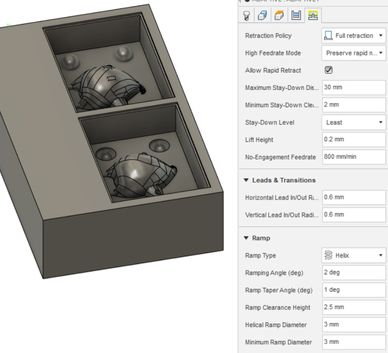
your milling toolpaths. The first one "Adaptive Clearing" is very good for rough
milling the majority of the unneeded material.
After you are done
with your setup settings, you can start with
your milling toolpaths. The first one "Adaptive Clearing" is very good for rough
milling the majority of the unneeded material.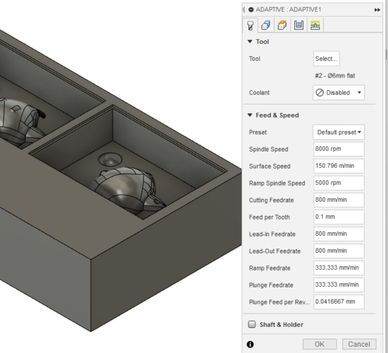 First, you want to
select your tool.
First, you want to
select your tool.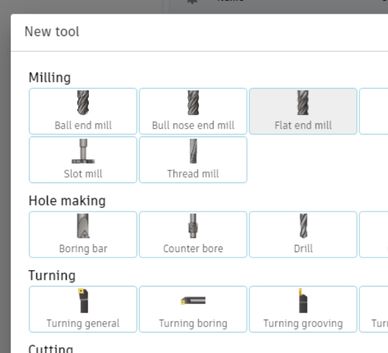 Creat a new one,
make it a flat end mill.
Creat a new one,
make it a flat end mill.
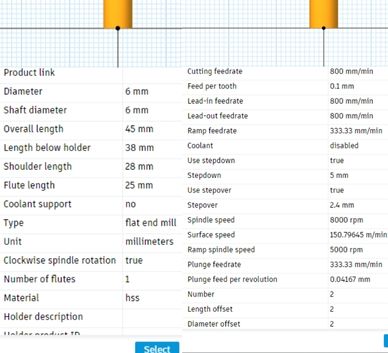 These are the
settings of this tool.
These are the
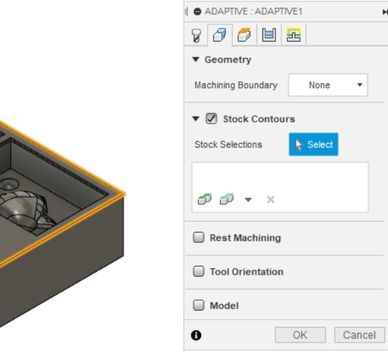
settings of this tool.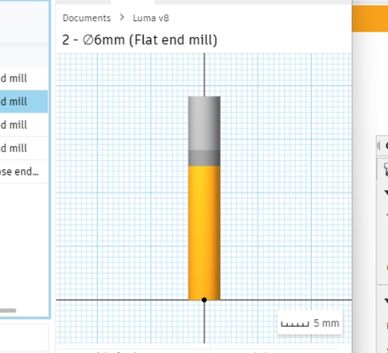 Settings 1 (Make
sure Rest Machining is ticked off)
Settings 1 (Make
sure Rest Machining is ticked off)
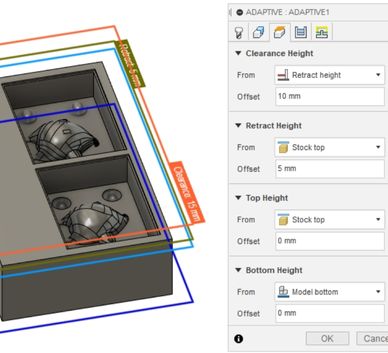
 Settings 2
 Settings 3
 Settings 4
 Settings 5
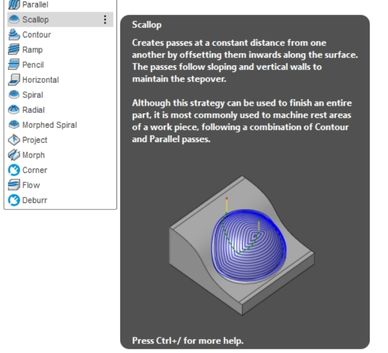 Next milling
strategy is Scallop. This is optimal for finetuning and round surfaces.
Next milling
strategy is Scallop. This is optimal for finetuning and round surfaces.
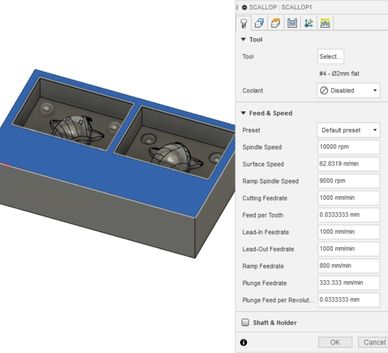 Settings 1. I am
using a 2mm flat end mill tool for this as this allows for much finer
milling.
Settings 1. I am
using a 2mm flat end mill tool for this as this allows for much finer
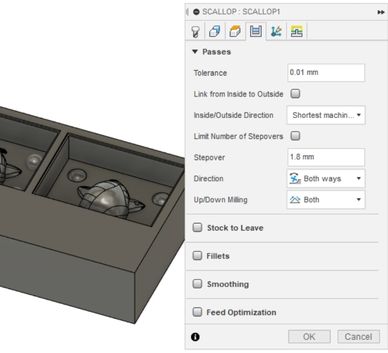
milling.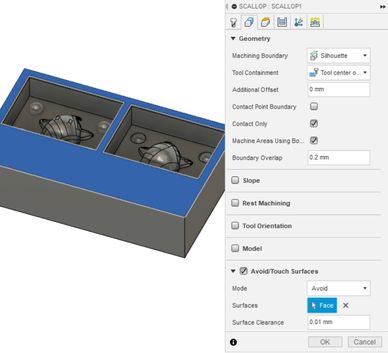 Settings 2
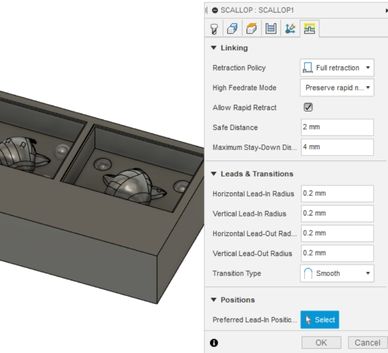
 Settings 3
 Settings 4
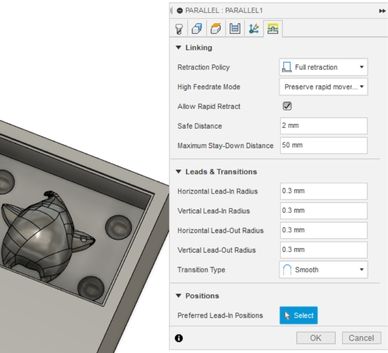
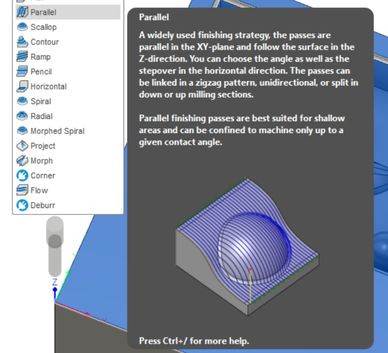 Last milling
strategy is Parallel. This is optimal for finishing passes.
Last milling
strategy is Parallel. This is optimal for finishing passes.
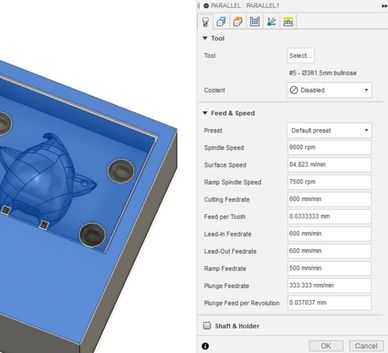 Settings 1. I am
using a 3mm bull nose end mill.
Settings 1. I am
using a 3mm bull nose end mill.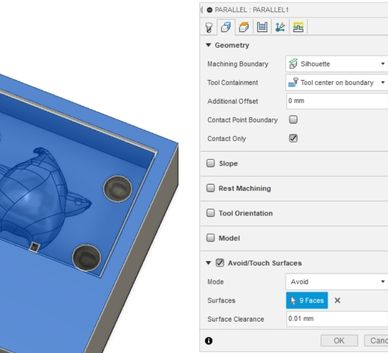 Settings 2
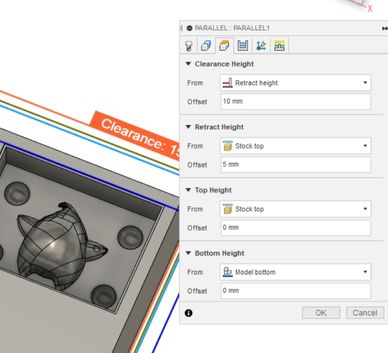 Settings 3
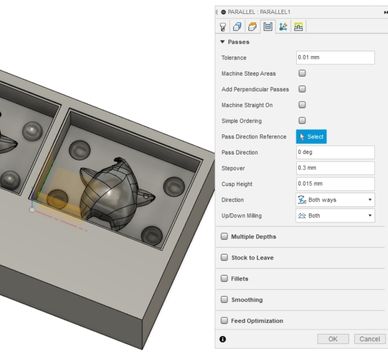 Settings 4
 Settings 5
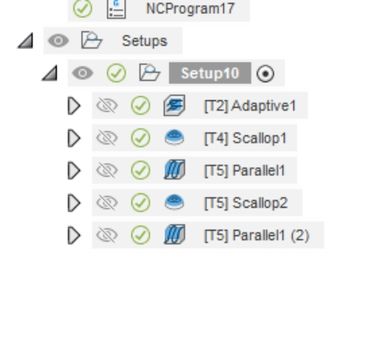 I used scallop and
parallel twice to get a really smooth finish.
I used scallop and
parallel twice to get a really smooth finish.
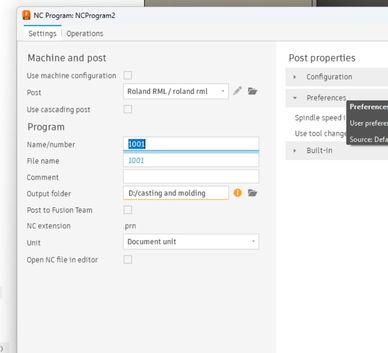 When you have set
up you milling strategies, you can create their respective NC programs. You need
one for every different tool. I chose the post processor of the Roland MDX as I
worked with this CNC for this assignment.
When you have set
up you milling strategies, you can create their respective NC programs. You need
one for every different tool. I chose the post processor of the Roland MDX as I
worked with this CNC for this assignment.
3D Milling
I used 3 different end mills during the whole process. 6mm flat end mill, 2mm flat end mill and 3mm bull nose end mill. Wax block is 15 cm x 9,1 cm x 3,7 cm (LxBxH)
 Adaptive clearing
milled away most of the wax and also made quite the mess, but I easily cleaned
this with a vacuum cleaner.
Adaptive clearing
milled away most of the wax and also made quite the mess, but I easily cleaned
this with a vacuum cleaner.
 Scallop as the
first finer milling process.
Scallop as the
first finer milling process.
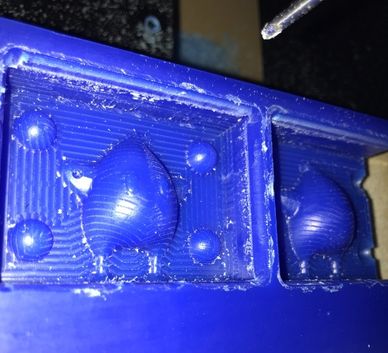 The finished wax
model looked very nice. It had a very good level of detail and was quite smooth!
Time to make the molds.
The finished wax
model looked very nice. It had a very good level of detail and was quite smooth!
Time to make the molds.
Molding and casting
 Let's start with
the materials I actually used. First off is Smooth-On Ecoflex, I used this to
make a negative mold.
Let's start with
the materials I actually used. First off is Smooth-On Ecoflex, I used this to
make a negative mold.
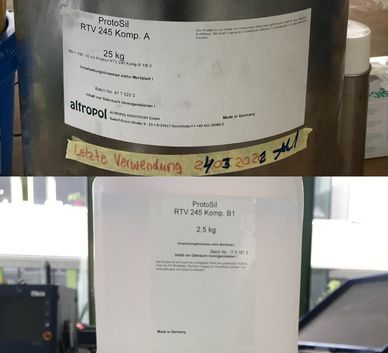 ProtoSil was also
used to make a negative mold.
ProtoSil was also
used to make a negative mold.
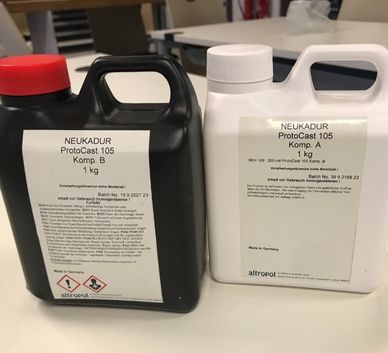 I used Neukadur to
cast Luma!
I used Neukadur to
cast Luma!
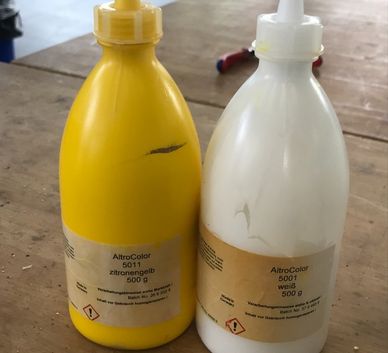 And these colors
along with it to give Luma a yellow-ish color.
And these colors
along with it to give Luma a yellow-ish color.
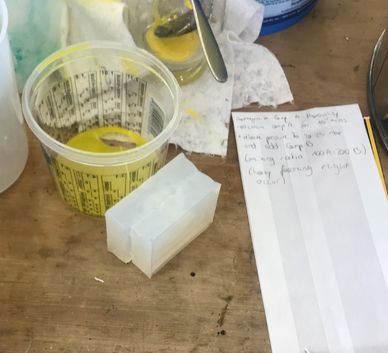
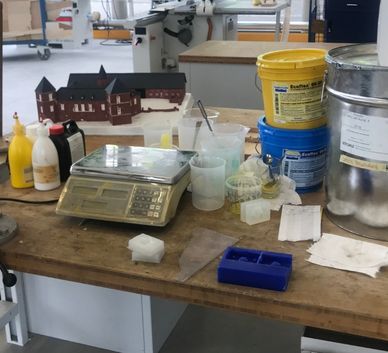 My work station for
now, with all the materials, a scale and I am wearing gloves of course!
My work station for
now, with all the materials, a scale and I am wearing gloves of course!
 I started with
ProtoSil. I mixed component A and B under a vacuum.
I started with
ProtoSil. I mixed component A and B under a vacuum.
 Since one side of
the wax got milled away, I used acrylic glass as the missing wall. I poured the
vacuumed mix inside.
Since one side of
the wax got milled away, I used acrylic glass as the missing wall. I poured the
vacuumed mix inside.
 The cured mold
looks like this, it was very easy to remove and sturdy while also being a bit
bendable. Just like in the Group assignment test casts.
The cured mold
looks like this, it was very easy to remove and sturdy while also being a bit
bendable. Just like in the Group assignment test casts.
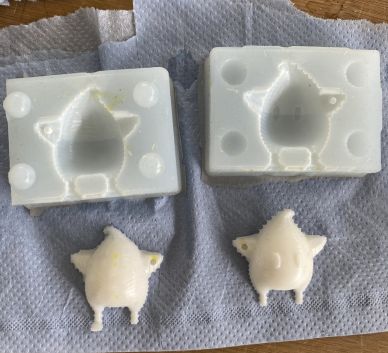
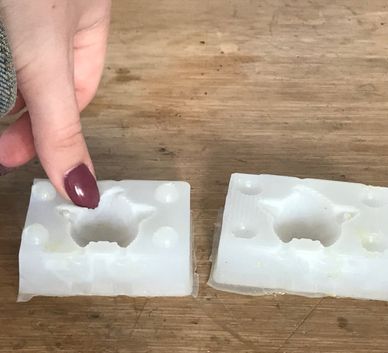 I repeated the same
process with Smooth-On Ecoflex and this is the result, a super stretchy negative
mold.
I repeated the same
process with Smooth-On Ecoflex and this is the result, a super stretchy negative
mold.
 Now mixing
Neukadur, as I already learned from the test cast, you have to mix this very
fast, as the pot-life is 5min or less. It took me a few tries to get this right.
Now mixing
Neukadur, as I already learned from the test cast, you have to mix this very
fast, as the pot-life is 5min or less. It took me a few tries to get this right.
 Vacuumed it as
well. I didn't actually measure the time, but it felt as if this mixture had a
slightly prolonged pot life compared to the test cast. I have a hunch that maybe
the color I added might
have caused this.
Vacuumed it as
well. I didn't actually measure the time, but it felt as if this mixture had a
slightly prolonged pot life compared to the test cast. I have a hunch that maybe
the color I added might
have caused this.
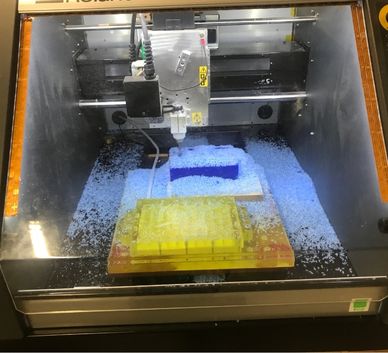
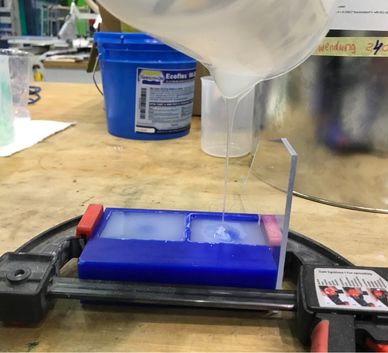
 Now pouring it in!
As you can see I use one hole for pouring and the other for letting air out.
I had to use hot glue to seperate the two holes, because in my first attempts he
mix would get into the second opening as well. I also used the hot glue to
really seal the seam of the two touching negative mold parts.
Now pouring it in!
As you can see I use one hole for pouring and the other for letting air out.
I had to use hot glue to seperate the two holes, because in my first attempts he
mix would get into the second opening as well. I also used the hot glue to
really seal the seam of the two touching negative mold parts.
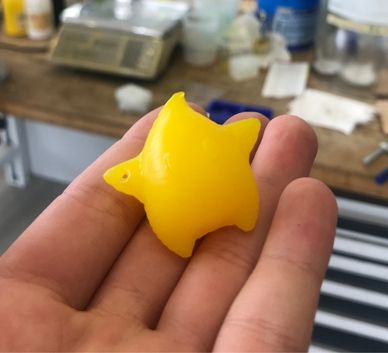 The fully cured
model looked very nice. It had a very good level of detail and was quite smooth!
Now only a bit of painting is left and it's done!
The fully cured
model looked very nice. It had a very good level of detail and was quite smooth!
Now only a bit of painting is left and it's done!