
Assignment 2 - Project Management
The first week for me consisted of first and foremost getting into Linux or a little more precise into Ubuntu. Furthermore I managed to get Git and Visual Studio Code running on Ubuntu and sketched out my first ideas for a final project.
Installing Ubuntu
Since I always wanted to get into Linux I took the opportunity and challenged myself to absolve FabAcademy with a Linux operating system. Since I had no clue as to which of the many distributions of the Linux kernel would offer what, I simply chose Ubuntu as I already knew it from a test run with Linux from a few years back. Since I am using a Macbook and therefore running MacOS on the laptop and since I already used the bootcamp manager to have a seperate windows installation on my Laptop for work puposes, I was stuck with running Linux on a virtual machine instead of natively, as to not delete my windows partition.
My first try installing Ubuntu as a virtual machine was using VirtualBox, which has an application for macOS. I chose VirtualBox as I already used it privately and in a work environment and I was quite satisfied with its functions and performance. This time however nothing went really smooth for me. After generating the VM and booting into the Ubuntu installation medium I was greeted with underwhelming perfromance. Booting the system would take minutes and the performance within the system wasn't any better. I troubleshooted many different solutions and eventually the bootup was pretty fast but I still had horrendous performance within the VM. I cannot really explain why, because on my laptops windows partition is also a ubuntu installation which runs much better.
After I couldn't find anymore fixes or solutions for my problems with the VMs performance I looked for other virtualisation solutions on MacOS and found Parallels Desktop. After using its test version I promptly noticed, that the performance of ubuntu wasn't even comparable to what VirtualBox had to offer for me and I didn't even needed to setup specific parameters. It just worked great out of the Box. So in the end I settled for Parallels to virtualise Ubuntu for FabAcademy.
Using Ubuntu for the first time and installing Git
Since I only worked with Ubuntu a few times for work purposes and was always handed already initialized VMs with everything I would need on them I had to install everything by hand for the first time. Thankfully I already had some time with Command Line Interfaces and didnt have a hard time getting everything to work as I wanted. After installing git via the command line and changing the default shell to zsh as was suggested in the students Bootcamp I was ready for the first Assignment.
Here are the Links for the Student Bootcamp, where I learned about zsh:
All of the Student Bootcamp videos and slides can be gathered from here. They are a great start into many topics and helped me out a lot!
Cloning the project and working on the Webpage
Since I already worked with Git before, getting the project set up was not really a problem, although this was my first project where the repository was solely edited by me and not a whole group developing a project. I mainly learned Git by using it. I was throwon into a huge git project at my workplace and through trial and error and many sessions with the guys who manage gitlab at my workplace, I slowly got a grip of what todoand what not to do. Tutorialwise, I would recommend a Tutorialseries like this one. And just following along. This is very usefull for beginners as it shows everything step by step.
After cloining the repository into a folder I created for the development of the webpage I began working on it. The first thing I did was creating a secondary branch for developing changes, as I know this system well from working with goups over git. After developing on the newly created development branch I pushed my first changes to the about page on said branch and began the merging process to see the results.

When adding the new Branch via GitLab, one has to manually tell git that it has to search for new branches when working with Git-Bash again. Here is an example of this update called fetch:
Jan@Jans-PC MINGW64 /g/FabAcademy/jan-bewersdorff (master)
$ git fetch
From gitlab.fabcloud.org:academany/fabacademy/2022/labs/kamplintfort/students/jan-bewersdorff
* [new branch]      development -> origin/development
Instead of useing GitLab to create the desired new Branch, one can also use following command with Git-Bash:
git checkout -b "newBranchName"
After creating the new branch the user has to switch to it in order to work with it. To change the current branch via Git-Bash one has to use the following command:
git checkout "newBranchName"
If the branch was created using the checkout command with the -b flag, this step does not need to be performed as git will automatically switch to the newly created branch
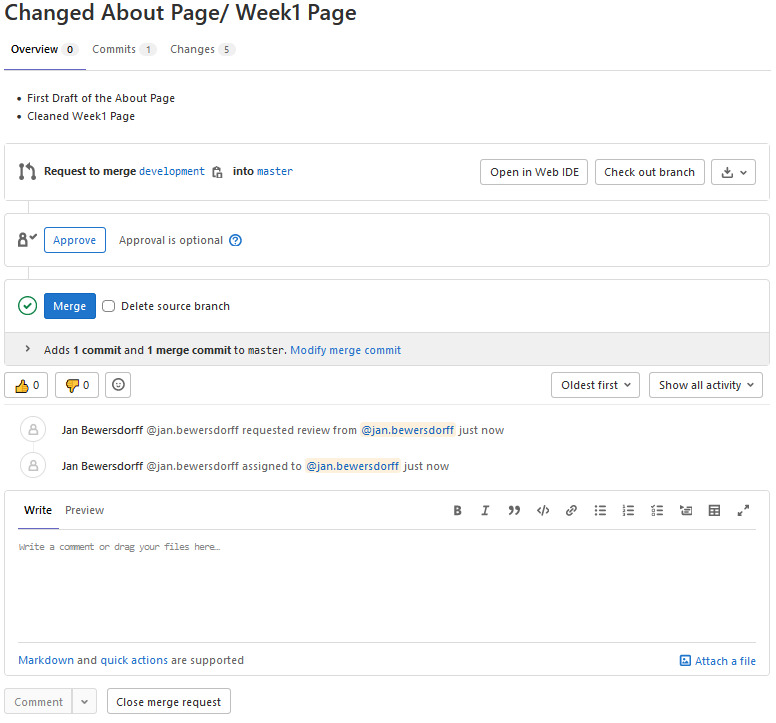
If enough features were added to the branch or if i wanted to test out the changes on the live website i needed to merge the two branches. This essentially means, that all changes of the branch which is being merged into the other will be made on the other branch. Of course this could mean that conflicts could appear if both branches differ for the same file (maybe because two people edited the same files). In my cases however, until now atleast no merge conflicts were found. I merged the two branches via GitLab as that was the way i knew it from my work. A merge request then looks like this:
After the global lecture I first had the idea to switch away from mkdocs and somehow use Angular as I previously worked with Angular for a short amount of time. After the local lecture however, my focus shifted away from angular and towards a HTML5 project as our instructor showed us HTML5 UP!. After searching for a fitting theme, I downloaded the Phantom Theme. Since I did not want to delete the original project for now, as I did not know yet if I would stick with the HTML5 theme or if I would swap back to the MkDocs template, I created a new feature branch to test out the template and see if I could make it work for my purposes. After testing around a little bit I was convinced that this would be the template I would use for the rest of FabAcadamy. After I created all missing html pages that I would need for the project I began changing the style sheet to give the pages a more personal touch, than only using the stock template. I for example changed around some coloring and removed the cross from every image displayed as part of the "buttons" to navigate the page. In the same process I set every one of these pictures to have a clear background colour as to better show the images behind them, instead of using different colourfull styles that would taint the image in said colours.I haven't worked much with style sheets up until now, but the learning curve was quite steep for me and after a short time I changed the style sheet to my satisfaction. While I changed the style sheet, I also filled out the html documents with the text I already wrote within the mkdocs template. I also used the Fab-Icon made by Flore Alynne Verschelde which was kindly posted via Mattermost!
One of the problems we could come across when building our page, that was mentioned multiple times, were size constraints. As I have a pretty camera module within my smartphone, I went through multiple stages to shrink the sizes of my images. After collecting them, i resized most of the images as their dpi was far to big for a website. I mostly just used the resize feature of MS Paint for this, as i was most familiar with using that. After that I used https://imagecompressor.com/ (which was recommended by our local instructor) and https://tinypng.com/ to compress the images even further up until they reached round about 100kb.
At last I added a "Last Modified"-functionality to all my pages, as I have seen them across other pages aswell. Since I do not use MkDocs I had to create a script which gets the last time the underlying document was edited input this date value into a html block. The javascript code works as follows:
let dateLastModified = new Date(document.lastModified);
document.getElementById("lastModified").innerHTML = "Last Modified: " + dateLastModified.toLocaleString();
With this I only had to give each page a html element with the id of "lastModified". The innerHTML attribute would than be set with the date variable. After trying this out with the published page however, i noticed that the time would always be set to the time the page has been called. So I need another approach.