
Interface and Application Programming
Group Assignment
Group Assignment:
compare as many tool options as possible
The group work that our group has done can be seen here
Individual Assignment:
write an application that interfaces a user with an input &/or output device that you made
This week, the assignment is to write an application to interface with the board I have designed. For this purpose, I have used the processing as an user interface and arduino for programming.
Interfacing with Processing
For this week, I attended the local session by Mr. Rico apart from Prof. Neil's lecture. Out of the lecture, I have understood that Processing programming is almost similar to Arduino programming which I am quite familiar for now.
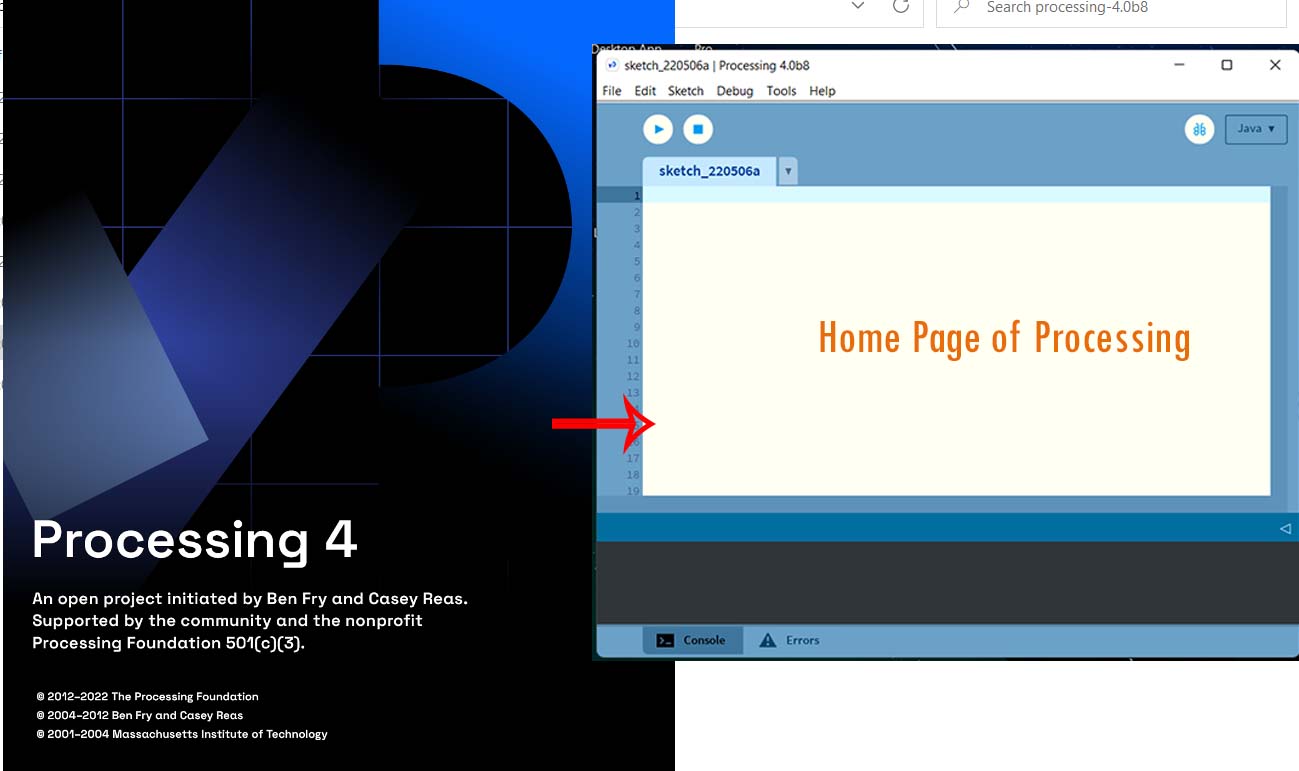
Basic tutotials can also be seen here. for processing.4.Processing is a Java for artist. I also referred tutorials for this class. Basic codes for processing is as shown below:
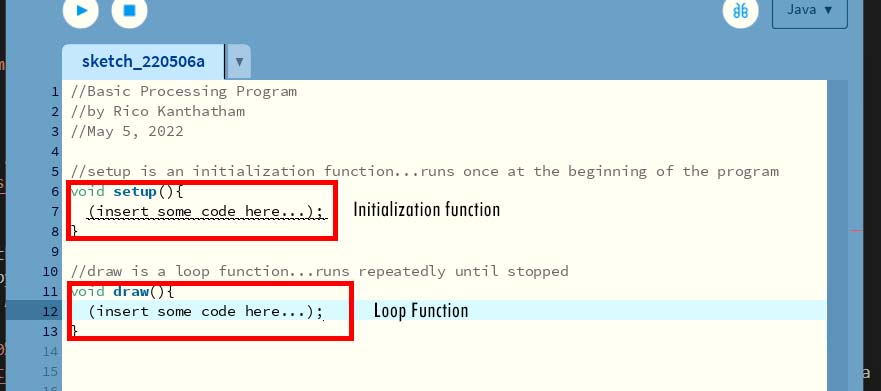
Comments are written with //.
                    //setup is an initialization function...runs once at the beginning of the program
                    void setup(){
                        (insert some code here...);
                        }

                    //draw is a loop function...runs repeatedly until stopped
                    void draw(){
                        (insert some code here...);
                        }
                        // uses slash slash for comments
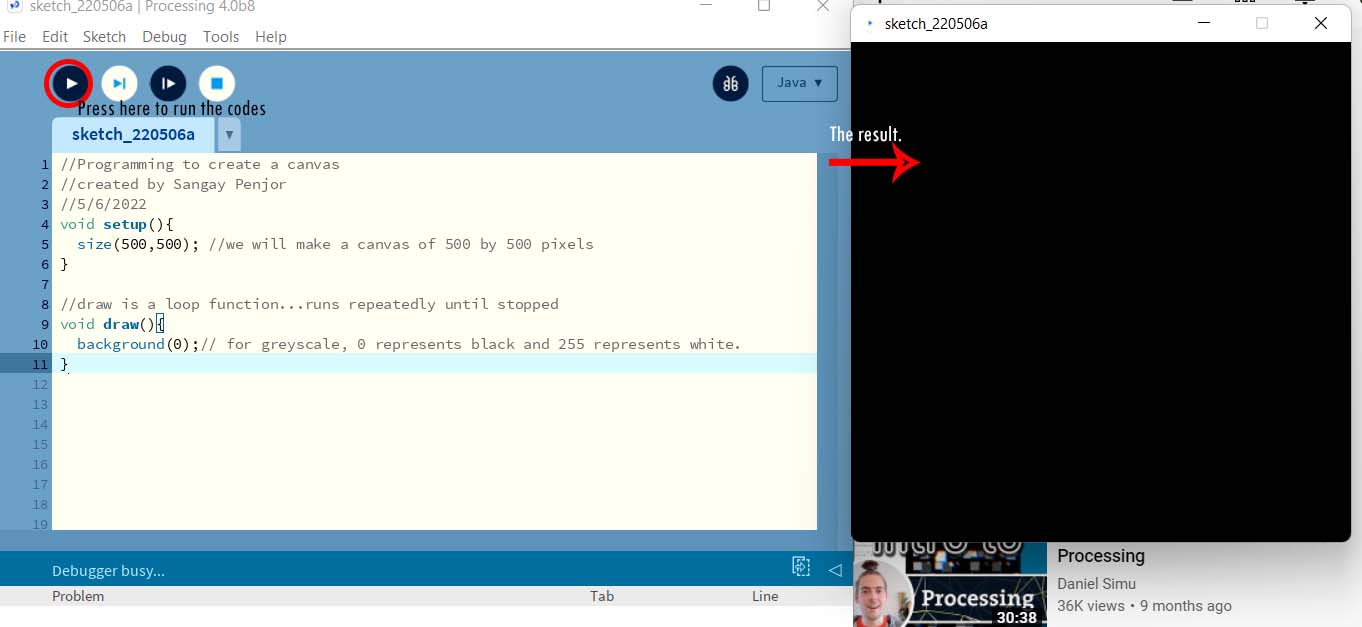
Making Canvas
We can make canvas with the codes size under void and giving background in draw functions. Do not forget to terminate code with a semi-colon ;
                    //Programming to create a canvas
                    //created by Sangay Penjor
                    //5/6/2022
                    void setup(){
                        size(500,500); //we will make a canvas of 500 by 500 pixels
                        }

                    //draw is a loop function...runs repeatedly until stopped
                    void draw(){
                        background(0);// for greyscale, 0 represents black and 255 represents white.
                        }
The result is as seen below:
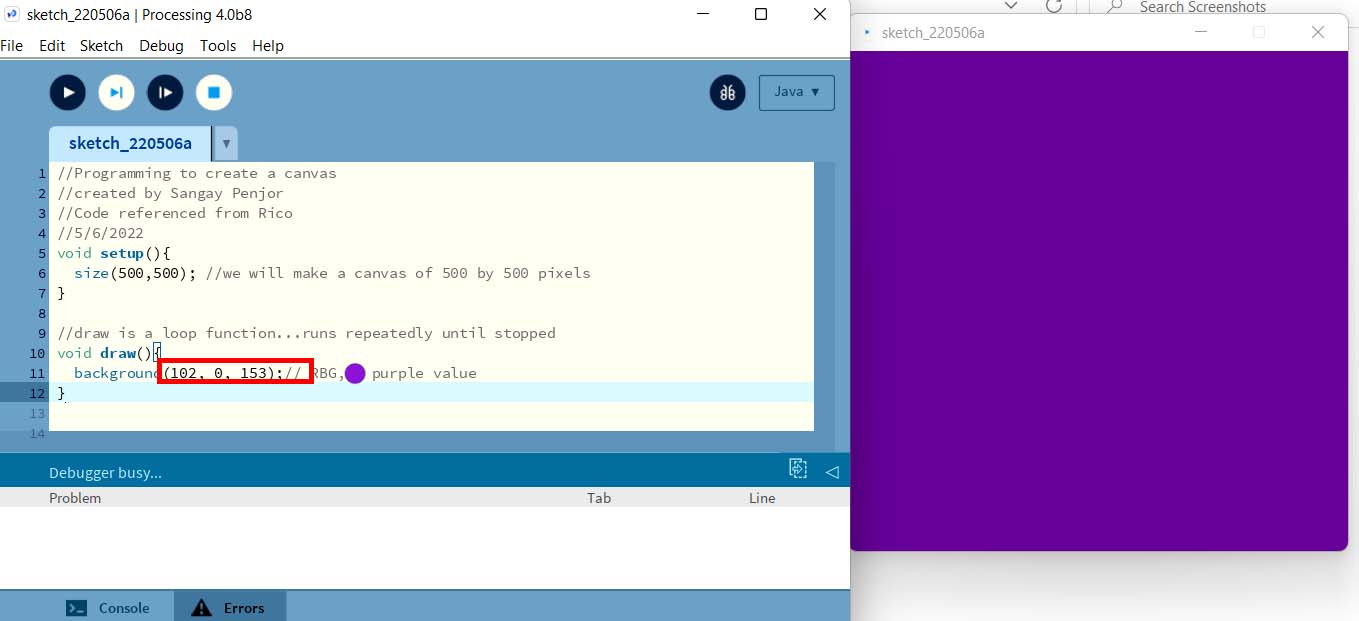
We can also use RBG values for our background color. For RBG values, I referred color values for Java
You can use the RBG color format using the (R,B,G); format.
                                void draw (){
                                    background(R,B,G);
                                }
For example, to create a purple canvas, you can use the following codes:
                        //Programming to create a canvas
                        //created by Sangay Penjor
                        //Code referenced from Rico
                        //5/6/2022
                        void setup(){
                            size(500,500); //we will make a canvas of 500 by 500 pixels
                            }

                        //draw is a loop function...runs repeatedly until stopped
                        void draw(){
                            background(102, 0, 153);// RBG, purple value
                            }
The result is as seen below:
Creating Basic Shapes on Canvas
We can also create 2D basic shapes on Canvas such as rectangle, circle etc... The origin (0,0,0) is considered at top left corner. rect function is used to create a rectangle:
//Programming to create and bsaic Shapes
//created by Sangay Penjor
//Code referenced from Rico
//5/6/2022
void setup(){
size(500,500); //we will make a canvas of 500 by 500 pixels
}
//draw is a loop function...runs repeatedly until stopped
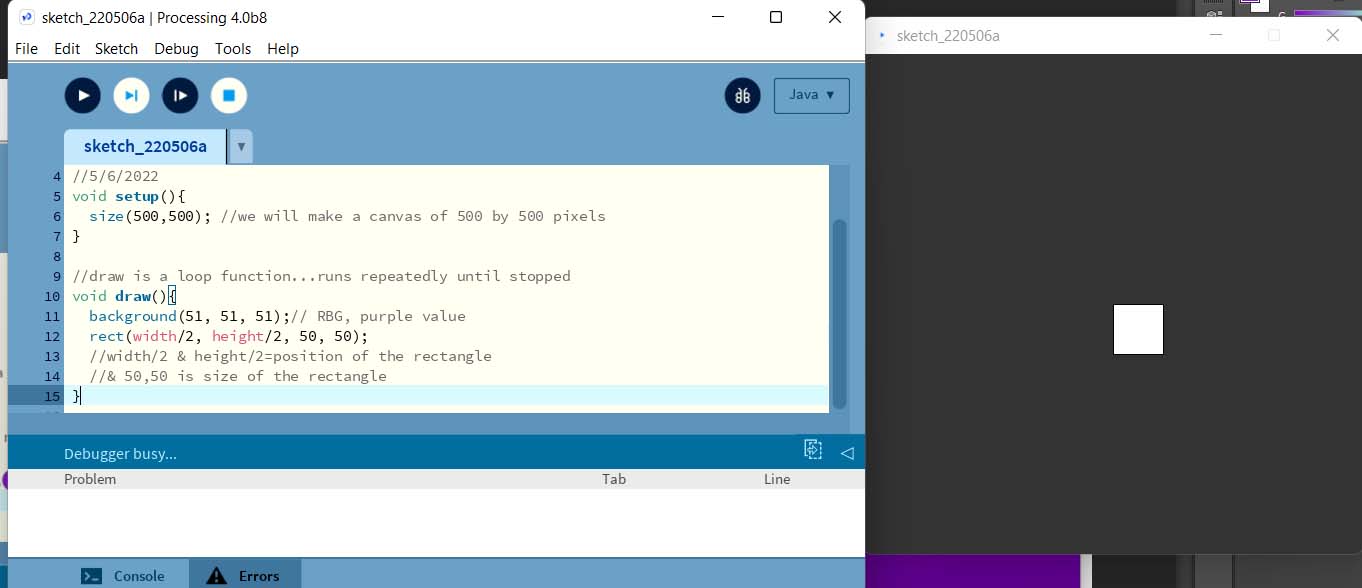
void draw(){
background(51, 51, 51);// RBG value
rect(width/2, height/2, 50, 50);
//width/2 & height/2=position of the rectangle
//& 50,50 is size of the rectangle
}
View the result as shown below:
I tried using different strokes and functions to create circle and rectangle 2D shapes.
                            //Programming to create and bsaic Shapes
                            //created by Sangay Penjor
                            //Code referenced from Rico
                            //5/6/2022
                            void setup(){
                              size(500,500); //we will make a canvas of 500 by 500 pixels
                              }

                            //draw is a loop function...runs repeatedly until stopped
                            void draw(){
                              background(51, 51, 51);// RBG, purple value
                              //rectangle
                              rectMode(CENTER);
                              stroke(0,200,200);
                              strokeWeight(8);
                              rect(width/2, height/2, 60,60); //origin upper left
                              //circle
                              stroke(0,150,200);
                              strokeWeight(20);
                              circle(width/3, height/3,100);
                              }
The result is as seen below:

We can explore with positions, colors and shapes. It is to note that the codes created first will be shown above the codes
created later, meaning the shapes will be shown above.
Working with Texts and Strings
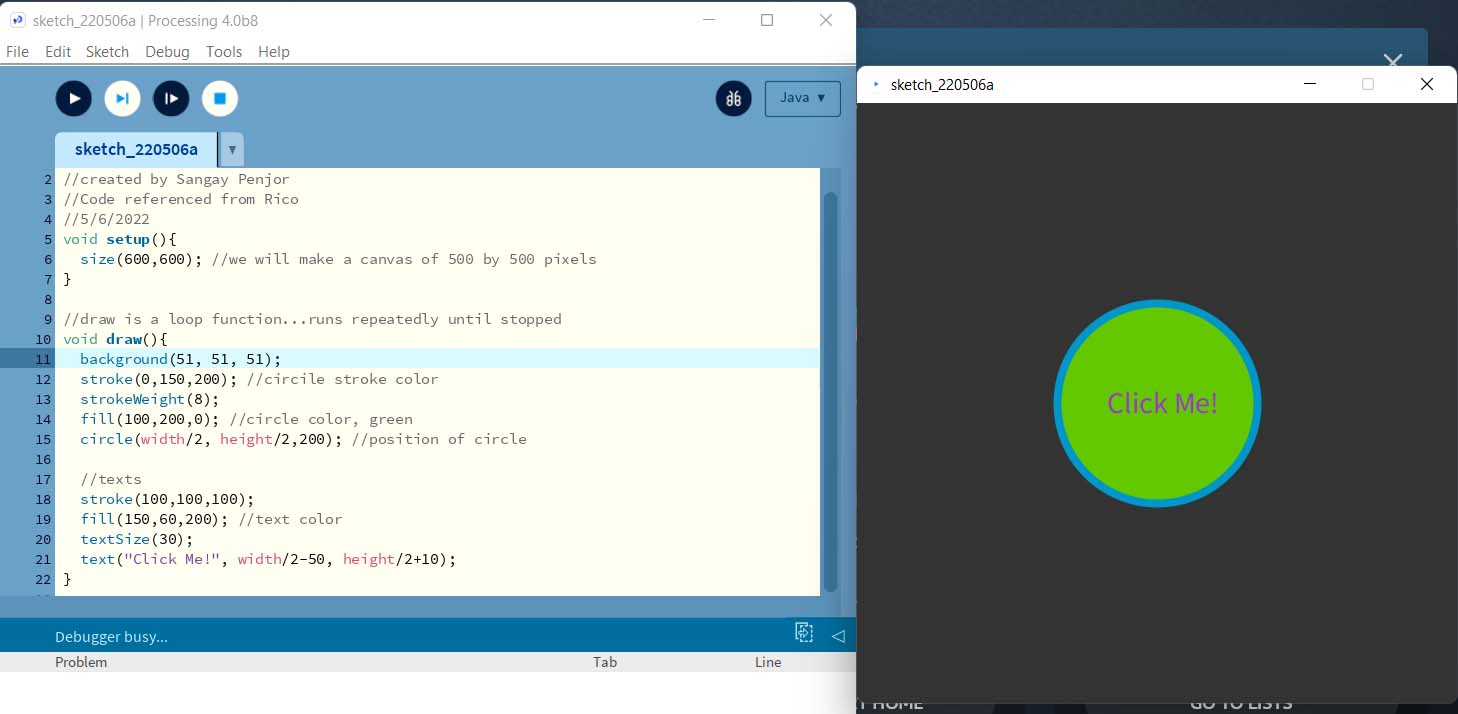
We can also work with strings and texts. Lets try to wrk with texts. I used the following codes to write the texts on the circle on canvas.
                        //Programming to strings and texts
                        //created by Sangay Penjor
                        //Code referenced from Rico
                        //5/6/2022
                        void setup(){
                          size(600,600); //we will make a canvas of 500 by 500 pixels
                        }

                        //draw is a loop function...runs repeatedly until stopped
                        void draw(){
                          background(51, 51, 51);
                          stroke(0,150,200); //circile stroke color
                          strokeWeight(8);
                          fill(100,200,0); //circle color, green
                          circle(width/2, height/2,200); //position of circle

                          //texts
                          stroke(100,100,100);
                          fill(150,60,200); //text color
                          textSize(30);
                          text("Click Me!", width/2-50, height/2+10);
                        }
The result of the code above is seen as before:
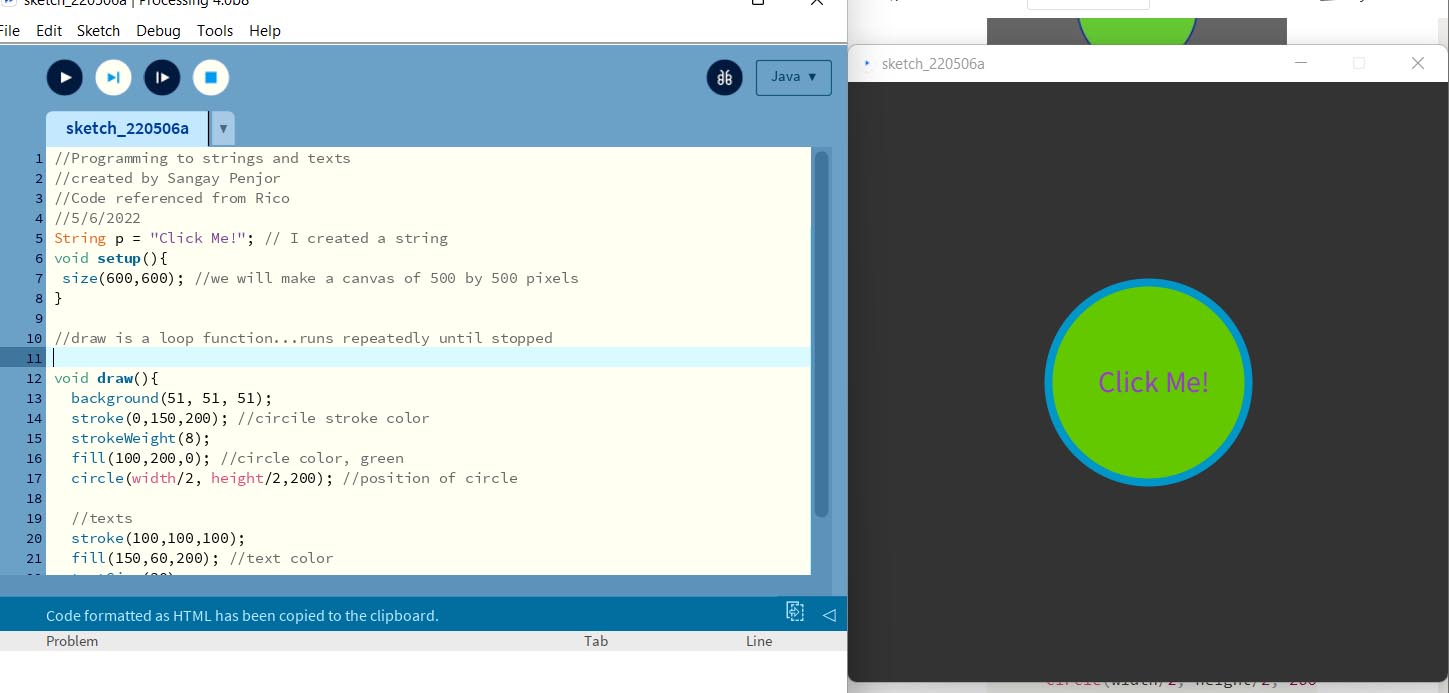
Text can also be defined as strings. It is a basic programming but I am a beginner. So, let me show the how we can define the text the as string.
                        String p = "Click Me!"; // I created a string
                        void setup(){
                         size(600,600); //we will make a canvas of 500 by 500 pixels
                        }

                        //draw is a loop function...runs repeatedly until stopped

                        void draw(){
                          background(51, 51, 51);
                          stroke(0,150,200); //circile stroke color
                          strokeWeight(8);
                          fill(100,200,0); //circle color, green
                          circle(width/2, height/2,200); //position of circle

                          //texts
                          stroke(100,100,100);
                          fill(150,60,200); //text color
                          textSize(30);
                          text(p, width/2-50, height/2+10);
                        }
The result can be same as shown above and as shown below:
Making a Button for Mouse
For advanced events, I want to create a button which can response for the click of my mouse. The functions used are noCursor, mouseX & mouseY.
                            void setup(){
                              size(500,500); //canvas size in pixels
                              noCursor();
                            }

                            void draw(){
                              background(125); //greyscale...0 is black, 255 is white

                              //Button
                              stroke(0,0,153);
                              strokeWeight(5);
                              fill(51,153,255); //button color
                              circle(width/2, height/2, 200); //position

                              //Pointer
                              fill(255,0,0);
                              noStroke();
                              circle(mouseX, mouseY, 20); //mouse function for moving the pointer
                            }
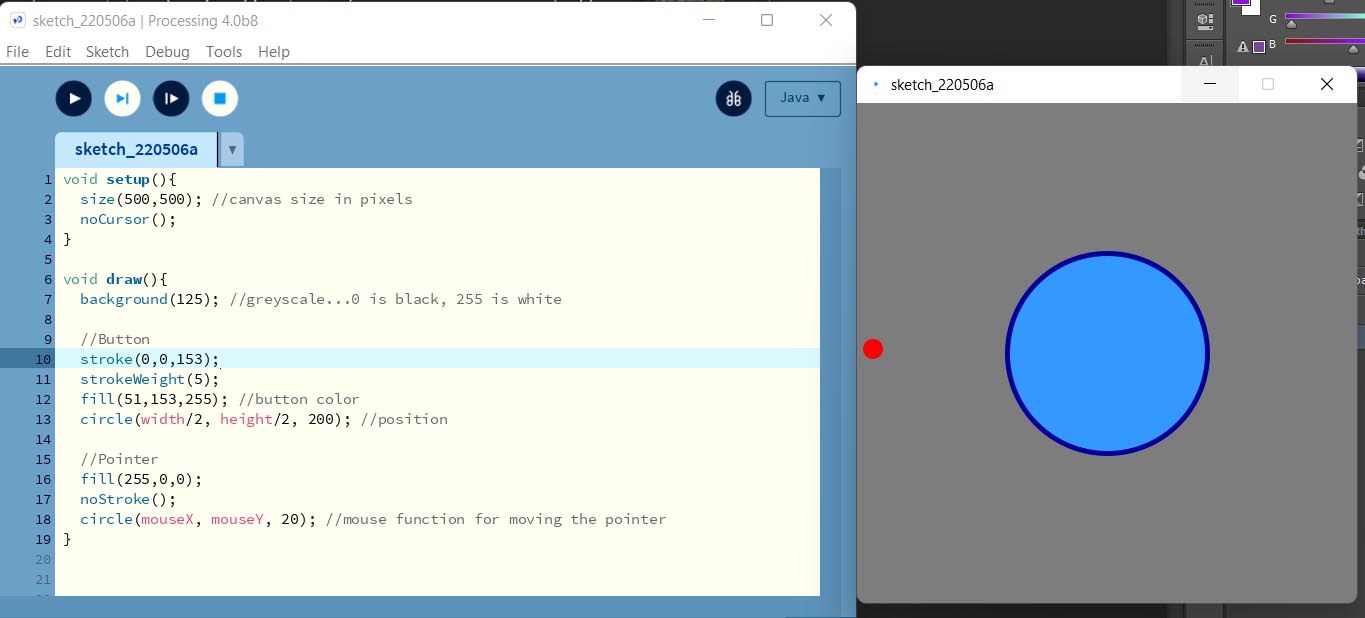
Note that the red cursor is movable with the action of the mouse.
Let us try to use if and else statement with the pointer. Give the positions of the pointer so that when it is inside the button, it changes the colors. The codes I used are:
                                void setup(){
                                  size(500,500); //canvas size in pixels
                                  noCursor();
                                }

                                void draw(){
                                  background(125); //greyscale...0 is black, 255 is white

                                  //Button
                                  //craeting a conditional statement, so that the color of the pointer depends on the pointer position.
                                  if (mouseX > 100 && mouseX < 400 && mouseY > 100 && mouseY < 400) {
                                    fill(0, 200, 50);
                                  } else {
                                    fill(200, 0, 0);
                                  }
                                  stroke(0,0,153);
                                  strokeWeight(5);
                                  circle(width/2, height/2, 300); //position

                                  //Pointer
                                  fill(255,0,0);
                                  noStroke();
                                  circle(mouseX, mouseY, 20); //mouse function for moving the pointer
                                }
The outcome can be seen below:
Another condition that we can explore is if we press the mouse, the color button must change. We can do that by changing the if statement to mousePressed function.
                                    void setup(){
                                      size(500,500); //canvas size in pixels
                                      noCursor();
                                    }

                                    void draw(){
                                      background(125); //greyscale...0 is black, 255 is white

                                      //Button
                                      //using mousePressed function
                                      if (mousePressed) {
                                        fill(0, 200, 50);
                                      } else {
                                        fill(200, 0, 0);
                                      }
                                      stroke(0,0,153);
                                      strokeWeight(5);
                                      circle(width/2, height/2, 300); //position

                                      //Pointer
                                      fill(255,0,0);
                                      noStroke();
                                      circle(mouseX, mouseY, 20); //mouse function for moving the pointer
                                    }
The result is as shown below:
I modified the codes in if statement and put three conditions as I just want my button to change the colors when I click inside the button only. The codes I used are:
                                        void setup(){
                                          size(500,500); //canvas size in pixels
                                          noCursor();
                                        }

                                        void draw(){
                                          background(125); //greyscale...0 is black, 255 is white

                                          //Button
                                          //using mousePressed function
                                          if (mousePressed && mouseX > 100 && mouseX < 400 && mouseY > 100 && mouseY < 400) {
                                          fill(0, 200, 50);
                                          }
                                          else {
                                          fill(200, 0, 0);
                                          }
                                          stroke(0,0,153);
                                          strokeWeight(5);
                                          circle(width/2, height/2, 300); //position

                                          //Pointer
                                          fill(255,255,255);
                                          noStroke();
                                          circle(mouseX, mouseY, 20); //mouse function for moving the pointer
                                        }
view the result below:
Processing Button Program
The main purpose is to develop an application. I want to make a button and progam it to sent a
character through serial communication, from Programming program to Arduino Program.
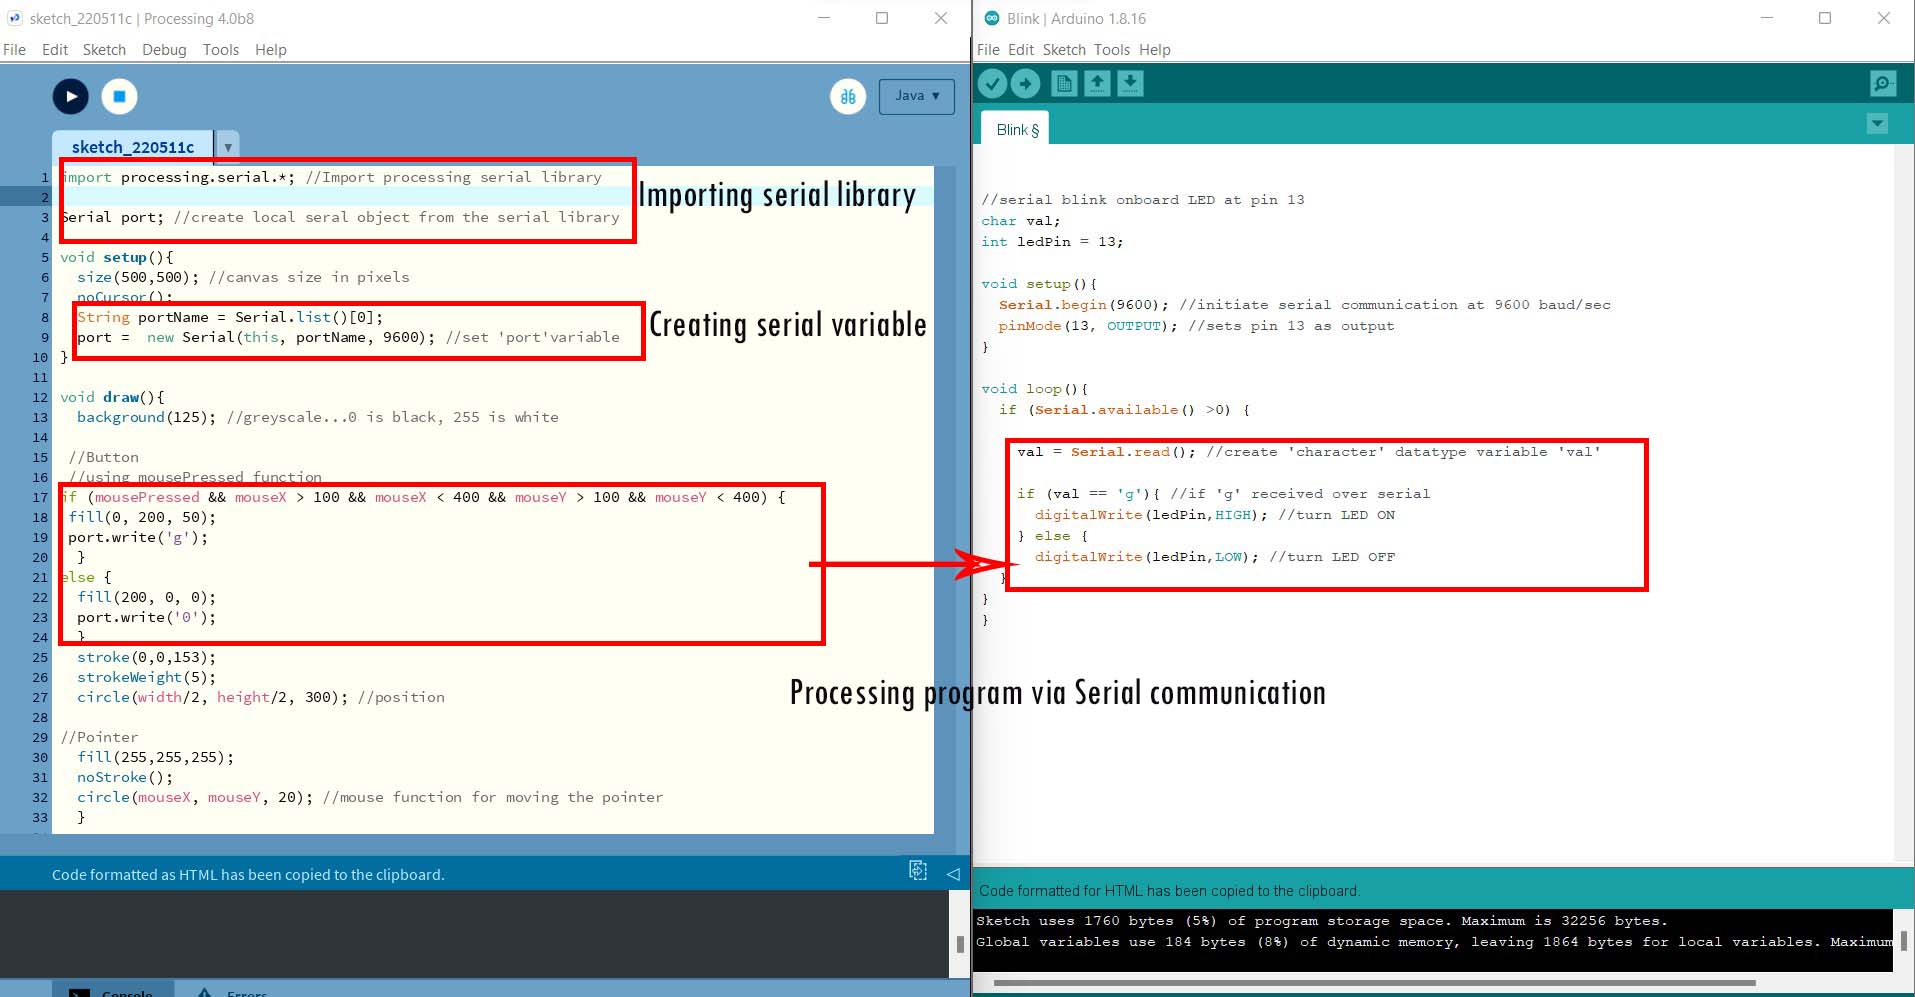
For this, we need to import Serial Library through codes:
import.processing.serial.*;
Serial port;---> create Serial variable
port=new Serial(this, "COM_number", 9600); ---> Initialize Serial object
port.write("k:); generate a Serial write event.
Programming Processing
                            import processing.serial.*; //Import processing serial library

                            Serial port; //create local seral object from the serial library

                            void setup(){
                              size(500,500); //canvas size in pixels
                              noCursor();
                              String portName = Serial.list()[0];
                              port =  new Serial(this, portName, 9600); //set 'port'variable
                            }

                            void draw(){
                              background(125); //greyscale...0 is black, 255 is white

                             //Button
                             //using mousePressed function
                            if (mousePressed && mouseX > 100 && mouseX < 400 && mouseY > 100 && mouseY < 400) {
                             fill(0, 200, 50);
                             port.write('g');
                              }
                            else {
                              fill(200, 0, 0);
                              port.write('0');
                              }
                              stroke(0,0,153);
                              strokeWeight(5);
                              circle(width/2, height/2, 300); //position

                            //Pointer
                              fill(255,255,255);
                              noStroke();
                              circle(mouseX, mouseY, 20); //mouse function for moving the pointer
                              }
Arduino Programming
Arduino program that receives characters from the Processing program via Serial communication connection and triggers actions through MCU pins
                            //serial blink onboard LED at pin 13
                            char val;
                            int ledPin = 13;

                            void setup(){
                              Serial.begin(9600); //initiate serial communication at 9600 baud/sec
                              pinMode(13, OUTPUT); //sets pin 13 as output
                            }

                            void loop(){
                              if (Serial.available() >0) {

                                val = Serial.read(); //create 'character' datatype variable 'val'

                                if (val == 'g'){ //if 'g' received over serial
                                  digitalWrite(ledPin,HIGH); //turn LED ON
                                } else {
                                  digitalWrite(ledPin,LOW); //turn LED OFF
                              }
                            }
                            }
You can see the codes below. It uses the serial communications.
The result can be seen below. For now, I have used Arduino Uno board as a test.
Communincation of Processing and My Board
I am going to use the my final project board to program and interface using Processing and Arduino IDE. I am using the same board that I have designed in output week.
In order to get a serial communication between my PC and board, I connected my board to PC using FTDI connector. FTDI connector for serial communications require 4 pins i.e., VCC, GND, Rx & Tx. In order to program the board, I connected ISP of USBtiny to my board.
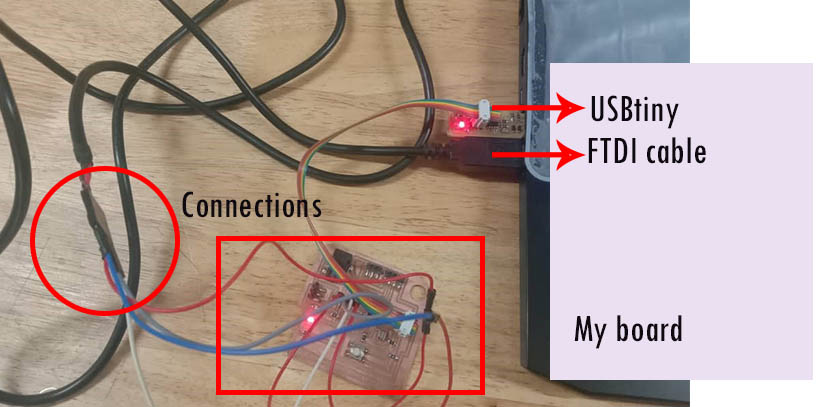
Remember to switch Rx and Tx of the reciever and the transmitter as shown below:

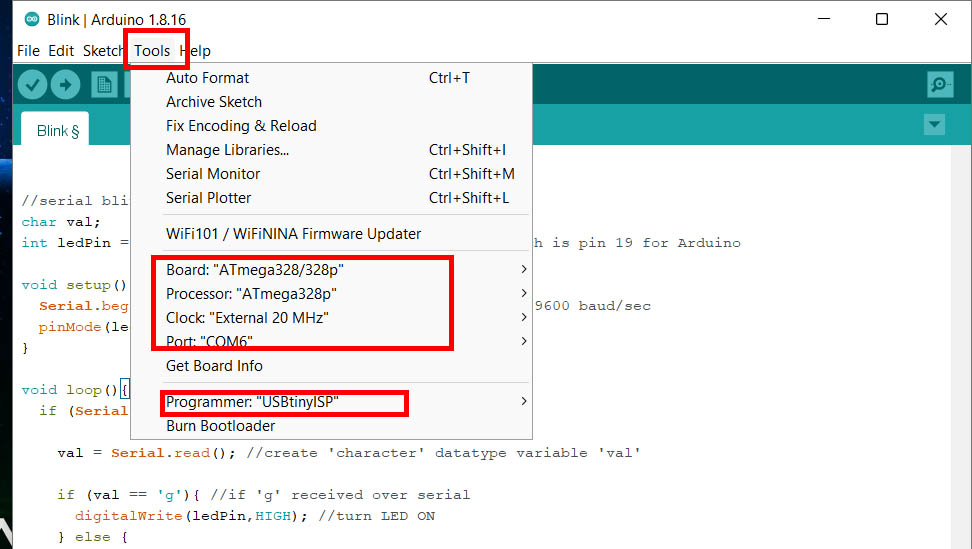
I want to glow LED of my board. I have LED on Pin 28 of my ATmega328p board, which is Pin 19 in Arduino IDE. Therefore, I changed the programming as follows in Arduino.
                                //serial blink onboard for Atmega328p board
                                char val;
                                int ledPin = 19; //my Atmega328p has a led at pin 28 which is pin 19 for Arduino

                                void setup(){
                                  Serial.begin(9600); //initiate serial communication at 9600 baud/sec
                                  pinMode(ledPin, OUTPUT); //sets pin 13 as output
                                }

                                void loop(){
                                  if (Serial.available() >0) {

                                    val = Serial.read(); //create 'character' datatype variable 'val'

                                    if (val == 'g'){ //if 'g' received over serial
                                      digitalWrite(ledPin,HIGH); //turn LED ON
                                    } else {
                                      digitalWrite(ledPin,LOW); //turn LED OFF
                                  }
                                }
                                }
The tools should be set as shown below before loading programs.
The programming for processing remains the same. In simple terms, we need to understand that, we are programming an application in Processing and communicating it through serial communication protocol to my board using Arduino. We use the Arduino to understand and interpret the commands communicated from Processing to the board. We are asking the LED to glow when it recieves the character 'g' in this case. Character 'g' is programmed as the mouse click.
Following video shows the result: