Wildcard week
There were three things that grabbed my attention for this week and would really love to try all three:
- Printing the halftone image of
Papik-Tatik (Grandpa-Grandma) on a t-shirt. - Using composites to build the shell of the prosthesis.
- Learning to use TensorFlow, an end-to-end open source machine learning platform.
Printing a halftone image on a shirt
What I really wanted to do for this part of the assignment was to recreate a halftone image of Papik-Tatik (or Grandpa-Grandma), a beloved and gorgeous monument in Artsakh on a t-shirt. Here are the steps I followed:
Screen printing is a printing technique where a mesh is used to transfer a pattern to a substrate. In my case, I would be using the vinyl cutter to cut out the design that I wanted to transfer to a t-shirt, and the t-shirt would be my substrate. Here's how screen printing works:
- The pattern/logo you want printed is designed.
- The design is sent to the vinyl cutter to be cut out on vinyl.
- The part of the pattern you want inked is removed, and then the rest of the vinyl is transferred (perhaps with the help of a transfer tape or masking tape) to the mesh.
- The substrate if fixed behind the mesh.
- Ink is placed on the mesh, and a squeegee is used to distribute and squeeze the ink through the mesh.
- The mesh is removed. The substrate now bears the pattern that was designed.
Papik-tatik
I downloaded this image and looked for an image halftone converter online. That's when I found Adobe Photoshop Express, a free online photoeditor that allows such effects. I uploaded the image there, and cropped it first:

Then I did a bit of touch up to remove the orange trash can from the image since I could not remove it through removing the background:

And finally removed the background:

Then it was time to resize Tatik-Papik so that it would fit any size I wanted to print:

And then went ahead with the halftone effect; here I could choose anything between 0-100%. After experimenting a bit, I went for 100% as that meant larger 'dots' which would make it easier for the vinyl cutter to cut.

In order to cut the image, it had to be modified in Inkscape to become a vector image. In order to do so, it was downloaded from the
online Photoshop website as a .png file as Photoshop only creates raster files (the site requires registration
after the first download). The .png image was then autotraced using Path -> Trace bitmap...;
Multiple scans and 16 scans were chosen to trace it.

Here is the final result -- Papik and Tatik in halftone:

I then deleted the raster layer leaving only the vector image. This had to be prepared for vinyl cutting by
deleting the fill of the image and only leaving the outline (or strokes). This was accomplished by right clicking
the image and choosing Fill and stroke..., choosing no fill, choosing to have stroke,
and setting the size of the stroke to 0.01 mm, which created a very thin outline ready to be cut by the vinyl cutter.
(the same procedure if followed to cut something using the laser cutter as well).

Then I proceeded to cut the halftone design on vinyl cutter. As mentioned in the Computer-controlled cutting week, we have a Roland CAMM-1 vinyl cutter at the lab.

The force was set to 160 gf (gram-force) and the speed left at 15 cm/s.
Cutting out the halftone turned out to be a tedious task:

And though I was using fine tweezers, peeling it was even more tedious:
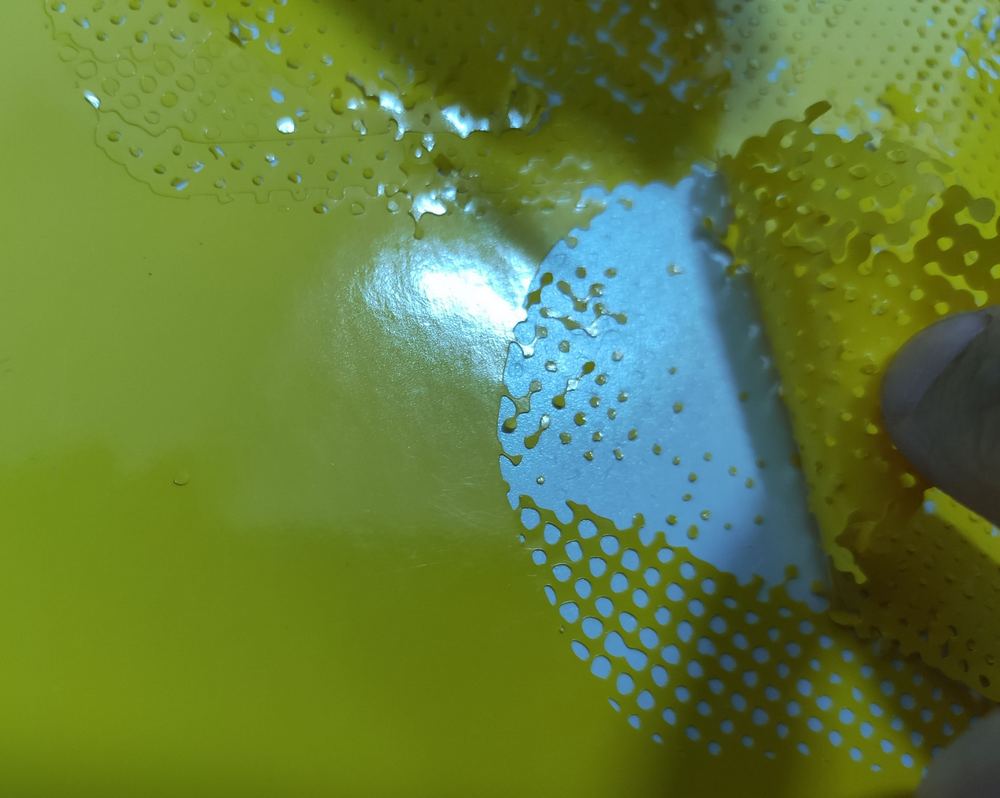
So, in the interest of time, I decided to forego of this for the moment and screen print something simpler.
Song lyric on a shirt
I settled on the phrase "Երբոր ծառերն հագնին տերև", which is a line from the song Kilikia: (what is Kilikia?)
The phrase means "When the trees wear leaf" referring to the coming of spring.
The creation was simple and straight forward: type the phrase in Inkscape and center it, right click and choose Fill and stroke...,
choose no fill, choose to have stroke, and set the size of the stroke to 0.01 mm, which is what the vinyl cutter needs to see
(though I've had other things cut alright too).

From Inkscape you can choose File -> Print... and choose the Roland GS-24 cutter. It is important here that
Preferences is selected and the correct size of vinyl is set: Get from the machine does this job just fine.
This time the result was easier to work with. The letters were removed from the vinyl and later placed on my latop:

The mesh screen was ready to receive the template. The size of the frame was 25x20 cm:

A masking tape was placed on the removed letters and parts that remained and the vinyl itself placed on the mesh screen:

The masking tape peeled off painlessly:

The screen was now ready to be printed:

The shirt was put on a piece of cardboard and clipped from two sides to make it steady:

The printing ink also stayed ready -- no mixing required in this case:


All screen printing tools were now set and ready:

The screen was placed on the shirt and held in place by hand (next time, I'd probably use a sturdier method). Ink was applied using a wooden tongue depressor stick:
The ink was then squeegeed over the vinyl and through the screen mesh to be absorbed by the shirt:

And behold... the shirt is ready:

Overall, screen printing a nice and smooth experience, a bit zen, as Neil would say :) I'd like to return to printing the halftone Papik-Tatik at some point.
Composites
This week I was also interested in creating the arm section of my prosthesis out of composites.
I was initially interested to do it out of carbon fiber and epoxy resin due to the light weight of the result; however, that had to change due to unavailability of the carbon fiber and I had to switch to fiberglass. Other materials I procured were cling wrap, felt-like material, and vaccuum bags.
However, as I didn't have an arm mold ready at that point, didn't make any composites until October of this year.
So on October 1st, Vachik and I had to chance to drive up to Dilijan, meet Ohad, who was visiting us, and for the first time ever in our lab make some fiberglass composites.
Here are the steps to create a composite as explained by Ohad:
- Machine the mold for creating the composite.
- If using fiberglass, make sure it's not pretreated with epoxy (due to toxic fumes from cutting); if so, you can cut it using a lasercutter to fit the mold. A minimun of 3 shells are required. You can also use scissors, though it will ruin them.
- Cover the mold with cling wrap since the cling wrap does not stick to epoxy resin.
- Place one layer of the fiberglass on the mold.
- Lightly cover the fiberglass with premixed epoxy resin using a painting brush. The layer of epoxy should be thin and almost completely absorbed by the fibers.
- Place the second layer of the fiberglass on the first. The fibers of various layers don't have to be parallel and in fact it's preferabble that they're not.
- Let the epoxy resin from the bottom layer be absorbed as much as possible by the fiberglass, and only apply a thin layer of extra epoxy where there is an empty spot.
- Repeat the same process for all the layers you'd like (min: 3).
- In the end, you'd need a perforated layer of cling wrap, or a ready-made version of that.
- After the perforated layer, a layer of felt should be placed for absorbing all the extra epoxy.
- Place the whole thing in a vacuum bag, seal it, and vacuum all the air out. Should make sure no epoxy gets through the felt layer to the vaccuum pump entrance tube, because any epoxy that enters the vaccuum will ruin the pump.
- After the epoxy is cured, the vaccuum bag can be opened and all the layers taken out.
- First remove the felt layer, and then the perforated layer. While they can both be removed together, this recommended approach may leave less of a mess.
- Any sides that are not glossy can be polished off by sanding. However, a face mask and goggles are essential in sanding as epoxy resin dust is highly toxic and should not be breathed in.
And here are how the actual making of the arm took place. While I had procured some fiberglass from before, Vachik brought some finer version of it with a finer weave -- this is supposedly better for smaller molds. Vachik also brought a vacuum pump and a cling wrap material that came with holes already punched into it.
In order to create a mold, Ohad suggested we use the native software for ShopBot, which is called VCarve Pro. He suggested we create a really simple design -- a pattern of half-way milled 'holes' in this case -- so that the ShopBot can mill it rather quickly, as we only had half a day. This would indeed be easy for ShopBot to complete quickly, as the pattern was achieved from overlapping the downward motion of the ShopBot toolbit (drilling) in a rectangular pattern.
Here is the array of circles that was created using VCarve Pro:

The the toolpath for milling the circles was created by using the same software:

We were even able to create our own custom milling bit to get the job done:

This was on the same computer as the ShopBot CNC interface, so we were able to mill it right away using the G-code generated. The milling was done on a wax block, shavings of which are of course reusable and can be melted to create a new mold.

Here is what the final mold for making our composite looked like:


After the mold was made, the area where we were to make the composites was prepared by clearing it of extra objects, wrapping the table and the scale with plastic, and the two parts of the epoxy resin to be used were set ready. A cup, mixers, and other devices that were needed were also set ready to be used.
Initially, a few fiberglass sheets were cut (using scissors) to the size of our molds, as while applying the epoxy resin there would not be enough time to tend to the cutting. I had read before that the scissors could be damaged from cutting the glass fibers; in any case, the damage was minor enough to be invisible to the naked eye. It is also possible to cut the fiberglass with the laser cutter; however, taken that our lab does not provide ventilation for the lasercutter to the outside, it is not something we'd like to do often.
Next, the epoxy and resin were mixed in the correct proportion. The solution that results here will turn into a glassy object if it dries on its own. The epoxy has long chains of molecules, which dry in an intertwined fashion, and as a result, it is very hard under pressure, or compressing forces. The fiberglass fabric that we use to make the composite, on the other hand, provides tensile strength thanks to its glass fibers. Which is why a composite is a material that can withstand both high compressive and tensile forces.
The mixture was then applied to the mold in a thin layer, and the fiberglass piece placed on it. The mixture was then brushed on gently on the fiber, and another layer placed on it. The epoxy would seep through the layers and get them wet, so in fact, very little epoxy resin was needed to cover the small number of remaining dry parts.

The difficulty in this part was to keep the fiberglass from slipping off the mold. The mold was made of wax, and eventhough a fine-weave fiberglass was used, the holes of the mold were too small and close for the fiberglass to stay on, so the fiberglass kept slipping off the mold. Many people tried to help to keep it in place, but it was rather hard. What saved the situation, was to just press all the layers of fiberglass together tightly, per Ohad's suggestion, and then lay it on the mold as evenly as possibly. The vaccuum stage was then what really got the soaked fiberglass into the holes.
As we had some extra epoxy resin, we tried to also lay them at the bottom of a cup:

And at last we tried to pour the remaining epoxy resin into other molds (from the Molding and Casting week) to get glass casts made.
Then, all the molds were covered with punctured cling-wrap and afterwards some felt. They were placed in a vaccuum sealed bag (one of those you can find in stores to store clothes in suitcases). The bag was sealed and the vaccuum pump was used to pump out the air from it.

It seemed the vaccuum bag could not quite keep the vaccuum when the pump was turned off, so we ended up switching the bag. The new one proved to be a lot more effective:

The composites were then left at the left in the sealed and vaccuumed back for a few days. The final result from the wax mold turned out as follows:

Here the final result can be compared to the mold that produced it -- given the level of detail, I'm surprised by the result (it's not as bad as I thought it would be):

And here are the results from pouring the epoxy resin into the molds; they're almost 'glass':

Overall, the composite feels flakier than I would expect it to, but I haven't actually tried damaging it to verify that.
The VCarve Pro file to make the mold is included at the bottom of the page.
3D scanning of an arm
For designing the arm, I thought the best approach would be to 3D scan an arm and use that as a starting point. The Oqni organization was kind enough to lend us their Artec Eva 3D scanner:


And Vachik was kind enough to volunteer his time to be scanned by me. The scanner works with its own propriety software, Artec Studio 15 Professional, which allows for processing the raw images and getting the desired result.
Here is the initial (raw) result of scanning Vachik's arm:

The processing was done through Artec's software. Here were the steps:
- Click on the
Toolsside tab. SelectGlobal registration. - After completing the previous step, select
Outlier removal. - Select
Smooth fusion.
The processed file is now ready:


TensorFlow
TensorFlow really grabbed my attention as Neil talked about it. It would open up the possibility of interpreting signals received from my myosensor and train the prosthesis board to act accordingly, something comparable to the Coapt system, or the software that used to come with Myo Gesture Control Armband or comes with OyMotion EMG ArmBand. This would take a very long time to master, I'd assume; however, the prospect was alluring enough to pull me in.
Initially, I checked out these four videos in a series:
- Intro to Machine Learning (ML Zero to Hero - Part 1)
- Basic Computer Vision with ML (ML Zero to Hero - Part 2)
- Introducing convolutional neural networks (ML Zero to Hero - Part 3)
- Build an image classifier (ML Zero to Hero - Part 4)
Then, I decided to go for this TensorFlow tutorial, but as a prerequisite, since I haven't had any formal training in Python, I decided to watch this Python tutorial, which is a great tutorial to watch at 2x the speed if you're familiar with any programming.
Downloading the files
The files for the screen printing can be downloaded from the following links:
- The Papik-Tatik (.svg file, 453 kB)
- The song lyric design (.svg file, 2.65 kB)
- The ShopBot VCarve Pro design file for the composite mold (.crv file in a .rar archive, 3 MB)


.jpg)