FINAL PROJECT
What does it do?
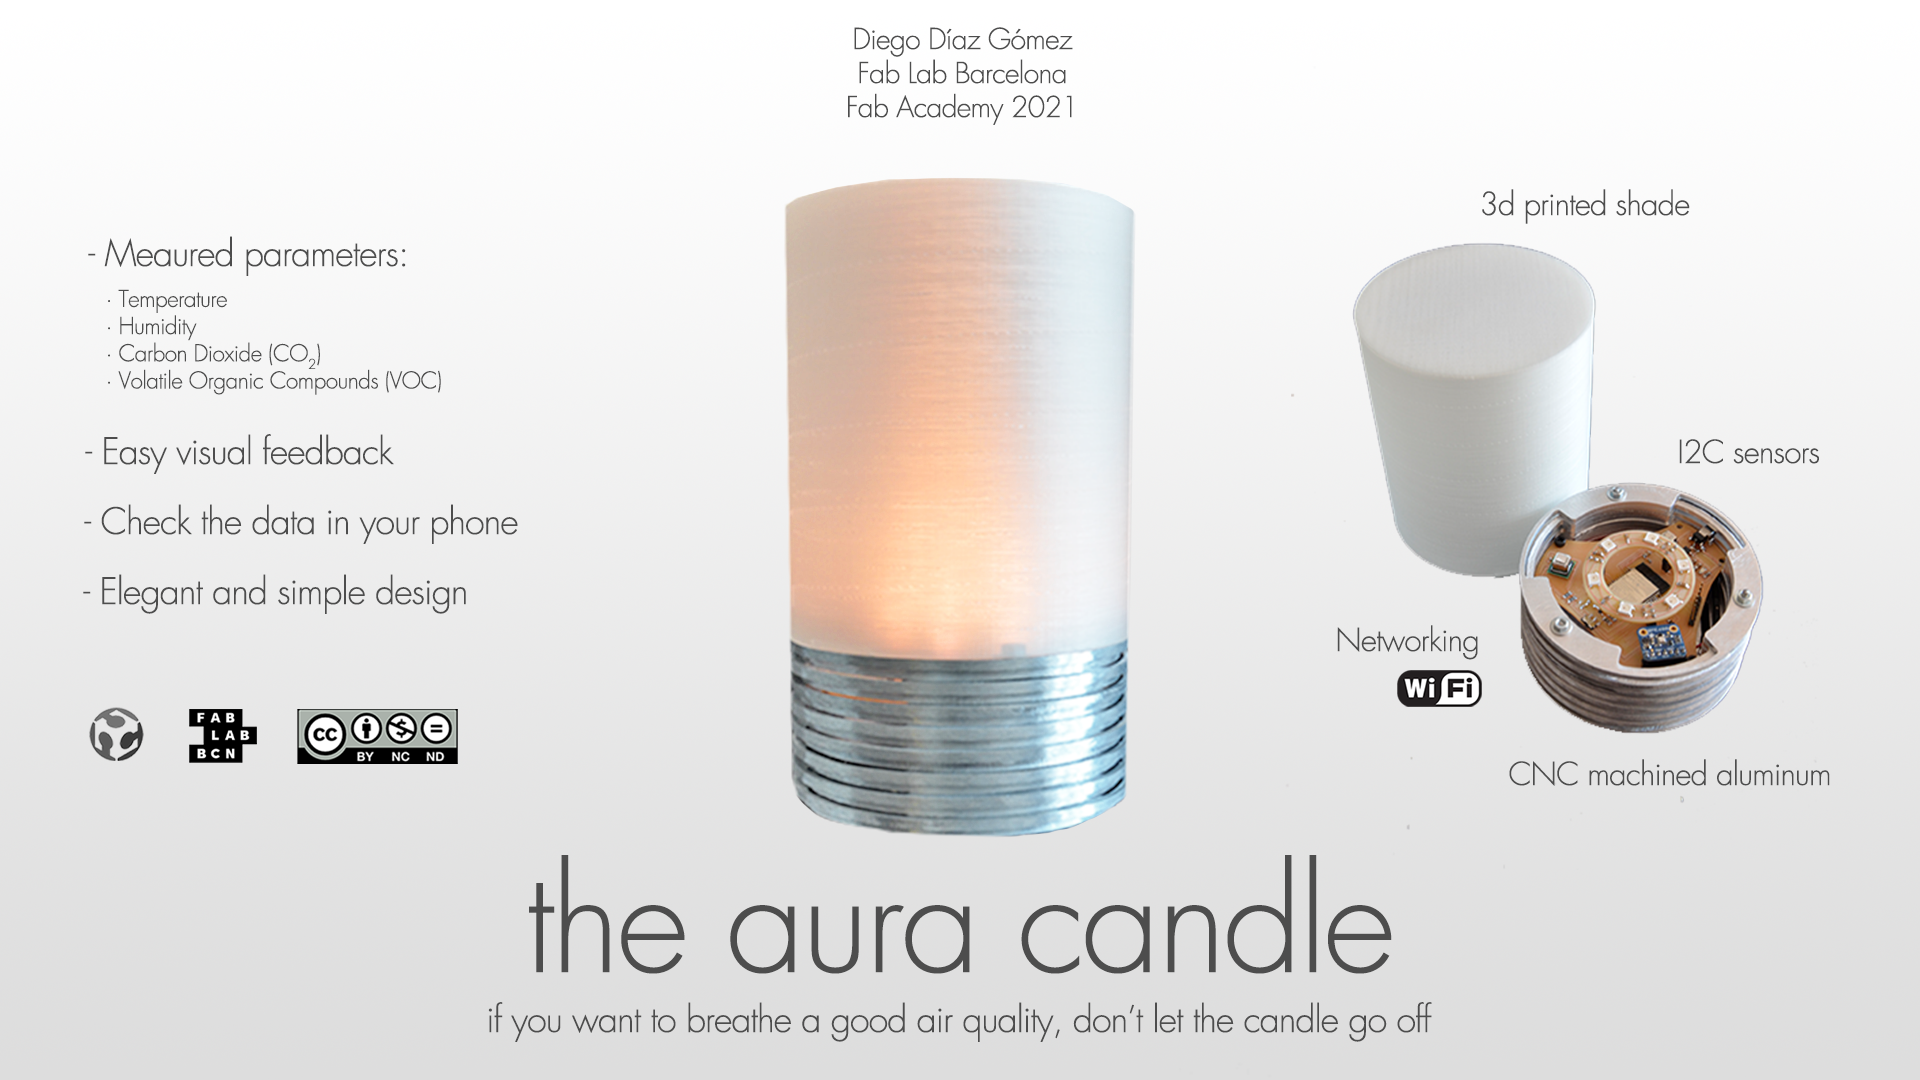
The idea is to make a device that is able to tell you how good is the indoor air quality of your home. By measuring parameters such as temperature, Humidity, VOC and CO2, it can calculate how good good are the values all together and it can tell you if you are breathing a good or a poor quality air. For instance, if the device is telling you that the air quality is not good, it might be necessary to open a window, or to turn on the heating.
As I want the device to be a part of anybody's home, I'd like it to be aesthetic as a piece of furniture or decoration.
It should tell you with just a fast look at it if the air quality is good or not. To make the design as simpler as possible, the real values measured are gonna be able to be checked from a smartphone or a computer by sending data to a server.

Who's done what beforehand?
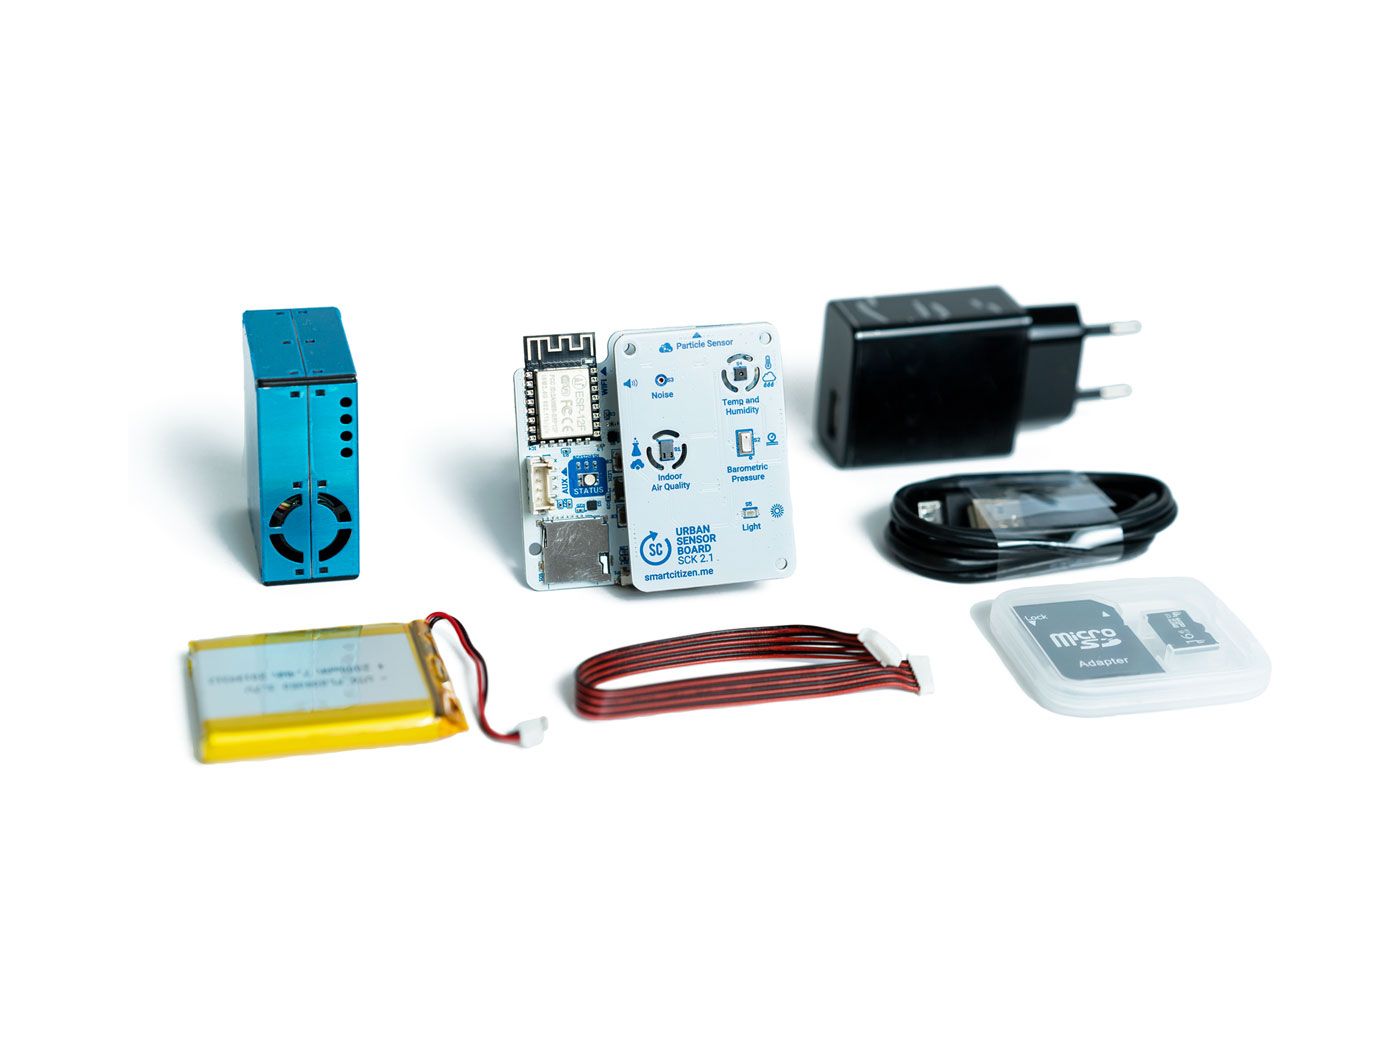
Smart Citizen Kit
One good example is the Smart Citizen Kit that was developed here in FabLab Barcelona, that can measure the outdoor air quality in order to share it with the comunity empowering them to seek for solutions. Link to the Smart Citizen Kit.
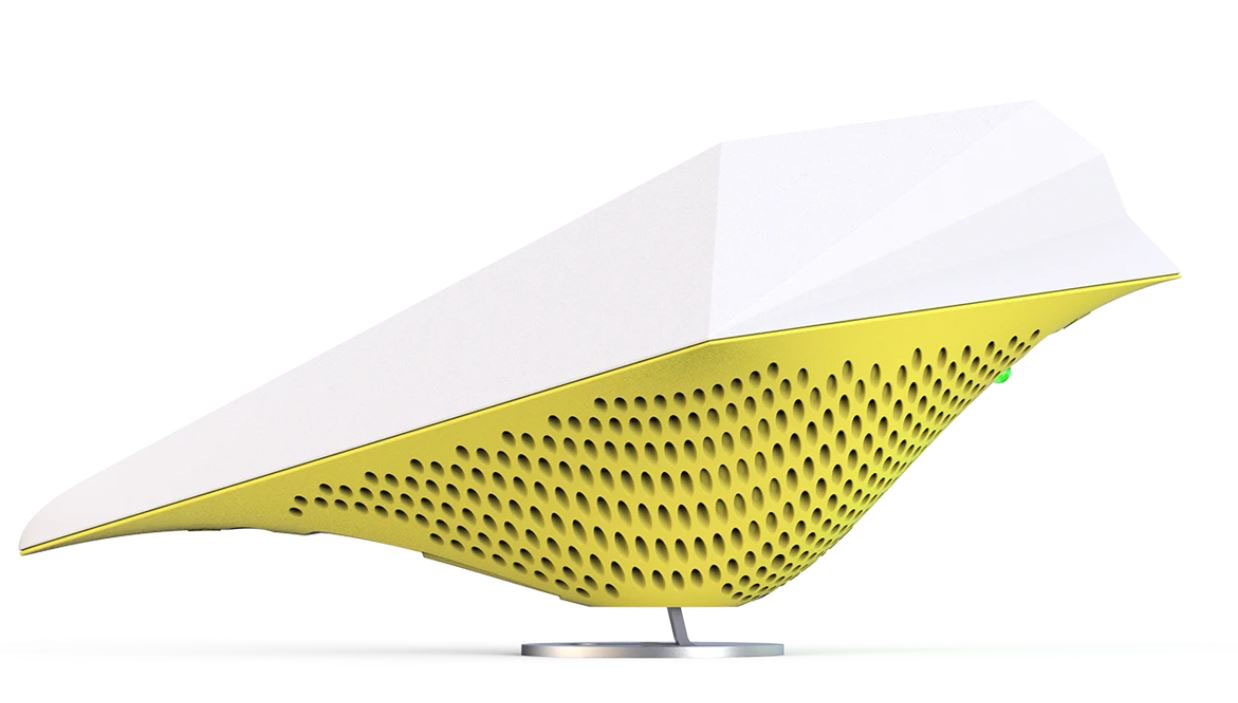
Air Bird
Air Bird is a clever indoor climate sensor developed by GXN, that works like a kind of a coach giving you feedback via gentle bird sounds in case you have a poor air quality in your home. Lint to the Air Bird
What did you design:
To design the shape and the interface of the device, I came up with the idea of making it in a shape of a candle, so that it goes off in case the air quality drops, and on again in case the air quality improves. There might be one or two intermediate states, when the candle is twinkling about to turn off.
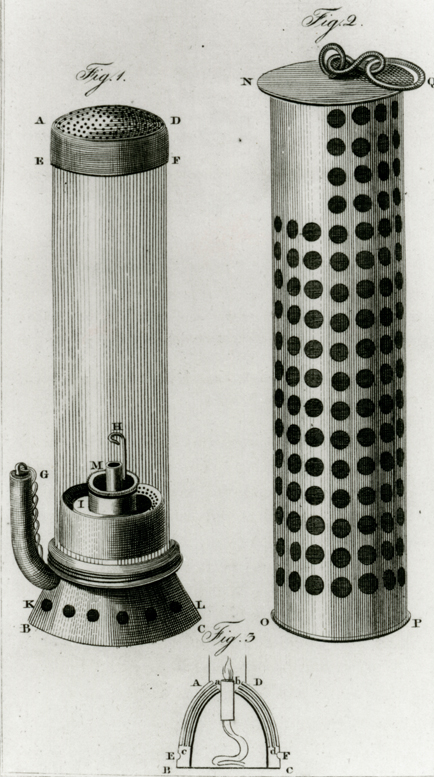
This idea is based in some lamps that were used in coal mines to prevent explosions due to firedamp, like the Geordie lamp, invented by George Stepheson in 1815. The operation of this lamp is such that, in case the proportion of firedamp became too high and the oxygen drops, the lamp is extinguished.
Geordie lamp:
Read about it in Wikipedia here
Example of the operation of the candle:
Good air quality, the candle is always on
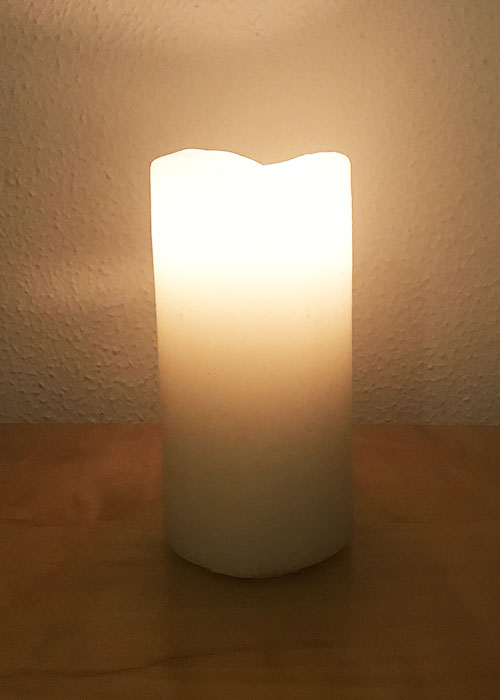
Not so good air quality, the candle is twinkling about to turn off

Poor air quality, the candle is off
Other design references:
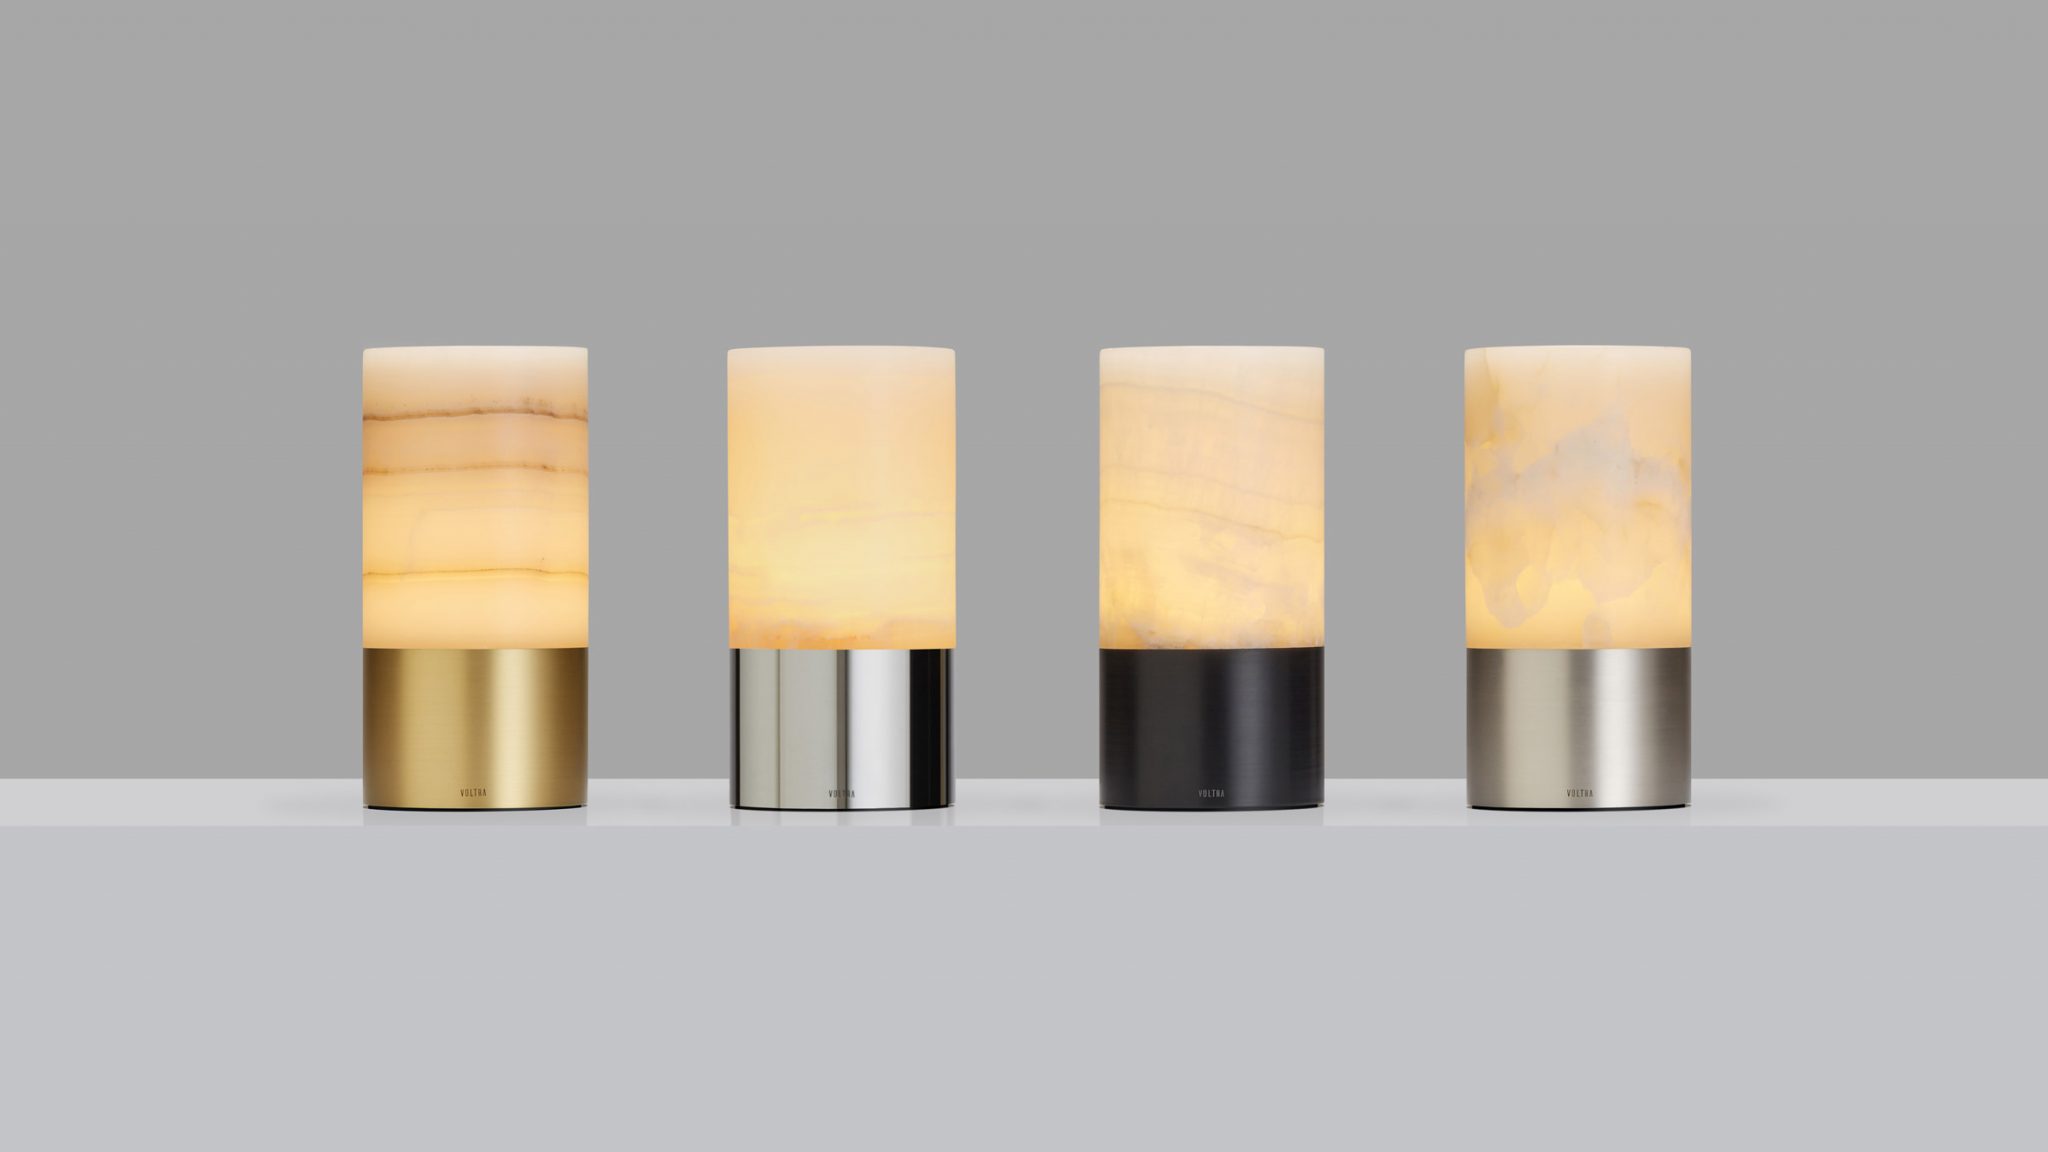
I also searched for contemporary references of candle shaped lamps, finding some beautiful designs that inspired me
Lamp that emulate candlelight by Voltra:
Tabletop light with candle-like glow by Foster+Partners:

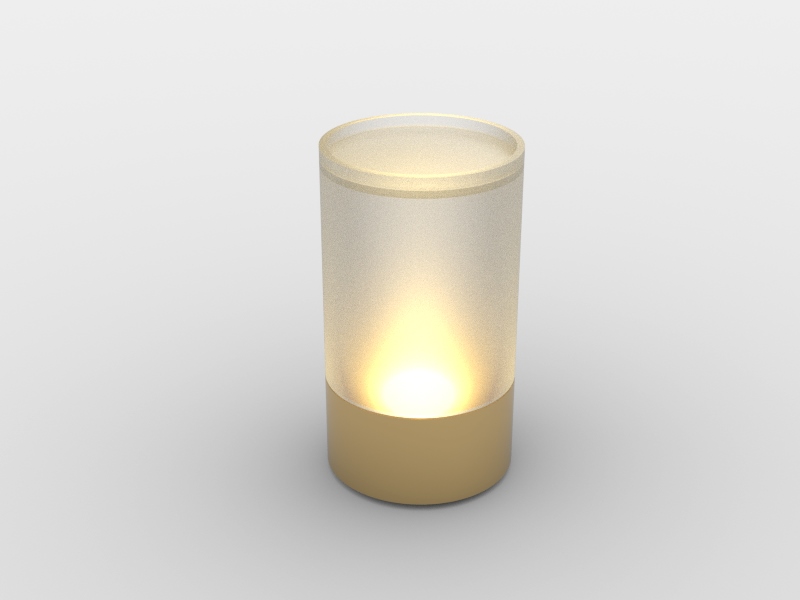
Technical design test and render:
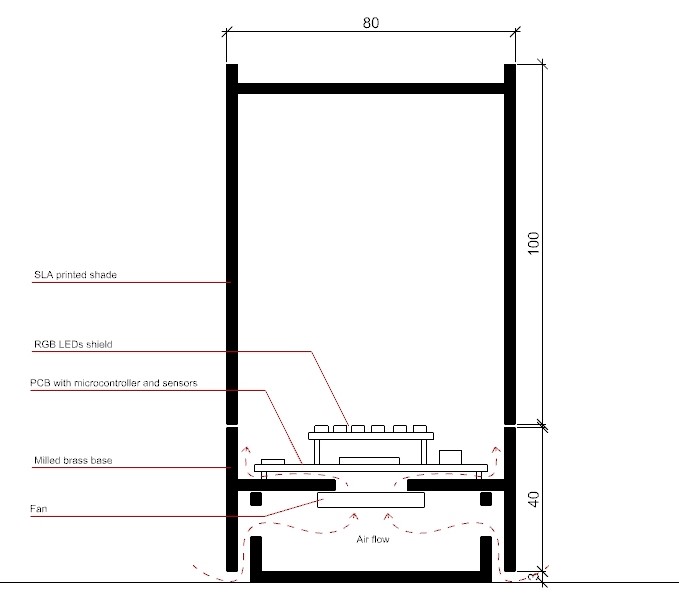
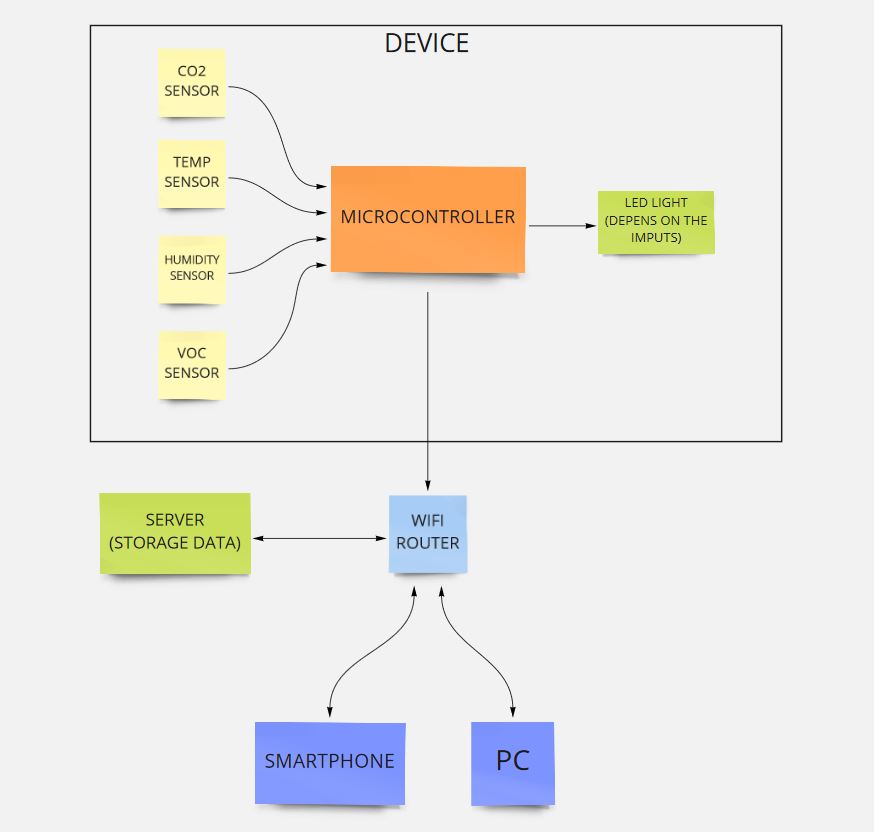
Operation diagram:
What materials and components were used?
Hardware:
Base (candle holder):
- CNC milled aluminium in sheets of 3mm and assembled togegher by layers.
Candle:
- FDM 3D printing with glossy PLA
Electronics:
Sensors:
- Temperature & Humidity & VOC sensor: Bosch Sensortec BME680
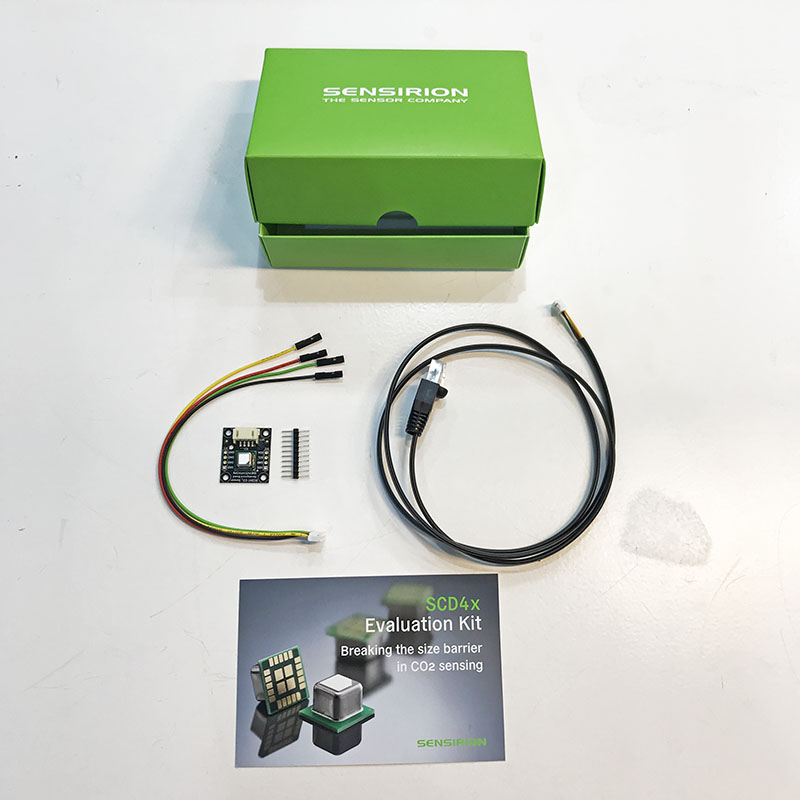
- CO2 sensor: SEK-SCD41-SENSOR
Other components:
- EPS32 microcontroller
- Resistors
- Capacitors:
- Button
- Swith
- LEDs
- Copper board for the PCB
- Fan
- Mosfet
- Voltage regulator
- Jack DC connector
Where did they come from?
Most of the materials came from de Lab stock. We just needed to order the CO2 sensor to Digi-Key and I had to buy the aluminum for the base.
- FabLab Barcelona
- Digi-Key
- Hiper Aluminio
How much did they cost?
| Component | Supplier | Quantity | Unit cost |
|---|---|---|---|
| ESP32-WROOM-32U (16MB) | FabLab stock | 1 | 3,80 € |
| 10 kOhm resistor SMD | FabLab stock | 4 | 0,10 € |
| 100 Ohm resistor SMD | FabLab stock | 2 | 0,10 € |
| 499 Ohm resistor SMD | FabLab stock | 1 | 0,10 € |
| Capacitor 0,1 uF SMD | FabLab stock | 7 | 0,29 € |
| Capacitor 10 uF SMD | FabLab stock | 2 | 0,30 € |
| Tactile Switch SMD | FabLab stock | 1 | 0,83 € |
| Slide switch | FabLab stock | 1 | 0,83 € |
| Red LED SMD | FabLab stock | 2 | 0,25 € |
| P-channel mosfet | FabLab stock | 1 | 0,38 € |
| 3.3V voltage regulator | FabLab stock | 1 | 0,94 € |
| SK6812 Neopixel LED | FabLab stock | 6 | 3,67 € |
| Female DC jack connector | FabLab stock | 1 | 0,80 € |
| Copper board | FabLab stock | 1 | 2,00 € |
| Bosch BME680 sensor | FabLab stock | 1 | 15,47 € |
| SEK-SCD41 SENSOR | Digi-Key | 1 | 40,69 € |
| LED RGB 1W | Amazon | 1 | 9,99 € |
| 6 aluminum sheets 250x250mmx3mm | Hiper Aluminio | 1 | 40,00 € |
| Glossy transparent PLA | FabLab stock | 1 | 2,00 € |
| TOTAL COST: | 143,58 € |
What parts and systems were made and what processes were used?
- Base: CNC machined aluminum
- Shade: FDM 3d printing with transparent glossy PLA

- Electronics: PCB milling
- Programming
- NetworKing
What questions were answered?
Some of the questions I've asked myself beforehand were the following that I'm answering after finishing the project:
- Are the sensors gonna be able to measure the air quality from inside the candle?
- To allow that, I designed the base on a way that it has little grooves that allow the air to flow. Besides that, the base is divided in two chambers with a fan that moves the air between them, so that the air is always moving.
- What if the LEDs stop working
- As you can check the values in your phone, you can see if the candle is working or not.
- Is the design appropriate? Is it too direct or too abstract?
- In the end I'm happy with the design. It's simple but the kind of light, reminds a candle.
- Is it easy to read all the values from your smartphone?
- Yes, you only have to go to the server IP
- Is it gonna be plugged or is it gonna have a battery?
- In the end, I decided to not have batteries, as the candle is not supposed to move. So it only needs a regular 5V DC power supply.
What worked? What didn't?
Hopefully, in general therms, everything is working. The things remaining to improve are:
- make more blinking modes of the light
- adjust the intervals of the parameters and values measured to match the different blinking modes
- send data to a database in a server
- improve the interface of the webserver embeded in the microcontroller
How was it evaluated?
The evaluation of the final is stipulated in the Nueval site. Apart from answering all the previous questions, making a slide and making a 1 min video, this other questions were answered as well:
- Does the project incorporate 2D design?: Yes
- Does the project incorporate 3D design?: Yes
- Does the project incorporate additive fabrication process?: Yes (3D printing)
- Does the project incorporate substractive fabrication process?: Yes (electronics milling and CNC machining)
- Does the project incorporate electronics design?: Yes
- Does the project incorporate embeded microcontroller interfacing and programming?: Yes
- Does the project incorporate system integration?: Yes
- Does the project incorporate packaging?: Yes
- Is the Final project independently operable?: Yes
- Is there a separate Final Project Page?: Yes
- Is it included the Bill of Materials?: Yes
- Are the weeks that I worked on my final project linked to this page?: Yes
- Are the video and the slide linked in this page?: Yes
- Are all the original files included?: Yes
- Is the chosen license included?: Yes
- Is the work done by other acknowledged?: Yes
What are the implications?
Slide:
Video:
Previous weeks work:
Week 2:
3D design tests
Week 5:
3D printing tests for the base and the shade
Week 10:
Imput devices: Testing temperature sensors
Week 10:
Output devices: Testing RGB LED and Mosfet
Week 10:
Networking: Testing ESP32
Week 10:
Interface and application programming: Testing web server in a ESP32
Week 16:
Applications and implications:
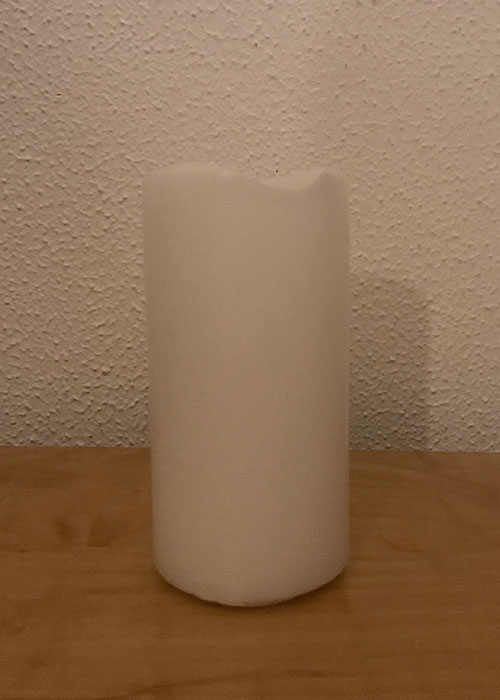
- Tests in FDM with natural filament and SLA with transparent resin
- Sketches and diagrams of the operation
Final Project Process of development:
The process of development was a back and forth exercise during the whole Fab Academy cycle. So it was a five-month journey where the design was changing little by little until the final result.
3D design:
The final shape was conditioned by numerous factors. First of all, I wanted the device to look slightly like a candle so I thought it as a base (simulating a candle holder) with a translucent shade (simulating the candle itself)
The design of the base was conditioned by the material. I liked the idea of a metal base in contrast to the lightness of the shade, so I considered two options: brass and aluminum. As I started to ask for prices of materiales I quickly discarded the brass. Then, when thinking how to mill the aluminum, I realized that it was no possible to mill all the base in one piece, so I would have to divide it in at least two layers. That led me to bring this concept to it's maximum expression, thinking the base as a multiple layer cylinder with a lot of wings so it allowed me to make grooves in order to let the air go in.
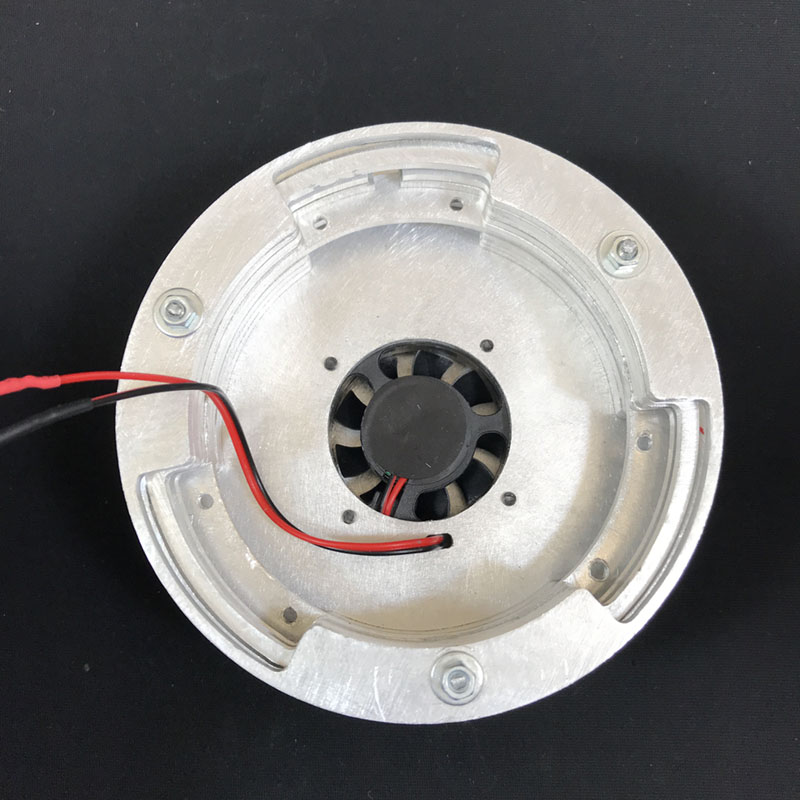
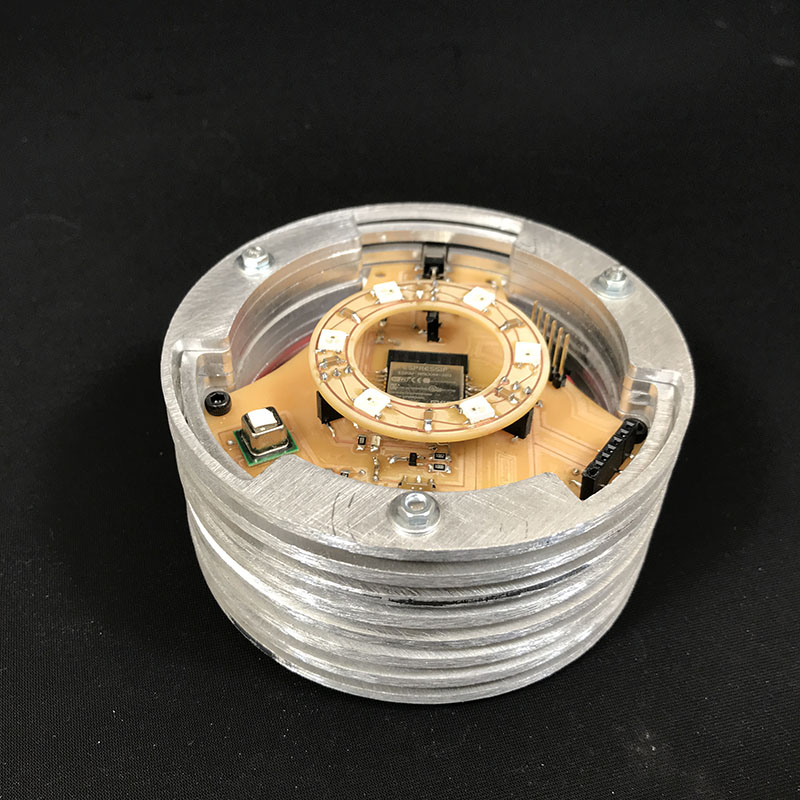
In the end, the base has two chambers divided by a solid layer with a fan, that propels the air towards the other chamber where the electronics are, creating a air flow between the exterior and the interior of the lamp
I also designed it together with the electronics, so that they fit inside.
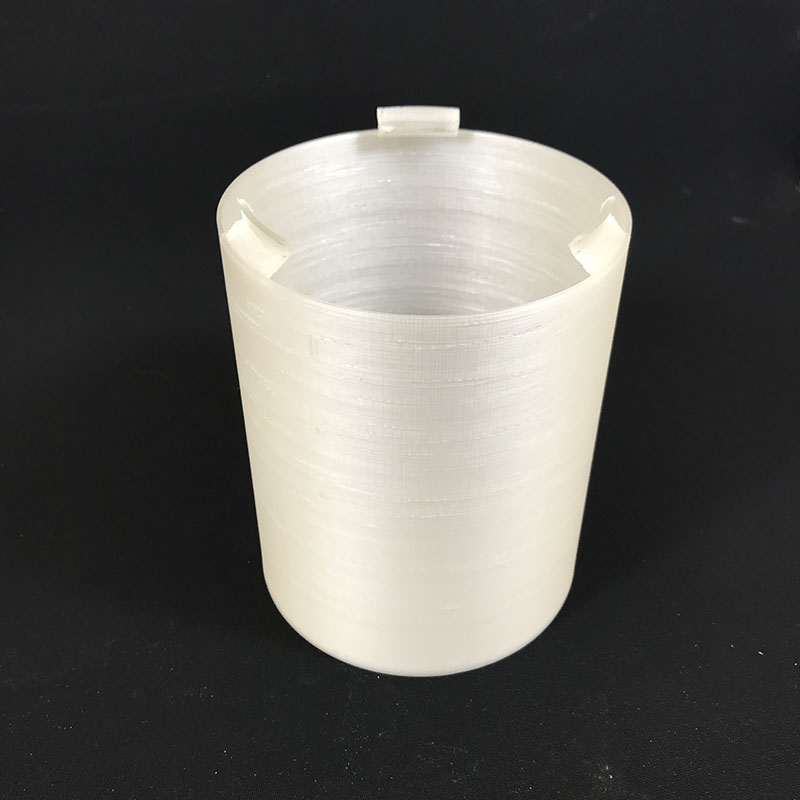
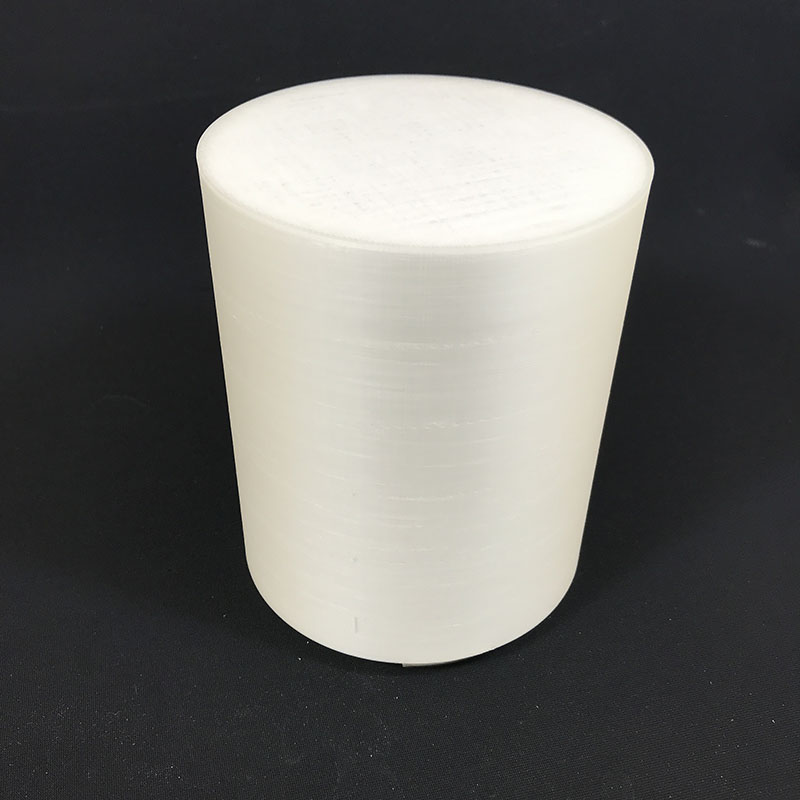
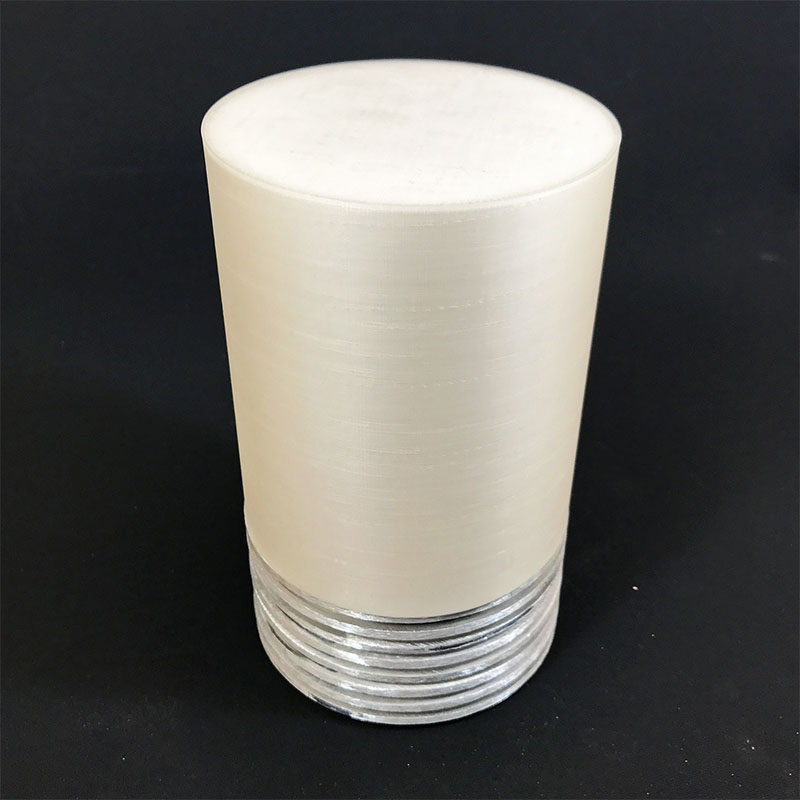
For the shade itself I decided to go minimalist and make a pure cylinder.

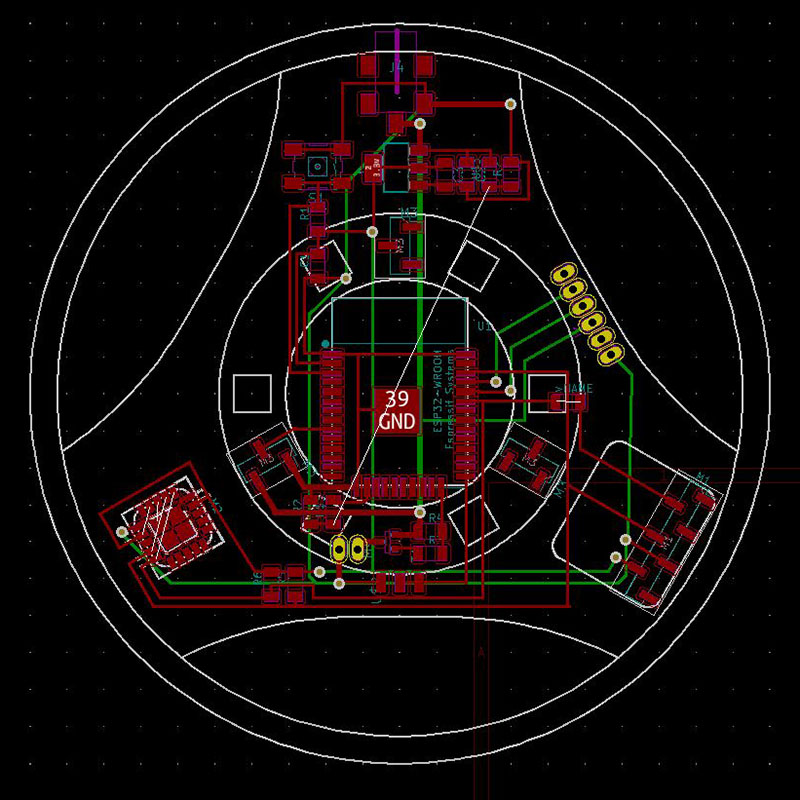
Electronics design:
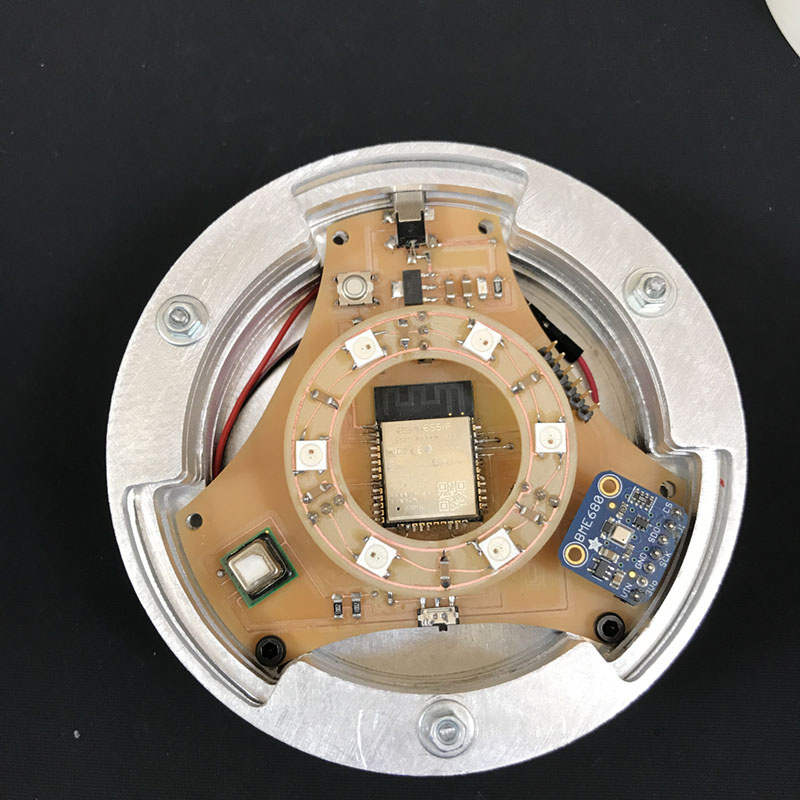
For the electronics design I started placing all the components in order to know all the measures and adjust de dimmensions of the base to be able to fit the electronics in there.
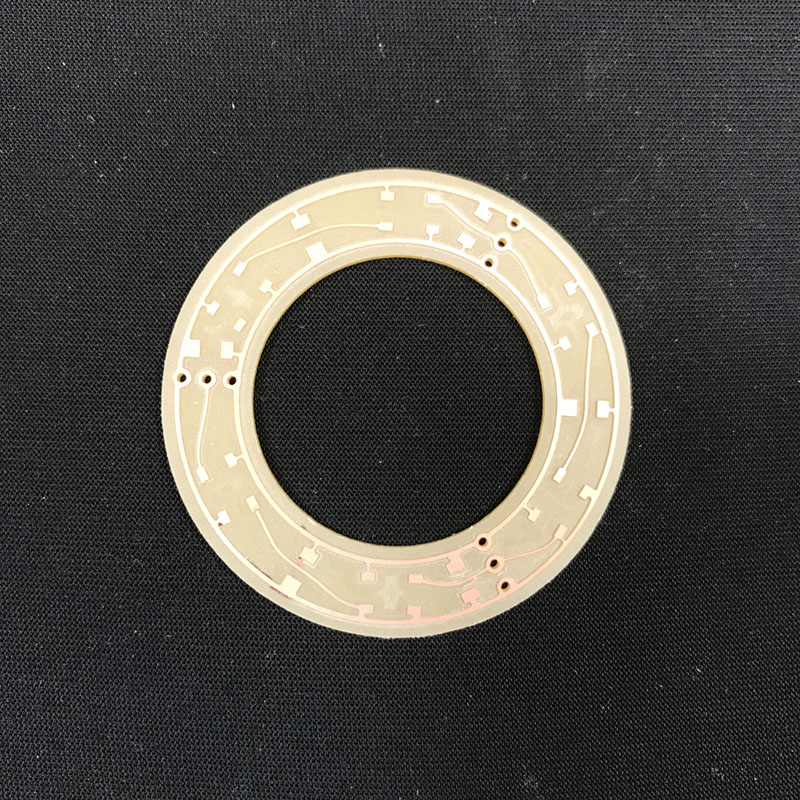
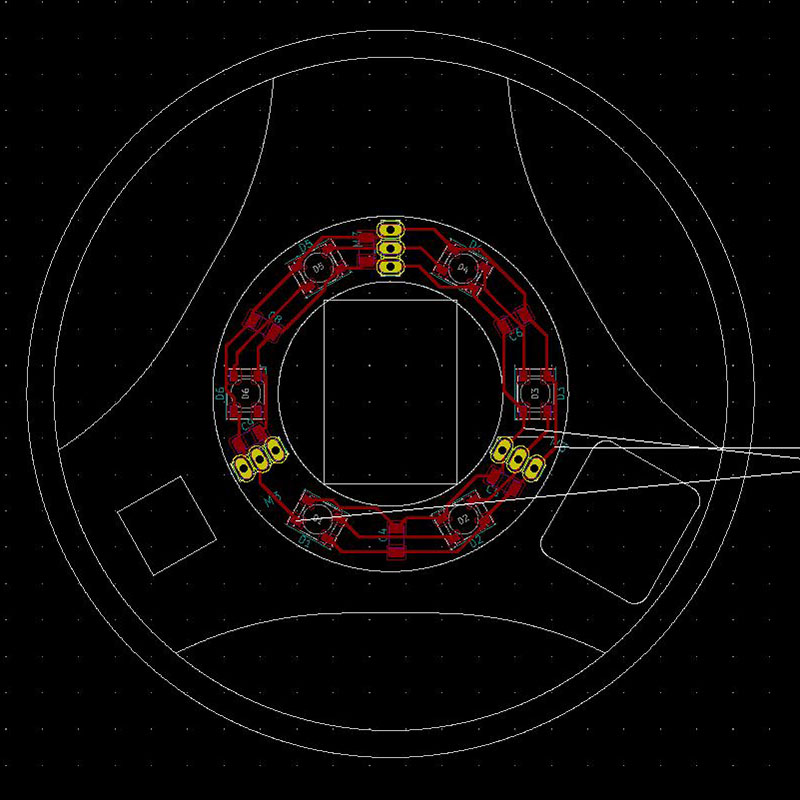
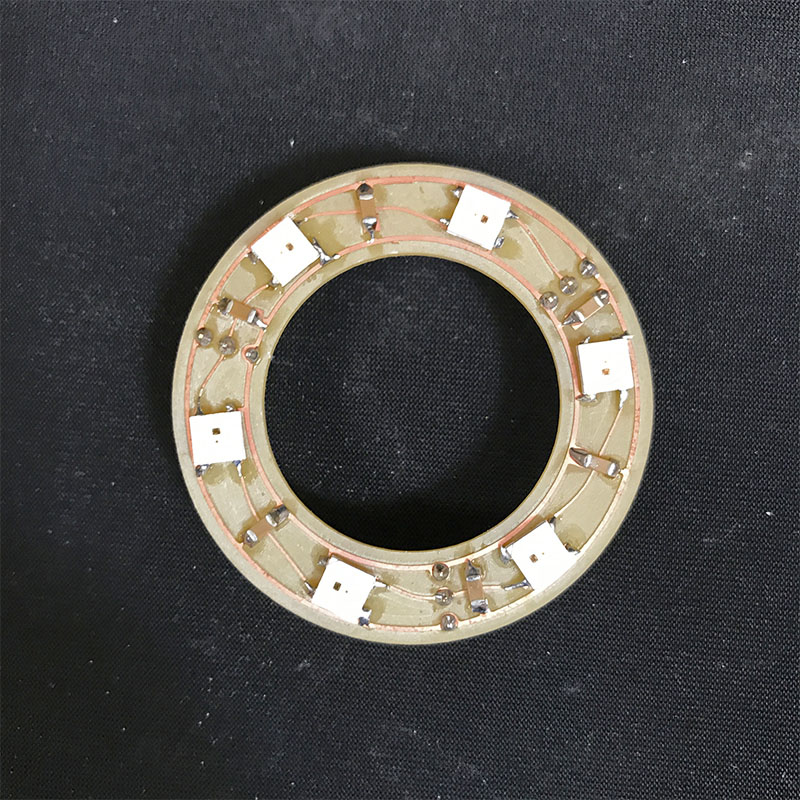
Then, once I decided the final diameter of the base, I designed the electronics so that it allows the air to flow from beneath, making it in a triangular-ish shape. I placed the microcontroller in the center, and then one sensor in one arm, another sensor in another one, and the power supply in the third arm. I order to make it as clean as posible, I decided to go double side. For the LEDs, I designed a circular shield to plug to the main board.
About the components I used, I chose an ESP32 because it already has WIFI and is powerful enough to handle the sensors, the LEDs and a web server.
For the sensors, I chose a BME 680 that measures Temperature, Humidity, VOC and Pressure, and a SEK-SCD41 SENSOR to measure CO2.
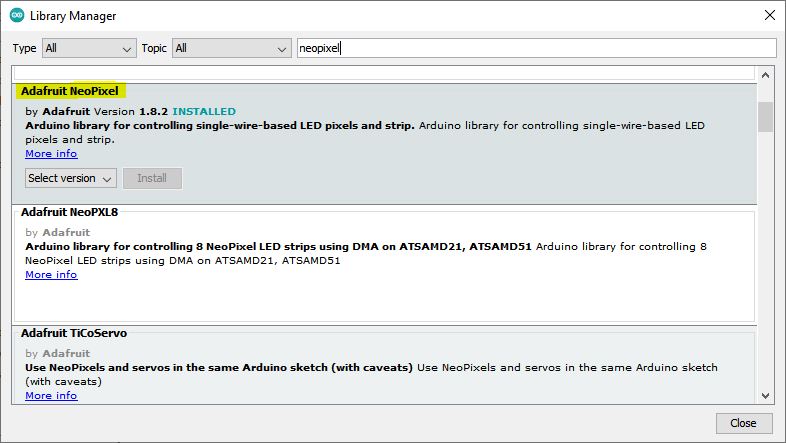
For the LEDs I chose Neopixel LEDs, because they are so easy to program and they are RGB.
The fan is a 5cm fan that works with a Mosfet that is controlled with a pin of the ESP32.
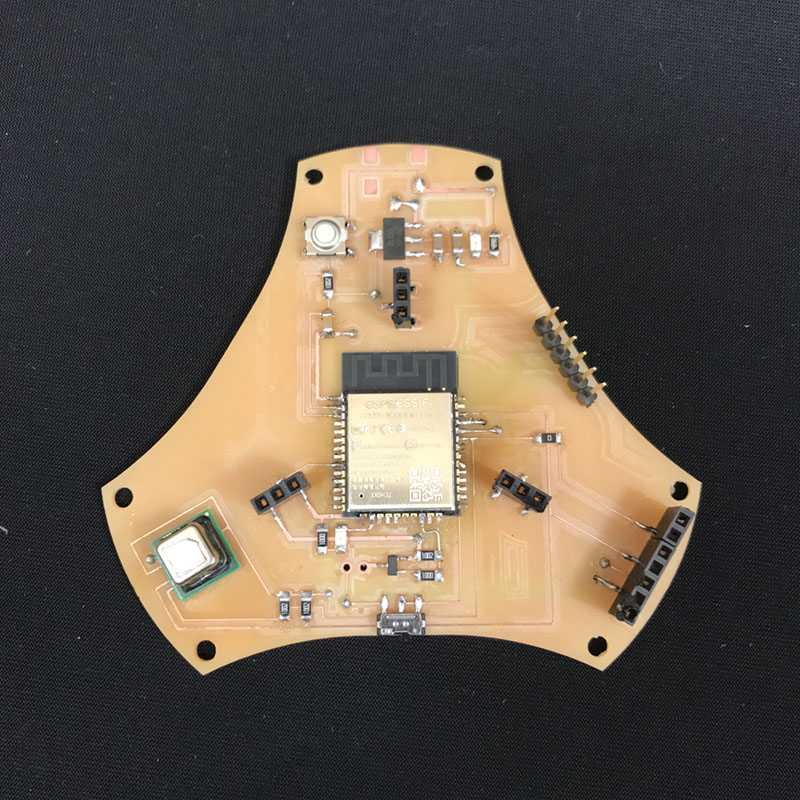
Electronics production:
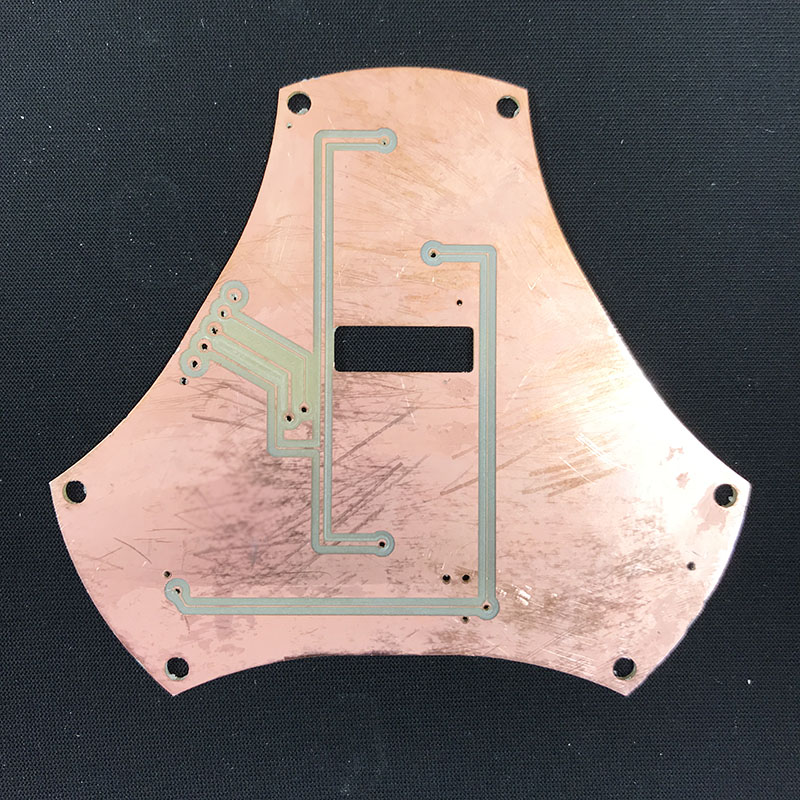
As I wanted the design as clean as possible, I milled all the copper from the front sides of both PCBs.
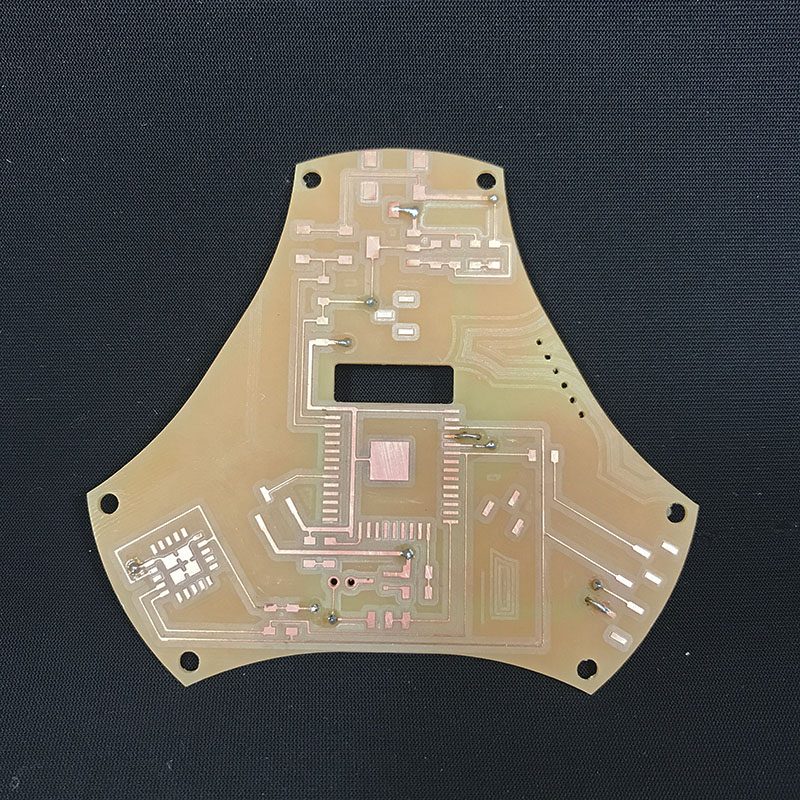
Back side of the main PCB:
For the CO2 sensor, I had to desolder it from the breakout board and then solder it again in my boar, because the breakout board was too big.
Final result of the boards with all the components soldered:
Shade:
For the shade itself, after some other tests with FDM and SLA, I decided to print it with PLA glossy. I also designed and tested some hooks to attach the shade to the base. The final result was satisfying.
Base:
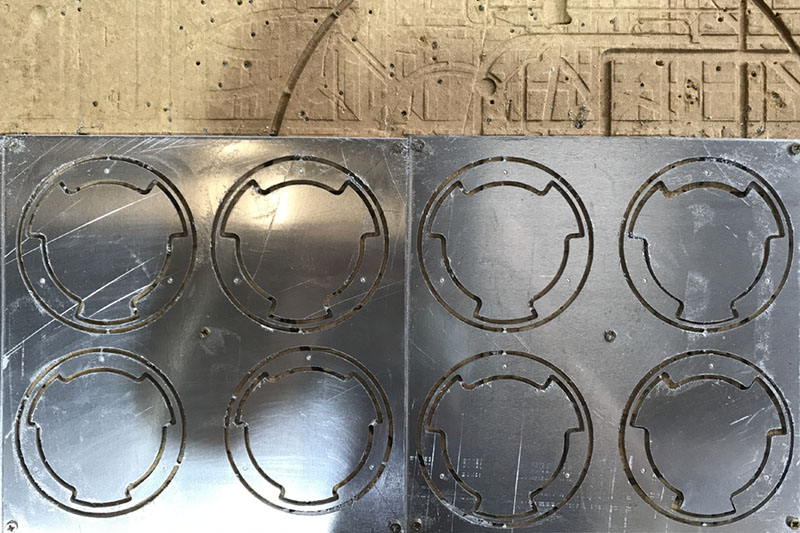
The base was made by layers with sheets of aluminum as I said before. There were 7 different kinds of pieces. As the sheets I had were 250x250x3mm, I fit 4 of them in each sheet.
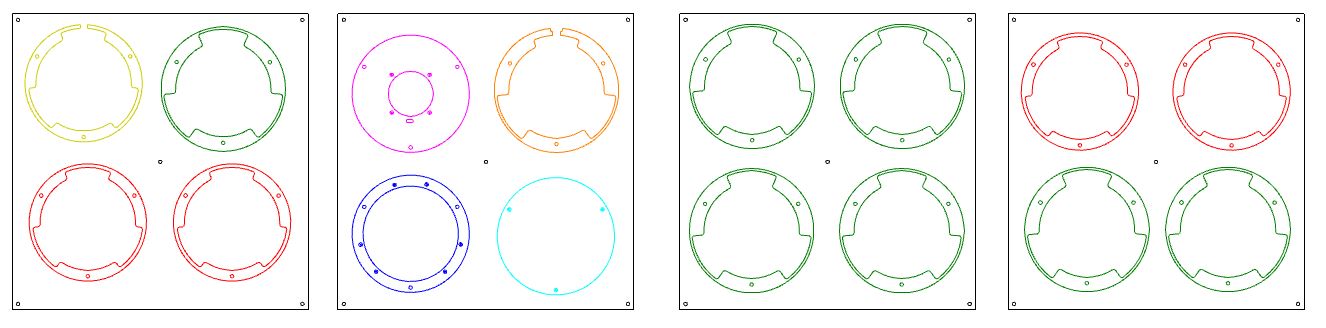
To mill them I used the CNC machine that we have here in the Lab, that is not perfect to mill metal. After some trials and errors, we found the proper speed. It also required some oil in the endmill in order to lube the friction.
The parameters used were:
- Spindle speed: 17.100 rmp
- Feed 380 mm/min
- Deep of layer: 0,3mm
The final result after milling:
For the screws itself, I only did some marks with the CNC and the I drilled them manually.
Assembly:
As I had the 3d model with all the parts mounted together, the assembly process was so easy and everything fit together very well.
Programming:
The programming had 3 main parts:
- The server and WIFI configuration
- The sensors (input)
- The Neopixel LEDs (output)
First of all I downloaded all the libaries:
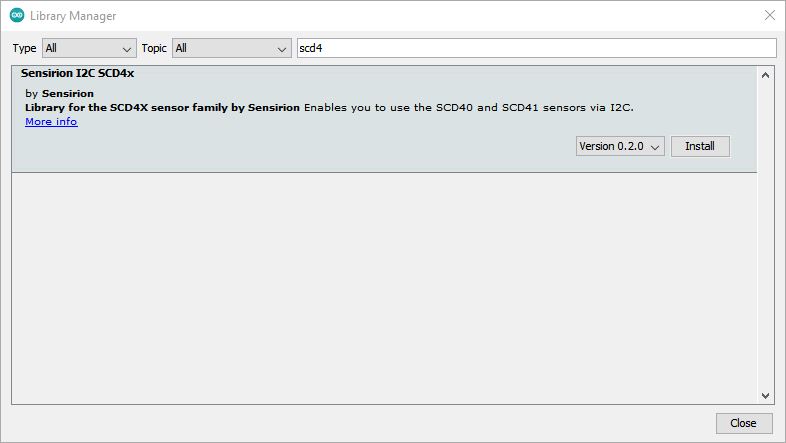
For the SEK-SCD41 SENSOR:
For the BME680. In this case there are two different libraries. The Adafruit one, that allows you to meassure raw values:
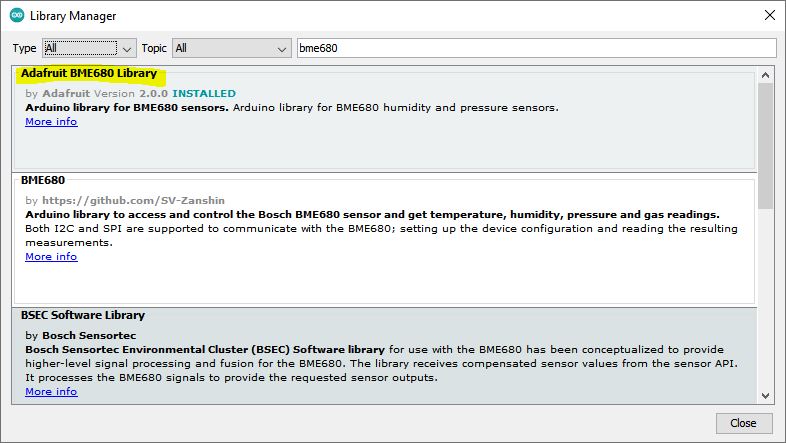
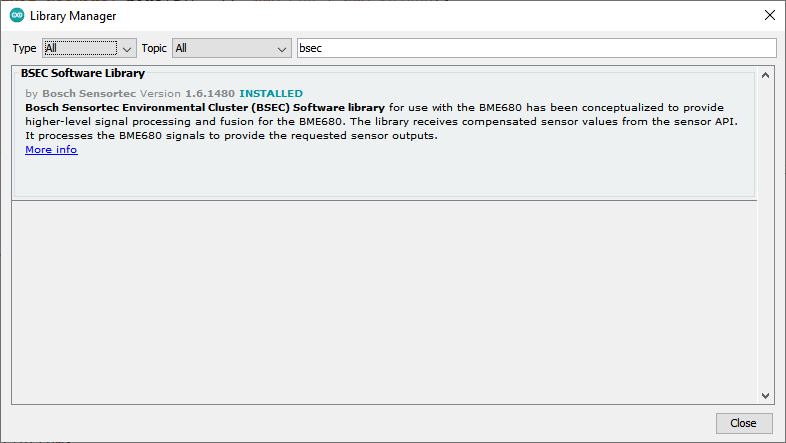
And the BSEC that is the good one because processes the signals to provide the requested outputs:
For this one I had several troubles trying to flash it in the ESP32, so I had to follow this guide: https://github.com/BoschSensortec/BSEC-Arduino-library to modify the platform.txt file. I'm attaching mine here. This one is working right now.
For the neopixels I downloaded the following:
The code itself is a mix of the three parts of code I mentioned before. I obtained them from:
- ESP Webserver that pushes data to a client: https://github.com/G6EJD/ESP-Webserver-Push-Data
- Candle flicker animation for Adafruit NeoPixel LEDs https://github.com/timpear/NeoCandle
- BME680 sensor: The example provided in the library called "basic"
- SEK-SCD41 sensor: The example provided in the library called "exampleUsage"
So in the code we have a first part where we define parameters, libaries and other settings. First we have the settings of the webserver for the EP32, then the settings and parameters related with the Neopixels and the candle effect and then the BSEC library settings.
  #ifdef ESP8266
  #include <ESP8266WiFi.h>
  #include <ESP8266WebServer.h>
  ESP8266WebServer server(80);
  #else
  #include <WiFi.h>
  #include <WebServer.h>
  WebServer server(80);
  #endif

  #include <WiFiClient.h>

  // candle for Adafruit NeoPixel
  // by Tim Bartlett, December 2013
  // current settings for 5v Trinket

  #include <Adafruit_NeoPixel.h>
  #define PIN 33
  Adafruit_NeoPixel pixels(6, 33, NEO_GRB + NEO_KHZ800);

  // color variables: mix RGB (0-255) for desired yellow
  int redPx = 255;
  int grnHigh = 110; //110-120 for 5v, 135 for 3.3v
  int bluePx = 10; //10 for 5v, 15 for 3.3v

  // animation time variables, with recommendations
  int burnDepth = 10; //10 for 5v, 14 for 3.3v -- how much green dips below grnHigh for normal burn -
  int flutterDepth = 25; //25 for 5v, 30 for 3.3v -- maximum dip for flutter
  int cycleTime = 120; //120 -- duration of one dip in milliseconds

  // pay no attention to that man behind the curtain
  int fDelay;
  int fRep;
  int flickerDepth;
  int burnDelay;
  int burnLow;
  int flickDelay;
  int flickLow;
  int flutDelay;
  int flutLow;

  Adafruit_NeoPixel strip = Adafruit_NeoPixel(6, PIN, NEO_GRB + NEO_KHZ800);


  //BSEC LIBRARY
  #include "bsec.h"

  // Helper functions declarations
  void checkIaqSensorStatus(void);
  void errLeds(void);

  // Create an object of the class Bsec
  Bsec iaqSensor;

  String output;
Then we have a second part where we define the webserver, with the Wi-Fi SSID and PASSWORD, and the website itself followed by the routine that updates the values when the IP address is accessed.
  //WEB SERVER
  int count; // global counter for diagnostics

  //Enter your Wi-Fi SSID and PASSWORD
  const char* ssid     = "Iaac-Wifi";
  const char* password = "enteriaac2013";

  // This function returns an HTML formated page in the correct type for display
  // It uses the Raw string macro 'R' to place commands in PROGMEM
  const char Web_page[] PROGMEM = R"=====(
  <!DOCTYPE html>
  <html>
    <style>
      .displayobject{
         font-family: sans-serif;
         margin: auto;
         text-align: center;
         width: 80%;
         border: 3px solid #727272;
         padding: 10px;
         background: #ffffff;
      }
      h1 {
        font-size: 50px;
        color: #727272;
      }
      h4 {
        font-size: 36px;
        color: #727272;
      }
    </style>
    <body>
       <div class = "displayobject">
         <h1>AURA CANDLE</h1><br>
         <h4>Temperature: <span id="TEMPvalue">0</span>°</h4>
         <h4>Humidity: <span id="HUMIvalue">0</span>%</h4>
         <h4>VOC: <span id="VOCvalue">0</span></h4>
         <h4>Pressure: <span id="PRESvalue">0</span>hPa</h4><br>
       </div>
       <script>
         setInterval(function() {getSensorData();}, 1000); // Call the update function every set interval e.g. 1000mS or 1-sec

         function getSensorData() {
            var xhttp = new XMLHttpRequest();
            xhttp.onreadystatechange = function() {
            if (this.readyState == 4 && this.status == 200) {
              document.getElementById("TEMPvalue").innerHTML = this.responseText;
            }
          };
          xhttp.open("GET", "TEMPread", true);
          xhttp.send();
          //~~~~~~~~~~~~~~~~~~~~~~~~~~~~~~~~~~~~~~~~~~~~~~~~~~
          var xhttp = new XMLHttpRequest();
          xhttp.onreadystatechange = function() {
            if (this.readyState == 4 && this.status == 200) {
              document.getElementById("HUMIvalue").innerHTML = this.responseText;
            }
          };
          xhttp.open("GET", "HUMIread", true);
          xhttp.send();
          //~~~~~~~~~~~~~~~~~~~~~~~~~~~~~~~~~~~~~~~~~~~~~~~~~~
          var xhttp = new XMLHttpRequest();
          xhttp.onreadystatechange = function() {
            if (this.readyState == 4 && this.status == 200) {
              document.getElementById("VOCvalue").innerHTML = this.responseText;
            }
          };
          xhttp.open("GET", "VOCread", true);
          xhttp.send();
          //~~~~~~~~~~~~~~~~~~~~~~~~~~~~~~~~~~~~~~~~~~~~~~~~~~
          var xhttp = new XMLHttpRequest();
          xhttp.onreadystatechange = function() {
            if (this.readyState == 4 && this.status == 200) {
              document.getElementById("PRESvalue").innerHTML = this.responseText;}
          };
          xhttp.open("GET", "PRESread", true);
          xhttp.send();
        }
      </script>
    </body>
  </html>
  )=====";

  //===================================================================
  // This routine is executed when you open a browser at the IP address
  //===================================================================
  void handleRoot() {
    //String s = Web_page;             //Display HTML contents
    server.send(200, "text/html", Web_page); //Send web page
  }

  void handleTEMP() { // This function is called by the script to update the sensor value
     float temp;
     temp = iaqSensor.temperature;
     server.send(200, "text/plain", String((float)temp,2));
    //server.send(200, "text/plain", String((float)temp)); //Send sensor reading when there's a client ajax request
  }

  void handleHUMI() { // This function is called by the script to update the sensor value
    float humi;
    humi = iaqSensor.humidity;
    server.send(200, "text/plain", String((float)humi,2)); //Send sensor reading when there's a client ajax request
  }

  void handleVOC() { // This function is called by the script to update the sensor value
    float voc;
    voc = iaqSensor.staticIaq;
    server.send(200, "text/plain", String((float)voc,0)); //Send sensor reading when there's a client ajax request
  }

  void handlePRES() { // This function is called by the script to update the sensor value
    float pres;
    pres = iaqSensor.pressure / 100;
    server.send(200, "text/plain", String((float)pres,0)); //Send sensor reading when there's a client ajax request
  }
In the void setup part, we have the part where the ESP32 is connected to WIFI and also the functions to update the values in the webserver. After that, all the calculations for the candle effect script and lastly the code for the setup of the sensor.
  void setup(void) {
    Serial.begin(115200);
    WiFi.mode(WIFI_STA);        // Connect to your wifi
    WiFi.begin(ssid, password); // Start the Wi-Fi services
    Serial.println("Connecting to : "+String(ssid));
    while (WiFi.waitForConnectResult() != WL_CONNECTED) {Serial.print(".");} // Wait for WiFi to connect
    Serial.println(" Connected to : "+String(ssid));
    Serial.print("Use IP address: ");
    Serial.println(WiFi.localIP());  //IP address assigned to your ESP
    //----------------------------------------------------------------
    server.on("/", handleRoot);         // This displays the main webpage, it is called when you open a client
    connection on the IP address using a browser
    server.on("/TEMPread", handleTEMP); // To update Temperature called by the function getSensorData
    server.on("/HUMIread", handleHUMI); // To update Humidity called by the function getSensorData
    server.on("/VOCread", handleVOC); // To update VOC called by the function getSensorData
    server.on("/PRESread", handlePRES); // To update Pressure called by the function getSensorData
    //----------------------------------------------------------------
    server.begin();                     // Start the webserver


    //NEOPIXEL
    flickerDepth = (burnDepth + flutterDepth) / 2.4;
    burnLow = grnHigh - burnDepth;
    burnDelay = (cycleTime / 2) / burnDepth;
    flickLow = grnHigh - flickerDepth;
    flickDelay = (cycleTime / 2) / flickerDepth;
    flutLow = grnHigh - flutterDepth;
    flutDelay = ((cycleTime / 2) / flutterDepth);

    strip.begin();
    strip.show();


  //  delay(3000);


    pixels.begin(); // INITIALIZE NeoPixel strip object (REQUIRED)


  //BSEC LIBRARY
  while (!Serial) delay(10); // wait for console
    Wire.begin();

    iaqSensor.begin(BME680_I2C_ADDR_SECONDARY, Wire);
    output = "\nBSEC library version " + String(iaqSensor.version.major) + "."
    + String(iaqSensor.version.minor) + "." + String(iaqSensor.version.major_bugfix) + "." + String(iaqSensor.version.minor_bugfix);
    Serial.println(output);
    checkIaqSensorStatus();

    bsec_virtual_sensor_t sensorList[10] = {
      BSEC_OUTPUT_RAW_TEMPERATURE,
      BSEC_OUTPUT_RAW_PRESSURE,
      BSEC_OUTPUT_RAW_HUMIDITY,
      BSEC_OUTPUT_RAW_GAS,
      BSEC_OUTPUT_IAQ,
      BSEC_OUTPUT_STATIC_IAQ,
      BSEC_OUTPUT_CO2_EQUIVALENT,
      BSEC_OUTPUT_BREATH_VOC_EQUIVALENT,
      BSEC_OUTPUT_SENSOR_HEAT_COMPENSATED_TEMPERATURE,
      BSEC_OUTPUT_SENSOR_HEAT_COMPENSATED_HUMIDITY,
    };

    iaqSensor.updateSubscription(sensorList, 10, BSEC_SAMPLE_RATE_LP);
    checkIaqSensorStatus();

    // Print the header
    output = "Timestamp [ms], raw temperature [°C], pressure [hPa], raw relative humidity [%], gas [Ohm],
    IAQ, IAQ accuracy, temperature [°C], relative humidity [%], Static IAQ, CO2 equivalent, breath VOC equivalent";
    Serial.println(output);
  }
In the void loop part itself, what we do is checking for connections to the IP address of the webserver, then reading the values of the sensor and in the las part of the loop we have an If statement to decide what kind of state of burning the lamp should have depending on the values measured.
  void loop(void) {

  //SERVER

    server.handleClient();  // Keep checking for a client connection
    Serial.println("server");
  //  if (millis() % 5000 == 0) { count++; Serial.println(count);} // Display a serial diagnostic print to check its running


  //BSEC LIBRARY

   unsigned long time_trigger = millis();
    if (iaqSensor.run()) { // If new data is available
      output = String(time_trigger);
      output += ", " + String(iaqSensor.rawTemperature);
      output += ", " + String(iaqSensor.pressure);
      output += ", " + String(iaqSensor.rawHumidity);
      output += ", " + String(iaqSensor.gasResistance);
      output += ", " + String(iaqSensor.iaq);
      output += ", " + String(iaqSensor.iaqAccuracy);
      output += ", " + String(iaqSensor.temperature);
      output += ", " + String(iaqSensor.humidity);
      output += ", " + String(iaqSensor.staticIaq);
      output += ", " + String(iaqSensor.co2Equivalent);
      output += ", " + String(iaqSensor.breathVocEquivalent);
      Serial.println(output);
    } else {
      checkIaqSensorStatus();
    }


  //IF

    if (iaqSensor.iaq > 200) {
      Serial.println("off");
      pixels.clear();
    }
    else if (iaqSensor.iaq >= 100) {
      Serial.println("flutter");
      flutter(1);
    }
    else {
      Serial.println("burn");
      burn(1);
    }
  //  Serial.println("delay");
  //  delay(100);

  }
In the last part, we define some other functions that are called from the main scripts, like the function to check the status of the sensor or the functions of the candle effect for the LEDs.
  // Helper function definitions
  void checkIaqSensorStatus(void)
  {
    if (iaqSensor.status != BSEC_OK) {
      if (iaqSensor.status < BSEC_OK) {
        output = "BSEC error code : " + String(iaqSensor.status);
        Serial.println(output);
        for (;;)
          errLeds(); /* Halt in case of failure */
      } else {
        output = "BSEC warning code : " + String(iaqSensor.status);
        Serial.println(output);
      }
    }

    if (iaqSensor.bme680Status != BME680_OK) {
      if (iaqSensor.bme680Status < BME680_OK) {
        output = "BME680 error code : " + String(iaqSensor.bme680Status);
        Serial.println(output);
        for (;;)
          errLeds(); /* Halt in case of failure */
      } else {
        output = "BME680 warning code : " + String(iaqSensor.bme680Status);
        Serial.println(output);
      }
    }
  }

  void errLeds(void)
  {
    pinMode(13, OUTPUT);
    digitalWrite(13, HIGH);
    delay(100);
    digitalWrite(13, LOW);
    delay(100);
  }


  // basic fire funciton - not called in main loop
  void fire(int grnLow) {
    for (int grnPx = grnHigh; grnPx > grnLow; grnPx--) {
      strip.setPixelColor(0, redPx, grnPx, bluePx);
      strip.setPixelColor(1, redPx, grnPx, bluePx);
      strip.setPixelColor(2, redPx, grnPx, bluePx);
      strip.setPixelColor(3, redPx, grnPx, bluePx);
      strip.setPixelColor(4, redPx, grnPx, bluePx);
      strip.setPixelColor(5, redPx, grnPx, bluePx);
      strip.show();
      delay(fDelay);
    }
    for (int grnPx = grnLow; grnPx < grnHigh; grnPx++) {
      strip.setPixelColor(0, redPx, grnPx, bluePx);
      strip.setPixelColor(1, redPx, grnPx, bluePx);
      strip.setPixelColor(2, redPx, grnPx, bluePx);
      strip.setPixelColor(3, redPx, grnPx, bluePx);
      strip.setPixelColor(4, redPx, grnPx, bluePx);
      strip.setPixelColor(5, redPx, grnPx, bluePx);
      strip.show();
      delay(fDelay);
    }
  }

  // fire animation
  void on(int f) {
    fRep = f * 1000;
    int grnPx = grnHigh - 5;
    strip.setPixelColor(0, redPx, grnPx, bluePx);
    strip.setPixelColor(1, redPx, grnPx, bluePx);
    strip.setPixelColor(2, redPx, grnPx, bluePx);
    strip.setPixelColor(3, redPx, grnPx, bluePx);
    strip.setPixelColor(4, redPx, grnPx, bluePx);
    strip.setPixelColor(5, redPx, grnPx, bluePx);
    strip.show();
    delay(fRep);
  }

  void burn(int f) {
    fRep = f * 8;
    fDelay = burnDelay;
    for (int var = 0; var < fRep; var++) {
      fire(burnLow);
    }
  }

  void flicker(int f) {
    fRep = f * 8;
      fDelay = burnDelay;
      fire(burnLow);
    fDelay = flickDelay;
    for (int var = 0; var < fRep; var++) {
      fire(flickLow);
    }
      fDelay = burnDelay;
      fire(burnLow);
      fire(burnLow);
      fire(burnLow);
  //  Serial.println("Fire done");
  }

  void flutter(int f) {
    fRep = f * 8;
      fDelay = burnDelay;
      fire(burnLow);
      fDelay = flickDelay;
      fire(flickLow);
    fDelay = flutDelay;
    for (int var = 0; var < fRep; var++) {
      fire(flutLow);
    }
      fDelay = flickDelay;
      fire(flickLow);
      fire(flickLow);
      fDelay = burnDelay;
      fire(burnLow);
      fire(burnLow);
    //Serial.println("Fire done");
Files:
Rhino file for the base
Rhino file for the shade
STL file for the shade
KiCad files
Main board PNGs
Neopixel board PNGs
Arduino code