12. Interface and Application Programming
Assignment
- Individual assignment:
- Write an application that interfaces a user with an input &/or output device that you made
- Group assignment:
- Compare as many tool options as possible
Group Assignment
Check out the group assignment here.
Code with Processing
This week I went through some tutorials of Processing and created several projects with it.
Simple drawings
Firstly, I drew a face following the official tutorial of Processing.
Here are the basic functions I learned about:
-
size (800,600);- Set the canvas size to 800*600. Written invoid setup()session. -
background(228,247,227);- Set the color of background with RGB = 228,247,227. If written invoid setup()session, the color is only set once. If written invoid draw()session, it resets everytime.

-
rect(100,200,300,200);- Create a rectangle from (100,200) with a width of 300, and a height of 200. -
ellipse(200,350,200,400);- Create a circle with the center point at (200,150), with a width of 200, and a height of 400. -
line(200, 300, 350, 400);- Draw a line with x1=200, y1=300, x2=350, y2=400. -
fill (100,140,230);stroke (200,120,130);- Fill the shape with RGB (100,140,230), set the stroke’s color with RGB (200,120,130).
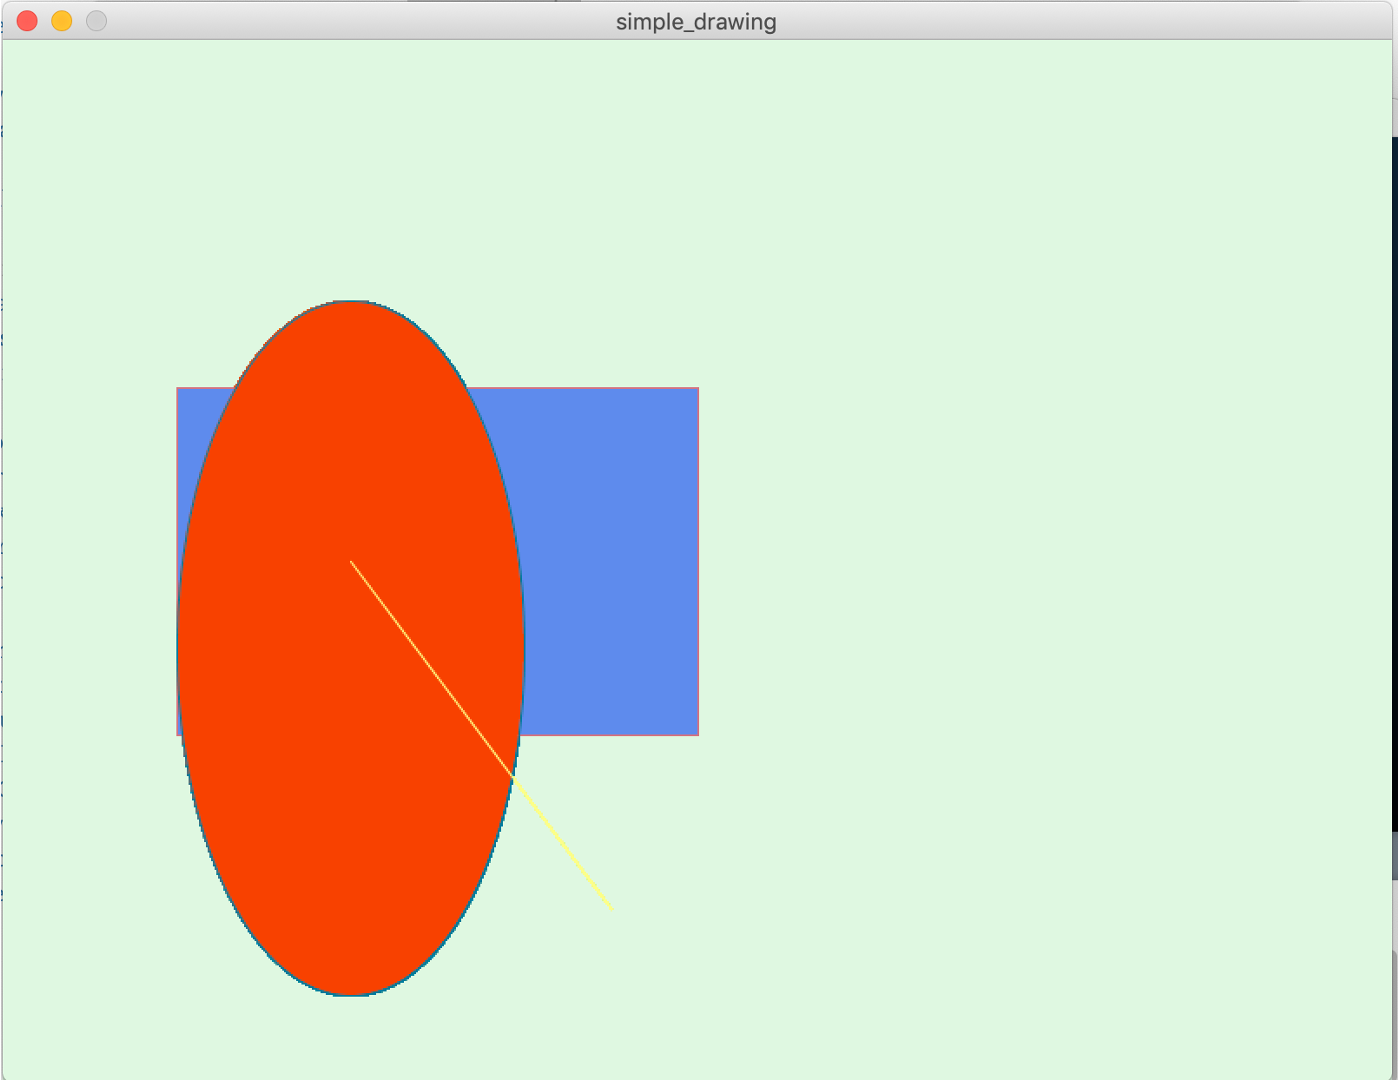
The order of the shape is based on the order of the code.
void setup() {
    size(800, 600);
    background(228,247,227);
}
   void draw() {
     fill (100,140,230);
     stroke (200,120,130);
     rect(100,200,300,200);
     fill (230,80,30);
     stroke (40,120,150);
     ellipse(200,350,200,400);
     stroke (255,255,150);
     line(200, 300, 350, 500);
   }
The code above generates a graph like this:
An interactive face
Then I made an interactive face. The eyes track the movement of the mouse, and if the mouse gets onto the face, the mouth opens with a text of “DON’T TOUCH!!”
I tried to add sound but it makes the program very heavy.
Without sound:
With sound:
In this project, I tried these fuctions:
-
Insert .svg file:
-
Put the .svg file in the same folder with the .pde file (the sketch).
-
PShape face;at the beginning. -
In
void setup(), writeface = loadShape("face.svg"); -
In
void draw(), writeshape(face,100,0,400,500);to put the .svg at (100,0) with a size of 400*500.
-
-
Implement eyes tracing the mouse:
- I wrote the lines as
ellipse(mouseX/35+243,mouseY/35+263,20,20); ellipse(mouseX/35+353,mouseY/35+263,20,20);so the location the black part of the eyes moves within the white parts.
- I wrote the lines as
-
Load sound:
-
Add the .mp3 file into the folder where the .pde file is.
-
import processing.sound.*; SoundFile file;in the beginning.
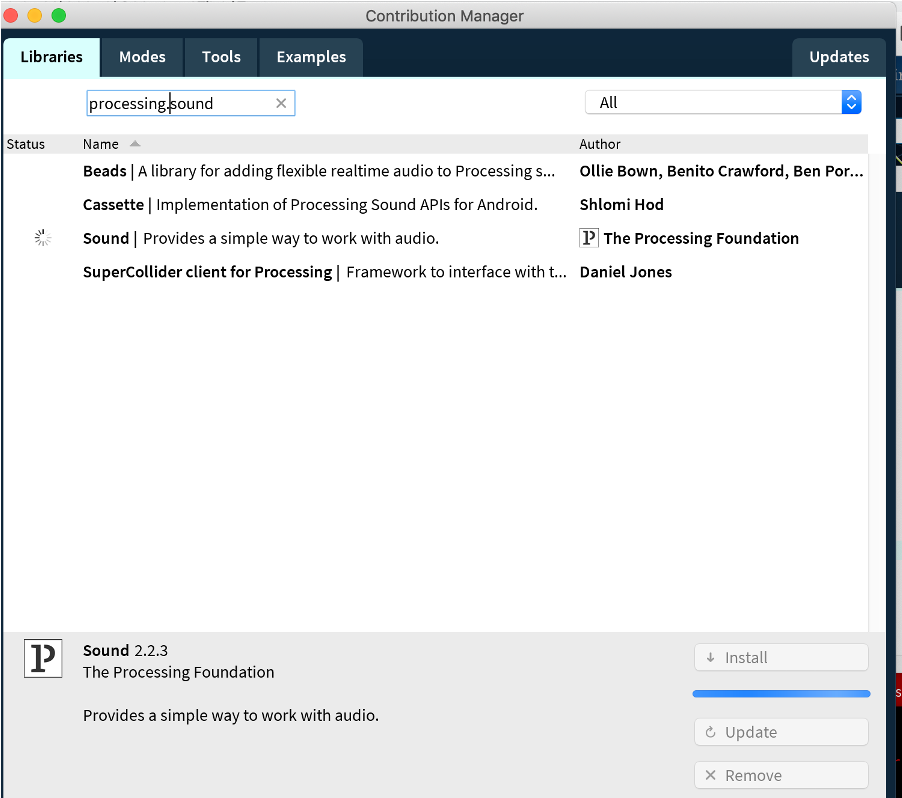
However, at first I got the error: “No library found for processing.sound”, so I installed the library from Sketch >> Import Library >> Add Library. I typed in “processing.sound”, found the library, and installed it.
-
file = new SoundFile(this, "no.mp3");invoid setup(). -
file.play();invoid draw()
-
The whole code looks like this:
PShape face;
PShape hand;

import processing.sound.*;
SoundFile file;


void setup()
 {
   size(600, 600);

  face = loadShape("face.svg");
  hand = loadShape("hand.svg");
  file = new SoundFile(this, "no.mp3");}

void draw() {
  background(228,247,227);

  shape(face,100,0,400,500);

  line(300, 380, 350, 380);

  fill(255);
  ellipse(250,270,40,40);
  ellipse(360,270,40,40);

  fill(0);
  ellipse(mouseX/35+243,mouseY/35+263,20,20);
  ellipse(mouseX/35+353,mouseY/35+263,20,20);


  if(mouseX>200 && mouseX<438 && mouseY>85 && mouseY<428){
  fill(255);
  ellipse(320,380,80,20);
  textSize(45);
  fill(117,48,145);
  text("DON'T TOUCH!!", 240, 510);
  file.play();
  delay(1000);}

 shape(hand,mouseX,mouseY,70,70);

}
Control a servo motor
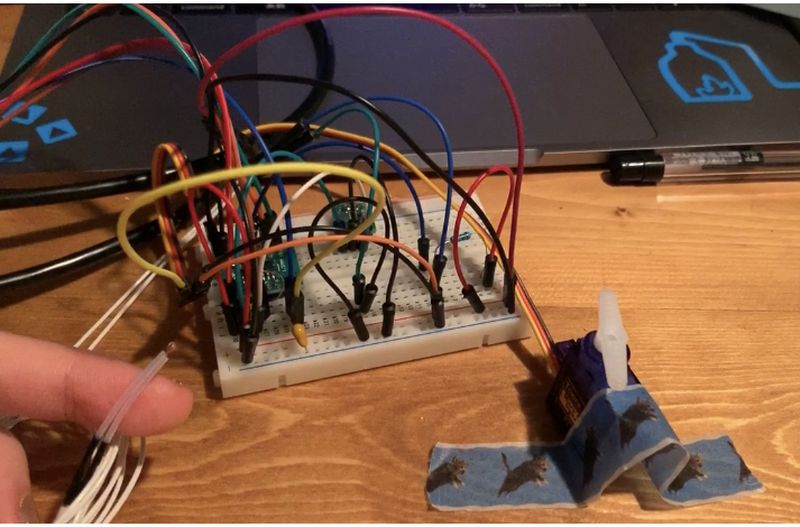
I tried to control the servo motor on the board I designed on a breadboard with ATTiny44.
This is the board I used for this and the next project. It’s created in the Output Devices week. The board has thermistor and a servo motor connected to it.
The details can be found in week11’s documentation.
The concept is to control the movement of the motor with the area clicked by the mouse.
At first I found a tutorial for a servo motor control using Arduino UNO, so I copied the code.
Arduino IDE:
#include <Servo.h>

Servo myservo;

void setup() {
  myservo.attach(6);  // attaches the servo on pin 6 to the servo object
 Serial.begin(9600);
}


void loop() {


    if (Serial.available() > 0) {
    char data = Serial.read();
    if (data == '1') {
      myservo.write(100);
      delay(1000);
    }

    if (data == '0') {
      myservo.write(180);
     delay(1000);
    }
  }
}
Processing:
import processing.serial.*;
Serial Port;

void setup() {
  size(300, 300);
  Port = new Serial(this, "/dev/cu.usbserial-AM00KE5E", 9600);
}

void draw() {
  if (mousePressed) {
    Port.write('1');
  }
  else {
    Port.write('0');
  }
}
However, it didn’t work…
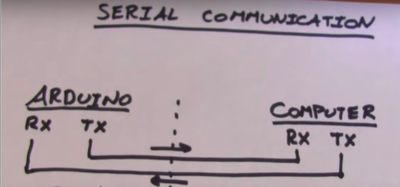
Set software serial
I learned that for Rx & Tx need to be connected, and to be defined in the code.
It’s not necessary Arduino UNO because the Rx and Tx was pre set, but is necessary for my board.
So I added #include <SoftwareSerial.h> and SoftwareSerial mySerial = SoftwareSerial(0, 1);//rx,tx.
In the program, Rx is set to PA0 pin, and Tx is set to PA1 pin. However, these are the Rx and Tx of the AVR. So for the FTDI/computer side, it should be reversed. So I connected Rx of FTDI to PA1 pin, and Tx to PA0 pin.
Arduino IDE:
#include <Servo.h>
#include <SoftwareSerial.h>
SoftwareSerial mySerial =  SoftwareSerial(0, 1);//rx,tx

Servo myservo;

void setup() {
  myservo.attach(6);  // attaches the servo on pin 6 to the servo object
 mySerial.begin(9600);
}

void loop() {


    if (mySerial.available() > 0) {
    int data = mySerial.read();
    if (data == "1") {
      myservo.write(0);
//      delay(1000);
    }

    if (data == "0") {
      myservo.write(180);
 //     delay(1000);
    }
  }
It still didn’t work…
Use int not char for signals
I learned that, the signal was sent as characters since they are written as “1” and “0”. And char data = Serial.read(); defines data as character.
When sending characters, unexpected extra signal might be sent. So I changed the signal into integer by removing the “” to 1 and 0, and changed char data = Serial.read(); to int data = Serial.read();.
This is how the motor moves when it’s sent as characters:
After changing to integer, the motor moved to the right angle, but there was delay between the mouse click and the motor’s movement.
Remove delay
I removed delay(1000); since this creates a lag.
Avoid 0 and 180 degrees
Since the motor might lock itself at 0 and 180 degrees, I changed it to 30 to 120 degrees.
Here is the new code.
Arduino IDE:
#include <Servo.h>
#include <SoftwareSerial.h>
SoftwareSerial mySerial =  SoftwareSerial(0, 1);//rx,tx
Servo myservo;

void setup() {
  myservo.attach(6);
  mySerial.begin(9600);
}

void loop() {
    if (mySerial.available() > 0) {
    int data = mySerial.read();
    if (data == 1) {
      myservo.write(30);
    }
    if (data == 0) {
      myservo.write(120);
    }
  }
}
Processing:
import processing.serial.*;
Serial Port;

void setup() {
  size(300, 300);
  Port = new Serial(this, "/dev/cu.usbserial-AM00KE5E", 9600);
}

void draw() {

  fill(255,255,0);
  rect(0,0,200,300);

  fill(255,0,355);
  rect(200,0,100,300);


  if (mouseX<200 && mousePressed) {
    Port.write(1);
  }

  if (mouseX>200 && mousePressed){
    Port.write(0);
  }
}
And it works as the video attached at the top of this session!!
Read serial data from thermistor
I tried to visualize the serial read with Processing from thermistor on the board I designed with ATTiny44.
This is how it turned out in the end.
I coded like this at first.
Arduino IDE:
#define THERMISTORPIN 2

#include <SoftwareSerial.h>
SoftwareSerial mySerial =  SoftwareSerial(0, 1);//rx,tx


void setup(void) {

  Serial.begin(9600);
}


void loop(void) {
  int reading;

  reading = analogRead(THERMISTORPIN);
  Serial.println(reading);
  delay(100);

  }
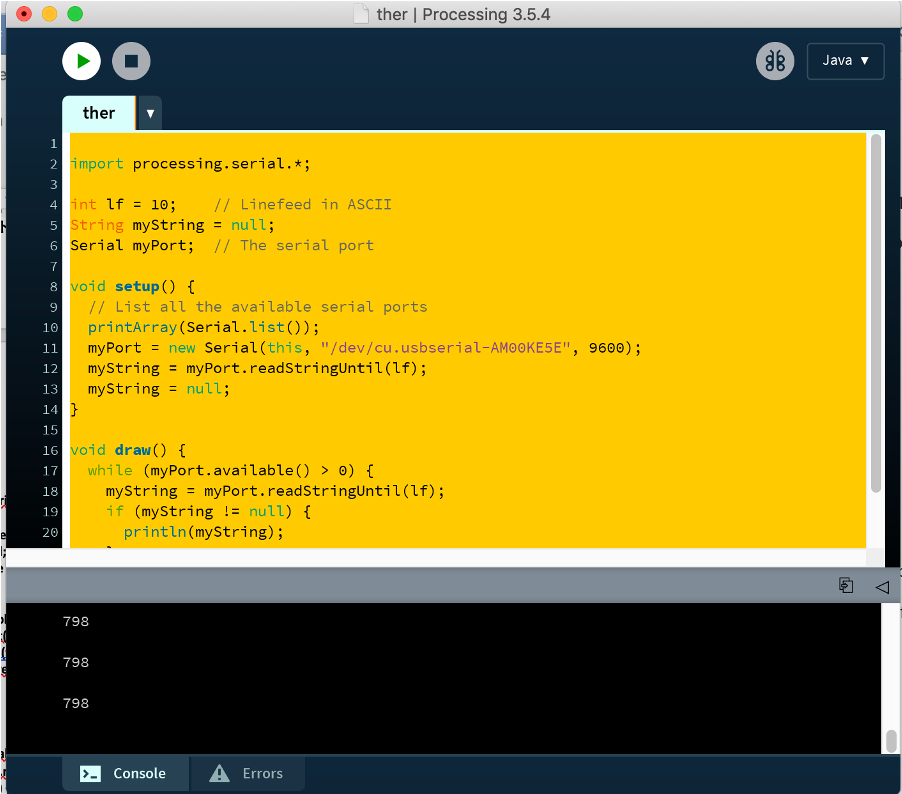
Processing:
myString = myPort.readStringUntil(lf); is the line that reads the serial data from the port.
  import processing.serial.*;

int lf = 10;    // Linefeed in ASCII
String myString = null;
Serial myPort;  // The serial port

void setup() {
  myPort = new Serial(this, "/dev/cu.usbserial-AM00KE5E", 9600);
  myString = myPort.readStringUntil(lf);
  myString = null;
}

void draw() {
  while (myPort.available() > 0) {
    myString = myPort.readStringUntil(lf);
    if (myString != null) {
      println(myString);
    }
  }
}
The serial data turns out to be fine.
However when I tried to draw rectangle with rect(0,300,myString,50), nothing showed up.
Trim the string
In the code, “lf” was used to add line feed, and this might add unecessary extra data. So this line was added to trim it: myString = trim(myString);.
Transfer string into number
myString is still string, so x = int(myString); was added to transfter myString into integer x. x was used later as the width of the rectangle.
I changed the code in Processing to this, and it worked:
import processing.serial.*;

int lf = 10;    // Linefeed in ASCII
String myString = null;
int x = 0;
Serial myPort;  // The serial port

void setup() {

  size(1000, 1000);
  myPort = new Serial(this, "/dev/cu.usbserial-AM00KE5E", 9600);
  myString = myPort.readStringUntil(lf);
  myString = null;
}

void draw() {
  while (myPort.available() > 0) {
    myString = myPort.readStringUntil(lf); //read 10 characters
    myString = trim(myString);
    if (myString != null) {
   //   println(myString);
      x = int(myString);
      println(x);
    }
    background(155);
    fill(0);
    rect(0,300,x,100);
  }
}
Add text and import font
I wanted to add text with fancy font.
I downloaded 24 Display - Southype from this site, added the .tiff file into the same folder as the .pde file.
I added PFont myFont; to the beginning of the code, myFont = createFont("display.ttf",60); to void setup(), textFont(myFont); to void draw().
This is the code in Processing that runs the program as the video at the top of the session!
import processing.serial.*;
PFont myFont;


int lf = 10;    // Linefeed in ASCII
String myString = null;
int x = 0;
Serial myPort;  // The serial port

void setup() {

  myFont = createFont("display.ttf",60);
  size(1000, 1000);
  myPort = new Serial(this, "/dev/cu.usbserial-AM00KE5E", 9600);
  myString = myPort.readStringUntil(lf);
  myString = null;
}

void draw() {
  while (myPort.available() > 0) {
    myString = myPort.readStringUntil(lf); //read 10 characters
    myString = trim(myString);
    if (myString != null) {
      x = int(myString);
      println(x);
    }
    background(155);
    fill(0);
    rect(0,300,x,100);

    fill(0);
    textFont(myFont);
    text(x, x+30,320);
  }
}