Jose Alegria - Fab Academy
![]()
![]()
![]()
![]()
Input
Devices
Assignment
wHAT iS THE ASSIGNMENT ABOUT?
Measure
something: add a sensor to a microcontroller board that you have designed and
read it.
Group
Assignment:
Probe
an input devices analog and digital signals
1st Step.
Electronics design
I used the
same board I designed for electronics design, with the modifications made for
output devices:
-
Removed the extra button and LED
-
Added input and output pins to be
able to connect and disconnect several peripherals to the board.
-
Added 5 V, 3.3 V and GND pins to be
able to send signals to peripherals.
If
you wish to see more information for this board designs, please follow the
links below:
2nd Step. Input
Devices
For this
assignment I will use an ultrasonic sensor to determine distance with my
modified board. First, I had to search for the appropriate setting for this
ultrasonic sensor:
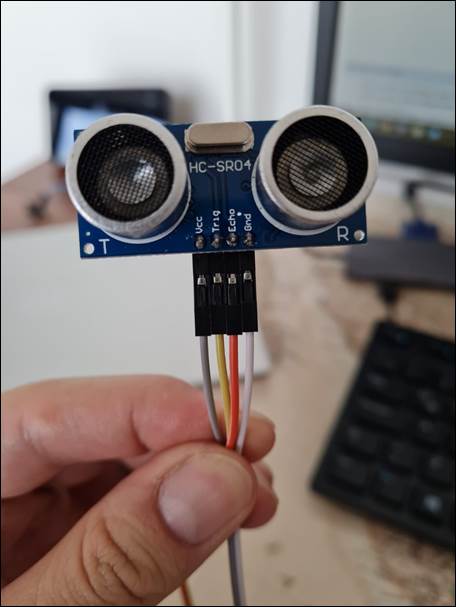
The
ultrasonic sensor has 4 terminals:
-
+5 V pin
-
Trigger
-
Echo
-
GND
This
means that I am going to use the 5V connector of my modified board for the
first time. Trigger and Echo are going to be connected to one of the free input
output pins (I have the pins 4, 5, 8 and 9 free to do this). GND connector is
the same I have been using since I designed this new board.
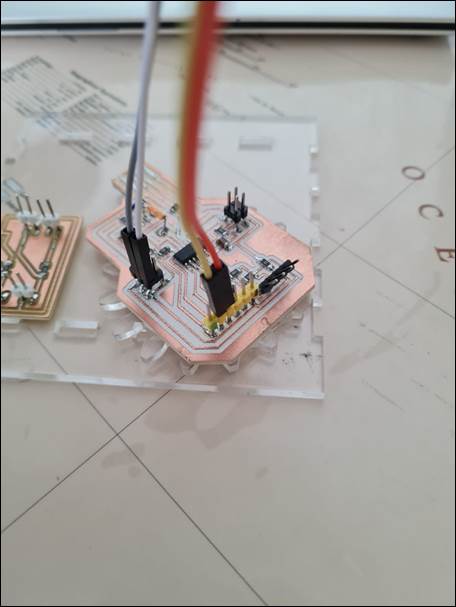
Finally,
I connected the pins as follows:
-
5 V: to one of the extra 5V pins.
-
GND: to Ground
-
Trigger: to pin 4
-
Echo: to pin 5
3rd Step. Code and
programming
To measure
distance with this sensor we will have to calculate the difference between the
emission of an ultrasonic beep and the reception of the sound and calculate how
much time does the sound need to travel certain distance.
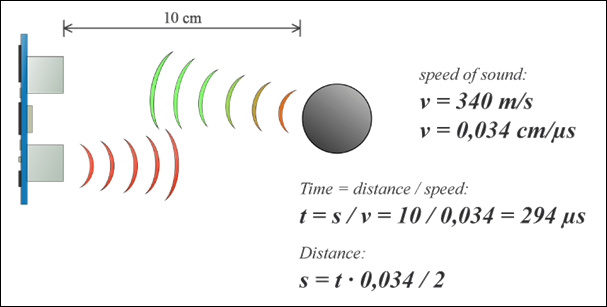
That
gives us one math operation to do before publishing the distance: sound takes
294 microseconds to travel 10 cm, so to convert the number to cm we should
divide the time by 29.4 and by 2 (to consider the distance going forth and
back).
This
is a simple operation that we will be making each time we take a measure.
After
setting that here is the code:
const
int trig = 4;
const
int echo = 5;
void
setup() {
Serial.begin(9600);
pinMode(trig,
OUTPUT);
pinMode(echo,
INPUT);
long
cm;
long
dur;
}
void
loop() {
long
duration, inches, cm;
digitalWrite(trig, LOW);
delayMicroseconds(2);
digitalWrite(trig, HIGH);
delayMicroseconds(10);
digitalWrite(trig, LOW);
dur
= pulseIn(echo, HIGH);
cm
= dur *10 / 294 / 2;
Serial.print(cm);
Serial.print("cm");
Serial.println();
delay(100);
}
3rd Step.
Operation
Until
now, the only way we have to receive the distance information would be to open
the serial monitor, I declared it during setup and sent the information during
the operation.
To
open the serial monitor you should use the Tools menu and select Serial Monitor

Once
you have the monitor open, we can start testing the ultrasonic sensor.
Conclussions
Once we know how the microprocessor pins work is
easy to plug and unplug the input device and changing the pin where it is in
the code.
Original
Files
1.
Source
code
Nueval
Checklist
-
Linked to the group
assignment page.
-
Documented what you learned from
interfacing an input device to microcontroller and how the physical property
relates to the measured results.
-
Documented your design and
fabrication process or linked to previous examples.
-
Explained the programming processes
you used.
-
Explained problems and how you fixed
them.
-
Included original design files and
source code.
-
Included a hero shot or video of your
board.
2022