I want a final project that will be useful for me or somebody else. I have started looking around for things that will make my life easier. For couple of days, I looked for ideas on the internet and ask people around me. The Ideas from them are not appropriate as part of the Fab Academy final project. The reason why I rejected the ideas is because they don't use multiple digital tools that we will learn during the Fab Academy class or they were fully mechanical, fully electrical, too small or too big. It's important to choose a project that motivates me and possible to do it during the 20 weeks of Fab Academy class.
One morning, I had the eureka moment. I will explain to you where my idea came from in detail just below.
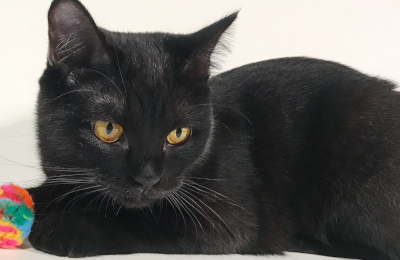
This is my fiance's cat and its name is Black Jack. He is one and a half years old and since he is a baby he likes to go to the bathroom and have some fresh water.
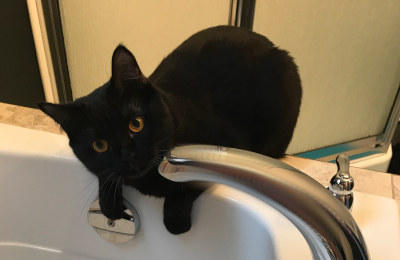
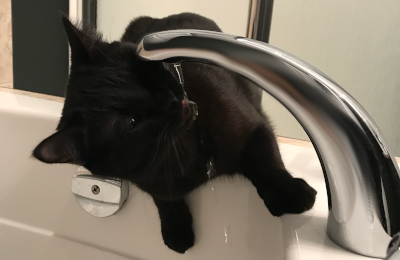
So that morning and like all the other morning, I saw Black Jack like that near the bathtub who is waiting for us for fresh water.
Several times during the day, not just in the morning, somebody open the tap and the cat can drink.
The problem with that solution is we waste water while he drinks and sometimes we forget to turn off the tap because we do something else. The other problem, we need to turn on and off every time that the cat wants to drink. The cat meows nonstop if we don't open it. I don't know why but they don’t drink enough water if we only give a bowl of water. To avoid health problems we give the bowl of water and the tap water when he asks for it.
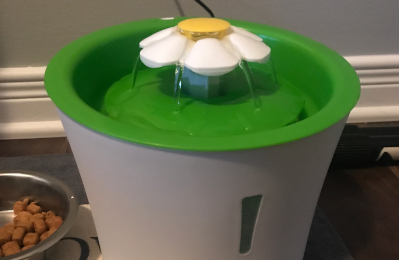
We received this little fountain for Christmas, and my fiance and I never saw the cat using it. Cats in general like fresh water and I presume that it is the main problem because the little fountain just makes a little waterfall without cooling it. Another part of the problem is waterfalls are not higher enough to look like a bathtub tap. When the fountain is running out of water, it makes a lot of noises and if we don't feel it up faster it can break the pump. The fountain is always on, so again during the night we ear the waterfall and the pump.
I did the research of different kinds of fountains and food dispenser for cats on the market and I always found something wrong about the product. The main reasons are:
The water is not cold.
The waterfall is not high enough.
The fountain doesn't have the low water level indicator.
The waterfall is always on.
The fountain doesn't have an automatic food dispenser.
First project idea
My idea of my final project is to make an automatic water and food dispenser. The main reasons why I chose this project, are explained in "find a project" section. I have a water dispenser issues but I realized that I have almost the same issue with the food. Somebody needs to be at home to feed the cat. So I decide to add the food dispenser in my solutions. The best way to fix two issues with one product. Some other reason why I choose this project is because I want to learn all the mechanical design software and tools during the Fab Academy class. In this project, I have a lot of different parts to design so it's perfect for learning. I want a project who look professional and look finished. The last reason is I will make a happy cat.
This project is separated in two parts, the water dispenser and the food dispenser. I will describe shortly some features of different parts.
Water dispenser
a cold waterfall
low water level indicator
a higher waterfall compared to other model on the market
a proximity sensor to start the waterfall
an automatic night light
Food dispenser
hours set for food distribution
big enough to contain multiple portions of food
an automatic night light
Project idea for the Fab Academy
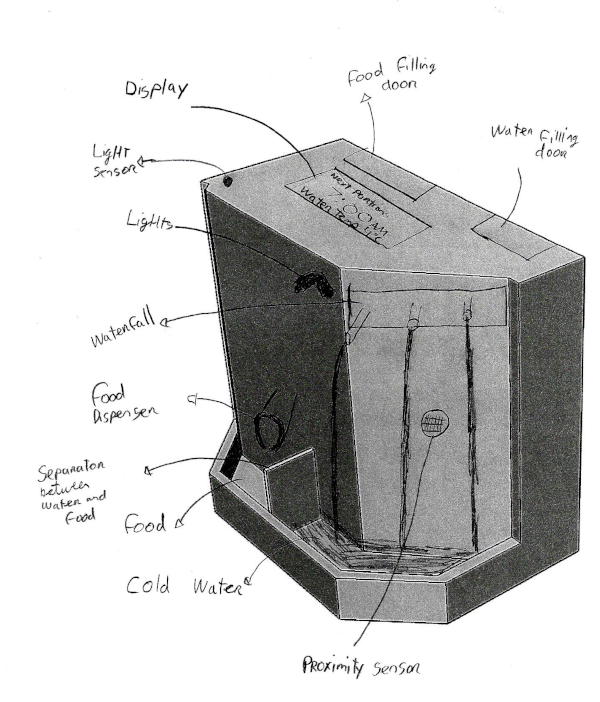
To begin, here is a sketch of the project I will realize. This will help to give you an idea of the project.
My final project is an automatic water dispenser for cats. The primary goal is to create a fountain with a high enough fall to be able to interest the cat in drinking. You can see the origin of my idea in week 1. The project mentioned at the beginning is an idea of the final result after several additions. It is not this project that will be completed in the fab academy but only part of it.
The fountain will have several functions. First, a peristaltic pump will pump the water to run the waterfall. This type of pump is quieter and cannot be damaged by lack of water and the flow rate is easily controllable. On the other hand, the flow rate of the fountain will be fixed so as not to overflow the fountain. The fountain will only start when the animal is in front of the fountain. This will be possible with a distance sensor placed in front of the fountain. Finally, a water level sensor will be installed so that the fountain stops pumping when there is no more water. A light will flash to indicate that water needs to be added. This same light will be used to light the fountain at night with a light sensor.
if you want to have more information on the different subjects listed below. I suggest you visit week 13 right here.
Who's done what beforehand?
What will you design?
What materials and components will be used?
Where the components and material will come from?
How much will they cost?
What parts and systems will be made?
What questions need to be answered?
Summary description of my project.
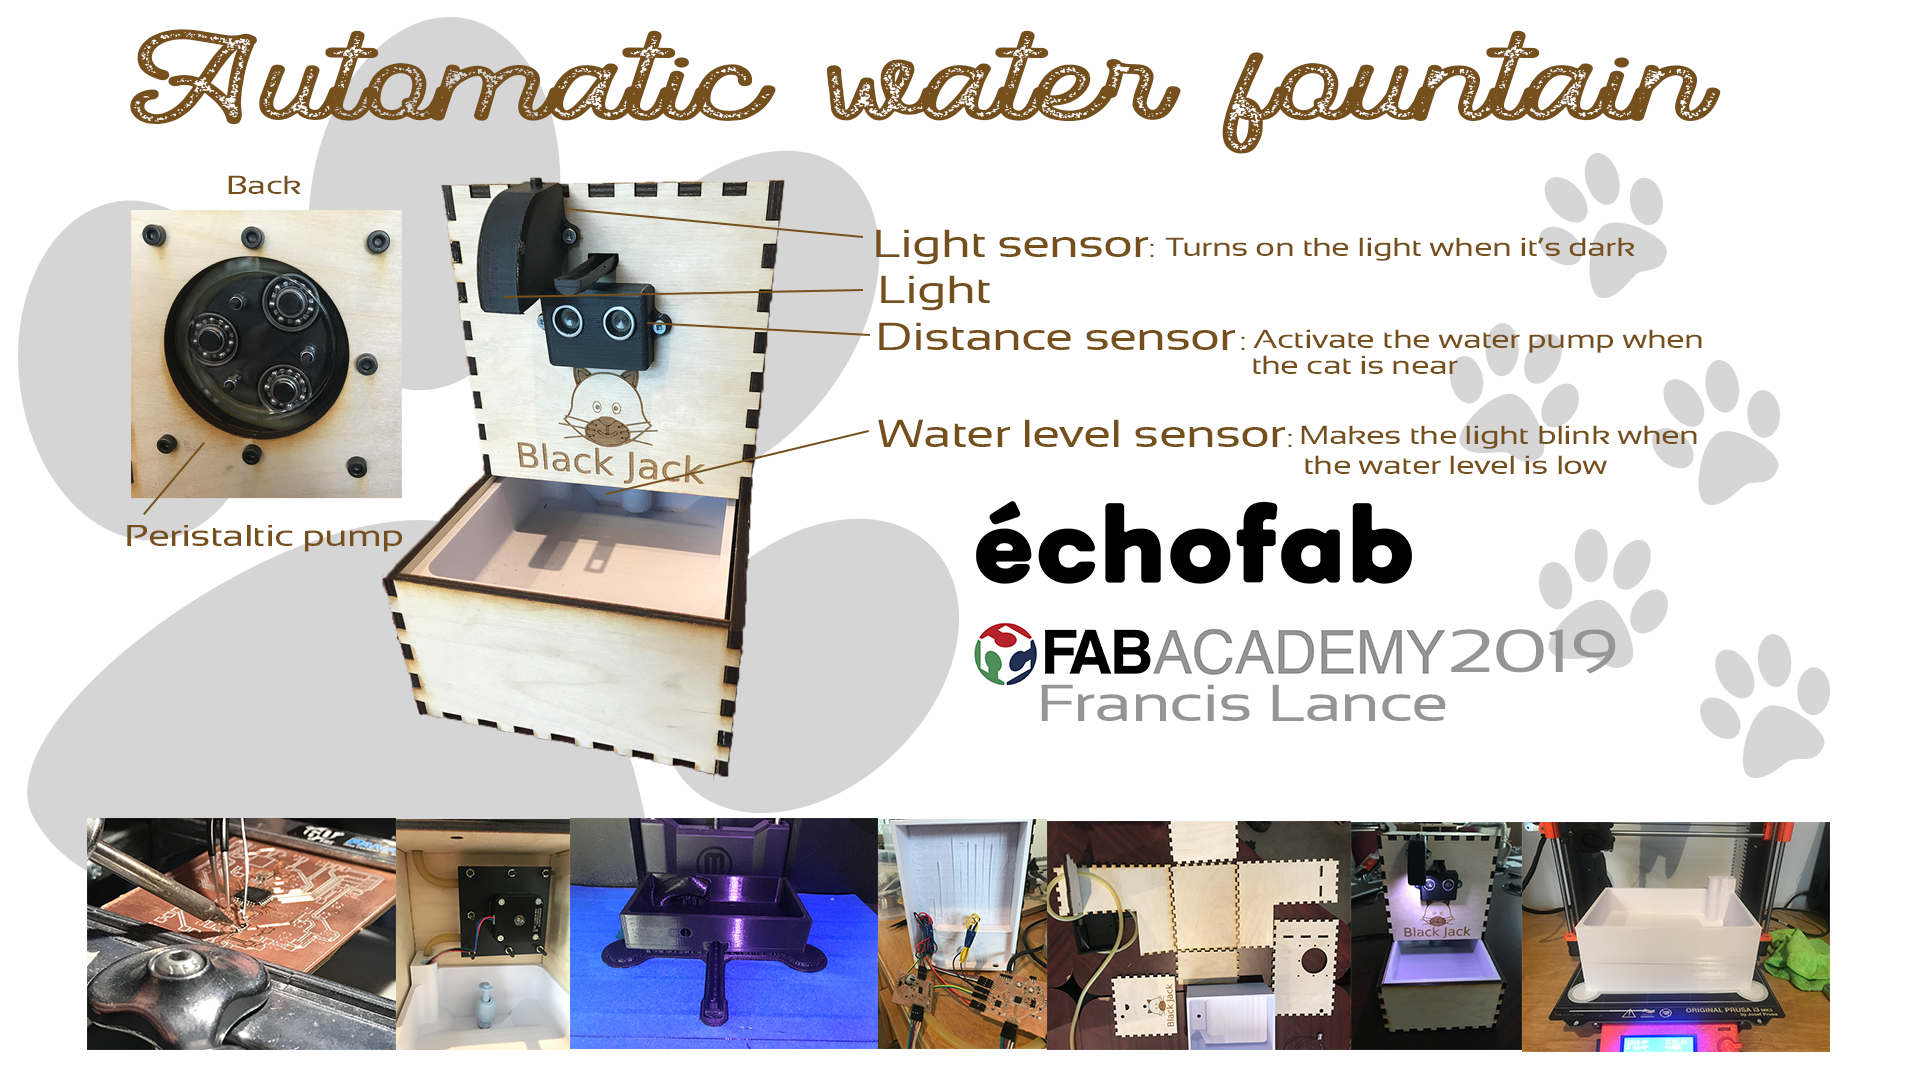
Because an image is worth a thousand words, I put up the poster presenting my project.
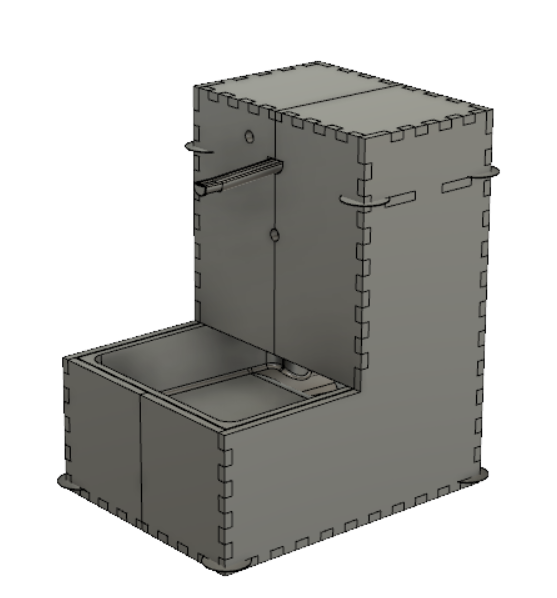
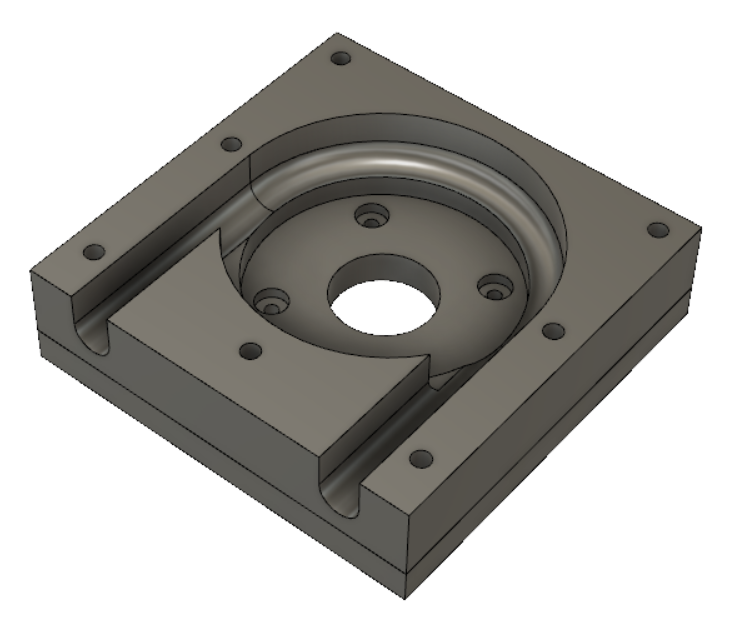
Water dispenser design
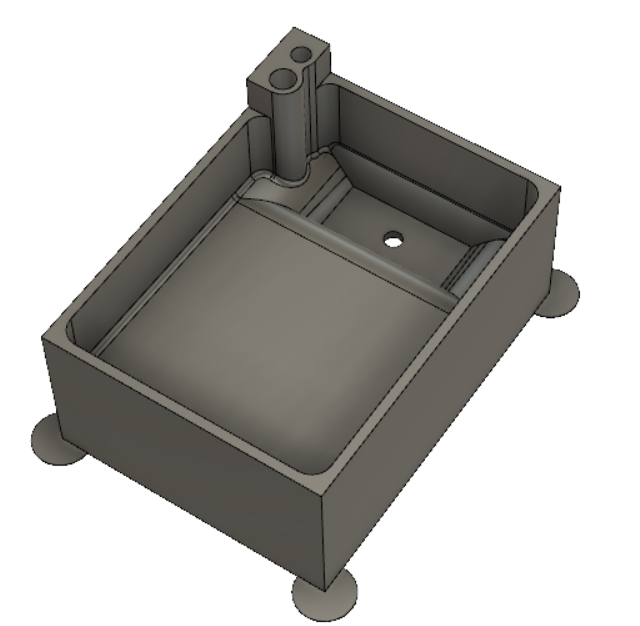
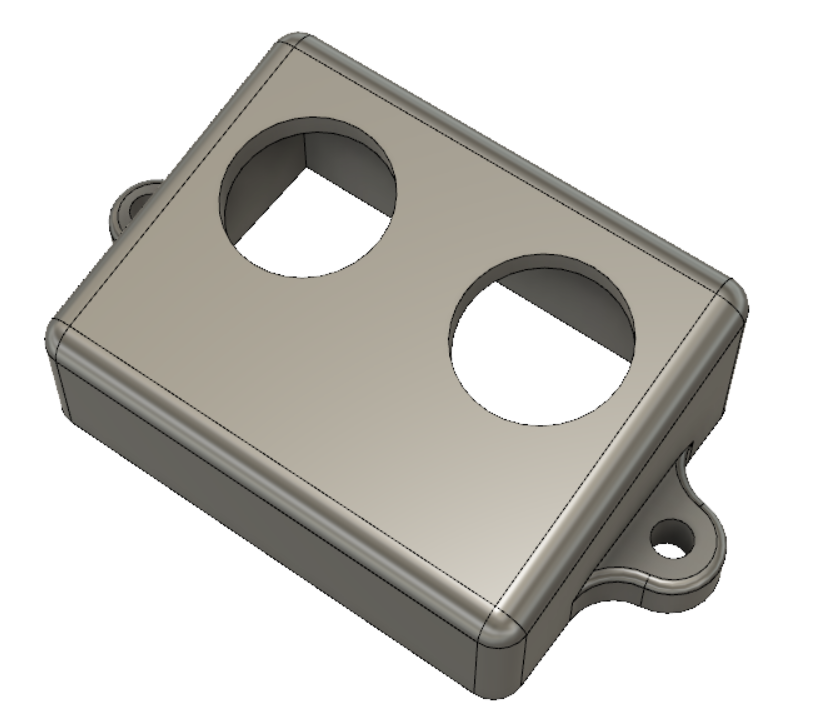
Here is the final design of my pump made using Fusion 360 software. I wanted to make a waterfall high enough to interest the cat but not too high enough to cause splashes. After some testing to pour water into a container, I decided to make the waterfall 120 mm high.
Here is the same result seen from behind. I decided to install the peristaltic pump at the back of the fountain because I found it interesting to see the pump mechanism in action. That's why there's a hole in the size of the mobile part of the pump.
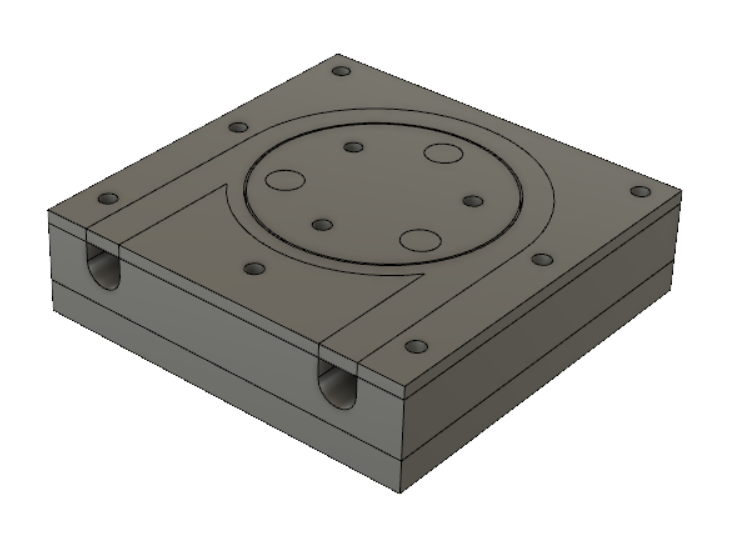
This is the main container located at the bottom of the dispenser. The challenge for this container was the water level sensor because it detects a water level too low at 41mm high. So I had to do a lower part so that the bottom of the container would start at 41mm. There is also a hole for inserting the sensor and also a hole for sucking water. The container is angled so that water can flow to the water level sensor. There are also two holes to be able to bring the latex hose to the pump and one to run the electrical wires.
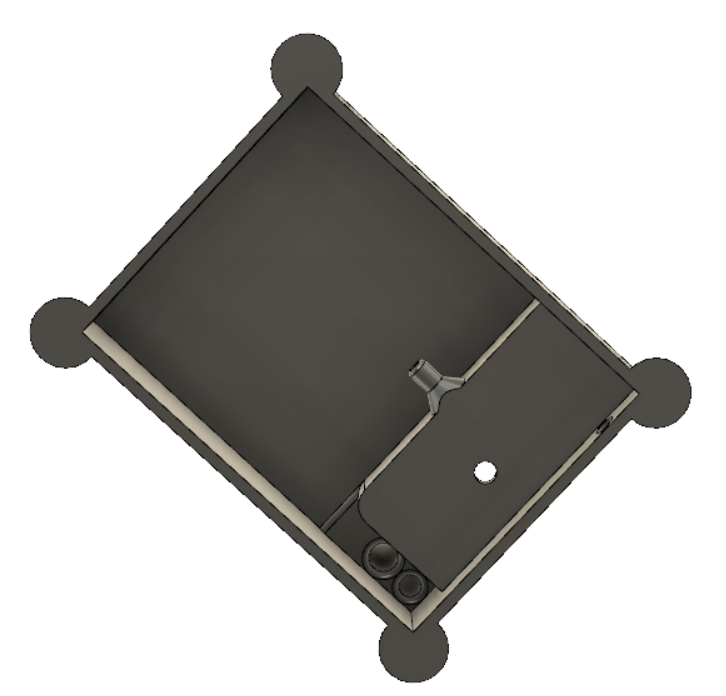
TIP: I put circles in the four corners of my room because when the pieces are very large, they tend to counter and twist because it takes off from the bed during printing. By placing the circles, we increase the adhesion surface to the bed and prevent our parts from moving away from the bed. The circles are about 4mm high ( 2 layers) and are easily removable with a knife.
We can see the water outlet of the container that is placed in the center of the container. For this small part, I put chamfer to solidify the part. The electric boards are placed under the main container.
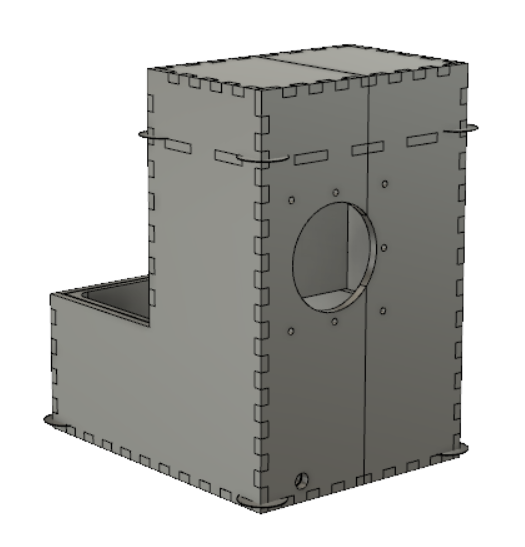
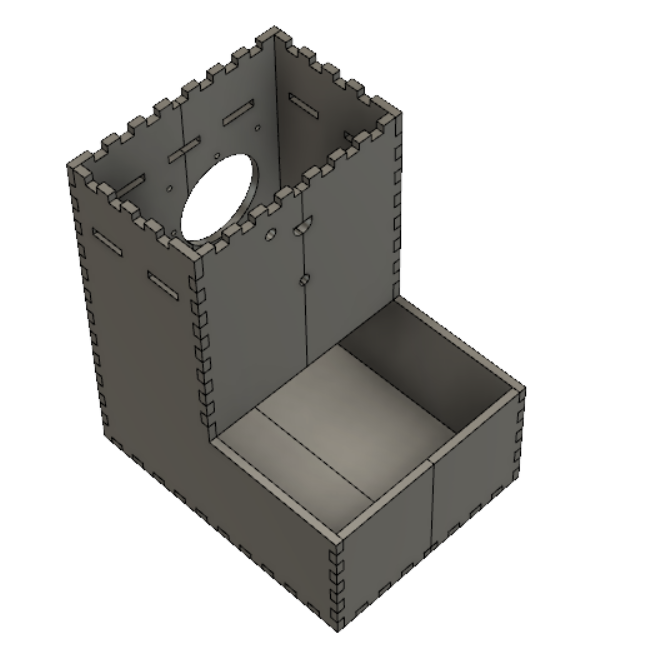
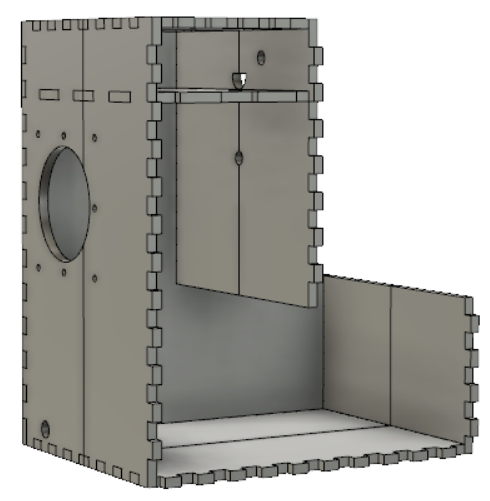
This part is made of wood and cut with lasers. I decided to go with a press-fit design to facilitate assembly. On the face you can see the hole for the wires of the distance sensor and another for the light and the light sensor. We also see the hole for inserting the pump at the back with the hole for the screws.
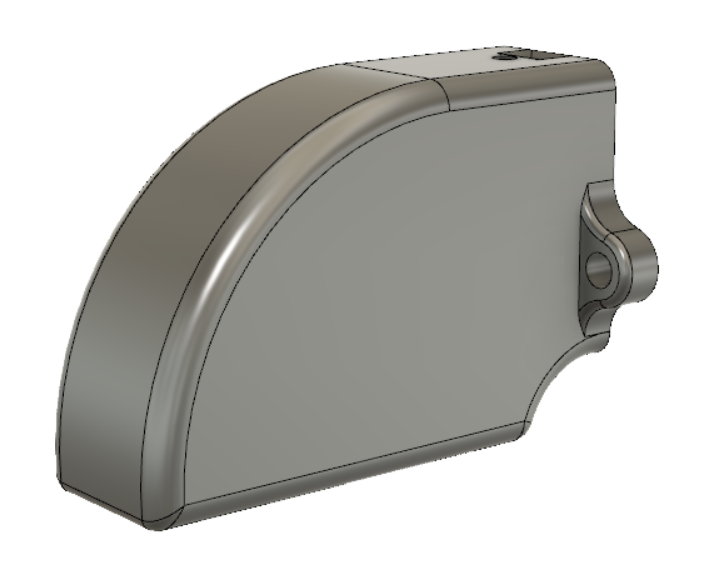
This is the top container. This is the container that receives the water from the pump. I put the inlet of the pipe this way to avoid splashing. There is also a way to pass the electrical wires of the light sensor and the light. At the end of the waterfall, I stopped so that the water would not have too much speed and fall outside the bottom container.
TIP: I put circles in the four corners of my room because when the pieces are very large, they tend to counter and twist because it takes off from the bed during printing. By placing the circles, we increase the adhesion surface to the bed and prevent our parts from moving away from the bed. The circles are about 4mm high ( 2 layers) and are easily removable with a knife.
To be able to support the top container, I put a wooden board under the container to hold it in place.
This part is used to hold the distance sensor in place. To fix it, I will use wood screws on each side. I designed it at a 10 degree angle so that I could be in a straight line with the position the cat must be in to activate the fountain.
This is the part that keeps the light down to illuminate the water dispenser. It also holds the light sensor which is completely opposite. The light must not influence the light sensor so that's why they are placed in this way.
Peristaltic pump designed
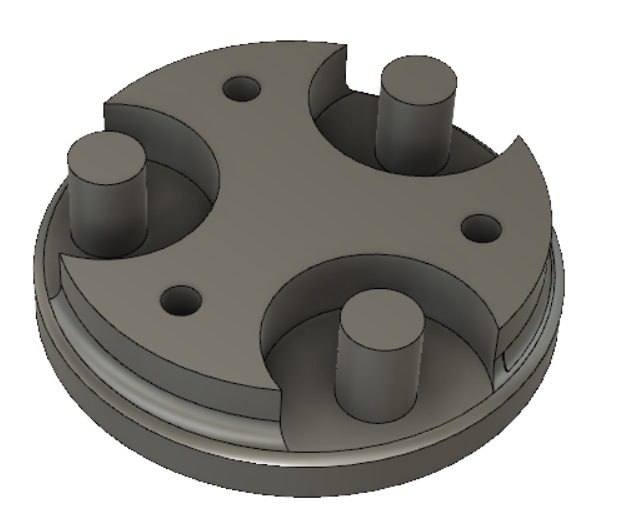
Here is the final design of the peristaltic pump. I decided to make this pump using 3D printing and also laser cutting for acrylic. I decided to make the two top pieces in acrylic to give the pump an interesting look. This way, it is possible to see the pump mechanism.
This is the moving part of the pump and also the part with the bearings. I put the axes in the center of the bearing higher so that I could come and lock myself in the acrylic room above. This is a way to make the shaft much stronger because there is constant pressure on the bearings.
This fixed part of the pump holds the latex hose in place. The crushed pipe is 2 mm thick and this is the measurement between the bearing and this part. Also, the crushed pipe becomes wider. That's why I put a 4 mm gap above the pipe.
Electronic designed
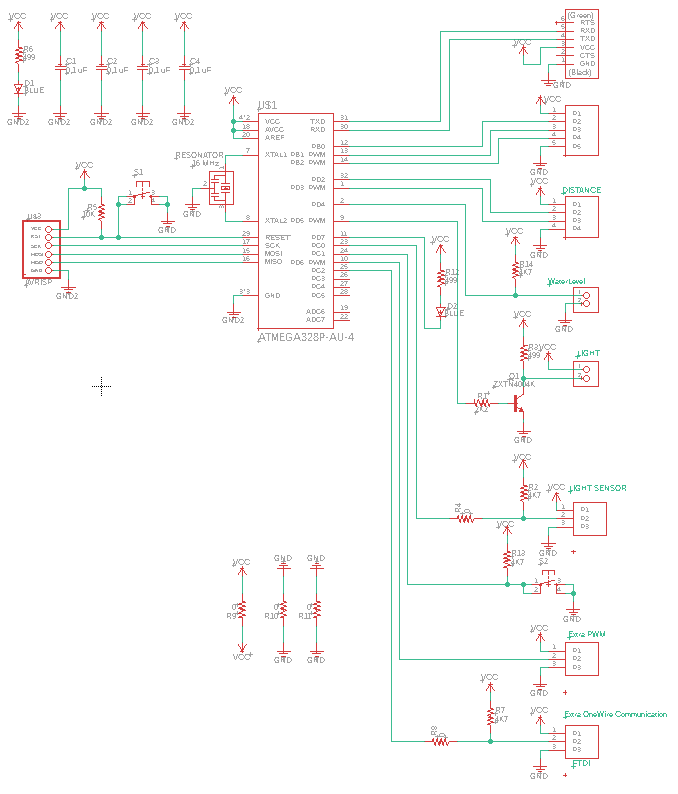
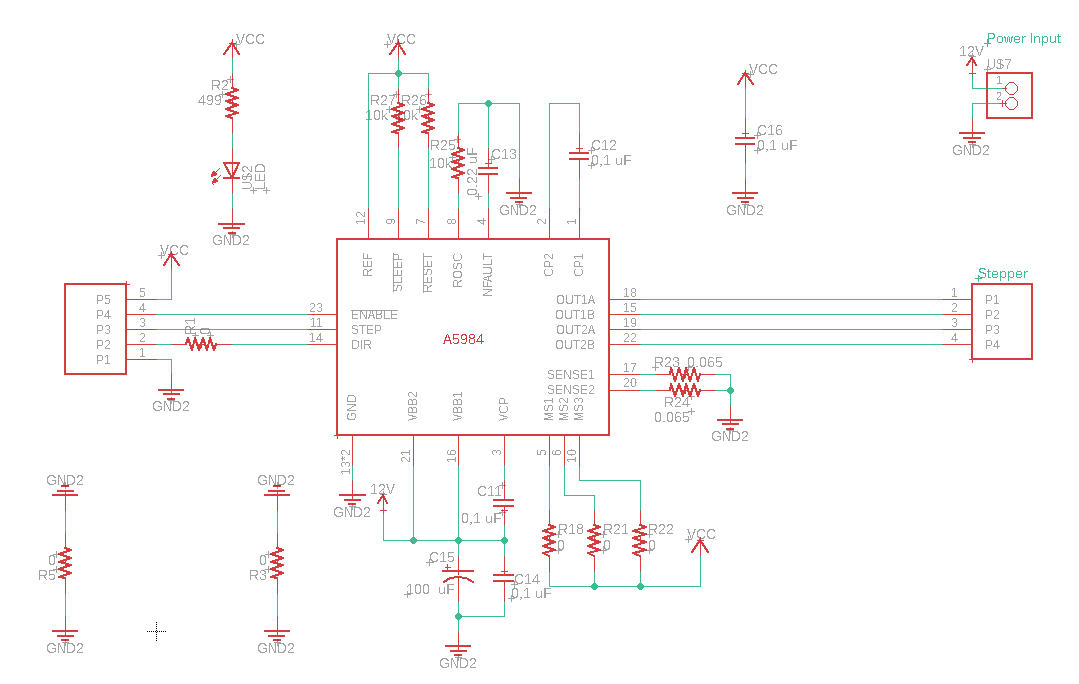
This is the main board that is in the final project. In the inputs there are the light sensor, the disatance sensor, the water level sensor, the ftdi, the ISP. In the outputs there is light and the output to the board for the stepper motor. I decided to make a separate board for the stepper motor to make it more modular. Also if a problem occurs with a board, it is not necessary to start all over again. The board was mainly designed from the board of week 11 input and week 12 output. The difference with the board of week 11 and 12 is that I removed the part of the unipolar stepper motor to make a board for a bipolar. So there was no transistor for the motor. I decided to put a transistor to control the light board because I didn't want to be limited to the current of the pin of the microcontrollers. Now with the transistor I can have a light that can consume 1A.
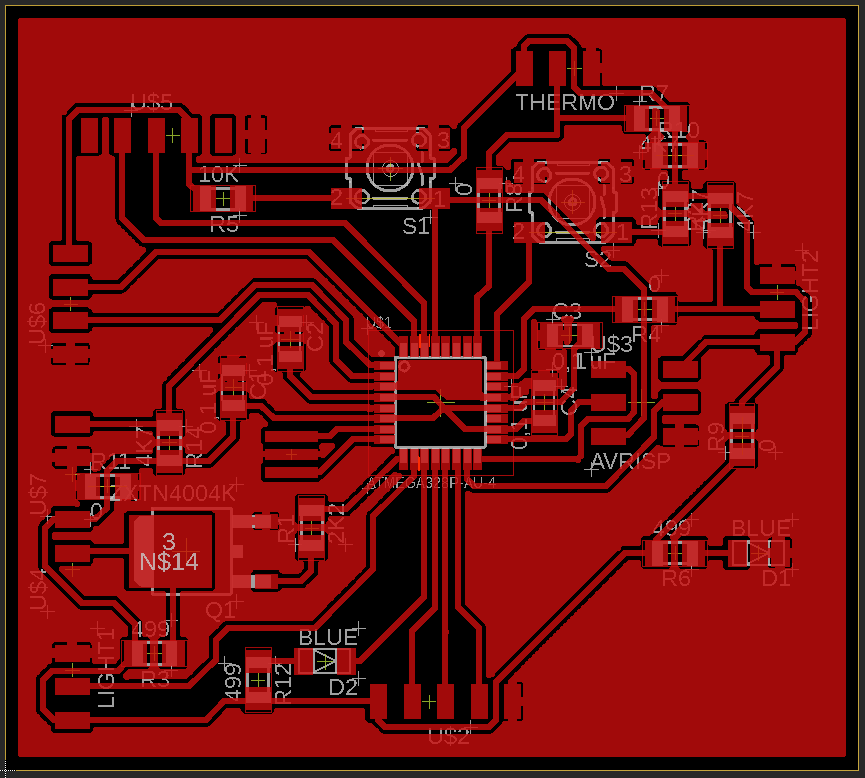
Here is the main board and as always it is important to put the crystal and decoupling capacitors very close to the microcontroller. Also, a Vcc decoupling capacitor must be placed on the microcontrollers. The traces are 15 mils wide to comply with the CNC's limitations.
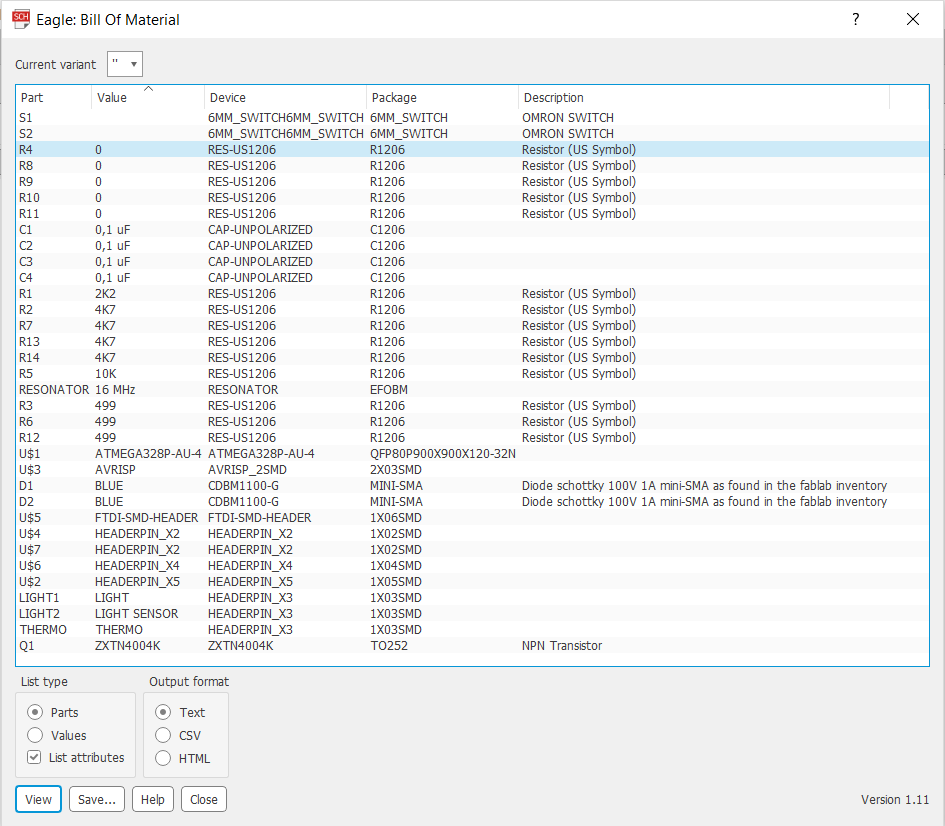
Here the BOM of the main board by values.
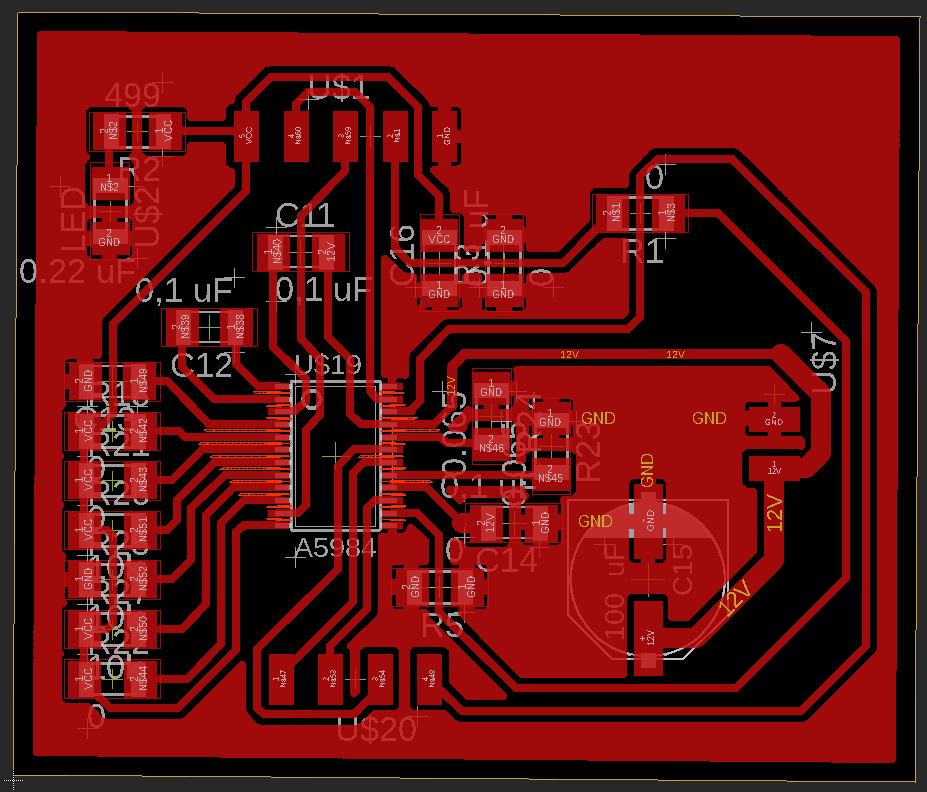
This board which is the drive of the stepper motor has been based on the smoothiedboard. You can look at week 13 to find out the reason for this choice. This drive can control a motor pulling a maximum of 2A. On the other hand, it is mentioned in the specifications that a heatsink must be set above 1A.
This board is larger than a commercial board because it is made only on one layer. The sales representatives are between 2 and 4 layers so it is much easier to reduce the size of the baord. This way, I had to put 3 jumpers which is 0 ohm resistors to be able to connect all the traces. The traces are 15 mils wide to comply with the CNC's limitations.
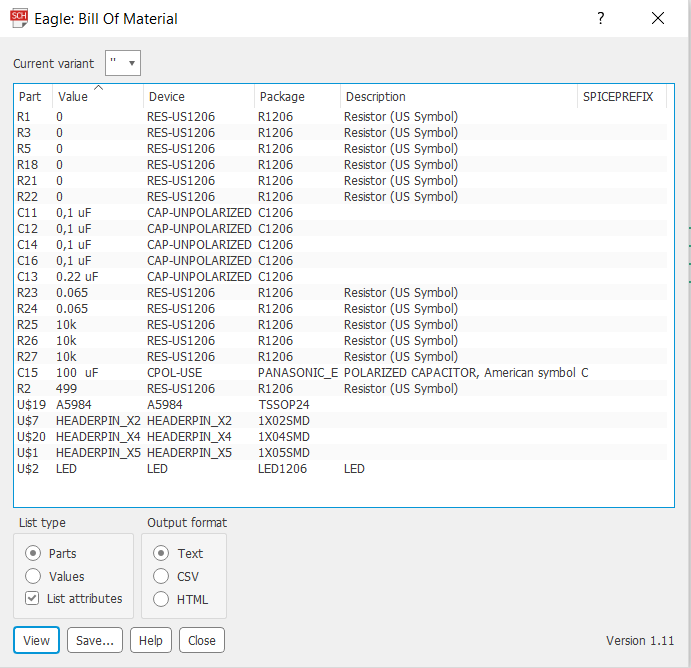
Here the BOM of the stepper motor drive board by values.
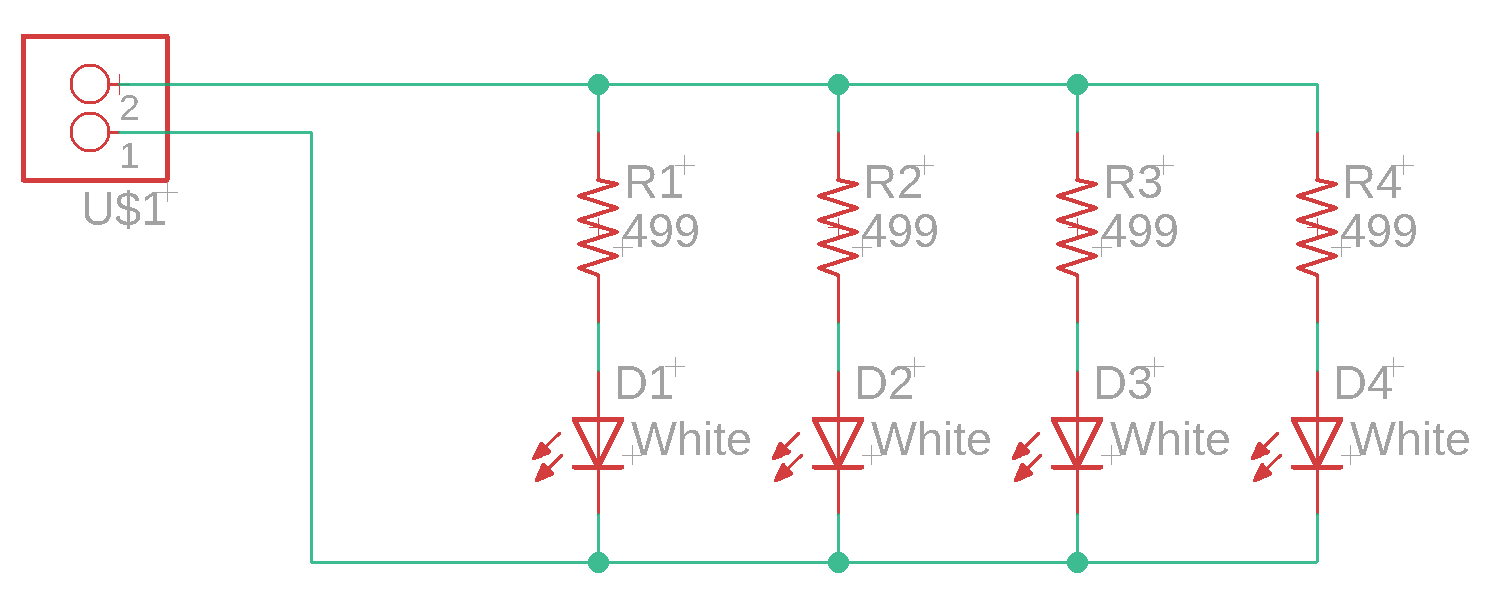
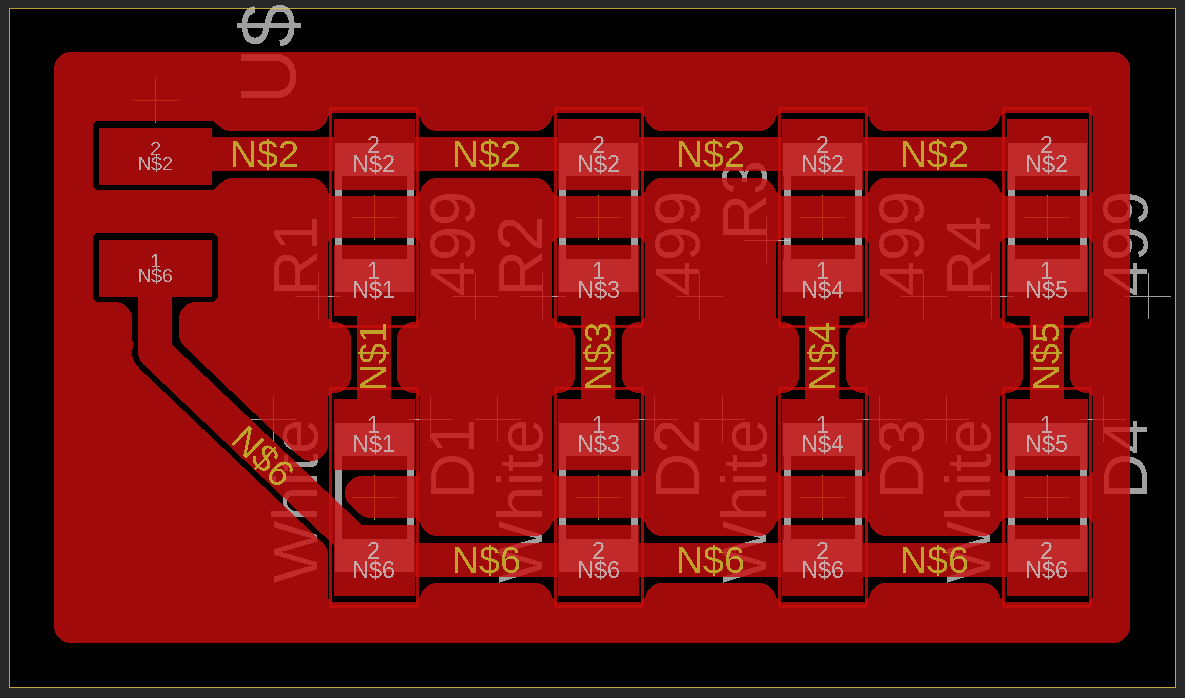
This is the board used to light the fountain. I put 4 white leds to have enough light in a compact format. It is connected using a 2-pin connector that is connected to the connector on the main board with the transistor.
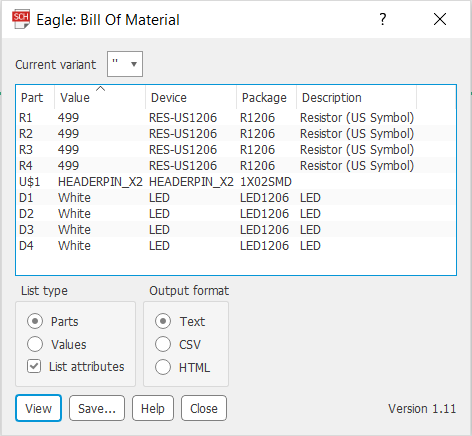
Here the BOM of the LED board by values.
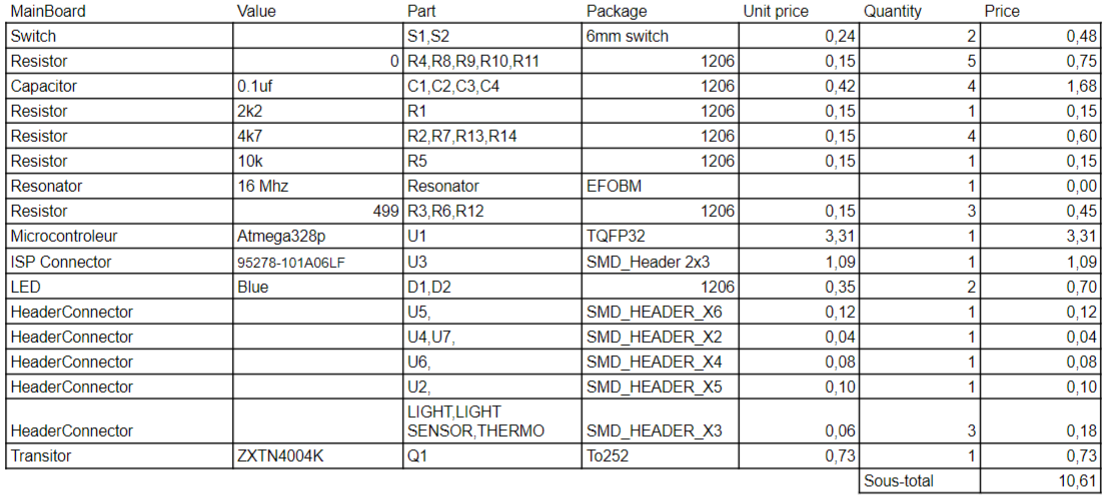
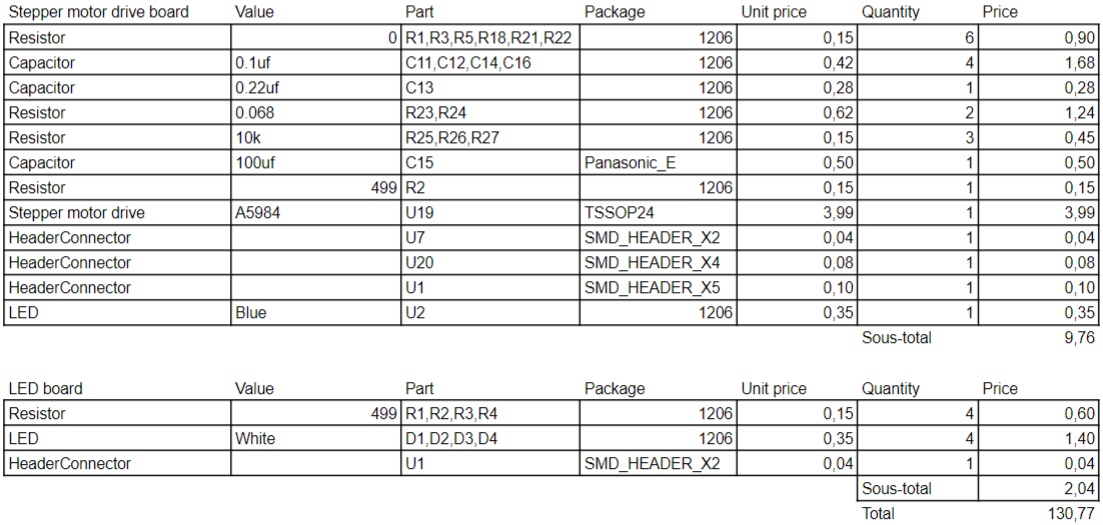
Final BOM with price
Here is the price list of all the equipment used in the project. It is important to note that all prizes are in Canadian dollars.
Software test
Here is the code to test the light on the board. The code simply makes the LED flash. This code is based on the arduino Blink example provided with the IDE.All comments are in the program.
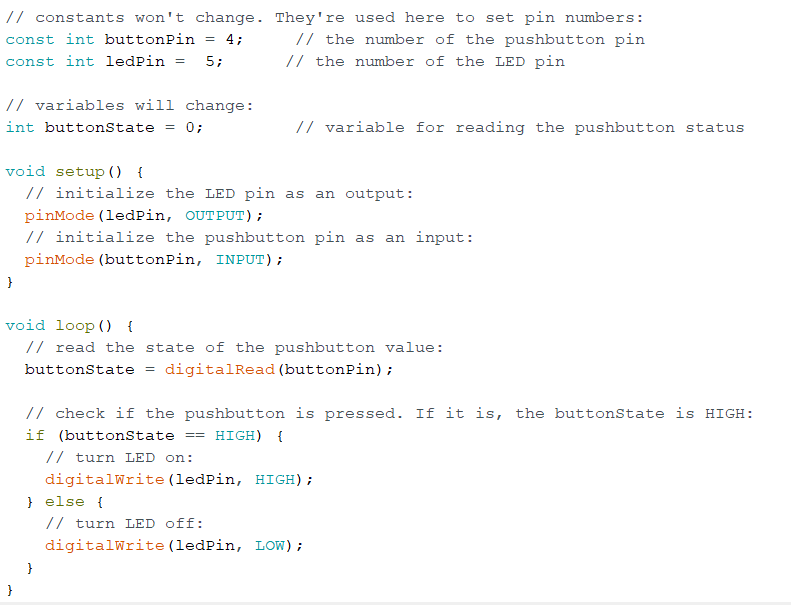
Here is the code to test the fountain light. The code simply makes the LED flash. This code is based on the arduino Blink example provided with the IDE. All comments are in the program.
Here is the code to test the fountain light. The code simply makes the LED flash. This code is based on the arduino Button example provided with the IDE. All comments are in the program.
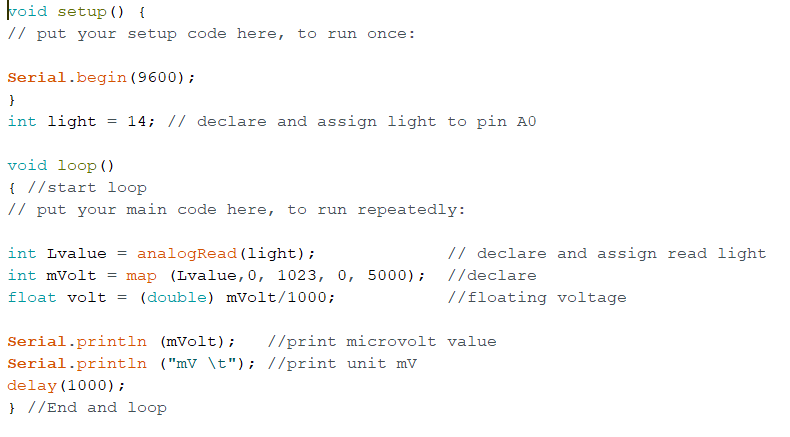
This code tests the light sensor by reading the voltage sent by the sensor. This code is based on the arduino AnalogInput example provided with the IDE. All comments are in the program.
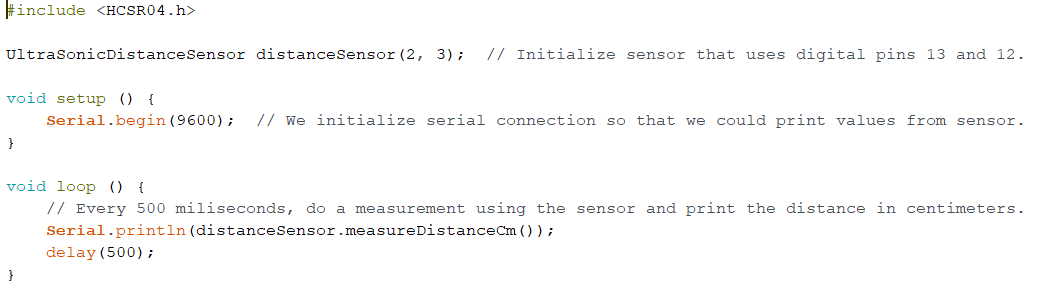
This code tests the distance sensor. This example was taken from the HCSR04.h sensor library provided in the week's documents. All comments are in the code.
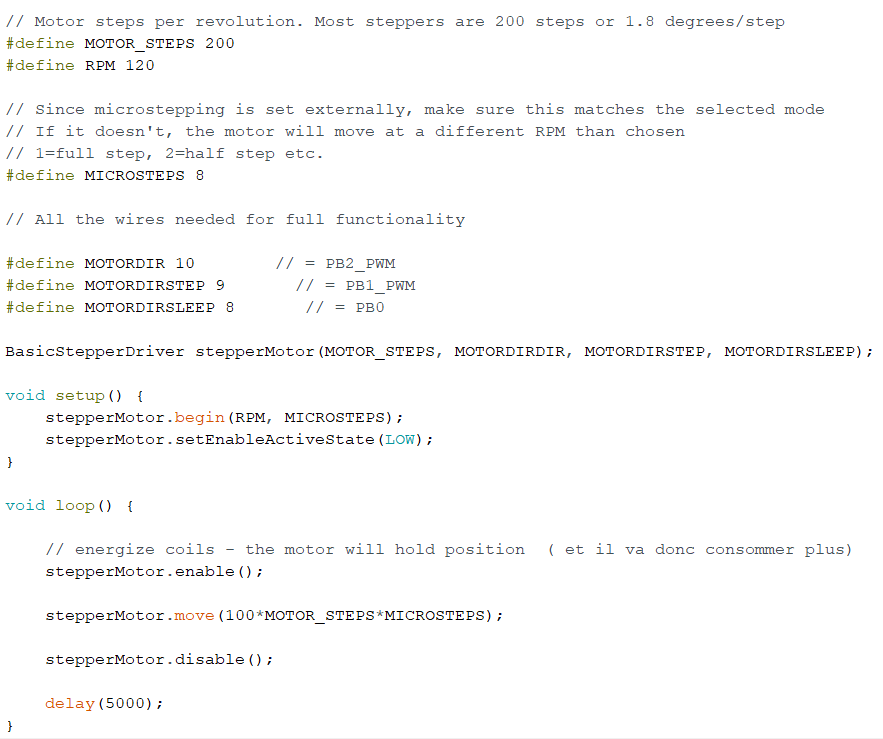
This code tests the stepping motor. The code has been taken from the philippe part in the group project. You can visit Philippe's page for more information. The code only runs the motor in one direction with a delay. All comments are in the code.
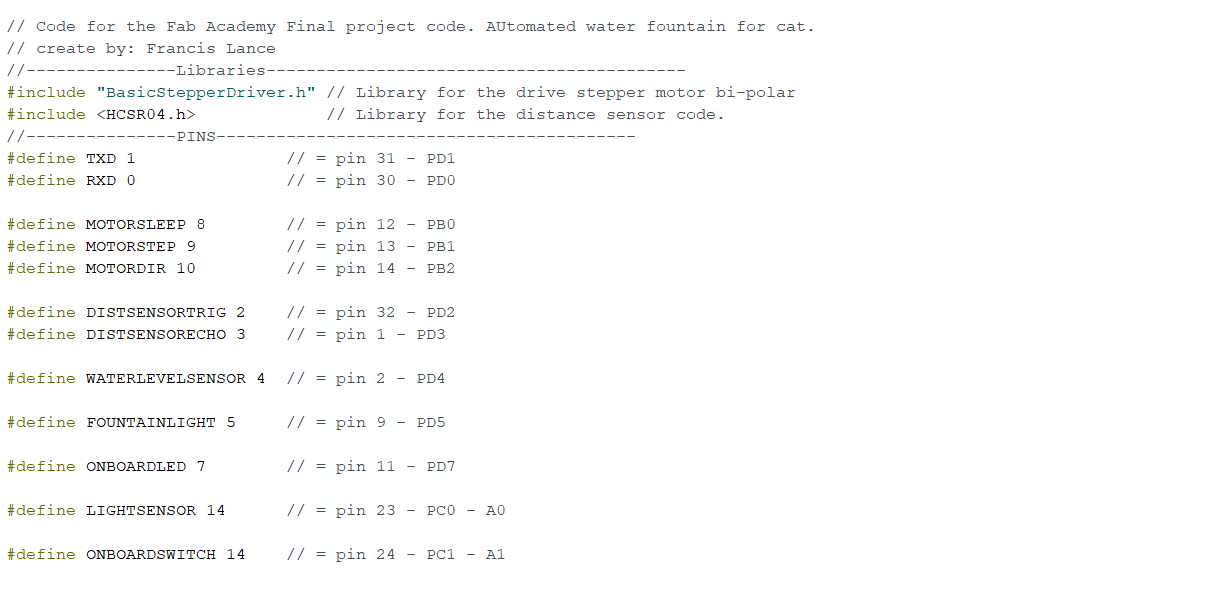
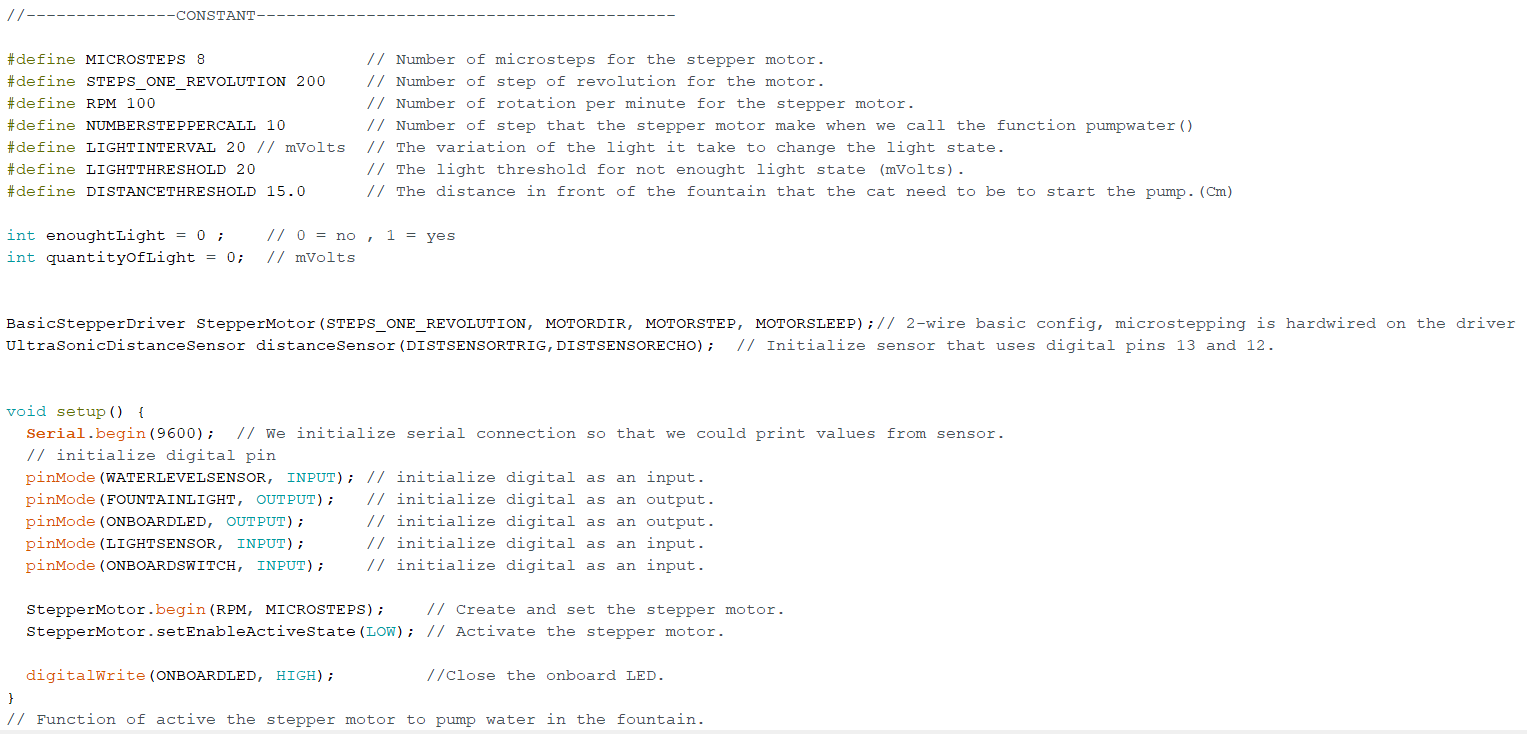
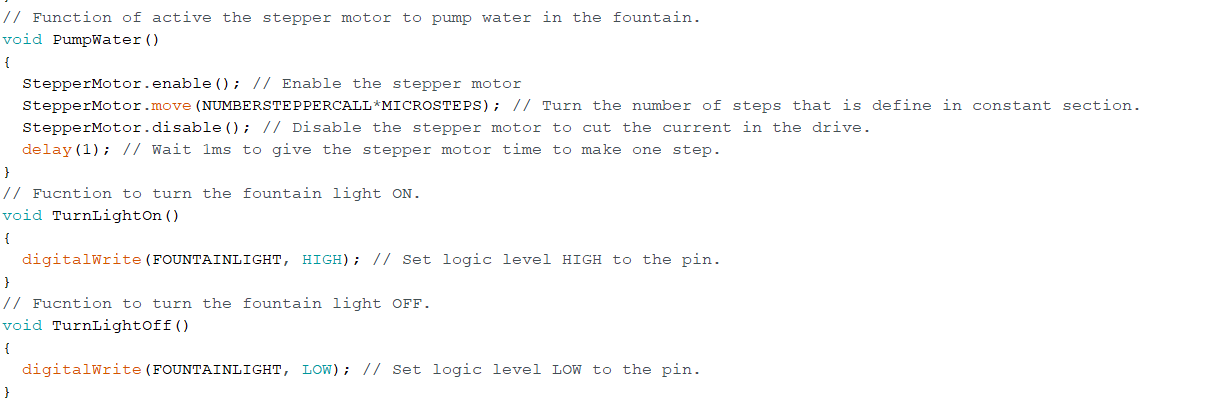
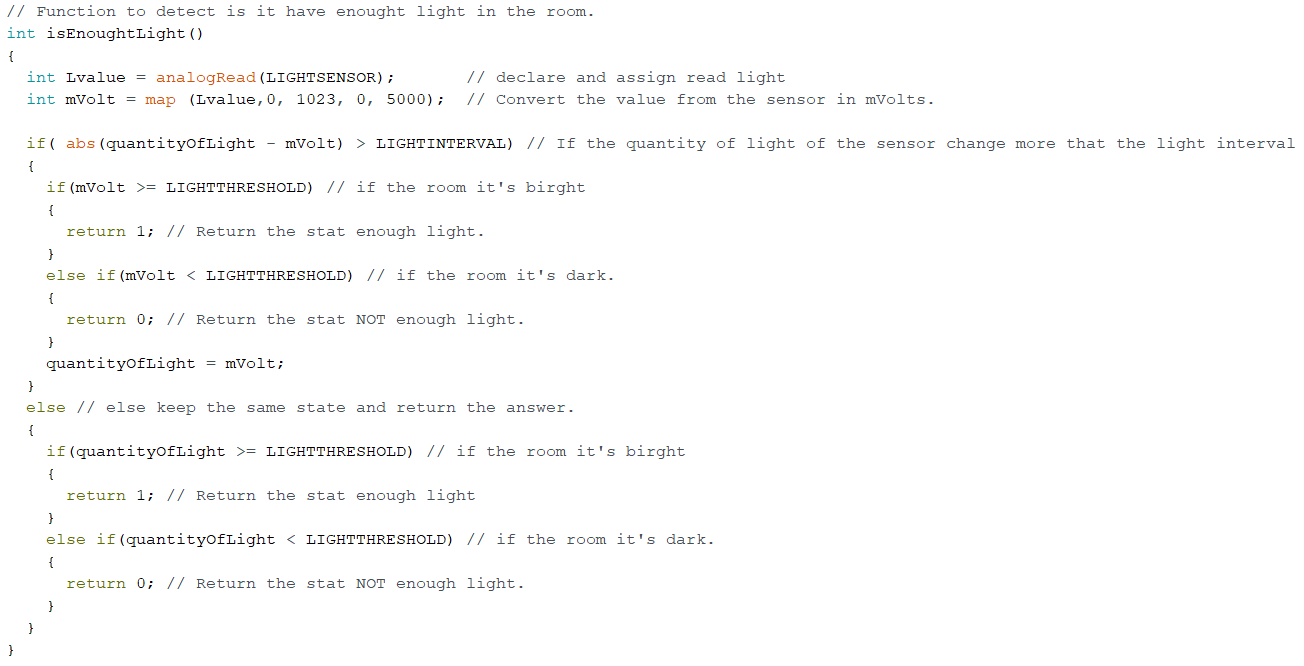
Software final project
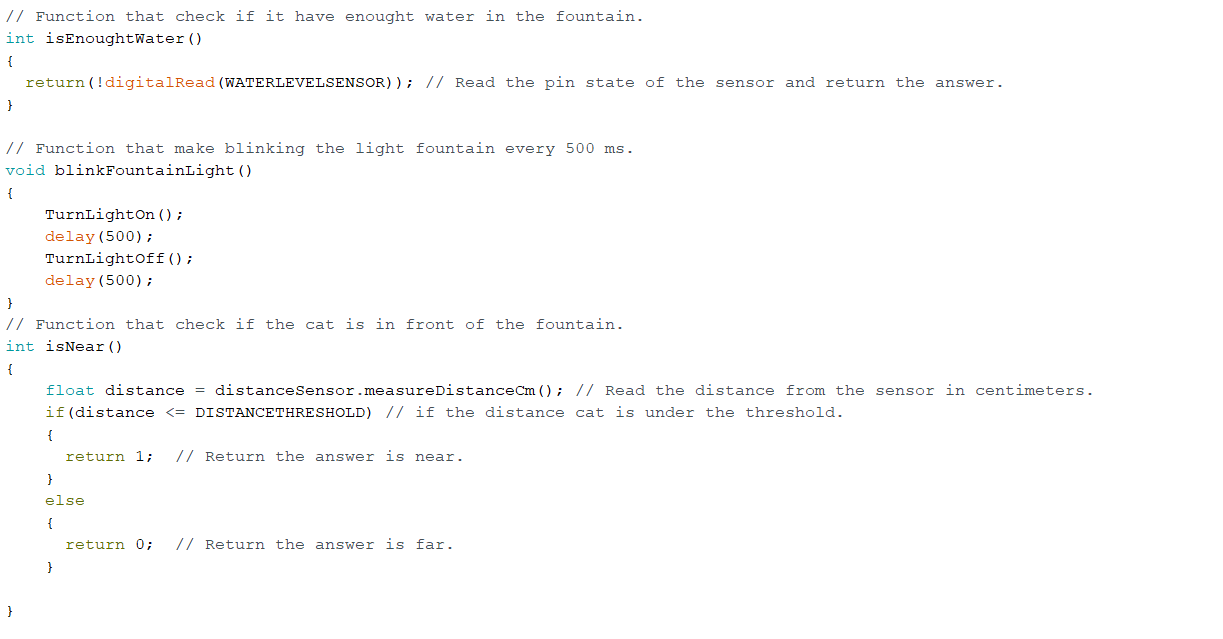
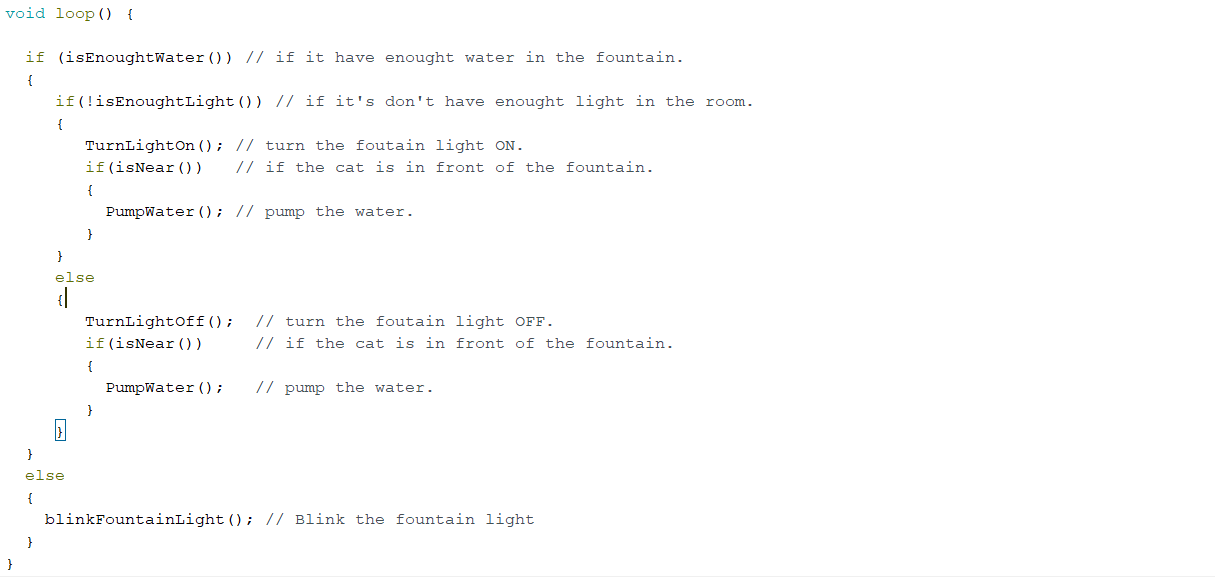
Voici le code principale de mon projet. J'ai décidé de faire plusieurs function pour rendre le code plus facilement lisible.
Here is an example of a function I wrote to make it easier to read the code. Sometimes, it's only grouped together some line of code that is often repeated.
License of my project
You can visit week 18 here to get more details on the intellectual property of my project but in summary my project is:
Presentation video
Link
For the original video file click here
For the original presentation poster click here
You can download all the files of this week right here.