Machine Design
Assignments
#1 - Add automation to a machine. Document the See group project and your individual contribution
This week, my targets are the followings:
- Design and code the firmware for the machine
- Test it on a test bench and document it
- Make it available for the team and help for final integration.
References
Lecture
This week is about adding automation to the machine designed two weeks ago
Topics covered (course) Video recording (course) Video recording (recitation) Students and Labs My filesLearnings
#1 - How to be proactive
To make a machine, multiple slills are required and there are dependencies between team members. My contribution is on the SW level. In order to help other team members to go ahead with their deliverables, I designed my code so it could run on a commercial board (an Arduino)
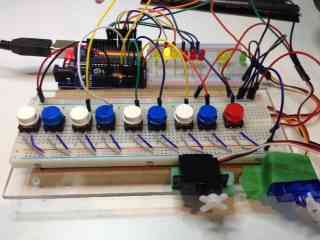
Here is how my test bench looks like:
- There are 8 press buttons: left/right/far/near/up/down/close claw/open claw. Each time you press a button, the machine will perform an action. For example, if you press LEFT, the machine will move one step to the left. How long will be the move depends on a constant written in the script. It is similar to the CNC we have in the Lab but there is no continuous mode currently. If you keep the button pressed, nothing happens.
- On the front side, on the right, there are two servo motors, one that simulates movements on the Z axis and another one dedicated to the claw itself.
- At the time I built the test bench, I had no way to include the two stepper motors in my bench. That is why I used a set of LEDs (on the right part of the test bench, on the bottom). There are three LEDs per stepper motor: one for the "Enable", one for the "Direction" and one for the "Pulse". With such a test bench, there is no guarantee that I'm shooting the right pulse with the right timing but at least I can confirm the global logic is ok and ensure the right stepper motor is turned On, in the right direction.
- There is an additionnal button (the red one) on the right side to simulate the "limit switch". Just a quick reminder on that topic. Why do we need "limit switches" ? We need limit switches on te X and Y axis because there is no way in the sW to figure out where th shuttle is located on the thread at a given time. With a limit switch at the min and max, we can get a signal when the shuttle hits one of them

UPDATED: sometimes group project are moving slower than expected. Since I designed the SW part, I wanted to test it as much as I could while others were dealing with electronics and mechanics. I made a prototype (of the Y axis) with a stepper motor and an off the shelf drive. Here is the video
#1 - How to be reactive
Even with a well documented code, there are always questions... and bugs. I made myself available to team members to help them to progress without any issue on the firmware part
Achievements
#1 - I designed and coded the firmware part of the project
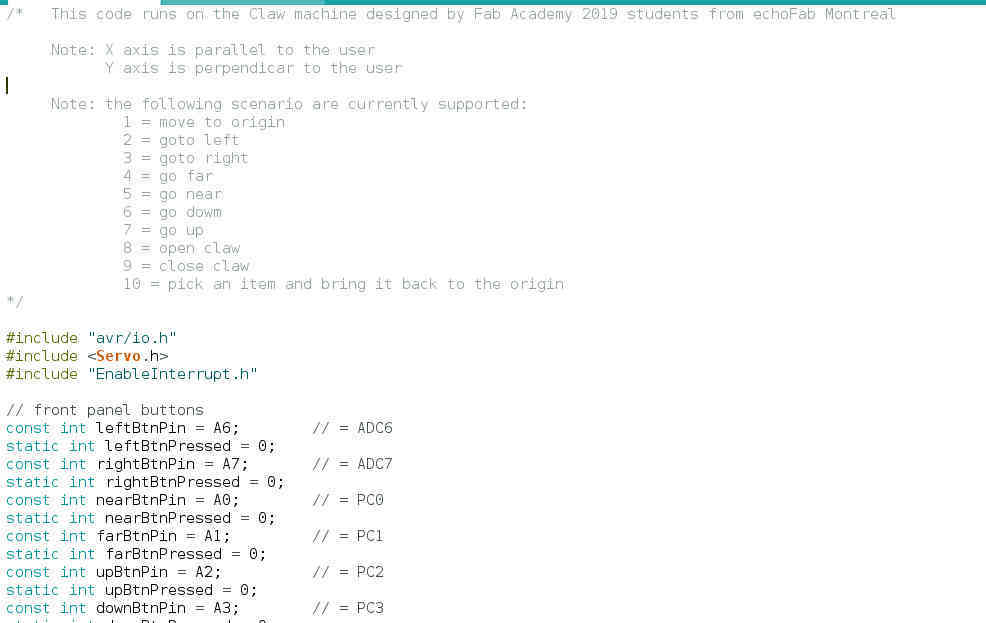
The code is available here and is fully documented inline

The main parts are:
- I included a library to drive servo and another that make it possible to handle interrupts on any pins and to go over Arduino standard limitations. I explained how interrupts work in week 9. Please refer to that documentation.
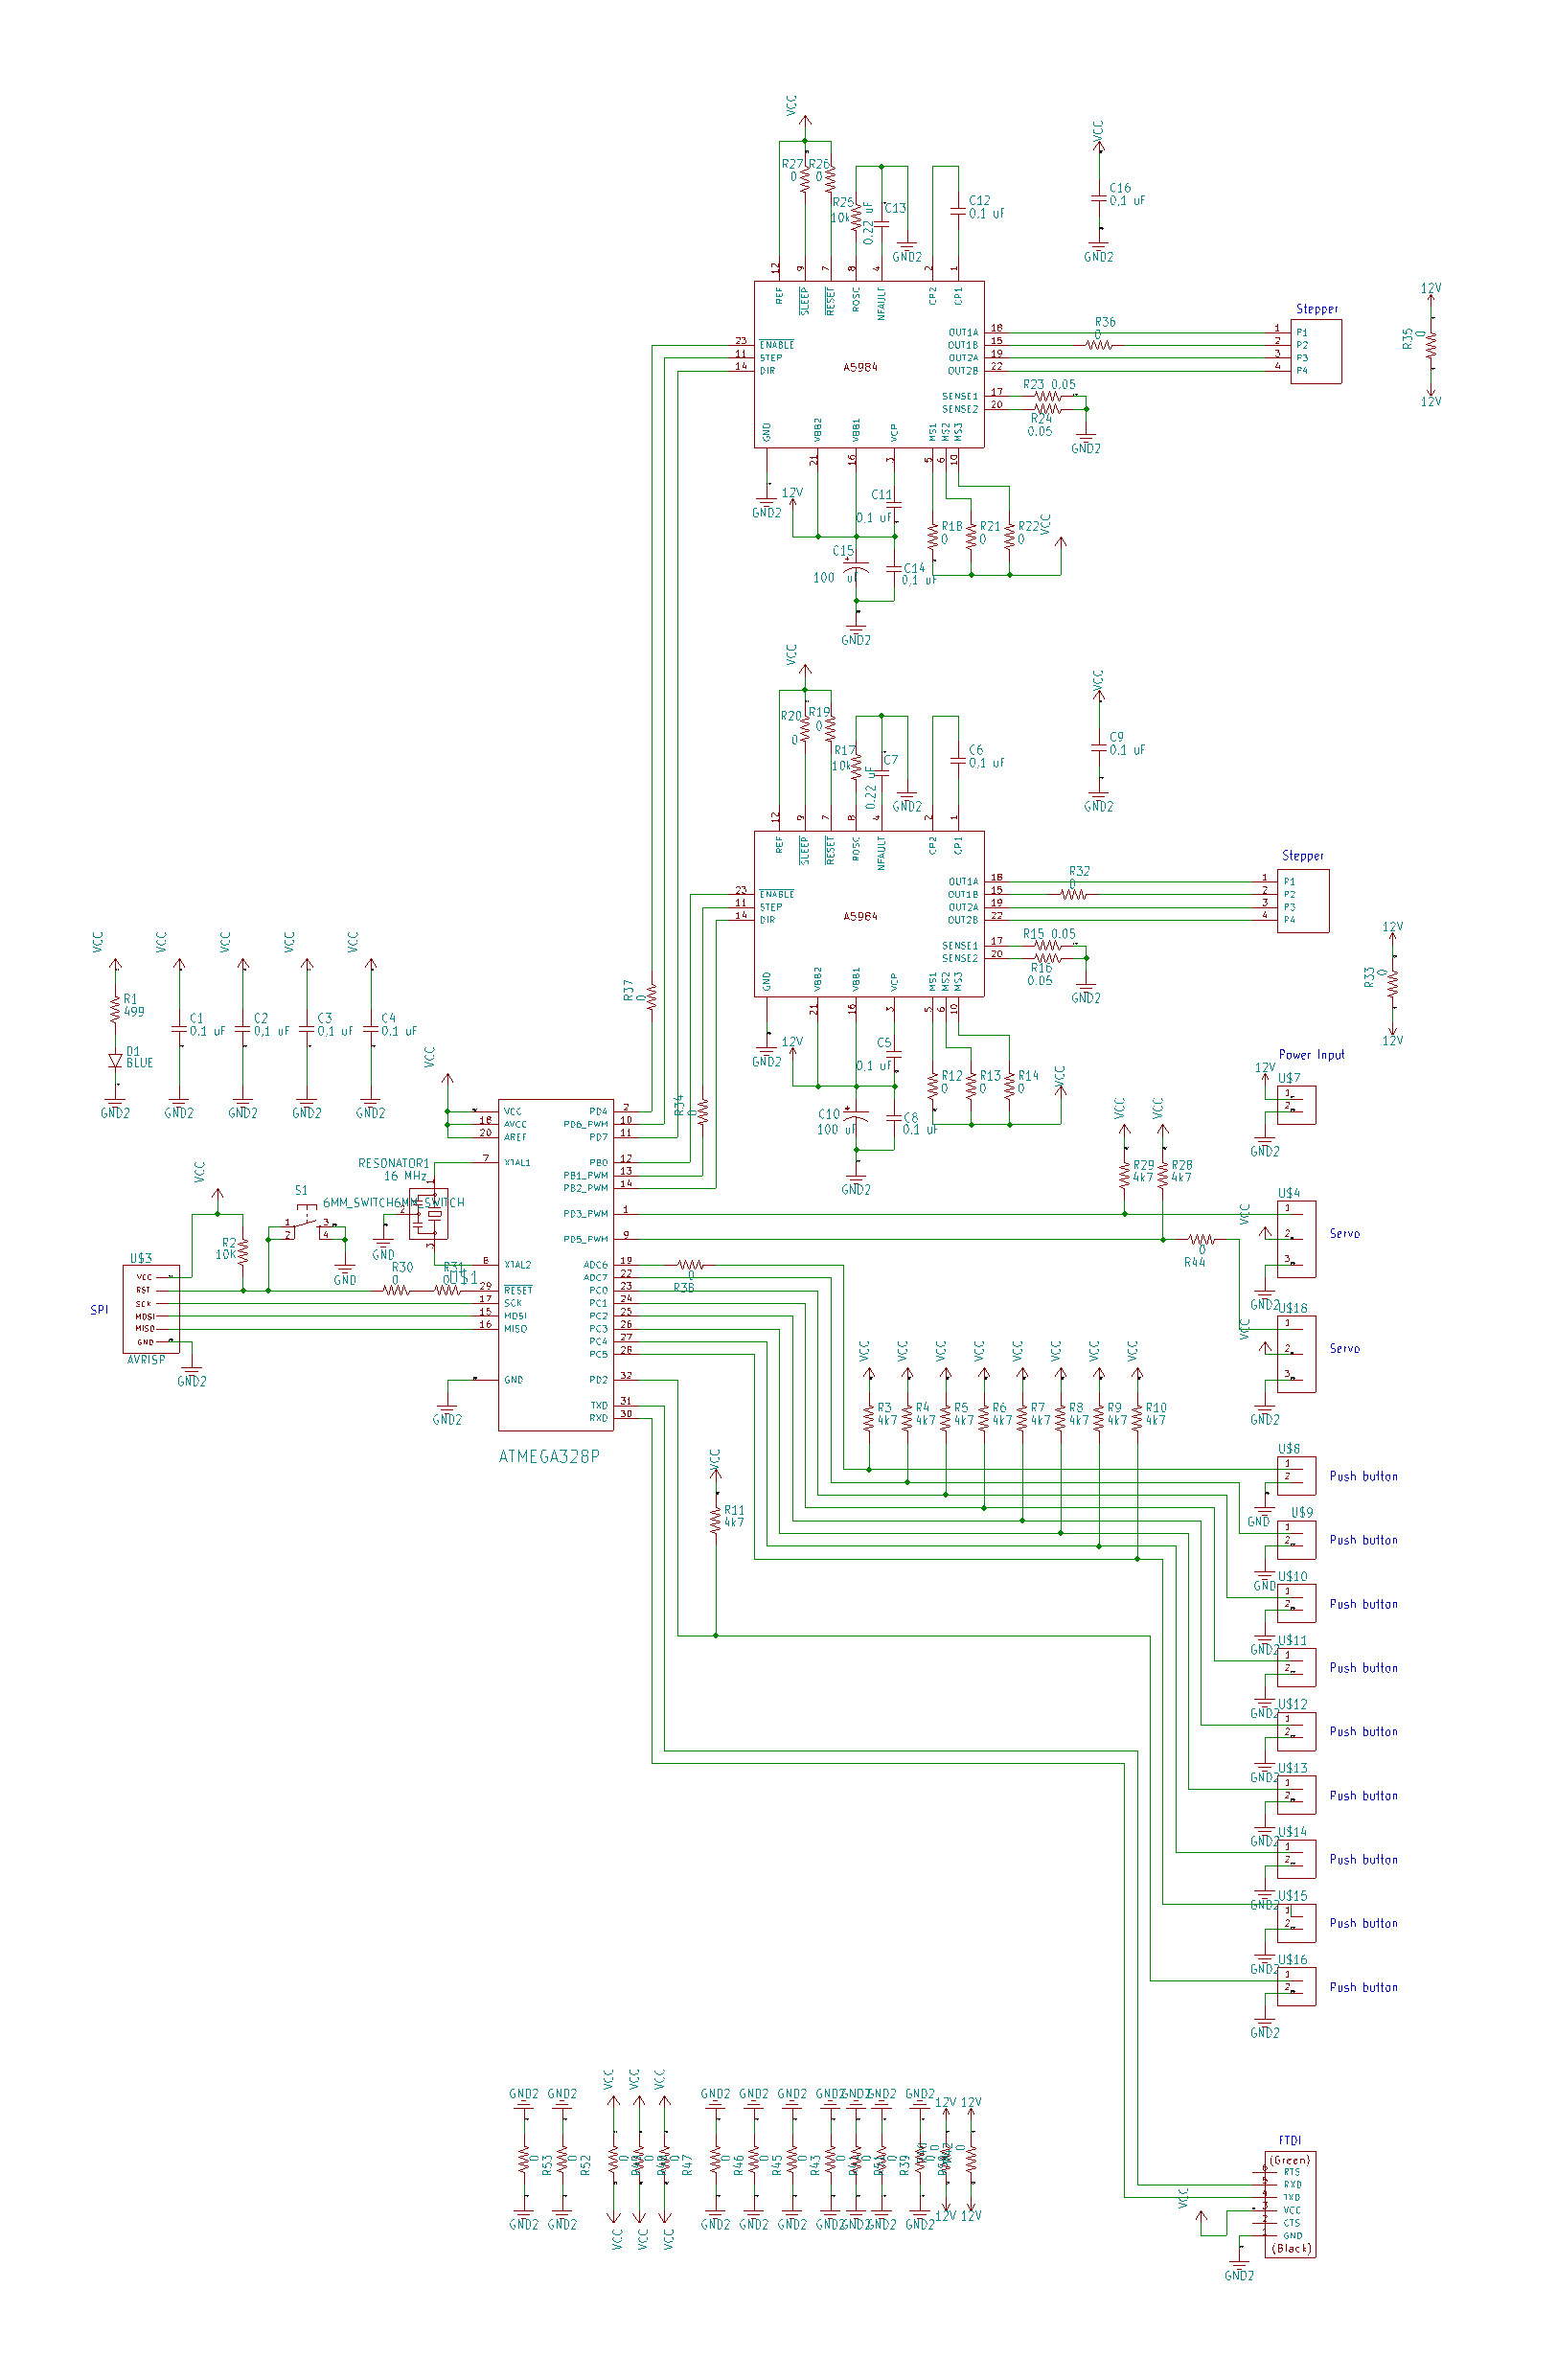
- Pin mapping: this is where I declare what is connected where, in sync with the schematic designer (Francis)
ATMEGA328P Pin ID Symbolic name PCB label Usage 19 = ADC6 A6 U$8 Left button 22 = ADC7 A7 U$9 Right button 23 = PC0 A0 U$10 Near button 24 = PC1 A1 U$11 Far button 25 = PC2 A2 U$12 Up button 26 = PC3 A3 U$13 Down button 27 = PC4 A4 U$14 Open claw button 28 = PC5 A5 U$15 Close button 32 = PD2 (digital)2 U$16 All limit switches connected in parrallel 2 = PD4 (digital)4 Enable X axis stepper motor 10 = PD6_PWM (digital)6 Step for X axis stepper motor 11 = PD7 (digital)7 Set direction for X axis stepper motor 12 = PB0 (digital)8 Enable Y axis stepper motor 13 = PB1_PWM (digital)9 Step for Y axis stepper motor 14 = PB2_PWM (digital)10 Set direction for Y axis stepper motor 1 = PD3_PWM (digital)3 U$4 Step for Z axis servo 9 = PD5_PWM (digital)5 U$18 Step for claw servo - Random generator: one of the machine use cases it to give the user the impression the machine is playing with him. To achieve this, I need to trigger some events based on random.
- As in all Arduino sketches, the setup() routine is executed only once, at board power up. This is where I execute a simple routine (executeCommand(1) to bring back the machine to its default location
- The main loop is organized as per the following:
- priority is given to remote commands. This is mainly intended to help other team members to debug the electronics and mechanical parts. The way to go is to connect over a simple Tx\Rx to the board and then to type a sequence number:
- 1 = move to origin (same as the sequence executed at boot up
- 2 = goto left (same as when user press the button)
- 3 = goto right (same as when user press the button)
- 4 = go far (same as when user press the button)
- 5 = go near (same as when user press the button)
- 6 = go dowm (same as when user press the button)
- 7 = go up (same as when user press the button)
- 8 = open claw (same as when user press the button)
- 9 = close claw (same as when user press the button)
- 10 = pick an item and bring it back to the origin (same as the sequence the machine will play randomly)
- Note: within Arduino terminal, do not forget to select "Newline" at the bottom
- When no command is sent over the remote link, the machine will wait for the user to press any button and will randomly take some initiatives (see pickAnItem() for more information on this

To deploy the firmware on the final board..
- Connect an ISP. Using Arduino IDE, burn a boot loader. Unplug the ISP
- Connect a FTDI cable
- Using Arduino IDE, publish the code (do NOT forget to press brielfly the reset button on the board to trigger the code download)
Things you may need to know
- Q: How to force the machine "random" behavior to be more or less intrusive ? A: update the randomPoolSize constantin the code. Smaller value means more intrusive
- Q: How to increase/decrease the distance traveled by the shuttle on X (or Y) axis each time I press a button ? A: update the following constants: Xppr, Xscale, Yppr and Yscale
- Q: my stepper motor are not moving the shuttle in the right direction ! A: change the following line of code: digitalWrite(dirYPin, forward); and write !forward instead. Same logic for the X axis at the line digitalWrite(dirXPin, forward);
- Q: How can I set the initial position, step size and max position for the servo motors ? A: update the following constants ZaxisLowerLimit,ZaxisUpperLimit, ZaxisStep, currentPositionOnZaxis, clawLowerLimit, clawUpp, clawStep, currentClawPosition
#2 - I made it available to the team and I helped for the final integration
Here are a few things we should have done differently
- Project management: we splitted the work at the beginning but we did not stick to the timeline. We should have designed, built and documented the mechanical parts after the first week and we missed that target. The second target has been delayed has well, some of us being trapped in unfinished work from previous weeks
- Scope definition: we spent time in improving some parts again and again but we lost the "big picture". Maybe the project was too ambitious, especially when we take into account the fact that we had to work on our final project at the same time.
- Purchasing and stock management: we ordered drives for one single board and something wrong occured when we started the board, with no spare parts available at that time
- Dependency management: software depends on electronics, electronics depends on mechanics but the final prodcut depend on all of them. We should never taken for granted that the part we design individually will fit easily in the final system. We should simulate, create test harnesses.
- We still managed to deliver something viable, hopefully.