18. Wildcard week - CNC Embroidery
This week I worked with the automated embroidery/sewing machine to create a new surface for my wave machine. I wanted to test whether a stretchy fabric surface would wave more smoothly than the rigid paper surface from my initial design. One problem with the paper surface was that it not only creased eventually, but didn’t stretch as was needed to accomodate the change in dimension between the pistons as the moved up and down in relation to each other. I did want some form/rigidity however, so I thought embroidery would allow for creating rigid lines strategically along the stretchy surface.
A new stretchy fabric surface for my wave machine. Ultimately I choose a neoprene instead of this one because of size limitations of the sewing machine frames.

 The fabric needs to be stretchy! Particularly stretchy along one axis only - anisotropic. This material was ideal but ended up being too small.
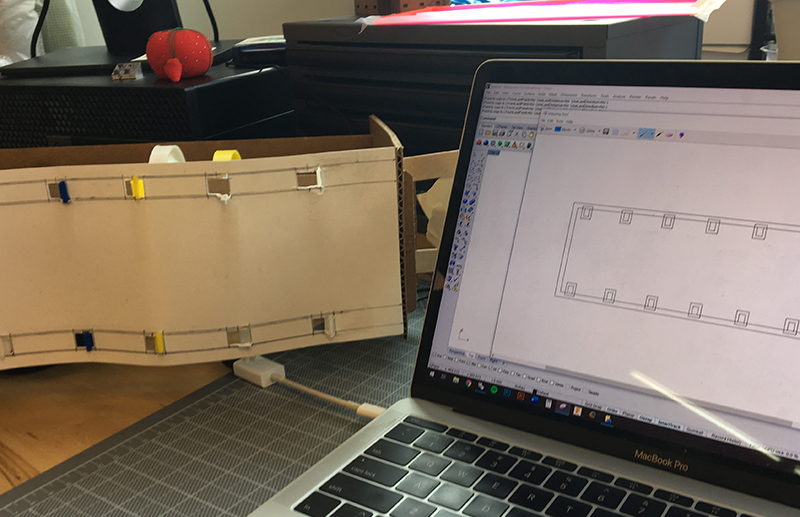 The new design would replace the paper surface from the original prototype. It was beginning to tear apart.
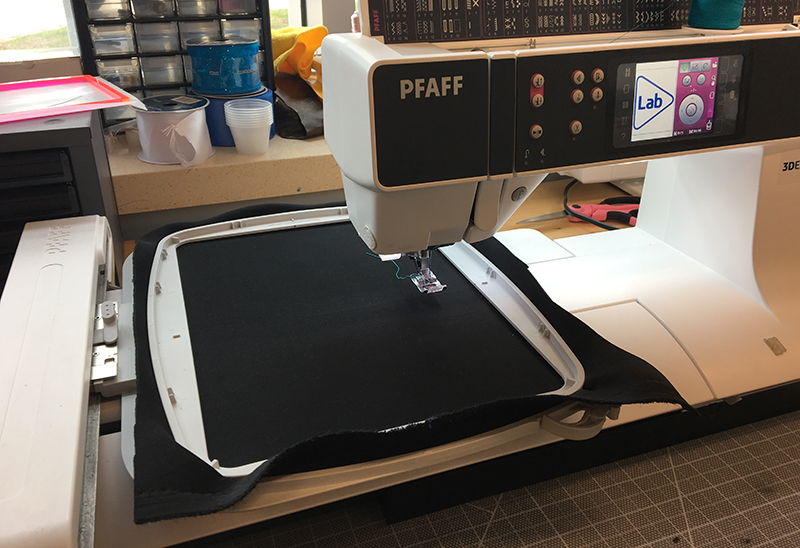
Machine - Pfaff
This Creative 3.0 Pfaff machine allows for automated sewing and embroidery of images and graphics on fabrics. I was pretty impressed with this machine - sewing machines are so highly refined machines yet are quite simple to operate.
Here’s our labs machine, Creative 3.0 Pfaff:
There’s a lot of skill to be developed in thread handling - I became pretty good at threading the needle after a while! During the sewing process I had to rethread the machine about 30 times. I’m not sure if it was the particular material that was causing de-threading.
Design of Stich Pattern
My first step was to design a 2D drawing of the surface with the appropriate mounting holes for clipping into the cam shaft pistons. I used Rhino to draw the surface patter with notches. DXF file available here. I did consider surface tension, but did not change the dimensions from the original paper design. After doing it once with the particular material I selected, I would now have shrunk the design by 5-10% so that when it is mounted it becomes taught.
Here is the file of the final pattern to be emroidered. I created ‘exanspansion joints’ to allow for horizontal stretching between the vertical pistions:

Embroidery Translation Software
The software - Brother PE Design Plus - was fairly easy to set up the drawing and generate the VIP file for the machine. I choose the ‘Auto Punch’ mode to generate a stitching pattern based on my black and white drawing.
 The software is asking what colors to not develop stitch patterns for. In my design I only needed the black to be stitched, but the it’s possible to have multi colored designs that the machine would tell you when to load/unload. I wasn’t too happy about the scaling effect when loading a new custom design. It’s important to make sure the final dimensions are the same as the original file.
Sewing Process - file download
Overall it when ok. It was pretty inconsistent in quality, althrough once it got going, it seemed to function better and produce smooth, more even stitching. The machine would automatically stop itself if something went wrong, in most cases! It would stop and say, please re-thread often.
The first step is to load the material into the frame. It needs to be tight! I’m holding it up with 3 fingers in this photo.

When loading the file, it’s good to know that if you’re image shows up in the preview screen, it is good to go! (if not, you’re probably using the wrong file type. Make sure it’s the VIP type.)

Here’s the VIP file for the sewing machine.
 Here’s the stitching in process.
Here’s a slow motion video - pretty cool.
Here’s a video from someone else that explains how the process works!
Major Failure!
On one ocaisson the machine did start making a louder noise, but did not stop or warn me. Eventually the machine did stop and I was left with a pretty huge knot to cut out.


I ended up having to cut this out of my fabric and out of the machine. It set me back about an 1hour. I’m still not sure exactly what went wrong, other than perhaps the fabric - it was neoprene - was too stretchy, and I didn’t stop it soon enough after hearing the more jarring noise.
Outcome
 Here it is after I’ve cut it out of the fabric sheet. It definitely snugs up as expected.
Here’s the final video:
It worked ok! The fabric wasn’t stretched enough to be really tight, but I do think it could be refined. it does have the advantage over paper in that it can stretch easily and not wear out, like my original surface did.
One unexpected outcome was the deformation of the surface across the width of the surface (instead of the length). You can see this in the video when the surface kind of buckles up and down. This was due to the fact that the material was primarily isotropic, meaning it was stretching in all directions. But really I just need it to stretch just in the length direction of the surface.