Week 2: Project Management
2019.01.23
Individual Assignments:
- Work through a GIT tutorial. Complete
- Build a personal website. Complete
Week 2 Contents:
- What I learned this week:
- Embedding Vimeo videos
- Obstacles and Solutions
- Downloads
- References
Version control
Why do we need version control?
I have previously used the really hard to control default version control system that everyone uses, i.e appending a date or version number to the filename. When you come back to your work and find mario.jpg, mario02.jpg, marioFinal.jpg, marioFinalFinal.jpg, marioFINAL.jpg, marioFINAL02.jpg you rapidly realise that this is unworkable for longterm or larger projects. Hence the need for a formal version control system.
What can a version control system (VCS) do for me?
Backup and Restore: Files are saved as they are edited (like Google Drive) so I can jump back to an old version.
Undo: Messed up a file? Just go back to the 'last known good' version.
Super Undo: If I mucked something up a year ago, I can go back to the version before I made that change.
Track changes: When you or I change a file we can leave a message as to why it was changed.
Sandbox: Making a big change? Make temporary changes in an isolated area before I commit the changes.
Branching and merging: A larger sandbox. I can branch a copy of the code into a separate area and modify it (branch). Then, when it works, merge it back into the main branch. Good for adding features.
GIT
What is git?
Git is a distributed version control system first implemented by Linus Torvalds in 2005 when keeping track of changes to the Linux kernel. The main purpose of the software is to track changes in files and allow multiple users to work on files.
Git is really a collection of command line utilities that track and record changes in files (mostly source code, but you can track anything). You can restore old versions, or compare and merge changes at at a basic level, but git scales up to complex branching and merging for large numbers of users.
A strong feature is 'non-linear development' which means it allows forking when working on software. New features can be developed in a secondary branch parallel to the main branch of the code. This code can then be merged with the main code when the feature is complete.
Git is decentralised, and your files are stored locally in a repository. Github/GitLab are for storing a copy of your respository online, to make collaboration easier.
What did I learn about git this week?
I followed this GIT tutorial (Github, 2018). I also read Gitlab Basics (Gitlab, 2018). Here's a short introduction to the basics of Git that I gleaned from my reading. Essentially how to start a repository, how to connect to a remote repository and secure it with an SSH key, how to add files, commit changes and push to the remote repository.
GIT: Initialise a new git repository
To start a git repository (local file store):
$ git init
Configure the repo using:
							$ git config --global user.name "put name here"


							$ git config --global user.email "put email here"
The git add command takes a snapshot of the current state of the repository and adds it to a temporary staging area that git calls the "index" (Git-scm.com, 2019). Essentially bringing it to git's attention.
Add a single file to the repository:
$ git add index.html
Add multiple files to the repository:
$ git add index.html main.css image.png
Add the entire current directory to the repository:
$ git add .
Committing writes the changes permanently into the history of the index.
Commit the changes:
$ git commit -m "Message here describing commit"
Check status of the repository:
$ git status
GIT: Add remote
GitLab is an online repository store. I have been given a Fab Academy remote repository:
Academany / Fab Academy / 2019 / Labs / Brighton / Brighton students / michael.edwards
The 'master' branch of the repository is stored there. Wherever I am I can pull the latest copy of the master branch from GitLab.
Here is how to link the local repository to the remote GitLab repository (origin is the name of the remote - this can be anything):
$ git remote add origin <git@gitlab.com:PATH/repo.git>
To check what remotes you have configured (the v is for verbose):
$ git remote -v
If you need to remove a remote for any reason, you can use:
$ git remote rm origin
GIT: Push and Pull
Once a change has been committed, it needs to be pushed to the remote repo:
Push the local repo to the remote repo:
$ git push -u origin master
The 'u' switch represents 'upstream' and is setting up tracking of the remote.
Download a copy:
$ git clone git@gitlab.com:PATH/repo.git
To get any changes from the remote repo:
$ git pull origin master
This should be done at the beginning of a session, to make sure you are working on the latest version of the files.
GIT: SSH (Secure SHell)
To be able to authenticate to the server/repo automagically without typing an insecure password all the time, I needed to configure SSH key pairs. These keys are unique to the device and the key pair is a private and public key stored on the local device. The public key is also stored on the remote repository (server). The public key can be shared anywhere, the private key is private and should be treated like the password for your bank!
To authenticate the client device sends the public key to the server, this contact generates a session ID. The server checks against a list of authorised SSH keys and if the relevant public key is found the server generates a random string encrypted with the public key that can only be decrypted with the relevant private key. This string is then sent back to the client device which uses the private key to decrypt it. The client device then returns an MD5 hashed combination of decrypted string and session ID, which the server uses to determine authenticity. This method of authentication is much more secure than a password, not least because of the large key.
I personally have two devices I will use the most - a Windows 10 desktop at home, an Ubuntu Linux laptop at the FabLab (actually, potentially, I might use my phone, Raspberry Pi and/or (ssssshh) work PC too). I have generated a private/public key pair on each device and put the public keys on the GitLab account. Any new devices I use can be added to the public key list.
To generate the SSH key pairs and add the key to Gitlab. Firstly I generated a key pair on my laptop:
$ ssh-keygen -b 4096 -t rsa -C "you@email.com"
The 'b' switch sets the length of the key, 't' the type (RSA) and the 'C' is comment, usually an e-mail address.
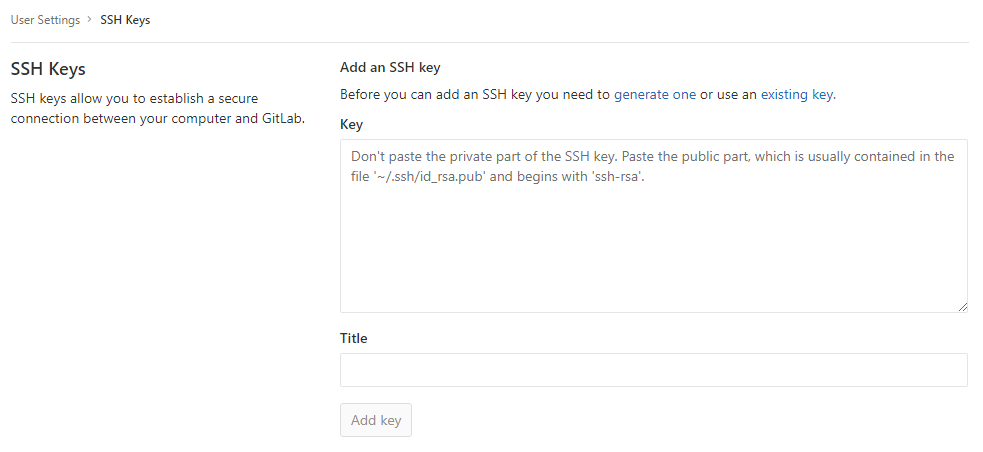
On my Linux laptop the keys are created in a (hidden) '.ssh' directory in my home directory. My public key is stored in '~/.ssh/id_rsa.pub'. I then copied the contents of this file and pasted it on to the SSH page on Gitlab (Profile > Settings > SSH Keys) - see the image below. The 'Title' field is automatically populated by the comment at the end of the key. By default this comment is an email address, but it can be anything. I changed the comment to identify my laptop as I am going to repeat this process on various devices and need to distinguish between the keys.
More instructions for generating the key pairs and configuring GitLab are here.
GIT: Multiple SSH Keys
Gitlab doesn't let you add the same ssh key into multiple accounts. I have @kitobor for personal projects and @michael.edwards for fab academy. To get around this issue I had to edit the ssh config file to serve different keys to different servers. On Linux, this was easy. On Windows... Well, I haven't solved it yet. For Linux, first move to the ssh directory (a hidden directory in home):
$ cd ~/.ssh/
Listing that directory with ls -l will show the files relating to the keys we generated earlier:
						-rw-r--r-- 1 michael users 1124 Jan 04 10:14 id_rsa

						-rw-r--r-- 1 michael users 1840 Jan 04 10:14 id_rsa.pub
To generate a new key-pair follow the instructions above, but use a different name for the keys e.g. 'fab_rsa'. Once you have two sets of keys you need to create a config file. From the .ssh directory run:
$ nano config
Then add the following configuration (the indentation is aesthetic):
						Host gitlab.fabcloud.org

						    HostName gitlab.fabcloud.org

						    User: git

						    IdentityFile: ~/.ssh/fab_rsa
This will now send the keys from fab_rsa when the host name is gitlab.fabcloud.org and the keys from id_rsa at all other times.
GIT: Commit Messages

The 'git commit' command 'records changes to a repository. These changes could mean any additions, deletions, or updates to the files stored in the respository' (Amaza, 2019). The sequence would be to add files to the staging area, use commit to record the changes, then use 'git push' to send the progress to the remote repository. The commit message is to describe the change, so that a future version of yourself, or other members of your team, can see and understand the changes you have made. This is fine in theory, but if you 'browse the log of any random Git repository, you will probably find its commit messages are more or less a mess' (Beams, 2019).
Amaza (2019) suggests that the quickest way to write a git commit is to use:
$ git commit -m "Git commit message here"
Obviously this method only provides a limited description of what was changed. Instead Amaza (2019) and Beams (2019) both suggest using the full git commit with a title and description, Beam expands further with 'The seven rules of a great Git commit message':
- Separate subject from body with a blank line
- Limit the subject line to 50 characters
- Capitalize the subject line
- Do not end the subject line with a period
- Use the imperative mood in the subject line
- Wrap the body at 72 characters
- Use the body to explain what and why vs. how
The subject line should be capitalized, limited to 50 characters and separated by a blank line from the rest of the commit (Amaza, 2019).
the description is explanatory text detailing what has been changed and why the change was necessary. Write in the imperative mood e.g. “Fix bug causing outage” rather than “Fixed bug causing outage”, this convention matches the output from git tools like merge or revert (Amaza, 2019).
Amaza posits that a commit message should answer three questions:
- Why is this change necessary?
- How does this commit address the issue?
- What effects does this change have?
These longer commit messages are good practice for a large team working on a large project - especially when code may be reviewed at a much later date. In all honesty, for my Fab Academy portfolio I will probably rely on using the -m method as I will be the only one making commits, and the changes will generally be small and explained in a single line.
GIT: View commit history
You can see all the changes to the repo using:
$ git log
GIT: Branching
A git repo can have multiple 'branches'. These are a way to make changes (maybe for test purposes) without changing the main code. For example the default branch is the 'master'. You can see the branches in your repo by using:
$ git branch
The '*' (star) denotes the currently checked-out branch - the branch we are working on.
You can create a 'experiment' branch using:
$ git branch experiment
Switch to the 'experiment' branch using:
$ git checkout experiment
Now we are working on the 'experiment' branch and nothing we commit will change the 'master' branch. If the experiments are succesful and we want to merge the code into the 'master', first we need to switch back to the 'master' branch:
$ git checkout master
We then merge the two branches:
$ git merge experiment
To delete the 'experiment' branch use:
$ git branch -d experiment
The following video by David Mahler is a great introduction to branching.
rsync
What is rsync?
The rsync application "is an open source utility that provides fast incremental file transfer" (samba.org, 2019). For a standard transfer, rsync compares the timestamps, filenames and filesizes of the files in a source location and synchronises them with those in a destination location. Only the differences between two sets of files are updated. The first time a file is copied rsync will transfer the entire file, but from then on it only copies changes. The basic syntax of the rsync command is:
$ rsync <options> <source> <destination>
Common options for rsync:
- -v : verbose
- -r : copies data recursively (but don’t preserve timestamps and permission while transferring data
- -a : archive mode copies files recursively preserving links, file permissions, user/group ownerships and timestamps
- -z : compress file data
- -x : human-readable, output numbers in a human-readable format
- -include : human-readable, output numbers in a human-readable format
- -exclude : human-readable, output numbers in a human-readable format
Example usage:
$ rsync -avze ssh ~/fabacademy/ root@192.168.1.10:/home/
The above command would run rsync using SSH in archive mode, be verbose about what it doing, compress the data and use ~/fabacademy/ as the source and the remote directory 192.168.1.111/home/ as the destination. The -e option followed by SSH gives us SSH for the transfer.
Include, exclude & delete
These options give us more control over the files that synched. The following command includes only files/directories starting with 'R'.
$ rsync -avze ssh --include 'R*' --exclude '*' ~/fab/ root@192.168.1.10:/home/
The exclude is given the wildcard '*' which means 'everything'.
Delete is an option that allows you to remove files if the source is different from the destination. A file that exists only on the remote server, but is not at the source, could be deleted from both using this option.
Things to bear in mind
The files are not copied completely, only the differences. It is possible (although highly unlikely) that you could make a change that didn't change the filestamp, filesize or filename. This change would not be detected by rsync (in standard usage) and it would therefore not copy the changes.
Making this website
Setup and Continuous Integration with Gitlab
I already have some (self taught) knowledge of HTML and CSS. I've mostly kept up with the major developments in web development, so I've decided to make my own site. I wrote a template page using a CSS grid layout and followed a tutorial for an animated canvas-based background. I also revised a few basic HTML things (lists, special characters, etc). I linked the 'normalize' stylesheet and wrote a seperate CSS (main.css) file.
Once the site was coded I followed the git tutorial and pushed the site to my Fab Academy repository.
The major new part of the process for me was the Continuous Integration/Continuous Deployment (CI/CD) pipeline in Gitlab, following the push. In the past I have uploaded files directly to a webserver using FTP, but this method is publishing a site from a cloud git repository. From Gitlab Docs: "GitLab offers a continuous integration service. If you add a .gitlab-ci.yml file to the root directory of your repository, and configure your GitLab project to use a runner, then each commit or push triggers your CI pipeline."
The .yml file is written in YAML and tells the runner what to do, it is stored in the repository root and and when anything is pushed to the repo Gitlab will look for the .yml file and start jobs. I have used the default .yml example for a static site:
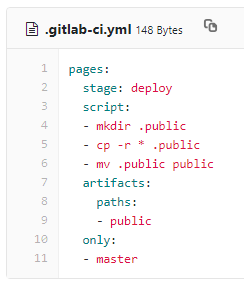 The 'stage' denotes a deploy only script. Any code pushed to the repo is automatically deployed. The 'script' section defines a shell script which is executed by the runner. The artifacts: paths section sends all files in the paths listed (public). I vaguely understand what it going on here: When I push a file to the repository (in the master branch only) the runner is instructed to create a directory called '.public' on the webserver. It then recursively copies everything in public to .public and then replaces public with the newly minted .public (by using 'mv' (move), so .public is renamed to public). If you followed all the publics, with dots or otherwise, well done! In a sentence: the git repo files are moved to a new directory which is then copied over the existing public directory on the webserver, thus updating the site.
To test my theory I made a couple of changes to the shell script. This should create a directory called 'ithinki' in the public directory. It will then copy index.html in there as understand.html. I will then be able to get to that path. I AM NOT doing this to my official Fab Academy repo, but to the mirror, in case it all goes wrong.
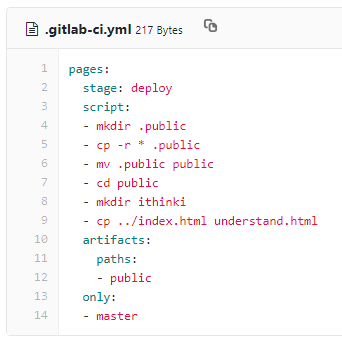 This did NOT create the file or the directory as I expected it to! The job did run and complete though, so I have no idea where I have created that directory and file! I have changed the .yml code back and will go back to reading...
HTML: Multi-level Lists
The list showing the page contents at the top of each page on this website contains an item called 'What I learned this week'. Rather than having a seperate list item for each different thing I have investigated, I wanted to have another level of the list indented and labelled, possibly with lowercase letters. I initailly did this using the 'type' attribute in the html list tag. It can be added to either <ul> or <ol> tags like so: <ul type="a">.
While this is a perfectly acceptable solution (the 'type' attribute, while deprecated in HTML4, has been reintroduced in HTML5) I wanted to stick to CSS styling, so investigated a CSS solution. There is a property called 'list-style-type' which can be used on <ul> or <ol> tags. There are three ordered list properties: reversed, start and type. 'Reversed' is a Boolean and specifies that the items are displayed in reverse order. The 'start' attribute is given as a number (regardless of the ordering type, so lower-alpha would display 'e' if the start attribute was '5'). The 'type' attribute indicates the numbering type (the list below is unordered and has the 'list-style-type' set to 'square':
- 'a' indicates lowercase letters,
- 'A' indicates uppercase letters,
- 'i' indicates lowercase Roman numerals,
- 'I' indicates uppercase Roman numerals,
- '1' indicates numbers (default).
The <li> tag can have a nested list inside it. This creates the multi-level list. The nested list can be ordered or unordered. The second position of the list below has an <li> element with a <ul> inside it. The unordered list has it's own set of <li> tags. The nested list is then closed with a </ul> followed by the </li> tag from the containing list. This looks a bit strange as the </ul> is inside an </li>, but this is the proper order.
The code to produce the above multi-level list described above looks like this:
						<ol>

						    <li>First item</li>

						    <li>Second item:

						      <ul class="square">

							      <li>Second item, first section</li>

							      <li>Second item, second section</li>

							      <li>Second item, third section</li>

						      </ul>

						    </li>

						    <li>Third item</li>

						    <li>Fourth item</li>

						</ol>
The CSS looks like this:
						.square {

							    list-style-type: square;

						}
And the code produces this:
- First item
- Second item:
- Second item, first section
- Second item, second section
- Second item, third section
- Third item
- Fourth item
The references at the bottom of each page are a styled unordered list. This is the last use for the 'list-style-type': It can be set to 'none' to remove the indent and the numbering.
HTML: Using Unicode in Webpages
There are various ways to use special characters with HTML:
- Directly as a character (♥ was pasted into the code).
- As a numeric character reference, based on the unicode number (♥ produces ♥).
- As a named 'entity' (♥ produces ♥).
<meta charset=utf-8> to the head area.
I've used the numeric character method to add the arrows next to the 'back to the top' links: ▲
Have a look at the source code of this page to see various examples: ⚡ ⚽ 😊 🍒
Escaping reserved characters
Browsers will parse the following characters as HTML, so they need to be escaped using an entity. I have used this method to display the HTML code in the sections above.
| Character | Entity |
| < | < |
| > | > |
| & | & |
| " | " |
HTML Canvas: Draw with Javascript and HTML
The bubbles in the background of this site are randomly generated on page refresh and they slowly grow and shrink. To create the bubbles I followed, and changed for my purposes, this tutorial. The basic topics covered are:
- Create the canvas
- Draw elements on the canvas (e.g. circles)
- Animate elements (redraw the screen)
- Interact with elements (on mouse click, etc.)
For this site there is very little HTML. Most of the code is done in Javascript. In the body section of the HTML there are the following two tags:
						<canvas></canvas>

						<script src="../js/bubbles.js"></script>
The <canvas></canvas> places a canvas on to the page. By default it is transparent and 300 pixels wide by 150 pixels high. The <script> tag links the Javascript file that will script the drawing on the canvas. In the Javascript call HTMLCanvasElement.getContext() to target the canvas element in the HTML and create a context. There are various context identifiers, 2D, 3D and bitmap options, but in this case I'm using 2D.
My script is relatively simple:
- Target the canvas and fit it to the size of the screen.
- Create a context
- Use a loop to generate an array of random x and y coordinates
- Create a loop using requestAnimationFrame(animate) inside a function named animate. Inside the loop:
- Draw the shapes
- Clear the screen (clearRect() over the entire canvas)
- Resize the shape slightly
- Repeat
Embedding Vimeo videos
Autoplay, loop, mute
I wanted my videos to autoplay, loop forever and start muted (to comply with autoplay rules for most browsers). I looked into the HTML5 video tag, but the lack of consensus over a standard format amongst the browsers is the main issue. To make sure the videos can be viewed on any browser you currently need to provide at least two formats: webm and mp4. I started doing it this way, but it is quite labour intensive to output two different video formats, then compress them, not to mention the issues with file size. After uploading 5 or 6 videos my site size had ballooned to 30mb, which means I can't fit too many videos into my <100mb.
<iframe src="https://player.vimeo.com/video/310047099" width="640" height="360" frameborder="0" webkitallowfullscreen mozallowfullscreen allowfullscreen></iframe>
The code above is the standard iframe that Vimeo produces when you click the 'Embed' button. Add this extra piece of code after the URL in the copied embed code to mute, loop, autoplay (and autopause) the video:
?muted=1&autoplay=1&loop=1&autopause=0
Obstacles
Using SSH with Git on Windows
I'm using Ubuntu on the laptop and everything worked fine out of the box. I generated the key pairs using
$ ssh-keygen -t rsa -C "your.email@example.com" -b 4096and added the public key to gitlab. It authenticated immediately and is working.
I'm using 'Git Bash' on Windows 10 on the desktop and had some issues to solve. Firstly the ECSDA server hash was causing issues - to solve this I opened an ssh connection in PuTTY to git@gitlab.com and cached the hash. This then allowed the clone to start, but it returned 'no supported authentication methods available'.
A little bit of investigation suggests that the problem lies with Git Bash using plink or PuTTY in the background to ssh. I changed the method using the following line:
$ GIT_SSH="/bin/ssh.exe"
I think I will have to type this every time I start Git Bash, until I figure out how to change the default.
I still need to work out how to add a config file for different servers. The answer supposedly lies in C:/Program Files/git/etc/ssh/ - but I can't get it to work.
Downloads
Javascript
References
Online
- Amaza, S. (2019). How To Write Proper Git Commit Messages. Medium.com [online] Available at: https://medium.com/@steveamaza/how-to-write-a-proper-git-commit-message-e028865e5791 [Accessed 02 Jan. 2019]
- Beams, C. (2019). How to Write a Git Commit Message. chris.beams.io [online] Available at: https://chris.beams.io/posts/git-commit/ [Accessed 30 Dec. 2018].
- Github. (2018). Try Git. Github.com [online] Available at: https://try.github.io [Accessed 16 Jan. 2018].
- Gitlab. (2018). GitLab basics. Gitlab.com [online] Available at: https://docs.gitlab.com/ee/gitlab-basics/ [Accessed 11 Feb. 2018].
- XKCD. (2019). Git Commit. xkcd.com [online] Available at: https://xkcd.com/1296/ [Accessed 01 Dec. 2018]. https://git-scm.com/
https://www.atlassian.com/git/tutorials
https://product.hubspot.com/blog/