What do I need to do this week?
My plan to this board is try to make a clock with two LEDs and one button
Drawing the board
Software used:Downloaded the Eagle and also the Fab and adafruit libraries. Ferdi gave us a quick Eagle’s introduction and also showed us two video tutorials (Tutorial 1, Tutorial 2) with the basics of schematic and board design.
Then I started the board using as reference these Tutorial. But as my idea was to make a two LED clock I just added one more LED and a battery space.
This is how my schematic draw looks like:

After long hours trying to figure the board draw I realize that the one possible solution for my “puzzle” was change the side of the ATTINY port for the second LED. Because I would like to keep the two LEDs close each other to make the clock display, so if the LED ports aren’t in the same side the board drawing become very complex.
FAIL 1

FAIL 2

Difficulties:
As my idea was to make a clock I decided that the LEDs and the button should be close each other, but this was my biggest mistake. Because I spent too many time trying to draw the board keeping these components together, and then I realize that I should take a look in Neil’s and others students designs. So if you don’t want to use 0 ohm resistors you must know that you have some limitations to design your board, is not so easy to put the things wherever you want.
This is how my final design looks like:

Then I exported to PNG file with 1.200 dpi. Using GIMP I did the outline and traces PNG files with some customs like my logo and the external trace. After that I did the milling process using de Roland MDX 20 and Fab Modules. The milling sacrificial board was not aligned as it must be so I did two times the traces with different Z heights. You can see below the first result, on the bottom-left corner there's still copper.


After soldering I tried to program my board with the Arduino Blink template. So apparently my board was fine and also it had passed on the smoke test. BUT after programming I discovered that I had chosen the wrong resistor. My mistake was taken the 499K resistor instead the 499ohm, then the LED became very weak:
FAIL 3

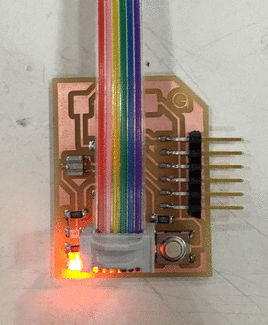
Final result:
Battery
As my idea is to make a clock, it can't be dependent of a wired power supply. So I putted in my draw a path to batteries and then I designed a battery case, using SolidWorks.

I printed it, but to make the contacts I needed some metal part. The solution was use a can to cut some pieces and then clean it to solder in my board.

Unfortunately it’s not working only with the batteries, I’m not sure why but I think it’s something with voltage incompatibility. The Attiny44 needs at least 2,7V, and I’m using 3 batteries of 1,5V each. So now I need to discover what’s wrong and do the programing for my clock during next week.
| File | Material | Machine |
|---|---|---|
| battery-case.stl | PLA Black (1.75mm) | Makerbot Replicator 2 |
| schematic and board design (eagle) | - | - |
| ← week 5 / 3D scanning and printing | week 7 / embedded programming → |
|---|