 Francesca Mereu
embedded programming
This week assigment is to study the ATTiny datasheet, and to program it in as many languages as possible.
Memory programming
Programming the AVR device involves setting the lock bits, setting the fuse bytes, programming the Flash, and programming the internal EEPROM. This data can also be read back from the controller along with signature bytes for identification of the device. Tiny devices can be programmed using serial programming or high-voltage parallel programming. In-system programming uses the AVR internal serial peripheral interface (SPI) to download code into the Flash and EEPROM memory segments of the AVR. It also programs the lock bits and fuse bytes. ISP programming requires only VCC, GND, RESET, and three signal lines for programming.
The following illustration shows the signals for ISP serial programming.
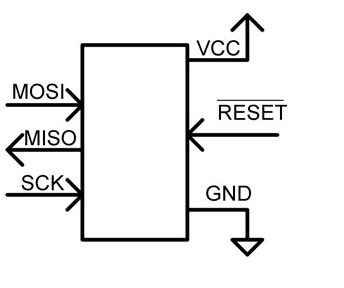
Programming C
C is a high-level programming language, and code written in C language has to be converted into machine language that your target controller understands and can execute. The tool that does this conversion is called a compiler. The Tiny controllers understand only binary format and have to be fed in bytes. A common way of storing a collection of bytes to be transferred to the controller is to use a hex file that contains the bytes in the form of hexadecimal notation. So there must be a tool that can convert C code into the hex file.
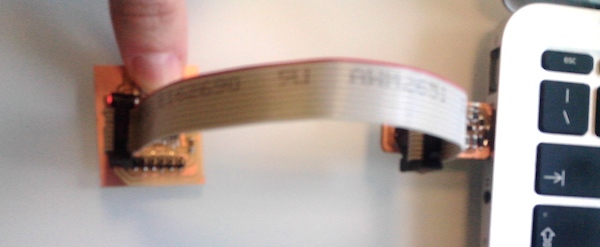
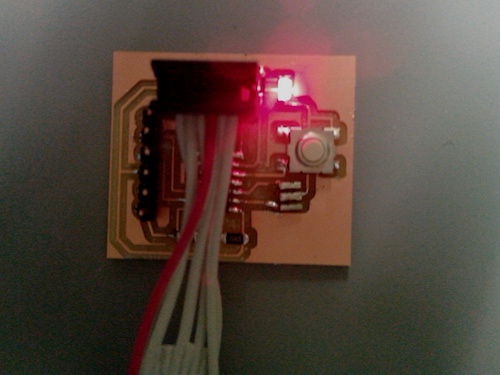
The first step was seeing the schematic style of my Hello-echo board. It was very simple :there are one LED and one switch in the circuit along with a reset switch. The aim of the project is to toggle the state of the LED each time the corresponding switch is pressed and released.
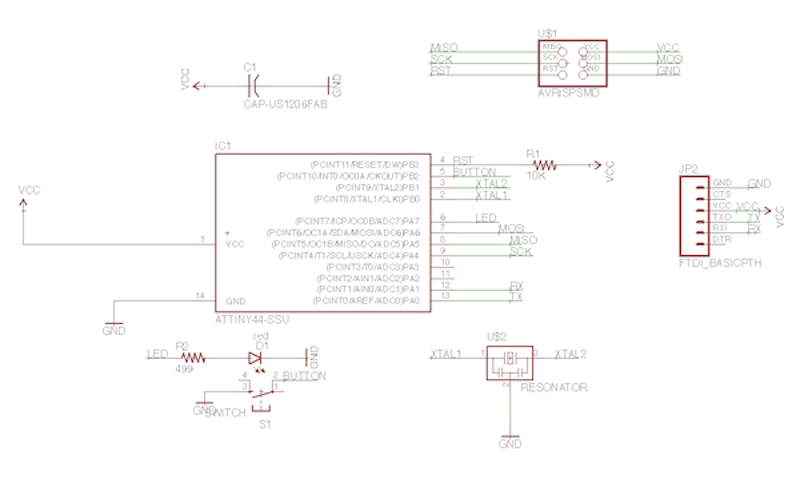
In the alternate style of drawing a schematic as below, the signals are assigned signal names, such as PB2, which happens to be pin 6 of the microcontroller. Pin 6 is supposed to connect to LED1. So, signal name PB2 is assigned to pin 6 as well as to the cathode of LED1. Similar signal names are used for the rest of the connections.
The blinking was achieved with the code below, replacing the main() code into the hello.arduino.328P.blink.make and merging it with hello.button.45.make by Neil:
#include <avr/io.h>
#include <util/delay.h>
#define input(directions, pin) (directions &= (~pin))
#define output(directions,pin) (directions |= pin) // set port direction for output
#define set(port,pin) (port |= pin) // set port pin
#define clear(port,pin) (port &= (~pin)) // clear port pin
#define pin_test(pins,pin) (pins & pin) // test for port pin
#define bit_test(byte,bit) (byte & (1 << bit)) // test for bit set
#define led_delay() _delay_ms(200) // LED delay

#define led_port PORTA
#define led_direction DDRA
#define led_pin (1 << PA7)
#define button_port PORTB
#define button_direction DDRB
#define button_pin (1 << PB2)
#define button_pins PINB

int main(void) {
   //
   // main
   //
   // set clock divider to /1
   //
   CLKPR = (1 << CLKPCE);
   CLKPR = (0 << CLKPS3) | (0 << CLKPS2) | (0 << CLKPS1) | (0 << CLKPS0);
   //
   // initialize LED pin
   //
   clear(led_port, led_pin);
   output(led_direction, led_pin);
   set(button_port, button_pin);
   input(button_direction, button_pin);

   //
   // main loop
   //
   while (1) {
	   if (pin_test(button_pins,button_pin)==0){
      	 	set(led_port, led_pin);
      		led_delay();
		    clear(led_port, led_pin);
    	  	led_delay();
		  }
   }
}
In order to complile it, I need to download and install CROSSPACK. Crosspack Development is a development enviroment for Atmel AVR’s microcontrollers running on Apple’s Mac OSX, simil to AVR Studio on Windows. It consists of the GNU compiler suite, a C library for AVR, the AVERDUDE downloader and several other useful tools.