Week 7::Embedded Programming
Assignments:
read a microcontroller data sheet
program your board to do something, with as many different programming languages and programming environments as possible
To perform the tasks in this this week I decided to use the following software:
- Photoshop CS5: For the layout and retouching of images for the web.
- Arduino IDE v 1.0.5: To programming hello board
- Eclipse Luna + AVR: To programming hello board
- Atmel Studio 6: To programming hello board
Preparing environments
Although the datasheet is extensive it has allowed me to meet some basic commands about programming and how to refer to different microcontroller pins (for nomenclature). To test several languages and ways of schedule I decided to look for a table of equivalence between Arduino and ATtyny44a.
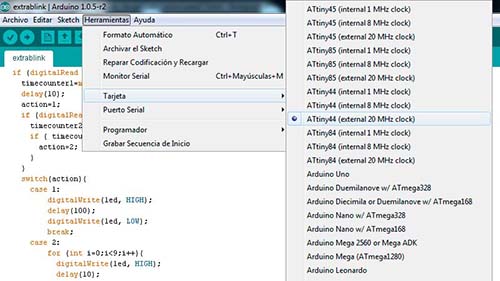
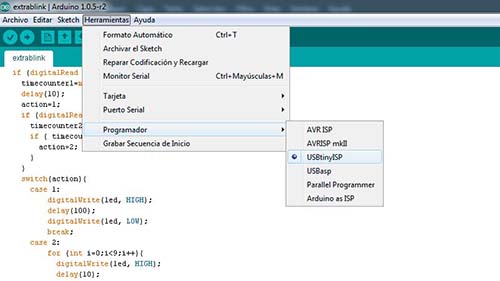
I decided to make this weekly task using three different programs: Arduino IDE, Eclipse Luna + AVR, and Atmel Studio 6. I started using version 1.0.5 of Arduino IDE because I've already used before. It can be downloaded from its official site: Download. Once installed we need to add the libraries needed to program the ATtiny download the compressed and unzip the folder named "ATtiny" in c:\users\[user_name]\Documents\Arduino\hardware\, if you have Windows 7 (if folder does not exist, create it). Now, when we started the Arduino programming environment should apparate the ATtiny option (20 MHz external clock) in the Tools menu -> card. When using as a programmer FabISP need to select it in tools -> programmer. Now you are ready to write our program, considering the conversion table Arduino pins and ATtiny44.
Config board:
Config Programmer:
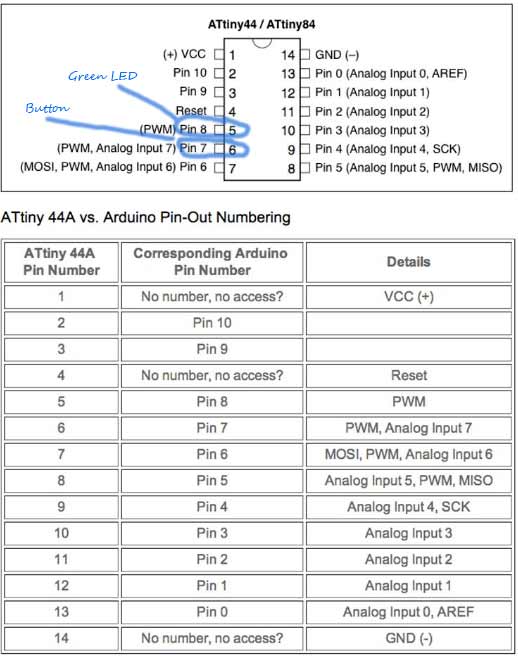
in the design of my board hello world I used PIN 5 (PB2) for a green LED, and the PIN 6 (PA7) for the button. Looking the equivalence of these pins with Arduino and make my program, when a quick press is performed on the button, the LED lights for one second. If we double-click or hold down the LED blinks 9 times.
int led = 8;
int boton = 7;
long timecounter1=0;
long timecounter2=0;
long interval=50;
int action=0;
void setup() {
pinMode(led, OUTPUT);
pinMode(boton, INPUT);
}
void loop() {
action=0;
if (digitalRead (boton)==0){
timecounter1=millis();
delay(10);
action=1;
if (digitalRead (boton) ==0){
timecounter2=millis();
if ( timecounter2 - timecounter1 < interval) {
action=2;
}
}
switch(action){
case 1:
digitalWrite(led, HIGH);
delay(100);
digitalWrite(led, LOW);
break;
case 2:
for (int i=0;i<9;i++){
digitalWrite(led, HIGH);
delay(10);
digitalWrite(led, LOW);
delay(10);
}
break;
}
}
}
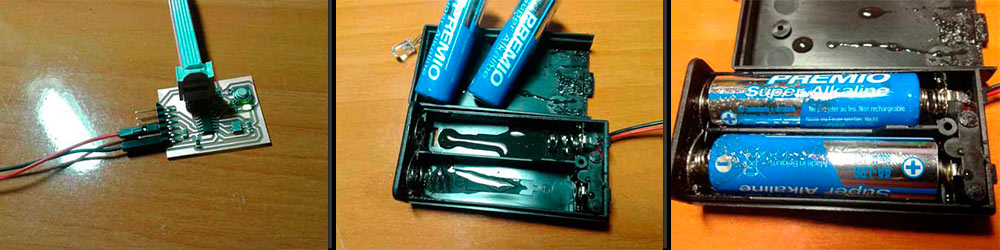
Now only program the board "hello World" using the FabISP created at week 4. I connect the FabISP via USB to PC, and the ISP Cable connect my board "Hello World". Here I have to make a small parenthesis, last week a colleague who is doing Fab Academy had a problem with the battery, it "exploded", well, I do the same thing has happened, and I think the cause is not removed the FabISP bridge power and energy was supplying the new board through the ISP, batteries also supplying power to the board through pins FDTI logically USB Power came batteries (which are not prepared to be recharged ) and exploded, spilling all the liquid they contain. Once the power to the FDTI (batteries) off I could continue without scares.
Hello World Board. Program I. Arduino IDE from Carlos Cano on Vimeo.
Then I'll try to make a program for Hello board using the programming language C in Eclipse Luna. A good manual that explains how to prepare your environment for a simple, web www.instructables.com can access the manual via this link. We can follow these steps to realize it (You can access the complete guide through the above link):
- Download and install Eclipse (C / C ++ version).
- Install AVR-GCC and AVR Dude (week 4).
- Install AVR Plugin for Eclipse.
- Make a new project
- Set Build Settings.
- Set AVR Target Settings
- New source file.
- Build and Upload to AVR
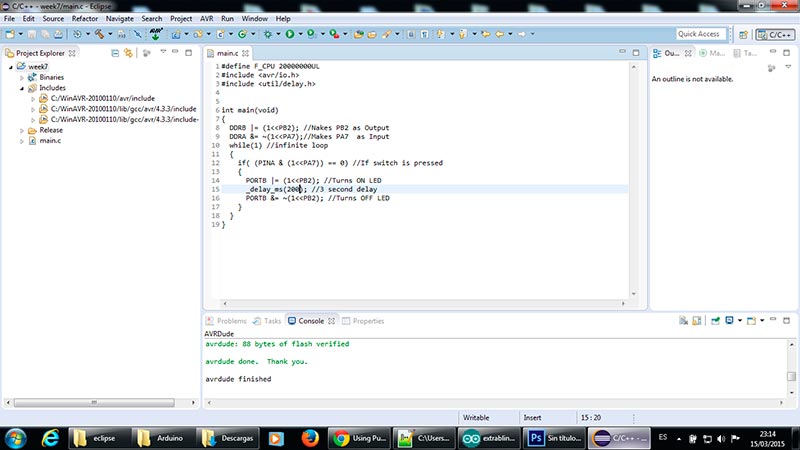
Bink on Eclipse AVR from Carlos Cano on Vimeo.
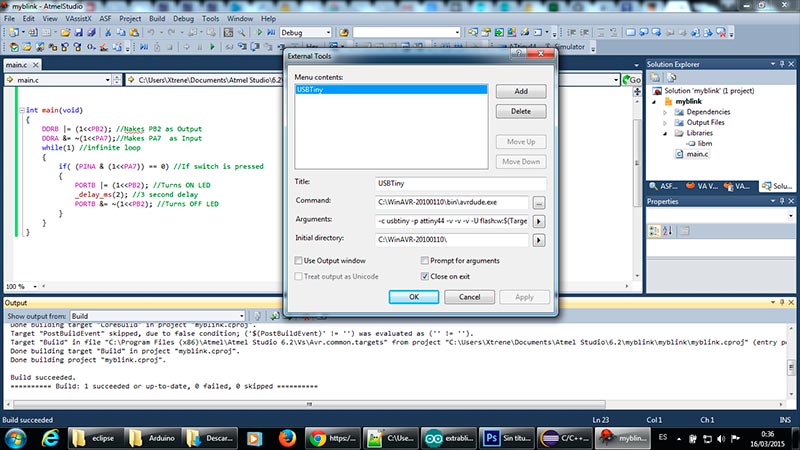
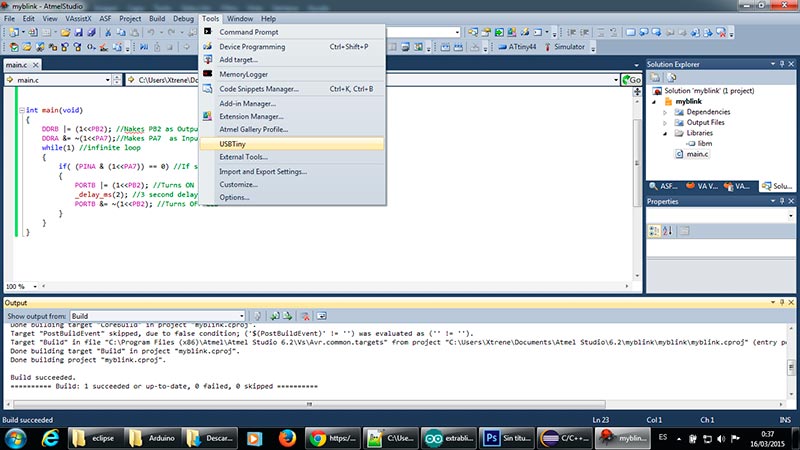
Finally, I decided to try the programming environment Atmel Studio 6, can be downloaded from the official website, requires prior registration. The programming language, like Eclipse, is C. We need to create the configuration to program through FabISP, this configuration has to be made for each type of microcontroller you want to program, in this case ATtiny44. Under the Tools menu, click on external tools. we click on add and in Title option put the name that describes what micorcontrolador will schedule with USBTiny. In command option put the path and executable for AVRDude, in my case "C:\WinAVR-20100110\bin\avrdude.exe" in arguments put: "-c usbtiny attiny44 -p -v -v -v -U flash: w: $ (TargetDir) $ (TargetName) hex: i ", and the initial directory:" C: \ WinAVR-20100110 \ "(path to AVRDude). Click ok and close. Returning to the tools menu you can see that there is a new option with the name that we have defined as title.
It is time to create a new project, click on file -> new .... Project and select GCC c Executable Project. Write a name for our new project and click the OK button. A window, Device Selection, where we select our micreocontrolador (attiny44) appears. When you have selected you can see extra information about this microcontroller, such as datasheets, vcc, tools suported ... We press Ok and we can start coding. When we want to program our Board Hello, select in Tools menu the option you created in the firsts steps (ex: FabISP attiny44).
C program for ATtiny using Atmel Studio 6 from Carlos Cano on Vimeo.