Week 4::Electronics Production
-Assignment: make the FabISP in-circuit programmer
Electronic
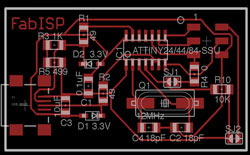
To make the task of this week I decided to build on the circuit described in http://fab.cba.mit.edu/content/projects/fabisp/ (David). To perform this FabISP I needed the following components:
- 1x Microcontrolator Attiny44A
- 1x Cristal 12MHz
- 1x Jumper Header(2x3)
- 1x USB Mini Conector
- 1x Resistor 0
- 2x Resistor 49
- 1x Resistor 499
- 1x Resistor 1K
- 1x Resistor 10K
- 1x Capacitor 0.1uF
- 1x Capacitor 10uF
- 2x Capacitor 18pF
- 2x Zender Diode 3.3V
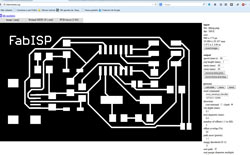
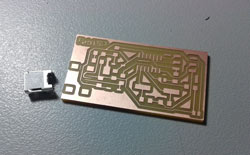
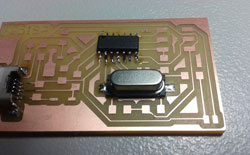
Once I download the PNG file on page mentioned above, I open it as input parameter in the Fab Module, and selected as output Roland MDX20, leave the default settings and prepare the machine to perform engraving and cutting board. While the process is complete, I prepare the material for electronics and looking for a programmer (thanks Nuria) that I will use to finish my FabISP.
FabISP Selected:
Png file open in Fab Modules:
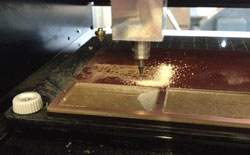
Modela working (I)
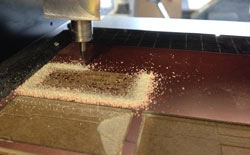
Modela Working (II)
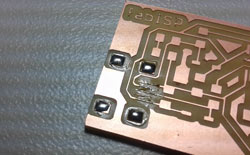
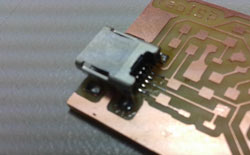
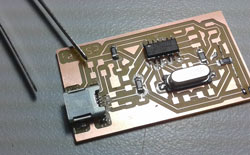
Start with solder electronic components, first I decided to solder components with more difficulty, Mini USB connector seems the hardest, prepare the tracks with some tin and very fixed careful piece welded opposite corners until fully seated, then each of the thin connectors to their corresponding track. Second, the microcontroller, placing it in position by brand (a small circle on top), welding first of the pins and once that match all other I proceed to apply to all other tin.
Board and USB Mini Conector:
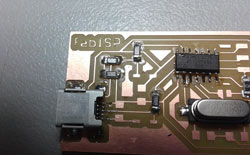
Preparing welds for USB mini:
Welding connector:
Welding Micro Attiny44a:
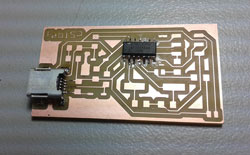
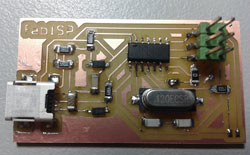
To conclude this section, have to be welded the other components, observing the correct position of the diodes, which have a brand to be respected according to the scheme of the first picture. FabISP seems to finish, with the help of a multimeter performed some continuity checks to Assure me that everything is correct, re-welding components improperly connected.
12 MHz crystal welding:
welding some resistors:
More resistors:
Final Job:
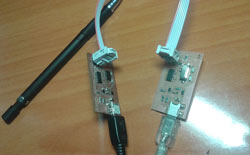
Programming
For this part of the programming of FabISP I followed the tutorial link below: http://academy.cba.mit.edu/content/tutorials/akf/programming_FabISP.html I used another FabISP Fab Lab Leon for this task. I used Ubuntu 14.04, and for the installation of the necessary programs I have performed the following steps (Get and install avrdude / GCC software and dependencies):
In a Terminal I run the following command:
sudo apt-get install flex byacc bison gcc libusb-dev avrdude
below:
sudo apt-get install gcc-avr
below:
sudo apt-get install avr-libc
Then type (may already be installed):
sudo apt-get install libc6-dev
The following is download and unzip the firmware, here have had problems in scheduling my FabISP. I've tried several firmwares and in all cases I have received numerous failures. In the end, I have used successfully is provided on the link:
Move to the desktop:
cd ~/Desktop
Download the firmware provided by David:
wget http://fab.cba.mit.edu/content/projects/fabisp/firmware.zip
Unzip the firmware
unzip firmware.zip
Move to firmware directory:
cd firmware
At this point, and given that I will use another FabISP for programming mine is not necessary to edit the Makefile, but had doubts about the value which was to contain the variable "F_CPU" the FabISP Master has a crystal of 20MHz, and I have built my ISP has a 12MHz crystal, the parameter that works for me is 12MHz, but as I understand, this parameter specifies the value of the clock speed of ISP master.
And finally, execute "make program" (i don´t need "make clean / make hex / make fuse whith this firmware):
make program
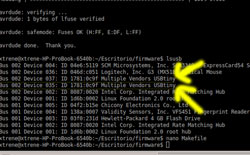
Now, when i do "lsusb" onto the terminal i can see two FabISP devices. My FabISP was programmed successfully
lsusb command:
Programming new FabISP:
xtrene@xtrene-HP-ProBook-6540b:~/Escritorio/firmware$ ls
main.c main.elf main.hex main.o Makefile usbconfig.h usbdrv
xtrene@xtrene-HP-ProBook-6540b:~/Escritorio/firmware$ sudo make program
avr-gcc -Wall -Os -DF_CPU=12000000 -Iusbdrv -I. -DDEBUG_LEVEL=0 -mmcu=attiny44 -o main.elf usbdrv/usbdrv.o usbdrv/usbdrvasm.o usbdrv/oddebug.o main.o
rm -f main.hex main.eep.hex
avr-objcopy -j .text -j .data -O ihex main.elf main.hex
avr-size main.hex
text data bss dec hex filename
0 2116 0 2116 844 main.hex
avrdude -c usbtiny -p attiny44 -U flash:w:main.hex:i
avrdude: AVR device initialized and ready to accept instructions
Reading | ################################################## | 100% 0.00s
avrdude: Device signature = 0x1e9207
avrdude: NOTE: "flash" memory has been specified, an erase cycle will be performed
To disable this feature, specify the -D option.
avrdude: erasing chip
avrdude: reading input file "main.hex"
avrdude: writing flash (2116 bytes):
Writing | ################################################## | 100% 2.95s
avrdude: 2116 bytes of flash written
avrdude: verifying flash memory against main.hex:
avrdude: load data flash data from input file main.hex:
avrdude: input file main.hex contains 2116 bytes
avrdude: reading on-chip flash data:
Reading | ################################################## | 100% 3.81s
avrdude: verifying ...
avrdude: 2116 bytes of flash verified
avrdude: safemode: Fuses OK (H:FF, E:DF, L:FF)
avrdude done. Thank you.
avrdude -c usbtiny -p attiny44 -U hfuse:w:0xDF:m -U lfuse:w:0xFF:m
avrdude: AVR device initialized and ready to accept instructions
Reading | ################################################## | 100% 0.00s
avrdude: Device signature = 0x1e9207
avrdude: reading input file "0xDF"
avrdude: writing hfuse (1 bytes):
Writing | ################################################## | 100% 0.00s
avrdude: 1 bytes of hfuse written
avrdude: verifying hfuse memory against 0xDF:
avrdude: load data hfuse data from input file 0xDF:
avrdude: input file 0xDF contains 1 bytes
avrdude: reading on-chip hfuse data:
Reading | ################################################## | 100% 0.00s
avrdude: verifying ...
avrdude: 1 bytes of hfuse verified
avrdude: reading input file "0xFF"
avrdude: writing lfuse (1 bytes):
Writing | ################################################## | 100% 0.00s
avrdude: 1 bytes of lfuse written
avrdude: verifying lfuse memory against 0xFF:
avrdude: load data lfuse data from input file 0xFF:
avrdude: input file 0xFF contains 1 bytes
avrdude: reading on-chip lfuse data:
Reading | ################################################## | 100% 0.00s
avrdude: verifying ...
avrdude: 1 bytes of lfuse verified
avrdude: safemode: Fuses OK (H:FF, E:DF, L:FF)
avrdude done. Thank you.
xtrene@xtrene-HP-ProBook-6540b:~/Escritorio/firmware$ lsusb
Bus 002 Device 004: ID 04e6:5119 SCM Microsystems, Inc. SCR3340 - ExpressCard54 Smart Card Reader
Bus 002 Device 036: ID 046d:c051 Logitech, Inc. G3 (MX518) Optical Mouse
Bus 002 Device 037: ID 1781:0c9f Multiple Vendors USBtiny
Bus 002 Device 035: ID 1781:0c9f Multiple Vendors USBtiny
Bus 002 Device 002: ID 8087:0020 Intel Corp. Integrated Rate Matching Hub
Bus 002 Device 001: ID 1d6b:0002 Linux Foundation 2.0 root hub
Bus 001 Device 005: ID 04f2:b15e Chicony Electronics Co., Ltd
Bus 001 Device 004: ID 138a:0007 Validity Sensors, Inc. VFS451 Fingerprint Reader
Bus 001 Device 003: ID 03f0:231d Hewlett-Packard 4 GB Flash Drive
Bus 001 Device 002: ID 8087:0020 Intel Corp. Integrated Rate Matching Hub
Bus 001 Device 001: ID 1d6b:0002 Linux Foundation 2.0 root hub