
02 Computer Aided Design
Assignment
- Try as many 2D/3D packages and document your experiences
- Render and present your project proposal in 2D/3D/animation
Journey
2D Packages- Adobe Photoshop - This is the default package used in my School and is loaded on all laptops. I find this package a little large and takes up too much space on the notebooks. The advantage is that it is full-featured and has lots of help and documentation. I must get down to using this software as it will definitely be the standard in cleaning up my photos etc.
Another major drawback is the size of installation. In SP we do not have a choice of the packages in the Adobe suite that we can install, and hence when we install this, everything is dropped in which takes up quite a large amount of disk space on my Mac.
Pros: Industry Standard, Full featured, good for raster images
Cons: Large disk footprint (SP), stiff learning curve - GIMP - A favourite of mine as it is cross-platform and I can use it on my Linux machines. I find the interface clean and simple to use, though it emulates a number of Photoshop features. I'm currently using this for my default graphic editor for quick and dirty work and find that with ver 2.8, most of my needs are satisfied (for free).
Pros: Cross platform, alternative to Photoshop, simpler, plenty of tutorials
Cons: Not for professional photos, no HDR - Libre CAD - I found this package some months back when I need to do some laser-cutting work and was hampered by the limited number of machines that ran Corel Draw in the Fab Lab. (Corel Draw was needed for the driver of the laser cutter). What I found, really nice on Libre CAD is that it follows the old AutoCAD (I mean really old) of entering data, which is using the keyboard. For example, to draw a line you would use "L" followed by the 2 coordinates. Simple! However, there are limitations to this software in terms of replication and drawing, which can only get better over the years.
Have just tested QCad, and it seems that LibreCAD is a copy of this more mature package Pros: Cross platform, vector drawing, simple to start Cons: No manual or instructions - InkScape - This package was introduced in the FabAcademy class, and was interested as it could add some raster to a vector drawing. The interface is simple and easy to get around with a quick learning curve. I have not used this extensively, however, I have intent to do so, and it might take over LibreCAD.
Pros: Cross platform, vector/raster drawing, simple to start.
Cons: Difficult to do CAD drawings. - QCad - A late entry which I discovered in Week 3 when I had to do computer controlled cutting. Performs much better than LibreCAD and has a manual to go with it. Will be using this in preference to LibreCAD
Pros: Cross platform, vector drawing, CAD exactness
Cons: A bit quirky in the command sections. Remove the "Trial" options otherwise, you could be wondering why certain functions don't work after 15 mins.
Examples of 2D files
3D Packages
- Sketch-Up - Simple elegant package for drawing 3D. Very fast learning curve and its ability to do 3D drawings is fantastic. I would use this package if I had something simple to draw and I need it fast. It fails in the exactness as you need construction lines to get exact locations and placement.
Pros: Simple, fast to learn, easy to use, excellent for simple projects. Excellent performance even on older systems
Cons: Needs construction lines, Windows only, can leave behind lines when creating output files for 3D printing. - 123D - Another product from Autodesk, elegant and easy to use, however, poor performance times and difficult to enter/change exact measurments is a hinderance. Lags after a while of use.
Pros: Elegant drawing environment, full-featured
Cons: Poor performance speeds, difficult to change drawings - Inventor - An Autodesk product which runs only on Windows (no emulation or VM), full-featured, easy to start but needs guidance in doing detailed drawings. Gets addictive when familiar with the techniques. Output is fantastic, with lots of tools.
Pros: Great product, full featured. 3yr free for Education, lots of help in SP from the MAE people
Cons: Runs only on Windows, needs fairly powerful system, 10GB download, must copy files to local HD before installation.
Experiences with Inventor
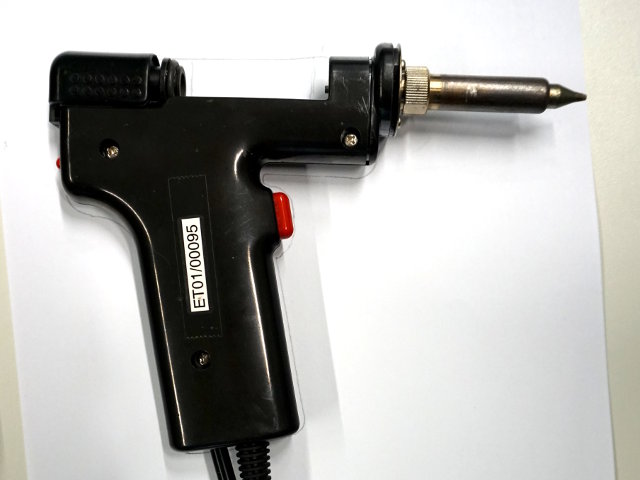 Using a soldinering iron as a sample for the handle
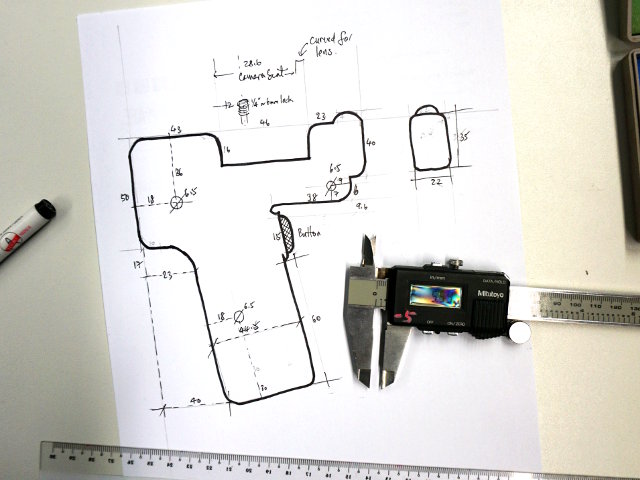 The plan
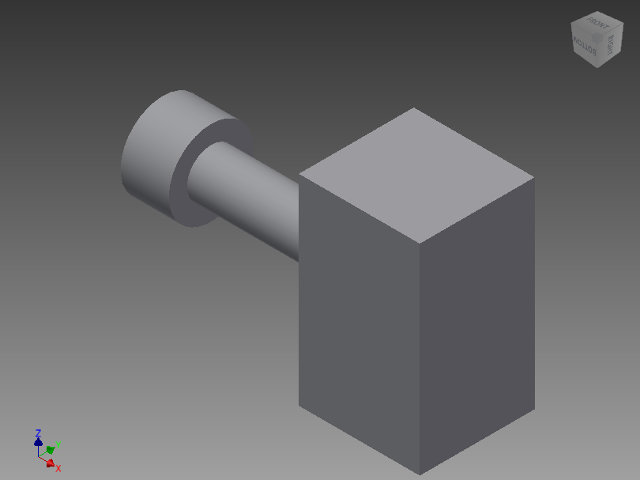
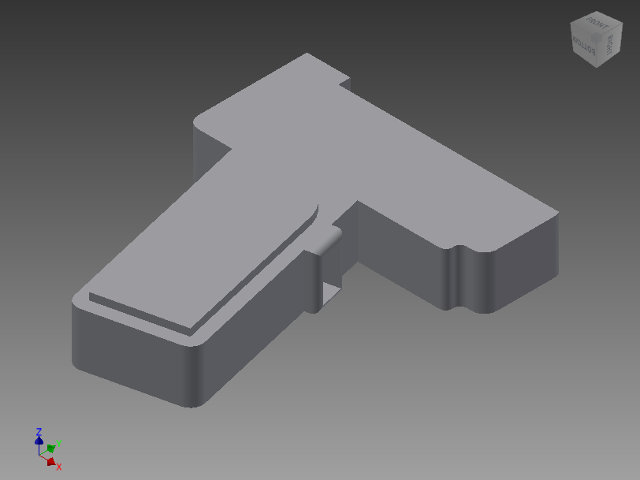 Holder for batteries and electronics
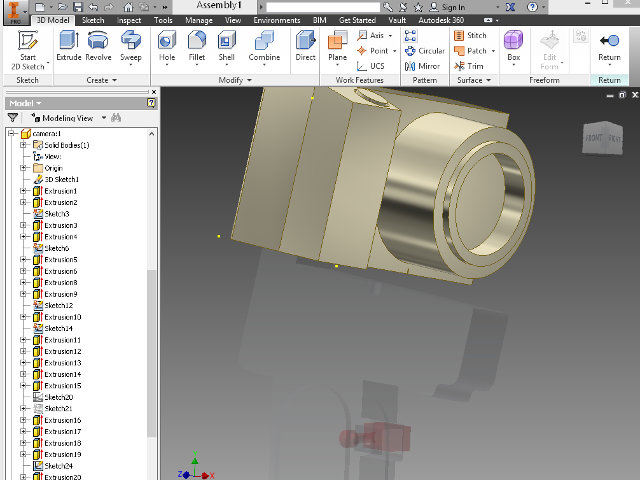
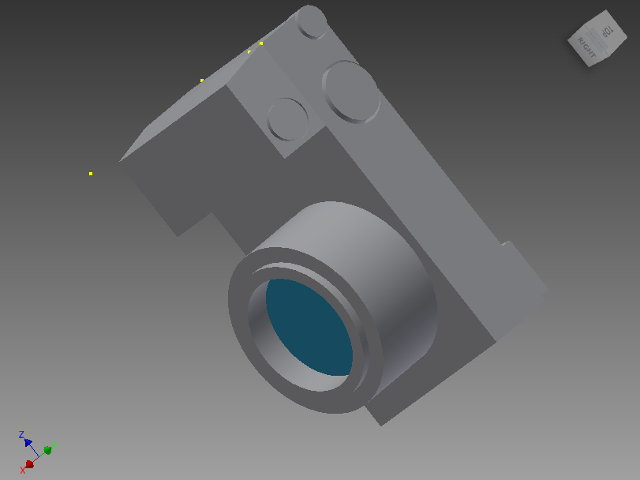 Sony NEX Camera
 Button for triggering events
 Assembly of parts, editing in place
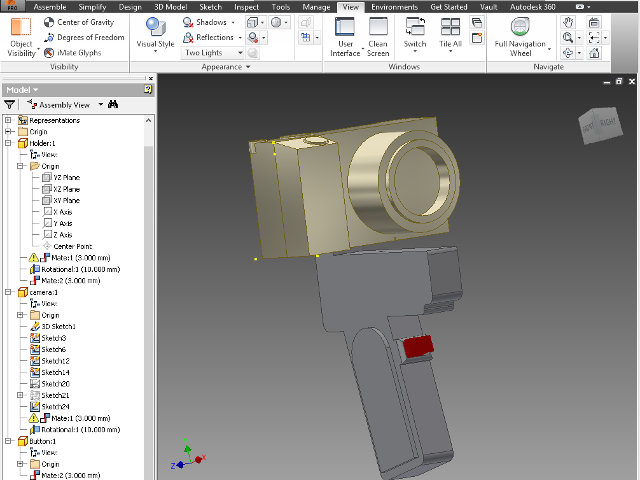 Full assembly of proposed project
- Camera holder (Holder.ipt)
- Button trigger (Button.ipt)
- Plate for camera (Plate.ipt)
- Assembly 1 (Panomatic_1.iam)
- Assembly 2 (Panomatic_2.iam)
Here are some tips to take note of when using Inventor:
- Free registration 3yr lease with Autodesk as Education. Download took 2 days (10GB), the download manager does not resume and Autodesk does not indicate the size of files.
- Copy the installation files to your local harddisk, otherwise will prompt you to insert DVD. Hence, need at least 25GB for the installation process. Need to get your registration code handy.
- Create a part first (.ipt file). Usually created in 2D and then by using extrusion either extend or cut out the solids. All drawing is done in 2D and then constructed in 3D.
- Some drawing tips
- Draw and measure on paper first
- Use ESC to terminate input
- Blue lines means that object is constricted (Green lines unconstricted), remove the dimensions before you can change it. If you enter values, the drawing is constricted.
- Remove any unwanted lines/arcs/circles otherwise when you extrude, you will get problems.
- You don't need to be exact i.e. parallel, at intersection etc, you can use the modifiers to do this for you.
- Use the dimensioning tool to help in exact placement. You can place first and then change location by changing the dimension value
- Use the MIDDLE mouse button to pan/enlarge drawing. Combine with SHIFT to rotate views, small rectangle on right also helps
- Do not champfer the edges until everything is finished, makes measurements and placements easier
- Use the VIEW option on ribbon to show the edges and hidden lines
- Need to select a plane for editing, this makes placement on the plane simpler
- Start drawing from middle of object and extrude outwards. Inventor can extrude symetrically/asysmetrically which is a great drawing tool.
- Draw all parts first, you can assemble it later. You can also copy all parts to a different folder and assemble from there.
Reflection
This week, I allocated the following time to go through the work
- 4 hrs for 2D packages (ok!)
- 4 hrs for 3D packages, decision and installation (overran)
- 12 hrs for drawing the mock-up of the final project (about right)
Unfortunately most of the time was spent trying to download the Inventor package which was at least 10GB and should be pre-downloaded for any session. Registration and installation was easy.
Inventor takes at least 2 hours of prep time, if I were to do it again, I would borrow one of the PRINTED tutorial books from the library and go through a intensive tutorial. You will need a minimum of 4 hours to achieve proficiency to draw a complete project. I shortened the process by having Roy give me 2 online sessions. There is also nothing better than working on your project, than drawing some meaningless cones and blocks.
Before starting, draw a profile/plan of your project on paper and have the measurements ready. It makes the translation to Inventor easier and helps you visualise your product. The holder, although simplest among the parts, took me the better part of 6 hours to draw, even with a drawn plan.
After 10 hours of drawing, I was proficient enough to draw the camera body without the help of a plan. The body was meant to be roughly imaged, and I could do this by alternating between 2D and 3D environments of Inventor using the extrusion command. An essential help to the drawing of the camera body was the camera itself and a vernier caliper to do the measurement. It was more of an exercise in 2D and extrusion.
The final drawing assembly was made up of 3 parts and with the help of Roy, who convinced me not to redraw, but to edit the existing parts using the assembly. I found this to be the most powerful feature of Inventor, and was totally blown away by the flexibility. I could shift from the assembly to the part, edit the part section in 2D, extrude the part and return to the assembly with the changes made. Truely amazing.
In the end, I spent more time on inventor than required, blowing the Tuesday deadline. CAD is a process of trial and error, and you can easily loose track of time. I would strongly suggest a worked tutorial.
I like Inventor, totally!!
References
- GIMP - a raster drawing program, similar to Adobe Photoshop. I use it to resize all the images in this site to a maximum width of 640px.
- InkScape - a vector drawing program, allows colouring and shading. Not a CAD program.
- QCad - My prefered choice for 2D CAD program
- SketchUp - Excellent beginners program for drawing 3D.
- AutoCAD Inventor - A full and complete 3D CAD package, can also be used for 2D work, excellent for rendering and simulating projects.
Not being of a artistic mind, I have shamelessly borrowed this template (simpleStyle_8) from html5webtemplates, in recognition of a simple, cool and functional webpage design.