INTRODUCTION
Look, listen and feel: multi-sensory toys to grow and have fun.
Experts agree that children learn and develop their minds during their early years, especially when they are encouraged to play with toys that attract their senses of sight, sound and touch.
What does that mean? Well, for starters, it means that playing with toys offers a learning experience, even if your child doesn't realize it. It also means that choosing multi-sensory toys the kinds of games and activities that involve the ears, eyes and fingertips--helps build up your child's brain when he or she is very young, and even as he grows up.
So I would like to develop a toy that can stimulate different senses.
The toy should:
- be decomposable
- intercact through light
- interact through sound
I will make a central body, at the central body the kid can connect the head and the other part of the animal. Once the animal is assemblied it will ricognize the kind of animal, even if it's a mix and will give auditory and britgh feedback.
GENERAL DESCRIPTION
The toy is composed by:
- a central part, the body of the animal
- one head
- two legs
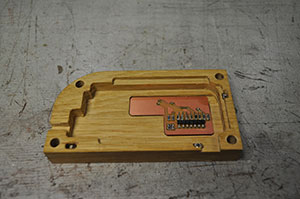
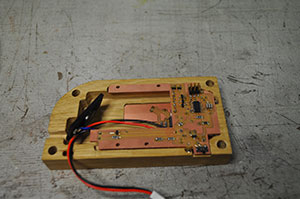
Inside the central part there are the main board with an ATTINY84, the input sensor (vibration sensor), the ouput devices (leds and speaker)and the supply (9V) battery.
Inside the head and the legs there are the resistors used to identify the different animals.
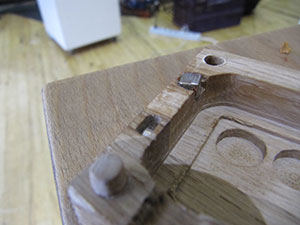
The junction between the different parts are magnetic and wooden pegs hold the the half of each part.
FUNCTIONALITY
With the switch placed on the bottom of the central body the toy is active and a white led is switched on.
Once the different parts are assembled the central body will react in different ways:
- if all the connected part belong to the same animal =>
=> one led turns blue and generate a first sound
- if the parts belong to different animals
=> the same led turns red and generate a different sound.
If the assembled animal is moved a rainbow led will shine and a song will played.
DESIGN
During the Academy time I realized that the wood is the material that most fascineted me. Between acrilic, resins, copper, fabrics, plastic filaments I wanted to have to do with wood.
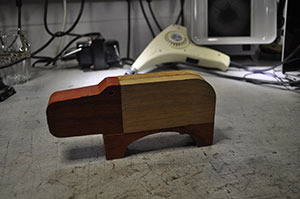
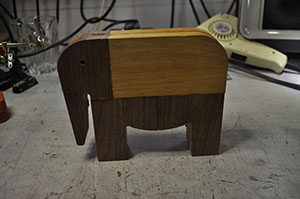
Due to my lack in drawing I realized that I could have started not complitly from scratch. I decided to work on a famous italian designer' project, "i 16 animali". The author is Enzo Mari. I wanted to make something that is an enjoyable view even is it's not used.
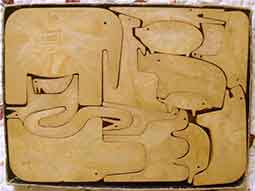
With paper and Rhino I designed the profiles, thought to a functional part separations and how to implement the electronics boards and devices inside the central body. For time matter I decided to have only head and the two legs.
In the ShopBot section I will explain in details the inner profiles and there purpose.
ELECTRONICS
Consideration about the battery
I considere to use bottom 3V batteries, 9V alkaline battery or rechargeable Lithium Polymer Battery with 3.7V. The 3V bottom battery would get empty too fast with 3 or 6 led load and the Lithium battery is rechargeable but also need a specific charge circuit and current/voltage controls. So for power and size I choose the 9V battery and a 3V3 regulators on the boards.
Consideration about the vibration sensor
There are different way to detect a motion, as an accelerometer or the Hall effect sesor. For costs, consumptions and sixe I choose the simple one: a vibration sensor.
Consideration about the sounds
During the week 12 I could try two sound generator: the piezo and a 8Ohm Speaker. Only for my personal feeling I choose to use the speaker. The next time? a micro SD card and reader.
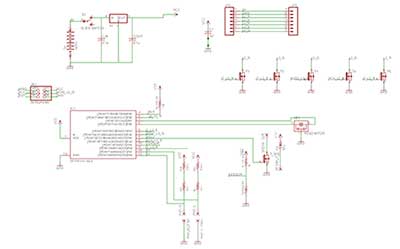
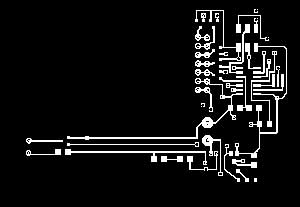
The Circuit diagram of the toy is the following
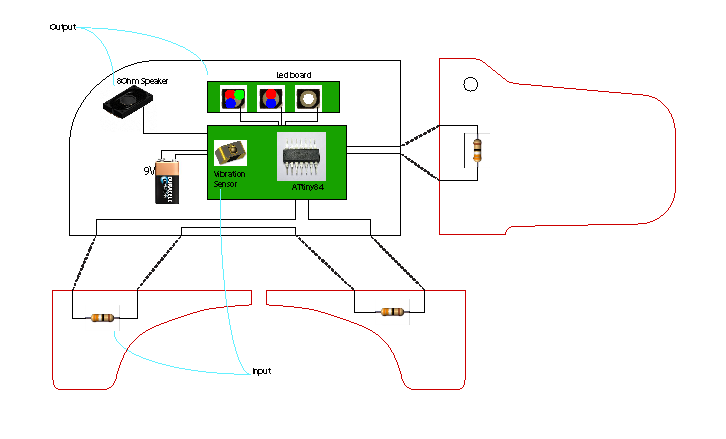
The electronic is devided in:
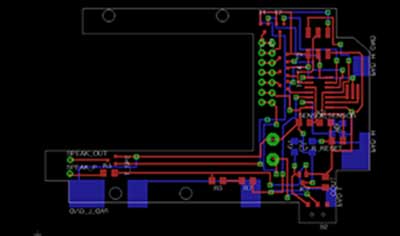
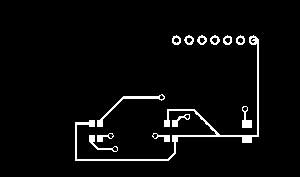
- Central board:
- ATTINY84 microcontroller, I needed 3 pins for input devices (1 for the vibration sensor and 2 t0 detect the different parts of the body) and 7 for the output devices (2 rgb led, one led and speaker)
- resonator
- Vibration sensor
- ISP pin connection
- 3V3 regulator, and the two intput and output capacitors
- 7 pin row header, connect the leds boards
- the N-channle mosfet, they drives all the output. In this way I can supply the led directly from the 9V. I hope the common ground between the two domains, 3V3 and 9V, is not going to bother.
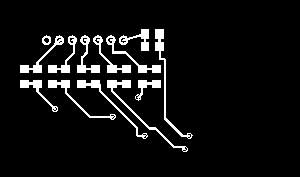
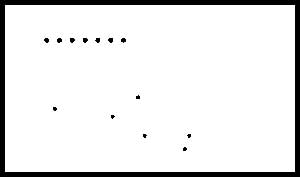
- the resistors, they form the two resistor ladder and the reference voltages I need to identify the animals. - Led Board:
it's placed in the central body on the lateral sides. It includes three led and the resistors. The supply is 9V and the resistors must limit the current, not higher then 20mA. I selected the resistor to have around 15mA for each leds. For the blue and white leds I used parallel 1k//500 Ohm and for the rest 5k//500 Ohm.
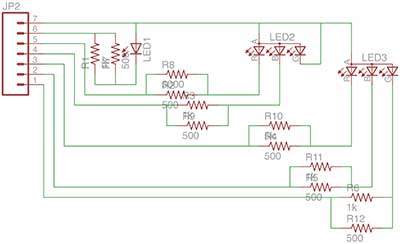
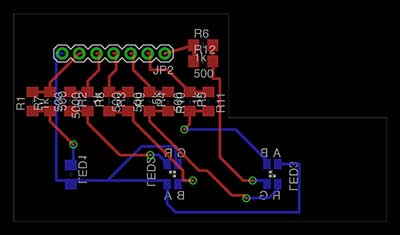
In the final prototype I had to change the connections on the board, the reason is explained in the "work laser section". At the end I disconnected the Led3 and connected the green cathod of Led2 instead of the Led3.
TEST
- The closing and shorting mechanism have been tested during week 14.
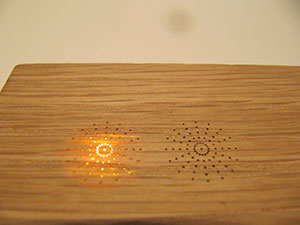
- To check if I could see the light through the wood I drilled five holes in a wooden block, from a 17mm block I went down 16.8mm, 16.6mm, 16.4mm and on. I could see the bright light trhough the 0.2mm and 0.4mm. For my final project I opted for the 0.4mm, the 0.2mm looked to fragile, worse case I could sand the 0.4mm.
- From week 14 expirience I decided to create a pocket for the magnet, to check if I could use a pocket at only 2mm distance from a vertical surface I made a test.
WORK WITH SHOPBOT
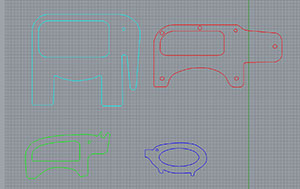
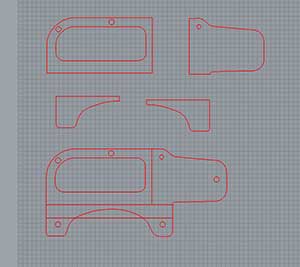
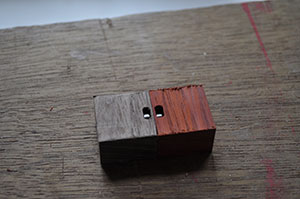
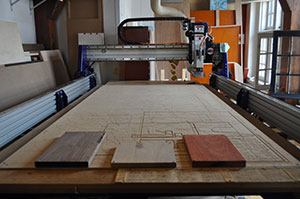
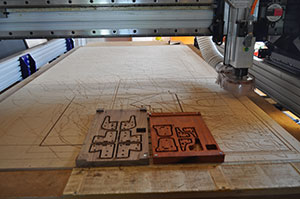
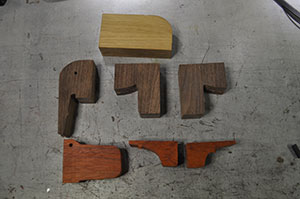
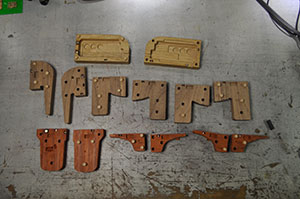
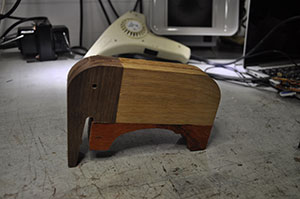
I bought three wood pieces: oak (white), african padouk (red) and american walnut (dark). From the oak I cutted the central body, from the padouk the hippopotamus and from the dark the elephant. The realization took two steps: the surfacing and the realy cut.
Surfacing
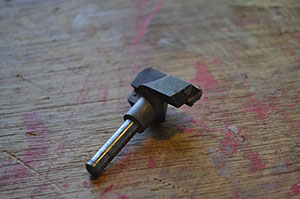
The pieces had different thickness and I aligned them to 17mm.I used a surfacing mill bit. The job runned at 30000rpm, speed 40 and deep pass 2mm.
Not to do!!!
Always be sure about the file you are loadin on the machine and that the measures you are writing to the machina are the correct one. It looks obvious but it can happen to have a bad day, you are not focused and my suggestion is only one: if you can postpone the job of one day, if you can't drink coffee and check 1000times. I went straight on a screw with the surfacing bit, twice, in two hours.
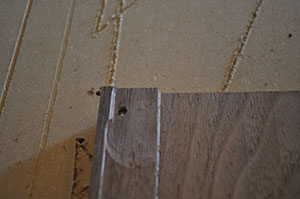
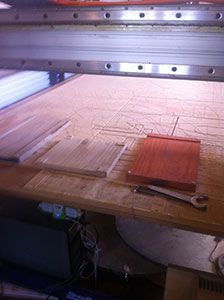
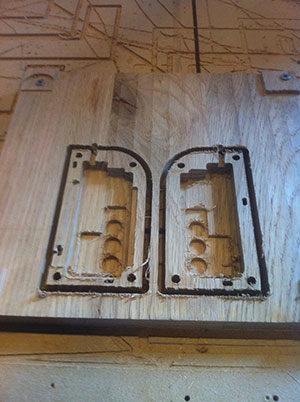
Milling and cutting
The final job included the mill of several pockets for the inner components and the cut out. The traces and the magnets pocket are done with a 1/8inches, two flutes mill bit, speed 60, 30000rpm. All the rest are done with a 5mm two down spiral flutes, speed 40, 30000rpm.
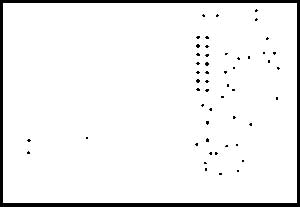
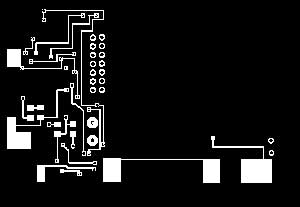
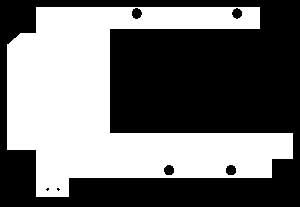
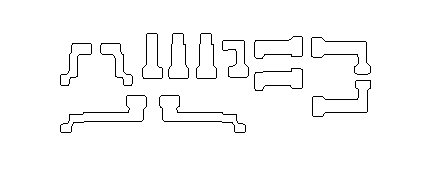
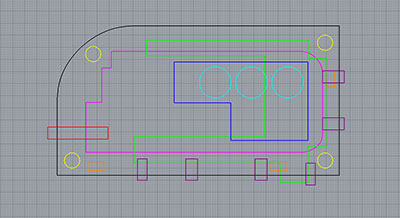 Color Legenda
turquoise - led
blue - led board
grren - control board
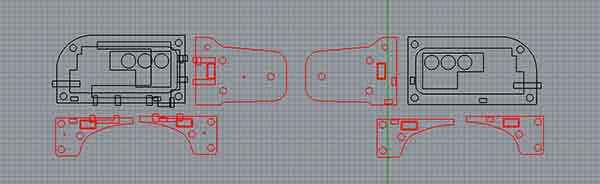
pink - big pocket
orange - magnets
yellow - pegs
purple - traces
black - cut
red - speaker
WORK WITH ROLAND MODELA MDX-20
Both the boards are asymmetric so I had two design two cutting profile, so the milling workflow was:

WORK WITH VYNIL CUTTER
I worked on the vynili cutter to make the traces that will short the different parts of the animals.
The corners are smooth out to simplify the cut, the machine set-up was speed 1mm/sec and force from 80 up to 120.
WORK WITH LASER CUTTER
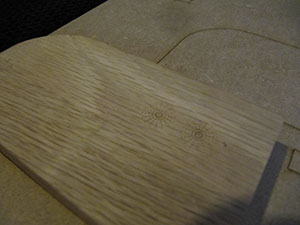
The debugging process forced me to use also the laser cutter and actually I'm glad it happened. I found out that the oak wood filters the blue light, I didn't have chance to see it fron the inside of the central body. To fix this lack I decided to cut a grid in correspondence to the led.
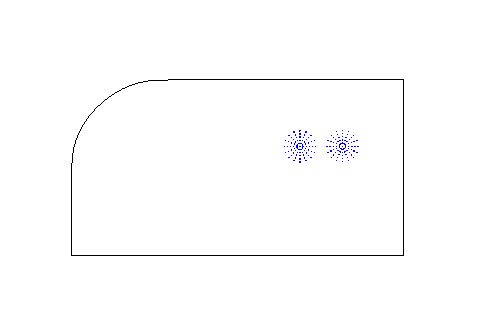
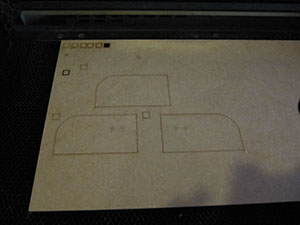
To properly allign the laser to the shape of the wood I followed the steps:
- put the wood in the laser cut and make the autofocus
- remove the wood from the laser
- place a sucrificial panel
- made the focusing by hand, in this way I could note how much the z calibration changed. In my case 15,7mm
- engrave the body profile on the sucrificial layer
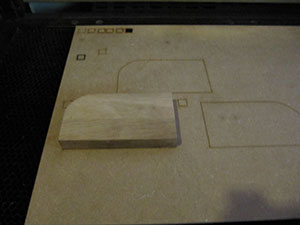
- move the laser back to the z calibration for the wood
- place the wood centered in the engraved profile
- and send the job.
I used for the sucrificial layer: power 100, speed 5, 750 ppi and for the oak wood: power 100, speed 10, ppi 750.
ASSEMBLY and DEBUGGING
I had to add some magnets and sand the led board corners.

CODE
The code can be much more improved, I had 1day and half to write it. As soon as I will fix it I will also aupdate it.
The explanation of the functions and the code are the comments in the code.
//It detects:
//Hyppo -> red
//Lele -> blue
//Mix Animal -> rainbow light
//Move -> song
int speakerPin = 5;
int sw_pin = 3;
int l3_r_pin = 2;
int l3_b_pin = 4;
int l3_g_pin = 6;
int leg_pin = 1;
int head_pin = 0;
int ts_low = 341 ; //low threshold for animals
int ts_high = 800; // high threshold for animals
int buttonPushCounter = 0; // counter for the number of button presses
int buttonState = 0; // current state of the button
int lastButtonState = 0; // previous state of the button
//MUSIC--------------------------------------------------------------------------
int length = 42; // the number of notes
//char notes[] = "ccggaagffeeddc "; // a space represents a rest
char notes_1[] = "fgagaAagfgagfag CAaACAagfgagfag "; // a space represents a rest
int beats_1[] = { 4,2,4,4,2,3,3,4,4,2,4,4,4,2,14,4,4,2,4,4,2,3,3,4,4,2,4,4,4,2,14,4 };
int tempo = 100;
//-----------------------------------
void setup() {
}
void loop() {
//read the values of leg and head
int leg_value = analogRead (leg_pin);
int head_value = analogRead(head_pin);
// ANIMAL
//I check the values of the legs and the head.
if (leg_value > ts_high && head_value > ts_high) { //if there are not animal => no light
analogWrite( l3_r_pin, 0);
analogWrite( l3_b_pin, 0);
analogWrite( l3_g_pin, 0);
}
else{}
if ( leg_value < ts_low && head_value < ts_low) { //hyppo
analogWrite( l3_r_pin, 250);
analogWrite( l3_b_pin, 0);
analogWrite( l3_g_pin, 0);
delay(10);
}
else {
analogWrite( l3_r_pin, 0);
analogWrite( l3_b_pin, 0);
analogWrite( l3_g_pin, 0);}
if ( ts_low < leg_value && leg_value < ts_high && ts_low < head_value && head_value < ts_high)
{ // Lele
analogWrite( l3_r_pin, 0);
analogWrite( l3_b_pin, 250);
analogWrite( l3_g_pin, 0);
delay(10);
}
else {
analogWrite( l3_r_pin, 0);
analogWrite( l3_b_pin, 0);
analogWrite( l3_g_pin, 0);
}
if (leg_value < ts_low && head_value > ts_low && head_value < ts_high)
{ //leg hyppo, head lele
analogWrite( l3_g_pin, 250); //green light
delay(10);
}
else {
analogWrite( l3_r_pin, 0);
analogWrite( l3_b_pin, 0);
analogWrite( l3_g_pin, 0);
}
if (head_value < ts_low && leg_value > ts_low && leg_value < ts_high)
{ //leg lele, head hyppo
//rainbow-------------------------------------
unsigned int rgbColour[3];
// Start off with red.
rgbColour[0] = 250;
rgbColour[1] = 0;
rgbColour[2] = 0;
// Choose the colours to increment and decrement.
for (int decColour = 0; decColour < 3; decColour += 1) {
int incColour = decColour == 2 ? 0 : decColour + 1;
// cross-fade the two colours.
for(int i = 0; i < 255; i += 1) {
rgbColour[decColour] -= 1;
rgbColour[incColour] += 1;
setColourRgb(rgbColour[0], rgbColour[1], rgbColour[2]);
delay(5);
}
}
//-------------------------------------------------
delay(10);
}
else {
analogWrite( l3_r_pin, 0);
analogWrite( l3_b_pin, 0);
analogWrite( l3_g_pin, 0);}
if (leg_value < ts_high && head_value < ts_high) { //if there is an animal => detect motion
Motion();
}
else{}
}
//MUSIC FUNCTION--------------------------------------------------
void playTone(int tone, int duration) {
for (long i = 0; i < duration * 1000L; i += tone * 2) {
digitalWrite(speakerPin, HIGH);
delayMicroseconds(tone);
digitalWrite(speakerPin, LOW);
delayMicroseconds(tone);
}
}
void playNote(char note, int duration) {
char names[] = { 'c', 'd', 'e', 'f', 'g', 'a', 'b', 'C', 'A' };
int tones[] = { 2110, 1880, 1675, 1581, 1409, 1255, 1118, 1055, 1184 };
for (int i = 0; i < 8; i++) {
if (names[i] == note) {
playTone(tones[i], duration);
}
}
}
//-------------------------------------------------------------
// MOTION SENSOR FUNCTION--------------------------------------
void Motion(){
buttonState = analogRead(sw_pin);
if (buttonState == lastButtonState) {
if (buttonState > 1000) {
buttonPushCounter++; //count the state changes
} }
lastButtonState = buttonState;
if (buttonPushCounter > 20) { //if the state changes are higher than 20
//Play the song
pinMode(speakerPin, OUTPUT);
for (int i = 0; i < length; i++) {
if (notes_1[i] == ' ') {
delay(beats_1[i] * tempo); // rest
} else {
playNote(notes_1[i], beats_1[i] * tempo);
}
}
buttonPushCounter = 0; //reset the count
delay(100);
} //else {
//}
}
//-----------------------------------------------
// FUNCTION RGB LED--------------------------------------
void setColourRgb(unsigned int red, unsigned int green, unsigned int blue) {
analogWrite(l3_r_pin, red);
analogWrite(l3_g_pin, green);
analogWrite(l3_b_pin, blue);
}
DOWNLOAD
MISSING
- I couldn't make any molded and casted parts. It was part of my programm to change different materials.
- In the code I have to implement the sound to ricognise the different animals. I'm not going to add it now. I will do it in the next prototype when I will implement SD card-read.
INVENTION, INTELLECTUAL PROPERTY AND INCOME
The actual prototype needs several improvements so, first of all, I would try to create the possibility for myself to work ahead with the project. To do that I'd search support through crowdfunding, I'd search someone interested in my idea and who could invests on it. I think that for this porpouse equity crowdfunding sistem of Symbid is the good choise.
"Symbid is about investing safely in new, promising, fast-growing businesses. Before a company is traded on the stock market, anyone can acquire an equity interest and profit by having the foresight to anticipate the company's growth.
[...]
How does it work? For each business that acquires new investors via Symbid, Symbid sets up an investors' cooperative.
[...]
The investors all become members in this investors' cooperative and it is the cooperative which is ultimately the shareholder in the business. Complicated? Not at all. Is there any increased risk due to the indirect ownership and control? Absolutely not. Of course, the universal entrepreneurial risk still remains, as in all equity investment: if a business cannot fulfill its obligations, it goes bankrupt and the investors lose their invested money."
It would permit the financial conditions not to sell the product but to develop it and reach the goal to have a product that can be qualified and read to turn in a business. In the meanwhile I would also look for someone with commercial and marketing expirience that could manage that part of big project.