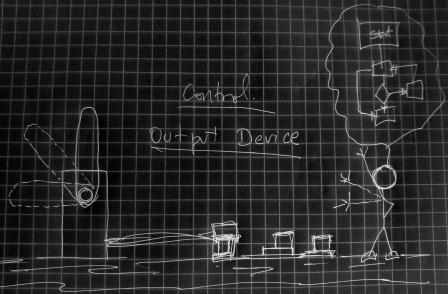
Week12Output devices
José J. Lazarte R.

Assignment
   Add an output device to a microcontroller board you've designed......
From card developed in Assignment 4 (Electronics Production) for programming of microcontrollers and microcontroller using the Assignment 6 (Electronics design) made ​​some modifications to the output device connected as a servo motor, push button and access to pins terminals for the ATtiny44 microcontroller.
To obtain a small development platform to interact with servo motors.
I proceeded to make the card generating the PNG file, then perform the Roland Modela machine and drills tracks.
Then I proceeded to implement the board and solder the components used.

And program it to do something.
In order to program an algorithm that meets the following flow chart was made:
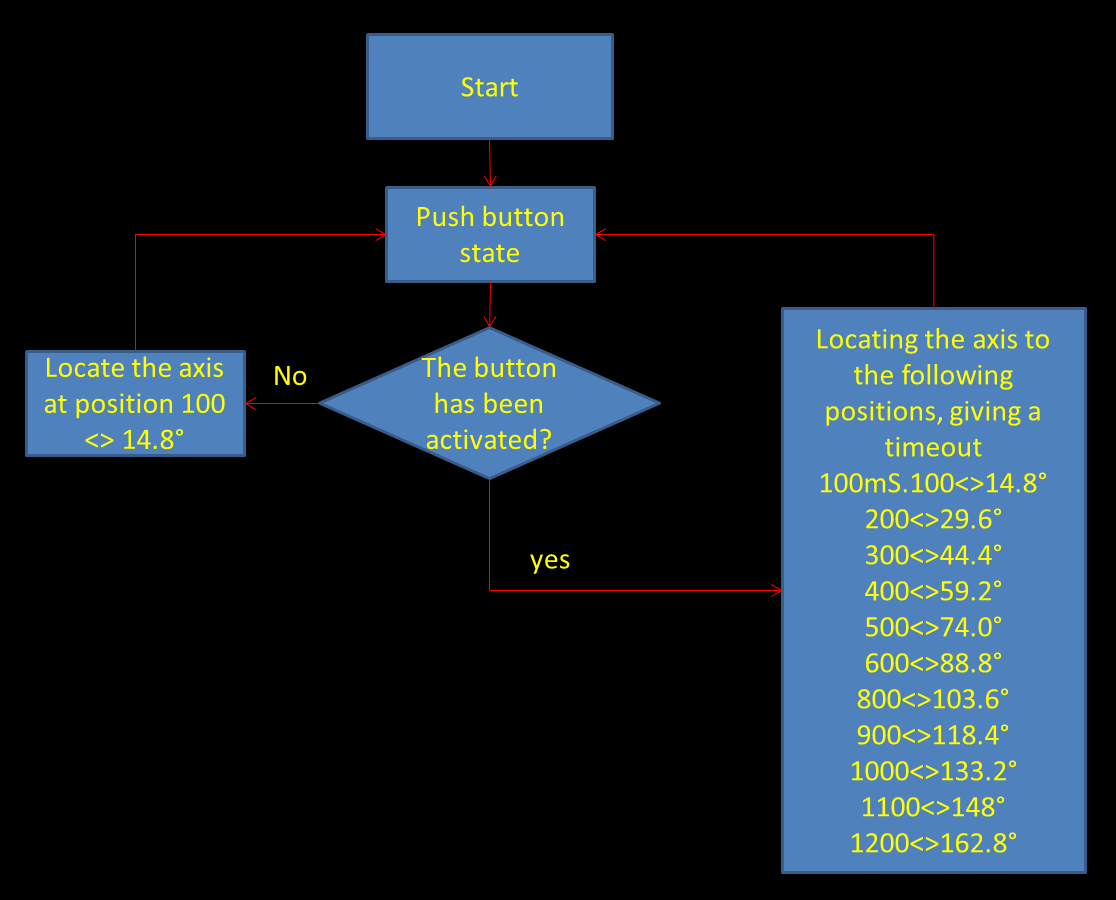
#include <avr/io.h>
#include <util/delay.h>

#define output(directions,pin) (directions |= pin) // set port direction for output
#define input(directions,pin) (directions &= (~pin)) // set port direction for input

#define set(port,pin) (port |= pin) // set port pin
#define clear(port,pin) (port &= (~pin)) // clear port pin
#define pin_test(pins,pin) (pins & pin) // test for port pin
#define bit_test(byte,bit) (byte & (1 << bit)) // test for bit set
#define position_delay() _delay_ms(100)

#define PWM_port PORTA
#define PWM_pin (1 << PA6)
#define PWM_direction DDRA

#define input_port PORTA
#define input_direction DDRA
#define input_pin (1 << PB3)
#define input_pins PINA

int main(void) {
   //
   CLKPR = (1 << CLKPCE);
   CLKPR = (0 << CLKPS3) | (0 << CLKPS2) | (0 << CLKPS1) | (0 << CLKPS0);
   // set up timer 1
   TCCR1A = (1 << COM1A1) | (0 << COM1A0); // clear OC1A on compare match
   TCCR1B = (0 << CS12) | (1 << CS11) | (0 << CS10) | (1 << WGM13);
   // prescaler /8, phase and frequency correct PWM, ICR1 TOP
   //ICR1 = 25000; // 20 ms frequency
   // set PWM pin to output
   clear(PWM_port, PWM_pin);
   output(PWM_direction, PWM_pin);
   set(input_port, input_pin); // turn on pull-up
   input(input_direction, input_pin);
   // main loop
   while (1){
      // wait for button down
      while (0 != pin_test(input_pins,input_pin));
      OCR1A = 100;
      position_delay();
      // wait for button up
      while (0 == pin_test(input_pins,input_pin));
      // 1 ms PWM on time
      for (int i=100; i<=1215; i=i+100)
      {
      OCR1A = i;
      position_delay();
      } 
   }
   }
Used for the servo motor axis motion occurs in an angular range from 0 to 180 degrees, in order to control it has climbed this angular range of the variable OCR1A values ​​between 0 and 1215 
when the button is not press, the initial position corresponds to 100 and  successively increase from 100 to 100 up to less than or equal to 1215 value.
The program was implemented in C language and development platform Arduino software, which we use to program the microcontroller in the footsteps of Assignment 6.

Was used as the output device servo motor type CS-939MG Corona brand.
Below we show two videos, the first of the programming and the second of operation.
video programming process: Video 1  
Video operation:  Video 2

Referencias:
http://www.arduteka.com/2011/12/componentes-el-servomotor/
http://www.servodatabase.com/servo/corona/ds-939mg