Fab Lab Barcelona SuperNode /Fab Lab Sevilla /Jose Perez de Lama
Weeks 16-19++ / final project
Retablillo de las Maravillas v1.0
Developed july>>august 2013
1./ Concept [in this page]
1.1/ Final concept / description
1.2/ Acknowledgements
1.3/ Initial concept
2./ Structure
2.1/ Chassis
2.2/ Secondary structures [roof & ramp, and marquee]
2.3/ Cushioning
2.4/ Screen / interface materiality
3./ Mechanics
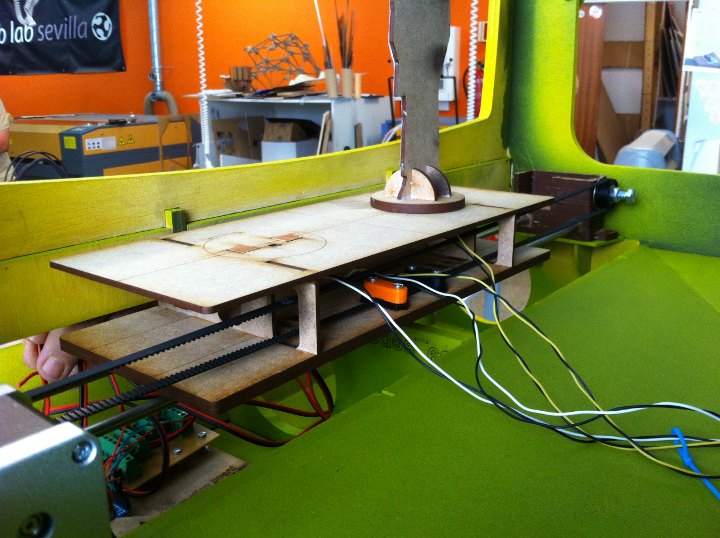
3.1/ Motorized platform
4./ Interactivity & electronics
4.1/ Switches / characters
4.2/ Screen / interface
4.3/ Motor controller
4.4/ I/O controller & interface
5./ Programming
5.1/ Motor controller
5.2/ I/O & interface
6./ Downloadable files & license
[1.1/ Retablillo de las Maravillas v1.0 :: concept]
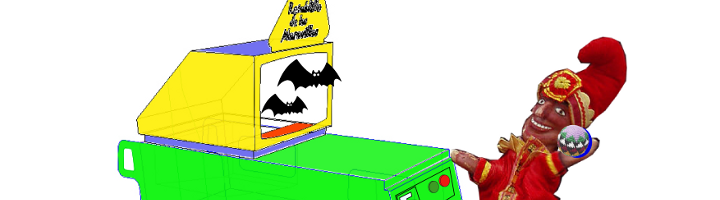
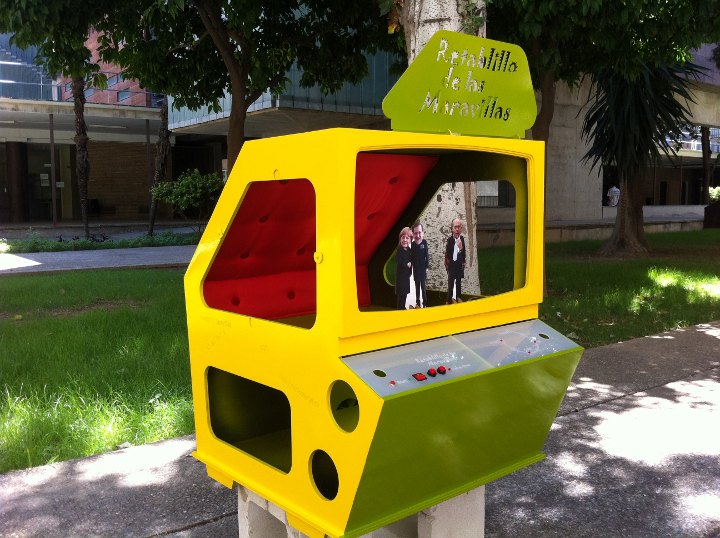
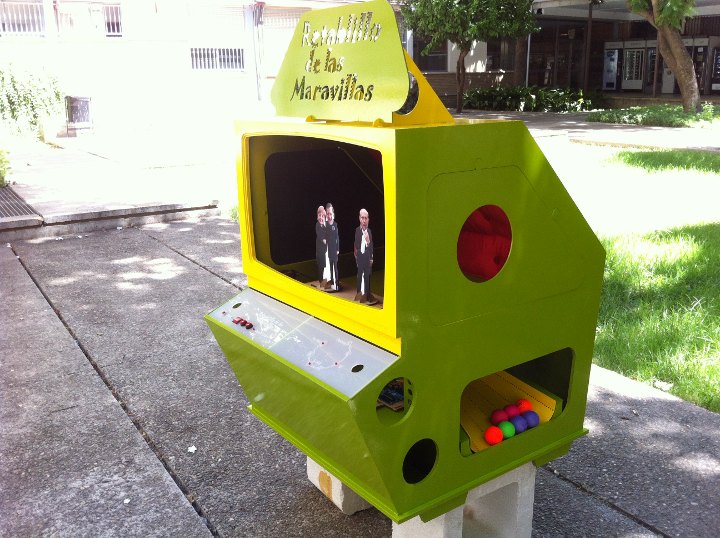
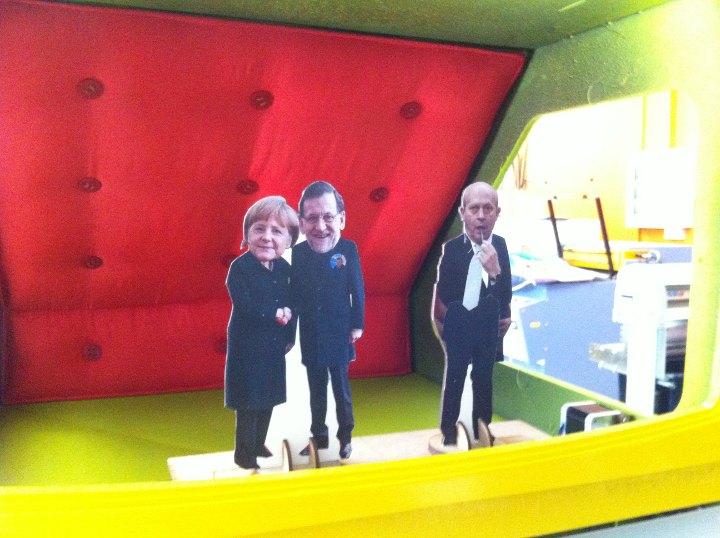
The idea was to design and fabricate something like a miniature ball-throwing booth that could be used as an agit prop, but also as a kids game.
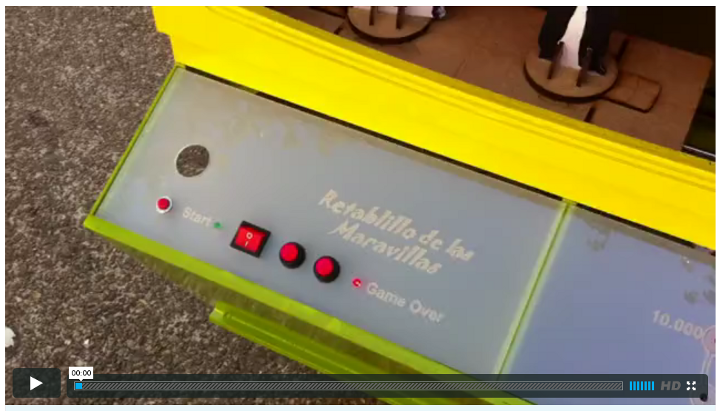
As a shape it looks like a hybrid of a 70's tv set and a pachinko booth, with a screen with some moving characters inside, and a control panel underneath with buttons to star and stop playing and interactive information about the development of the game.
The player has 30 seconds to shoot balls at the moving characters inside the screen, trying to knock them down. If the player indeed hits the characters and knocks them down, he/she gets points that are shown in the control panel. A green blinking light marks the start of the game, while a red blinking light marks game over.
The balls thrown into the screen are conducted through gravity and some ramps to the side of the volume returning to the players for the next game.
The hypothetical fun of the game is the possibility to throw balls at your favorite monster - or even at your favorite politician - as in the case i developed in version 1.0.
I believe it would be fun to take this contraption to political rallies, and that it might be a good instrument to call people's attention towards certain issues.
It is also just fun to play, and pretty intuitive, as i confirmed beta-testing it with the fab lab colleagues' kids, as can be seen in the video!
///
The project includes the following technical tasks that have been performed:
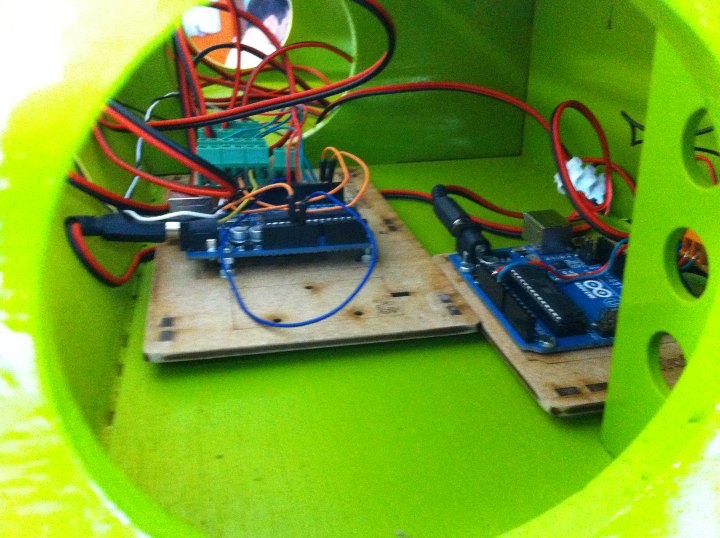
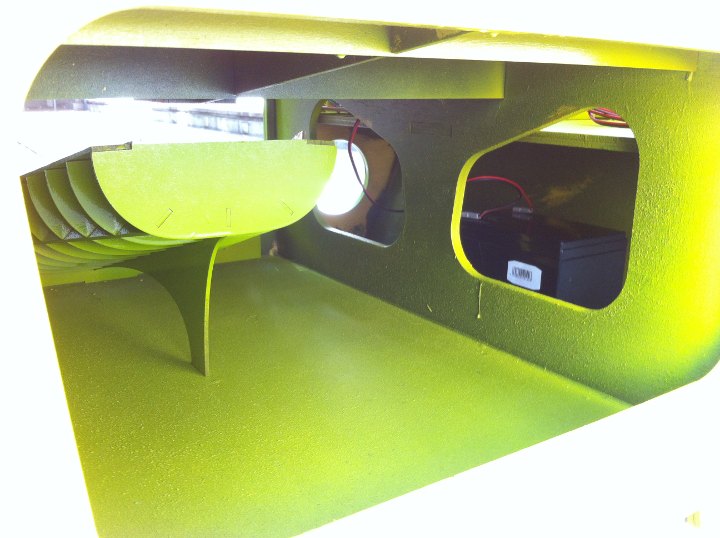
Concept design and design development; 3D design with Rhinoceros; 2D cutting files generation with Rhinoceros; laser cutting and etching [10mm plywood, 3mm MDF, 3mm acrylic, 2mm cardboard], press fit assembly and post-production; spray [pistol] painting; machine and hand sewing; mechanical design, assembly and testing; 3D printing [belt clamps]; interactive switch design using copper film and mini-magnets; electronics design [arduinos + 2 “shield" units], PCB production: milling; smd and through hole soldering; programming with Arduino IDE; systems integration: cabling including cable soldering, switches and reset push-button; 12V power battery design and installation.
video02 :: https://vimeo.com/71932511
[1.2/ acknowledgments]
Many thanks for their help to my colleagues at Fab Lab Sevilla, especially to Juan Carlos Pérez Juidías, and to Jose Buzón. Very special thanks to Aureliano Gómez, master of the Physics Lab at the School of Architecture, for his tremendous support in most of the phases of the project. Many thanks to my mother, Concha, and colleague Mari Carmen, for their awesome work with the cushioning! It is probably the coolest part of the Retablillo!
Lots of thanks to the Arduino community, and especially to Igna94Igna, for the code basics to control the stepper motor. And to the Reprap community, and Clone War community, for the mechanics design and tutorials.
Thanks to Nuria from Fab Lab Leon, who very gently sent us some materials that made the project possible.
To Lucia and Adriana, for her great beta-testing.
Of course to Neil, Sherry, Anna, Tomas, Bas, Luciano and the whole team at Fab Academy; - even if i am not so sure they will be proud of this...
To María José Lera, and Jose and Mercedes S, for their friendly support and feed back during the project development. And eventually... to Miryam RI, for her intriguing patience and her laughs when telling her about my ridiculous ideas!!!
Ah! And to the "bad guys" in the screen to give me a reason for the Retablillo de las Maravillas!
Project documentation: / structure / mechanics / electronics / programming / files
///
[1.3/ Initial concept / may 2013]
[assignment]
Plan and document a final project that integrates the range of units covered;
what will it do?
who's done what beforehand?
what materials and components will be required?
where will they come from?
how much will it cost?
what parts and systems will be made?
what processes will be used?
what tasks need to be completed?
what questions need to be answered?
what is the schedule?
how will it be evaluated?
projects can be separate or joint, but need to show individual mastery of all of the skills where possible, you should make rather than buy the parts of your project
[assignment development]
Retablillo de las Maravillas *, prototype 01
Neil Gershenfeld has written in several places that the killer app of digital fabrication may be personal fabrication... Therefore, after changing my mind a couple of times thinking of something serious and useful, I ended up returning to my initial idea... However, i simplified it some...
What will it do?
My final project will be a shooting gallery, to throw soft balls at and knock off some figures in a stage. If the player knocks off the figures in The Retablillo, he or she will get some response; possibly some sound, some LEDs lighting and/or some display in an LCD. The figure or figures in the stage will be moving to make knocking them off a bit more difficult, or hopefully fun.
The design will be easy to fabricate and well documented so that other people can reproduce it adapting it to their particular interests.
This is something I have been wanting to make for some time now – the personal fabrication issue. I think it would be a good piece to attract attention and interact in public space with people.
Who's done it beforehand?
I can imagine this can be seen in many carnivals and street festivals. To a certain extent it is inspired in the foosball by Alex from Fab Lab Amsterdam. I haven't done yet a thorough research to see similar projects. I hope I will find something I can reuse for this project but haven't done yet.
What materials and components will be required?
Plywood for sure. I think I would have more than enough with a 2400*1200*100mm sheet.
Fabduino, one or two.
Motor, stepper or servo.
Stepper or servo boards.
Acrylic laser cut mechanisms; or 3D printed ones.
LCD mini screen.
LEDs
The figures could as well be laser cut; 3D printed or milled, or made using molding and casting.
Where will they come from?
Stock in Fab Lab and Fab Inventory. Maybe we have to acquire plywood.
How much will it cost?
Hopefully cheap... Less than tens of dollars. I will have a precise budget soon.
What parts and systems will be made?
1/ There will be a tectonic part, which will be the container; probably including a system to collect and return the thrown balls.
2/ There will be a small mechanic contraption to move the figures from one side to the other.
3/ There will be some electronics: a sensor that will tell the system when the figure is knocked off.
4/ Some actuators that will operate when the figure is knocked off: lights, sound and/or LCD screen.
5/ Probably there will be a switch to restart the process (game).
6/ There will some instructions to play the game, and explain info related to it.
7/ There will be a web site documenting the project, and maybe showing pictures of people interacting with it once it begins being used.
Additional features (some of the former and these listed here could be developed in future phases):
Realtime connection with web, for example, twitter with points achieved and pictures of players.
Adding sound to the figures, interpellating the public.
Adding additional feedback events, for example an additional figure that shows up in the screen to congratulate the player...
Developing a more complex larger-screen rather than small LCD interface...
What processes will be used?
1, 2/ CAD design, maybe parametric, with Rhino + Grasshopper; milling machine in routing mode.
2/ Three-D printing and/or molding and casting of mechanisms. They could be laser cut in acrylic, too. A timing belt will be used here, probably recycled from an old printer.
3, 4, 5/ Fab Modules, and Eagle if needed, to design and process PCBs. Board milling with iModela; soldering and stuffing; testing and debugging. Programming with Arduino IDE and Arduino language. Arduino programs bootloading.
6/ Inkscape to for instructions graphic design and layout. Maybe laser cutting them in the structure or integrated panel.
7/ Seamonkey and/or wordpress for website design / publication. Ftp to save and publish documentation. Facebook might be used too to promote the project.
What tasks need to be completed?
I am afraid all tasks need still to be completed. The tasks will follow those described in former sections (“What parts and systems will be made?”).
Even if all the tasks need still to be completed, the experience accumulated in the Academy and before make me think I will be able to make it, at least at a proof of concept level.
What questions need to be answered?
Main questions to be answered relate to the electronics and programming part.
I need to make some working fabduinos; and then find code that can be used as a base to program the project devices.
I need to find out how to make the moving platform; I believe however that after building the MTM-RepRap this will be under control.
I need to find out how to make the LCD screen work. One of my colleagues Juan Carlos Venegas, managed this during the Academy, so I think he will teach me that.
I need to find out how to relate the on/off input of the knocked-off figures to the desired outputs: a) a) to activate certain LCD messages; b) to activate certain sound events, etc.
I need to find out how to reset the system with a switch to re-start the game.
What is the schedule?
The plan right now is to finish the project by May 29th. This means I have two weeks.
Week one will be dedicated to designing and fabricating the “tectonic” part, and sketching the electronics. During this week I will also fabricate some arduinos and debugg them.
Week two will be dedicated to designing and fabricating (if needed), and programming, testing and fine tuning the electronics. And to graphic design and finishings.
After the end of week one I will reassess the schedule, considering the progress of the CNC machine. It could be extended to two more weeks, which would mean finishing june 12th.
How will the project be evaluated?
I consider the project will be evaluated according to Anna Kaziunas' Final Project Overview, the goal of the project being to demonstrate mastery of the main areas that have been taught in the class.
///
* "El Retablo de las Maravillas" is the title of a short story, “entremés”, by Spanish classic author Miguel de Cervantes, where he depicts a lighthearted while ironic story around a theatrical representation: http://miguelde.cervantes.com/pdf/El%20Retablo%20de%20las%20Maravillas.pdf
///
Unless otherwise stated, information in this page is downloadable under a Creative Commons Attribution-Share A Like license; attribution: Jose Perez de Lama / Fab Lab Sevilla / Fab Academy 2013. Work based in the documentation provided by Neil Gershenfeld / Fab Academy 2013; and Anna Kaziunas, AS220 Fab Academy 2013, among other sources.

final project home / structure / mechanics / electronics / programming / all files
return home /perezdelama.jose