4. Computer controlled cutting
For this week assignment individual assignment was to cut something on VinlyCutter and to design and lasercut, document a parametric construction kit which can be assembled in multiple ways.
Vinly Cutter
The Assignment was to cut somme thing on VinlyCutter, I found that VinlyCutter use CutStudio software which comw with this Roland machine and it is machine used especially used to design stickers. To cut something on VinlyCutter we need :
-
Roland machine itself
-
A computer with a design
-
A material to use
There are steps helped me and you too you may follow them while cutting something on VinlyCutter:
First, I have loaded the material to use: There is an accessory behind the machine to help us to fix the material, there is a big white line and small ones on the machine, the first wheel should be at the midle of the big line and the second at the midle of one of the small lines keeping in mind that your working place is inside those two wheels then fix those accessories.
Long press a power button on the front of the machine, Select Roll and press enter then the machine will detect the size of your working area.
Adjust the blade: UnScrul the lock and take the device which held the blade out, then take the material, the same as what you are going to cut darw a line on it, you will see that a line was drawn without passing through all the material which means it is good then put it back and the devices in its place when it fits lock it.
Set Force and Speed parameters: Press MENU twice, UN SETUP will be opened through it go down with allow keys to CONDITION use Right allow key to set FORCE(I have used 1289) accordingly and use DOWN allow key to set SPEED(18cm/sec to 20cm/sec), all will depend on how hard the material to cut is.
Test: After setting up all correcly, you have to test if it will do your work correctly by long pressing Test button on the machine it will create a small box for you before sending your work.
Prepare your file for cutting: Open CutStudio software and you will see an interface like a paper, it has a working area, you need to adgust your working area to do it.
Cut your design:Import your design and resize your design to fit the cutting area, Right Click It then Select Image Outline and you may extract countour lines so that your design looks good Then keep the outline to be cuutted only and delete the orginal sticker then choose File, Cutting, and Ok and the VinlyCutter start cut your sticker.
I have dawnloaded two stickers to cut them on VinlyCutter and I have cutted my logo designed in Gimp too and stick them on my laptop.
First sticker dawnloaded

I import my sticker in cut studio software of our local vinly cutter machine and right click on it to remove image outlines as you can see below

Below, I deleted the orginal image and remain with outlines only to be cutted
![]()
Second Sticker dawnloaded

I also import my second sticker in cut studio software of our local vinly cutter machine and right click on it to remove image outlines as you can see below

Below, I deleted the orginal image and remain with outlines only to be cutted too.
![]()
My Logo I have cutted my design Logo in GIMP

I also import my sticker designed in Gimp in cut studio software of our local vinly cutter machine and right click on it to remove image outlines as you can see below

I deleted the orginal image and remain with outlines only to be cutted too and there was small dots, I select them as you can see that there are marked blue and delete them as you can see below.

Below, are my cutted stickers on my laptop

Control cutting
Laser cutter: is a type of CNC(Computer Numerical Control)that uses a focused, high powered laser beam to mark, cut, or engrave a material to form cusiom shapes. Like other types of CNC machine, a CNC laser cutter has a laser head containing a laser focus lens and a nozzle; Through the nozzle, this head and lens assembly focuses a laser beam-a column of very high intensity light-on the workpiece, melting, and cutting the work piece to form the desired shape. CNC lasers employ compressed gas to cool the focus lens and expel the vapolized metal out of the work piece.
Laser cutter parameters:
Power: When you focus a high-powered laser beam at that point on a material to use, the heat density at that point becomes high, resulting in rapid heating of a portion or complet vaporization of that point.
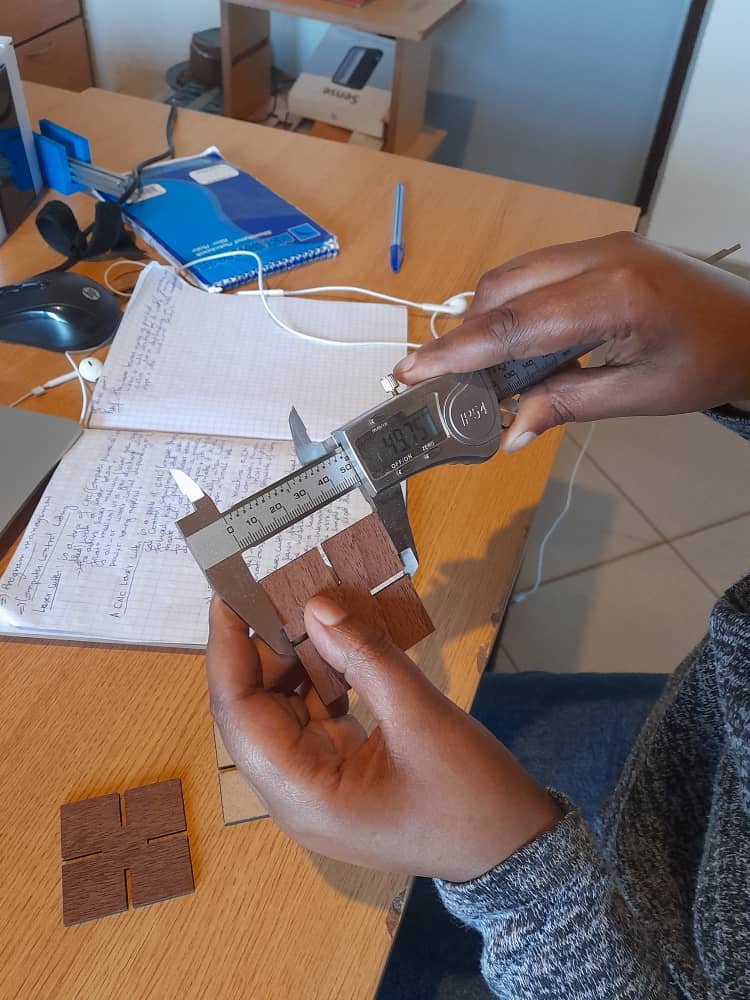
Speed: How fast the laser cutter cut your shape. Kerf: The laser burns away a portial of material when it cuts through and it change from 0.08mm-1mm depending on the material type and other conditional factors. For example, as you see on this scketch my parametric square designed in FreeCad has 50mm

After producing my parametrick kit, using caliper to measure its size, you can see that it has 49.75mm, It loose its size means Kerf=50mm-49.75mm=0.25mm
Below is the interface used for some setting
-When you want to engrave only, you choose Raster and customize Raster settings. -When you want to cut a shape only, you have to choose Vector and customize Vector settings. -When you want to combine cut and engrave, you have to select Combine and customize its settings.
We always use to set power(to the maximum) and speed(between 7,8 up to 10). When you decrease the power, you have to decrese the speed also and this lead to cut a shape using a long time.

To operate the machine
-Power on the switch. -Switch on the chiller. -Set the material on laser cutter bed. -There are four red buttons which are Laser, Pointer, Exhaust, Lamp at the bootom corner of the machine; -Turn on Pointer, Exhaust, Lamp first. -Focus the pointer by clicking Z Up and Dawn button on control panel. -Connect USB cable to laptop to give command to laser cut. -Turn ON the laser button while the output command is given to cut machine.
Warning while working on machine
Never leave the laser cutter unattended; Only cut materials approved by your instructor; Keep the lid closed at all the time unless loading the material while the laser is turned off; Clean Up debris in the laser cutter.
After passing through many tutorials on how to use laser cutter, I have imported the .dxf file format of my box created in InkScape into the machine which contains CoreDraw software; I have setted the speed and power for cutting according to material to use, Connect the USB cable to laptop having the software; Click ON start.
I cutted my box using our FabLab Lase cutter using the material given, Laser cutter amazed me on how it follow paths of your design and output your design correctly

This is me, trying to assemble my first cutted box.

Box assembling almost done

Below, is my final small Box and I realy enjoyed my box because it is my first time for producing a phyisical thing

Parametric construcion Kit
Now, Its time to design parametric kits, first of all I have to know what is a parametric kit, After searching it I found that A parametric kit is a kit that it its model is managed by parameters such as dimension, thichness,…means that when you try to modify one of those parameters, immediately your model change. Then I designed my parametric square using FreeCad 3D modeling Software and as mentioned when I tried to change one parameter my model change.
Below, is my square paramters.
I Opened FreeCad software and select SpreadSheet workbench to put my Box parameters as shown below

Below, is my fully constrainted square and If you want to learn basics on FreeCad software go to my week03 assign, it is a 3D modeling software I have chosen to use.
Below, Is my square pad or volume I want it to have

Below, is small rectangles scketches on one side of my square which will be holes on my parametric square

Below, is my final parametric square generated.

Then, I exported it as a DXF file to be cutted by our Laser cutter After following all steps as I learnt from our local fabLab instructor and I multiplying my design into 12 copy pieces, the Laser cutter start to cut my square design and I see a fire flame trying to open the laser cutter top cover it skips a step and my one square did not come out due to my mistake.

Below, is my constructed parametric kit assembled in a tree way

Below, is the second way of assembling my parametric kits.

Below, is how a single design look like after cutting it.

Files used Here
GROUP ASSIGNMENT
The group assignment was to characterize your laser’s focus, power, speed, rate, kerf, joint Clearance, and types.
As laser cutter:, a type of CNC(Computer Numerical Control)that uses a focused, high powered laser beam to mark, cut, or engrave a material to form needed shapes.
Like other types of CNC machine, a CNC laser cutter has a laser head containing a laser focus lens and a nozzle; Through the nozzle, this head and lens assembly focuses a laser beam-a column of very high intensity light-on the workpiece, melting, and cutting the work piece to form the desired shape. CNC lasers employ compressed gas to cool the focus lens and expel the vapolized metal out of the work piece.
Our laser cutter specifications
Our local fablab laser cutter type is Epilog laser and below are its specifications.
Epilog laser focus
-
Power on the laser(switch is located left side of the laser near the front).
-
Use correct table(Vector table with aluminum honeycomb grid that reduces backside burning).
-
Focus laser using a red box by:
- Openning lid
- Press(xy off)+(Go)
- Manually move the laser near the center of the material.
- Press(Pointer)ON to help.
- Remove the focus tool(triangle)from its parked position the tool is pointing toward the material.
- Adjust table so that the focus tooltouching the material(Press Down Arrow or Up Arrow)as needed.
- Put the focus tool back in its parked position or out on any other choosen position.
- Manually move the laser to the top left of the material(0,0)
-
Press(Set Home)(xy will be ON)
-
Confirmation home position(0,0):
-
It is an optional step
- press(xy off)+(Go)
- Manually move laser to some point of ur material
- Press(Reset)
-
Laser should automotically move to 0.0
-
Warm up(Option step):
- Press(Maint)
- Press(Down Arrow)
- Select #2(Align laser)- Press(Enter).
- Close lid
- Press(Up arrow)
- Press(Stop)2*times.


- Power: describes the output power of the laser, you have to set the power according to the materials; you have to use high power value for wood and a low power value for a paper; you have to set it between 0% which is minimum and 100% which is maximum.
Power50

Power70

Power100

- The speed: describes the movement of the laser where fast speed lead to less time of cutting and slow spped lead to long times. For example, large-scale engravings materials are engraved at high speeds between 80 and 100%, but for photo-engravings with lots of detail on wood, the speed should not exceed 10%. This setting also affects the quality of the laser cut, lay in between 0% and 100%.
Spped 5%

Speed 8%

- Kerf: The laser burns away a portial of material when it cuts through and it change from 0.08mm-1mm depending on the material type and other conditional factors. Below you can see how a designed square differ to a produced one.
Kerf calculation
Using caliper to measure the size of the cutted 30mm side square, you can see that it has 29.88mm, It loose its size means Kerf=30mm-29.88mm=0.12mm

The square of 50mm side square has a Kerf of 50mm-49.83mm=0.17mm

The square of 60mm side square has a Kerf of 60mm-59.78mm=0.17mm

The above 3 Squares in laser cutter with their engraved measurements.

- Joint Clarity:
Below, we have used the calipper to measure our wood material to use, as you can see it has 2.41mm of width.

Below, we have cutted a slot of 3mm and it doesn’t fit in.

Below, a slot of 2.41mm and it doesn’t fit in, it is hard to join them because they are equal.

By reducing our slot to 2.42mm their fit, means our joint clarity = 1(2.42mm-2.41mm).
