Final project⚓︎
TIME THE TIME⚓︎
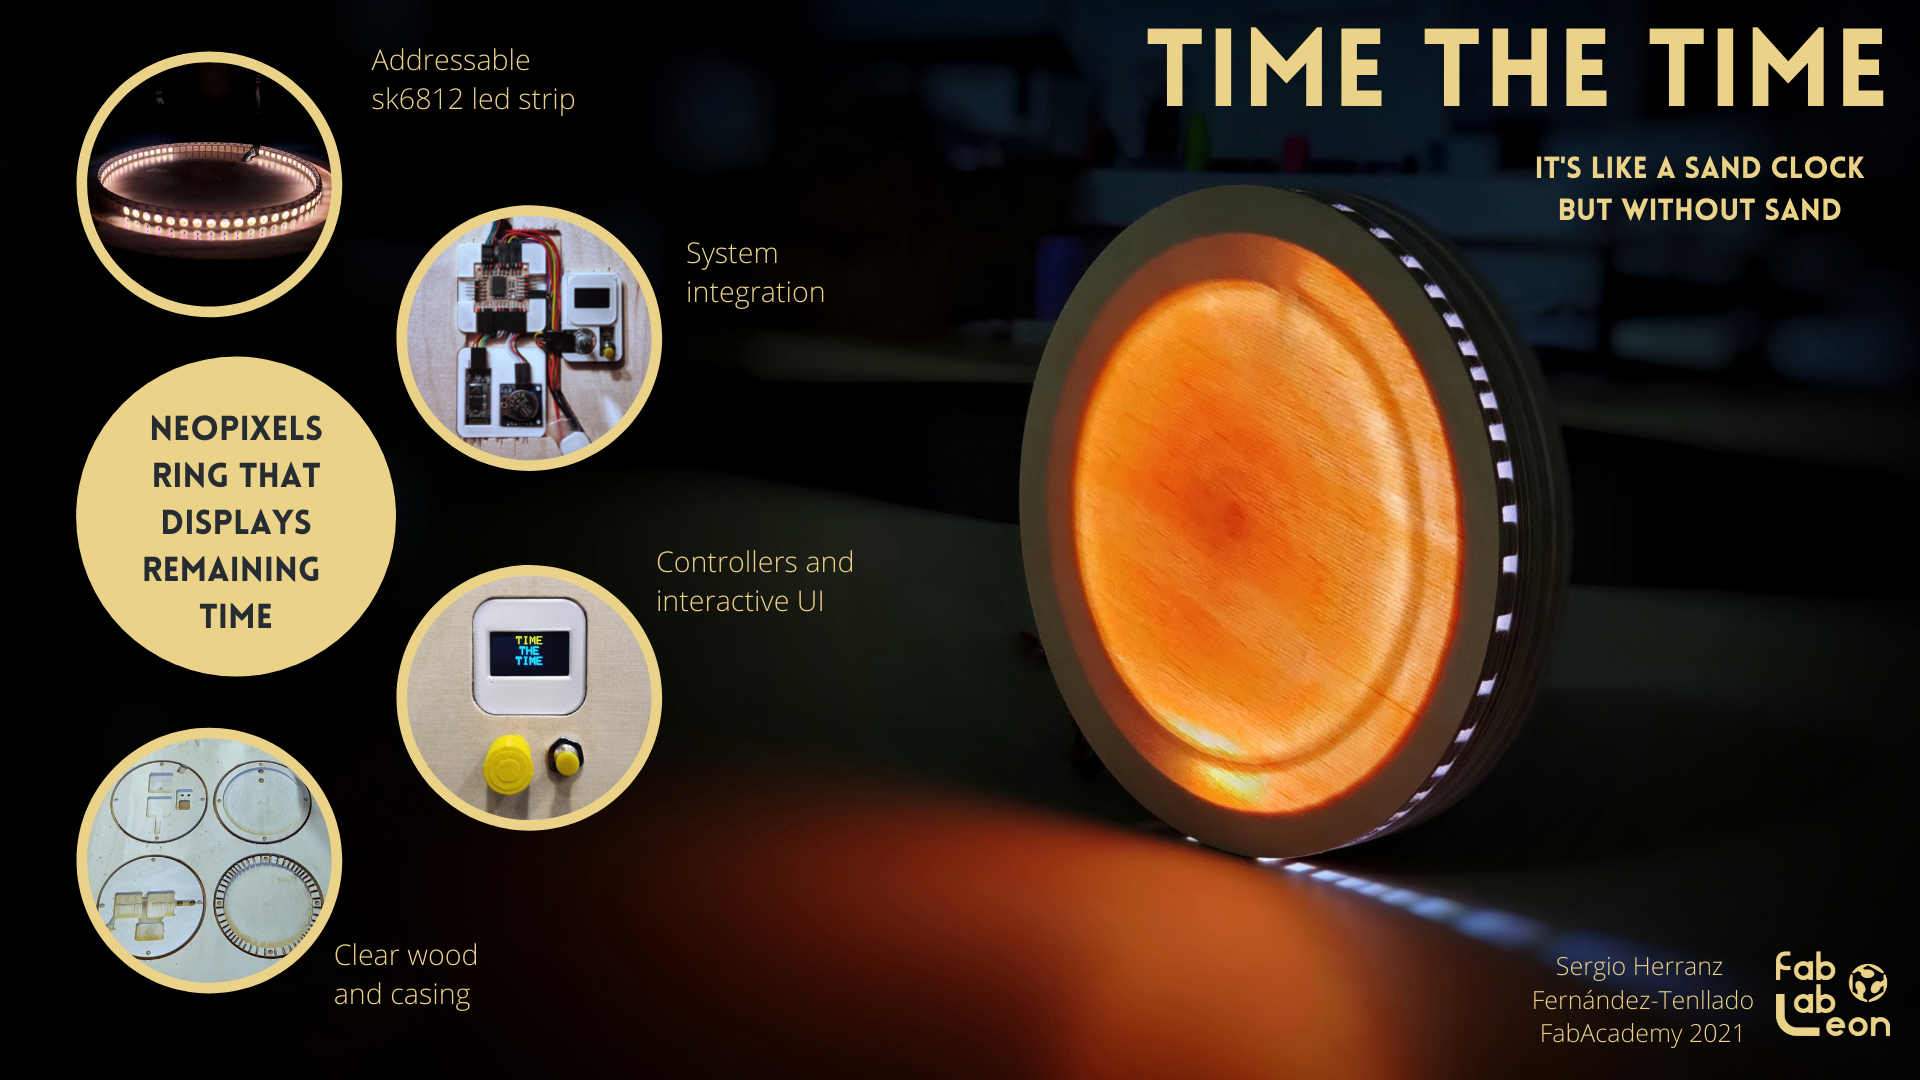
Time the time is a project about, you guessed it, time. It’s main focus is to help the user with it’s time management.
T3 is a device that shows, with respect to a period of time set by the user, the percentage of time elapsed through a light ring. This ring, which remains completely off at the beginning, will complete its shape over time until the end of the period.
T3’s primary purpose is to make the user more aware of the elapsed time, avoiding a temporary disconnection with reality. It also intends, as its ultimate goal, to reveal to the user the irreversibility of the passage of time.
Slide⚓︎
Video⚓︎
Presentation⚓︎
Questions⚓︎
Most of these questions have already been answered in the Applications and Implications assignment or during the development of the project, but now that it is finished, it is interesting to evaluate how many of them have gone as planned and what has changed in those that have not.
What does it do?⚓︎
I have written a summary about the project, its purpose and its functionality at the beginning of this page, but the description tends to the poetic, so I will try to be more specific below.
Time the Time is a “visual timer”. It counts down time, like a sand clock The idea is that the user defines a desired period of time and the clock will visually represent how much of that time has been completed. The user can interact with the project from the back side to configure the time, leaving the front side only for the visual representation. The time period to be represented can range from minutes to days, although it would be mainly focused on periods of one to several hours, in which a specific task has to be completed. The visual representation thought for the first spiral would be by a ring of neopixels under a translucent wooden surface, which would illuminate the percentage of the circumference corresponding to the time elapsed with respect to the total established. My main personal objective is to be more aware of the passage of time while I am engrossed in a task, in order to avoid dilating the hours of unproductive dedication.
Who has done what beforehand?⚓︎
FabAcademy is an inexhaustible source of creativity and innovation, as Neil said in his TED Talk, so it is practically impossible to dismiss the idea that there is another project similar to mine, although I have not really found any other project that shares the same purpose. Even so, there have been other projects that try to address the management of time and it’s representation. These are some of the most representative for me:
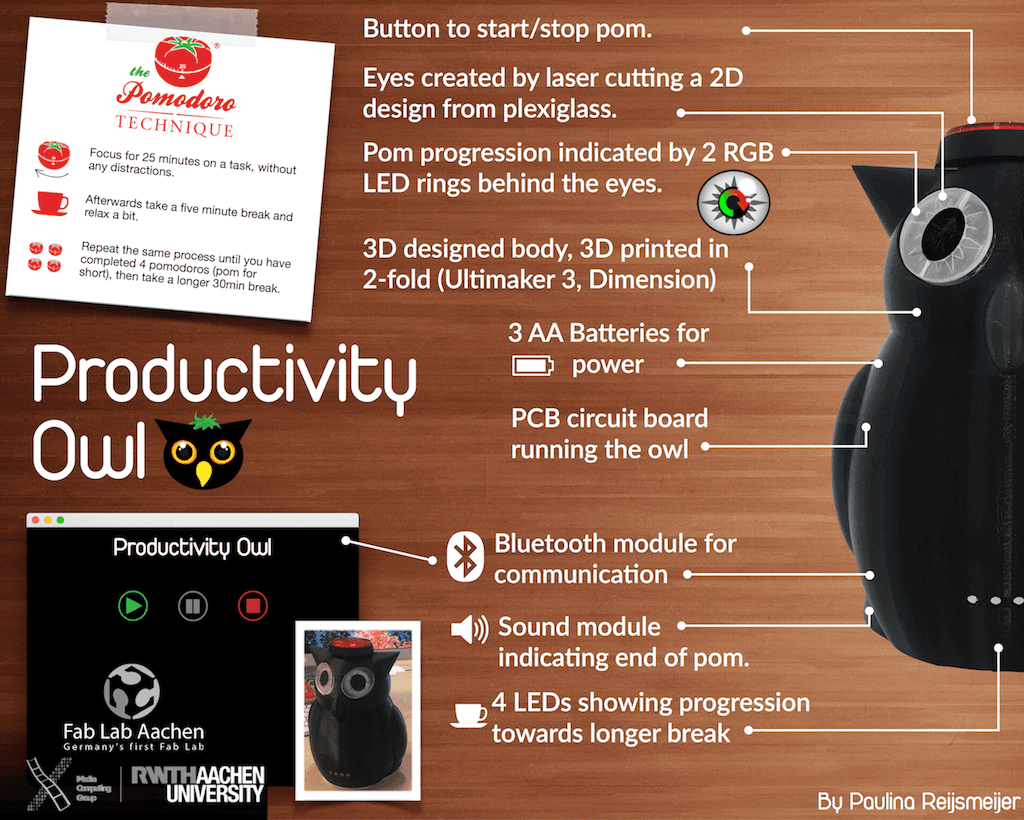
- Pomodoro Productivity Owl by Paulina Reijsmeijer: this is possibly the closest FabAcademy project to my own. Both in terms of its ultimate goal, higher productivity and greater management of time, and in terms of its representation, the percentage of elapsed time out of the total. The difference lies in the fact that the time periods are already defined in advance and cannot be modified by the user, in order to adhere to the Pomodoro technique, and that the representation of time is a practical purpose as a means, and not an end, to visualise the passage of time. Still, it is a project I am studying closely, with the main interest in the implementation of the code that makes it work.
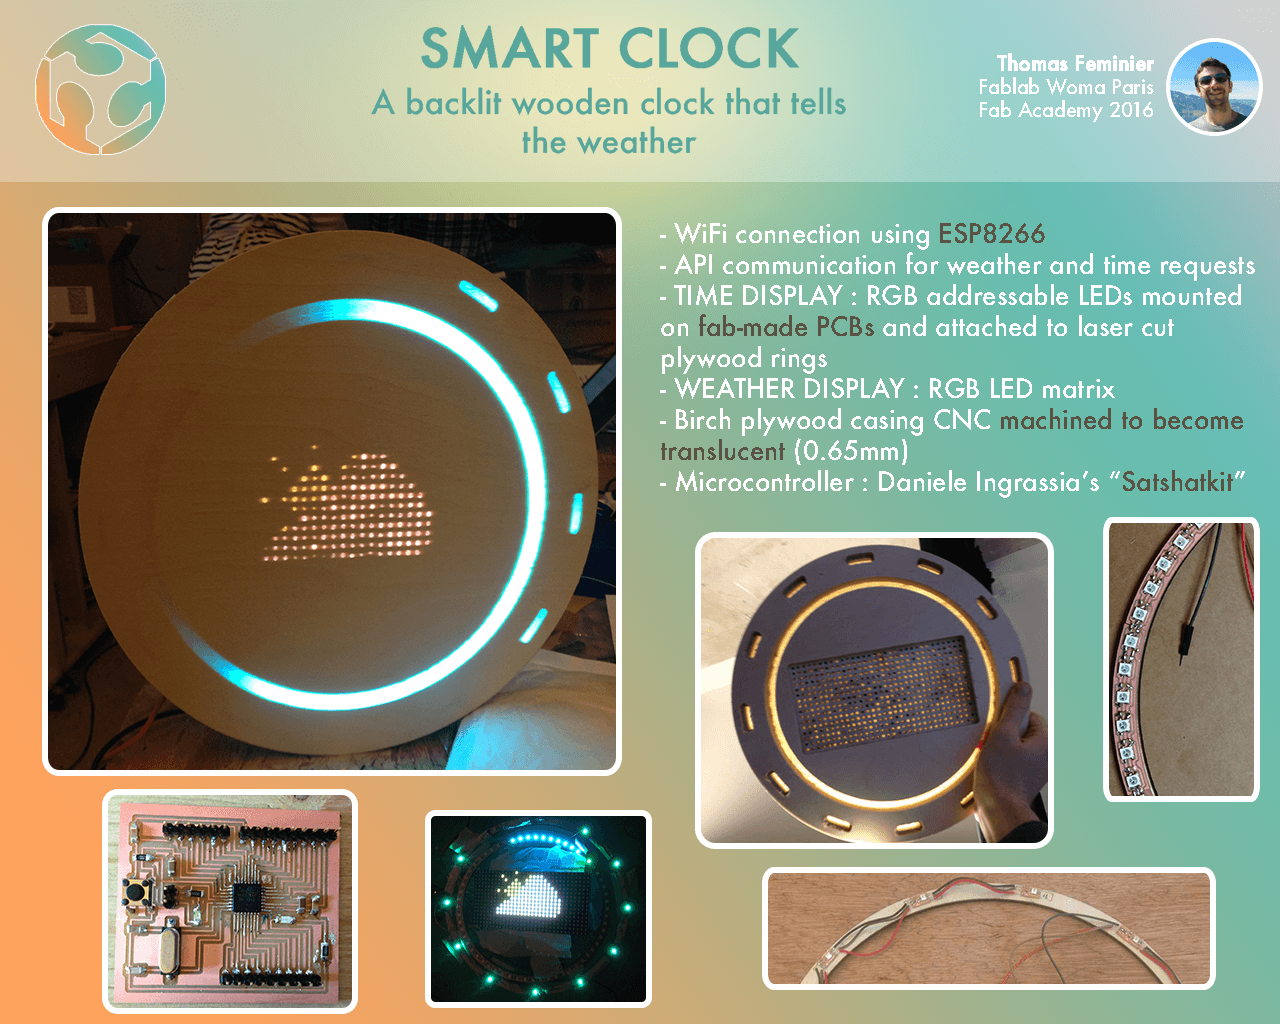
- Smart Clock by Thomas Feminier: my instructor Nuria showed me this project after I told her about some ideas I had for the visual part of my project. It has been a reference in terms of manufacturing processes and the results obtained. I have been using her documentation to get manufacturing ideas that may be useful for my project, such as the manufacturing of the curved plates to create the light ring and the manufacturing of the translucent wood, which I will try to replicate.
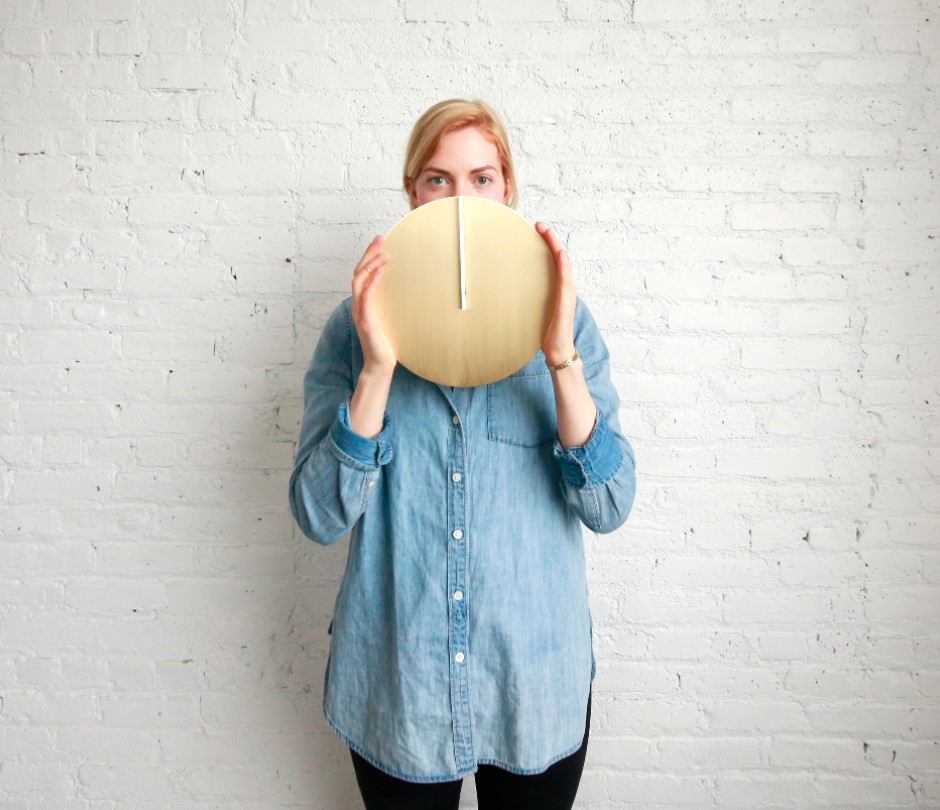
- Daylight clock by Arielle Hein: although this is not a FabAcademy project, it is perhaps the one that has had the greatest impact on me. In her TED Talk, “A new way to measure time”, Arielle talks about how her perception of time changed because of how much dayligth she could see when he moved to NY adn how that make her struggle in daylife, so she decided to make this project to be aware of it. Time issues have been constant in my life, so I’m for the same approach, generate change.
What did you design?⚓︎
- 3D: Each part of the project is designed from the ground. Beginning with the wood casing to create the body of the project, to each of the 3D printed parts for casing the electronics, port distribution and system integration packaging. Also the inside methacrylate holding mechanism for the led ring, and the magnets system for snapping all the casing.
- Electronis: I have designed the main board taking into account all the corresponding wire routing for a clean system integration, and custom-made cables.
- Software: I have written all the main code from the ground. From the different interfaces that the user goes through to the implementation of each electronic component in use, except for the libraries used for its functionality.
What materials and components were used?⚓︎
- Materials:
- Birch plywood for the casing.
- FR1 copper plates for the board.
- PLA for the 3D printed parts.
- Magnets, wires and connectors
- Methacrylate for the watch face
- Electronics:
- AtTiny 3216
- Led SMD
- Capacitor 1 uF
- Resistance: 0(x1), 0.5K(x2), 5K(x2), 10K(x3)
- 6 pin male connector (x2)
- 4 pin male connector (x3)
- 3 pin male connector (x3)
- Inputs: RTC, Potentiometer, Button.
- Outputs: OLED display, Neopixels, Bluetooth module.
- Power Supply: PC modified one for testing, Power brick for final product
Where did they come from?⚓︎
I have mainly used materials from the Lab’s inventory, like the wood, the PLA, the methacrylate, all the electronics related stuff for the board, all the electronic components and extra consumables such as the magnets or wires. Most of these materials come from local shops, the PLA filament from Prusament and the electronic items and gadgets from Digikey and Amazon. The only thing I had to bought externaly was the led strip, as I wanted a specific model that I bought from Amazon.
How much did they cost?⚓︎
- 20€: Birch plywood
- 10€: Methacrylate
- 35€: Neopixels
- 2€: Inputs (RTC, Potentiometer)
- 10€: Outputs (OLED, BT module)
- 5€: Board and electronic components (FR1 board, ATTiny3216, resistances, capacitor)
- 10€: Other consumables (cables, connetors, magnets)
Total cost: 92€ approximately
The cost can be reduced a lot without compromising functionality, but maybe part of it’s design essence. If we choose a normal W2812b neopixel strip whitout specific white channel and less leds/m or cheaper wood we could reduce the bill in about 30€. Also I didn’t bought the special 5V 12A power brick, since I used the lab’s PSU instead.
What parts and systems were made?⚓︎
- Custom electronics board.
- Custom birch plywood casing.
- 3D printed parts for electronics system integration.
- Interchangeable watch faces (translucent wood, methacrylate, 3D printed translucent PLA).
- External UPDI programming port and power plug.
- Magnets mechanism.
What processes were used?⚓︎
- CNC wood milling for the casing.
- Copper milling and soldering for the electronics board.
- 3D printing for the custom parts to encapsulate electronic components in the casing.
- Laser cutting for the methacrylate parts.
What questions were answered?⚓︎
- Has it helped me to be more time conscious?
- Has it allowed me to be more productive?
- Has it made me less distracted?
I haven’t had time to test it in depth. I will have to see it’s real use in the future, when working through studying periods or in day to day life, but what I have been able to experience using it for now, I think it will.
- Does it look like a decorative item?
- Is it scalable and easily replicable?
I can say that it looks good and the finish it’s beautiful with the magenta watch face. Neil missed a “uuuuhhh” during the presentation when he saw it in operation. For it’s replicability, with all the documentation now finished it should be pretty easy to do, and even scale it’s size.
What worked? What didn’t?⚓︎
All the part corresponding to design and manufacturing I think has had a very satisfactory result. The finish of the project is good and as Neil said during the presentation of the project, it is close to being a marketable product.
On the other hand, time management has not been adequate and these last two weeks have been marked by a lot of work without a specific order, although the result has not been bad. Due to my desire for perfectionism, I would have liked to have one more week to finish polishing the project, although I don’t know if a better organization could really have achieved that. Also note that the software can be improved, and there are some functions that I have had to discard for the presentation because I have not been able to make them work in time. I will add them during the coming weeks, as I want to keep developing the project.
How was it evaluated?⚓︎
I will leave written first what where my thoughts when I started on the project, and compare it to how it really was evaluated and what I have accomplished.
- How will it be evaluated?: The main questions to answer is if it works, how well it’s made, and if it fulfills its function. If the user can interact with the interface, start a timer and the leds turn on correctly it should be a successful project! As a second requirement would be a nice integration of it’s parts and in consequence a beautiful project!
- How was it evaluated?: Based on the objectives that I had set at the beginning, I think the project is clearly a success. Both the first and second ideas have been fulfilled, and Neil has valued them very positively, especially the system integration and aesthetics part. I have been surprised to see how some objectives established at the beginning of the project have been satisfactorily met. In my case, I always set goals well above what is really achievable, so either I have far exceeded the performance I thought I would have, or I really thought that I was not going to achieve the final goal. Be that as it may, I am proud to have done it.
What are the implications?⚓︎
As a personal desire, I would like to see my project become a usefull tool for people who struggles with time management as I do. As this is a mandatory task to succeed in FabAcademy, it could became a tool for the students during the course to track their time during the week, and also a tool for Neil to represent class time during the course, or presentations! 
Also I have seen that Prusa has a contest for time management objects that include 3D printing so I will submit mine to see if I can win. The prize is a Prusa Mini + like the one we have at the lab and which I’m in love with, so it would be cool to win it and keep creating cool things at home!
Finally I want to remeber that this is a project made for me. My best business plan is that it helps me achieve my personal goals as a human being and in my career. Now that I have finished the project and have started testing it, I am sure it will have a positive impact on both of these things.
Files⚓︎
- Electronics schematic on Eagle (
.sch): file - Electronics board on Eagle (
.brd): file - Electronics board traces to mill (
.png): file - Electronics board exterior to mill (
.png): file - Main code in Arduino to upload to the board (
.ino): file - 3D printed casing for electronics (
.stl): file - Main design file with a full 3D model of the project, vectors and corresponding heights (
.3dm): file
License⚓︎
Time The Time © 2021 by Sergio Herranz is licensed under Attribution-NonCommercial-ShareAlike 4.0 International. To view a copy of this license, visit cc.org/licenses/by-nc-sa/4.0/
Time The Time © 2021 by Sergio Herranz is licensed under CC BY-NC-SA 4.0![]()
![]()
![]()
![]()