
Molding and Casting
WEEK 11
(14/04/2021 18:19 p.m.) Wednesday afternoon. This week is doubly special for me. On the one hand, we started the week of Molding and Casting. I have never made molds with this type of procedure that Neil taught us in class, but I am used to making casts and molds for my biomaterials research.
Also ... between Nuria and I we have partnered to surprise Adrián, Pablo and my friend Ana. They don't know that I'm going to see them this weekend. 🤫🤫
(18/04/2021 10:45 a.m.) Back in Madrid, this Saturday I had a beautiful experience in Leon. I have met Adrián, Nuria and Pablo 💚💚💚, and it has been wonderful to be able to share space and personal conversation with them without having a screen in between. This biomaterials workshop, although it has been short, has been very rewarding and all the girls have enjoyed the experience. That is the most important thing! 😍😍.
As this week is special, we need a little latin rhythm to carry out our experiments! 💃💃 That's why this week's song is Que se sepa by Roberto Roena y Su Apollo Sound . 🎷🎷
Yo nací con mi Bin Bin, y tengo mi Bom, Bom
Que se sepa (la la la la la la)

Organizing tasks
Like previous week, we have two types of assignments, one's group and other individual. So as usual, I organize my schedule and here the following Evaluation Criteria that we have to approach to complete the Assignment:
- ✓ Review the safety Datasheets for each of our molding and casting materials
- ✓ Make and compare test casts with each of the materials
- ✓ Document our work
- ✓ Design a 3D mould around the stock and tooling that you will be using, mill it (rought cut + finish cut) and use it to cast parts.
- ✓ Document how we designed our 3D mould and created the rougn and finish toolpaths for machining
- ✓ Shown how you made your mould and cast the parts
- ✓ Explained problems and how you fixed them
- ✓ Included our design files of mould
Extra credit
- ✓ Include a "hero shot" of our mould and final objects
Group Assignment
- SAFETY DATA SHEETS FOR MOLDING AND CASTING MATERIALS
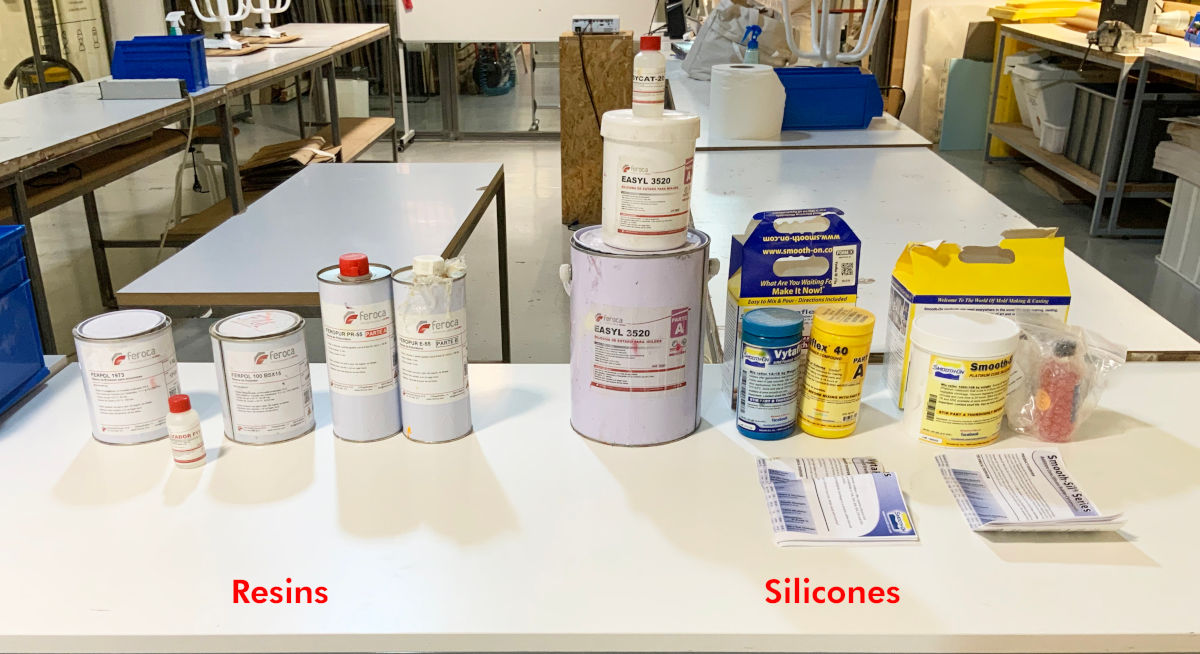
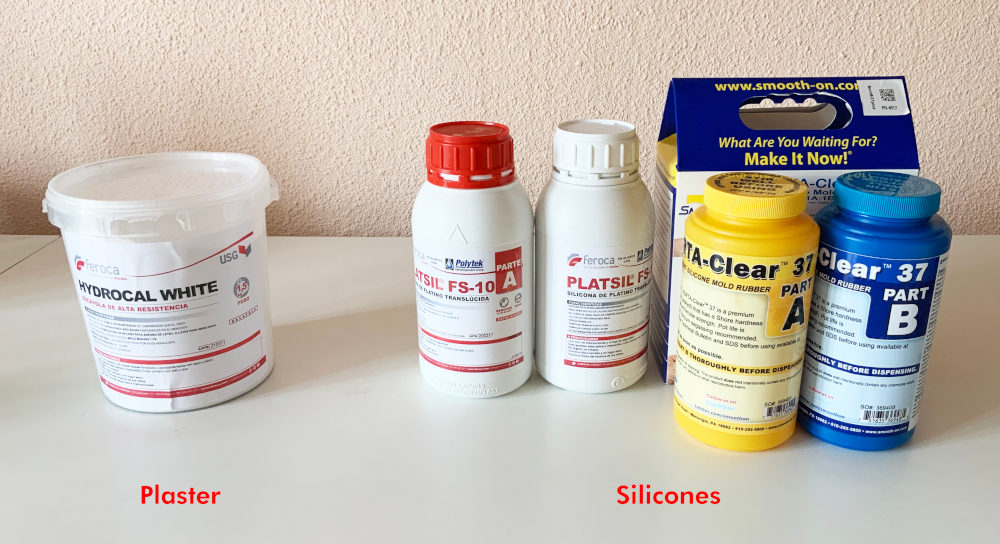
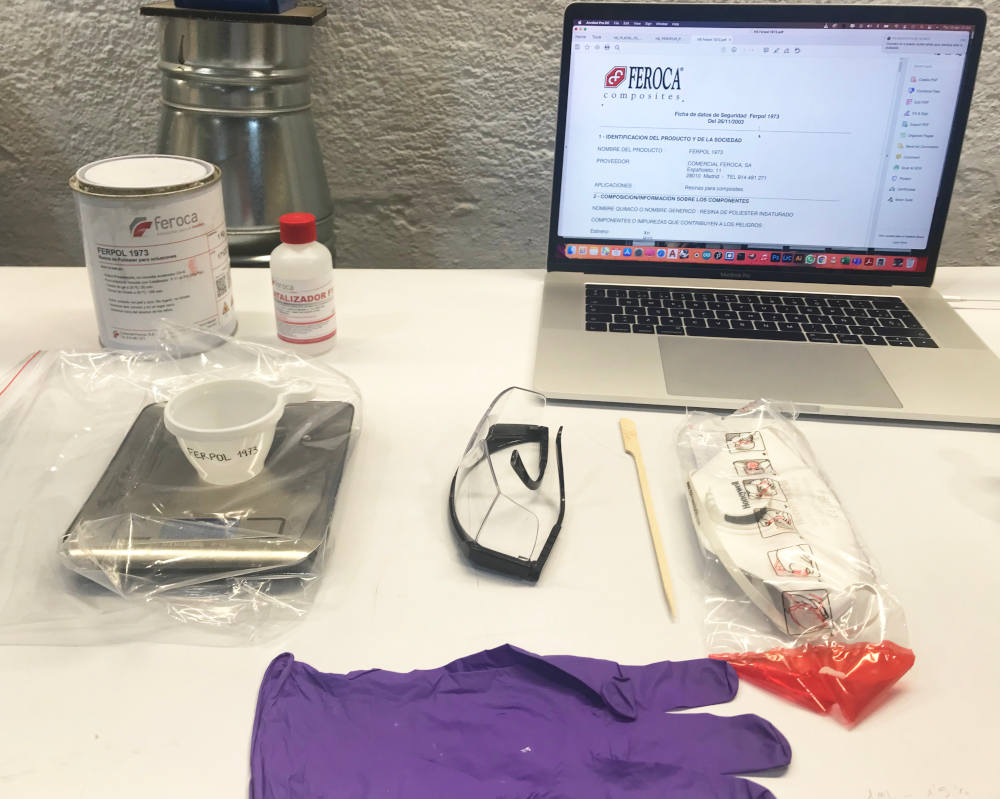
At fab lab IED Madrid, we have a small sheltered warehouse where we have gathered a series of resins and silicones of different types.
Some of these products come with their Data sheet, and others, like Feroca products, have their data sheets online.
Since my beginnings with Zap and Buj (now Buj Studio), I have worked on my own with some silicones and plasters that I had at home. Also, I am a huge fan of cooking 👩🍳! So I wanted to try a type of food-safe silicone to make something with sweets . 😋😋
-
_ EASYL 3520
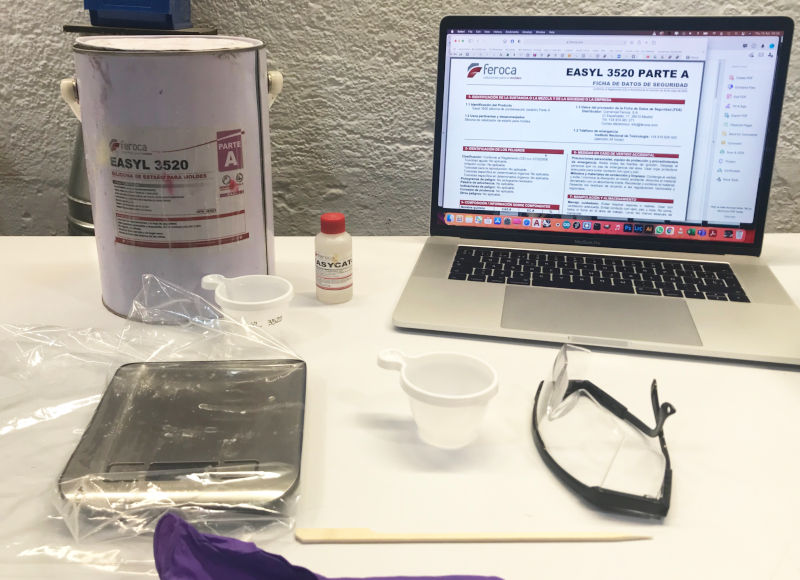
As part of the safety protocol to handling silicones and agaist COVID-19, you must wear protective glasses, nitrile gloves, protective clothing and a mask at all times. Care must be taken against possible abrasions or irritations to the skin and eyes.
The final result when mixing and curing the two parts of the mixture is a white silicone with a smooth, soft texture and very flexible.
-
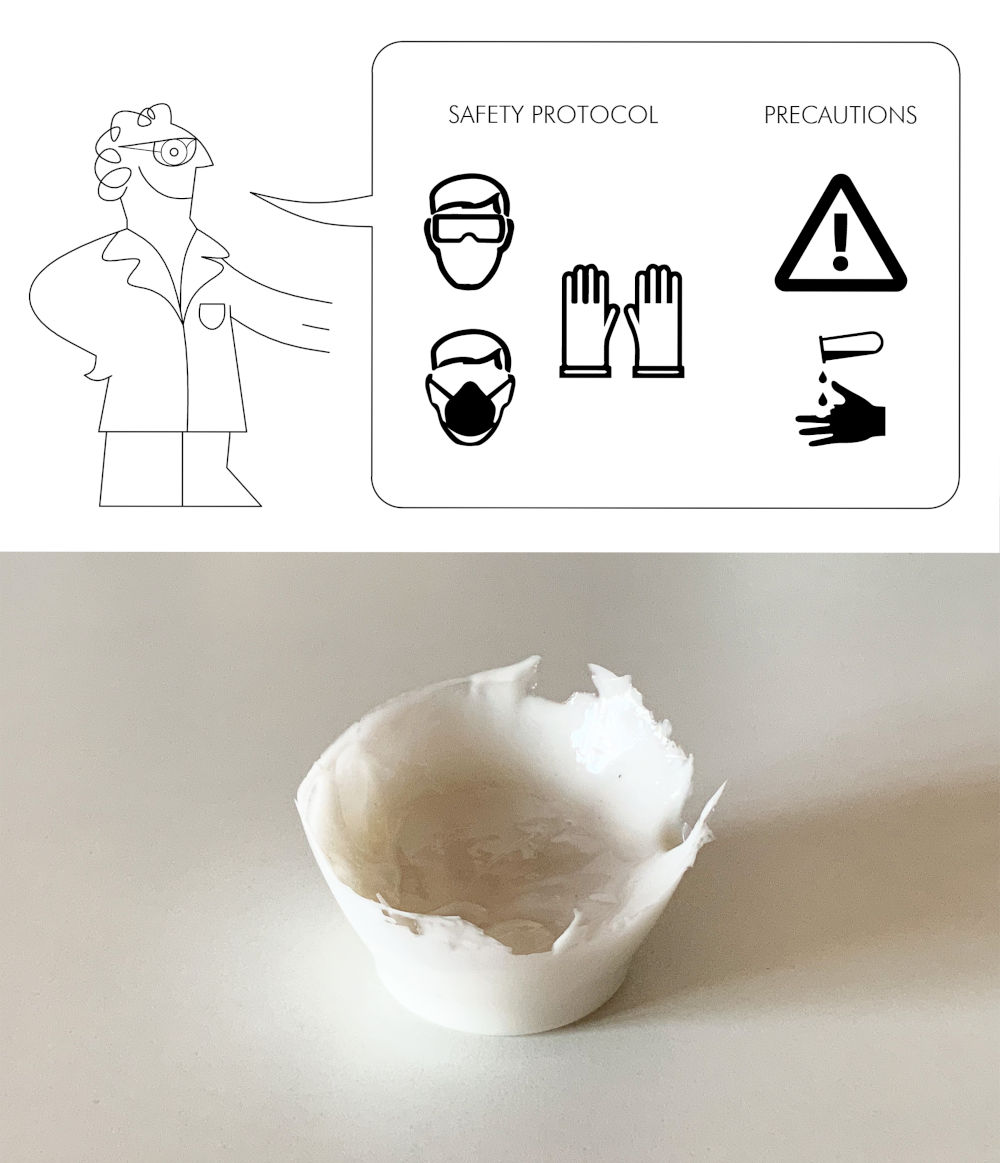
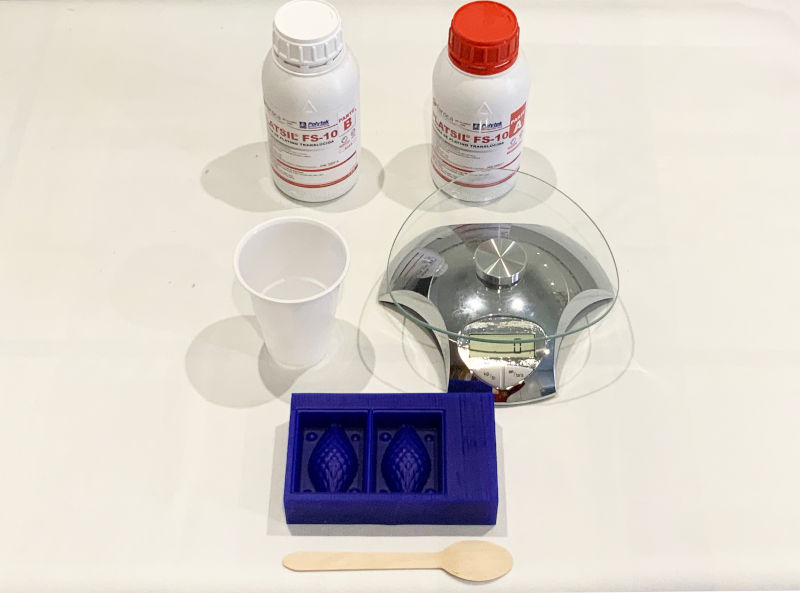
_ PLATSIL FS-10
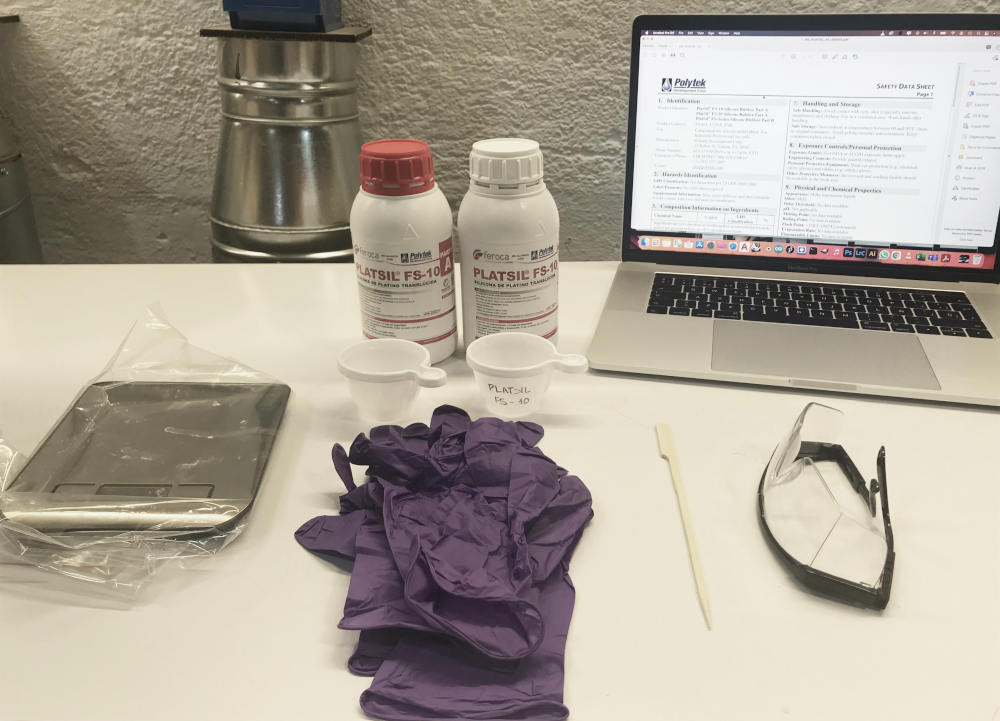
As part of the safety protocol to handling silicones and agaist COVID-19, you must wear protective glasses, nitrile gloves, protective clothing and a mask at all times. Care must be taken against possible abrasions or irritations to the skin and eyes.
The final result when mixing and curing the two parts of the mixture is a milky white silicone with a little viscosity and very flexible.
-
_ SORTA-CLEAR 37
As part of the safety protocol to handling silicones and agaist COVID-19, you must wear protective glasses, nitrile gloves, protective clothing and a mask at all times.
The final result when mixing and curing the two parts of the mixture is a translucent silicone very soft and flexible.
-
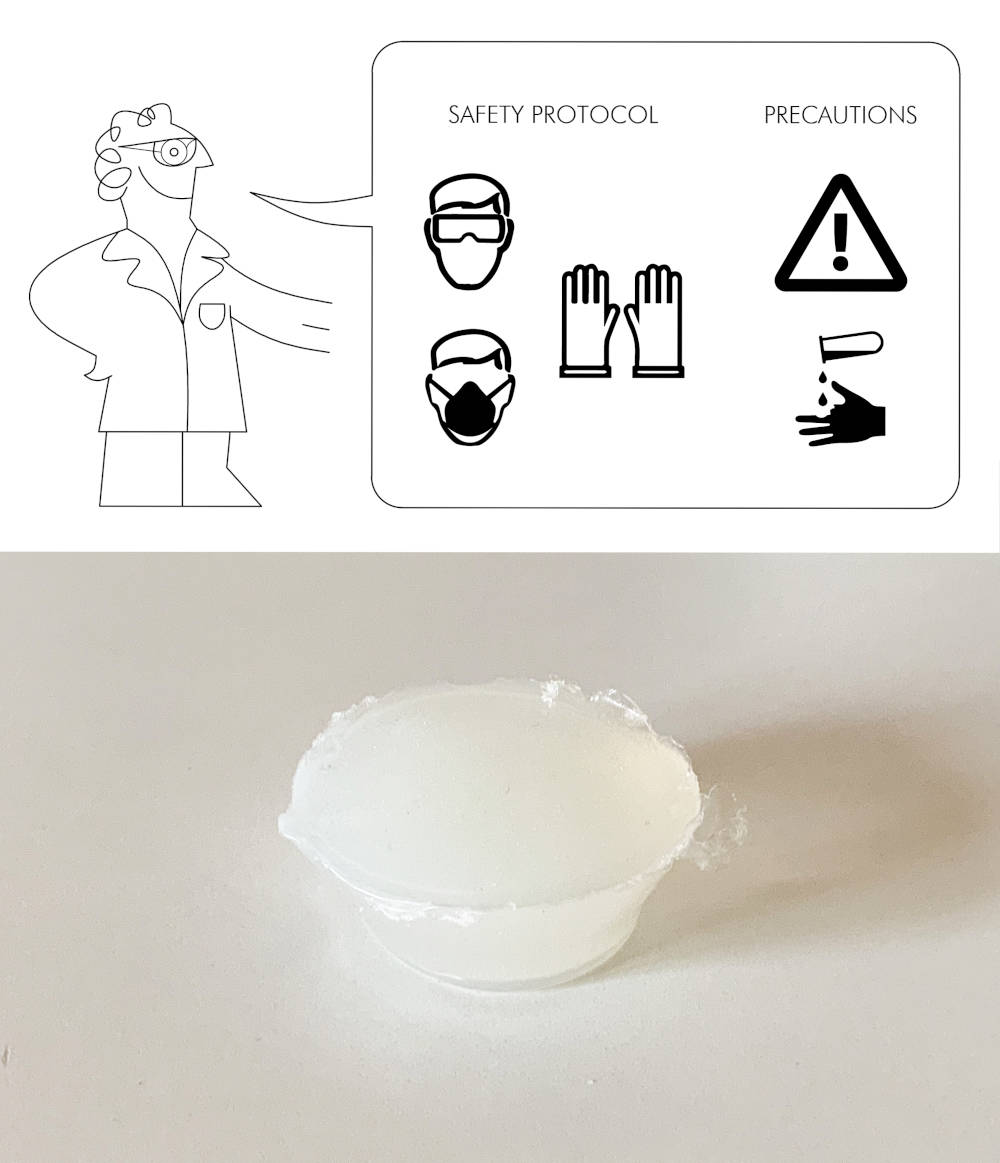
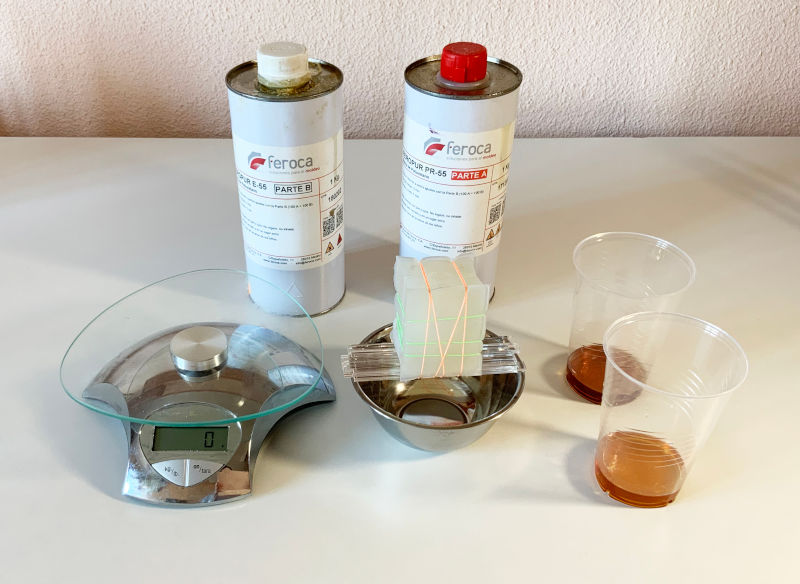
_ FERROPUR PR-55
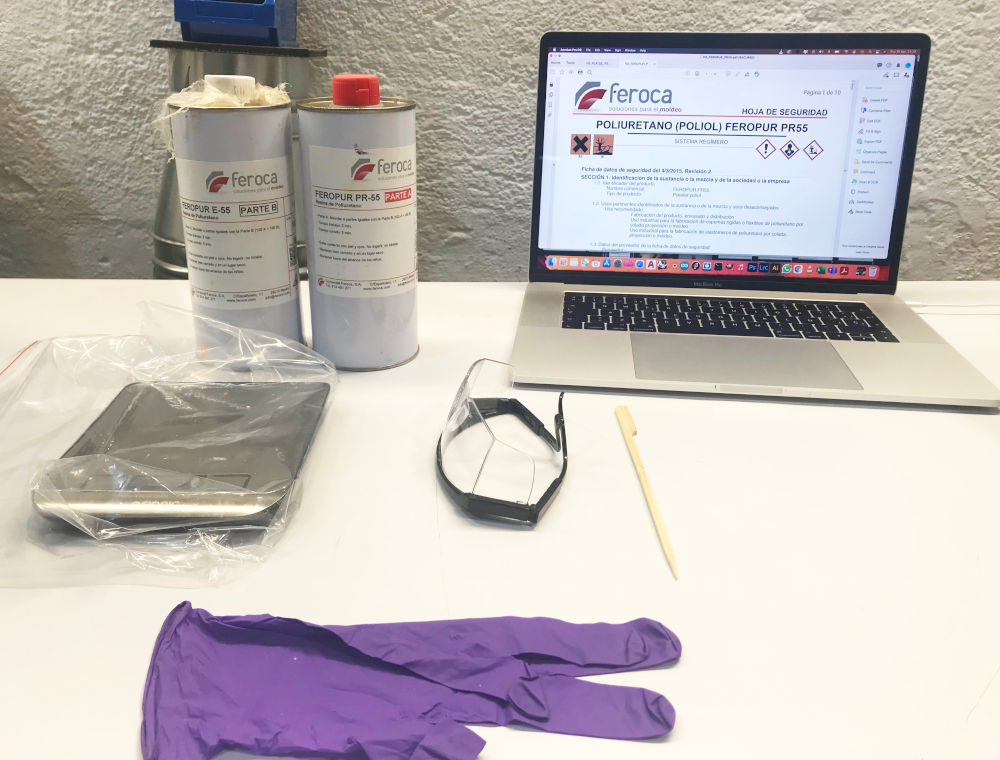
As part of the safety protocol to handling silicones and agaist COVID-19, you must wear protective glasses, nitrile gloves, protective clothing and a mask at all times. Care must be taken against possible abrasions or irritations to the skin and eyes. Both component parts in its mixture and separately is highly harmful to the environment.
The final result when mixing and curing the two parts of the mixture is a very rigid, soft and highly resistant ocher-colored resin.
-
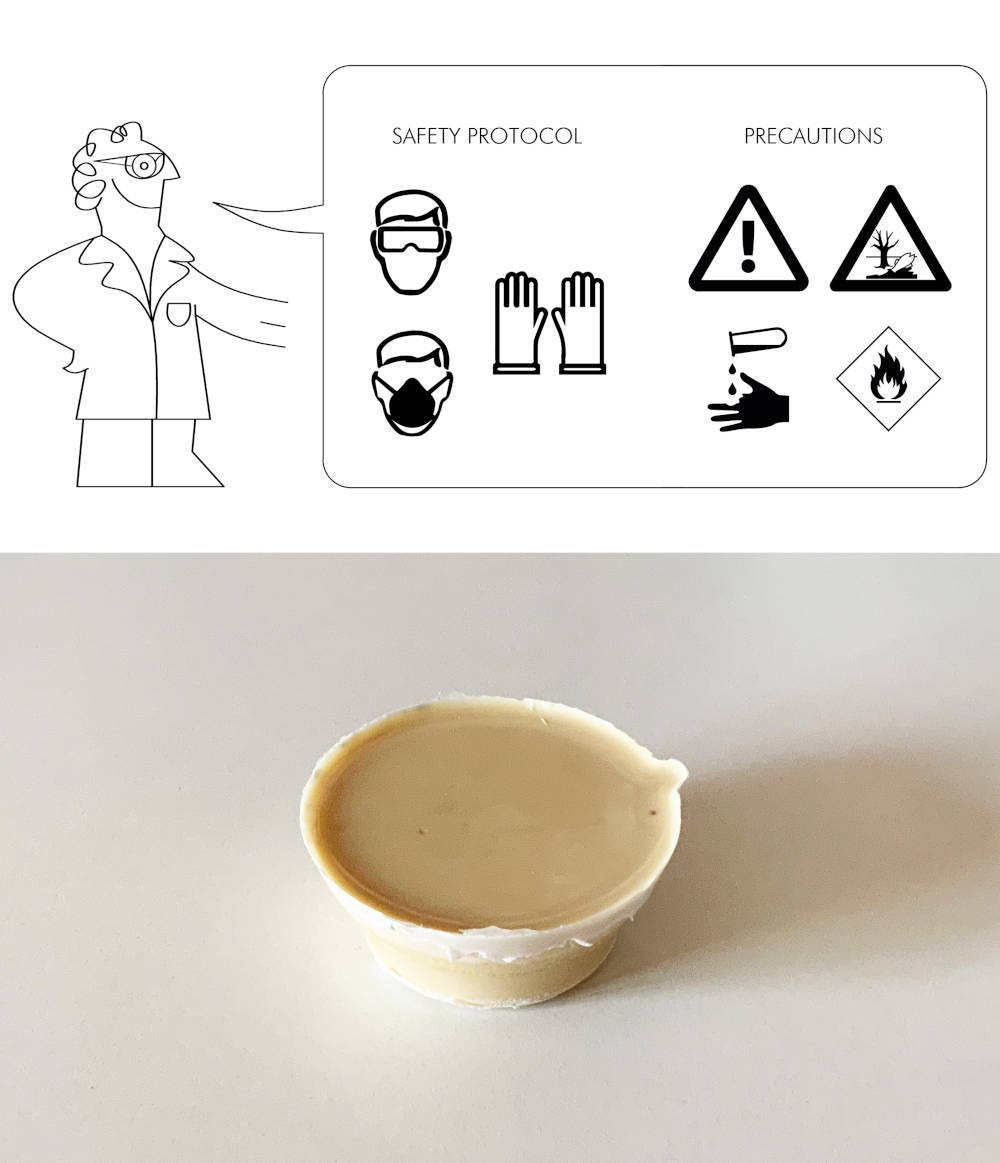
_ FERROPOL 1973
As part of the safety protocol to handling silicones and agaist COVID-19, you must wear protective glasses, nitrile gloves, protective clothing and a high protective mask at all times. Care must be taken against possible abrasions or irritations to the skin and eyes. Both component parts in its mixture and separately is highly harmful to the environment.
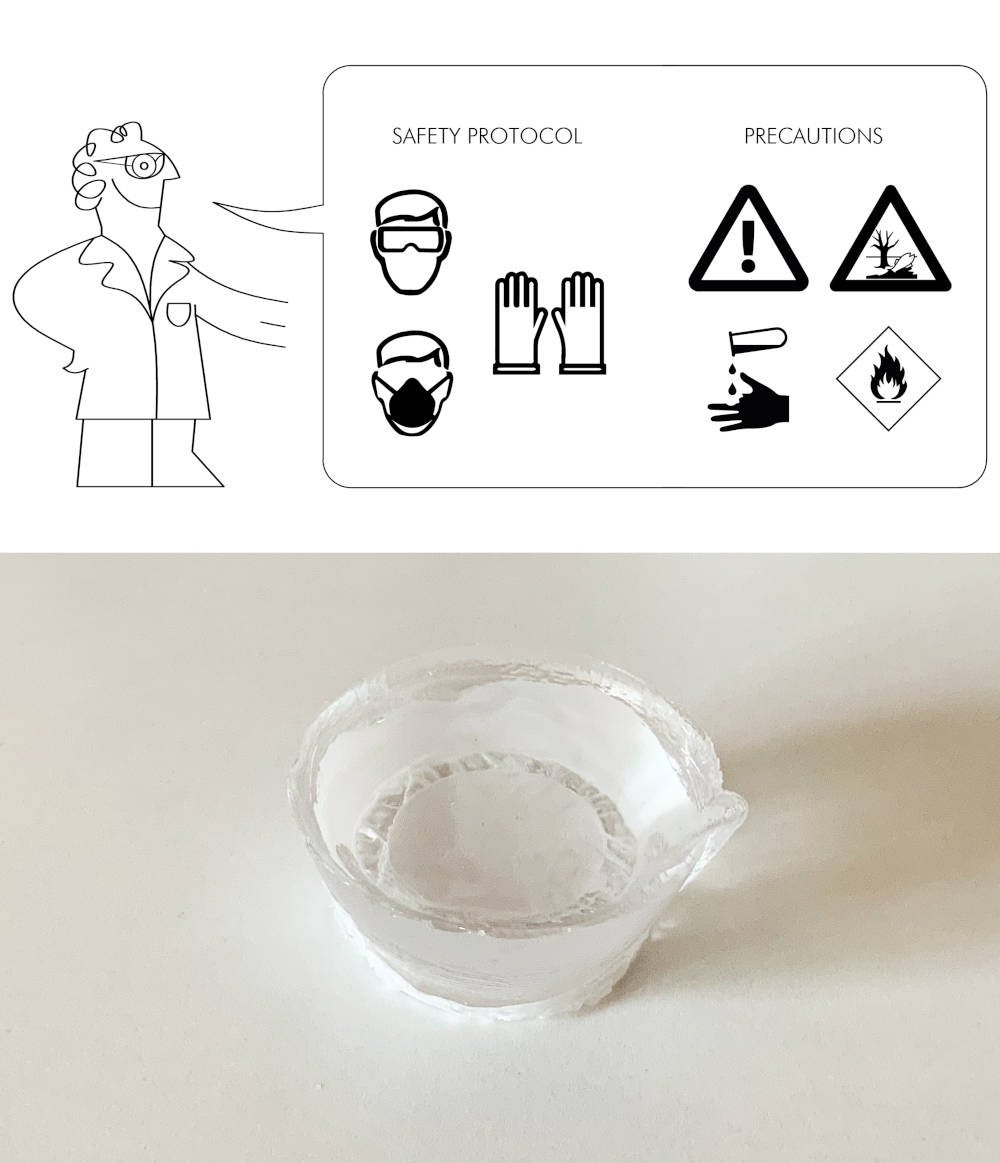
The final result when mixing and curing the two parts of the mixture is a very rigid, soft and highly resistant transparent resin.
-
_ HYDROCAL WHITE
As part of the safety protocol to handling silicones and agaist COVID-19, you must wear protective glasses, nitrile gloves, protective clothing and a mask at all times.
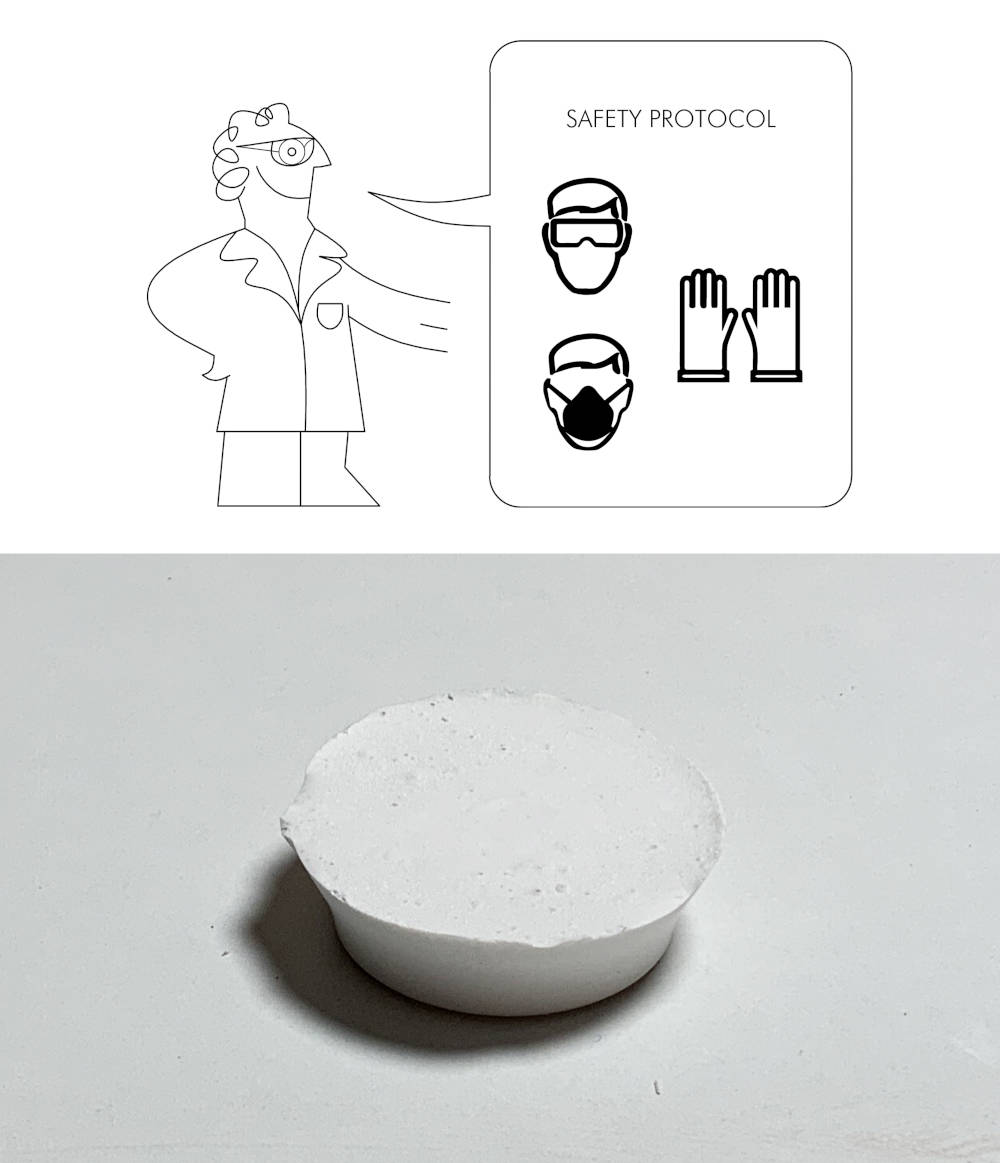
The final result when mixing and curing the two parts of the mixture is a rigid white solid plaster very soft and compact.
Individual Assignment
DESIGN A 3D MOLD
(16/04/2021 15:29 p.m.) During part of Thursday and Friday I spent some time thinking about what to design for this assignment, because the design must be small (due to the size of the wax) and we must be careful with the details that the CNC machine can or cannot mill.
Finally, I opted for the idea of making a small object designed in Grasshopper.
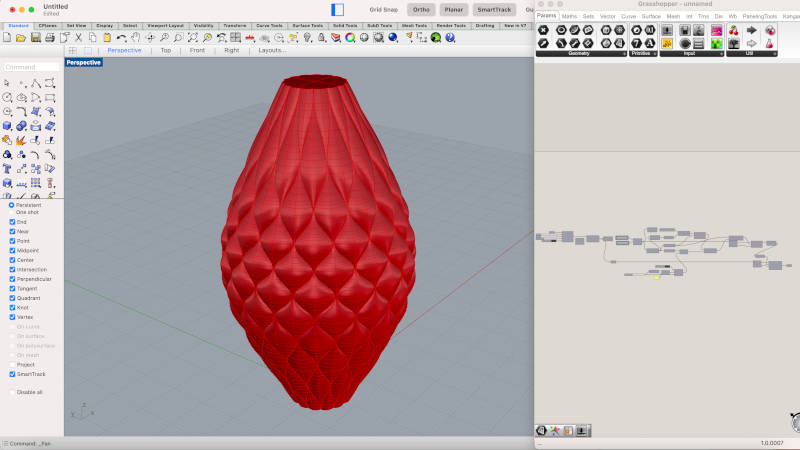
This is the workflow and the file where to find my design Pine Cone Design.GH. At first, I wanted to make a kind of wavy vase, but without wanting to imagine that the object looks like a pine cone 🤣🤣 (As my Hello Piña´s boards).

When I do a Bake, in Grasshopper, of the piece each of the surfaces that make up the object are individually divided. To join them, I select all the surfaces and do Join in Rhino. To close the object, I make a Planar Curves selecting all the vertices of the base and the counter base. Finally, I select all the surfaces and close the object as a solid with Join again.
From here, I draw the dimensions of my wax block (140 x 92 mm) and adapt the piece to the shape of the mold. If we are going to make a three-dimensional mold in two parts, it is important to draw some lugs to join each pieces between their. Other important thing is to make a small 1.5 mm recess around the contour of each part to help us when demoulding the silicone molds.
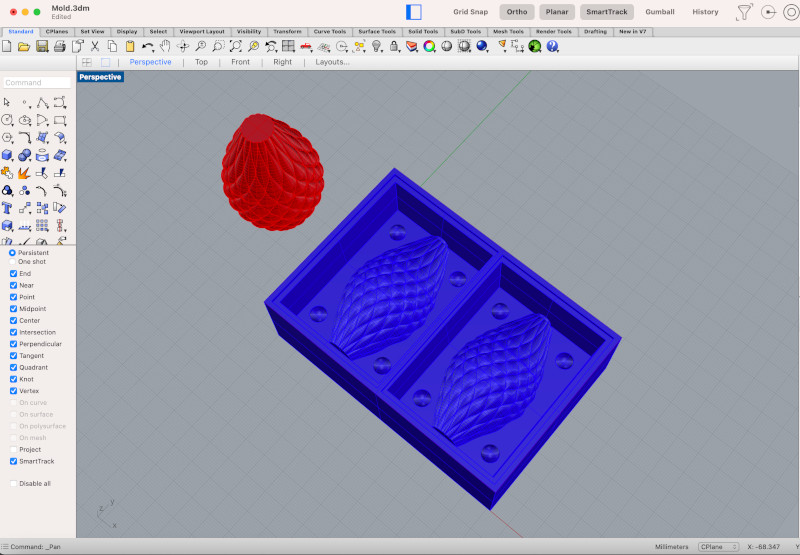
Once we have it, we join the part as a solid and export the design in .stl. Here you can download the file Pine Cone Mold.STL
3D MILLING
Once I had designed the pieces, I was started to mill my piece on the Roland SRM-20 from the fab lab IED Madrid. But unfortunately I had a problem because I did not have planar milling bits or mill ball end of 2-3mm. As I have to place a new order, the milling bits were not be in my fab lab on time and I would no longer have time to mill the part this Friday.
So, I got in touch with my crewmate, Alberto, and he let me share his space and his machines at the Fab Lab UE Madrid. Thank so much my friend 💚.
-
_ TRY TO MILLING AT FAB LAB UE MADRID
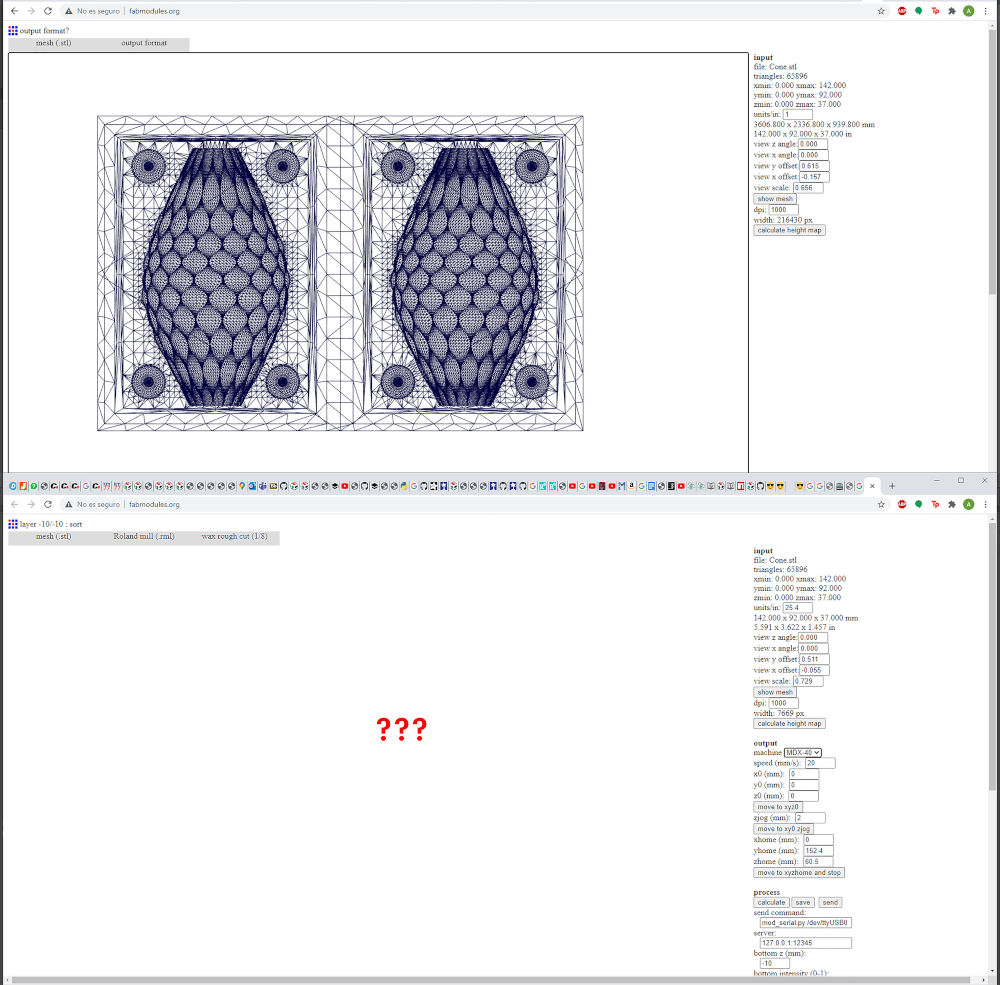
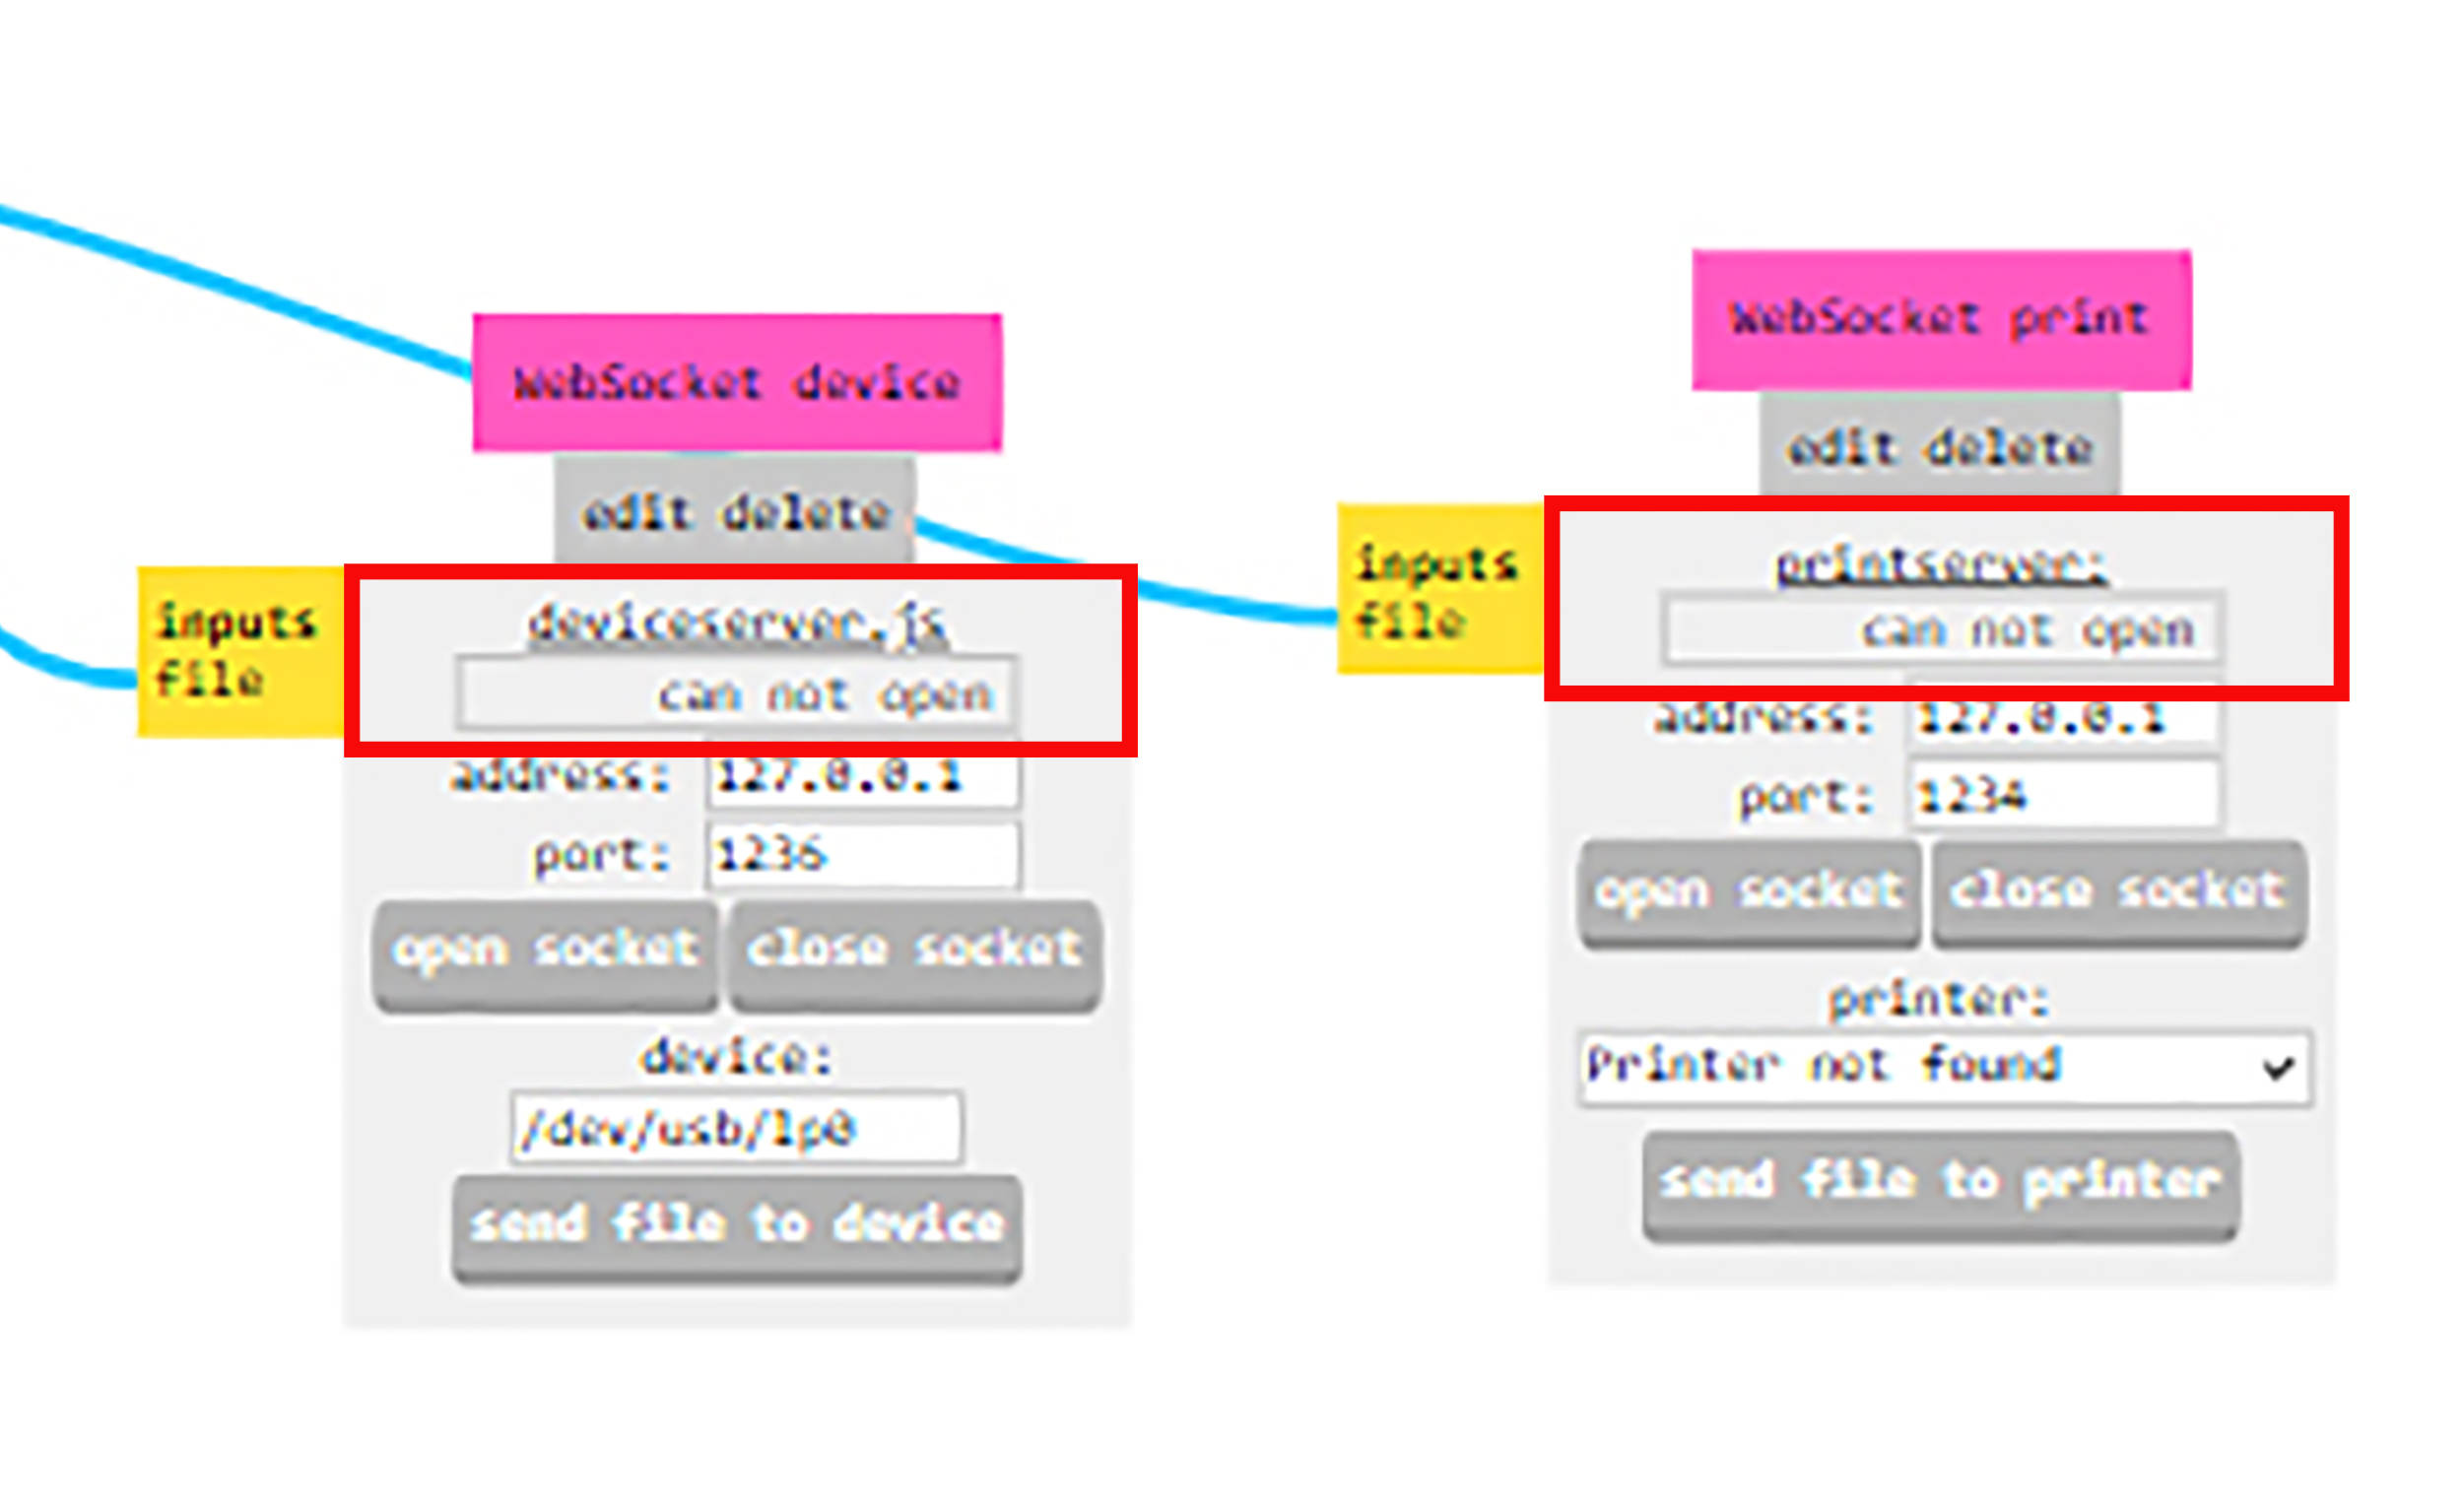
For milling in the Roland MDX-40 of the Fab Lab UE Madrid, the online software Fab Modules is used. So the first thing I do is import the Mesh .stl file for the wax milling and the first part, which is the roughing.
When I configure all the options, and I give it to Calculate, the software stays indefinitely thinking. It does not mark the path of the milling and remains blank for hours 😖😖😖.
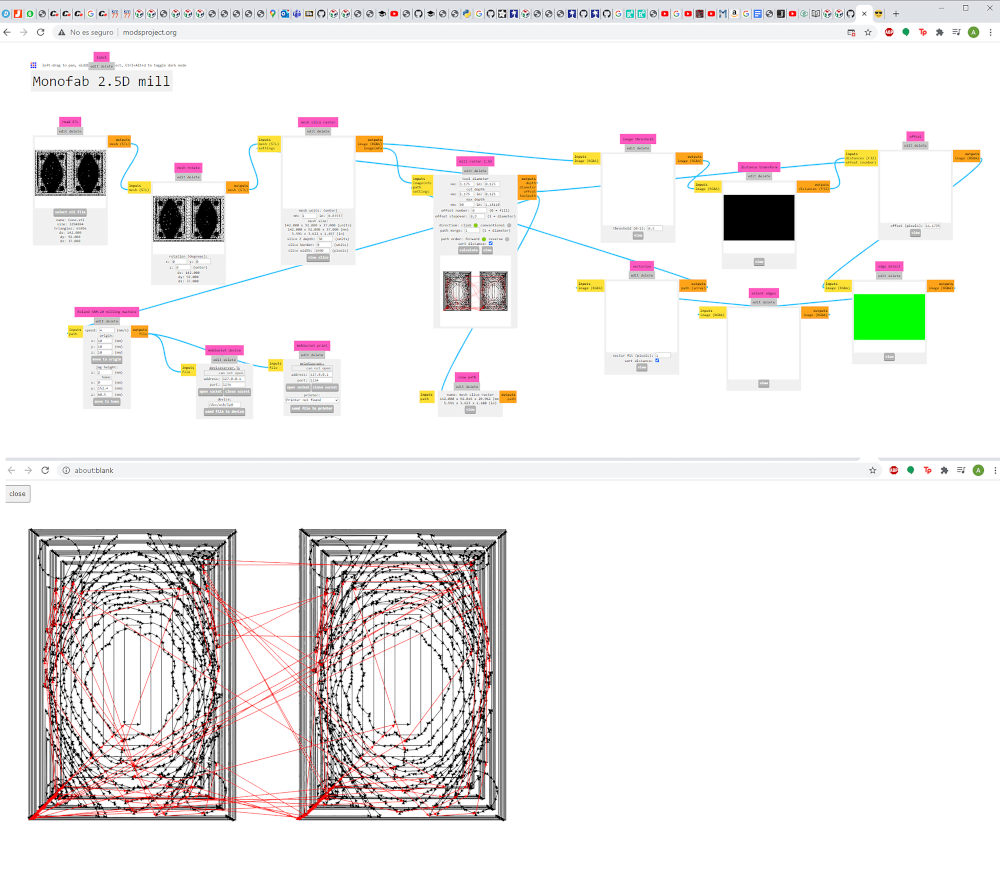
(16/04/2021 18:12 p.m.) Viewing various documentation from other students, including those Elena Cardiel, Alejandro Ulecia and my instructor Adrián Torres, I try my luck with Mods CE software, following the workflow that Adrián tried to carry out.
At the first time, he loaded the file well and successfully performed the rough milling simulation.
(16/04/2021 20:06 p.m.) But ... there was a problem. The software was not communicating with the machine to be able to send the file to mill. Talking with Adrián and seeing another series of documentation, I saw that the configuration of drivers to communicate the machine with the computer was harder and it was going to take me a long time. 😓
(16/04/2021 21:27 p.m.) It is already night, and the next day I had to catch the train at 7:00 a.m. to Leon 🚄, so I had to leave fab lab UE Madrid without milling 😞😞 and I advised Alberto to try to mill his piece on his big CNC Machine.
-
_ VISIT TO FAB LAB LEÓN
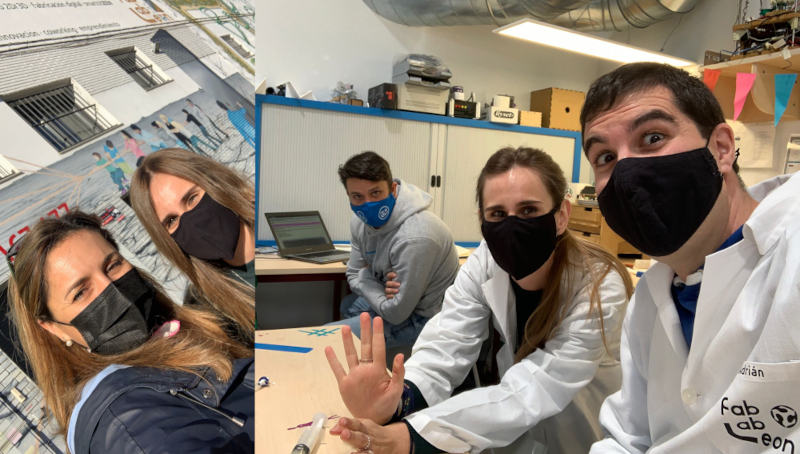
(17/04/2021 10:23 a.m.) I'm in Leon! 😍😍 As I am a remote student, this has been the first time that I have met my instructors Adrián, Nuria and Pablo in person, and I have been able to see the Fab Lab León live.
As I told you at the beginning, Nuria invited me to go to Leon to do a Biomaterials Workshop for university students of Biotechnology. Adrian and Pablo didn't know I was coming, so it was a surprise for them to find me there. I will never forget their confused faces. 🤣🤣
During this day I had the opportunity to get to know them more closely, talk, work, share experiences and give them a huge hug (despite the uncomfortable situation of the pandemic, the mask and the minimum social contact).
They already know it, but this Saturday I felt very happy and grateful for all the care and hospitality they gave me. It felt like home and I hope to see you soon (in person) again. I love you guys! 💖💖💖
During the workshop I was able to meet some wonderful students😍, very interested in the biomaterials world, their learning and their possible uses.
In it, Nuria and me shared our work and recipes so that the students could replicate them and have fun experimenting. It was an amazing experience to teach biomaterials classes again! We managed to make several samples and we all left very happy, which is the most important thing.

Thanks so much Nuria for everything! 😘😘
-
_ 3D MILLING AT FAB LAB LEÓN
(17/04/2021 16:10 p.m.) During Saturday afternoon, while Adrián and Pablo were doing the Global Open Time at the Fab Lab, Nuria showed me how to use the milling machine to be able to carry out my assignment piece. 😍
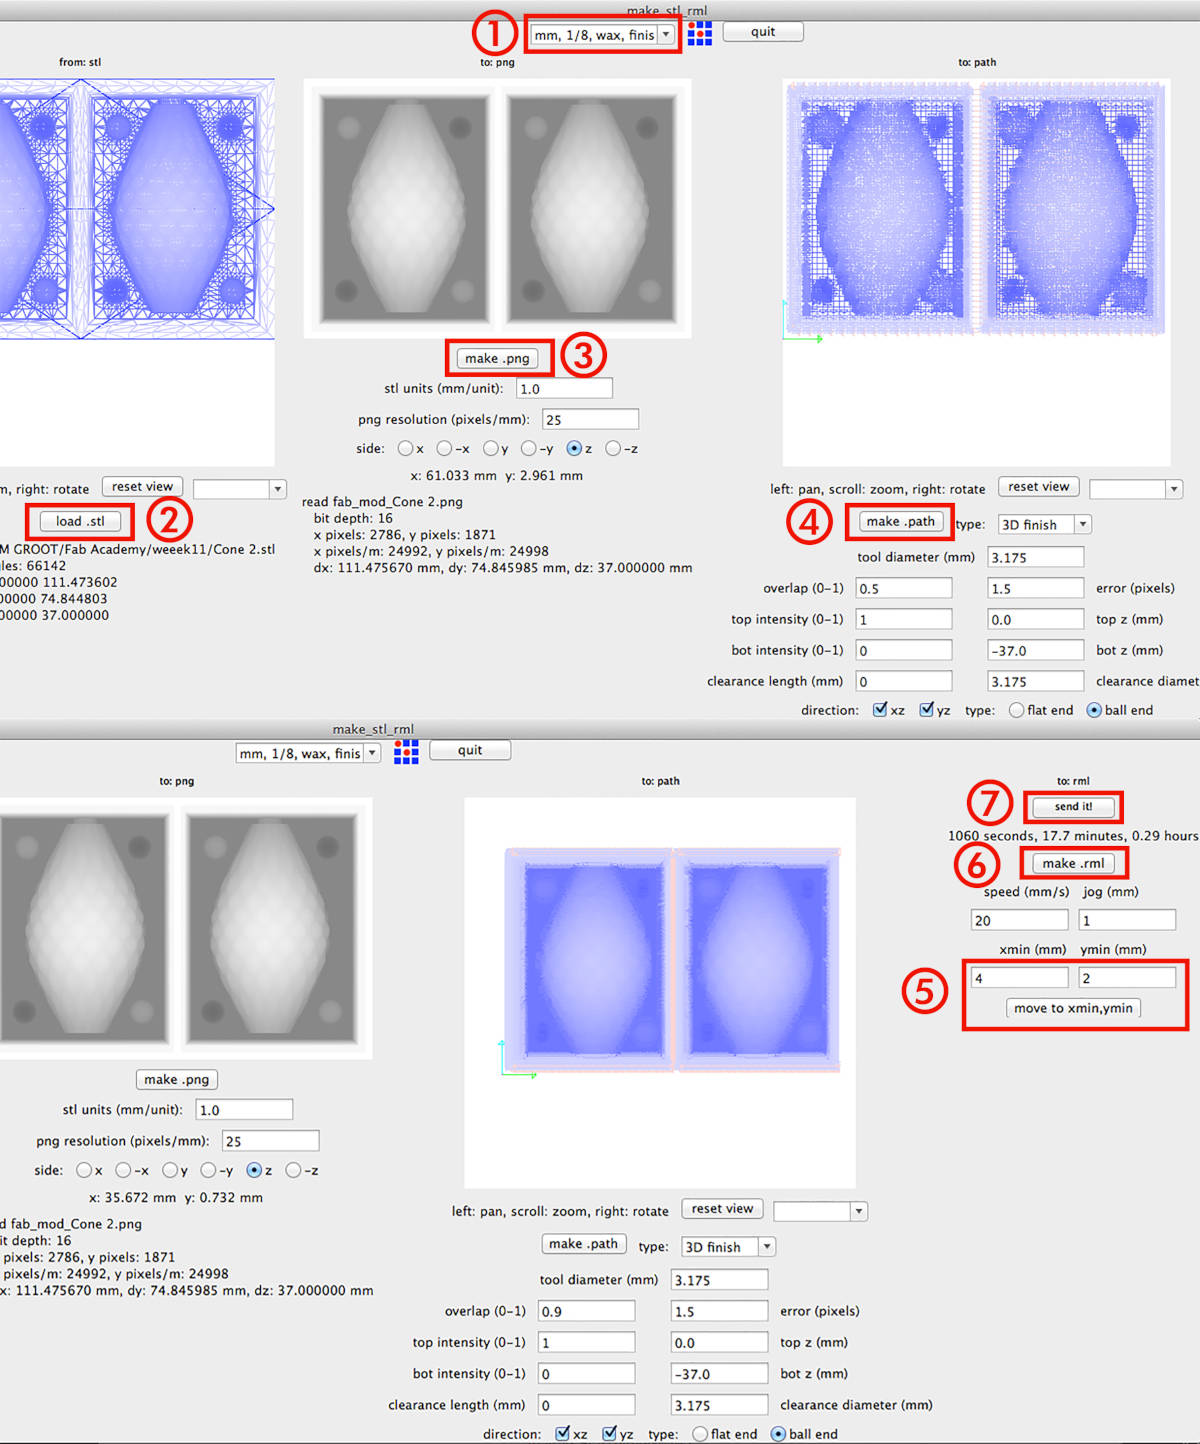
At fab lab Leon, they use a local Fab Modules software. It's a bit different from the online version, but it works great!
In order to do the first part of Rough Mill, I followed this process:
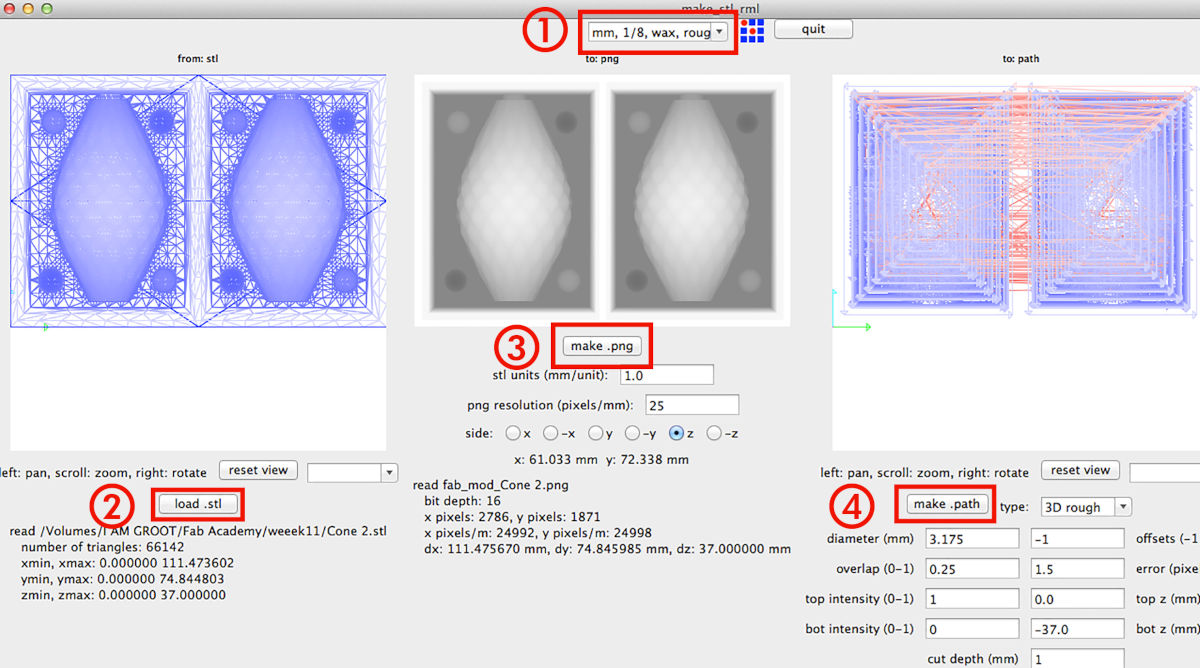
When we make .png the software makes a negative imagine of the design that we are going to mill, and once ordered, it estimates a milling time for each of the parts.
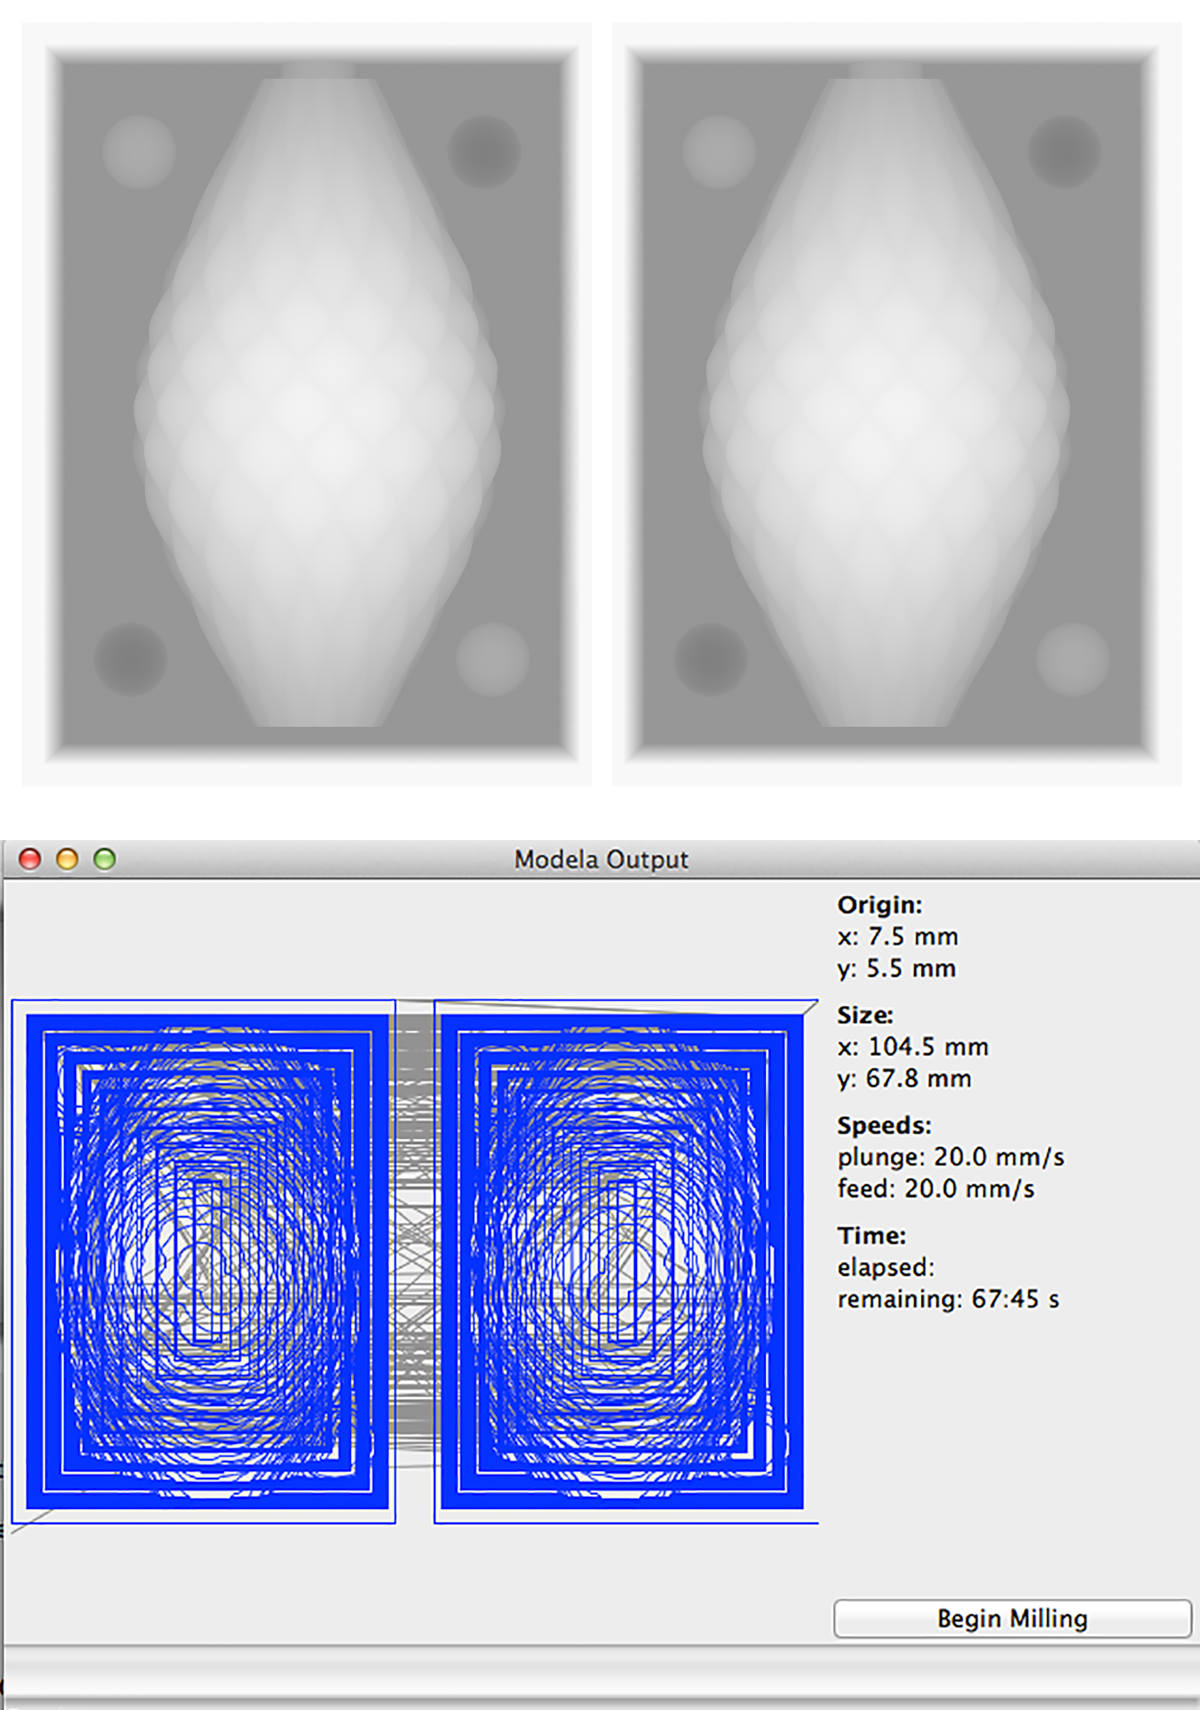
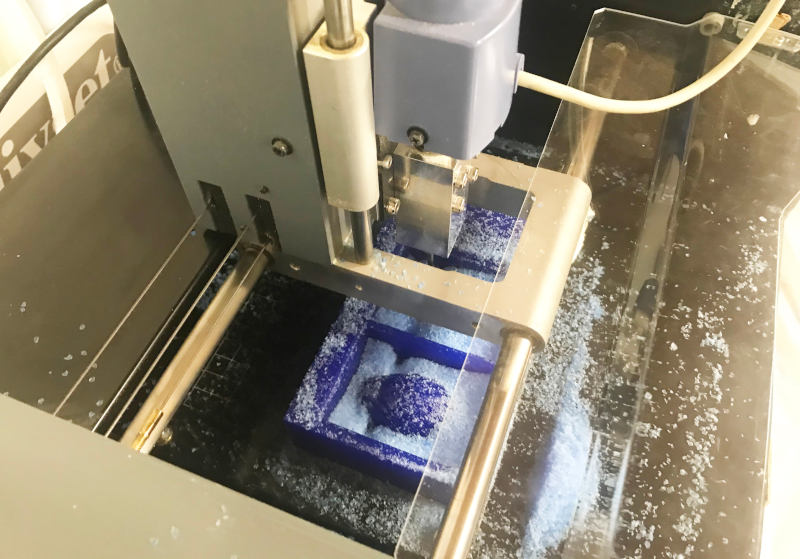
Here you can see a small time-lapse doing the rought milling:
To do the final milling, we follow the same workflow that I have indicated by changing two important parts:
Once this is done, we follow the same previous steps and send it!.
Here you can watch a short video doing the Finish Milling! 😊😊
Almost two hours later, the piece has finished milling!!. With all the wax that has been milled, we collect it in a bag and this wax can be reused, melted again and reused on another occasion.
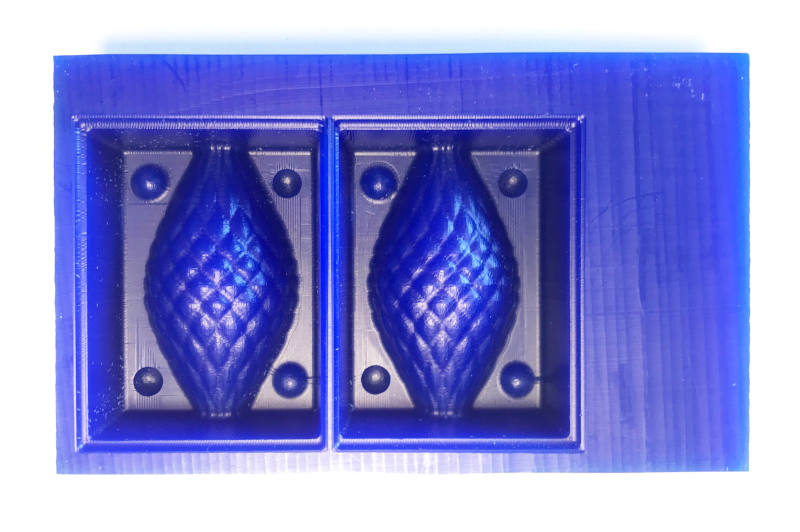
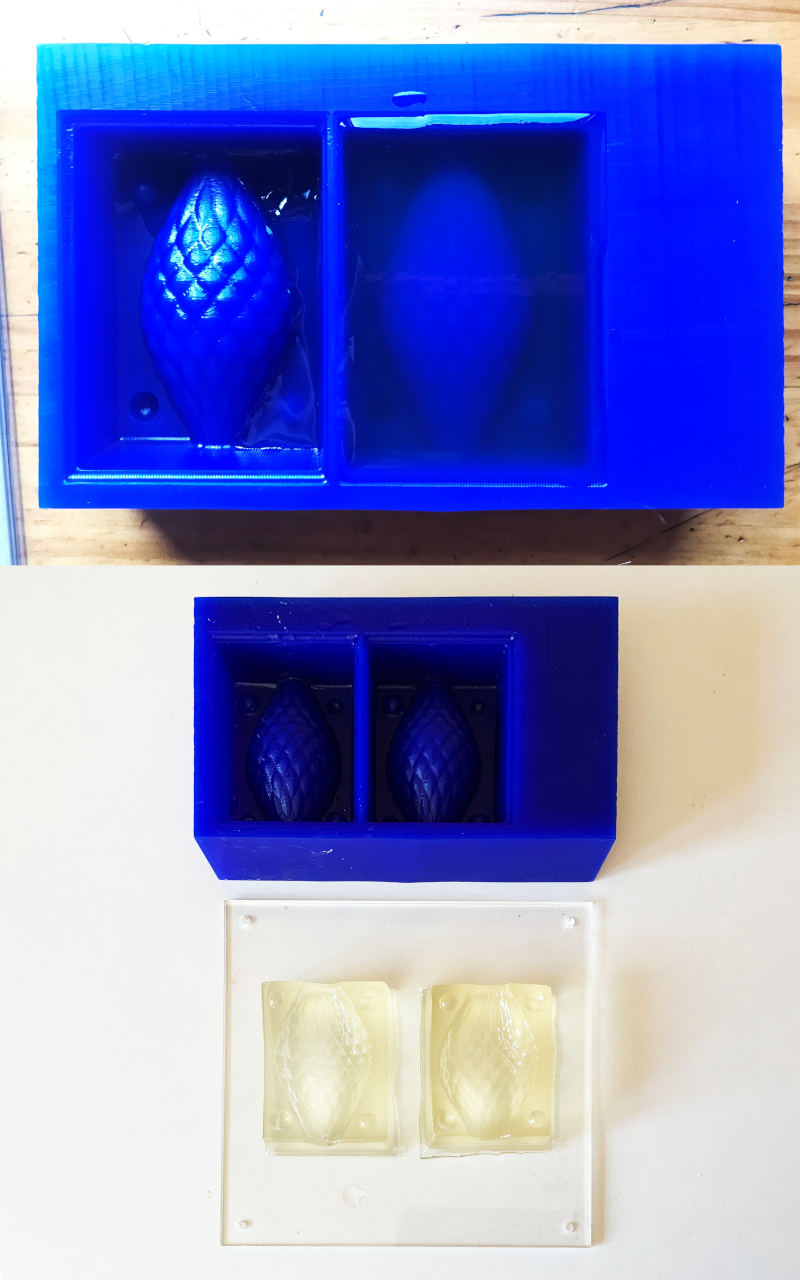
This is the final finish of the piece! 💙💙
I have had a few small glitches in the base of the figure. I did not leave enough distance to milling well the base of the object, so there have remained this part attached to the wall of the wax mold. With a cutter I have tried to separate both parts, but I have not been able to separate it enough to pouring the silicone in these areas.
MOLDING
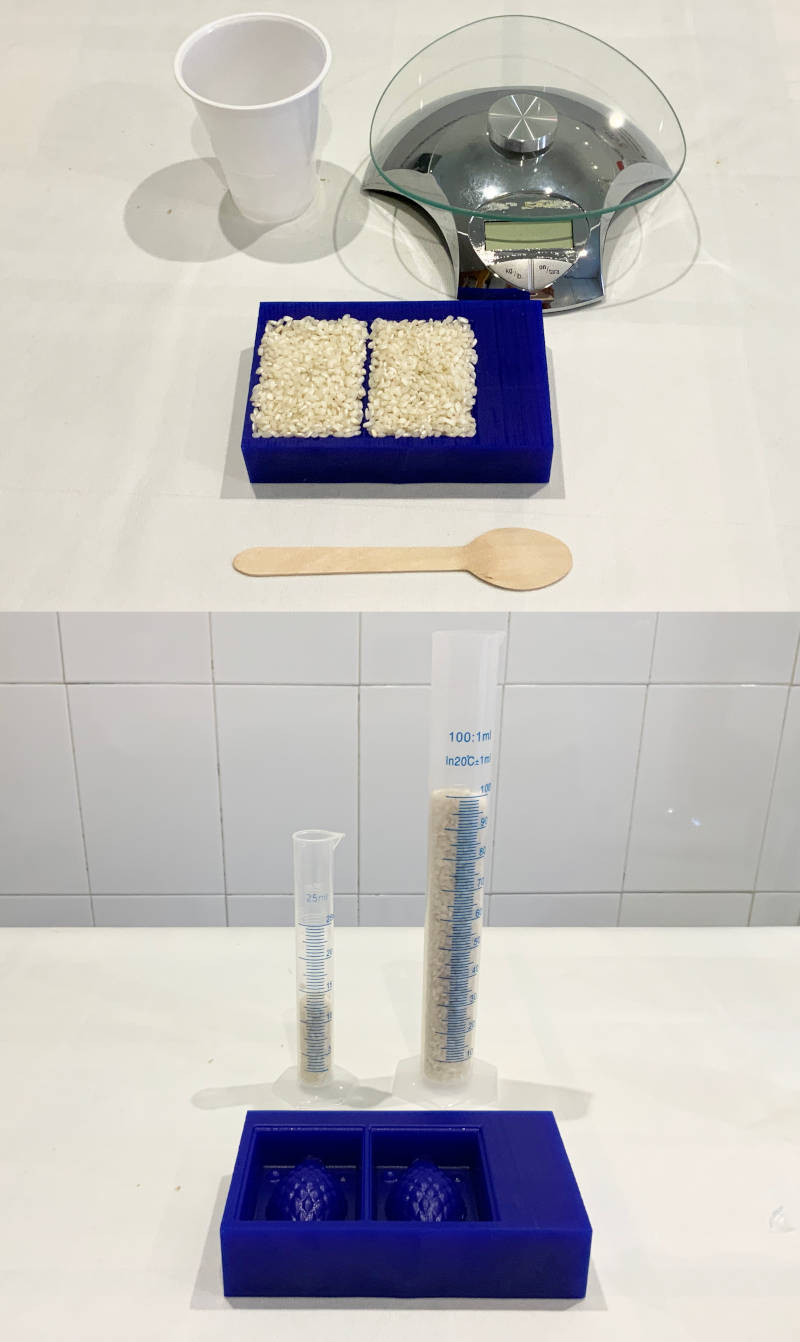
(18/04/2021 12:17 p.m.) To make the silicone molds, the first thing we do is measure the exact volume that we are going to need to fill the wax mold. Following the documentation of Adrián Torres and Alejandro Ulecia, I have tried the method of measurement with rice.
I could have done this process with water, but I thought the rice is more exact for this fixed volume and less "dirty", to use it.
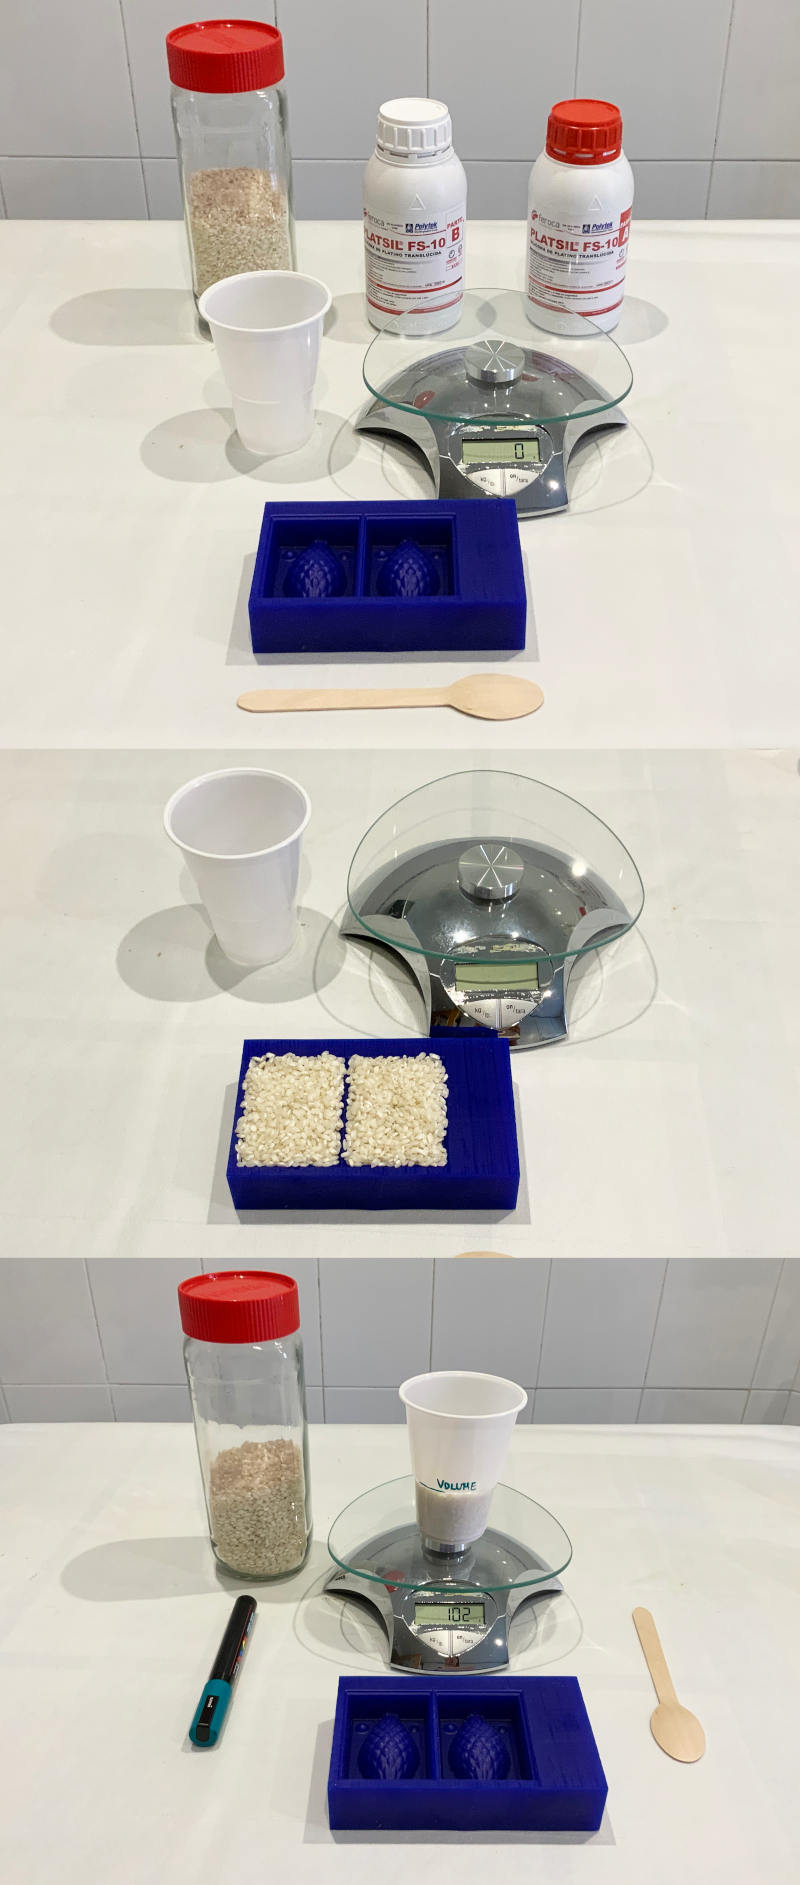
After measuring the volume in a plastic glass, I reserve the rice for the experiment I want to perform after... 🧐🤭
For the molds I wanted to try to make molds with three types of materials: platinum silicone, gelatin biosilicone and food save silicone.
-
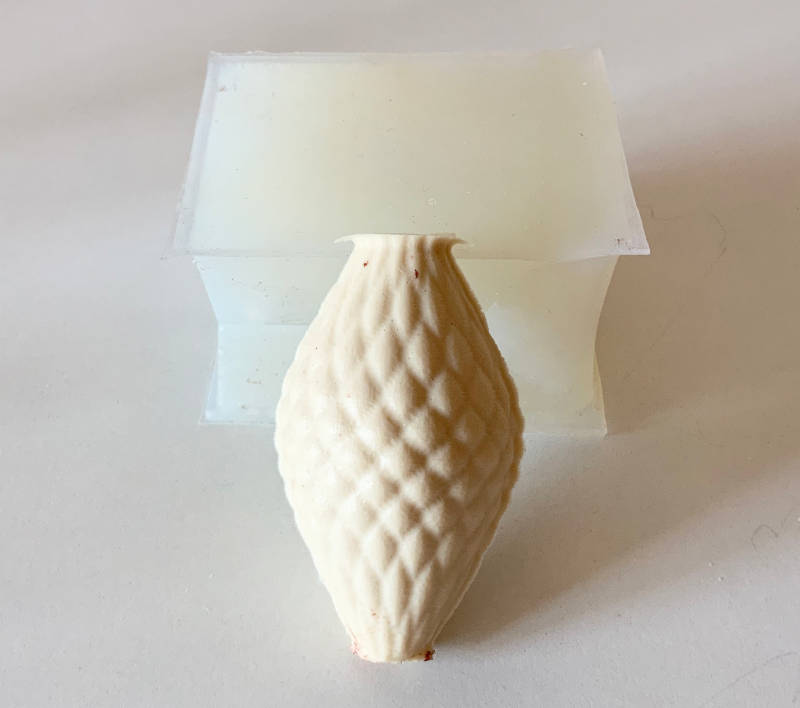
_ MOLD WITH PLATSIL FS-10
First I started by making a platinum silicone mold from the Platsil FS-10 brand. To make it we have to mix 1A:1B in equal parts.
(18/04/2021 12:34 p.m.) For a better release, I have used a release spray that I apply to the entire surface of the wax mold.
Once I have applied the liquid, I pour the silicone mixture and let it cure for a minimum of 35 minutes.

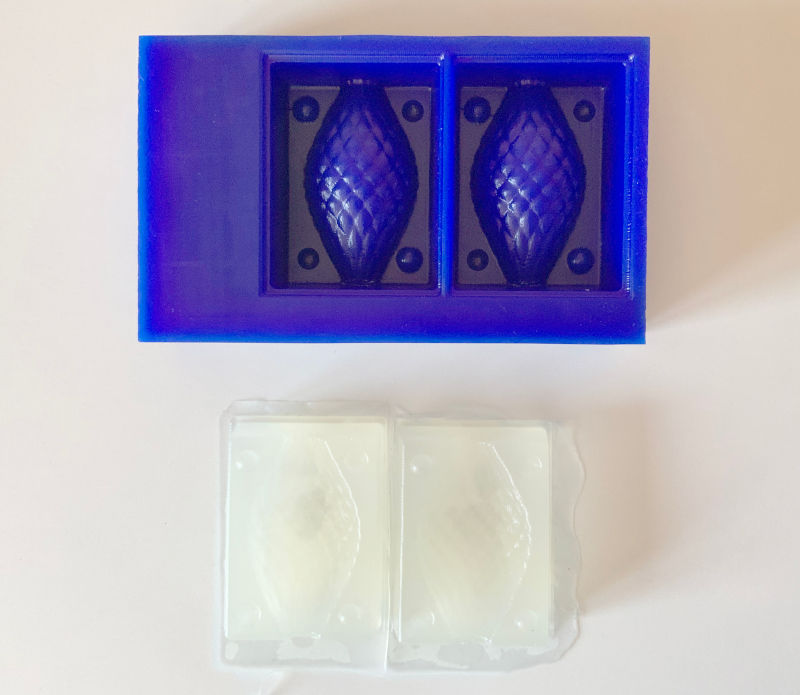
(18/04/2021 13:15 p.m.) After an hour aprox., I unmold the first silicone mold. And it has been perfect! 😍
A few years ago, I had previously worked with this type of silicone as there are very fast to cure and do not leave any type of bubble on the surface. As the mold has been so good and has dried very quickly, I have made another platinum silicone mold to will make more castings in the next few days.
-
_ MOLD WITH SORTA CLEAR 37
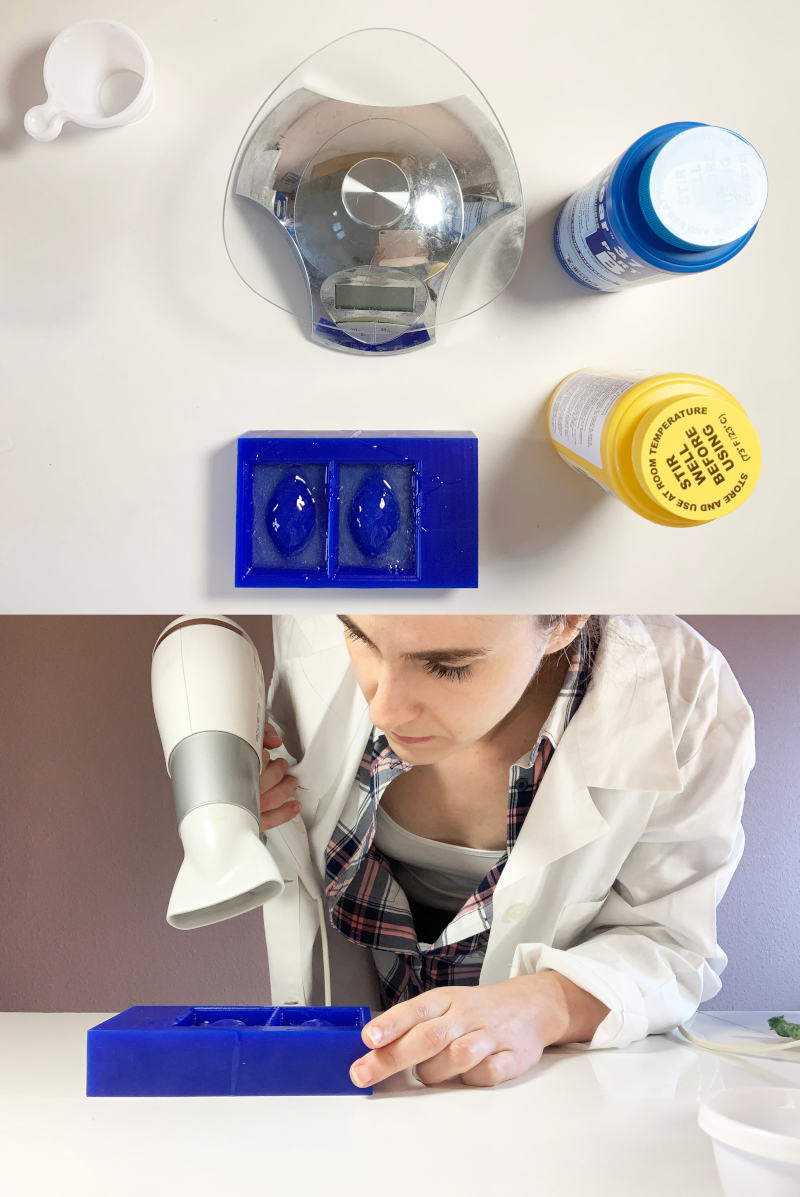
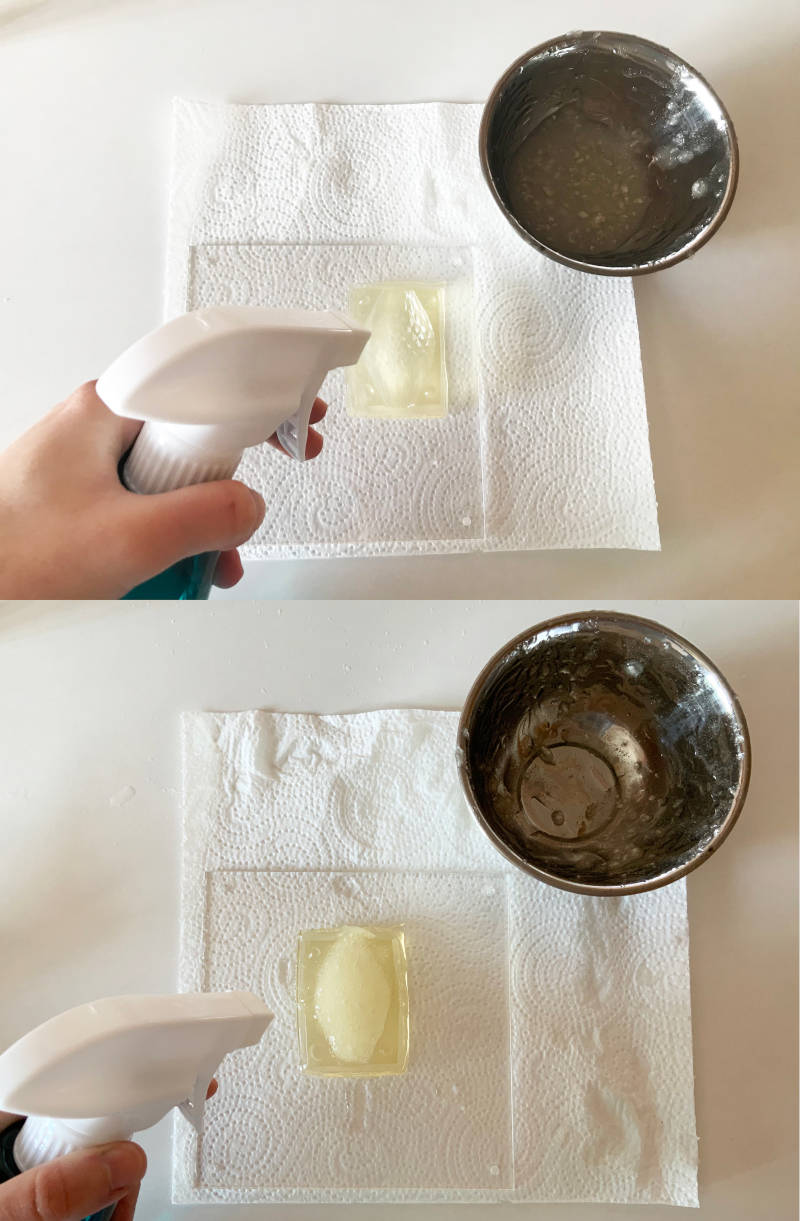
(19/04/2021 19:12 p.m.) Sorta Clear silicone is a type of silicone that can be used to make food safe molds. In this case it is very important to review the data sheet of the product to follow exactly the steps necessary to be able to make molds with food. As in the case of platinum silicone, the mixture consists of two parts that we must mix in equal parts 1A:1B.
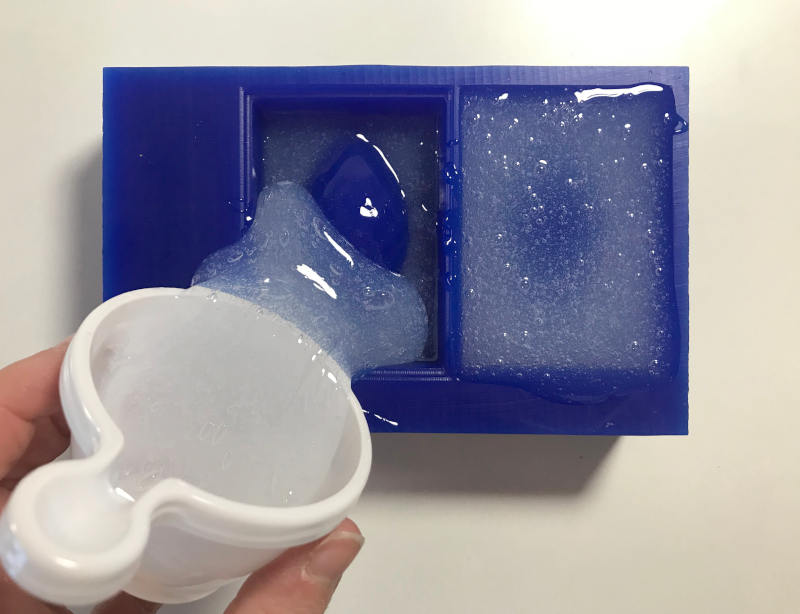
As this kind of silicone has a fast curing time of 4 hours, the seller has recommended me, first, I make a small pouring layer on the surface of the mold, and then apply hot air with a hair dryer to eliminate any bubbles that may appear around the mold.
Then we pour the rest of the mixture from the corner so the mixture flows through the mold and not too many bubbles come out.
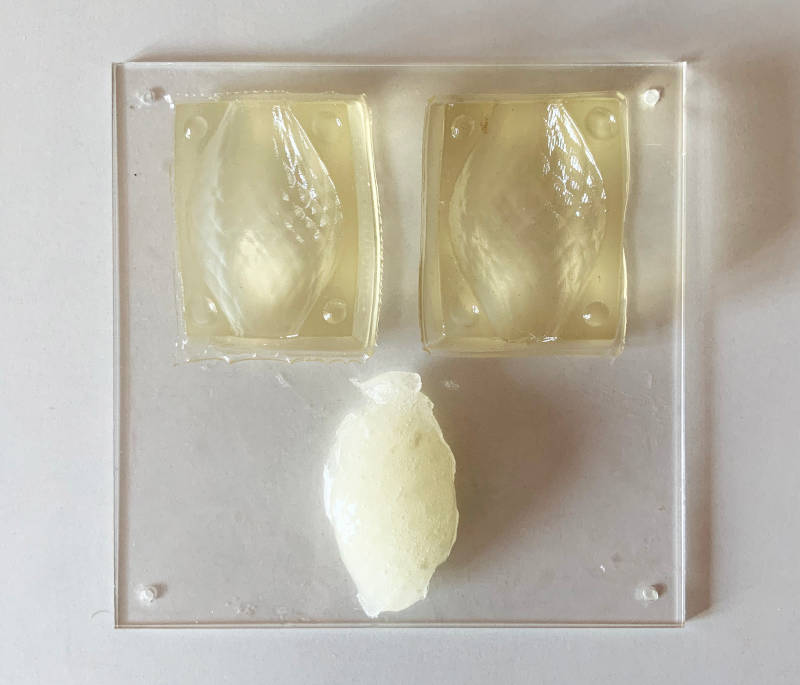
(19/04/2021 08:01 a.m.) The next morning, this was the end result! The hair dryer method works!
After drying, we put the mold in a post-curing process in the oven for 3 hours at 80º (the first two hours) and at 100º the last.
-
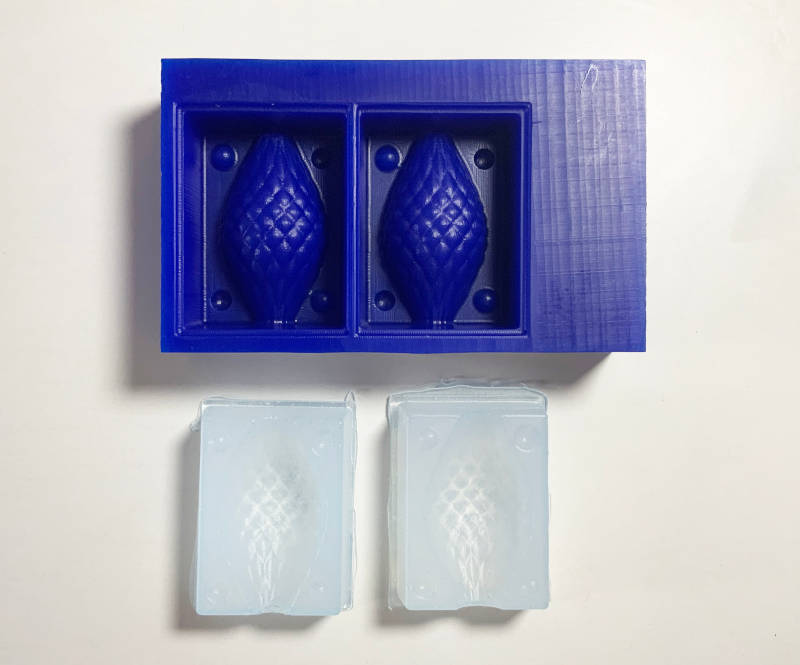
_ MOLD WITH BIOSILICONE (GELATIN BIOPLASTIC)
As part of my background is focused on biomaterials research and their properties for future uses, I wanted to make some objects and / or molds with bioplastic this week. I usually make biofoils with biomaterial, but I have never tried to do things with a lot of volume. Let's see what happens ...
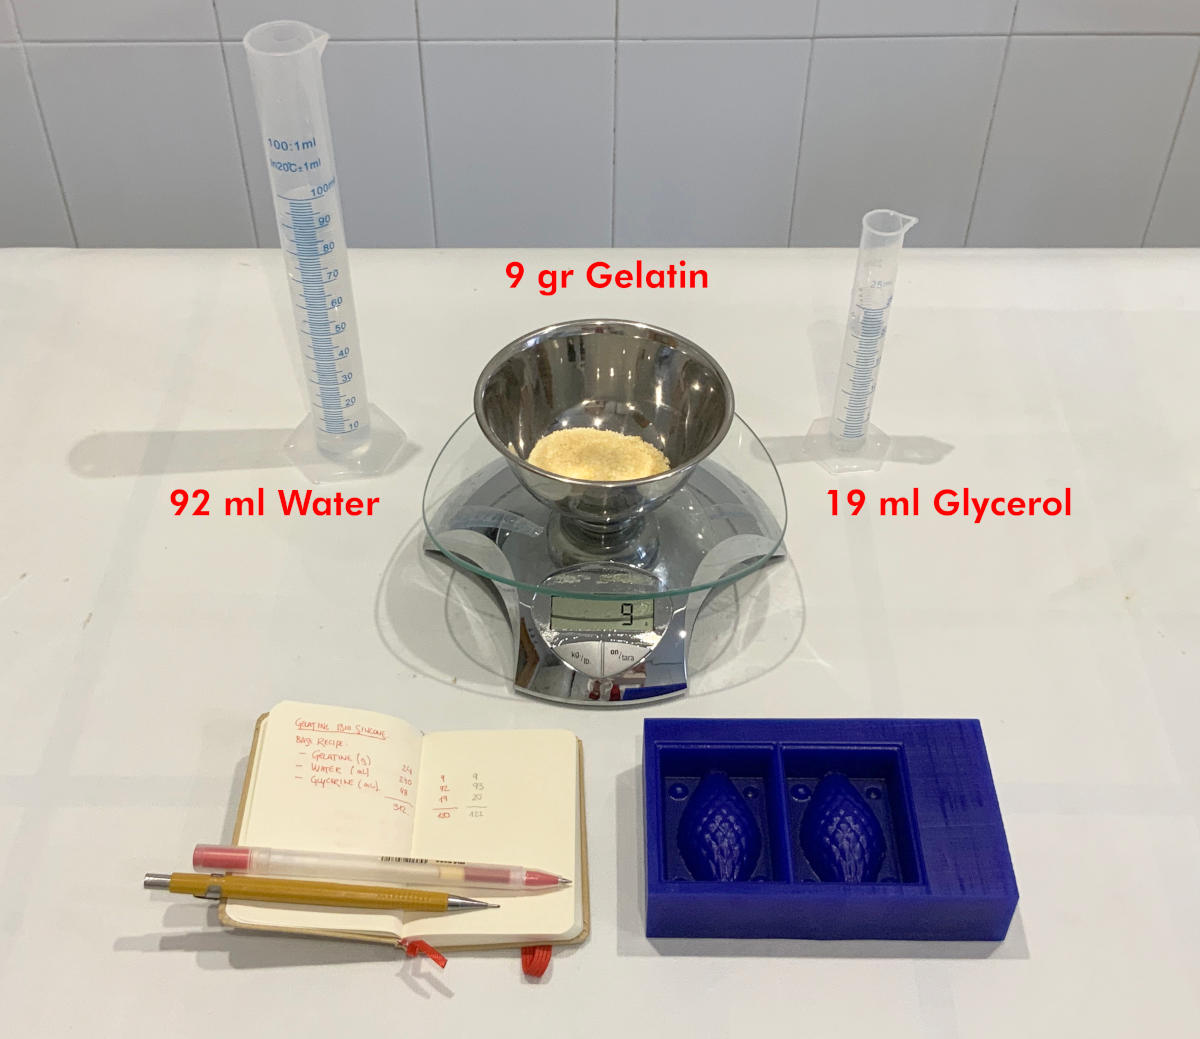
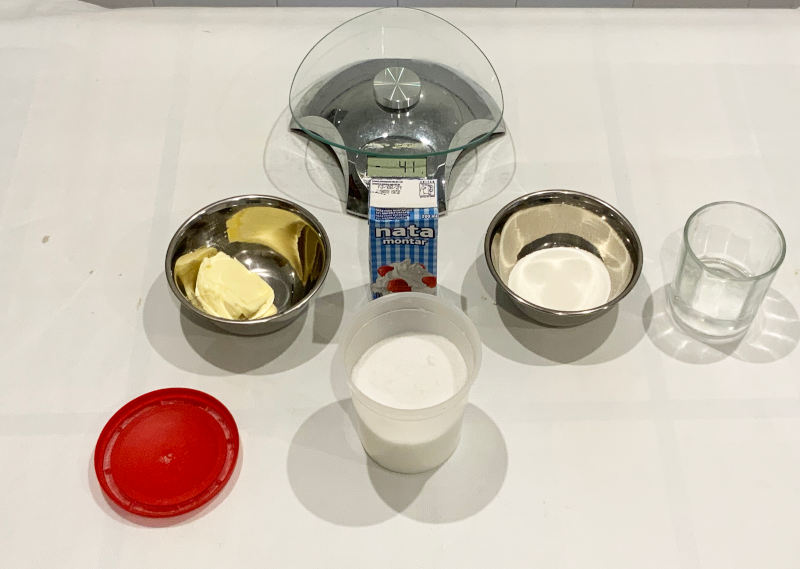
Following one of the base recipes that I have kept in my recipe notebook, I mix the following ingredients:
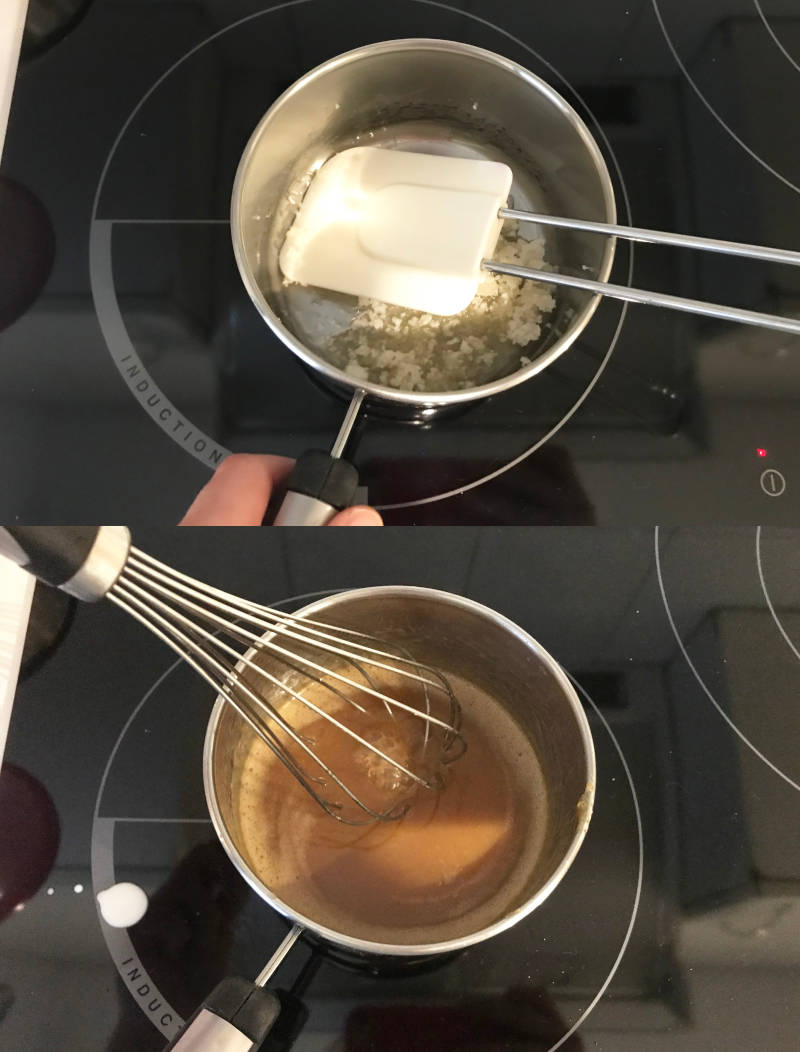
I have to cook all the mixture in a saucepan, and pour the mixture into the wax mold.
Once poured, I waited a couple of hours until the mixture seemed to have solidified. However, being a mixture that is more fragile in volume, one of the parts of the biomold broke. 😭
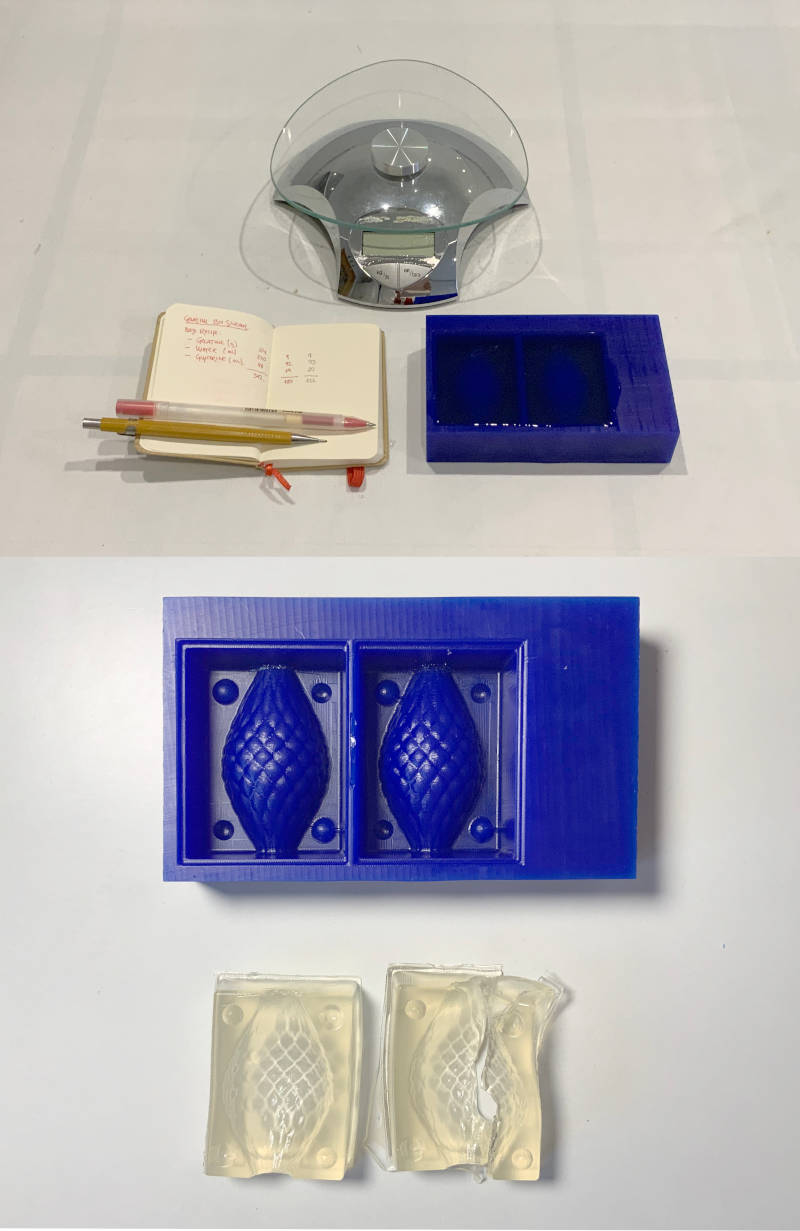
But nothing happens! The great thing about this type of bioplastic is it can be re-cooked and the mixture poured back!. After three unsuccessful attempts, I finally managed to make the two parts of the biosilicone mold 🎉🎉.
CASTINGS
For the Castings part, I have tried two common commercial products for making objects on mold, and several tests carried out with different types of bioplastics and food.
-
_ HYDROCAL WHITE
(19/04/2021 07:39 a.m.) To begin with, I used one of the plasters that I have at home. This kind of plaster is very good for making thin and very resistant surfaces.
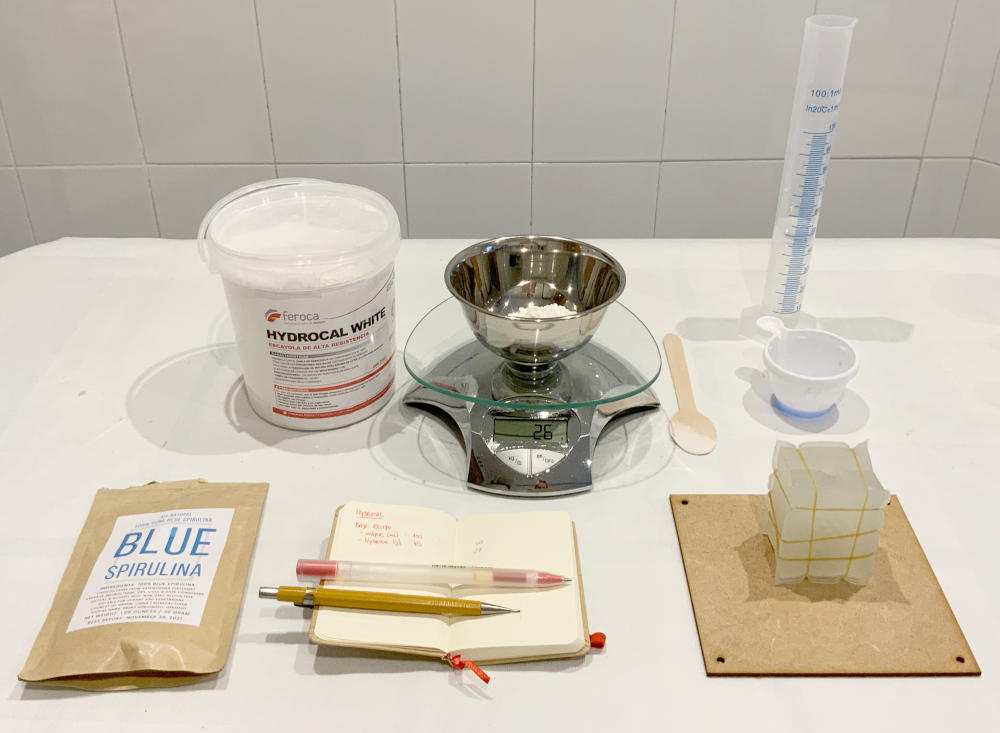
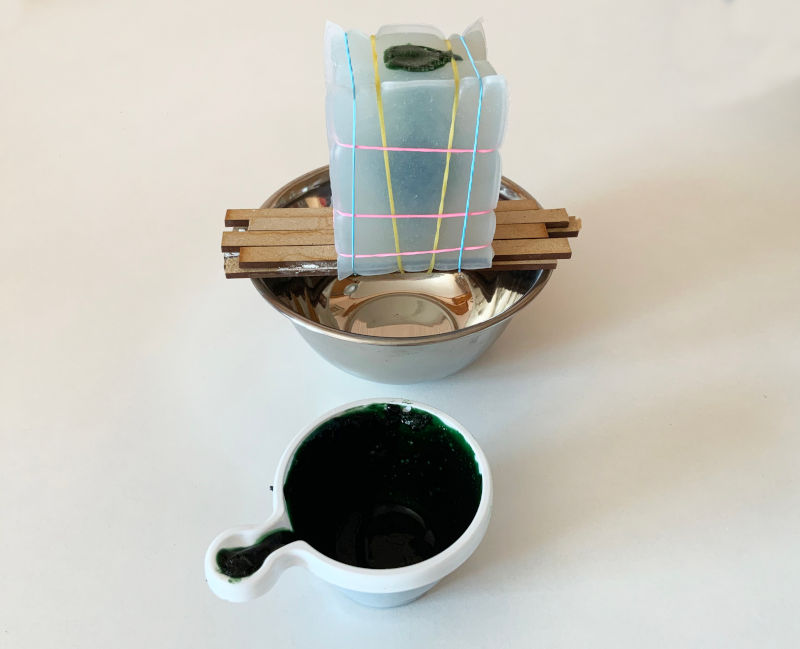
In order to make the pour, and as I have two holes in opposite parts of the mold, I have glued a thin silicone sheet with silicone, and I have put a wooden formwork in the lower part of the mold that I have fixed with elastic bands.
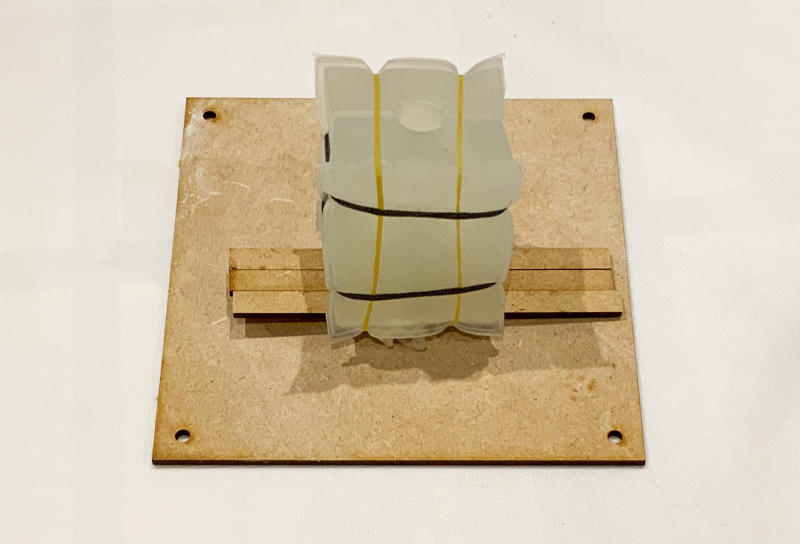
As it is a very liquid mixture, at first I had problems to prevent all the liquid from coming out of the bottom hole. I had to seal the silicone sheet better and put more elastic bands, to ensure that the mixture did not come out everywhere.
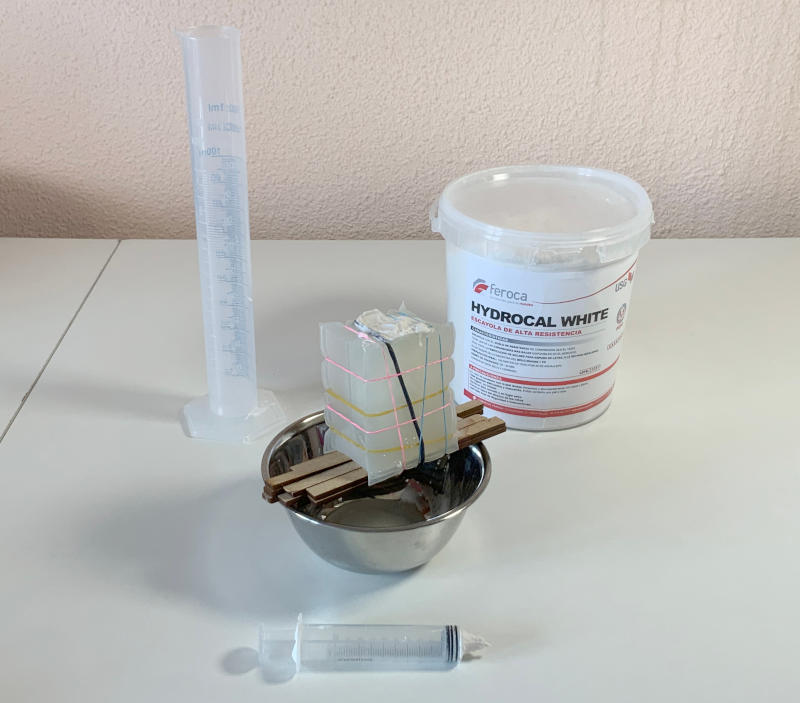
At the end I managed to keep the mixture inside the mold! And after a couple of hours, this is the final result! 😍😍

-
_ FERROPUR PR-55
To practice with the resins, I have used one with quick-drying curing (5 min), which is made of polyurethane (highly toxic). To mix, we divide 1A: 1B into equal parts and use the same formwork procedure on the platinum silicone mold.
Once the mixture is poured, inside it begins to generate an esothermic reaction, which gives off heat through the walls of the object and the mold itself.
15 minutes later we unmold it and this is the final result!
Personally, although the result of the catings with this type of materials is very precise and has the best finish, I do not like them very much, due to their high use polluting factor and harmful to health.
-
_ SPIRULINA + GELATIN BIOPLASTIC
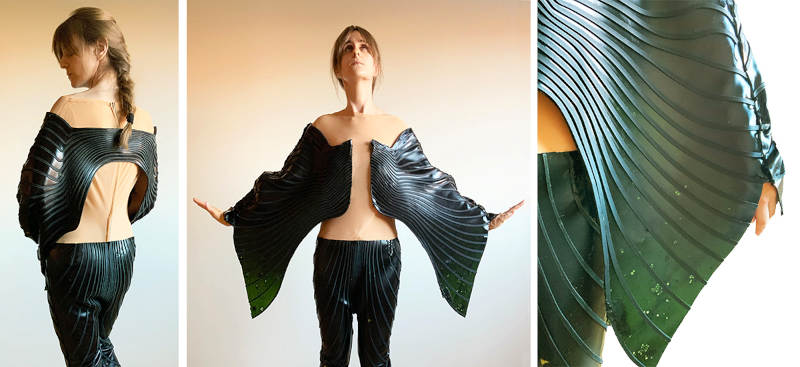
(09/07/2020 18:44 p.m.) Last year, during the master of Fashion Futures I was doing, I was researching the most elastic bioplastic I could find. After several tests with different biomaterials and several conversations with my friend and agronomist, Carlos Repiso, I found a formula to achieve maximum elasticity with a bioplastic made with gelatin and spirulina!.
Here you can watch a short video about the resistance tests that I did with the material.
This research helped me to carry out my final project, which consisted of making a whole garment made with spirulina bioplastic.
Following the formula that I discovered in my master final project, I am going to make a small volume sample for my silicone mold, with this ingredients:
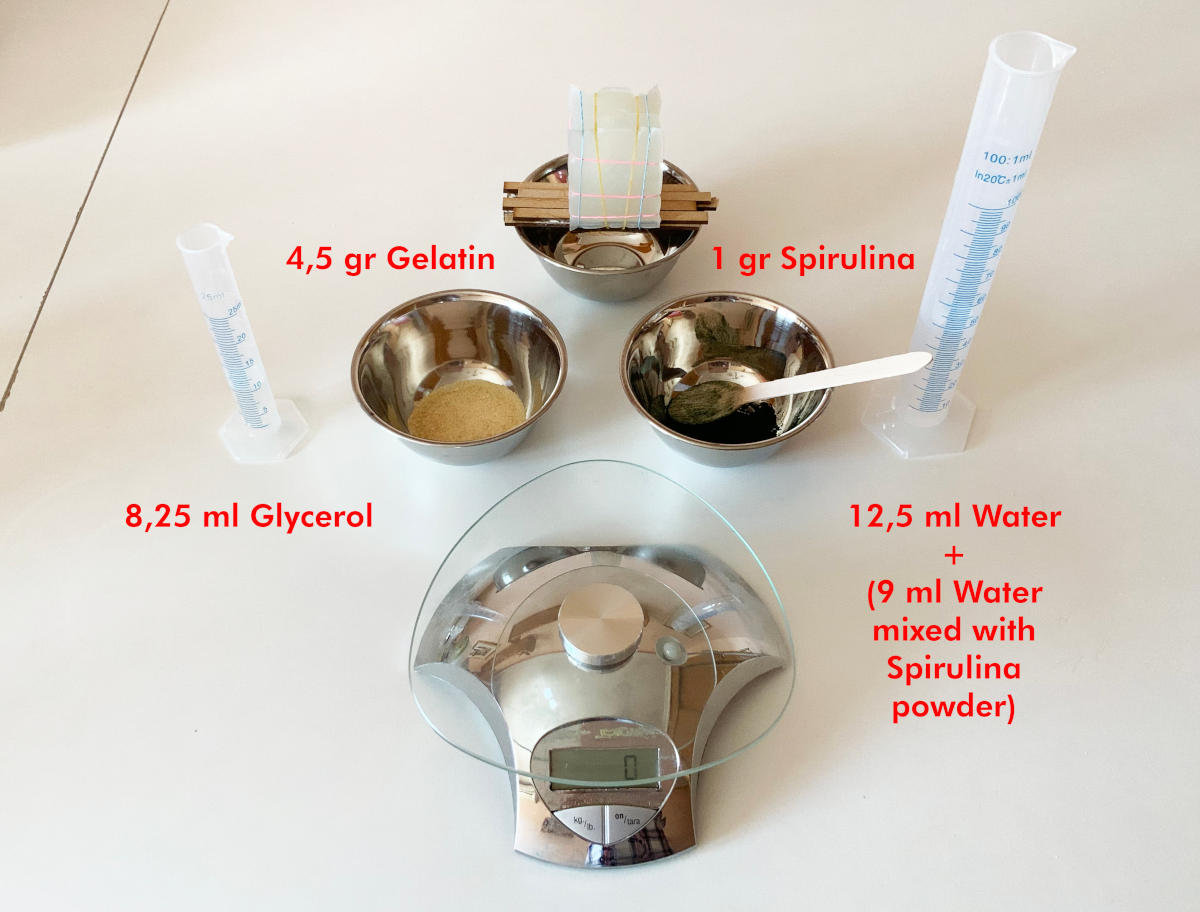
I have to cook the entire mixture of ingredients well in a saucepan and pour the mixture into the mold following the same formwork procedure as in the previous castings.
After a couple of hours, the bioplastic is completely solidify! As this is the first time that I pour volumetric figures with this kind of bioplastic, I realize several bubbles are generated around it, which we would need to remove with a vacuum chamber.
But looking at it in detail, it is very interesting the color gradient of the biomaterial in the final part of the object.💚💚💚
-
_ CONDUCTIVE ACTIVATE CHARCOAL + GELATIN BIOPLASTIC
Another of bioplastic tests I want to do, and that was very successful in the Fab Lab Leon during the biomaterials workshop last Saturday, is the activated charcoal bioplastic.
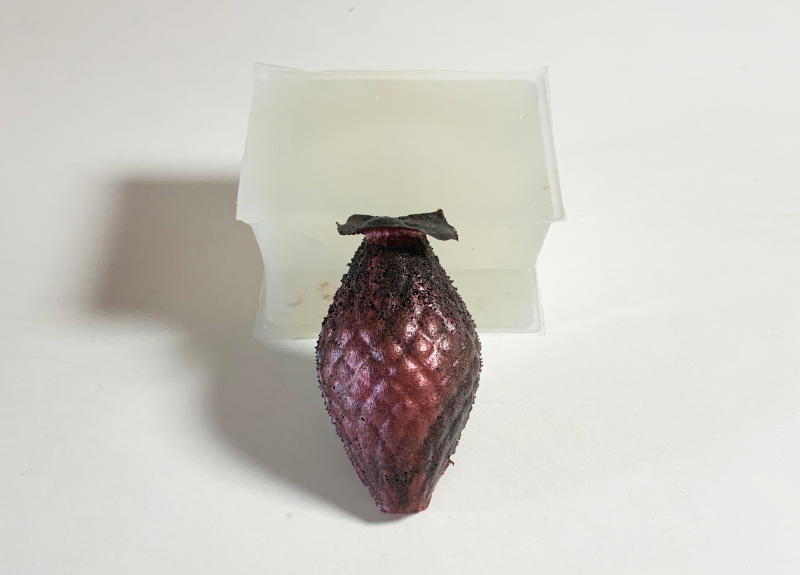
This type of bioplastic is conductive thanks to carbon is activated by the salt that is incorporated into the mixture. To do something different (in terms of dyes) I am going to add a pinch of mica powder around the walls of the silicone mold to create a different effect on the object.
To make the mixture, we need:
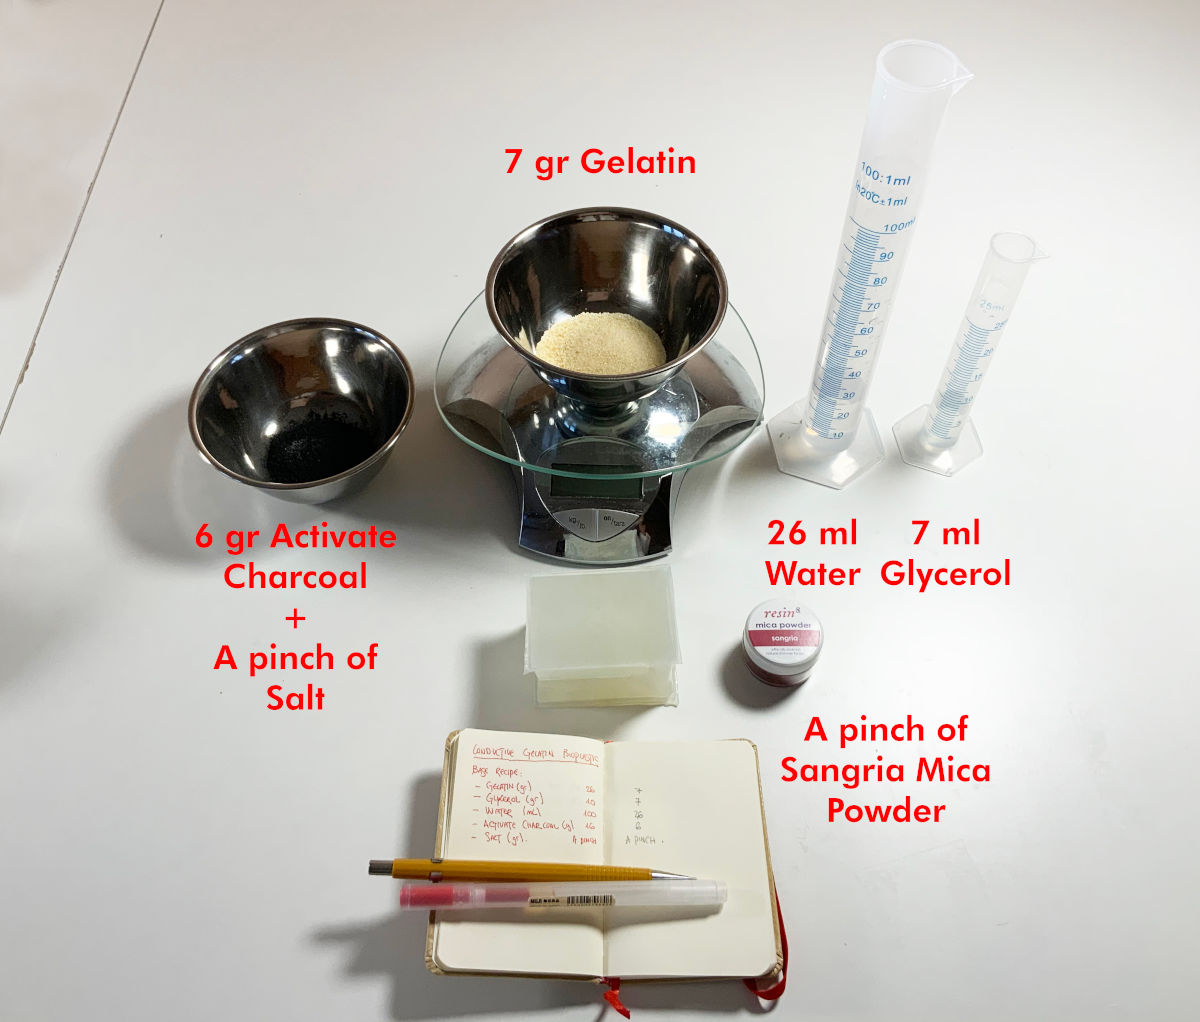
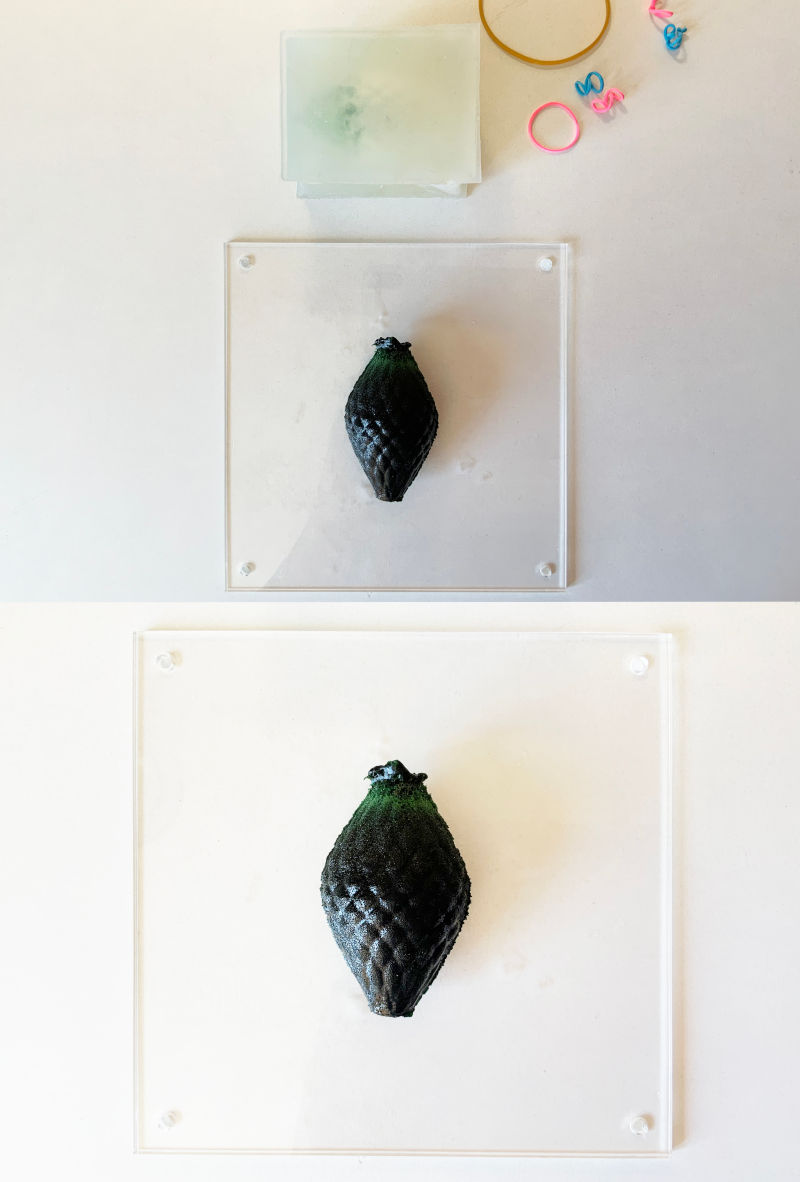
I cook the mixture again in a saucepan, and after several hours, the mixture has solidified successfully!
In this short video you can see the texture and elasticity of the final object. 😍😍
-
_ RICE BIOPLASTIC
With the rice that I had used to measure the volume needed from the molds, I have thought of reusing it to make a bioplastic version with rice!
I have never made a bioplastic with rice before! So this is going to be the first. Will I be successful? 🤔
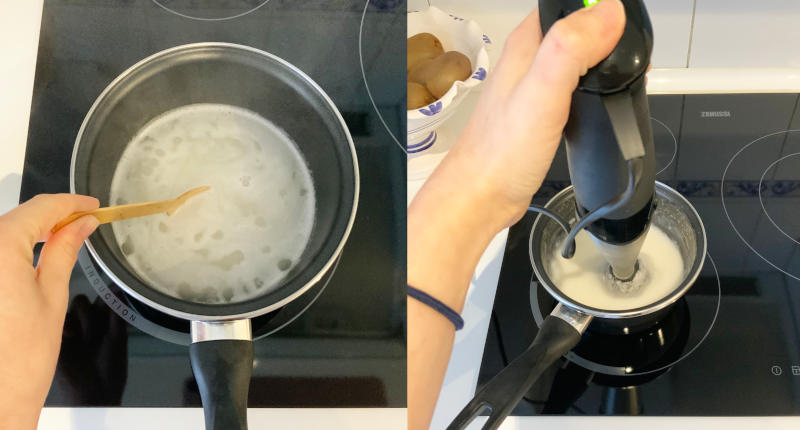
To do this, the first thing I do is cook the rice in water until it is well cooked. Once we have a very dense paste, we pass the mixture with a mixer. I let it dry and we obtain rice starch in pasta.
With this paste, we are going to make the following mixture:
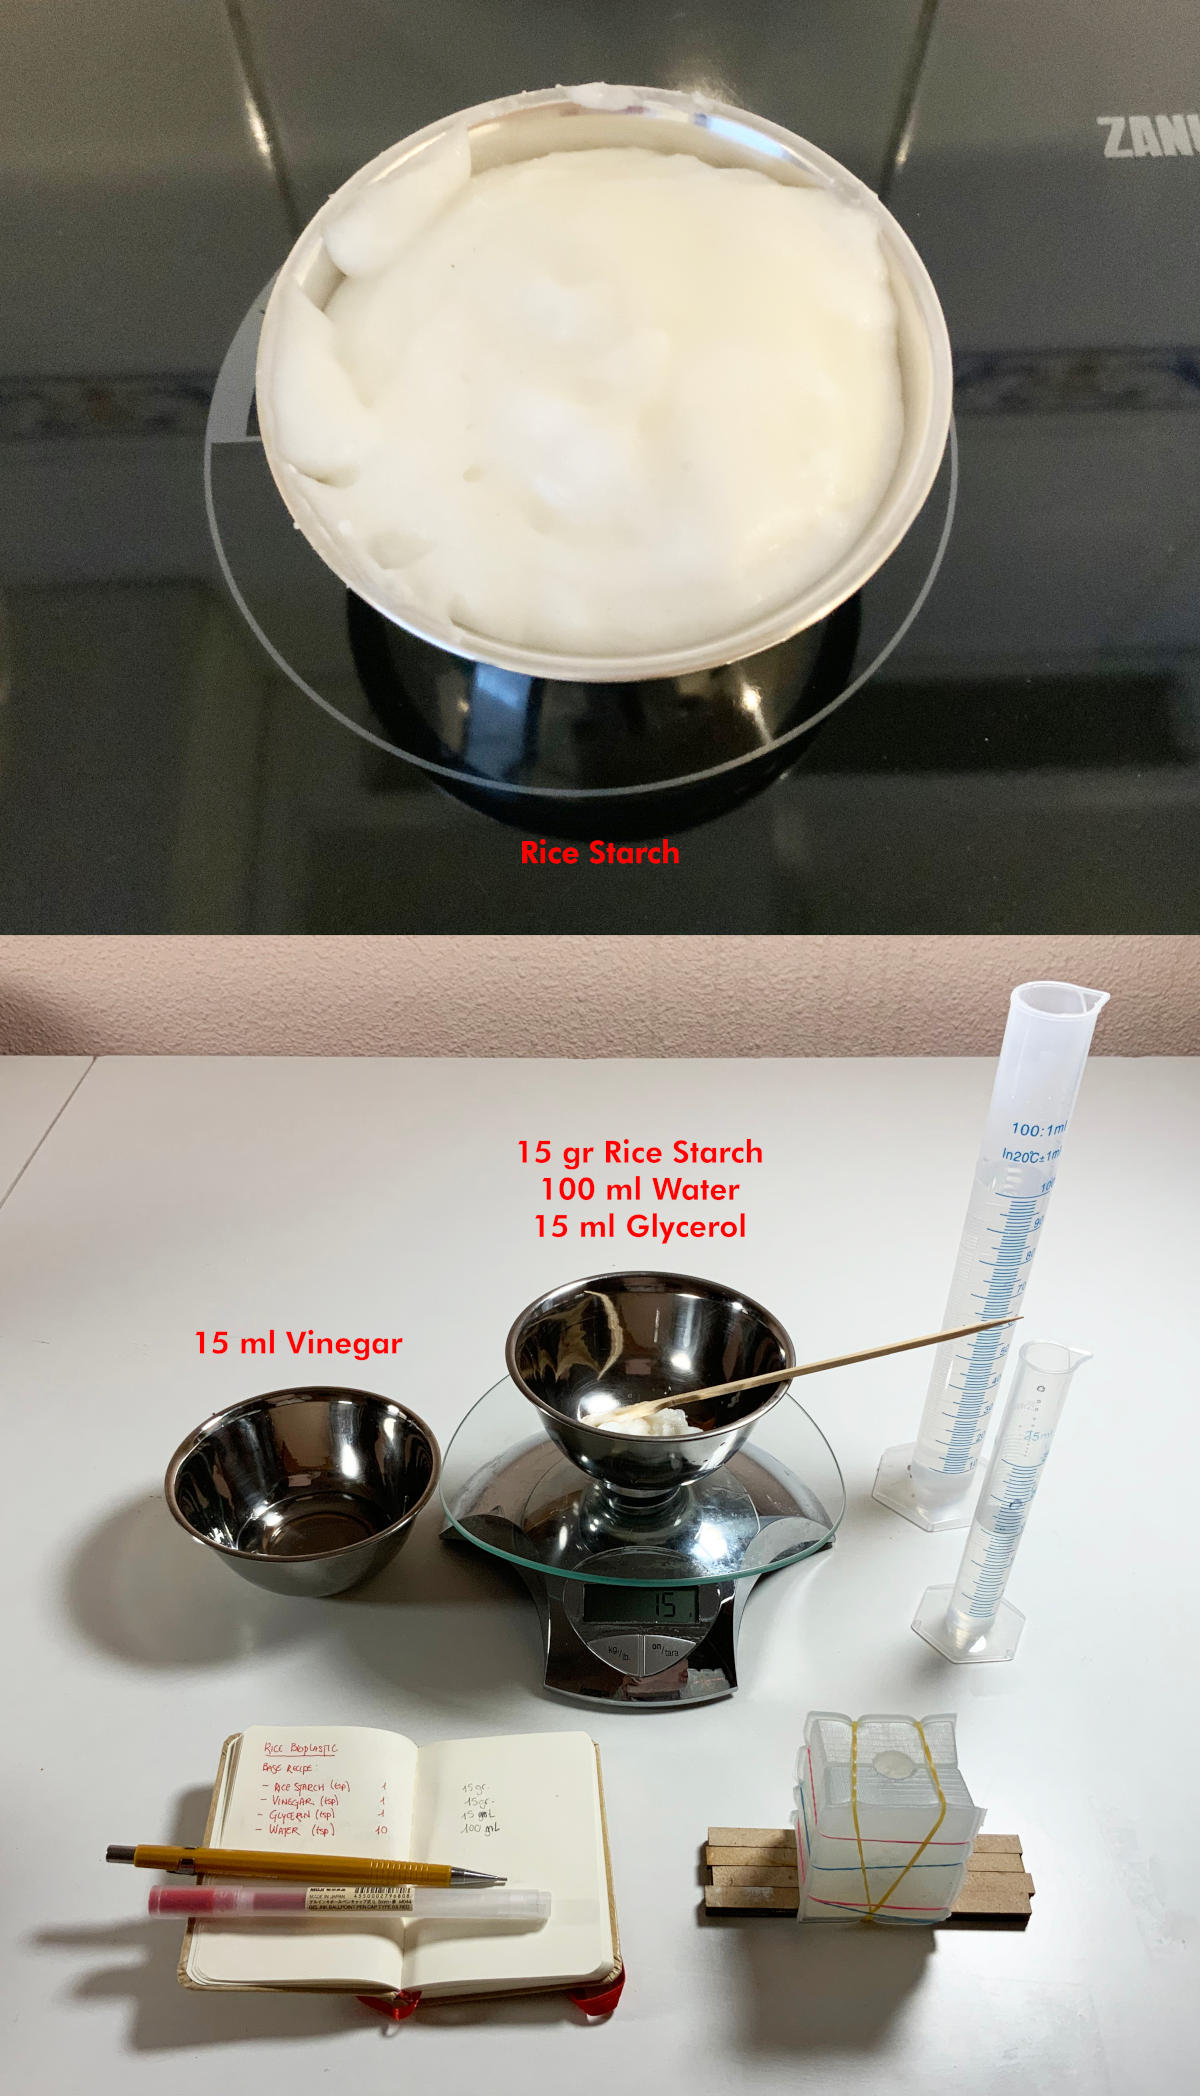
Once the mixture is cooked in a saucepan, I pour a little of the mixture into one of my flat molds( that I have) and another into the silicone mold with the usual formwork.
From my experience with bioplastics, mixtures that use only vinegar and glycerin without a base (gelatin or agar-agar) take longer to dry. At first time, I made the mixture without gelatin, and after a day it was very liquid. So I decided to speed up the process, adding a little gelatin to it.
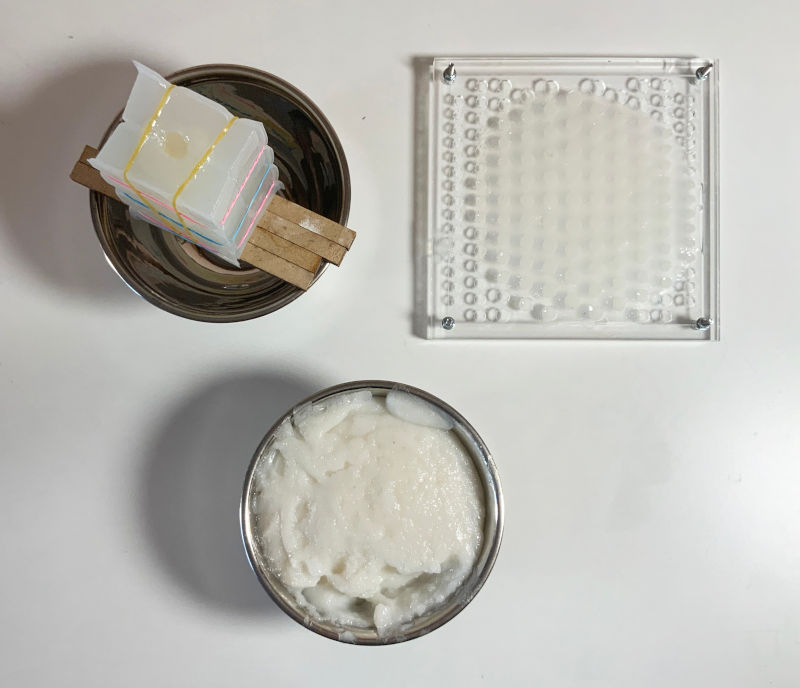
After two days of solidifying in the mold, the mixture has solidified and has this result! 😍. It is not dry yet, but it is a matter of time and patience.
-
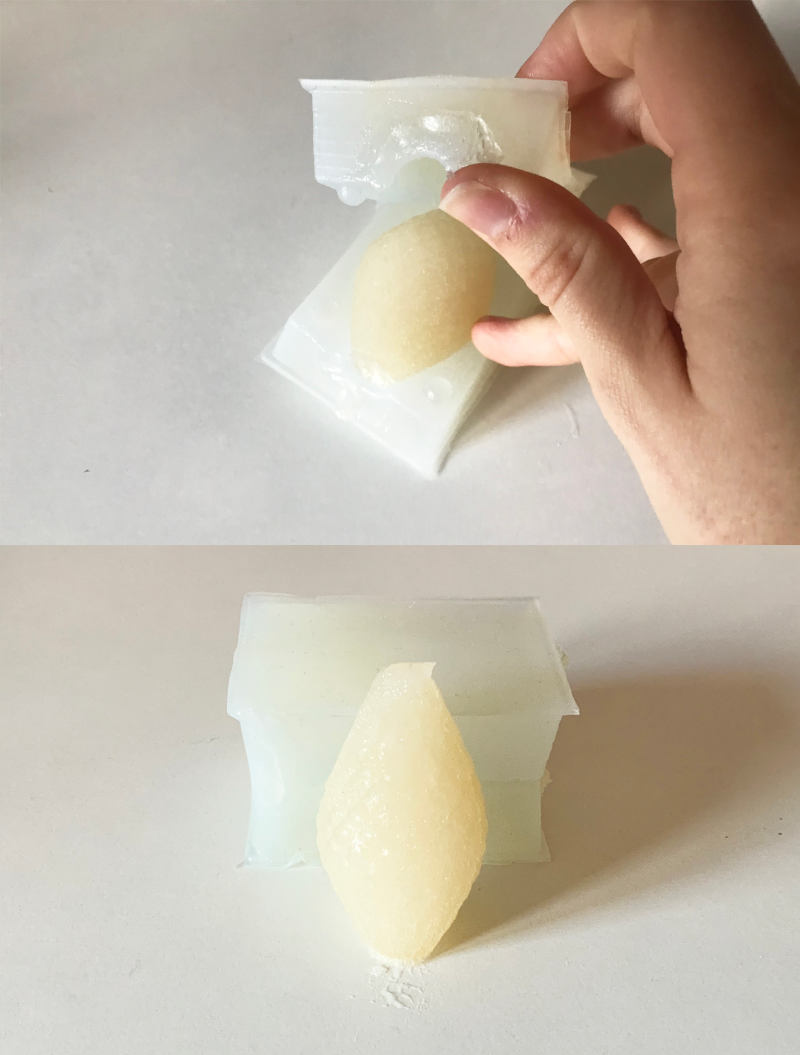
_ SODIUM ALGINATE BIOPLASTIC CASTING IN BIOSILICONE MOLD
For my next test, I want to try casting in the biosilicone mold that I have made with gelatin. But to do some kind of pouring on this mold, I have to make a cold biomaterial mix. (Gelatin bioplastic melts with heat).
So I choose to make a Sodium alginate bioplastic, whose ingredients come in two parts:
-
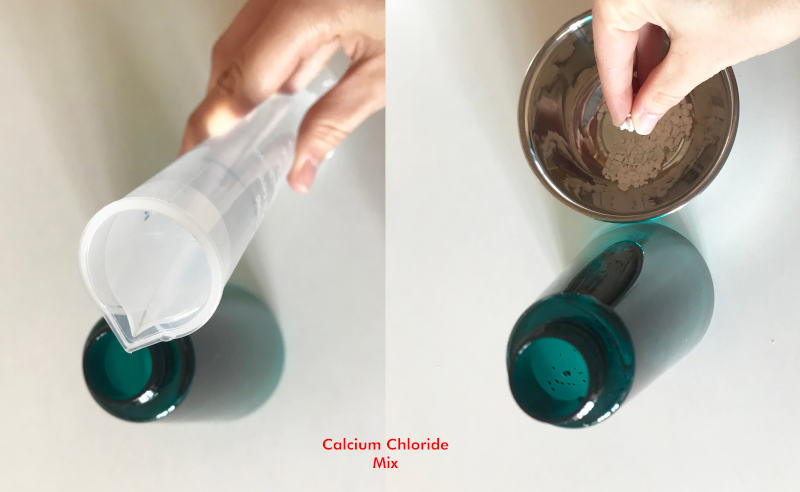
_ Calcium Chloride mix:
-
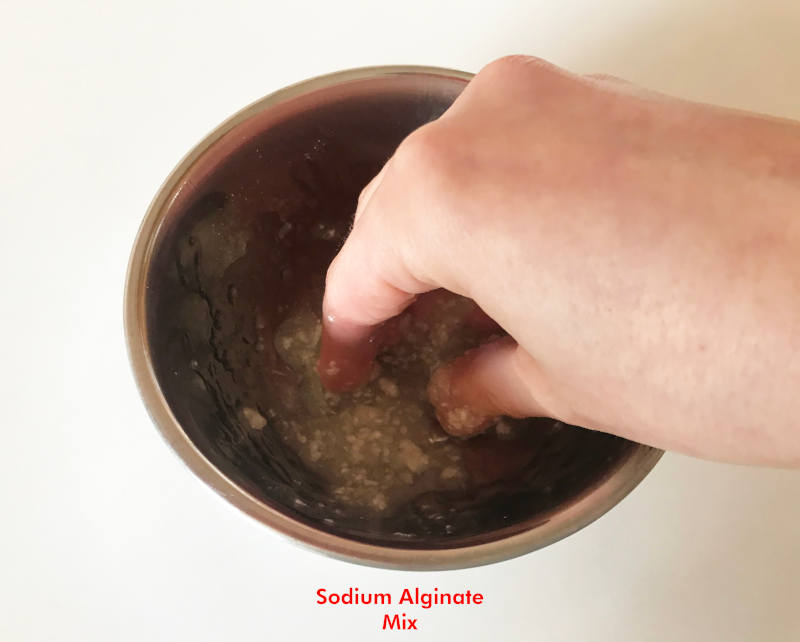
_ Sodium Alginate mix:
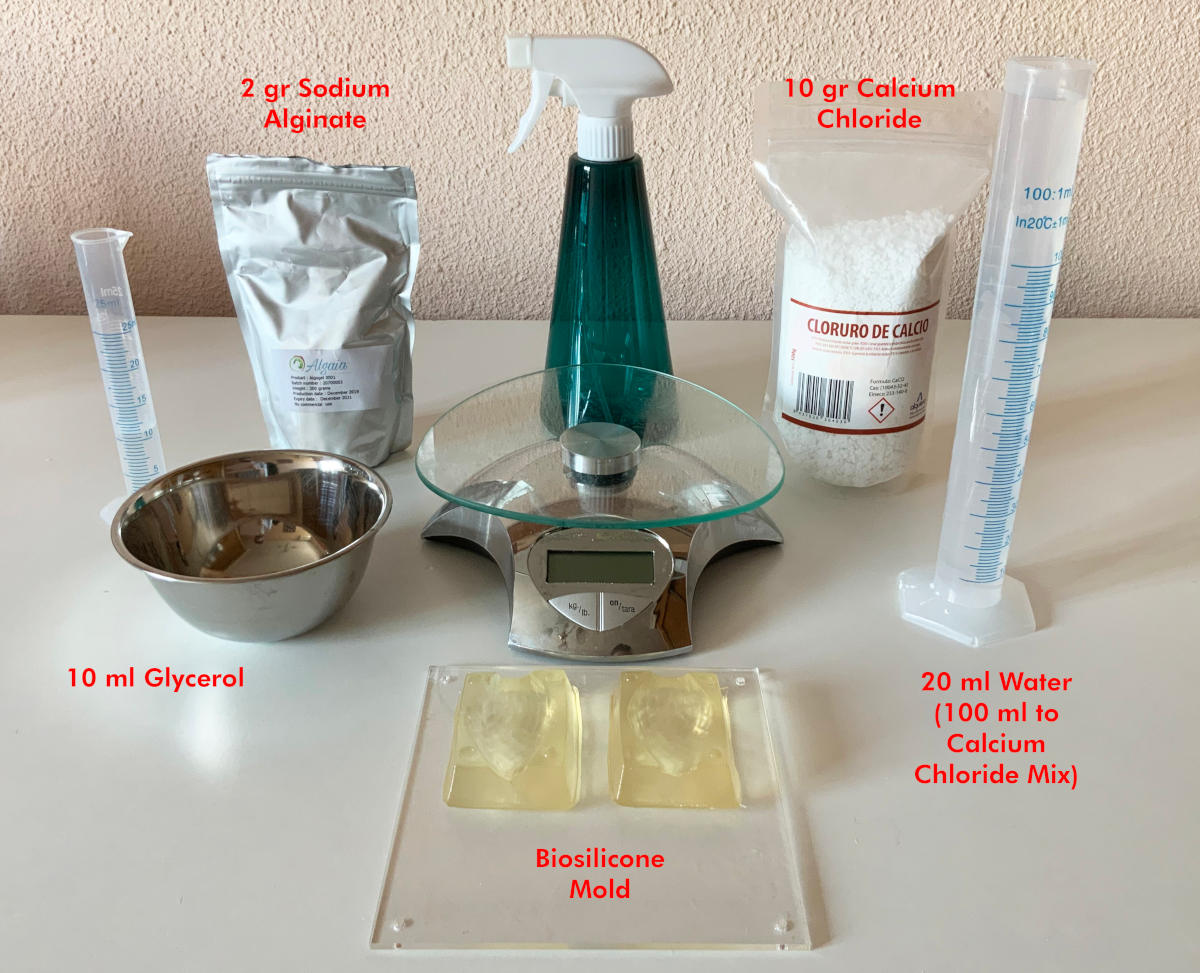
The first thing we have to do is mix the water with the calcium chloride in an empty spray can.
On the other hand, we mix the alginate with the glycerin and the water. As soon as alginate comes into contact with water, it forms lumps and sometimes it is best to mix it with your hands. It is very exhilarating! 😊
On the bed of the biosilicone mold we put a layer of calcium chloride with the spray. And once we pour the mixture, we do the same with the outer layer of the bioplastic.
Within a second, the calcium chloride has generated a solid thin layer that holds the object's shape firm. With which ... it works! 🎉 However, the inner alginate mixture must be allowed to dry well and I need to perfect the technique.
-
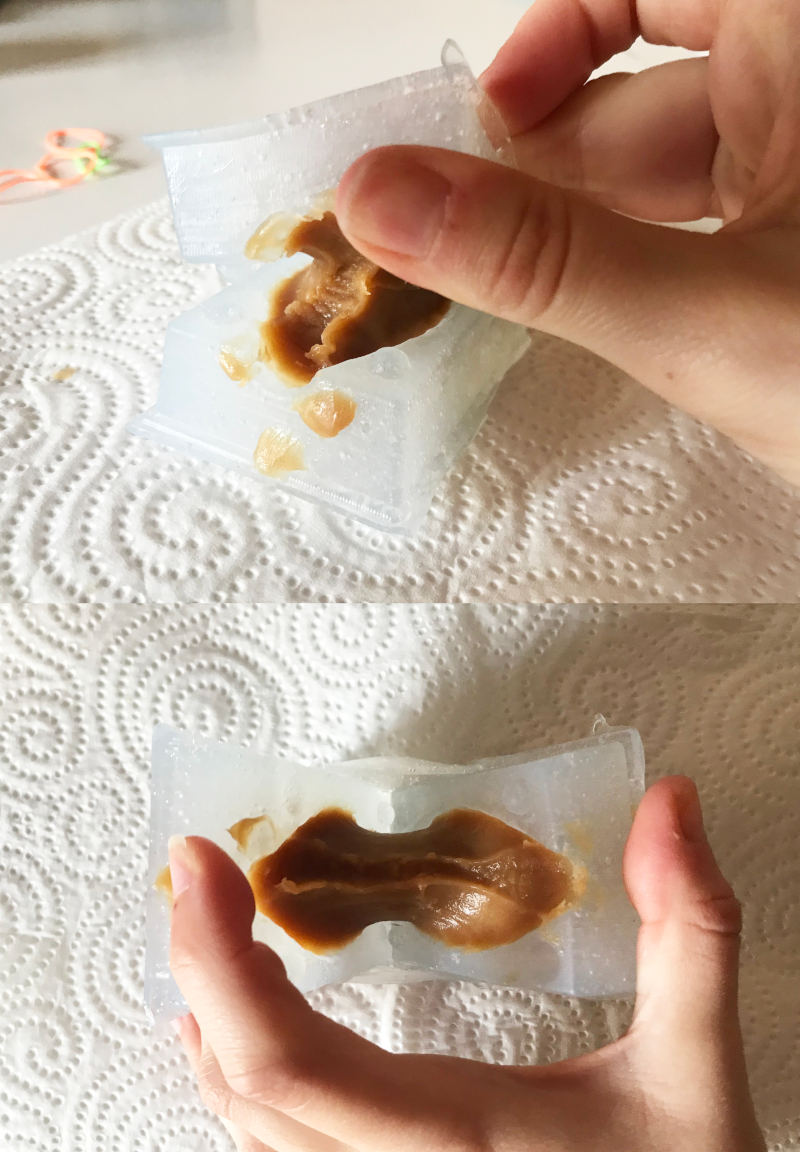
_ SALTY CARAMEL
To finish I wanted to make some candies with the food mold that I have made with salted caramel! 😋
I prepare the recipe, which is very simple and you can find many recipe tutorials.
Once cooked, I pour the mixture into the mold with the usual formwork and leave it in the fridge overnight.
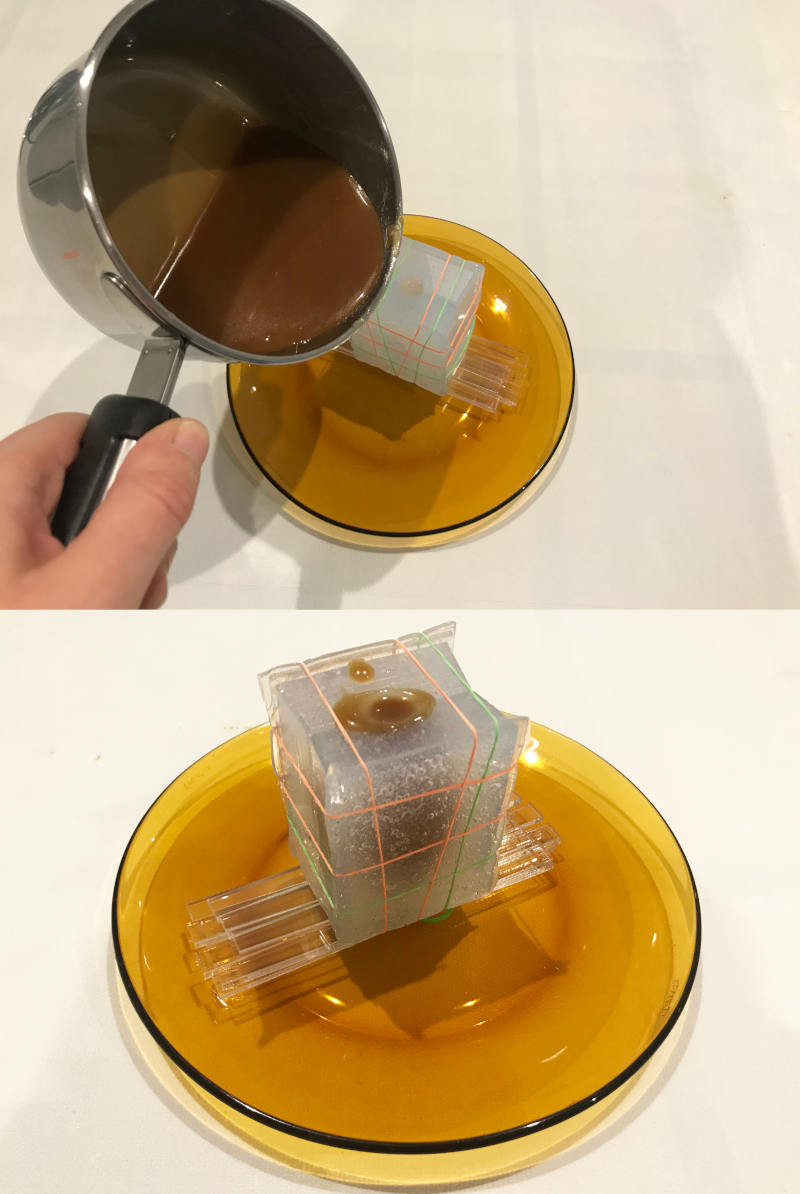
In the morning, when I try to unmold, I have made a mistake! I poured the caramel mixture without putting butter around the sides of the silicone mold! So when I tried to unmold it, it was stuck to the walls and I couldn't get it out. 😢
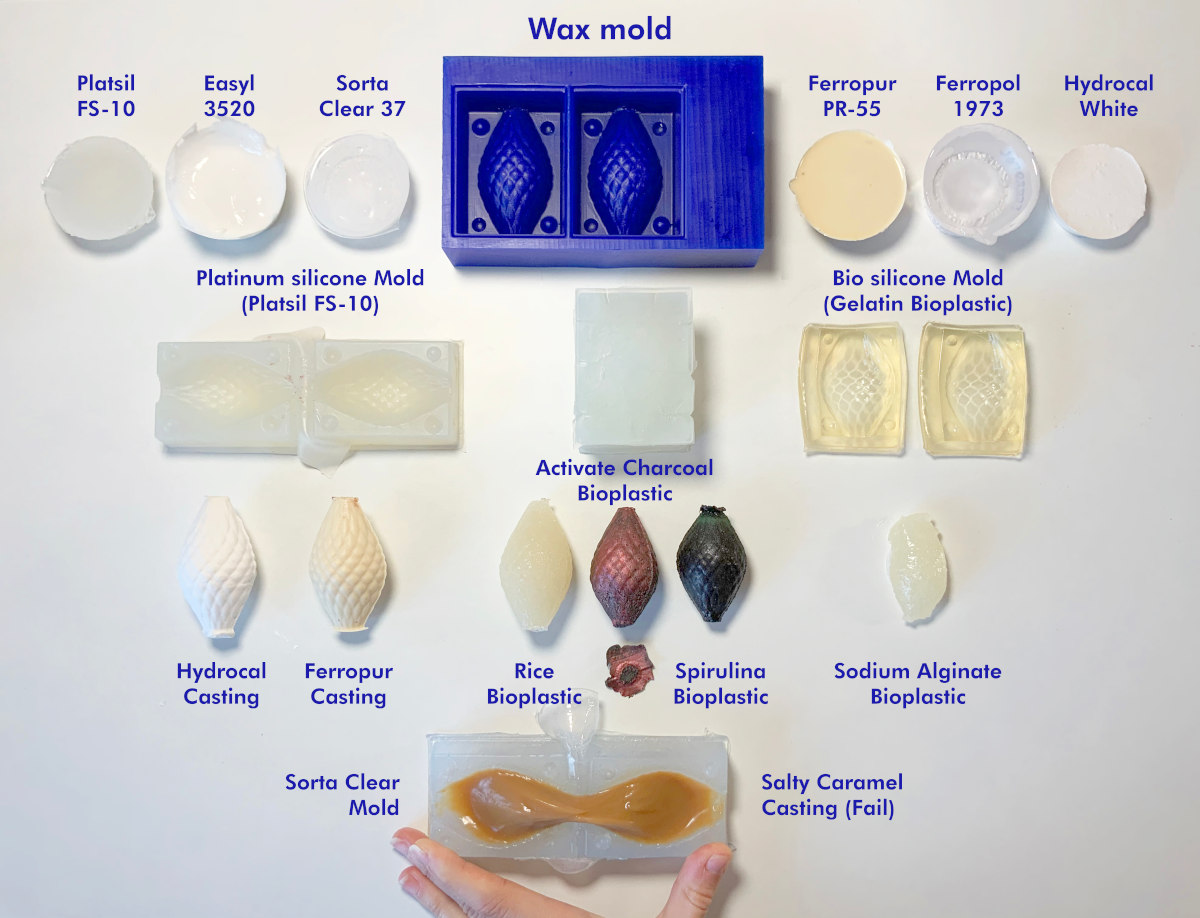
SUMMARY
After a whole week of successes and failures, these are the final results I have had throughout the whole week! I hope you like them as much as I have enjoyed making them. 😊😊