Project Development
Hello everyone! On this page you will be able to follow the evolution of my final project. If you already saw the initial idea, you are well aware of how crazy and big this project is for me. If you're not, then we will go chapter by chapter, as I'll try to explain every single part of the project, and every decission that I'm taking.
This is the current stage of the project. I'm refining the shape of the car, I'm dividing it by pieces, and making it printable. Soon you'll be able to see more new progress, so check this page often, as I'll be updating it as I work on it.
Chapter one: the idea
What you are about to read is a very crazy, very freaky, very particular developement for a niche market. I'ts made for car designers, by car designers, and trust me, we are very unusual people. Chris Bangle, BMW's former head of design, said once "Designers think everything done by someone else is awful, and that they could do it better themselves, which explains why I designed my own living room carpet, I suppose". Well, this project may be an unnecessary developement, a bit like Chris Bangle's carpet, but I'm unusual, I believe in this idea, and as Neil said, "A FabLab is a safe place for unusual people", so from the tranquility of my FabLab, here's the topic: I want to modernise the early stages in Concept Car Prototyping.
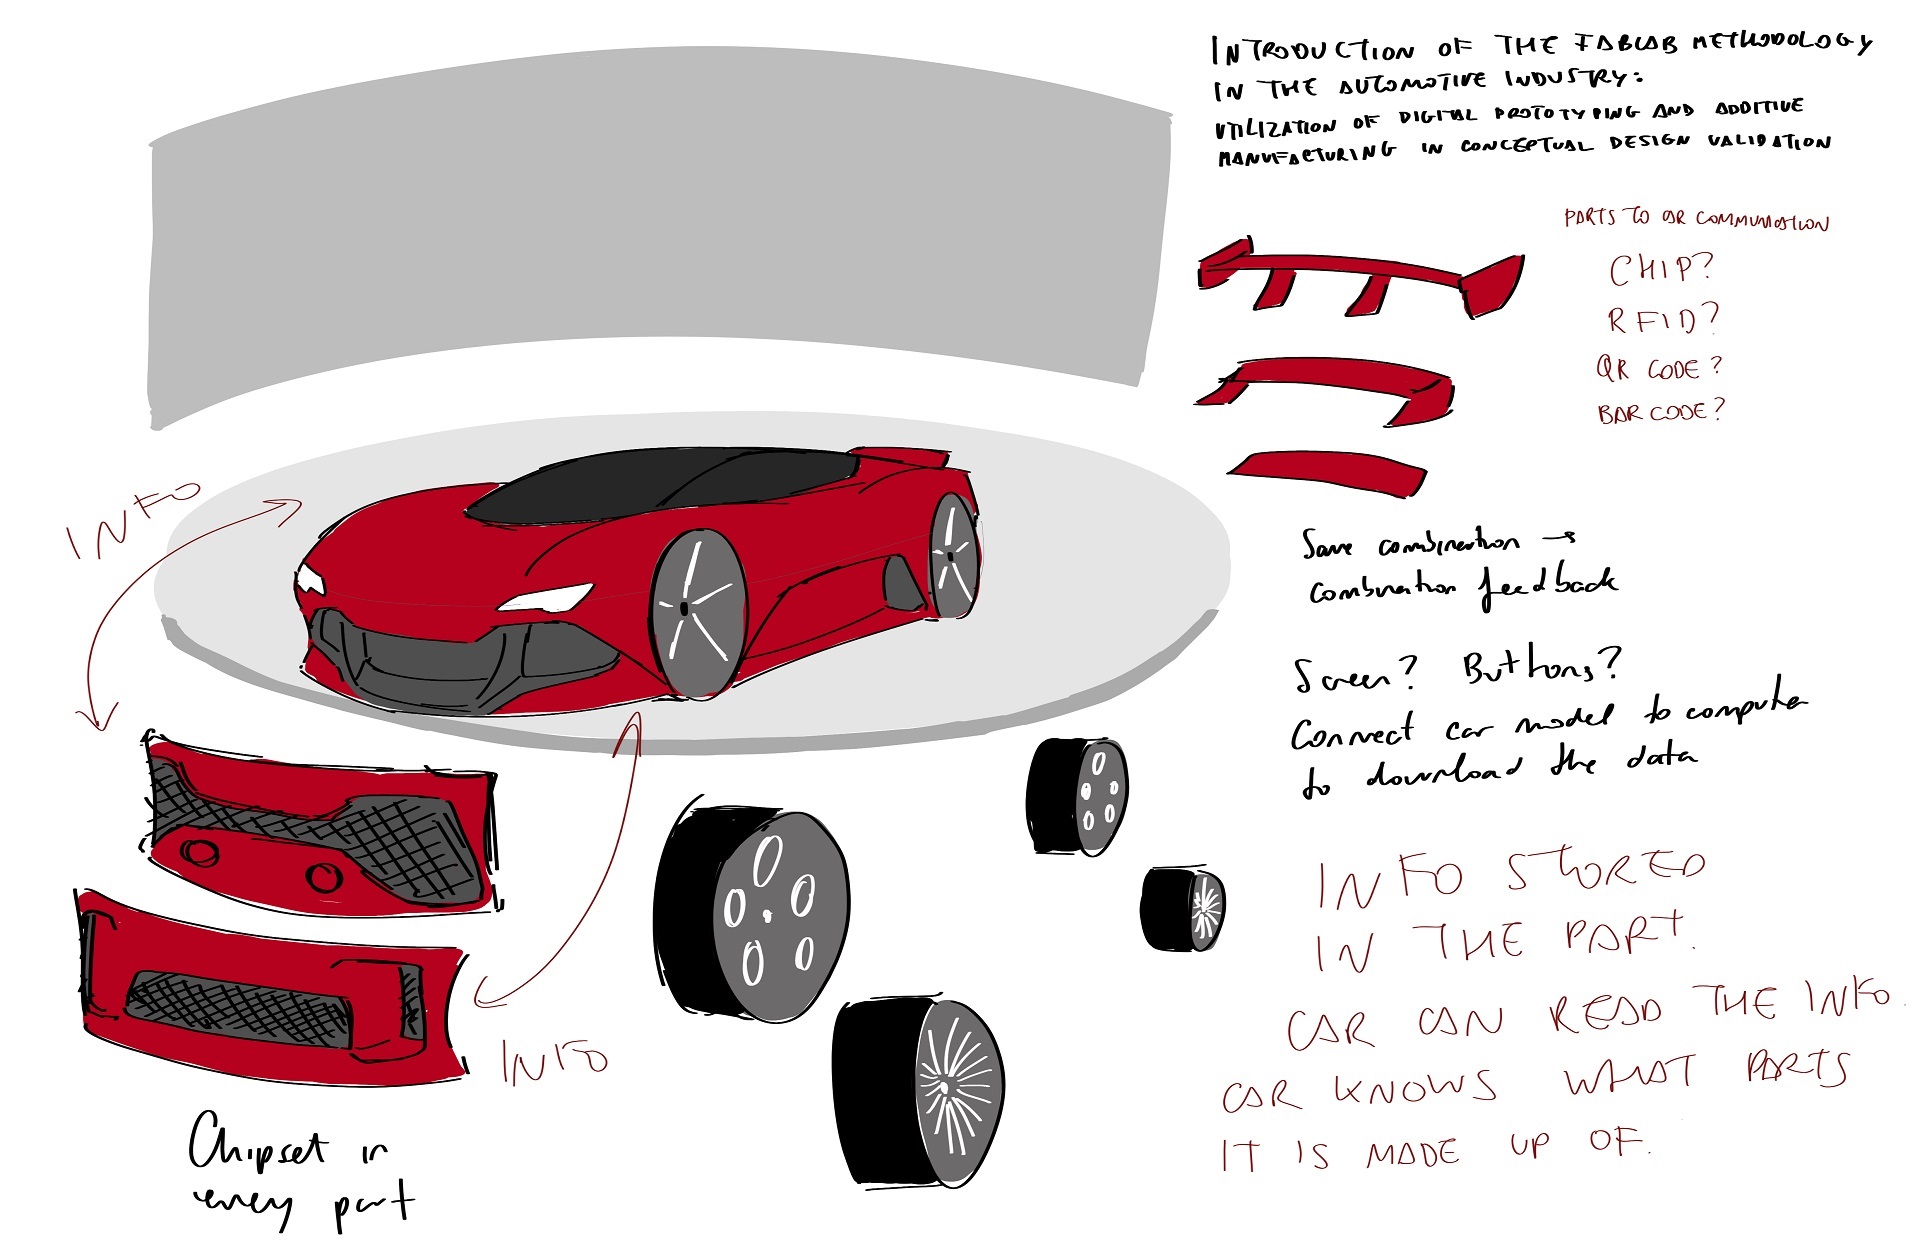
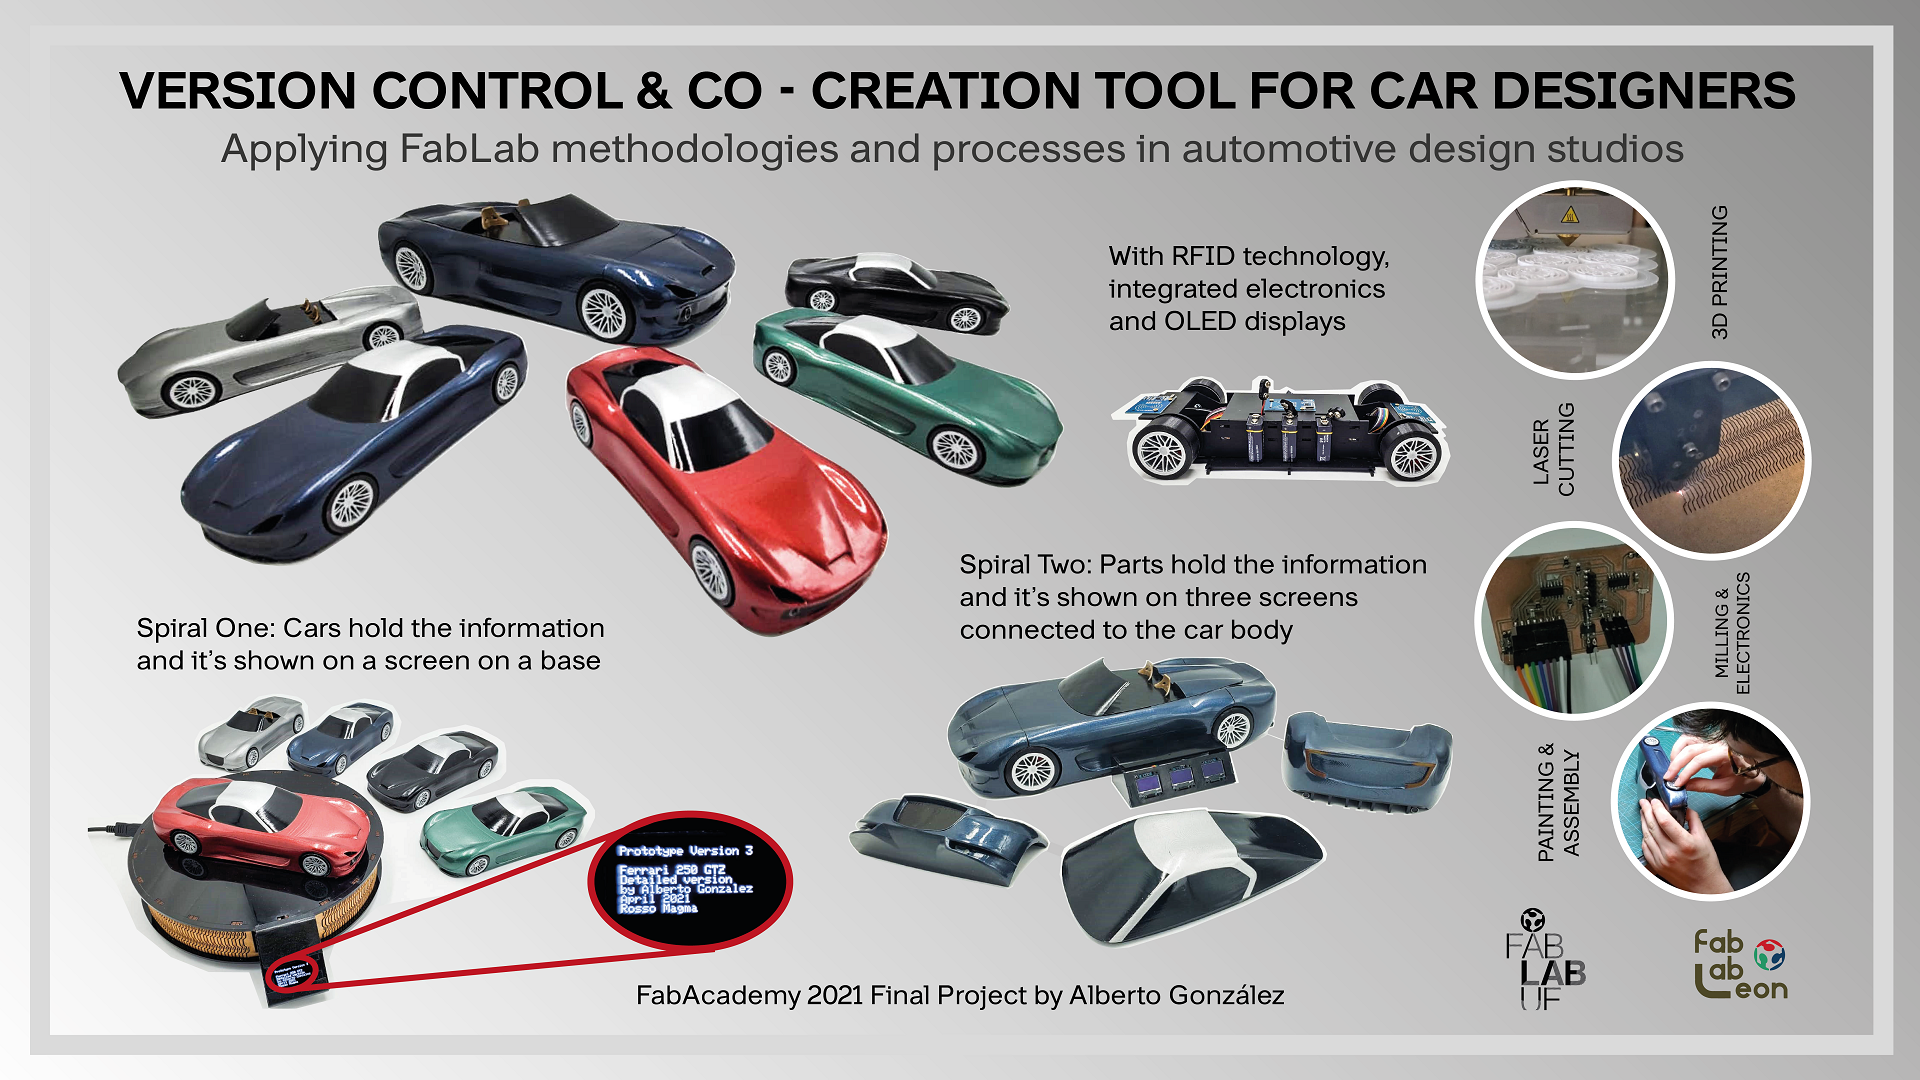
In order to do that, I want to create a car prototype scaled model with different interchangeable parts. Each part would contain some kind of information, and that information could be shared with the main structure or the car body, so the designers working on the model would know in that moment what kind of parts is the model made of.
Wether it's going to be with RFID, barcodes or whatever, it's not yet decided, but I know I want a car model with different interchangeable parts, and I know I'd like to use different FabLab machines and techniques to create each one of the different parts.
First I'm going show you the initial sketch and I'll go through a couple of clarifications but I'll document the rest of the progress week by week here.
This project is going to take me a very long time. As I'm originally planning on building a 1:5 scale model car just to show the system working on its real environment, it's going to take a lot of CAD time. Then, there's the material. I will probably have to go through 10 kg of filament to make all the 3D printed parts, plus I want to create the wheels in resin, and the base in milled and laser cut wood. I'm going to need RFID chips and sensors, and an Arduino or similar board to be able to control all the system. I'm going to need a screeen to display the data. And of course a huge space to build the model itself, as a 1:5 model car is about one meter long...
Even if the original idea for my final project was to create a way to share information between interchangeable parts in an assembled model. It's like a lego, but the pieces can share information within each other and to the people around the assembled model, it became a tool for designers. A tool for my future self. Let's see how far can we develop this idea.
However, first of all, I want to give a little bit of background of what I want my final project to work for. I don't know where will I end, but here's the dream: This idea is aiming for modernising the early stages in Concept Car Prototyping.
Chapter two: the scope
First of all, we have to discuss what are we actually going to be working on. What is Concept Car Prototyping? And why reforming a process that has been unchanged for almost 80 years? .
When we are talking about Concept Cars, we are talking about the first steps in the development of a new car model. Concept cars are a tool that designers use to show to the managers of a company, the automotive media and possibly a group of potential clients what the upcoming regular production cars are going to look like and what kind of design trends the Brand is going to follow. So what are the basic stages a new car project goes through, in order to evolve from an idea of the designer to a production model?.
 .
.
Lexus LC Design Process: 1:5 clay model (one of many), 1:1 clay model (one of two or three), Concept Car (unique), 2012, Production Car (regular production), 2016
When a new car project is on the horizon, hidden away in the deepest and most secret rooms of the design centres, a meeting is held in which the designers and the top managers of the brand envision and discuss ideas for the new models. That meeting is called ‘the briefing’. In the early stages, the designers of the brand’s team are organized in small groups and each of them shows their vision of the original idea, presenting a reduced-scale clay model car.
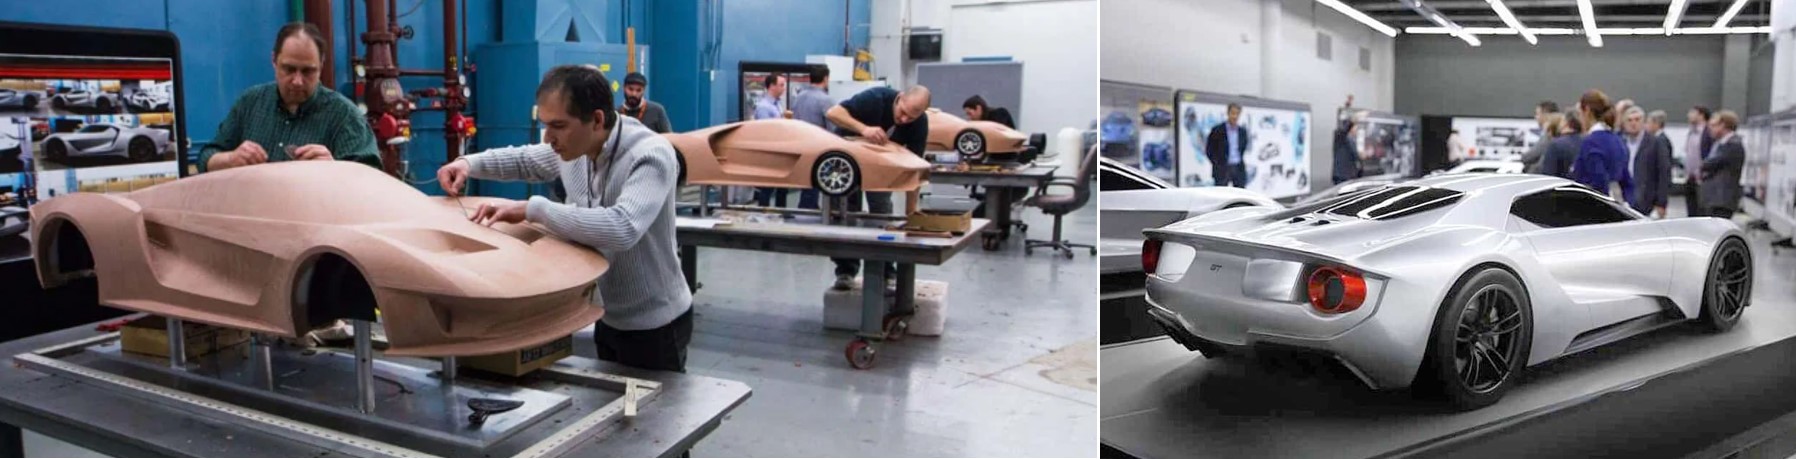
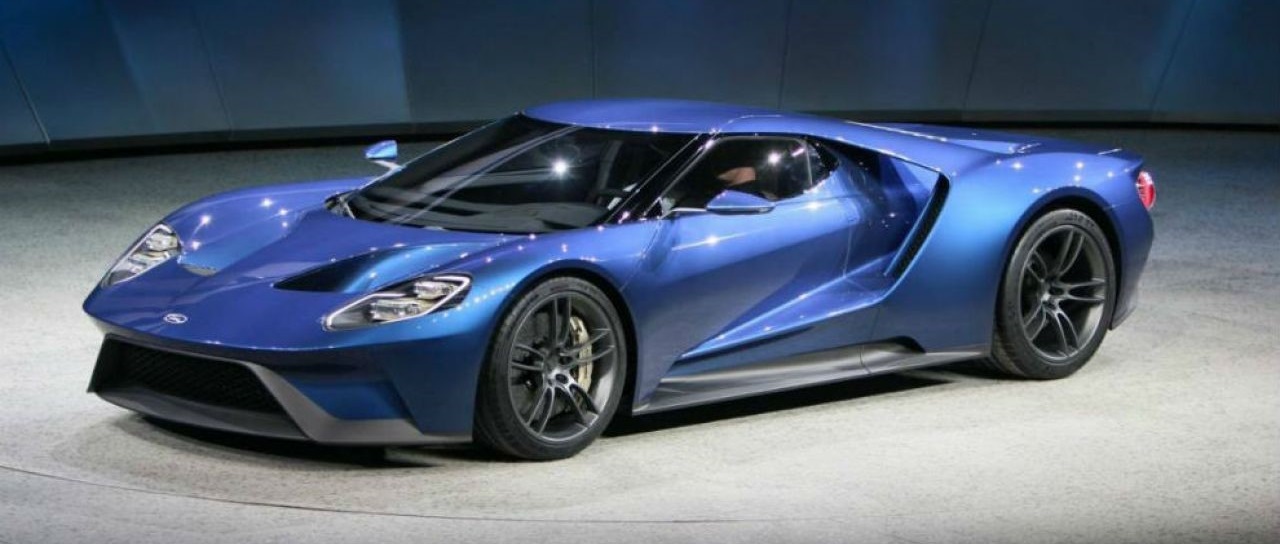
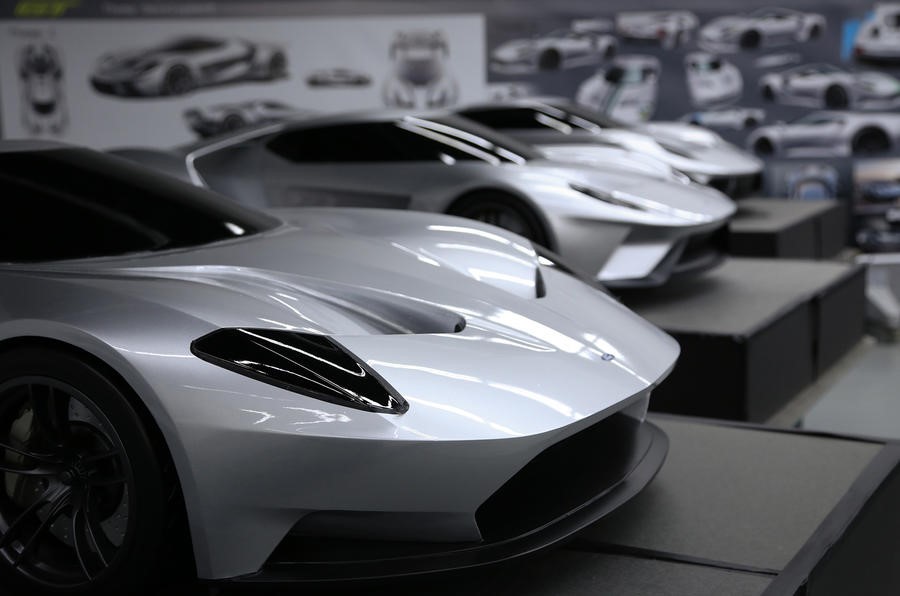
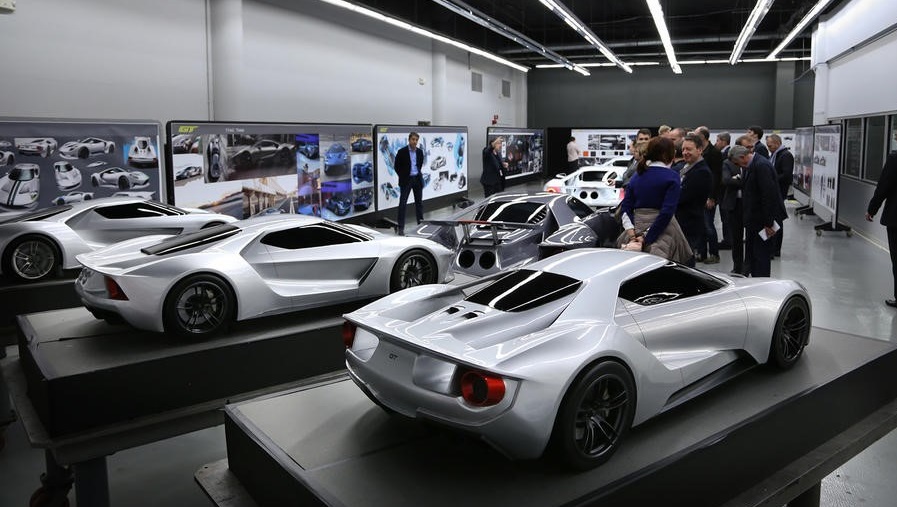
Ford GT design process (1:5 clay models). Source: Detroit Free Press and Formtrends
Several 1:5 scale models are made in order to develop the full potential of the idea and the design team, together with the managers of the brand, usually chooses up to three potential directions to go. After that, rough 3D models are created and the different full-size clay models are produced using a multi-axis milling machine .

The whole design team then works on the different 1:1 clay models, adding and removing material until the whole team is happy with one of the results. That will be the version of the car that moves on to the Concept Car stage. A new full-size model is created using metal and composite materials. At this stage, the model is equipped with a working interior and usually with a running drivetrain, suspension system and brakes. Most importantly, the model already has the technological features that will make the car stand out among the hard competition on the automotive market.
If the car is approved by the managers of the company, it is then presented in an auto show, where the automotive media have a chance to give a feedback. Assuming that the results are positive and they decide to take the concept to production, the car is completely redesigned. All of the parts are CAD-modelled again, adapting the shapes and functionalities of the concept car to the ‘big numbers’, because designing the components of a concept car and designing those of a real series production model are two entirely different things.
This “Small clay models – Big clay models – Concept Car – Production car” approach has been the industry standard for the last 70 years, since Harley Earl ‘invented’ this system when working in General Motors. Not much has changed ever since, except for the addition of multi-axis milling machines to help the designers create the ‘rough clay shapes’ that they work on. And I’m not here to prove them wrong. The big clay models are used for some reasons.
“Why clay?” laughs Joe Dehner, Head of Ram Truck and Mopar Design for Fiat Chrysler, “I asked the same question when I got here 28 years ago, yet here we are doing the same thing. I explain it as using an erasable pencil versus permanent ink, and clay lets you go back and make changes.”
Lloyd VandenBrink, modelling manager at Ford Truck Studio in Dearborn, Michigan, is a big believer, as well. “Clay has two characteristics that make it good for use. It’s easy to change — you just add it, or take it away. It allows you to be creative and come up with something quickly. 3D printing, on the other hand, is just that — printing.”
“Secondly, it’s a great collaborative tool,” he continues. “Everyone can get around it, brainstorming three-dimensionally.” (from BBC Autos)
However, Clay has huge disadvantages. For instance, it is not possible to create clay removable parts that can be interchanged between several different models. I personally believe that it would be very interesting to allow designers to share parts between different models, especially in the early 1:5 small model phase. Here is where the FabLab tools can help.
Those 1:5 scale cars are actually very ‘Fabbable’. With modern 3D printing machines and easier to use 3D CAD software, the idea of a ‘big scale Lego car’ does not seem very crazy, does it?
And what if the interchangeable parts could store information in them? For instance, who was the designer, what was the inspiration, the date of the designing, … The main core of the car would be able to read that data and know what combination of parts are forming it.
That could be one of the tools that car design companies give their teams, not to replace clay modelling but as an additional tool during the co-creation process in the early stages of the design. That data could be paired with the feedback of the design team on each specific combination.
It would definitely be a change, but an extremely useful one, I believe. It would be a powerful tool that could potentially improve the collaboration in the team that works on a Project.
This is only a dream, of course. An idea coming from a young, ‘just graduated’ car designer and engineer who ended up working in two different FabLabs rather than in a car company and decided to apply the potential that the Lab has to offer to his dream job. Car designing with modern tools in a simultaneous and collaborative design and engineering environment. Is it just a crazy utopia? Anyway, What is FabAcademy for? We are here to express ourselves through what we create.
Chapter three: the origins
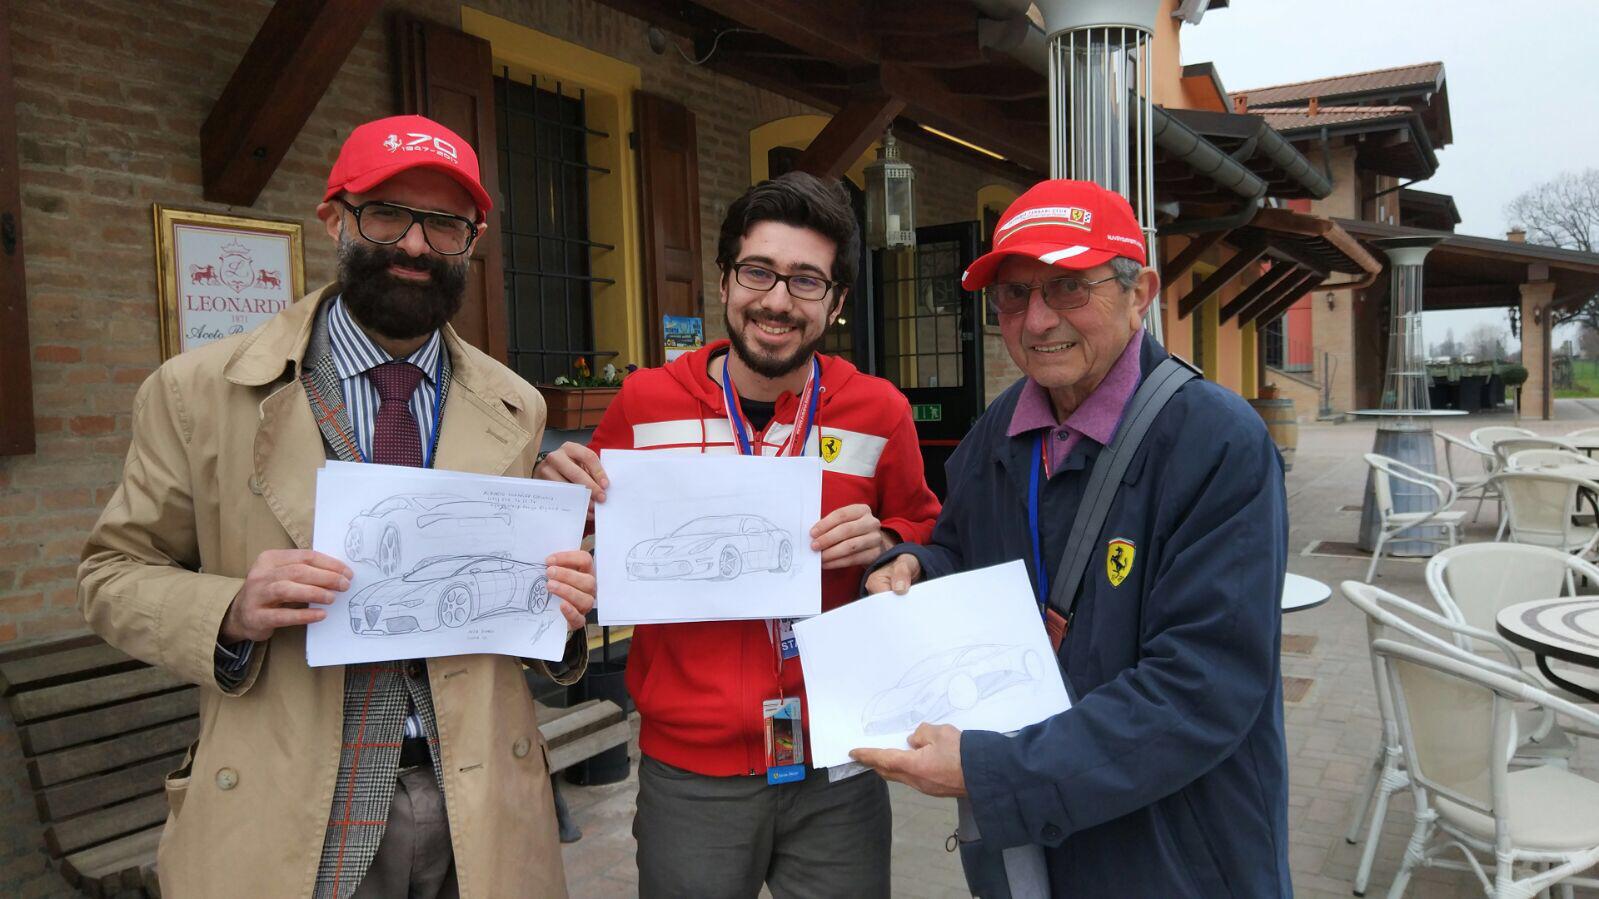
I would never be working on a project like this without the inspiration of the design masters of the modern era. I'm not talking only about Chris Bangle, Jason Castriota, Walter De Silva or Ian Callum. I'm talking mainly about the ones I had thre pleasure to meet. Horacio Pagani, Leonardo Fioravanti, Mario Galbiati, Giacomo Caliri, Ferruccio Covini and most importantly, Oscar Scaglietti
Living in Italy and meeting these amazing people made me dive deeper in a very special part of the high-end automotive industry: Coachbuilding. Coachbuilding is a way to build cars, creating a bespoke exterior and interior design in very limited numbers from an already existing vehicle. In late 2019, I graduated in Industrial Design Engineering with a thesis on applying FabLab tools in coachbuilding. However, Coronavirus crisis hit the industry hard, and I've decided to stay in the FabLab side, that I absolutely love. I'll have time to go back to Coachbuilding when things get better, hopefully in four or five years.
So I want to take FabLab tools and methodology into car design. I want to design for coachbuilding in my final project. What should I design?
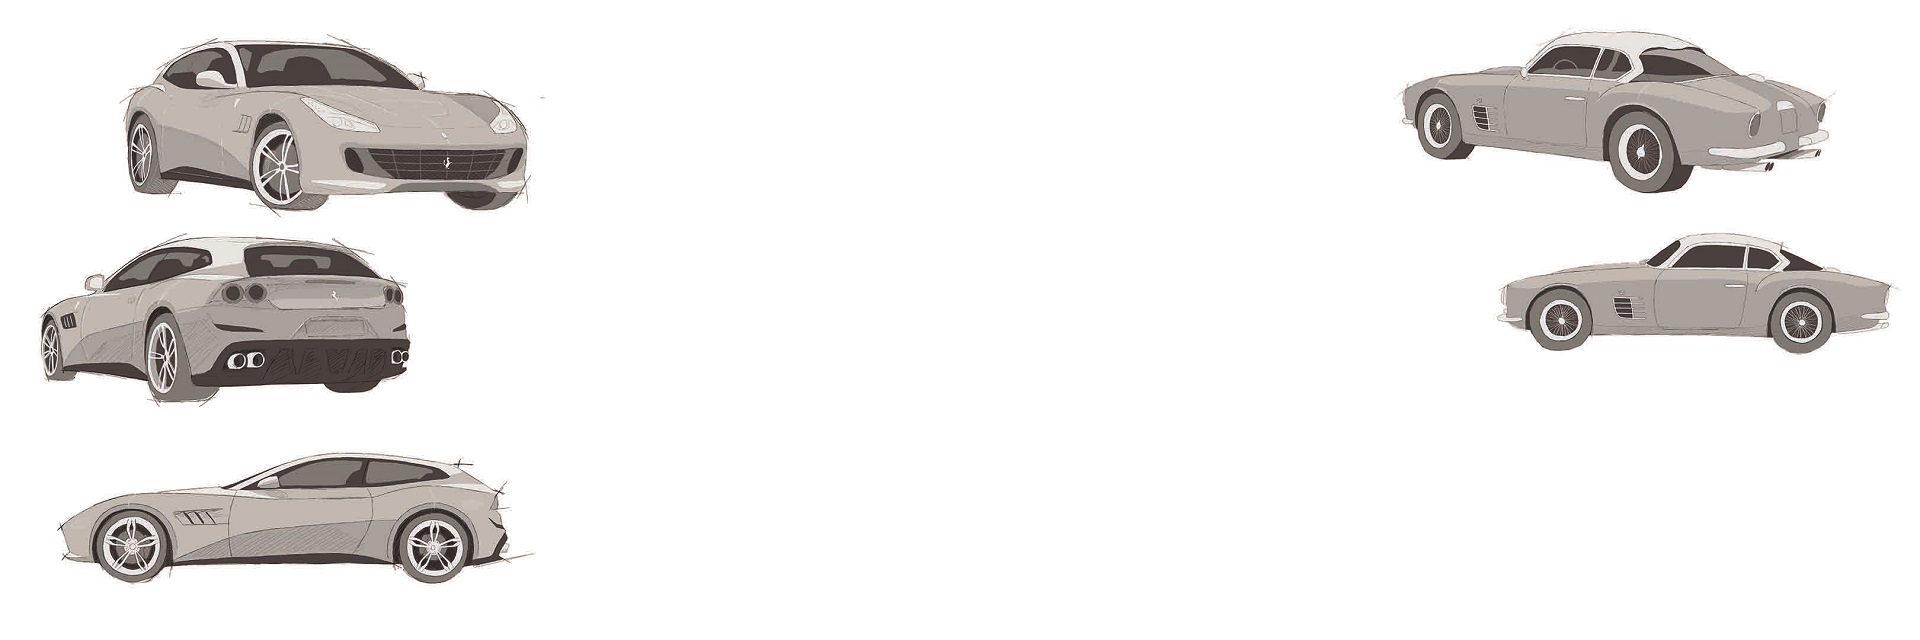
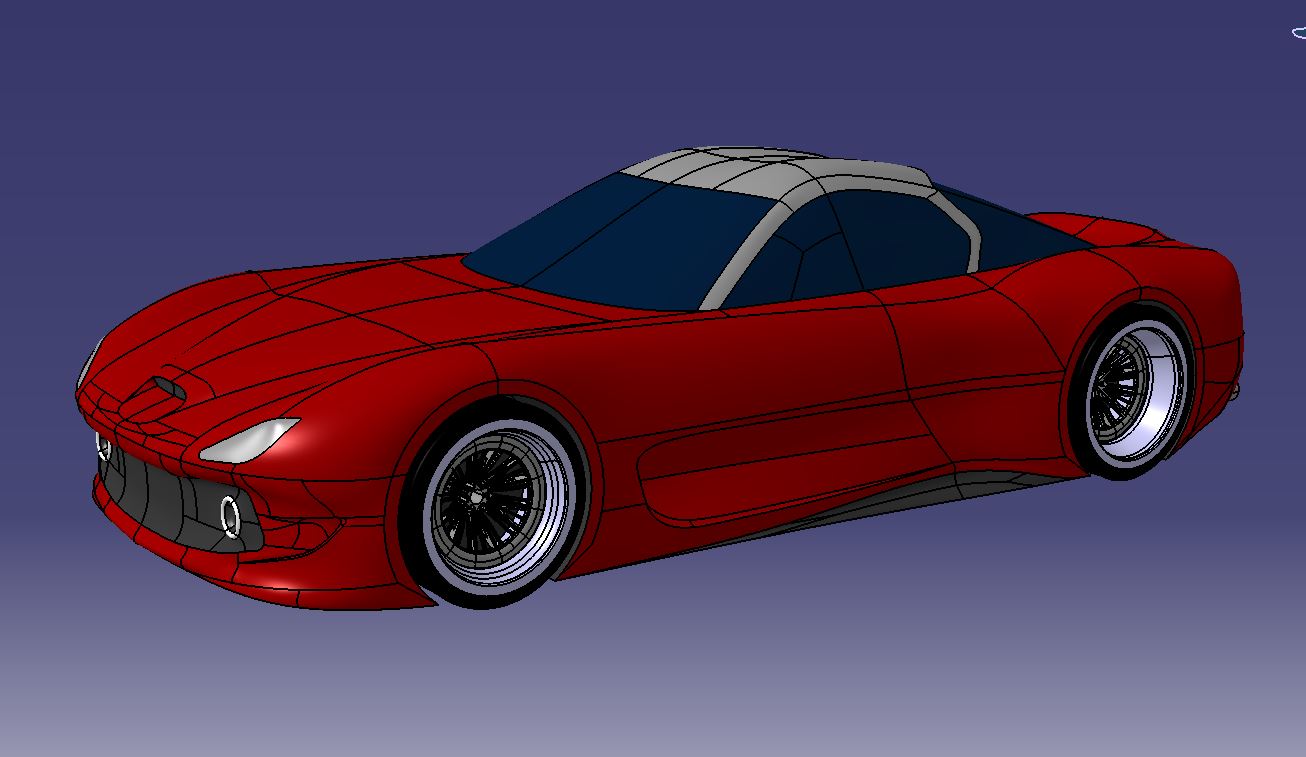
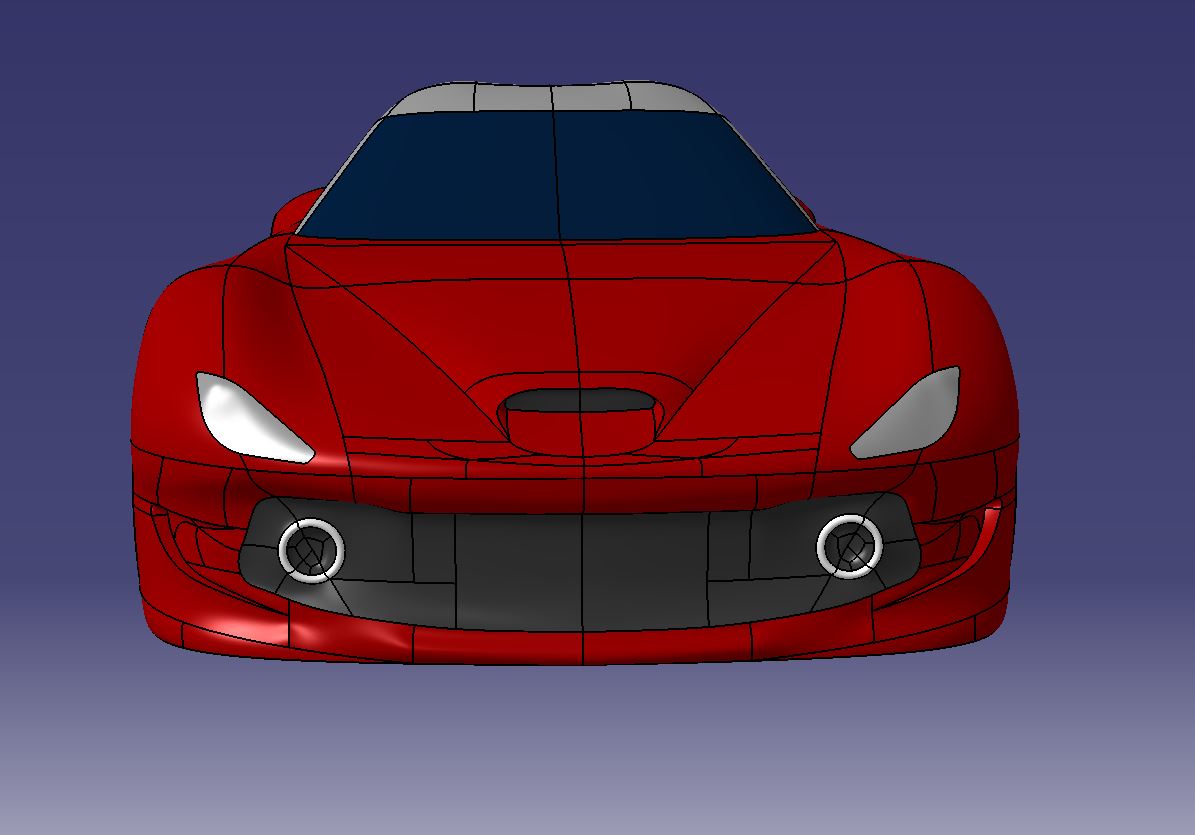
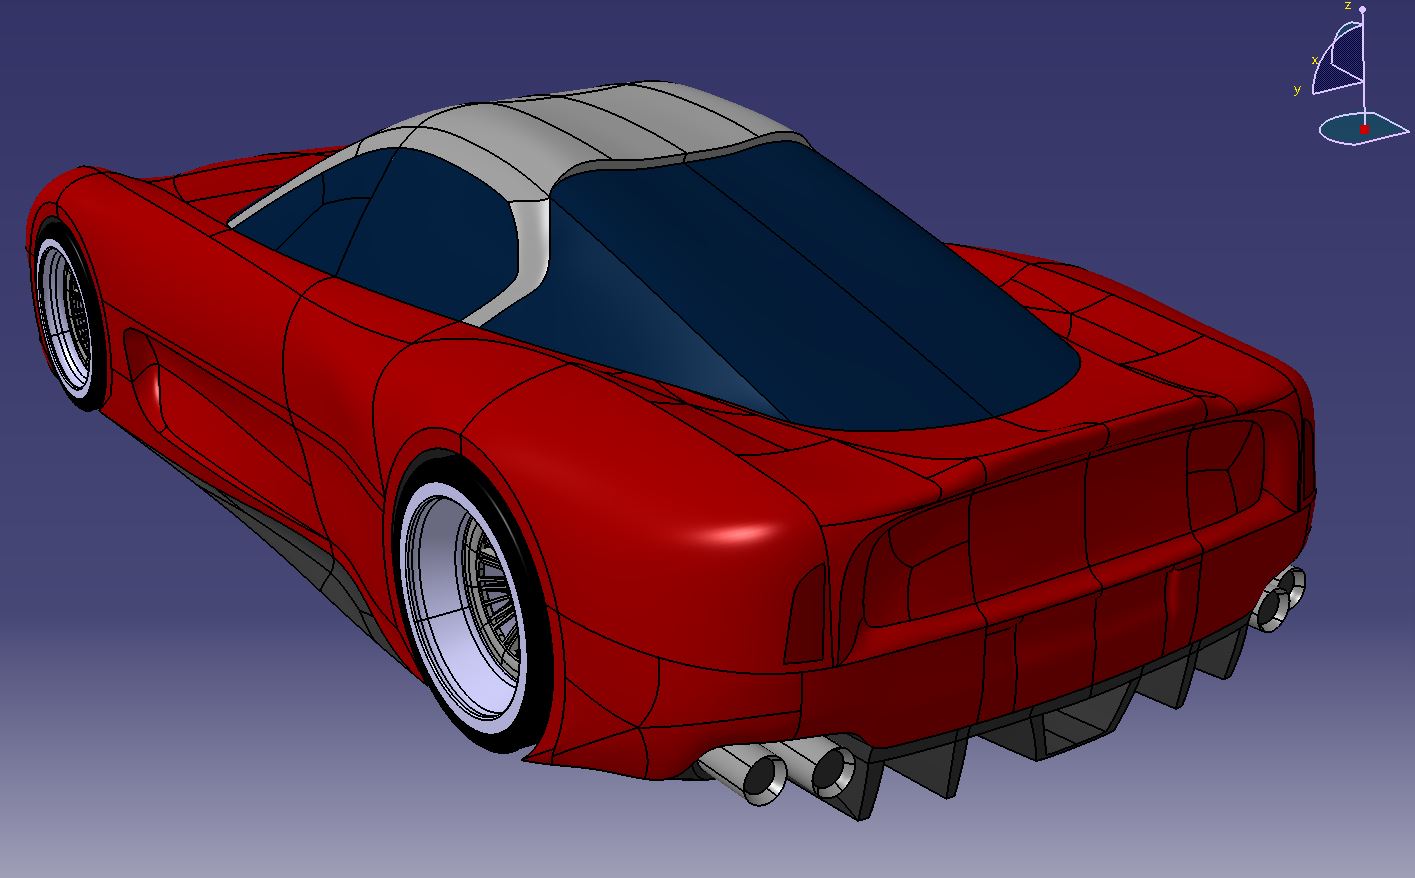
I'm going to design a coachbuilt Ferrari for italian coachbuilding manufacturer Zagato. I'm going to take a current Ferrari model and I'm going to show different design variations that could be applied to a real coachbuilding project. And I'm going to make models of all the variants, I'm going to make the parts interchabgeable and I'll make them store information. But first of all, we need a design...
However, it's very important to do a very wise time management if you want to finish on time. In my case, I put myself limits: if I could not arrive to May with a photoshop design of the car, I'd loose that on my project (and I lost it indeed). If I could not get the CATIA design for the 15th of May, that moment the improvements would be frozen. If I could not get the electronics on time, I was not going to paint the models...
On June the 5th the models had to be finished. My girlfriend was flying from Italy, after more than 6 months without seeing each other. But the presentation day was on June the 9th... So, what did I do?
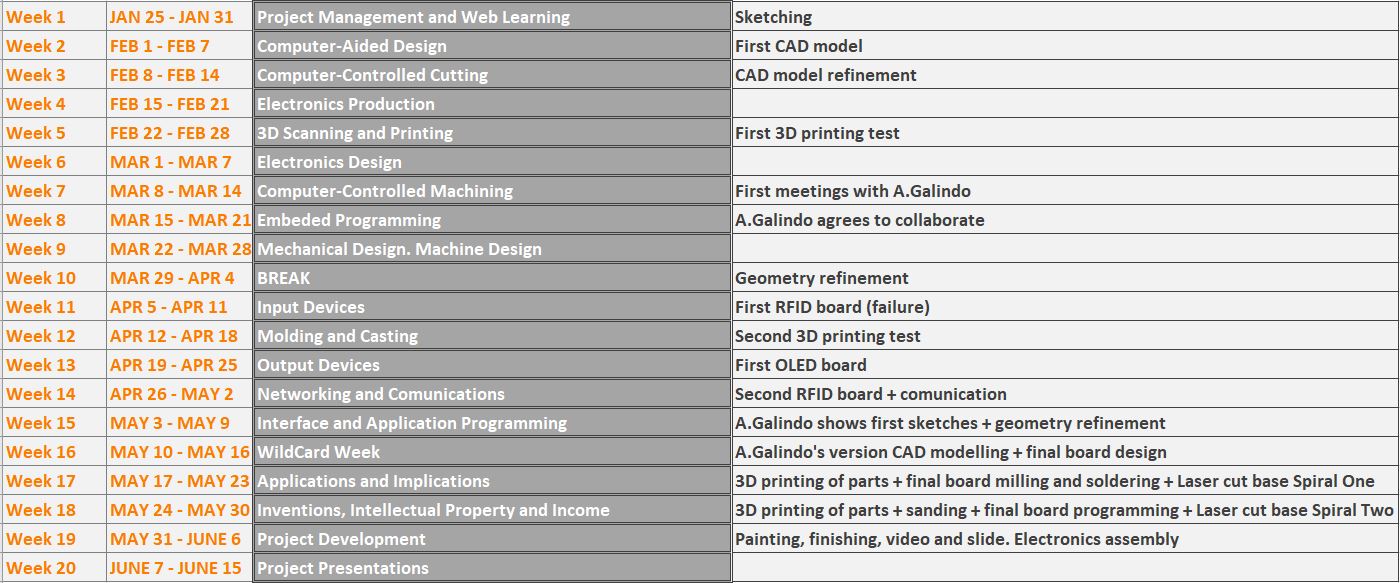
Even if I ended up reducing the scale of the project, it was needed to use almost every single assignment of this FabAcademy to complete the project on time. Working week by week was key to finish, but also to enjoy every single stage. This was how I ended up organizing every task:
Working with model maker Rafael Domingo (who happens to be my uncle) helped me reducing the times of painting and finishing, also he helped me a lot with the finishing. He has a very tight working schedule as he works for a big furniture company, so I had to learn quick and apply all of his knowledge as quickly as possible. Luckily for me, it was not the first time I worked with him, so I had previous experience with sanding PLA, (patience is key here) and applying paint and varnish, as well as masking the shapes.

So now let's see how it went, step by step:
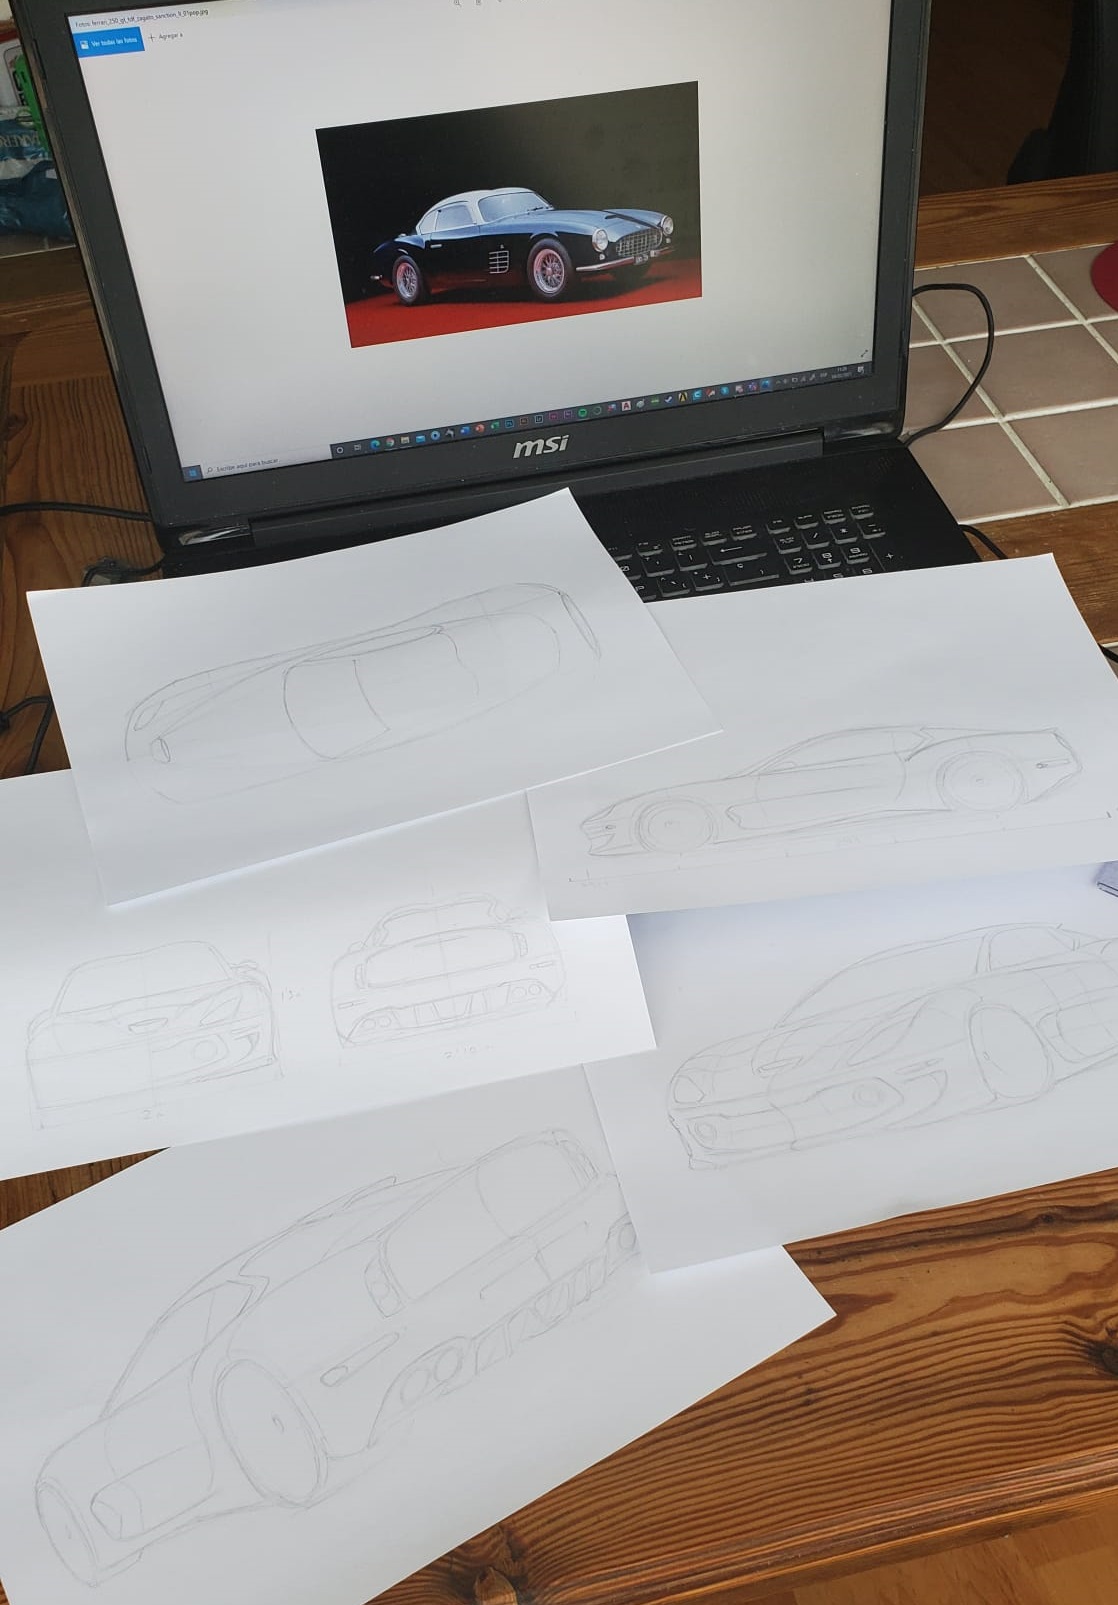
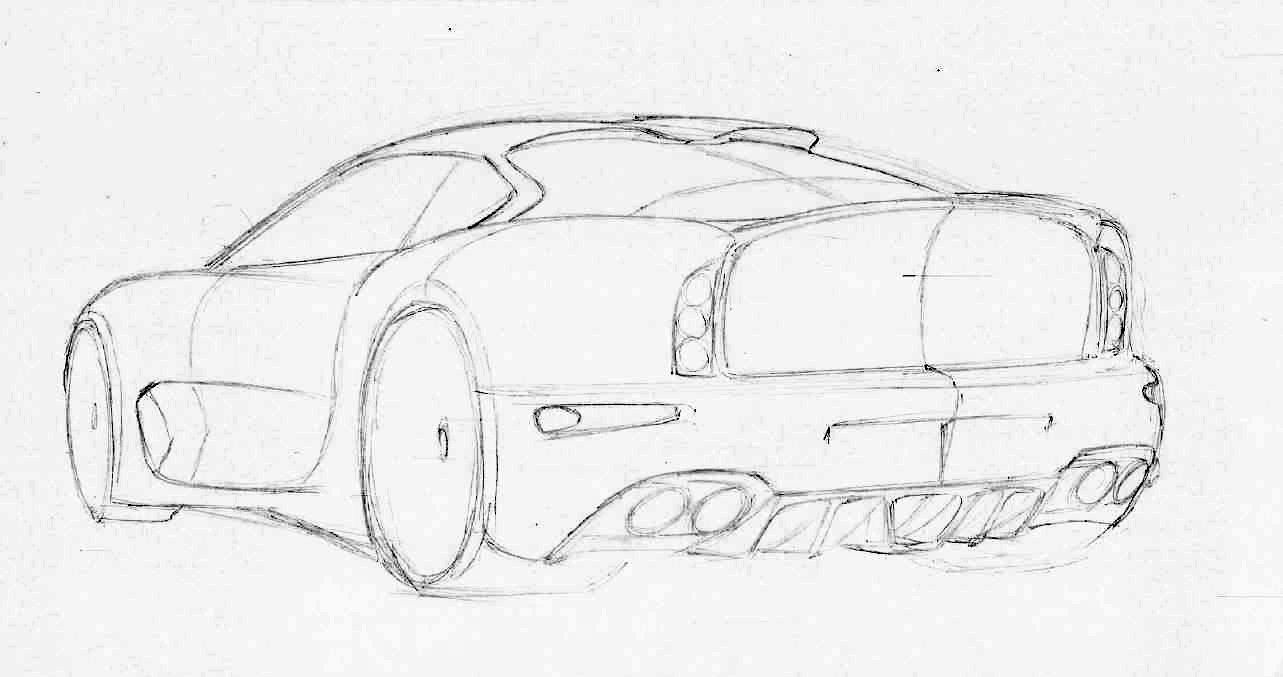
Chapter four: design by hand, use digital tools
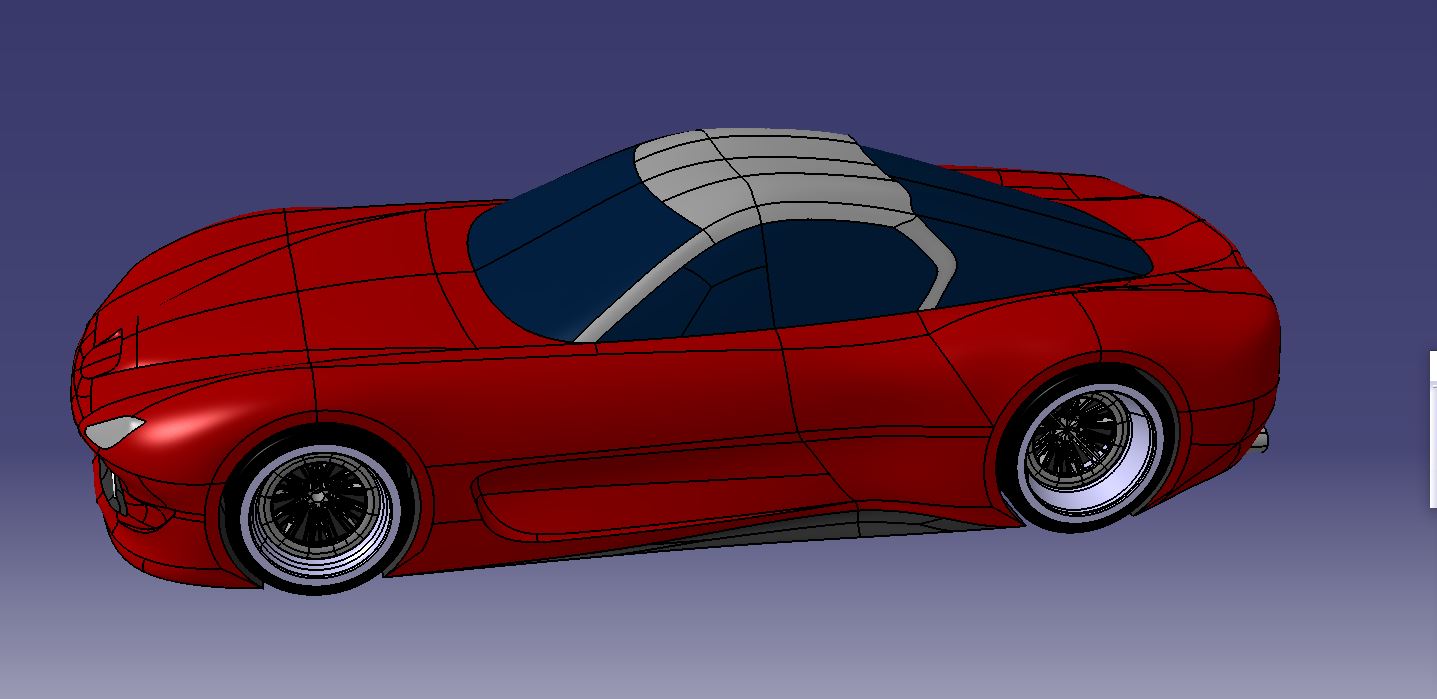
Chapter five: CAD modeling
In order to model the design, I follow the methodology that I described in the CAD design week.
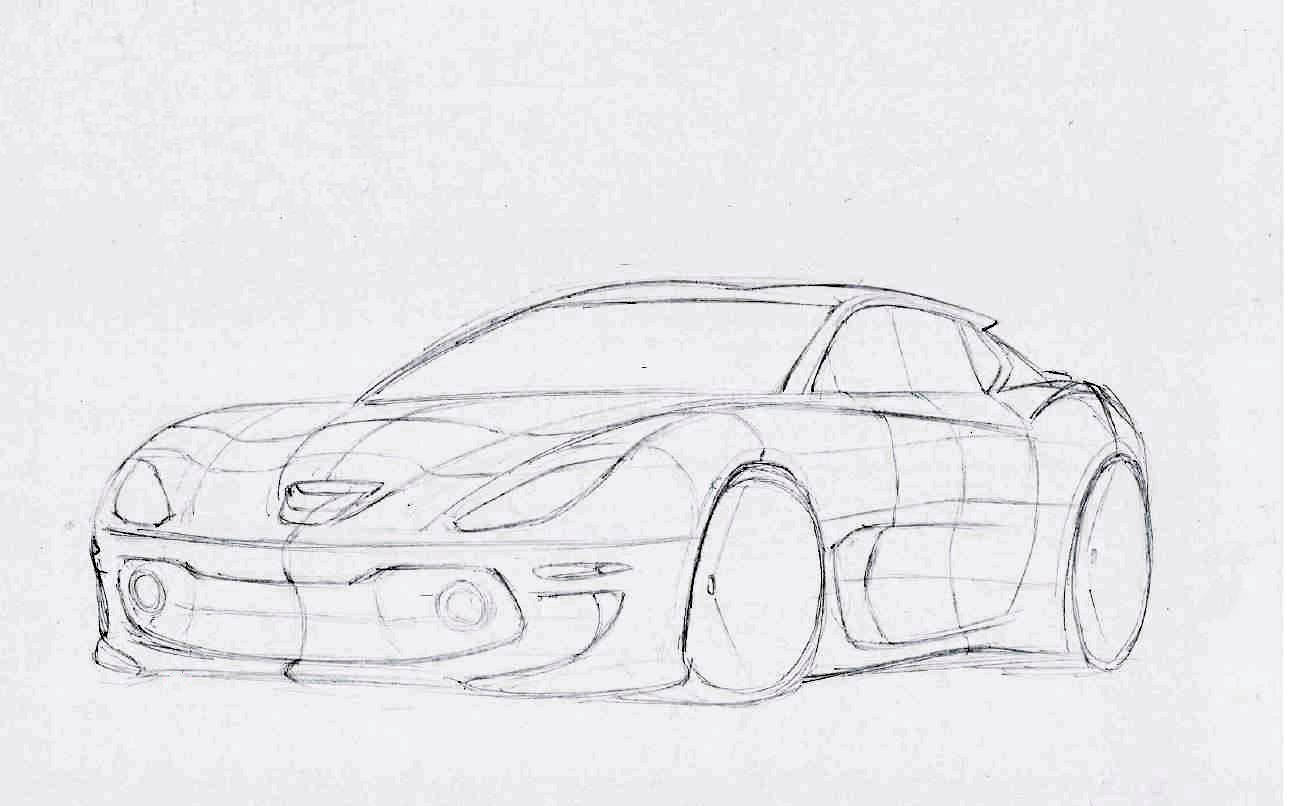
So we can go from these simple sketches
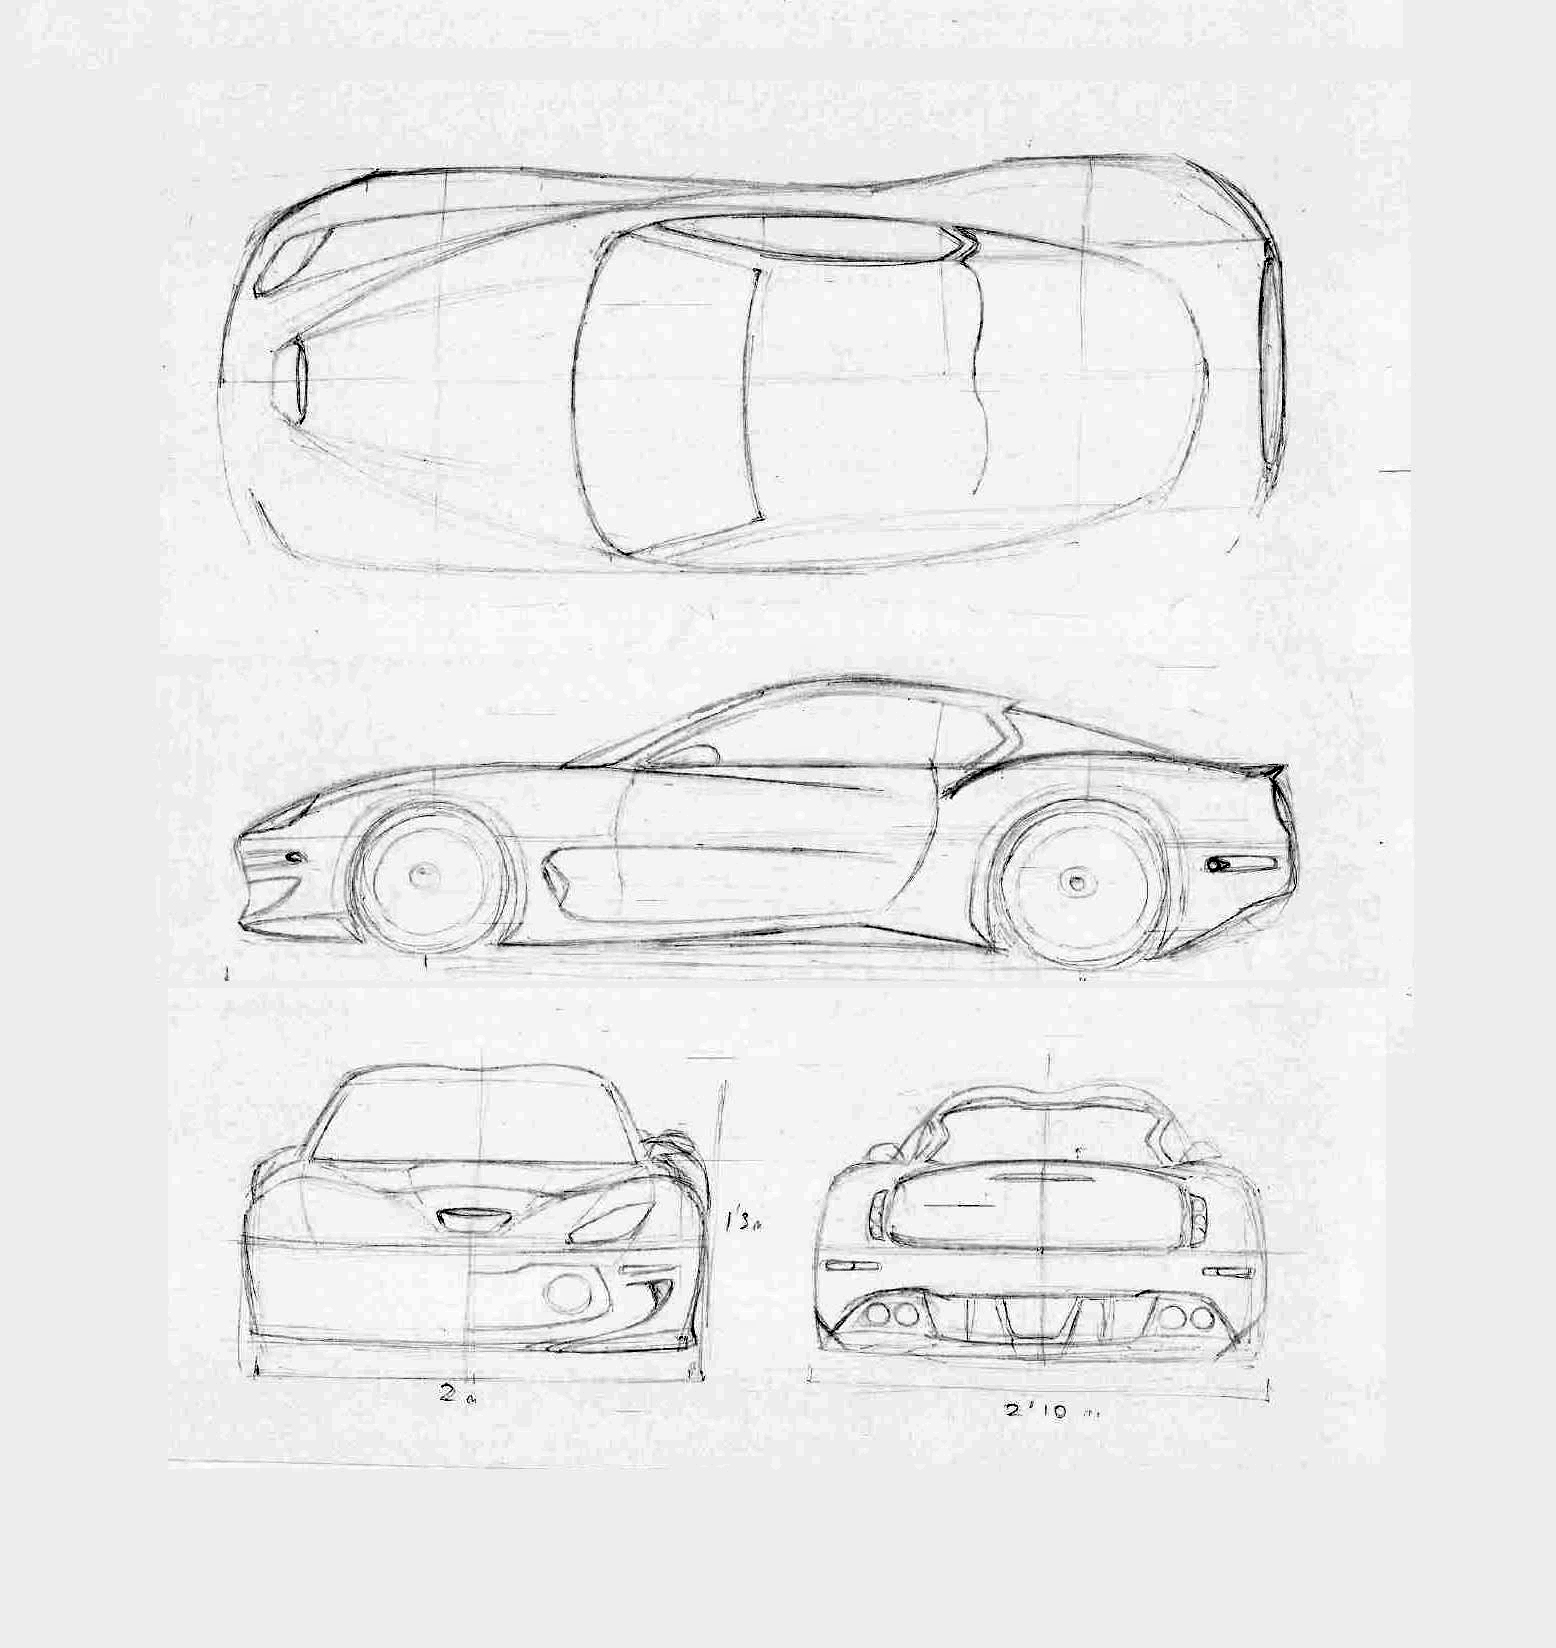
To the lines that will determine the surfaces. As I showed in the CAD design week, this lines are controlled by nurbs that can be modified during the whole life of the model
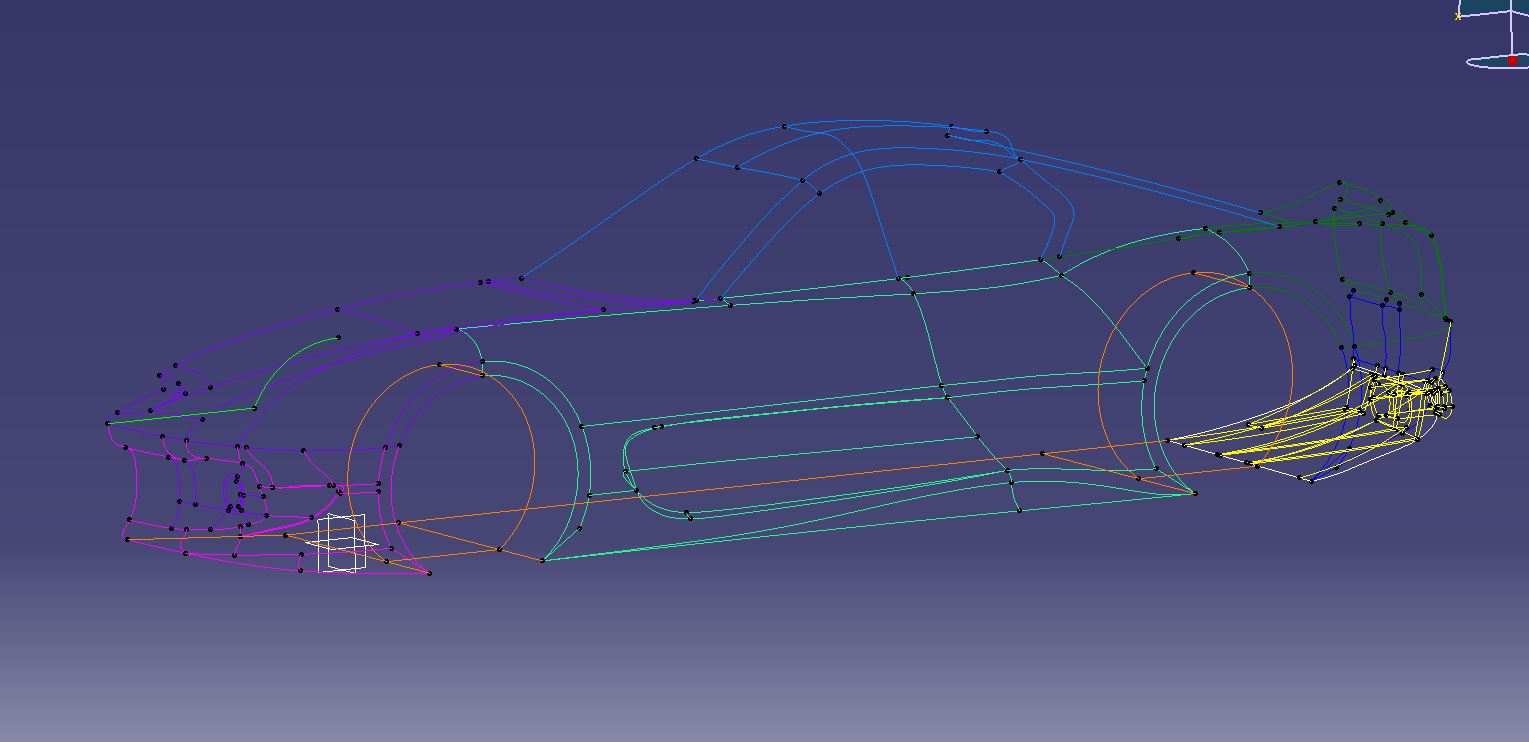
I use different geometrical sets to separate the different areas of the car
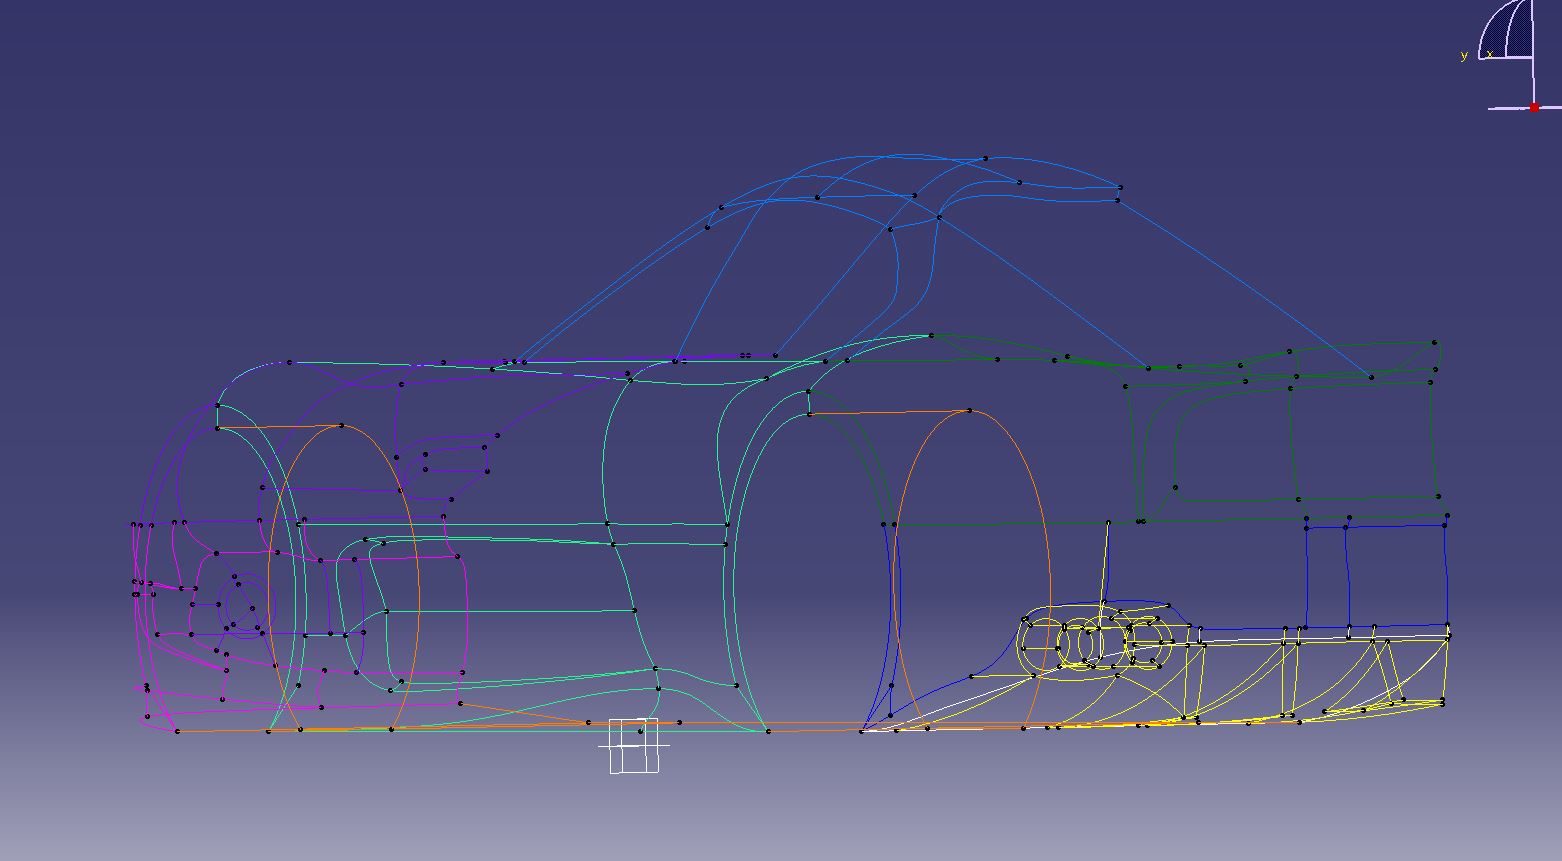
And then I just have to create the surfaces that these lines create
39 iterations were needed to create and refine the surfaces that you now can see in these pictures
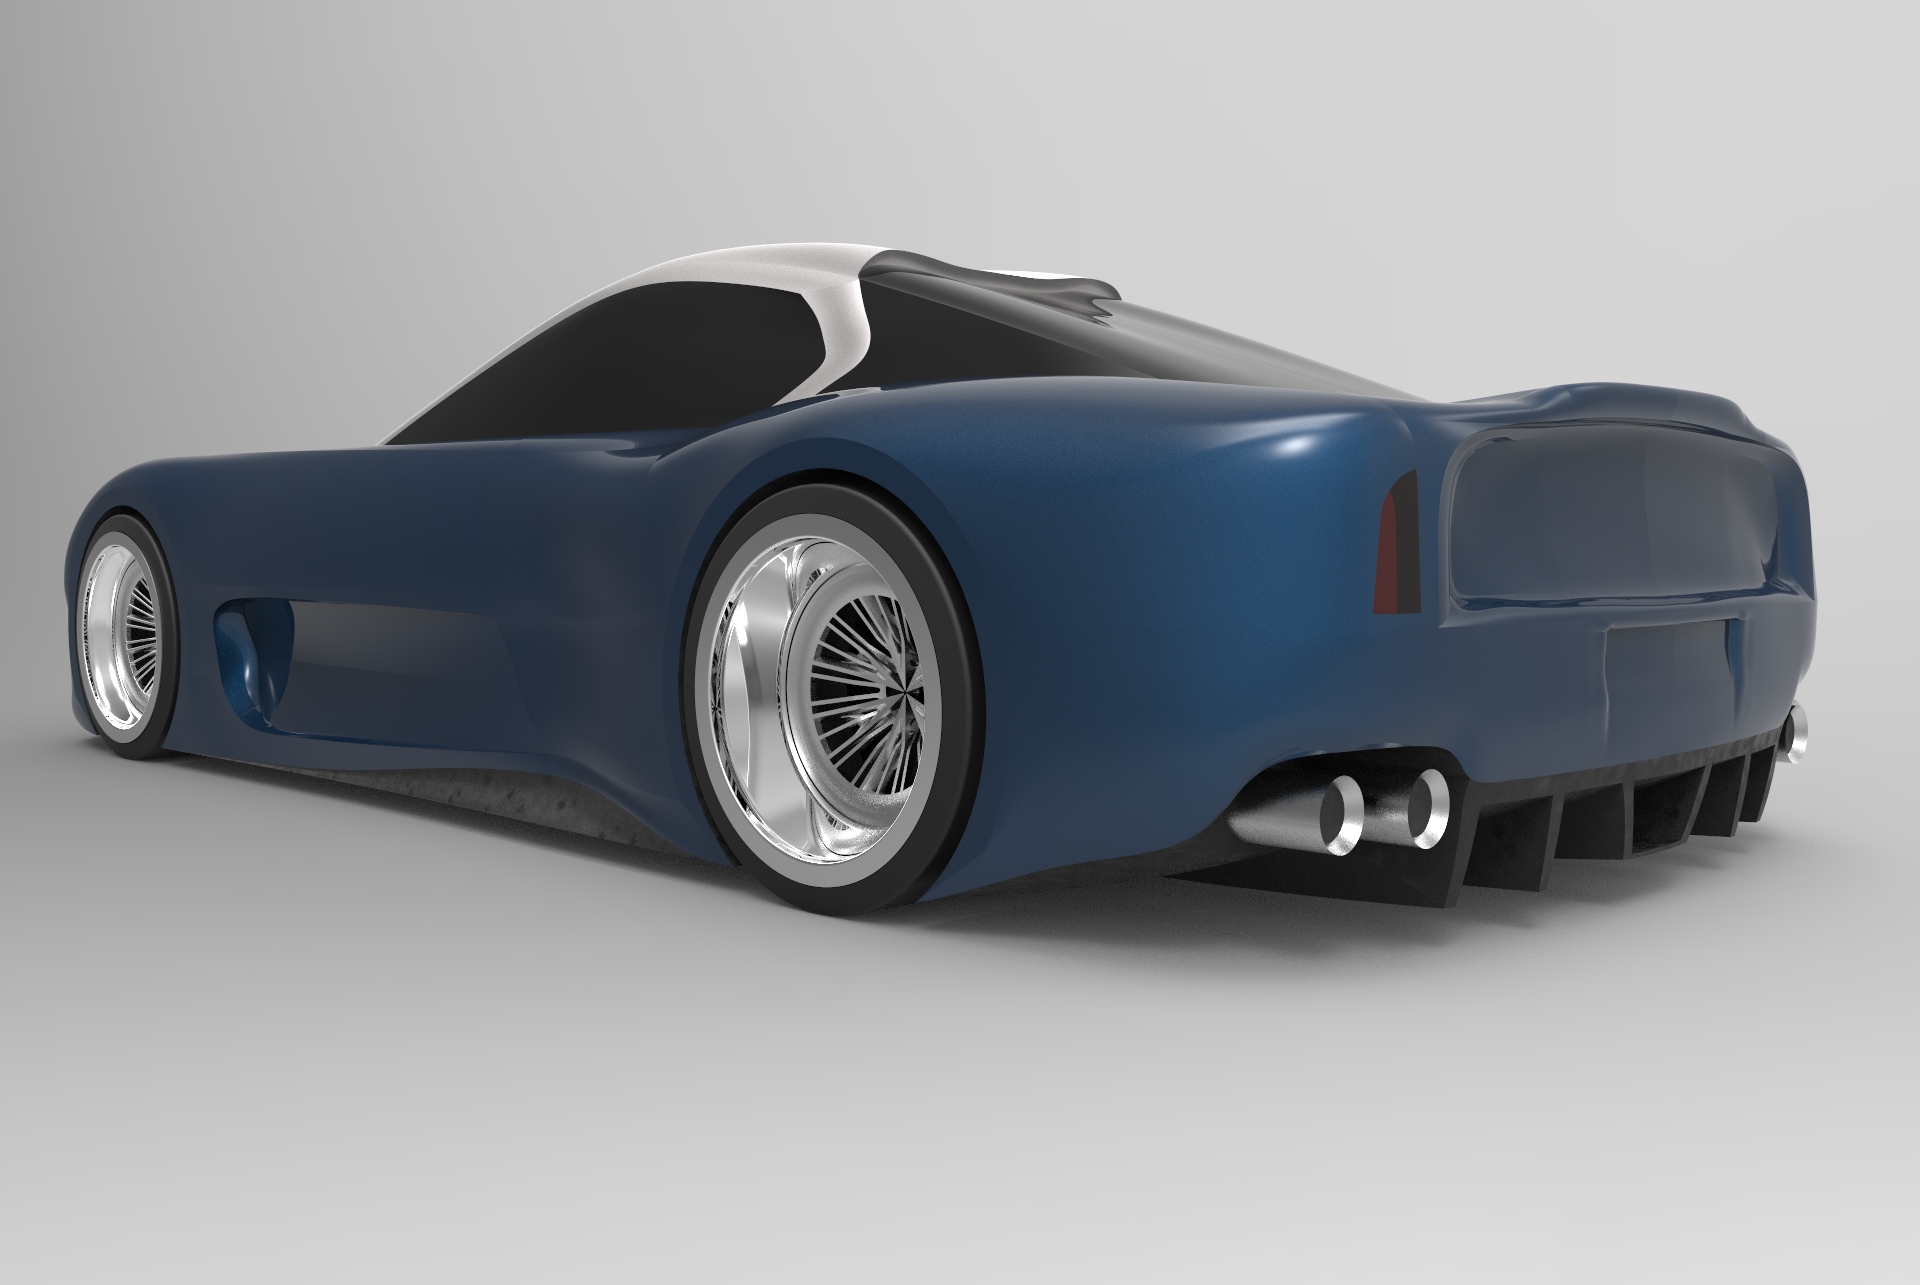
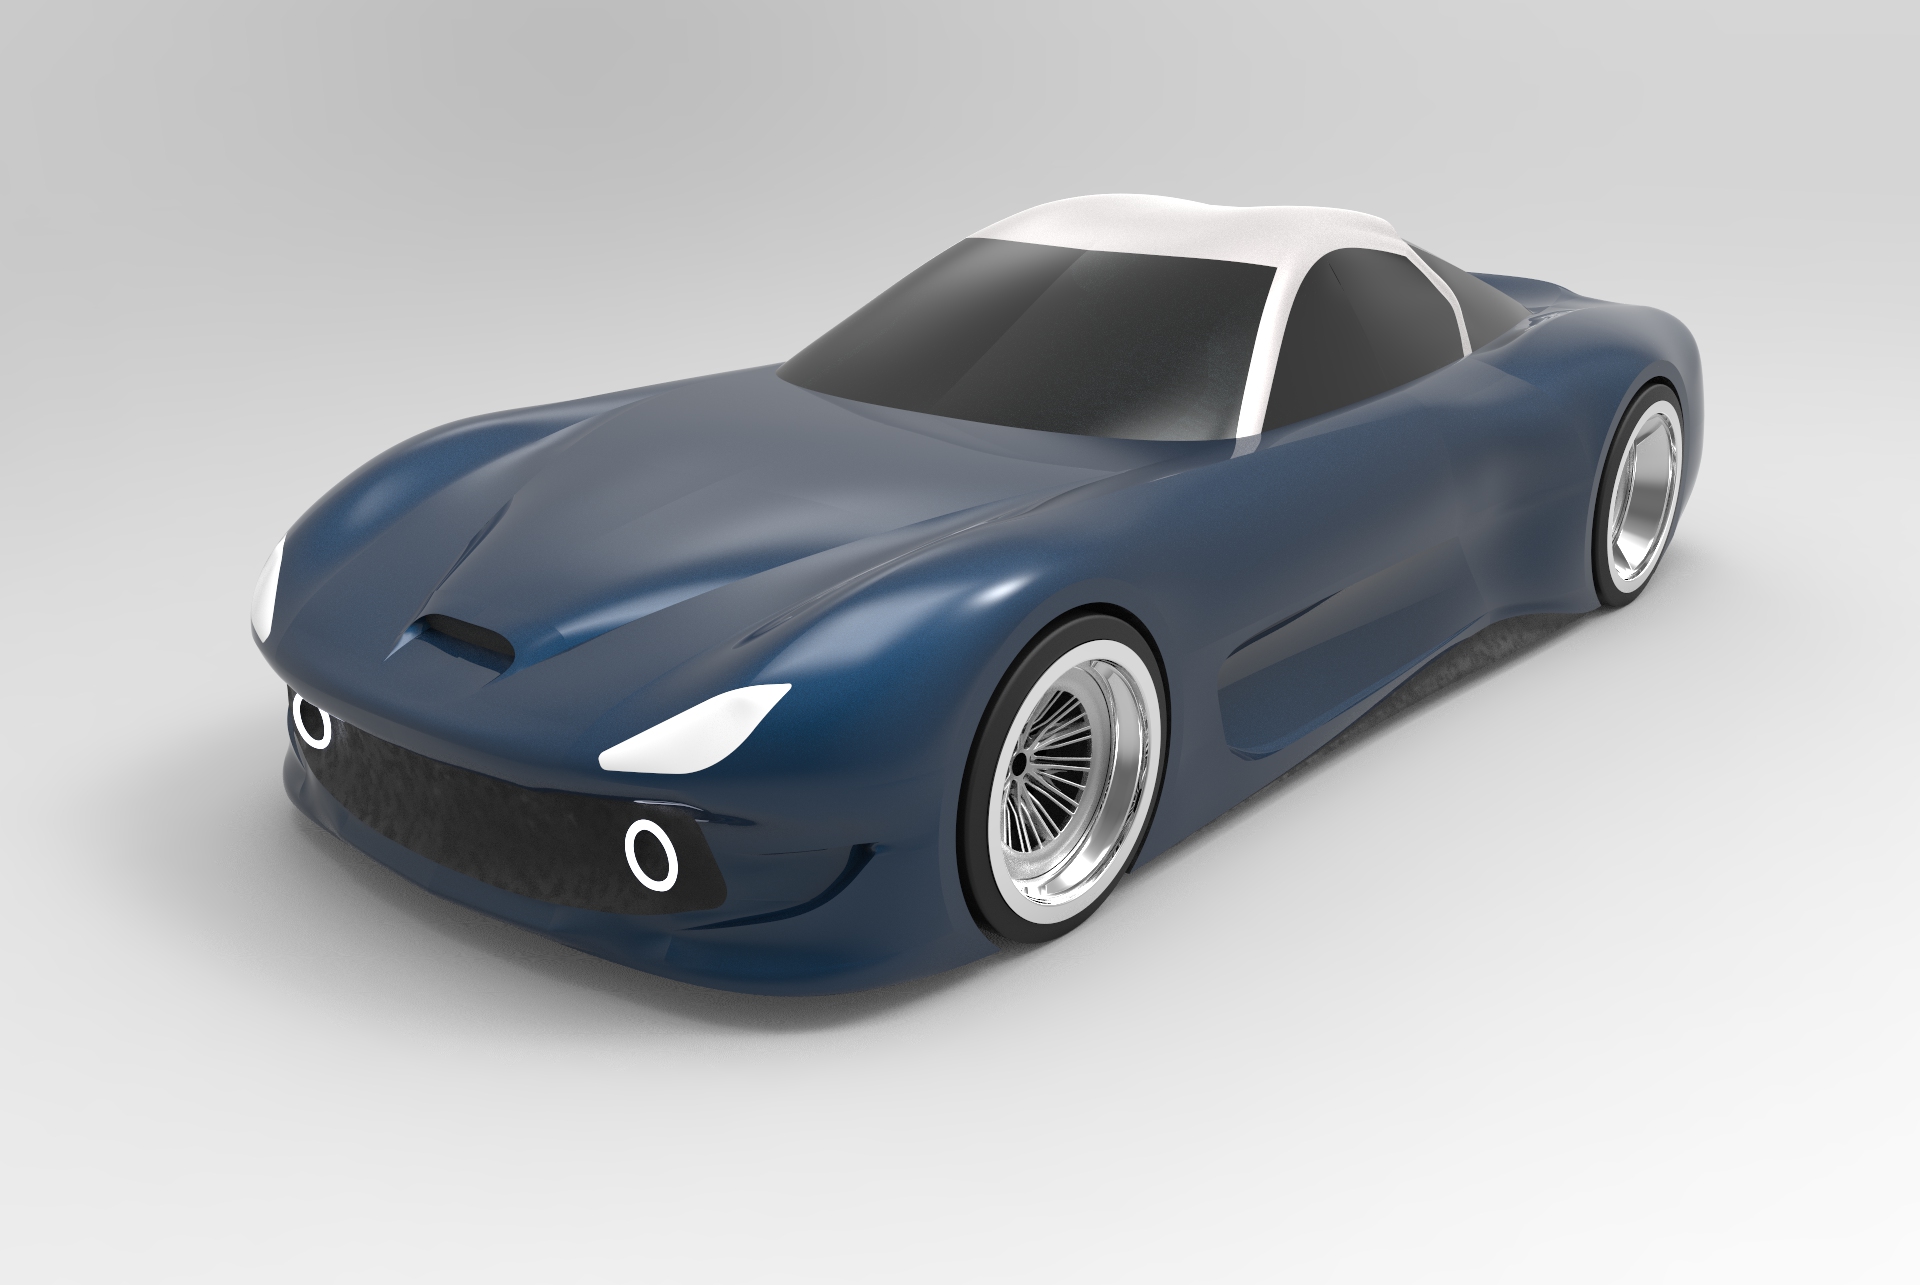
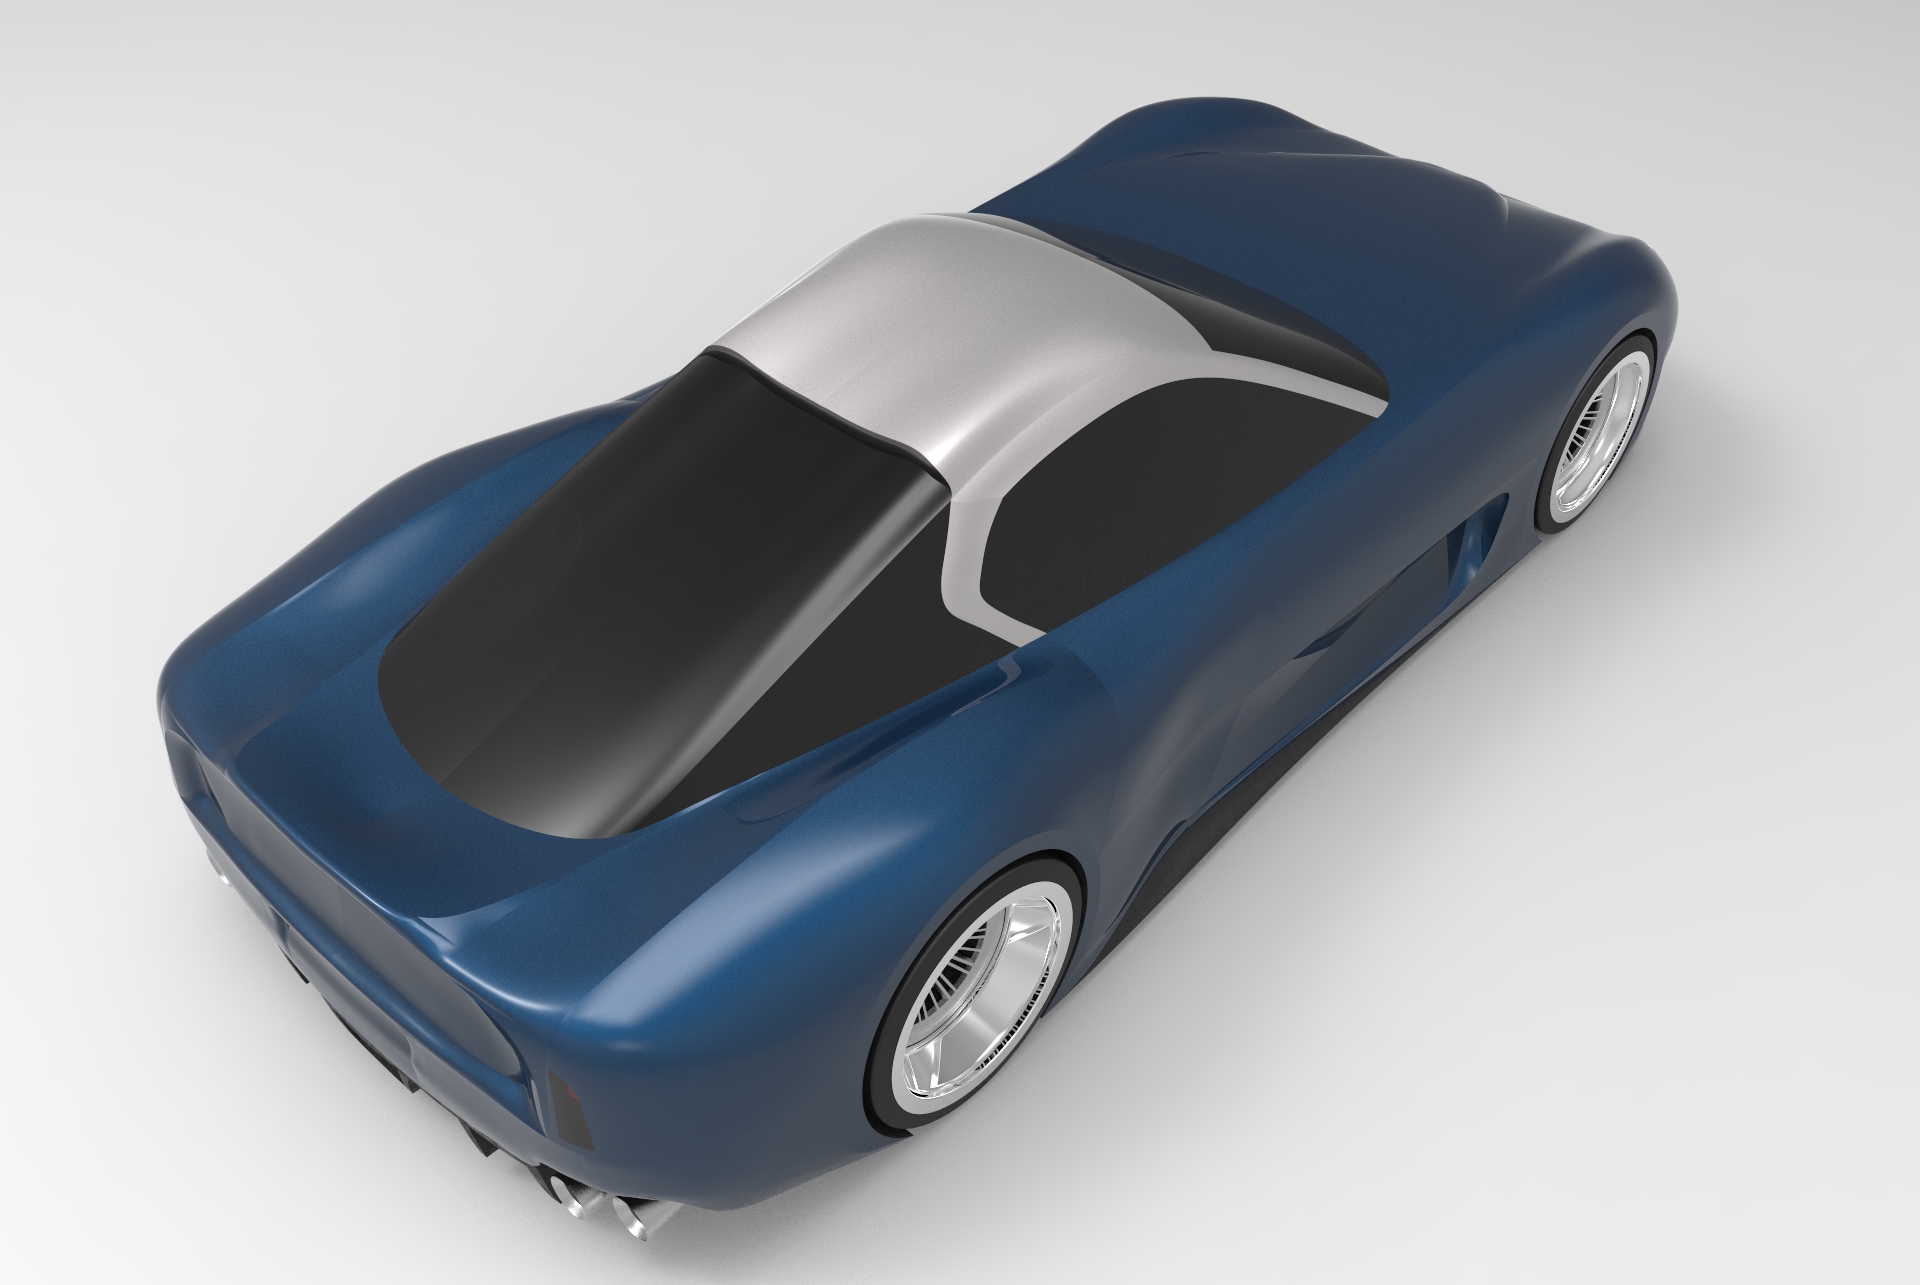
Chapter six: Coming to life
Once I had everything ready for the render of the first model, I used Keyshot to create some renders and be sure that this was the correct geometry for 3D printing.
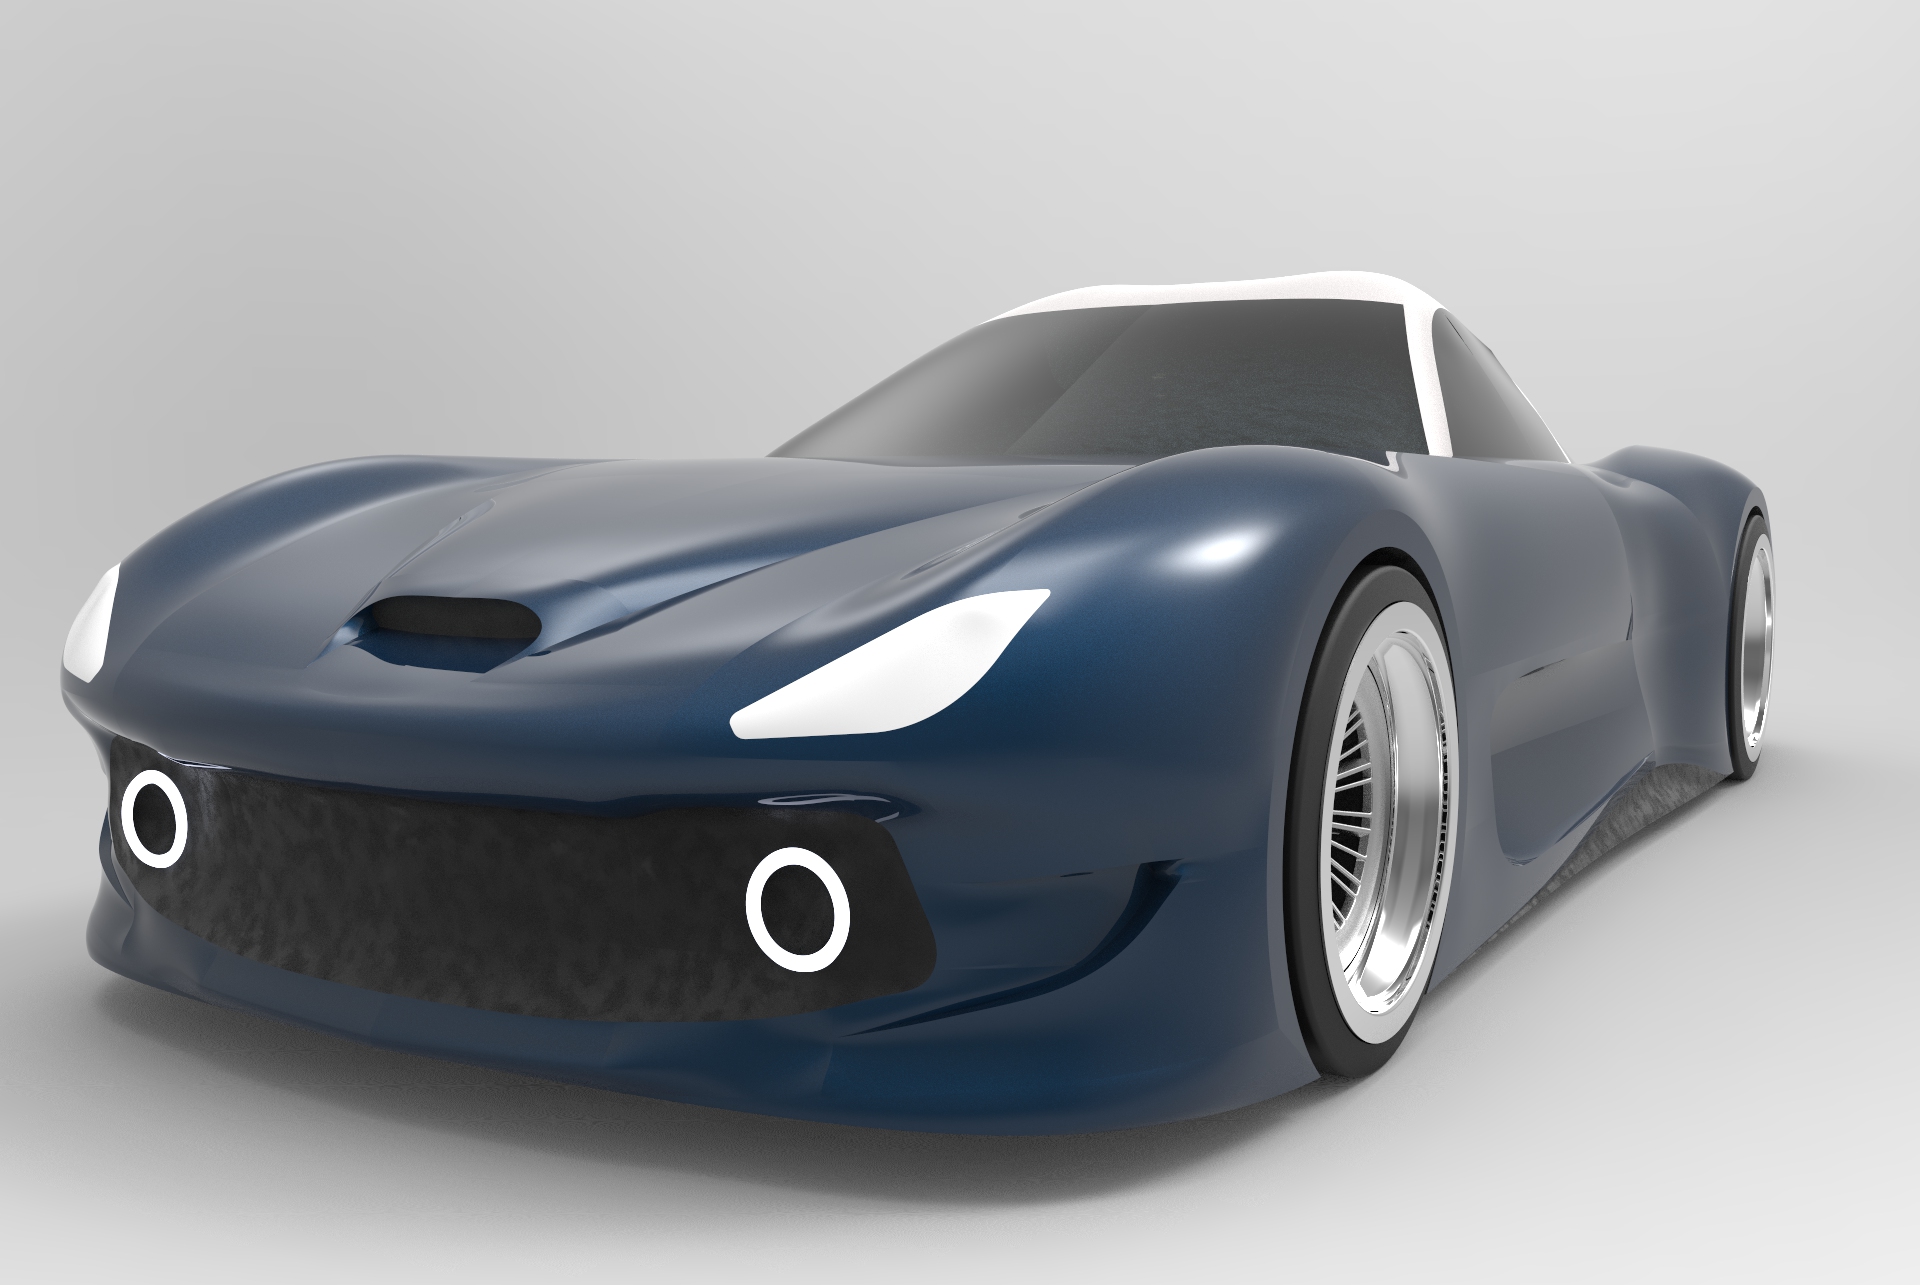
Chapter seven: who are you, random part?
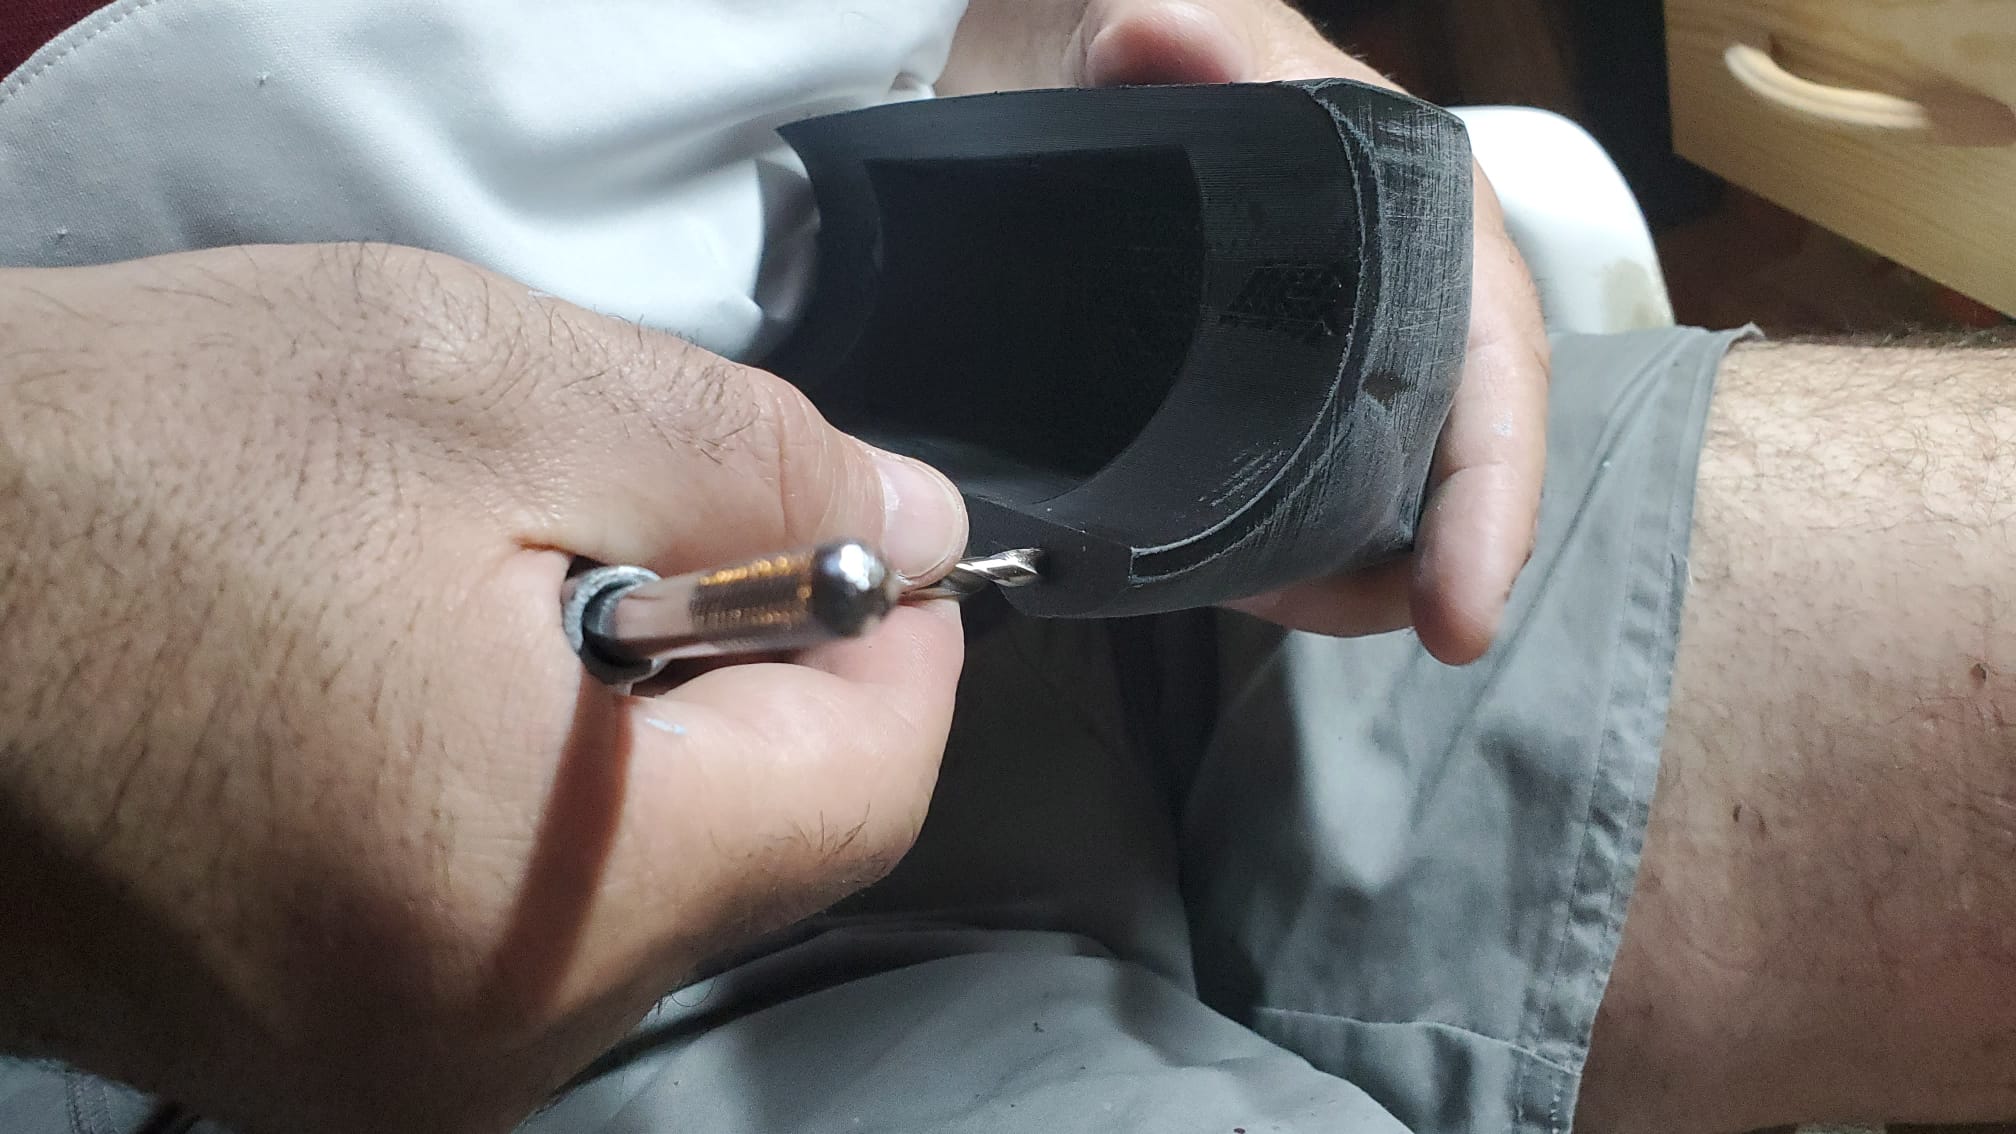
And so, after my week of quarantine because of a close contact with a Covid-positive (I was negative in the end), fabrication began.
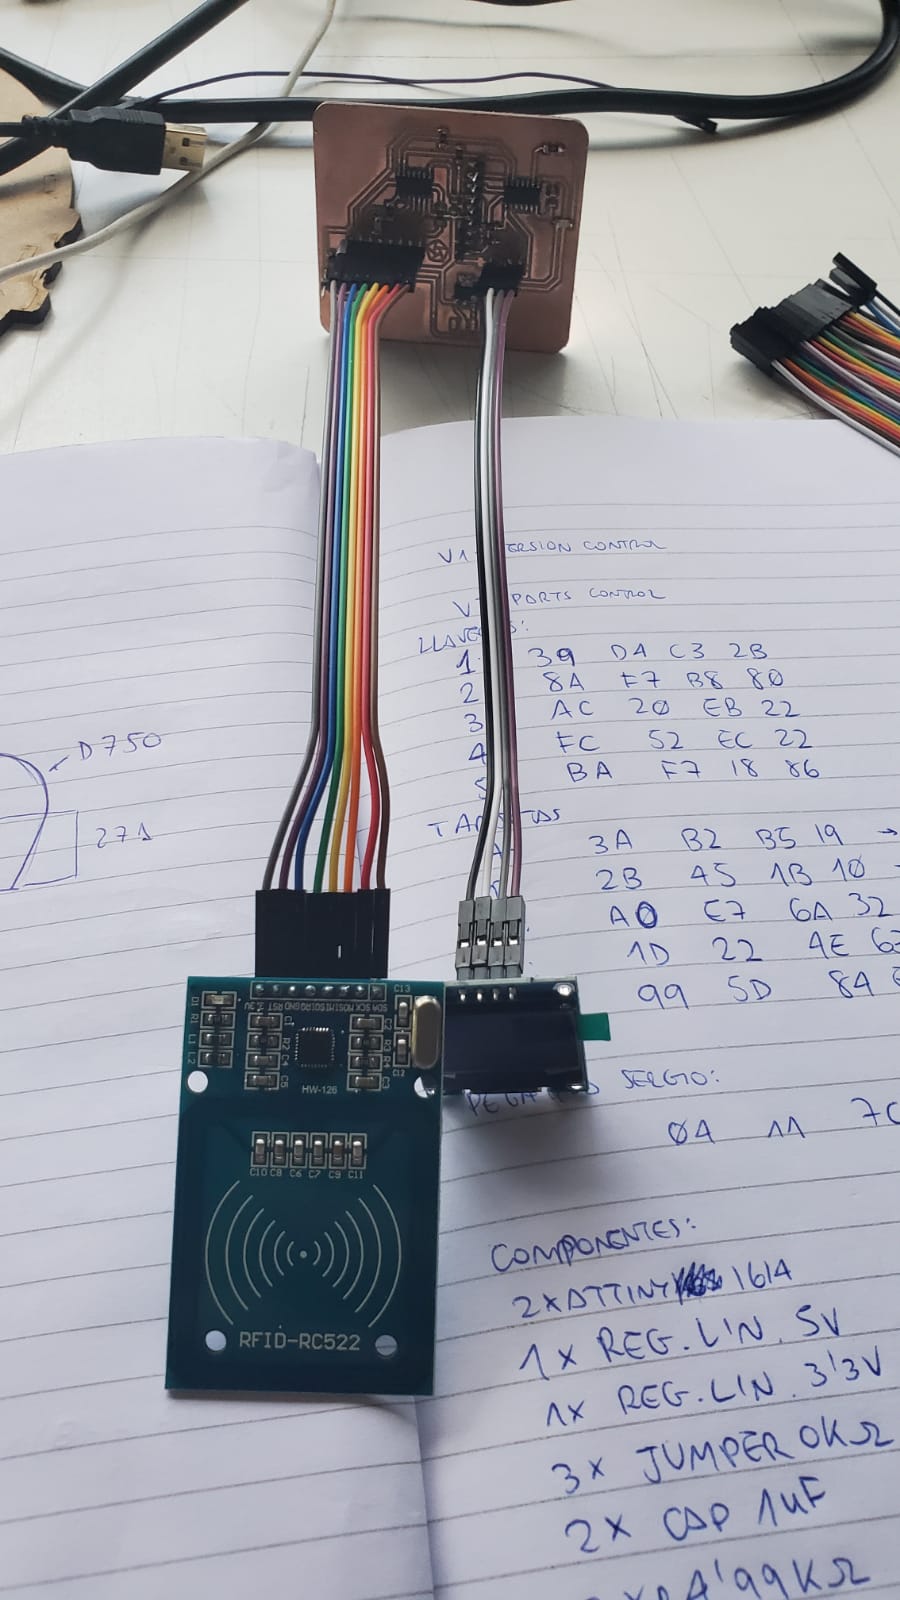
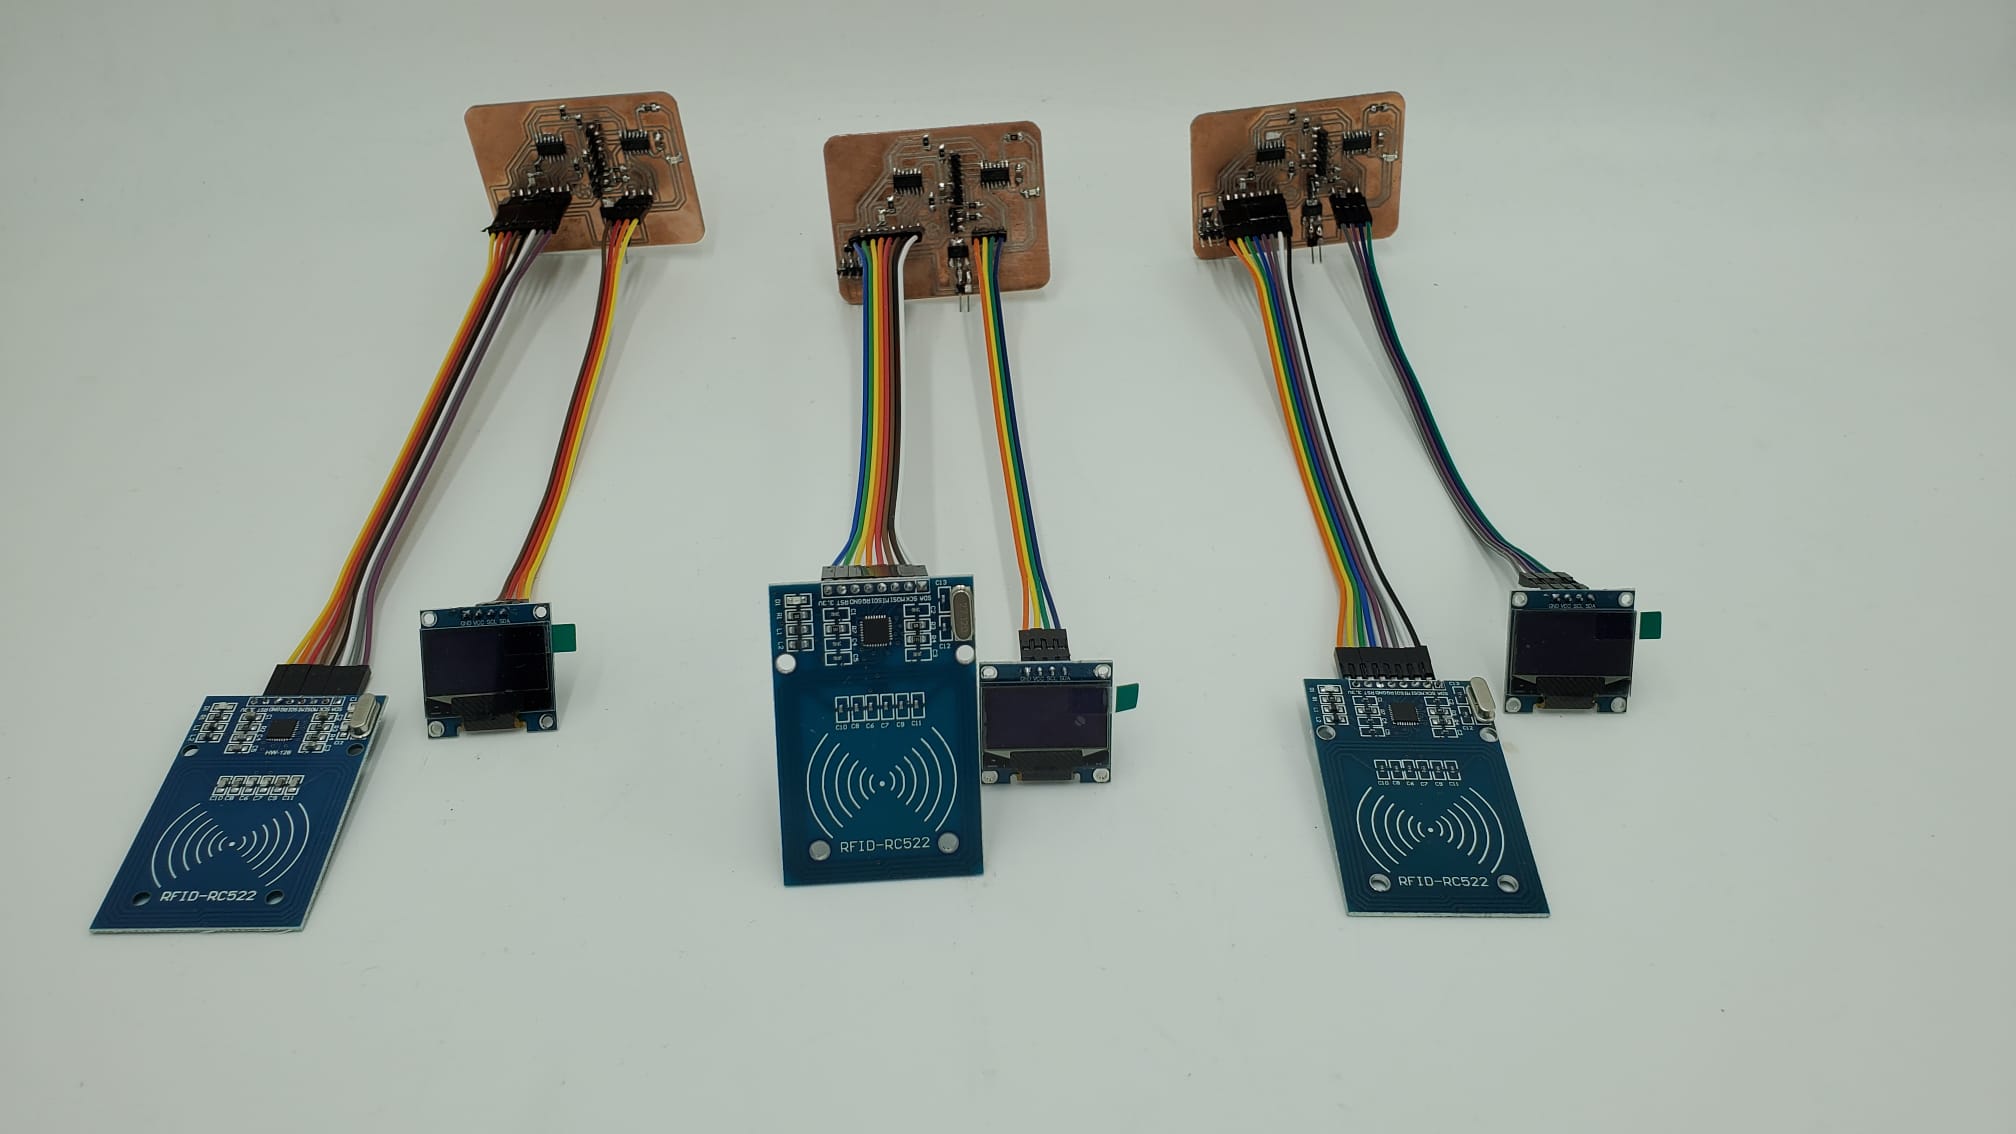
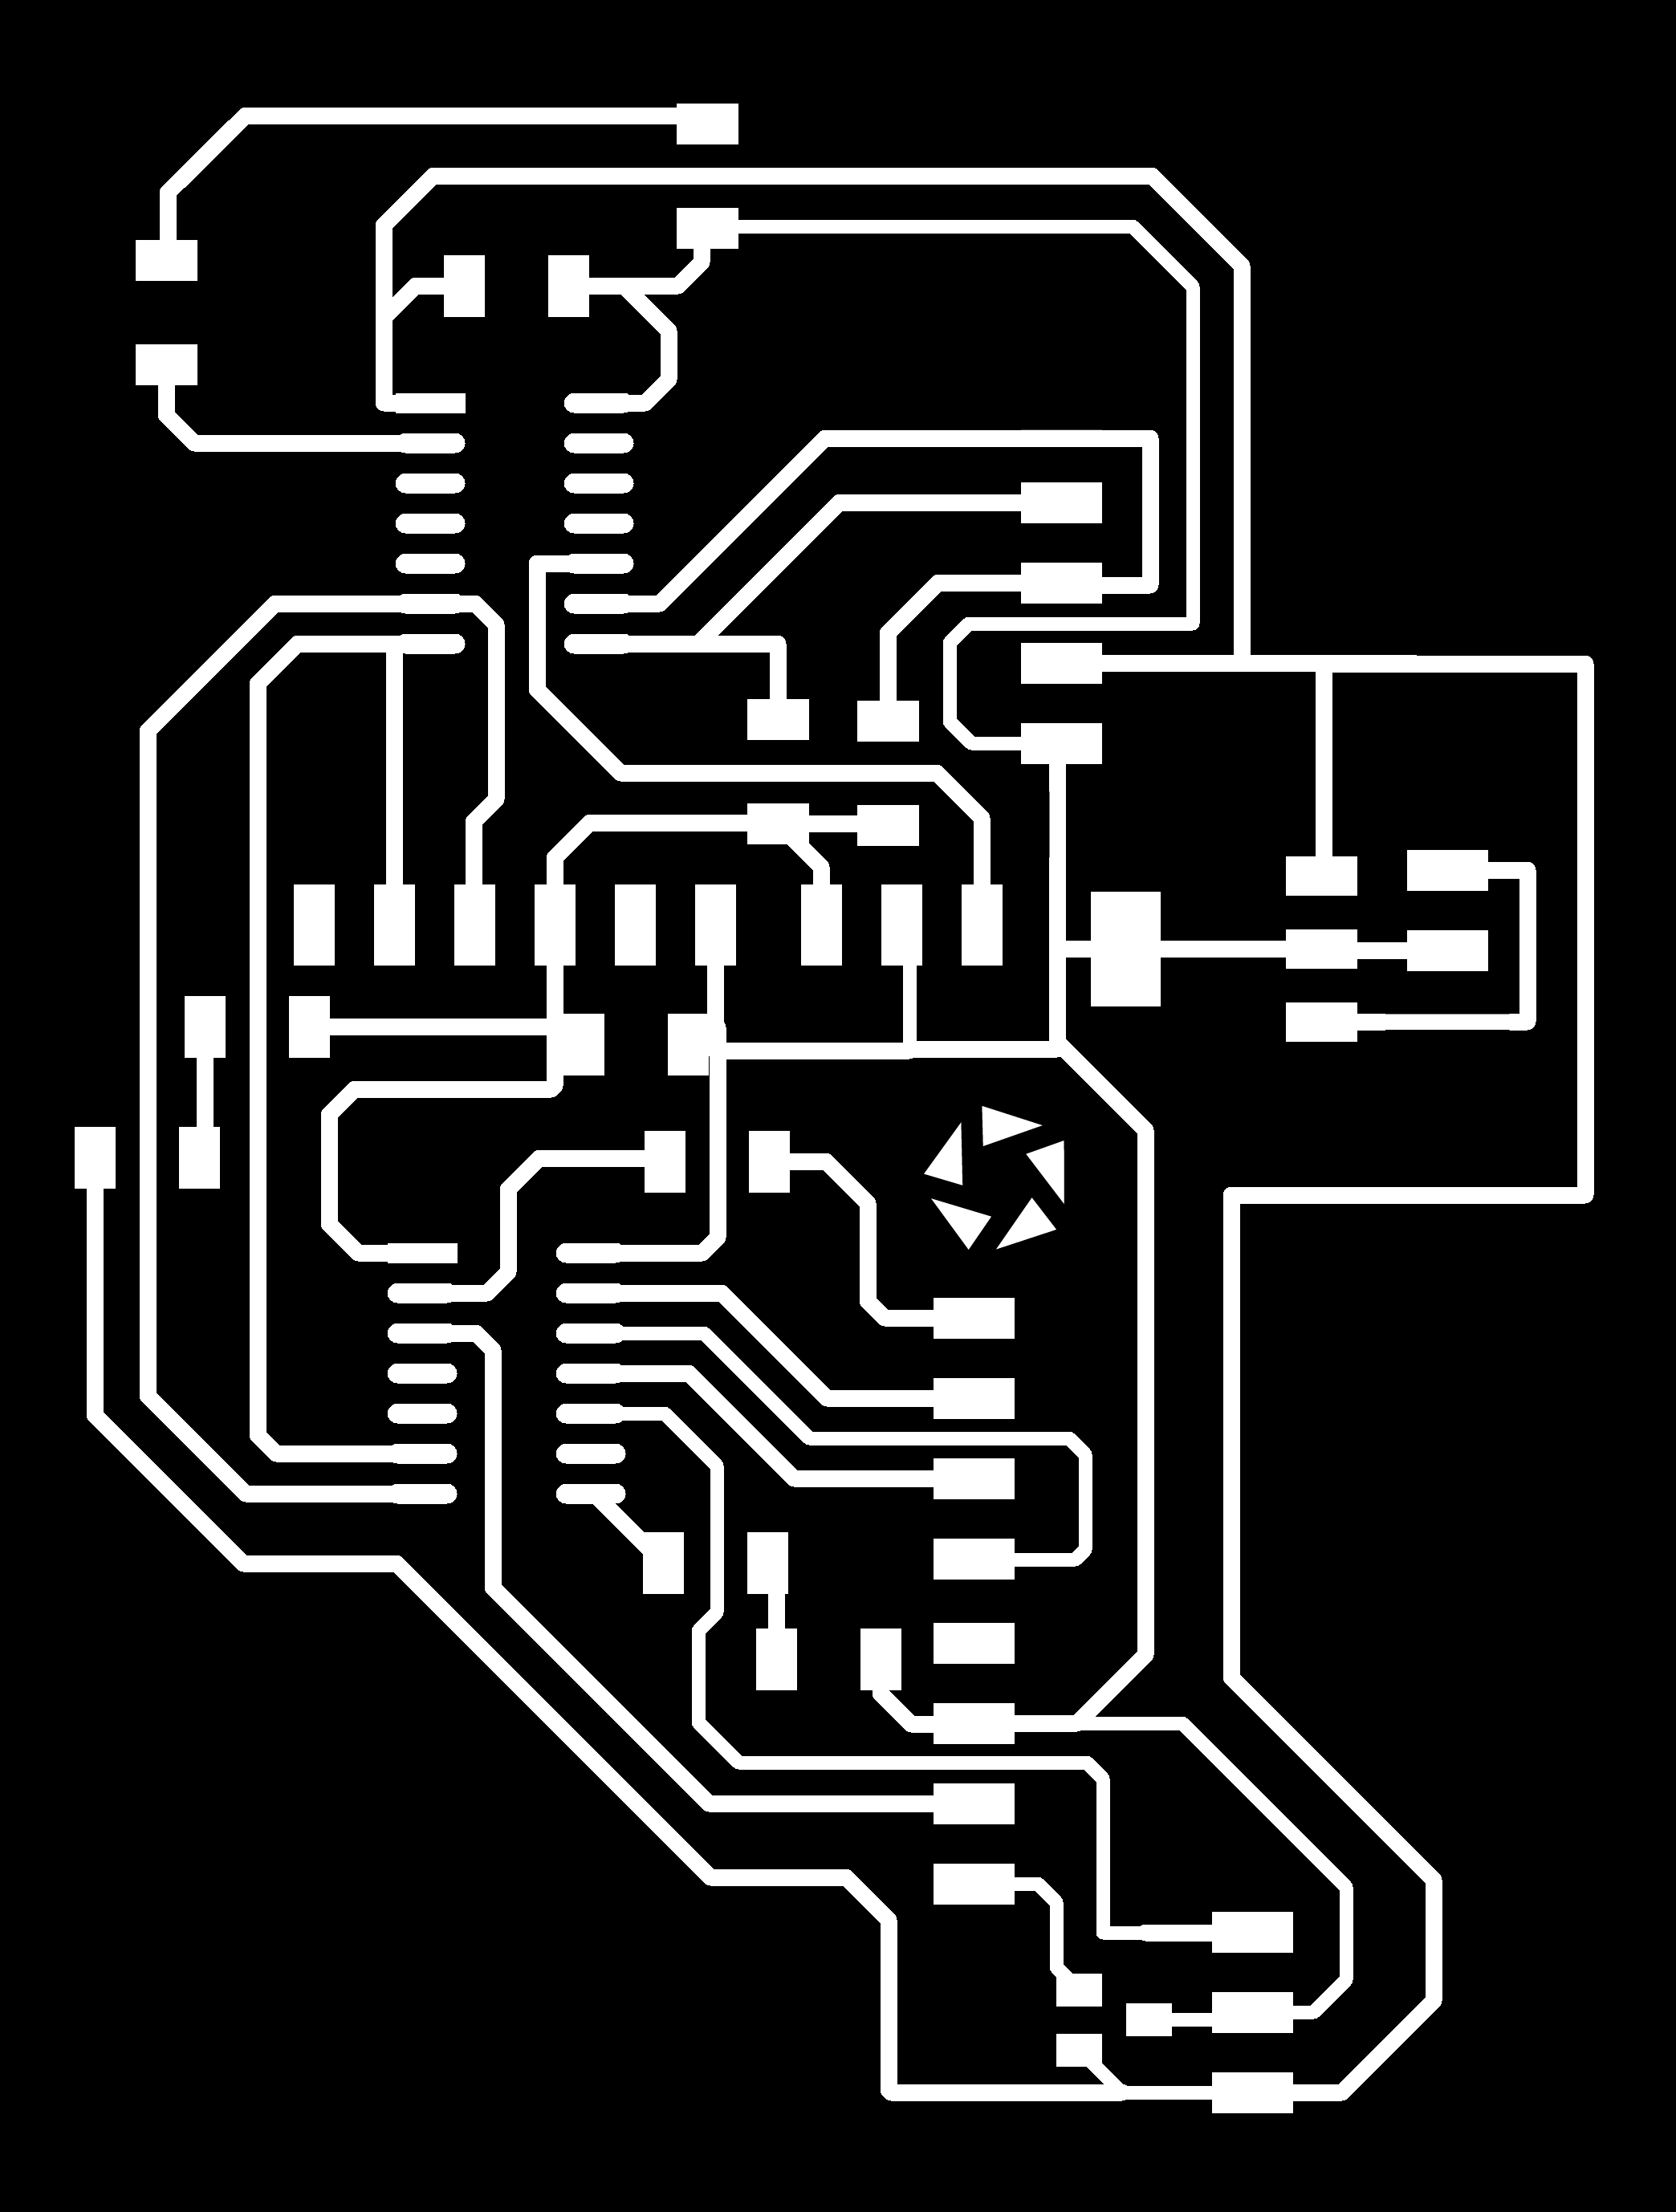
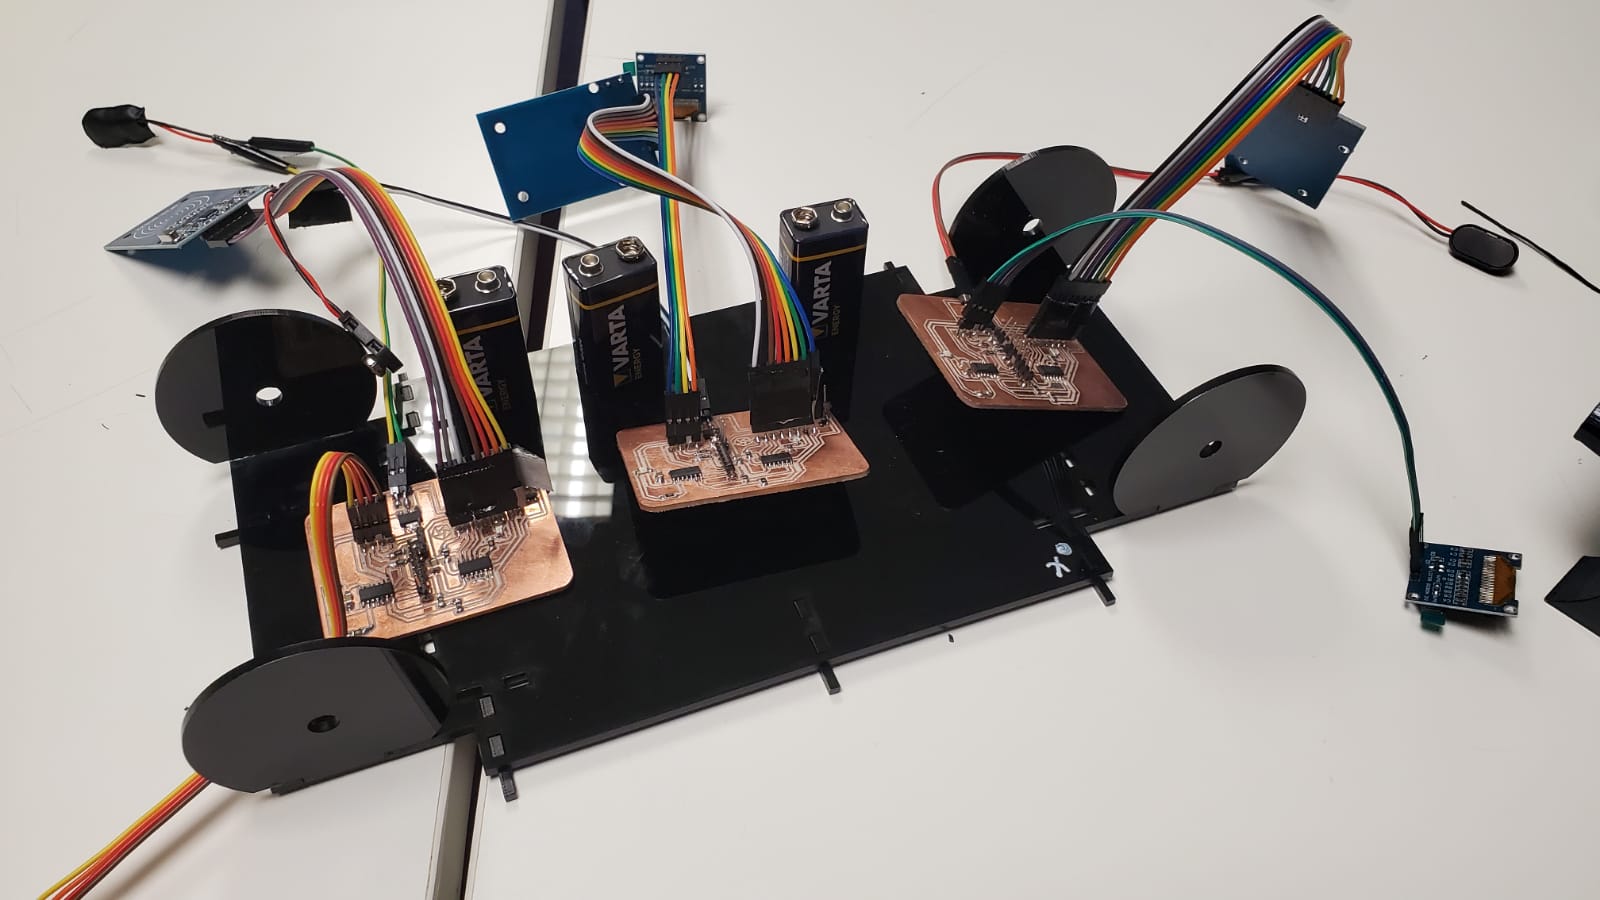
Electronics were key in this project, and so this was the module I designed: it has two ATTINY1614s, the connection for the RFID, the connection for the OLED screen, and it's programmed via FTDI with Adrián's adaptor.
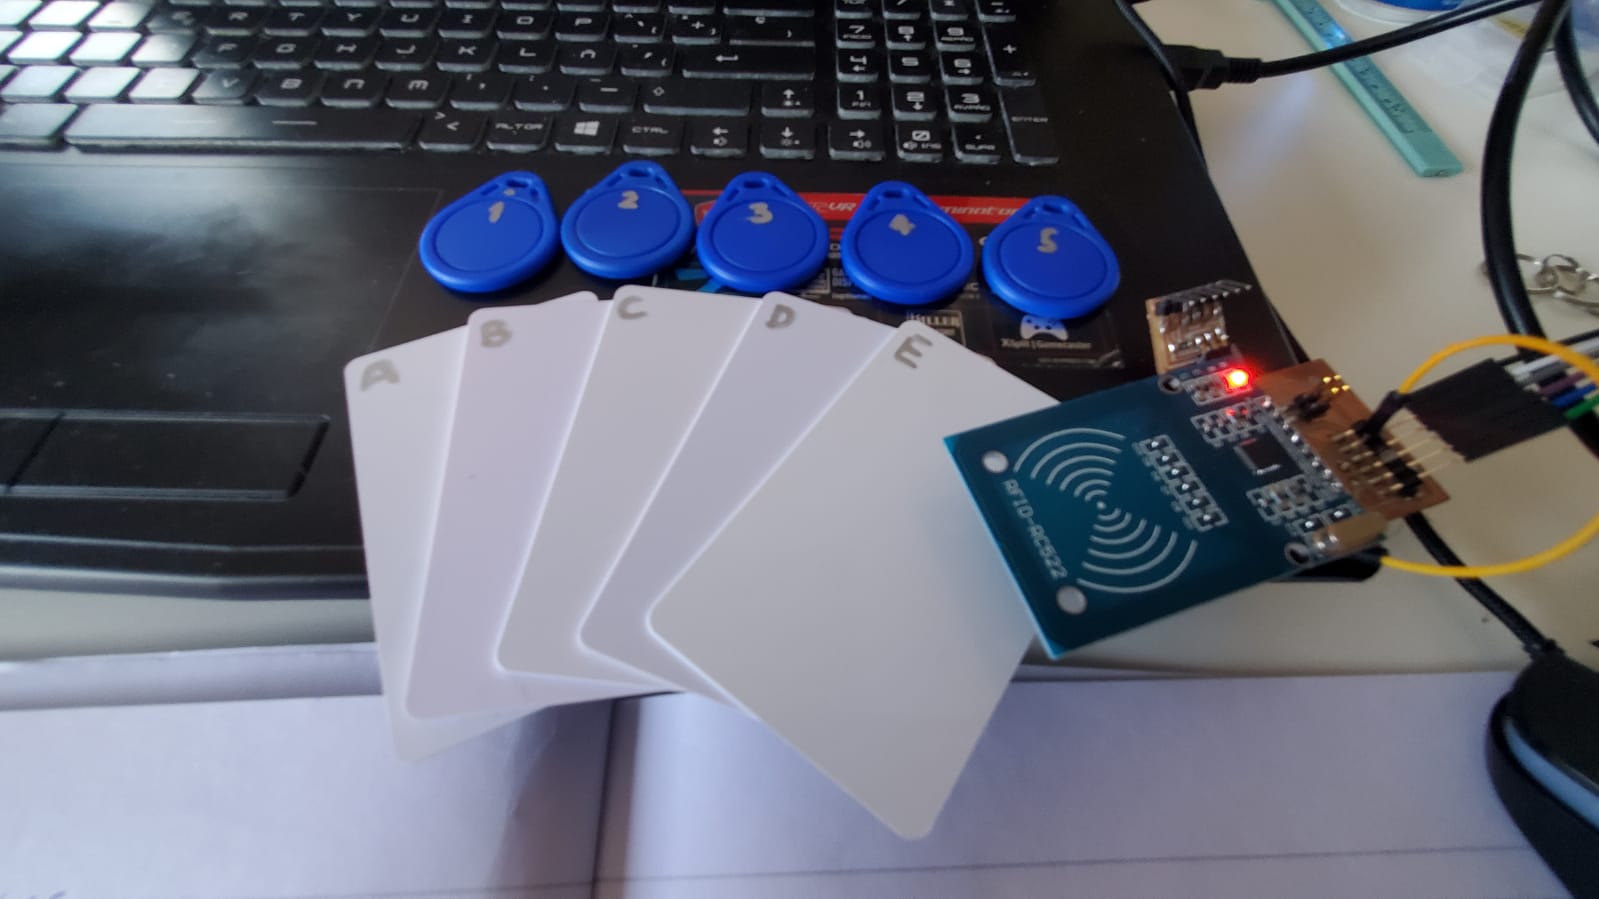
With the board I did in the networking and communications week I tested my RFID cards and keychains that were going to be attached to my parts
And the modules were built
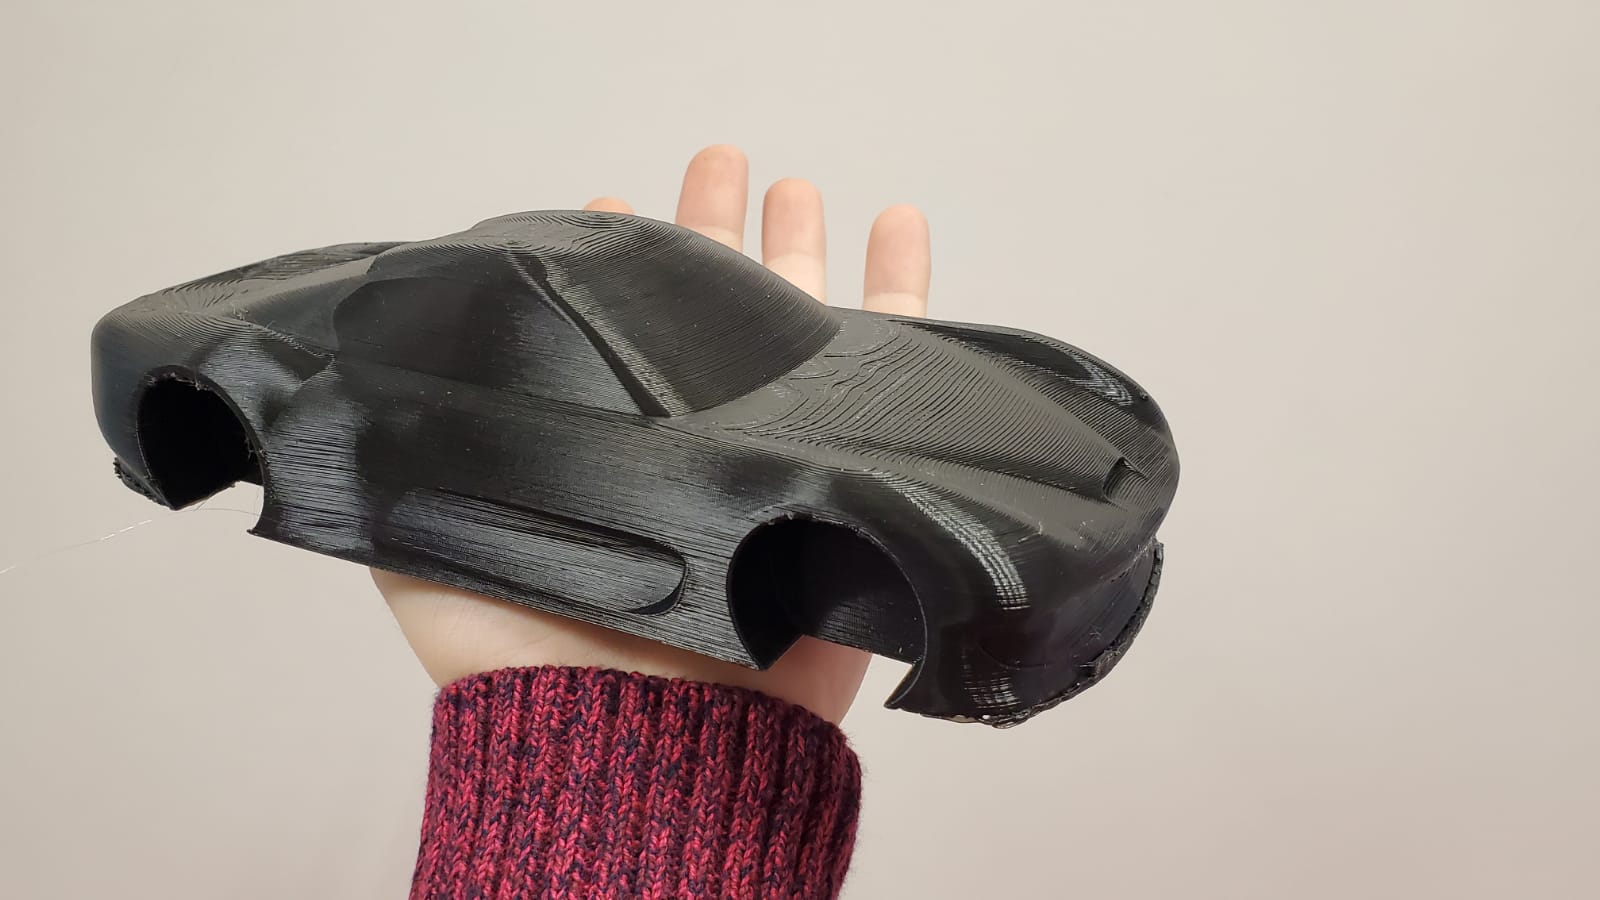
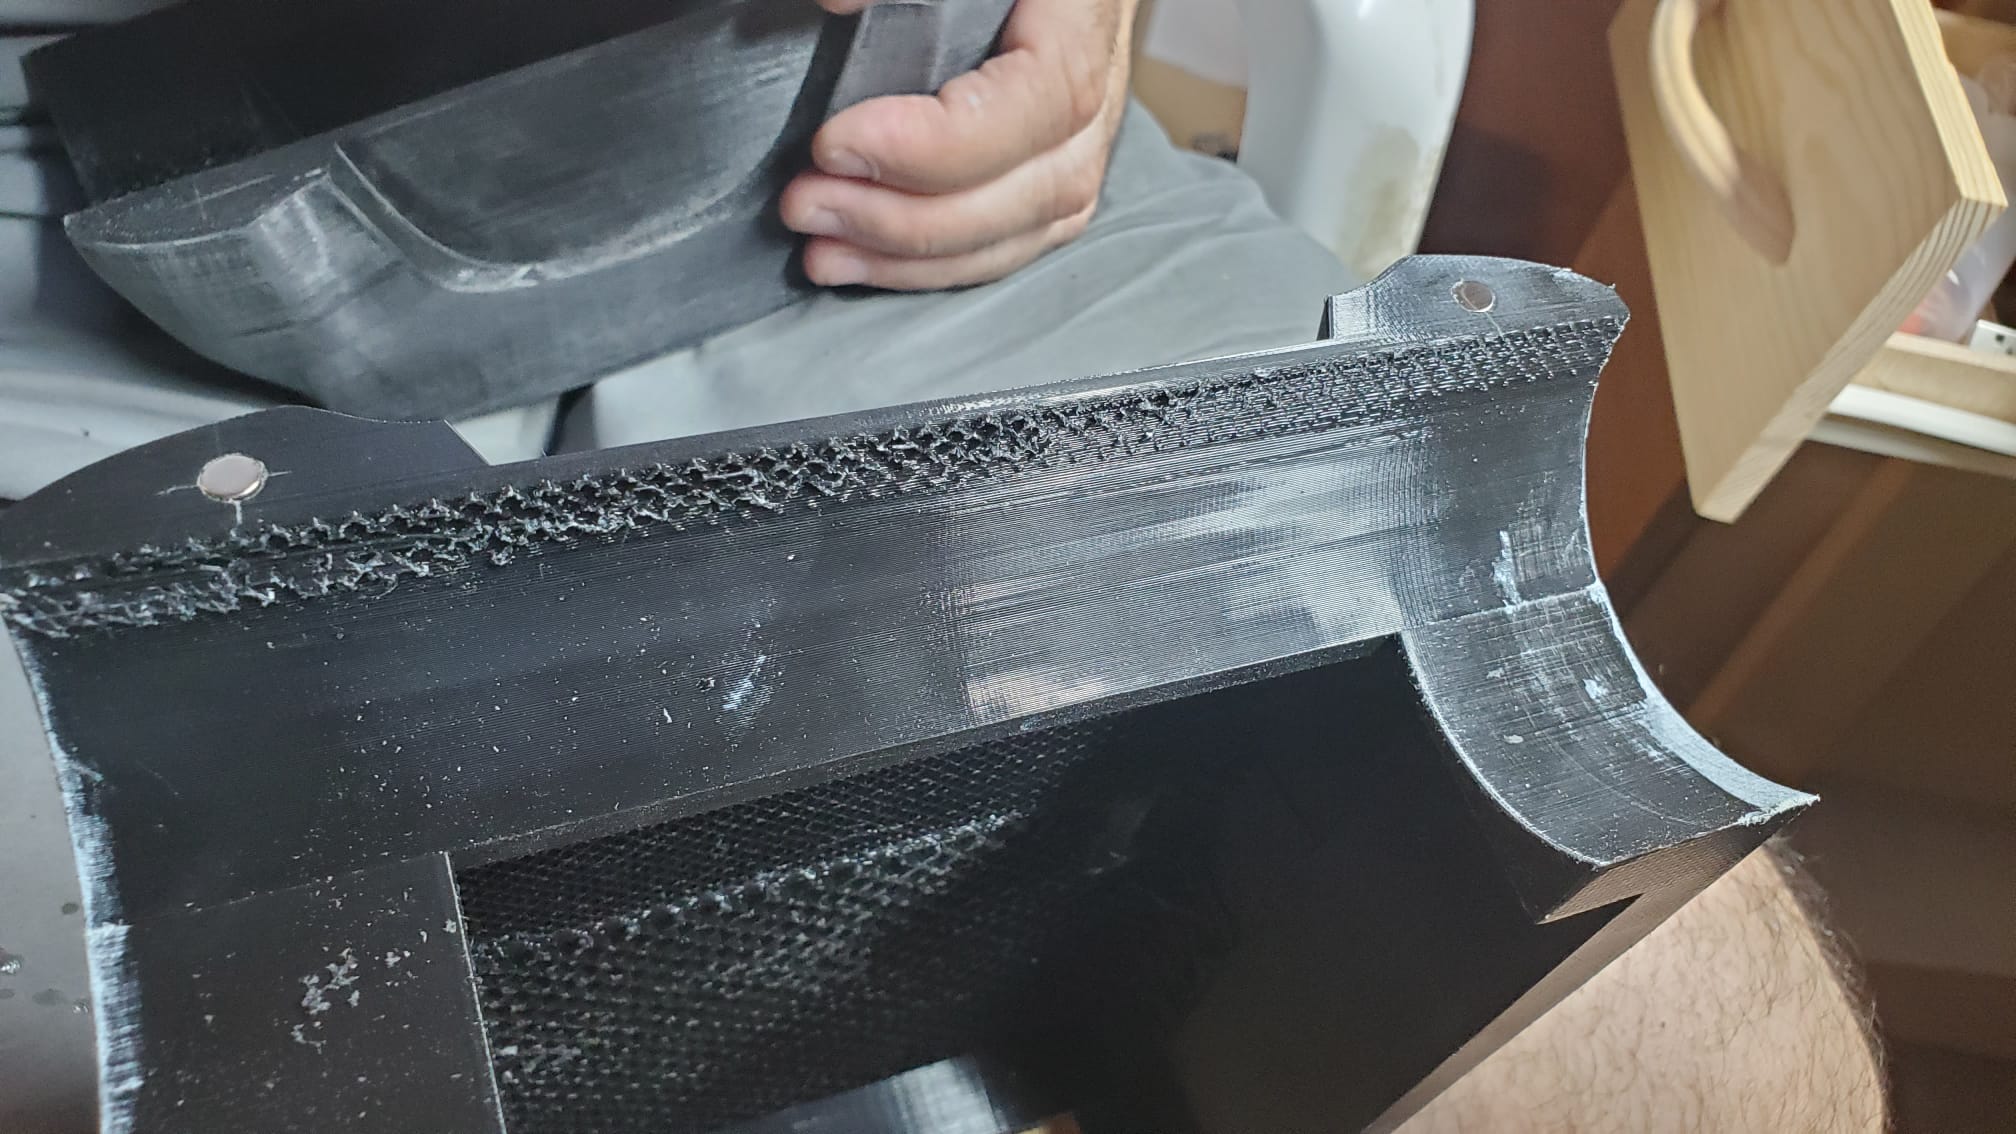
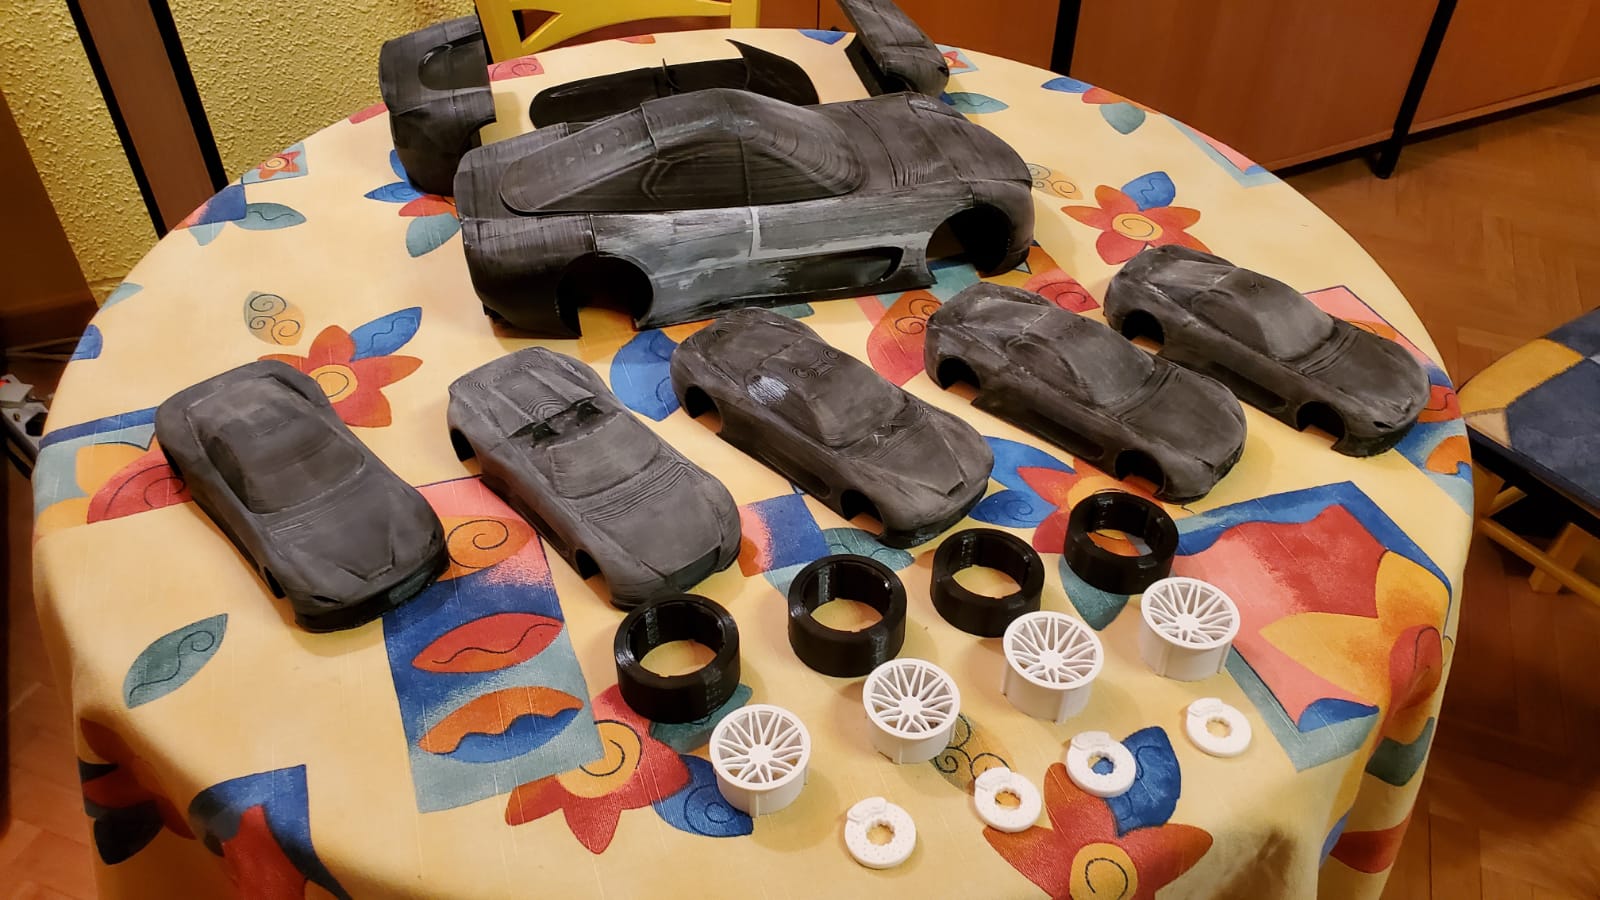
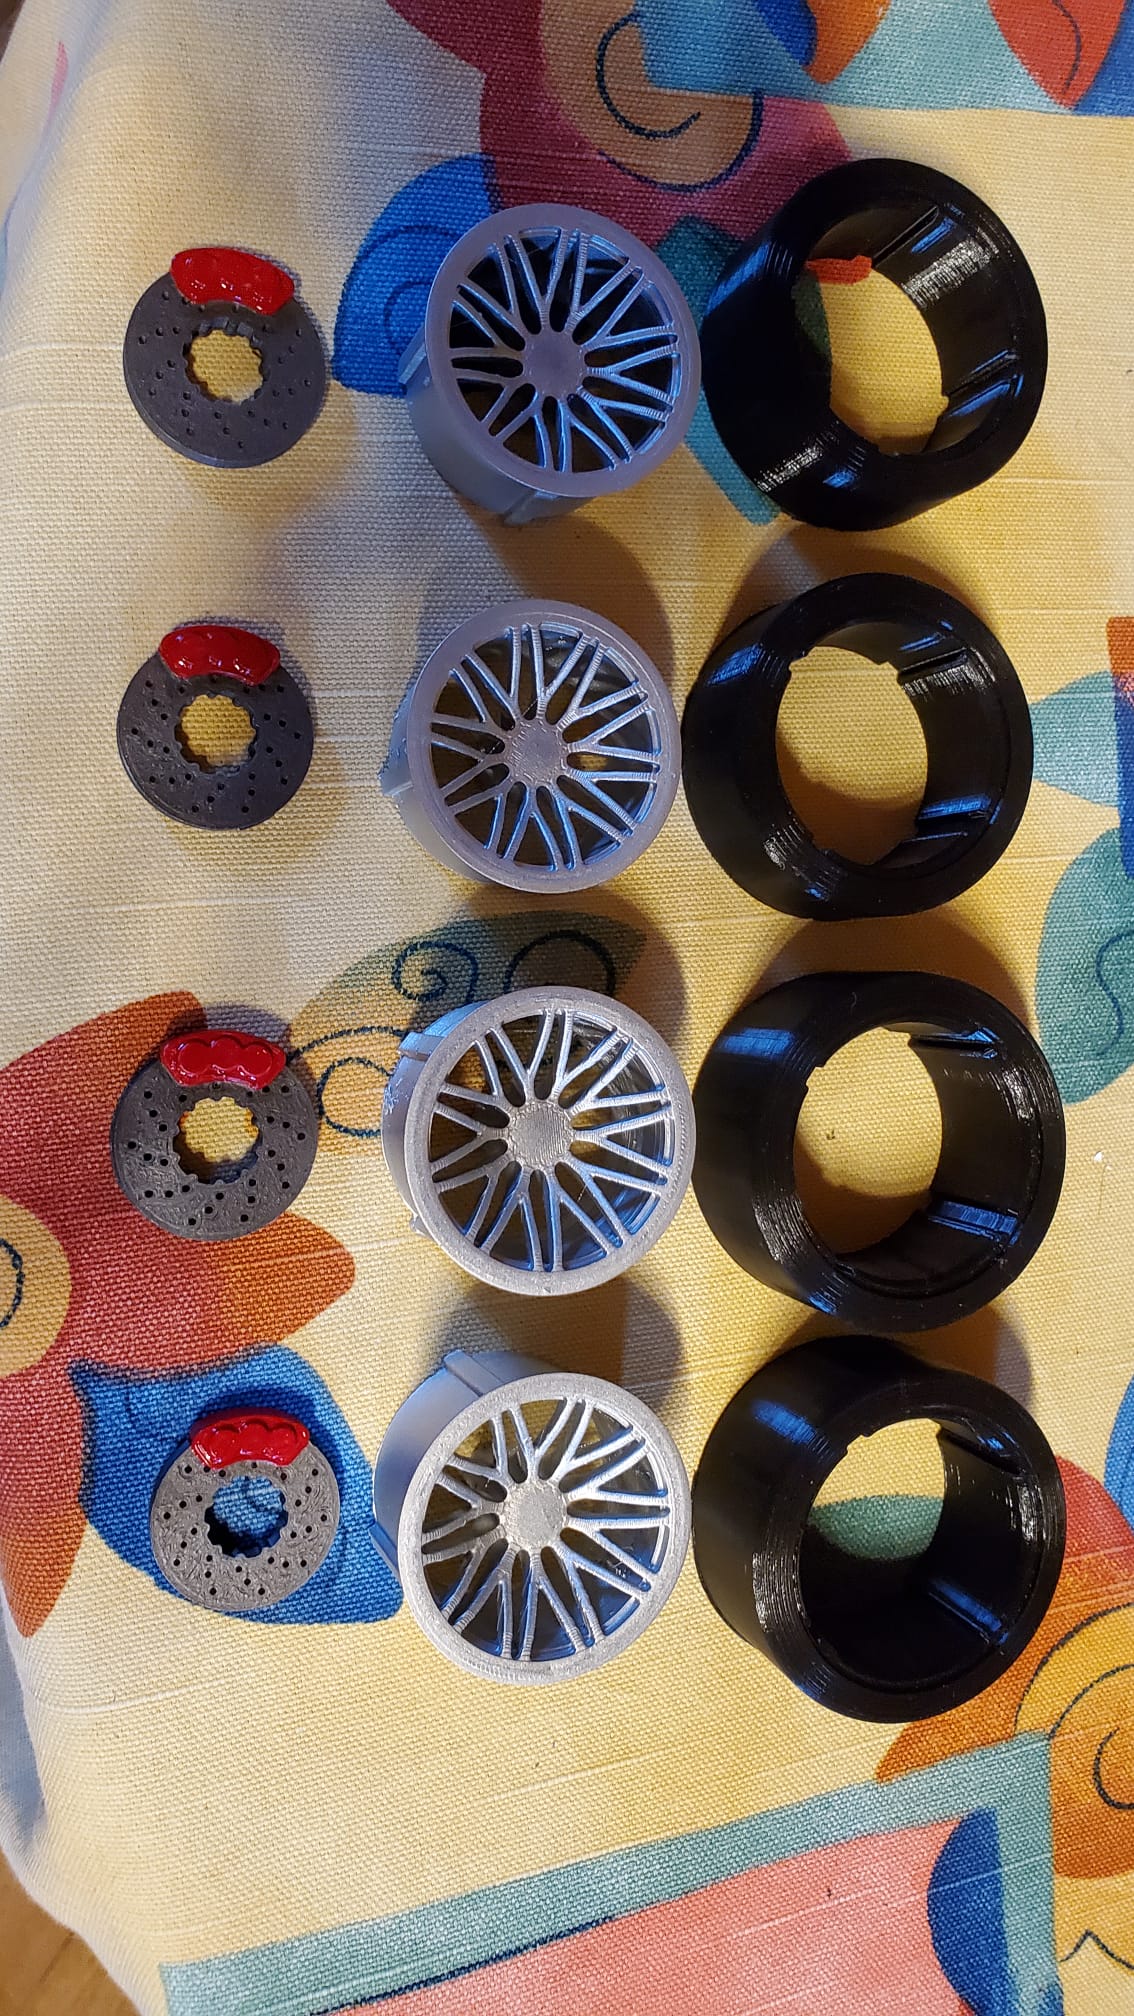
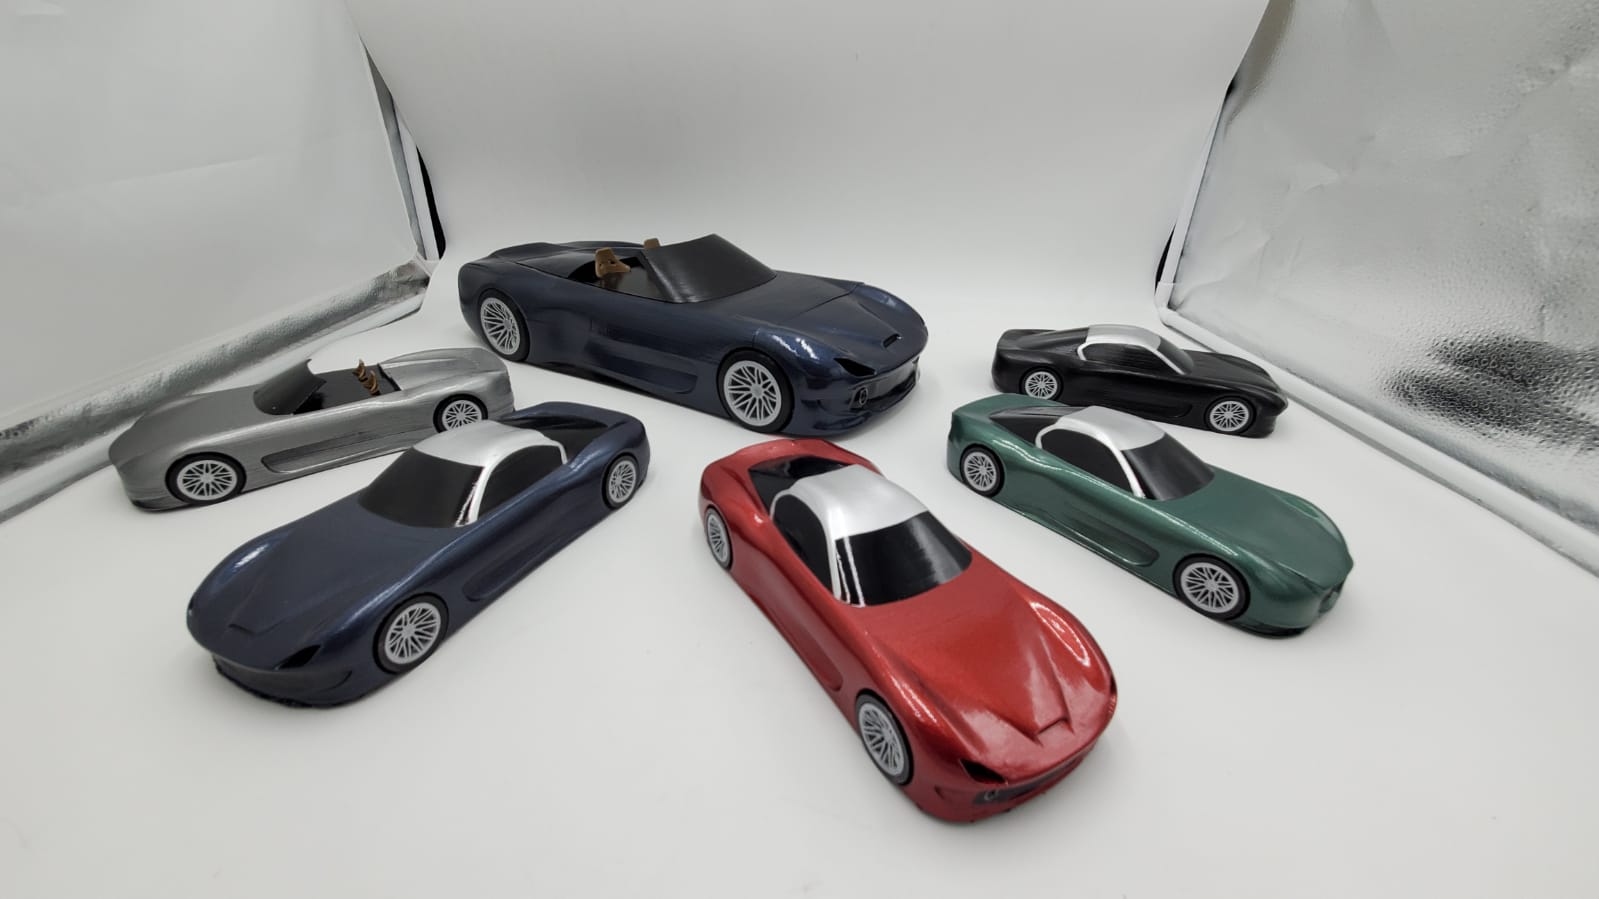
Meanwhile, the Creality Ender 5 and 5 plus of my FabLab were full of work, as they had to create all the parts for the big models and the small variations.
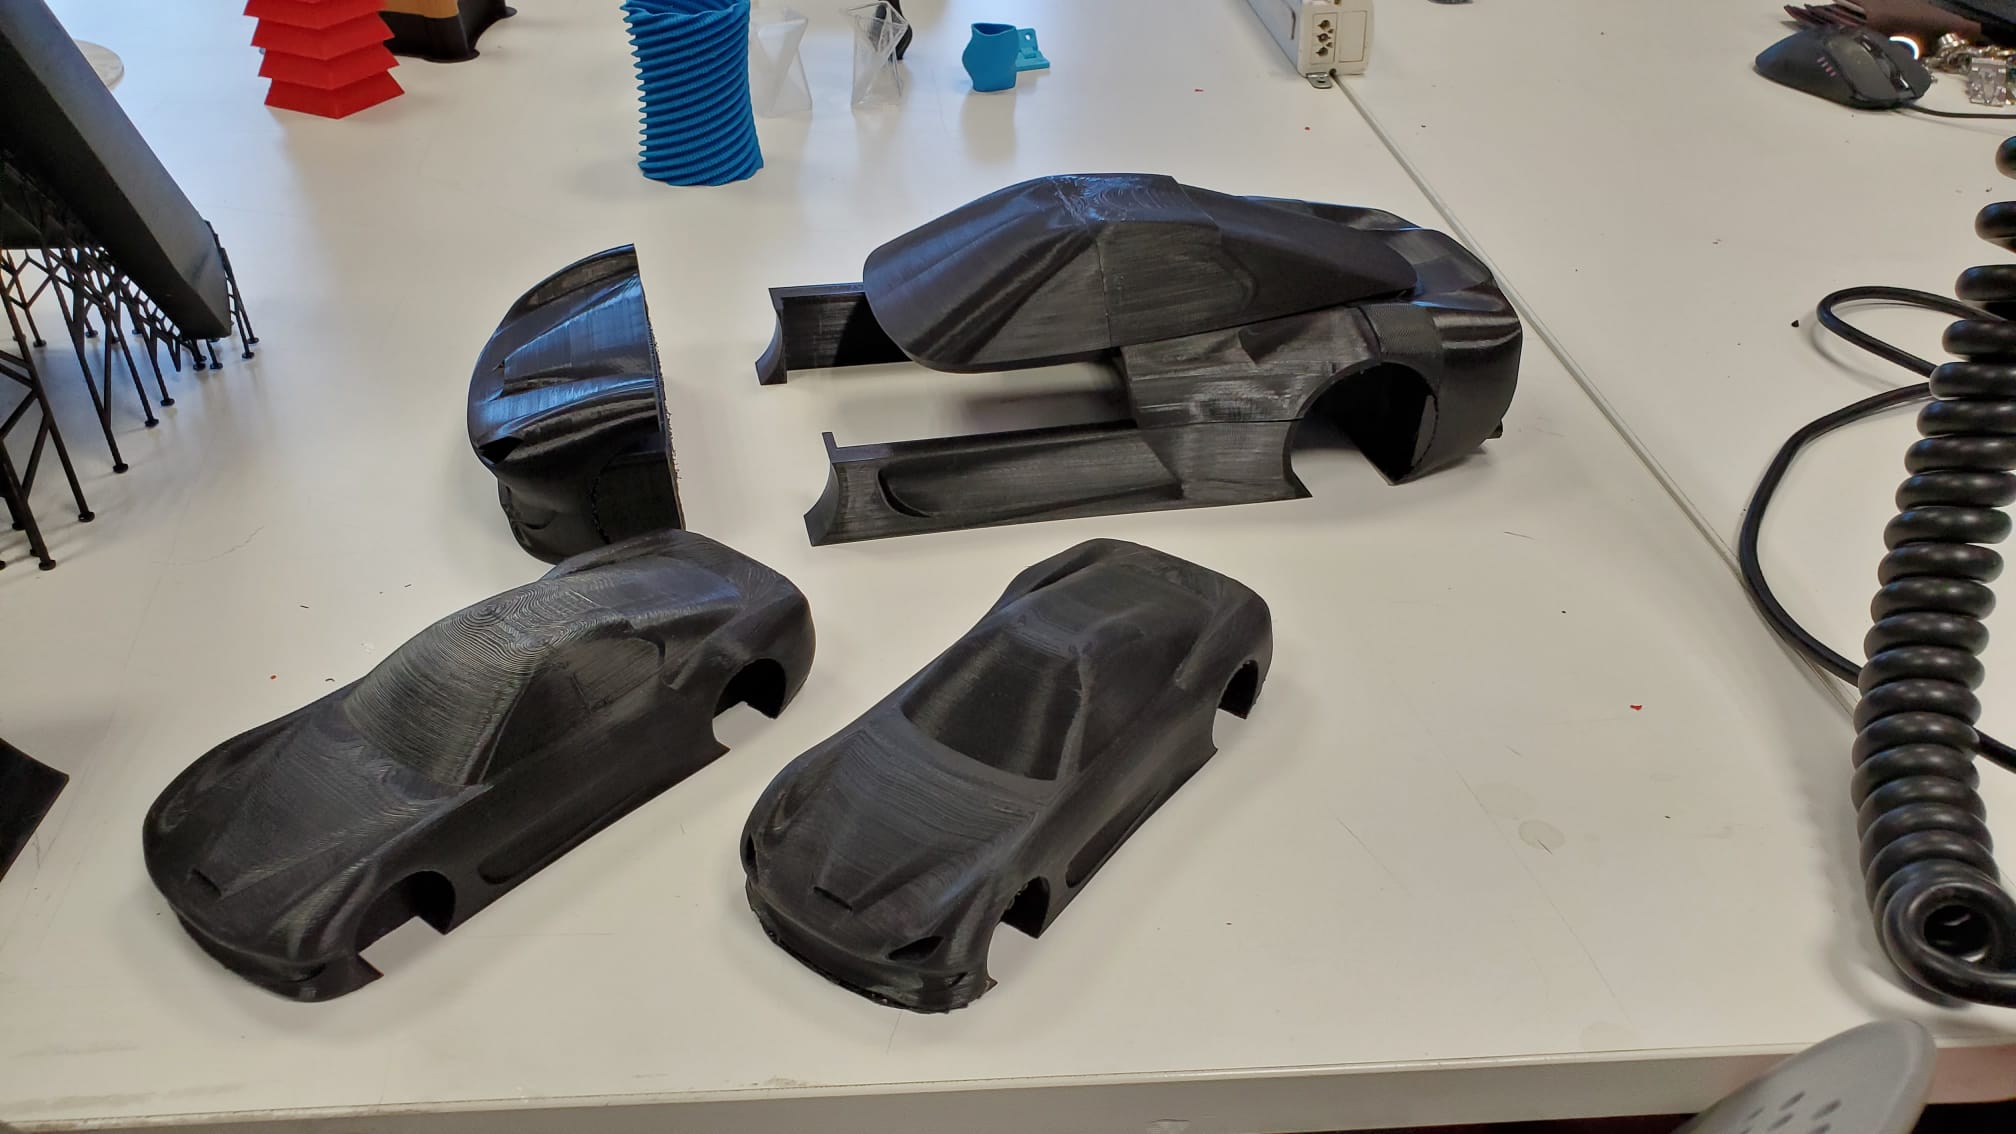
The small cars are 1:24 scale, and the big model is 1:12
You can get the original file for the RFID code HERE.
You can get the original file for the SCREEN code HERE.
As the STLs for every singke part are too big for them to fit in the repo (almost all of them are over 20 Mb), I'm storing them in my skecthfab account
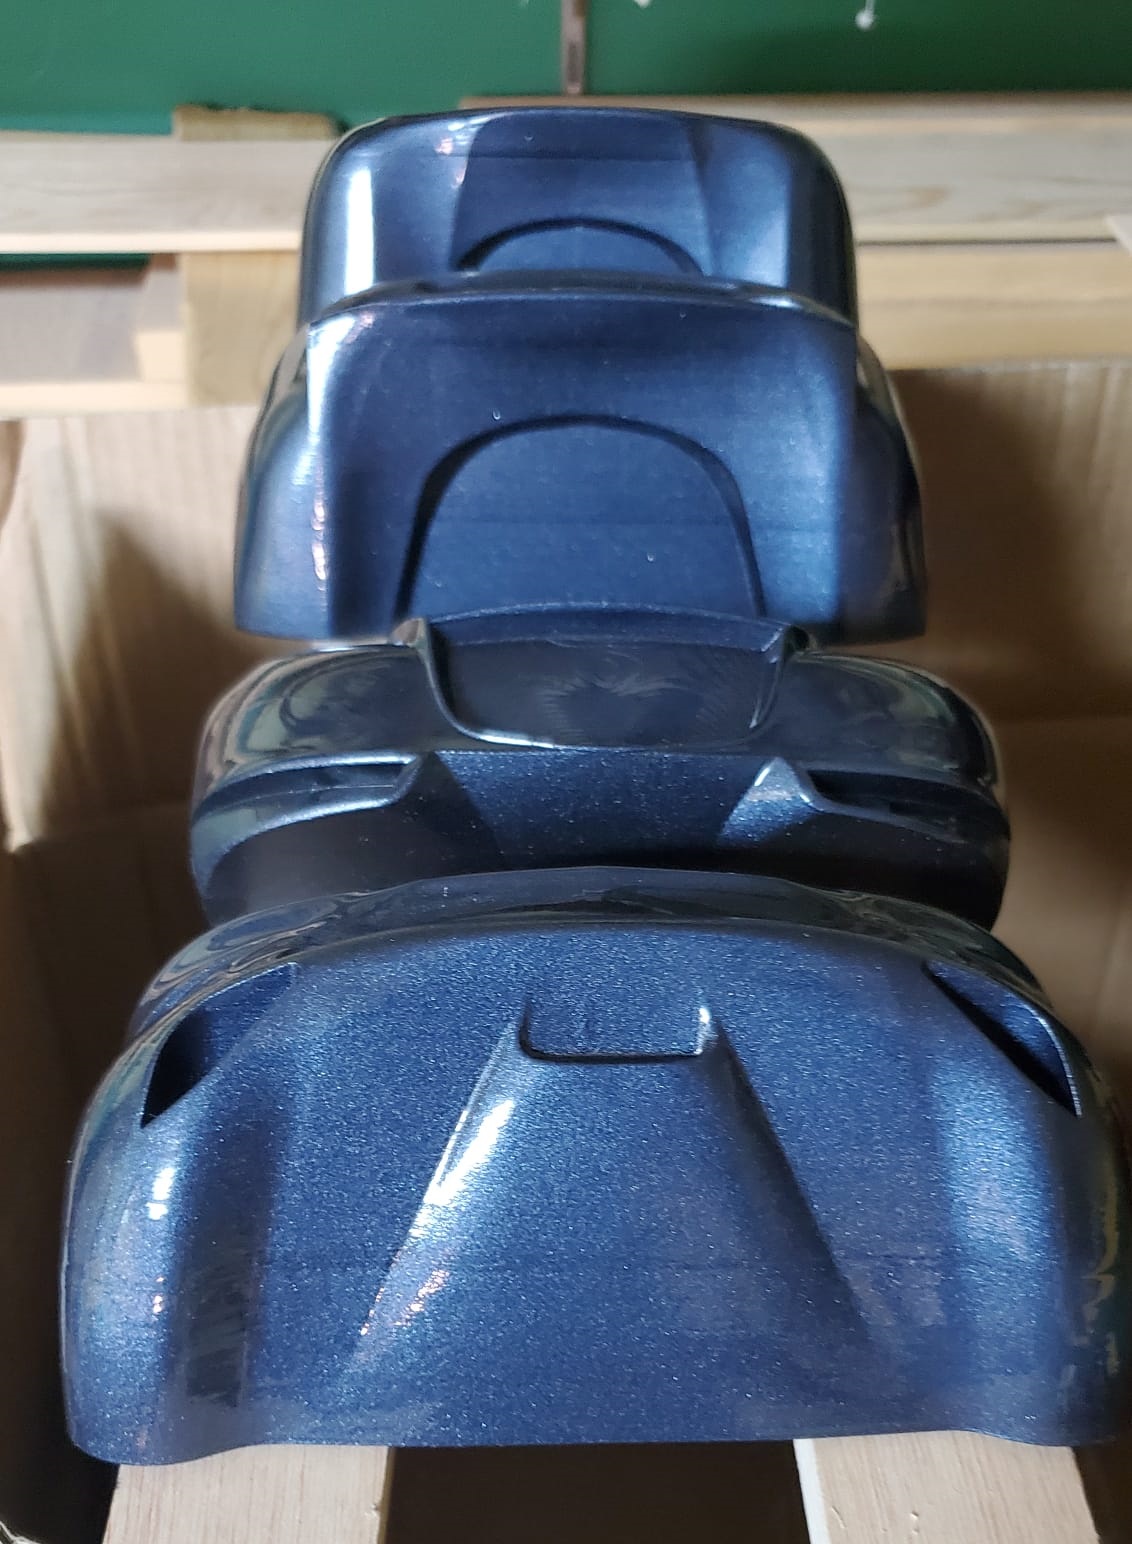
Chapter eight: bodywork and paintwork
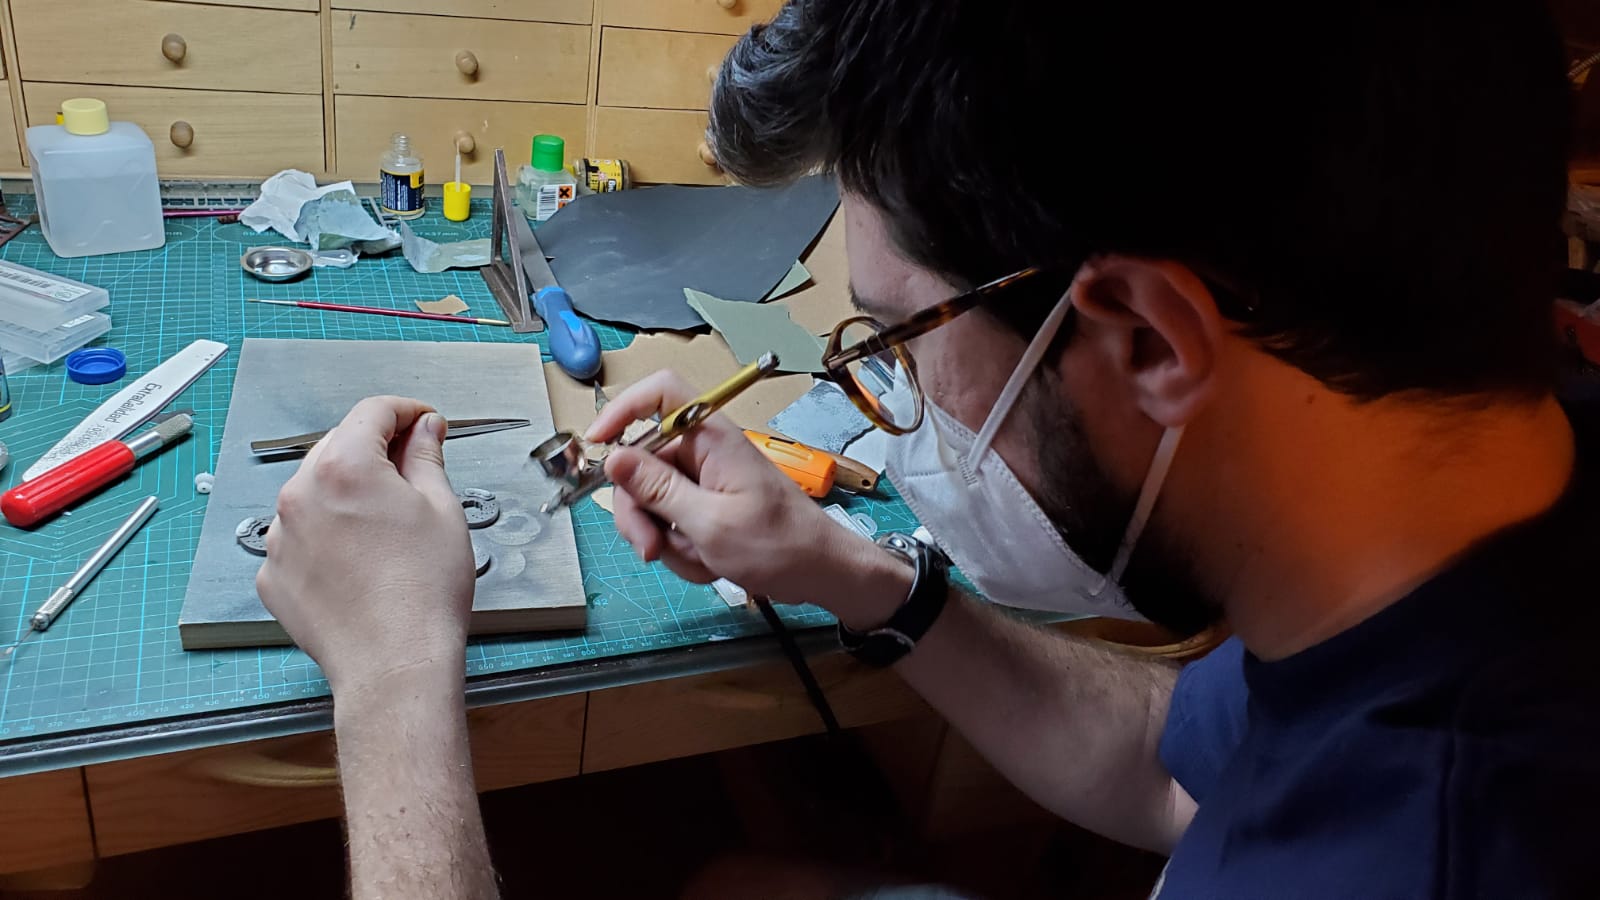
Once the parts were fabricated, it was time to test fit them and start the finishing
My uncle, Rafael Domingo, who has been painting planes, tanks and boats models for years, was the one who taught me everything I know about finishing a plastic part, so it made all the sense in the world that for this particular phase of the project, I moved to his workshop to work on the wow effect
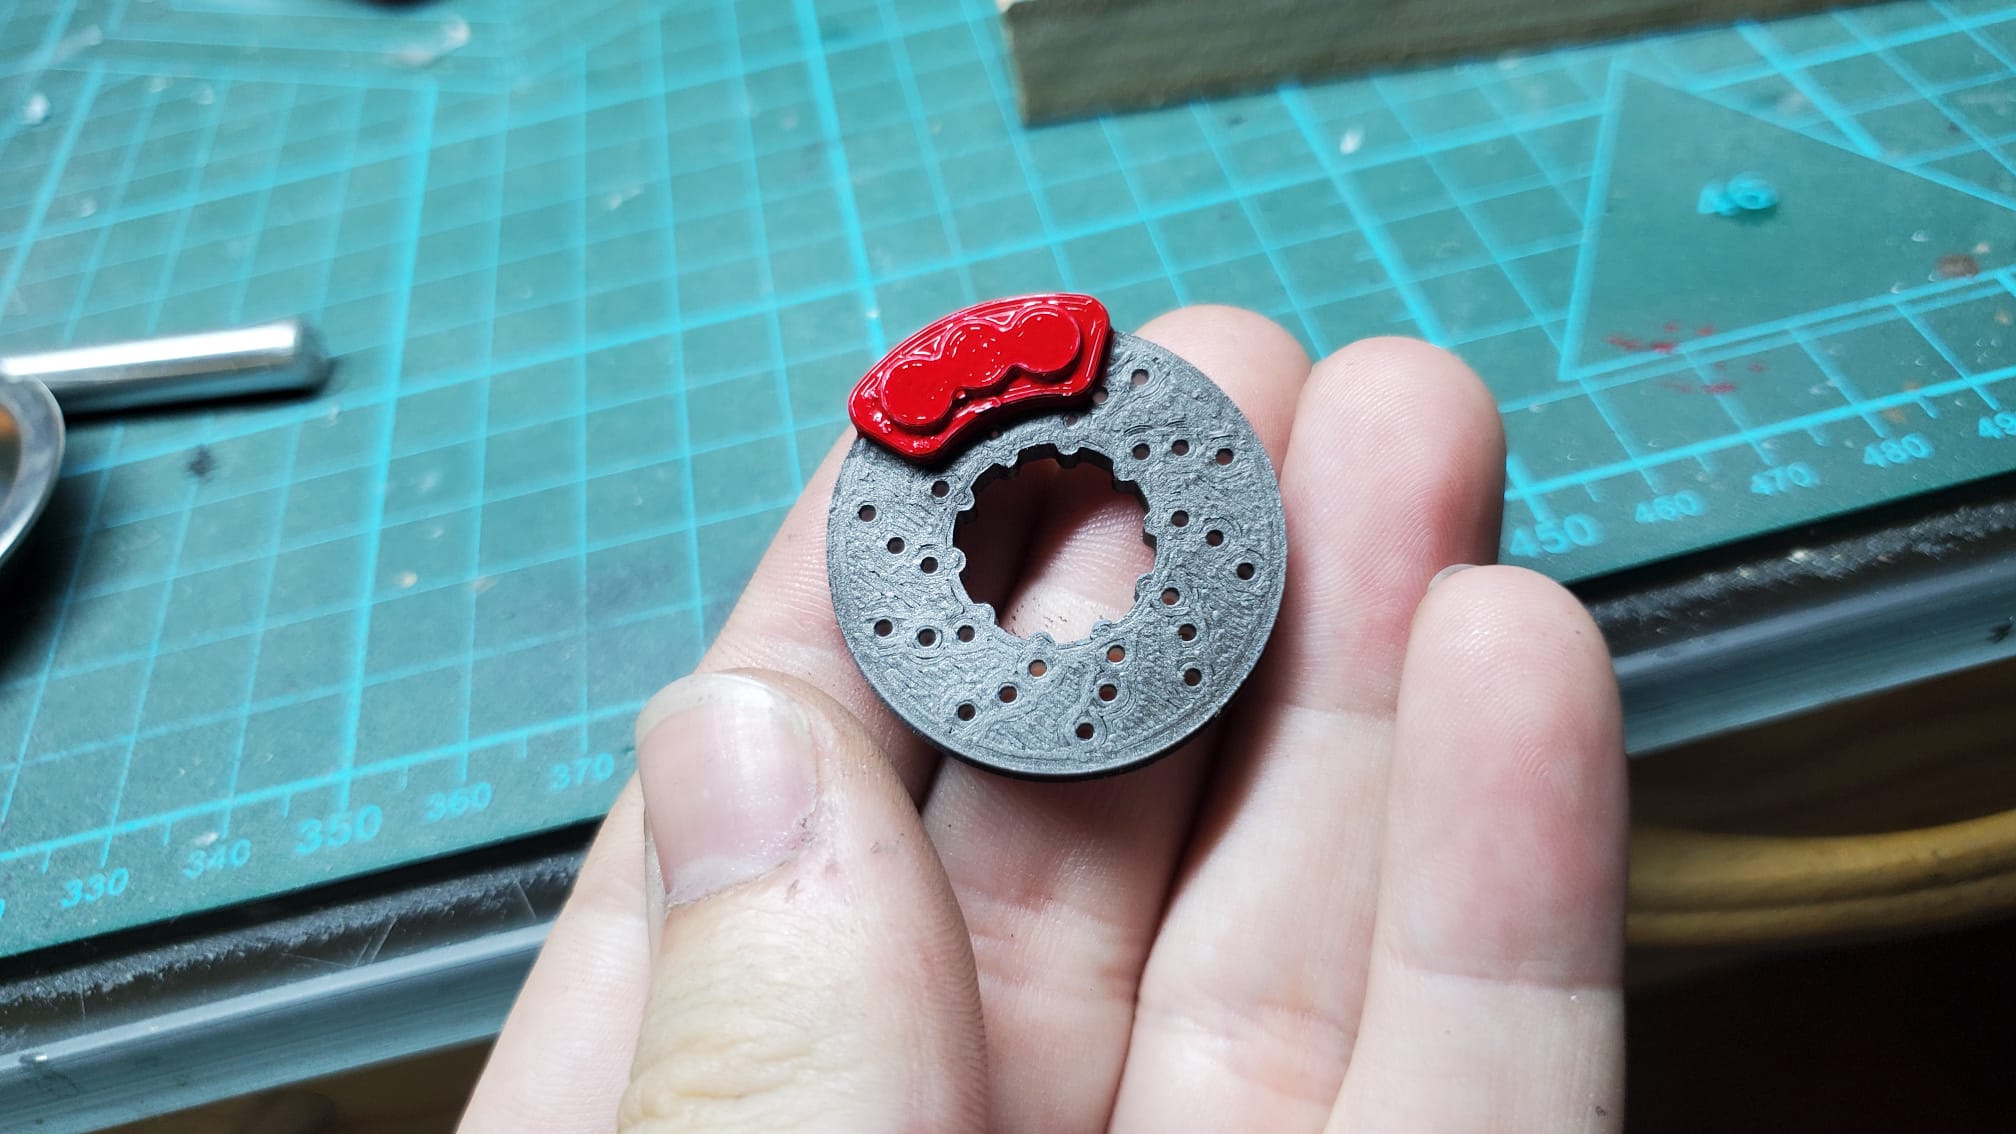
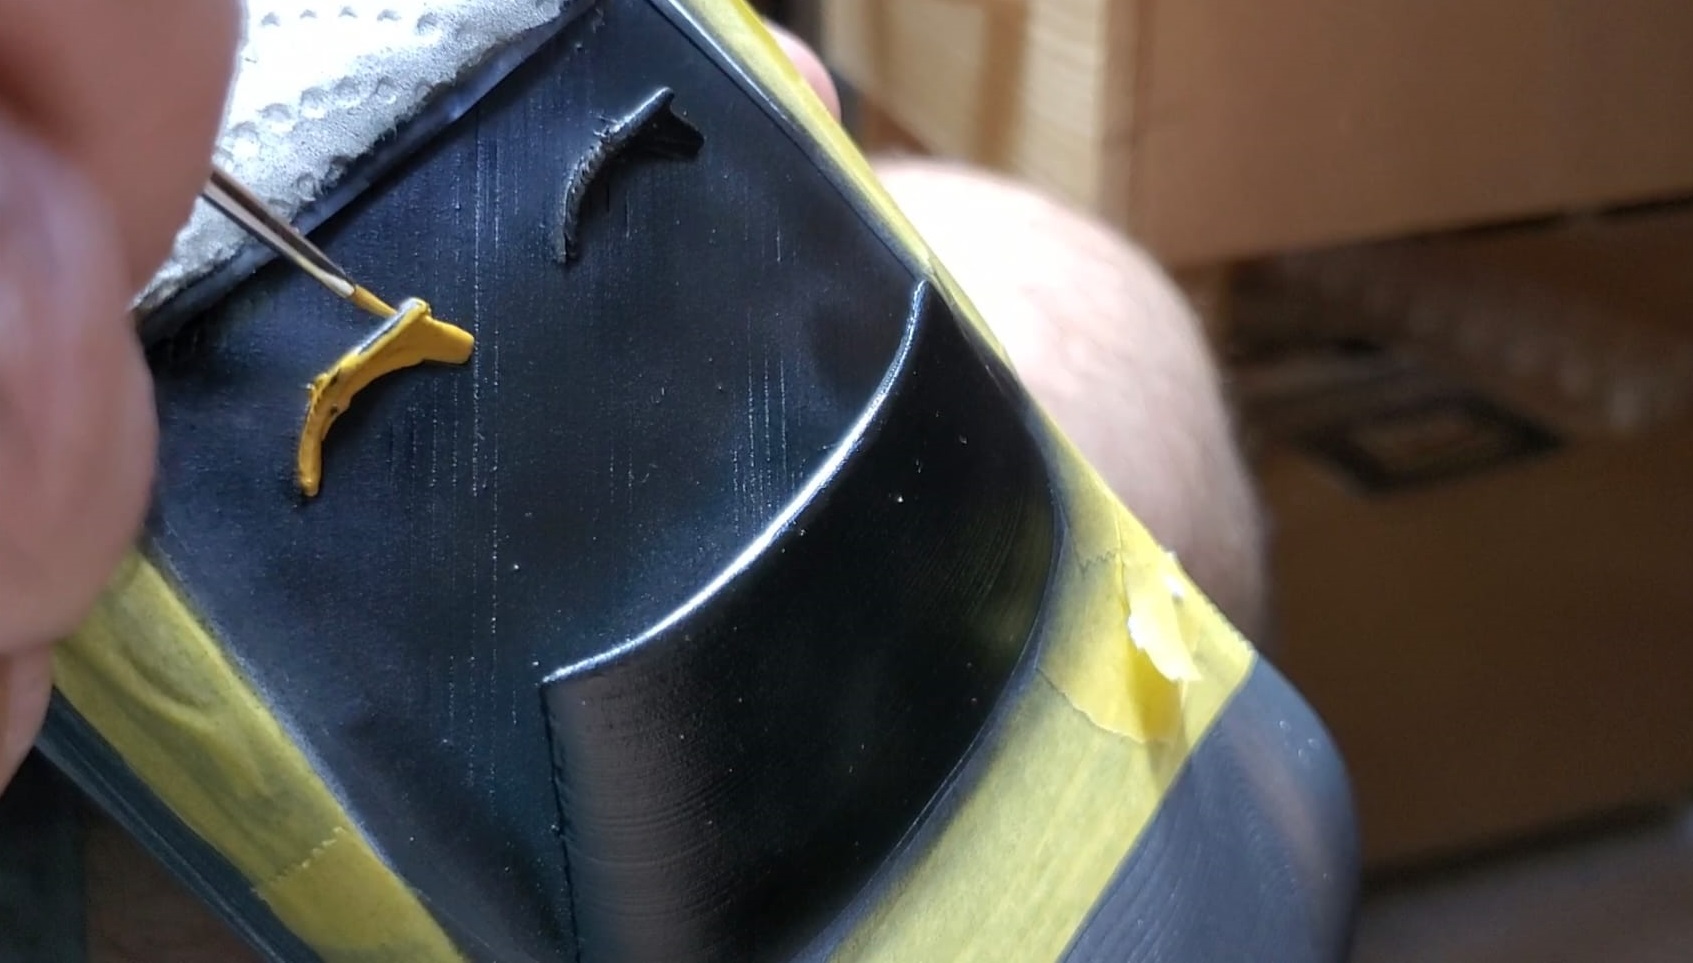
We placed the magnets in the parts for them to fit between each others (functionality can be seen in the video of the final project)
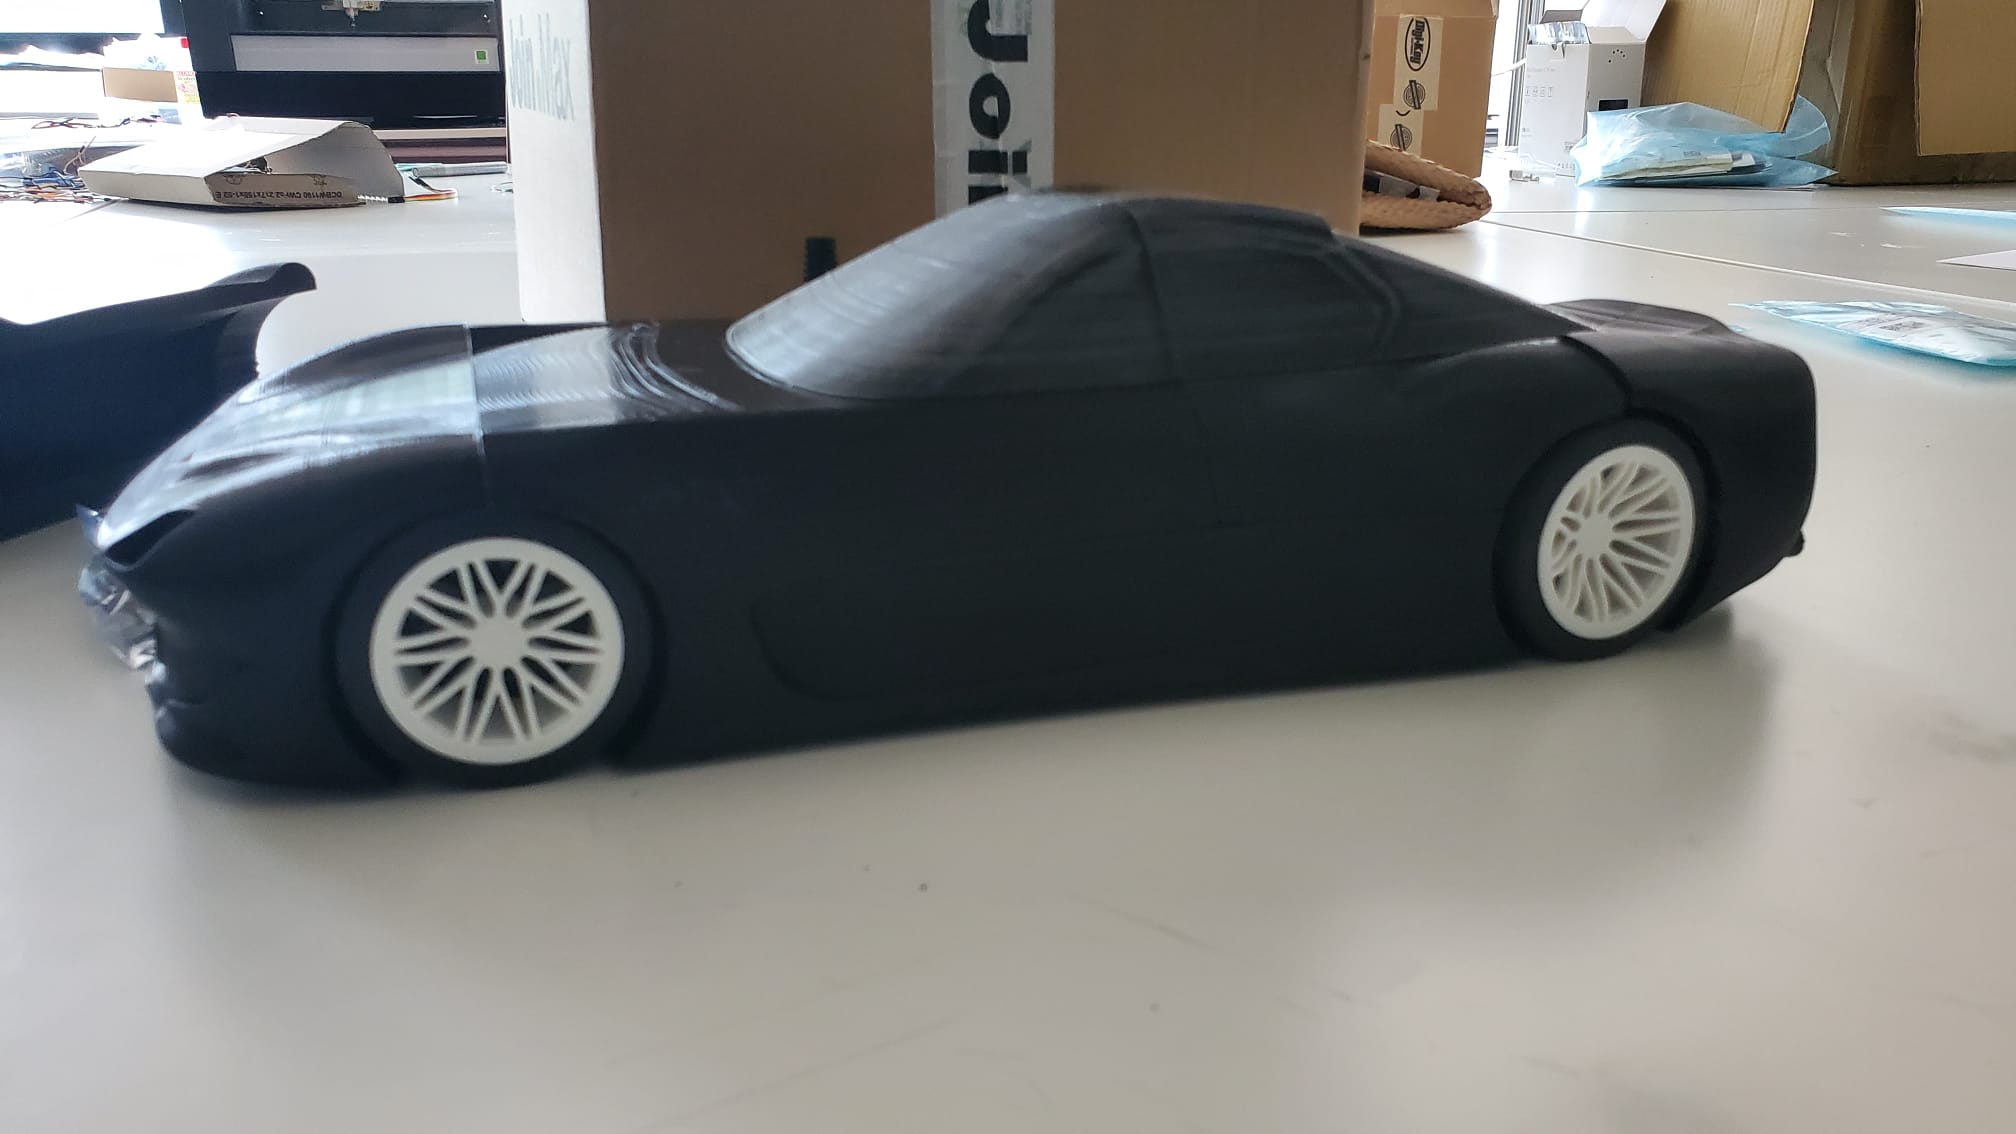
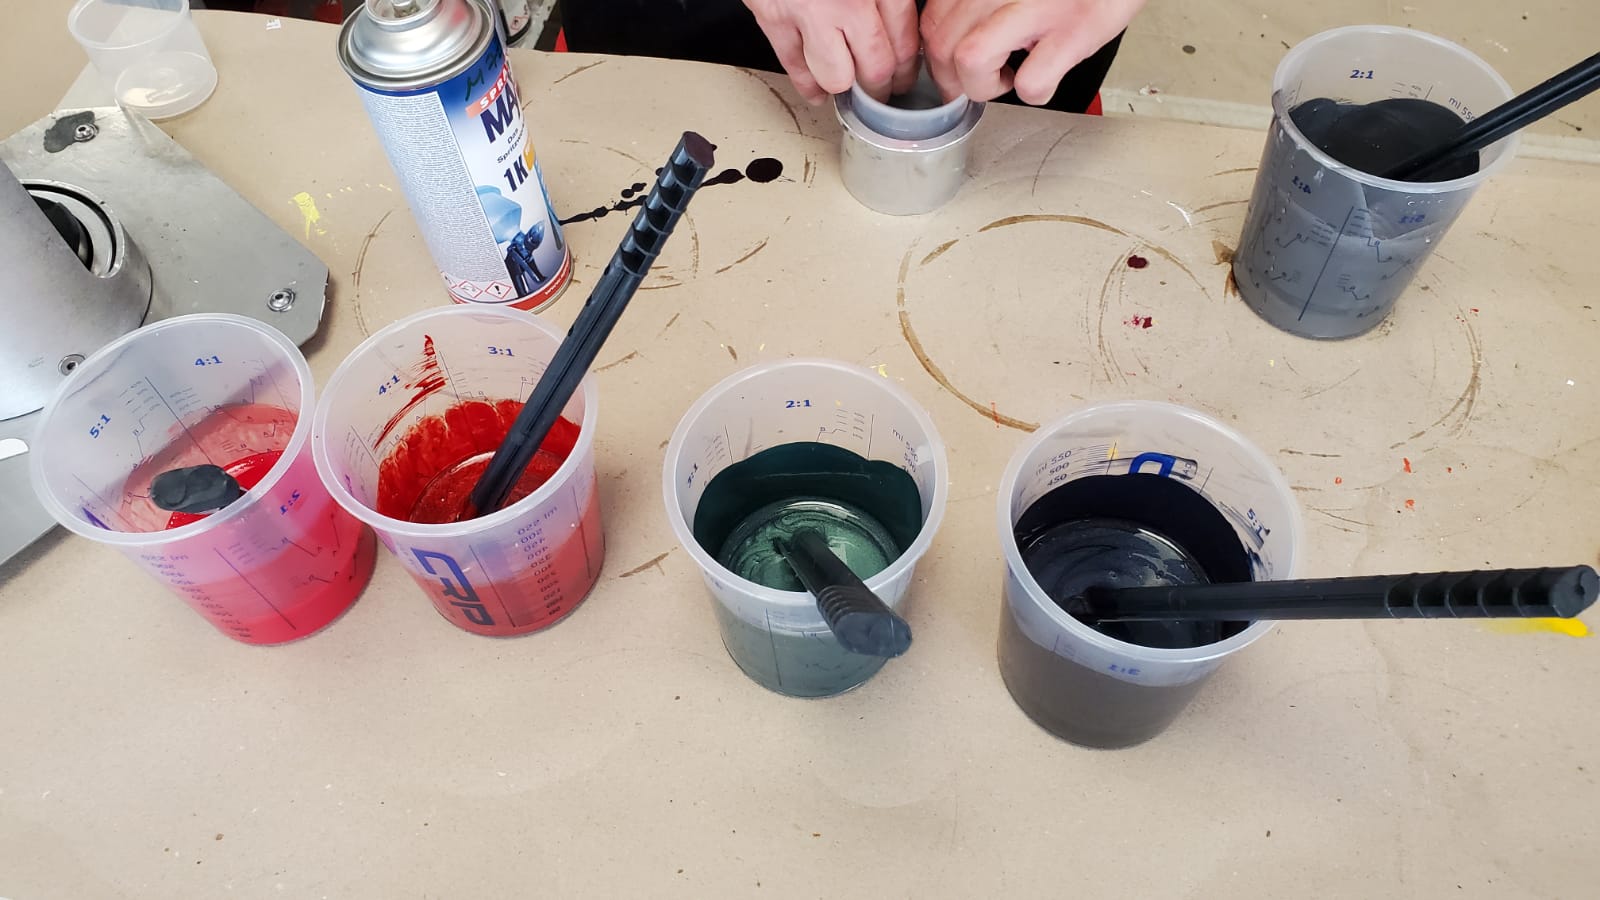
In order to create that wow effect, though, many hours of sanding and painting were required
The body colors were specifically made to order to us by Cepisa, a local shop specialized in paint. They are Ferrari, Aston Martin and Porsche multi-coat paints, and we used the real deal. These are automotive grade paint sprays that workshops use for small paint corrections.
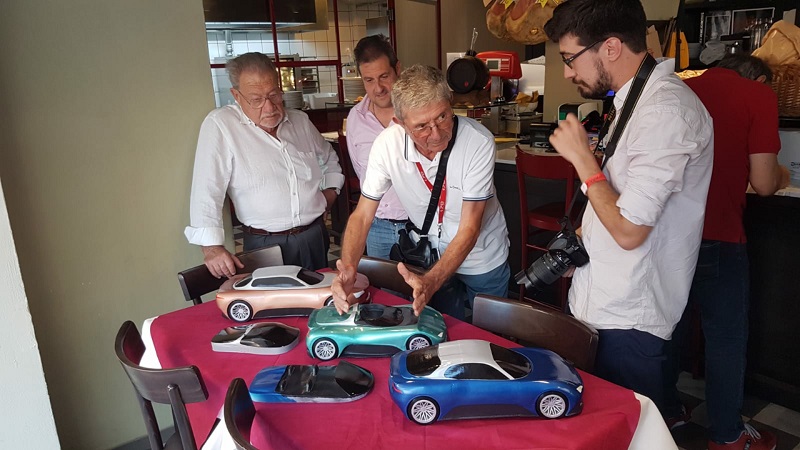
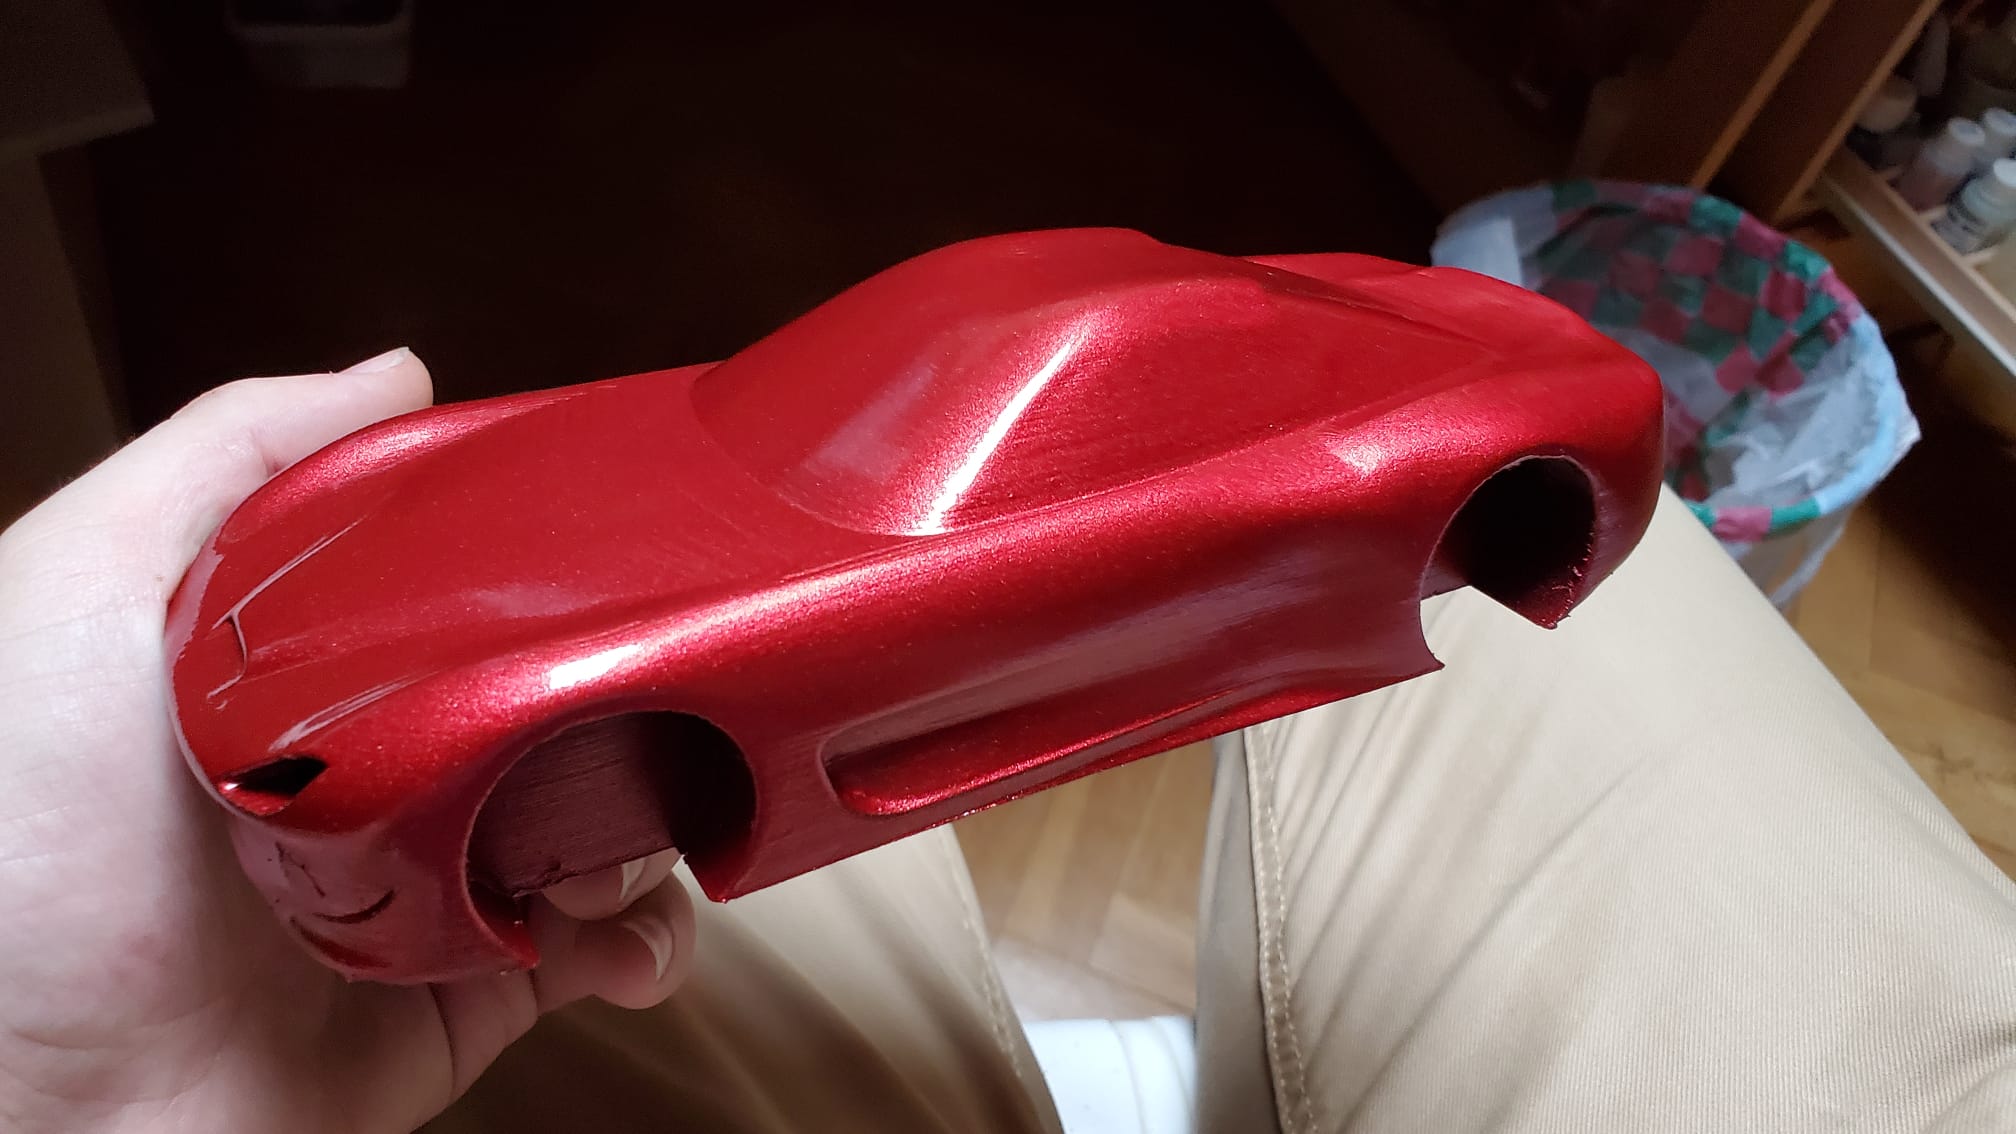
For the 1:12 scaled car, we took care of every single detail
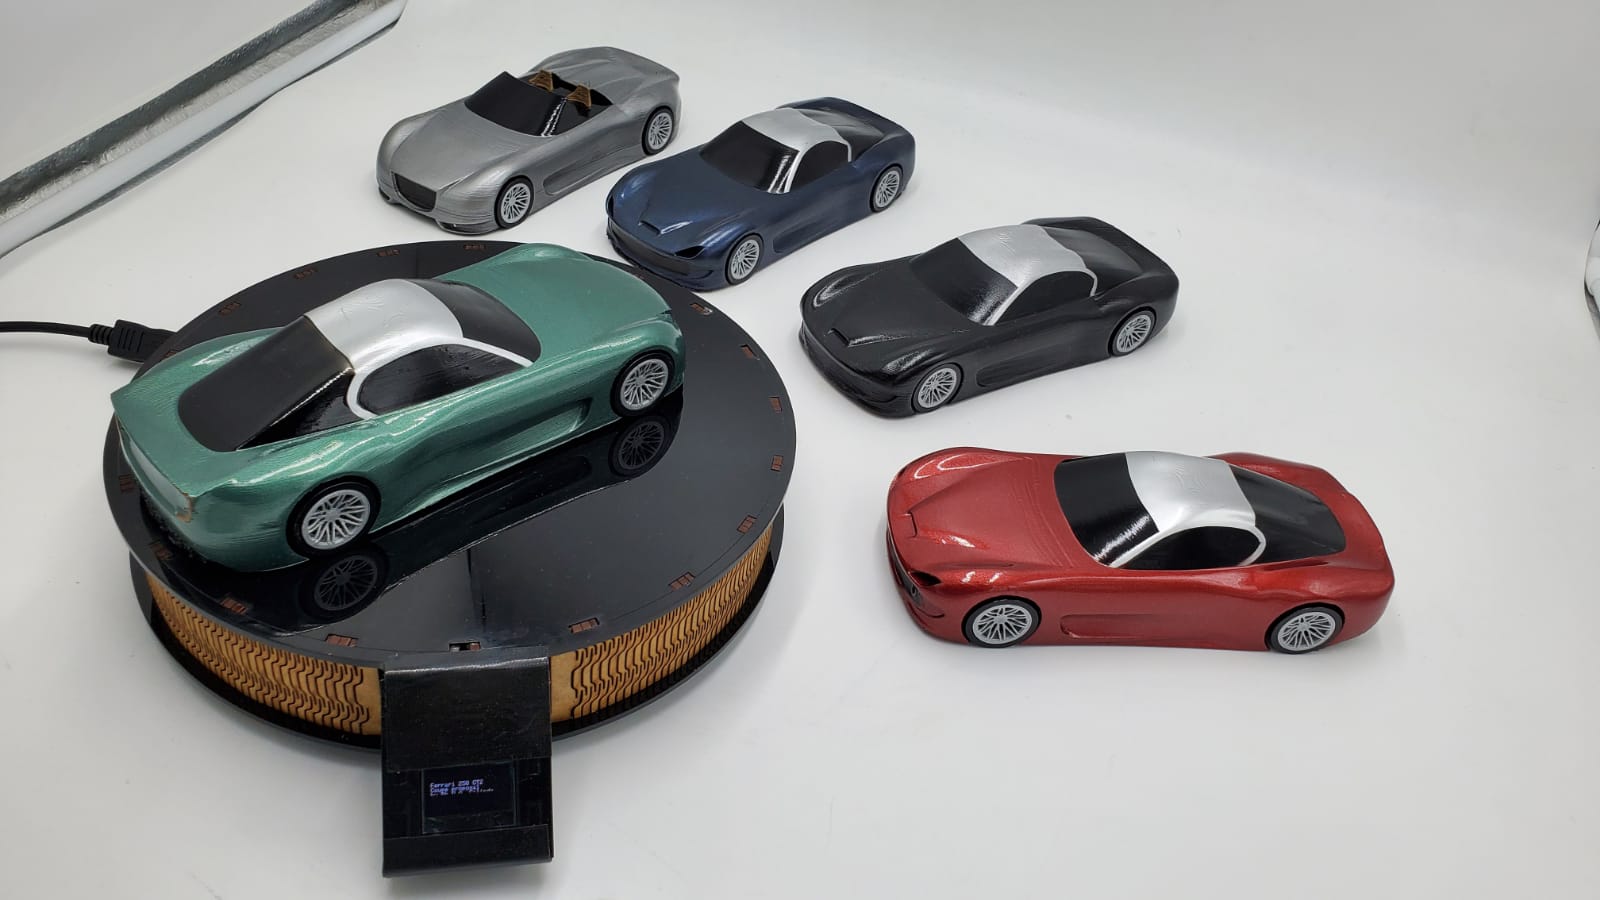
It's amazing how 3D printed models can look with a little bit of care and 200 euros worth of paint...
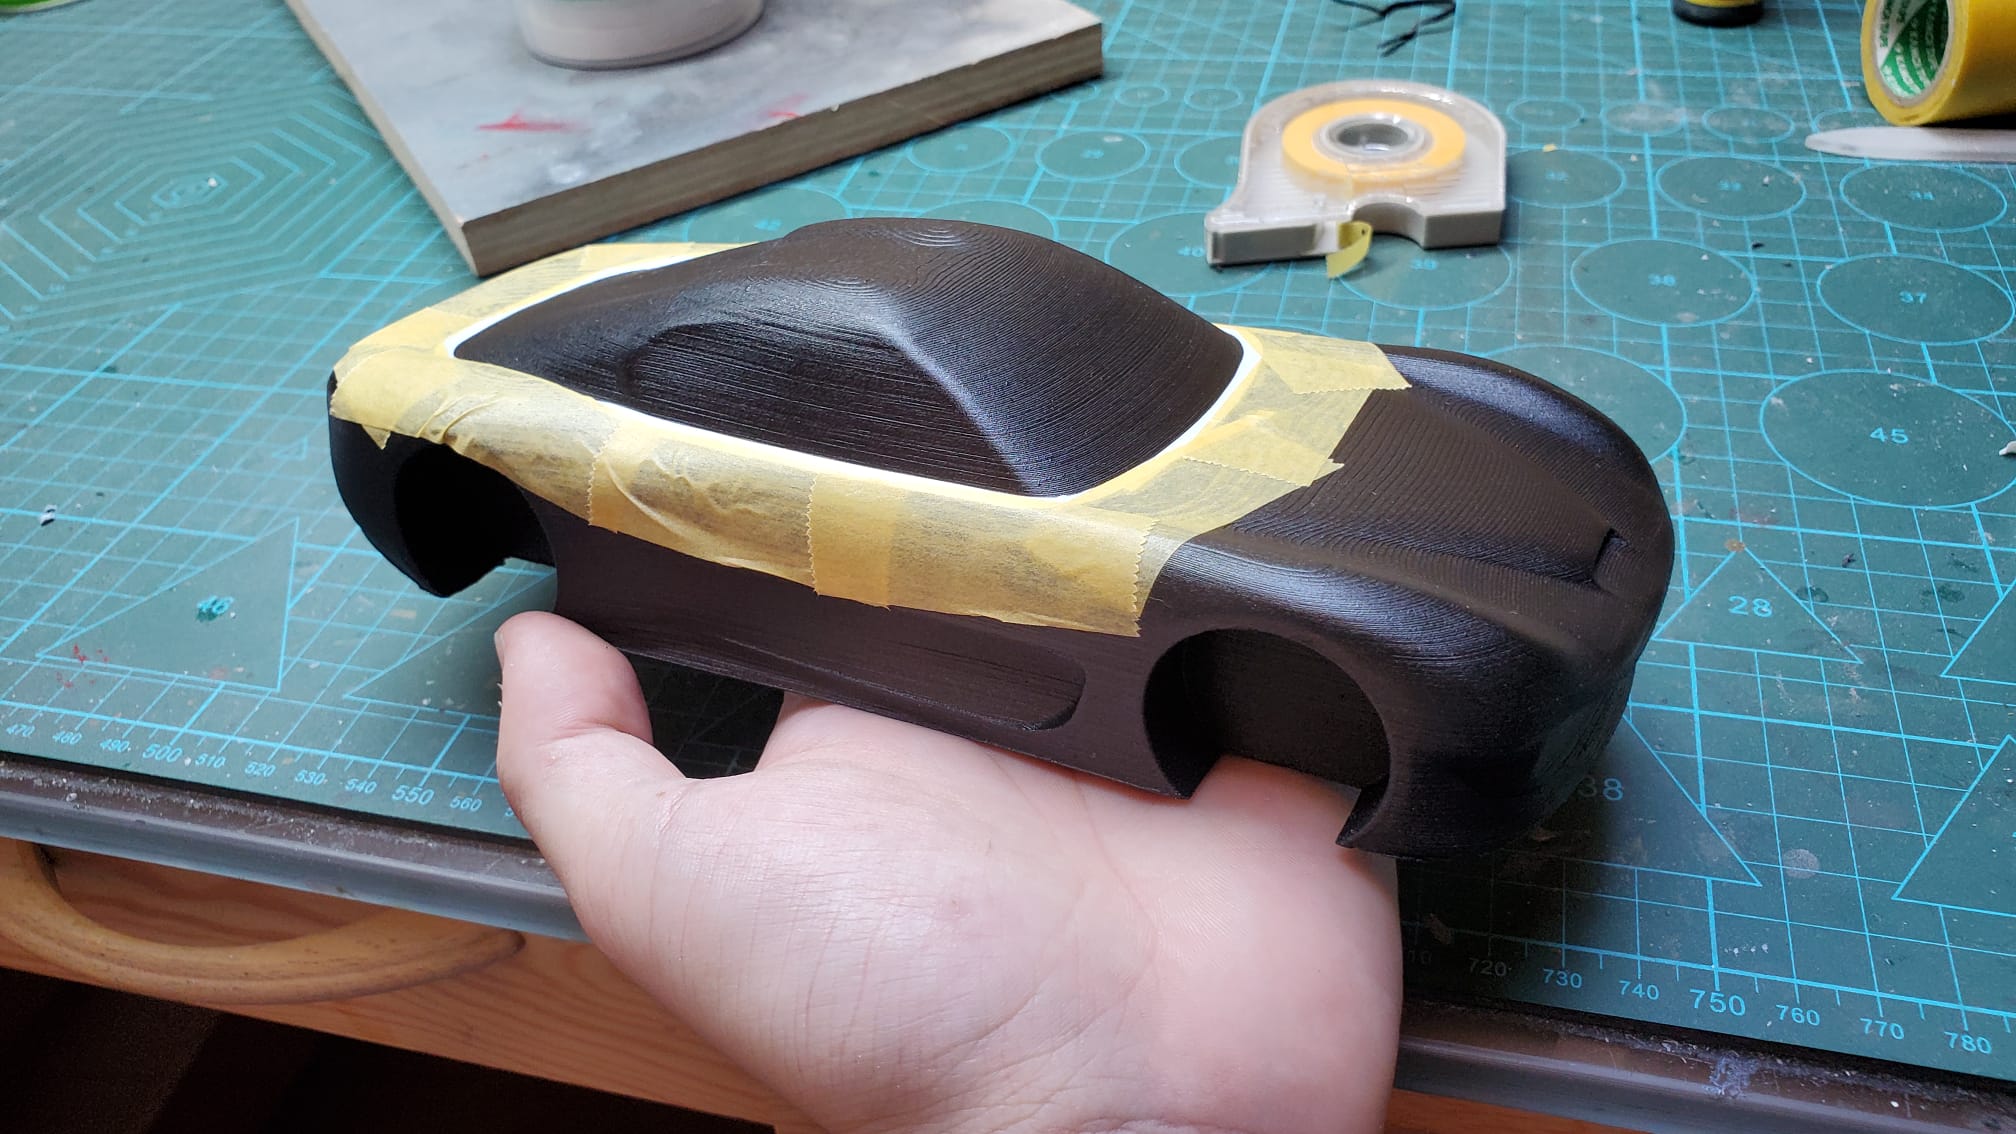
The roof of the cars was painted in a different color, so the main body had to be masked
The parts were ready to be assembled, and so the completion began
Some final details, and the cars were ready to be presented
Chapter nine: a chassis to rule them all
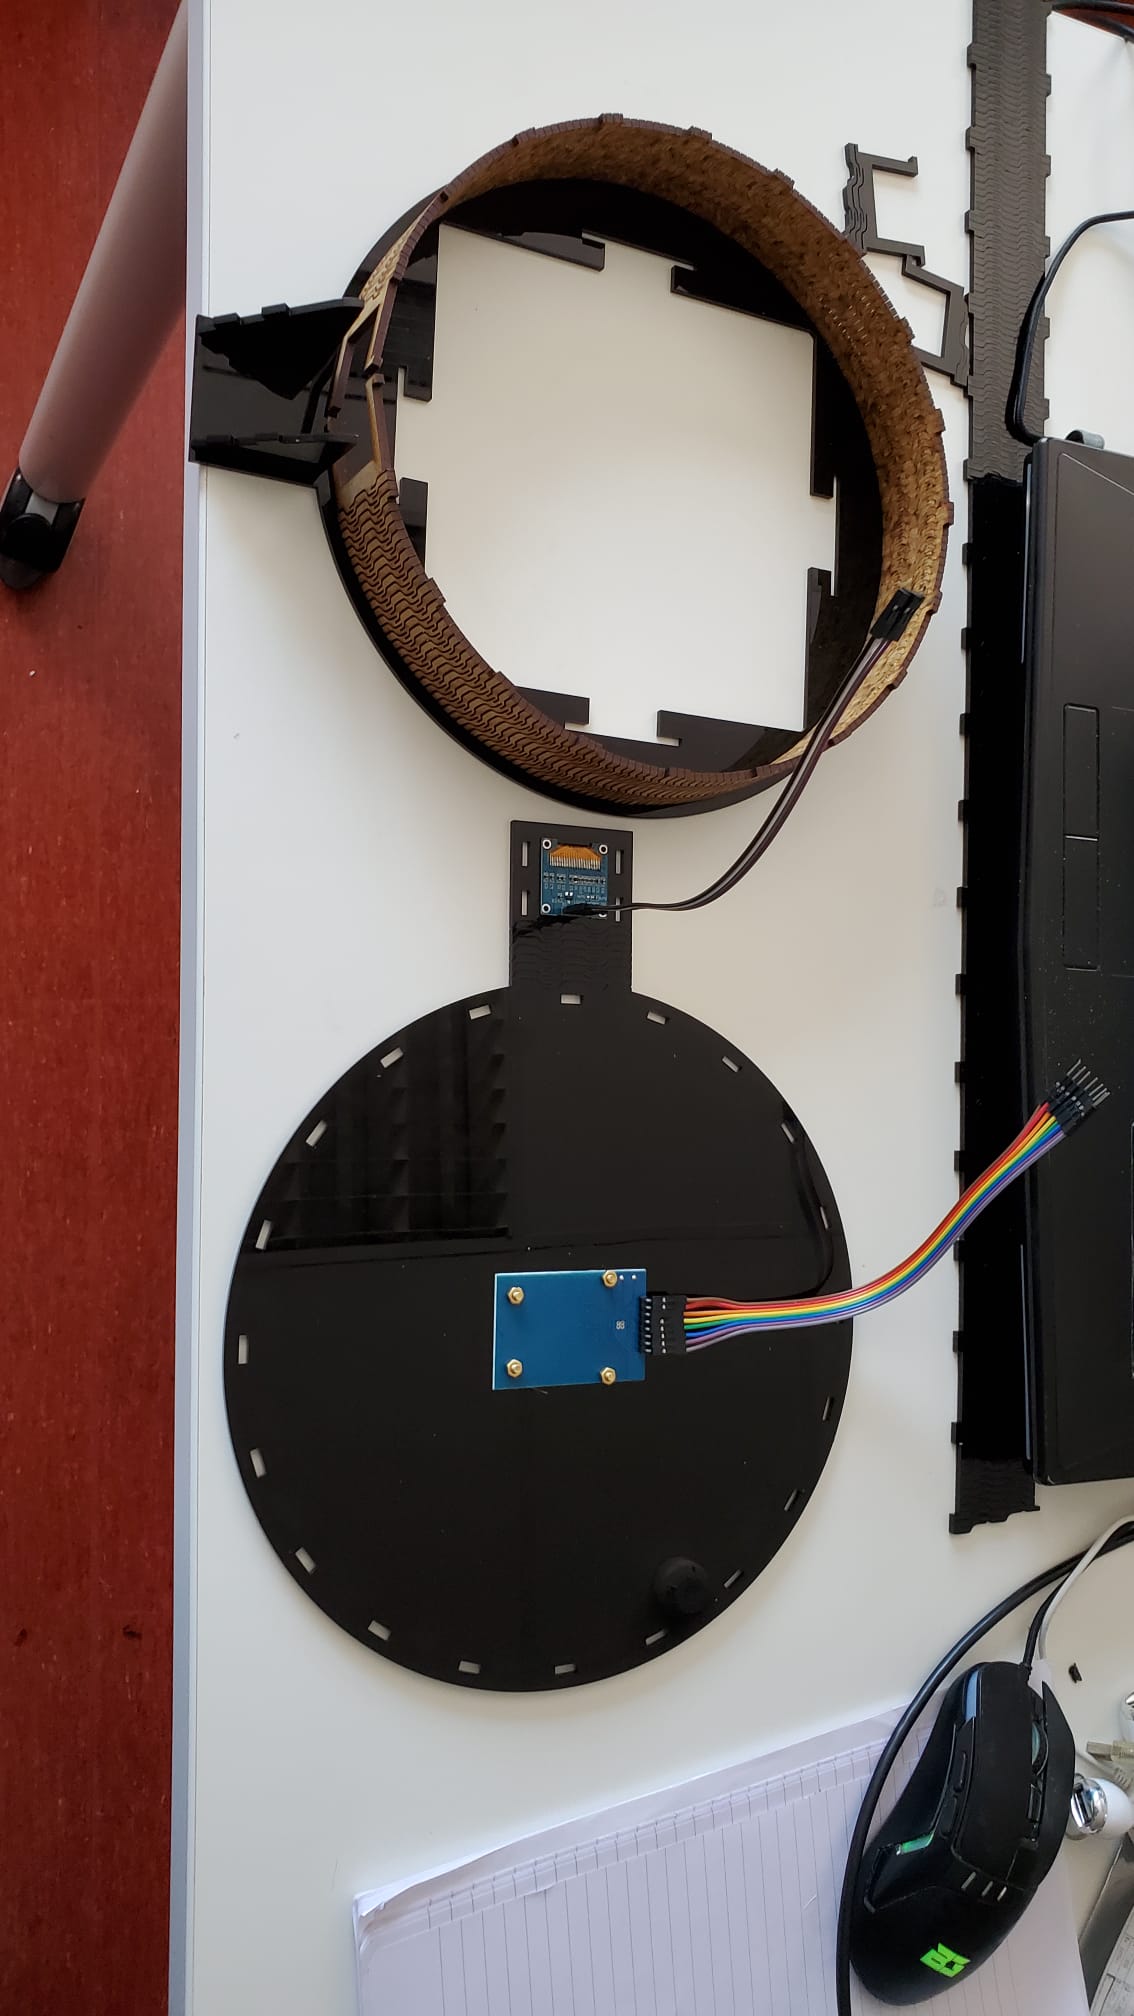
In order to create the chassis and the circular base to accomodate the electronics, AutoCAD was used.
You can get the original file for the base for the 1:24 scale models HERE.
You can get the original file for the base for the 1:12 scale models HERE.
Note: The base shown in the image above is not the completed one. The file that is ready for the download is the multi-level part, so the cables are properly organised. You can see the assembly of the electronics in the final video.
You can get the Eagle Schematic file for the board HERE.
You can get the Eagle Board file for the board HERE.
Chapter ten: everything works
SPIRAL ONE: SMALL MODELS AND BASE
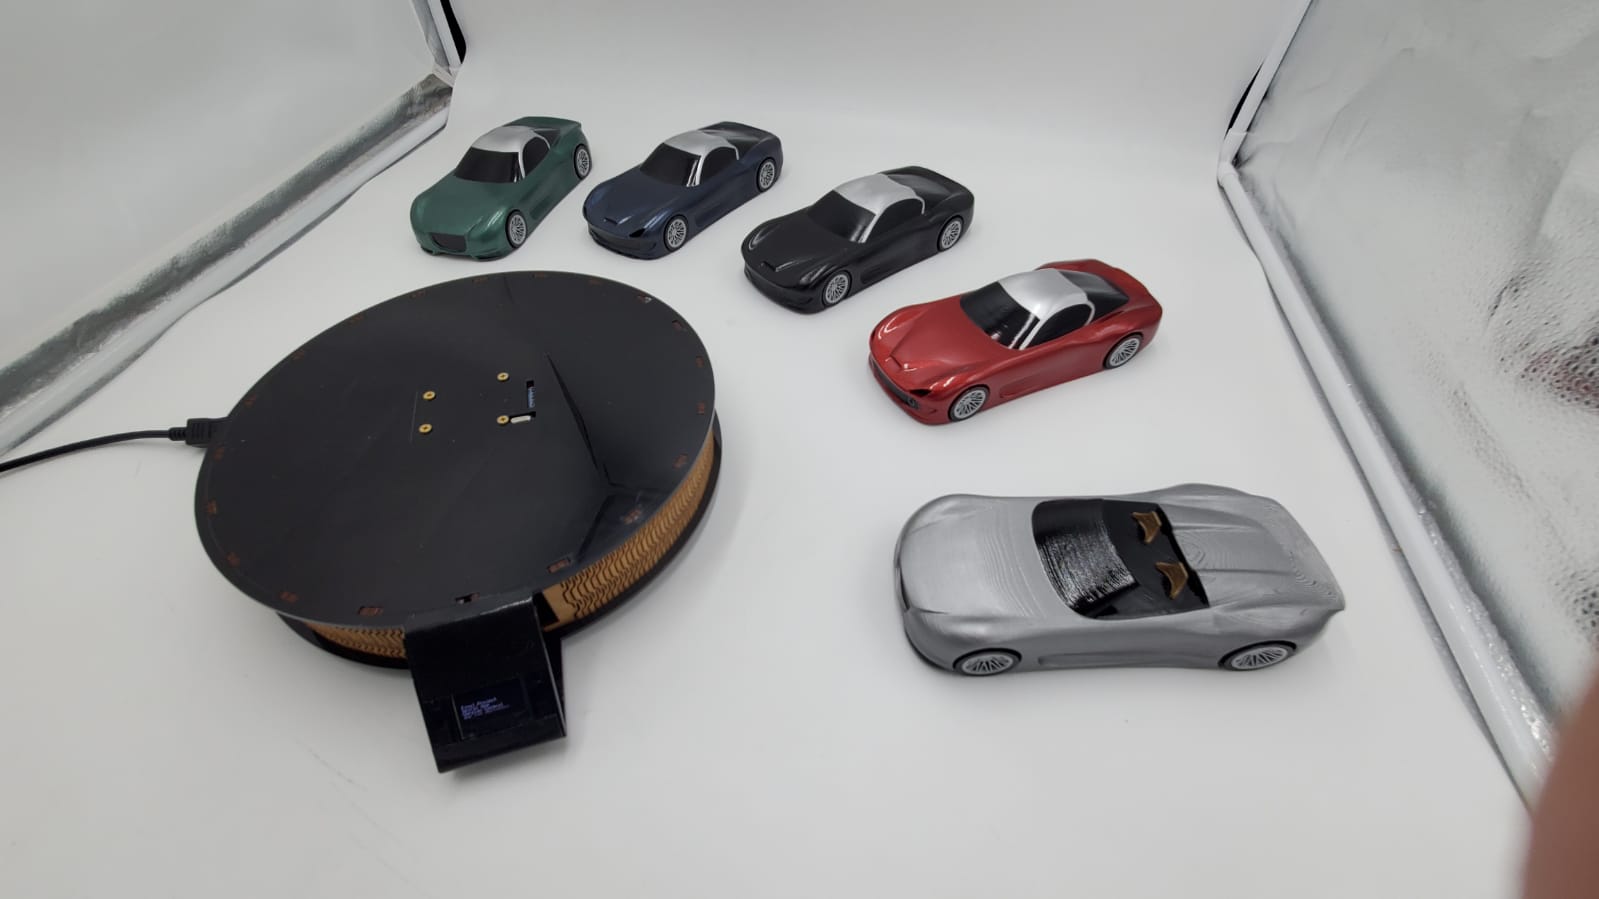
When a car is placed on the base, the base (that gets the power via USB with a FTDI cable, but can be powered with a battery as well) shows the information related to the model
SPIRAL TWO: BIG MODELS WITH SCREENS
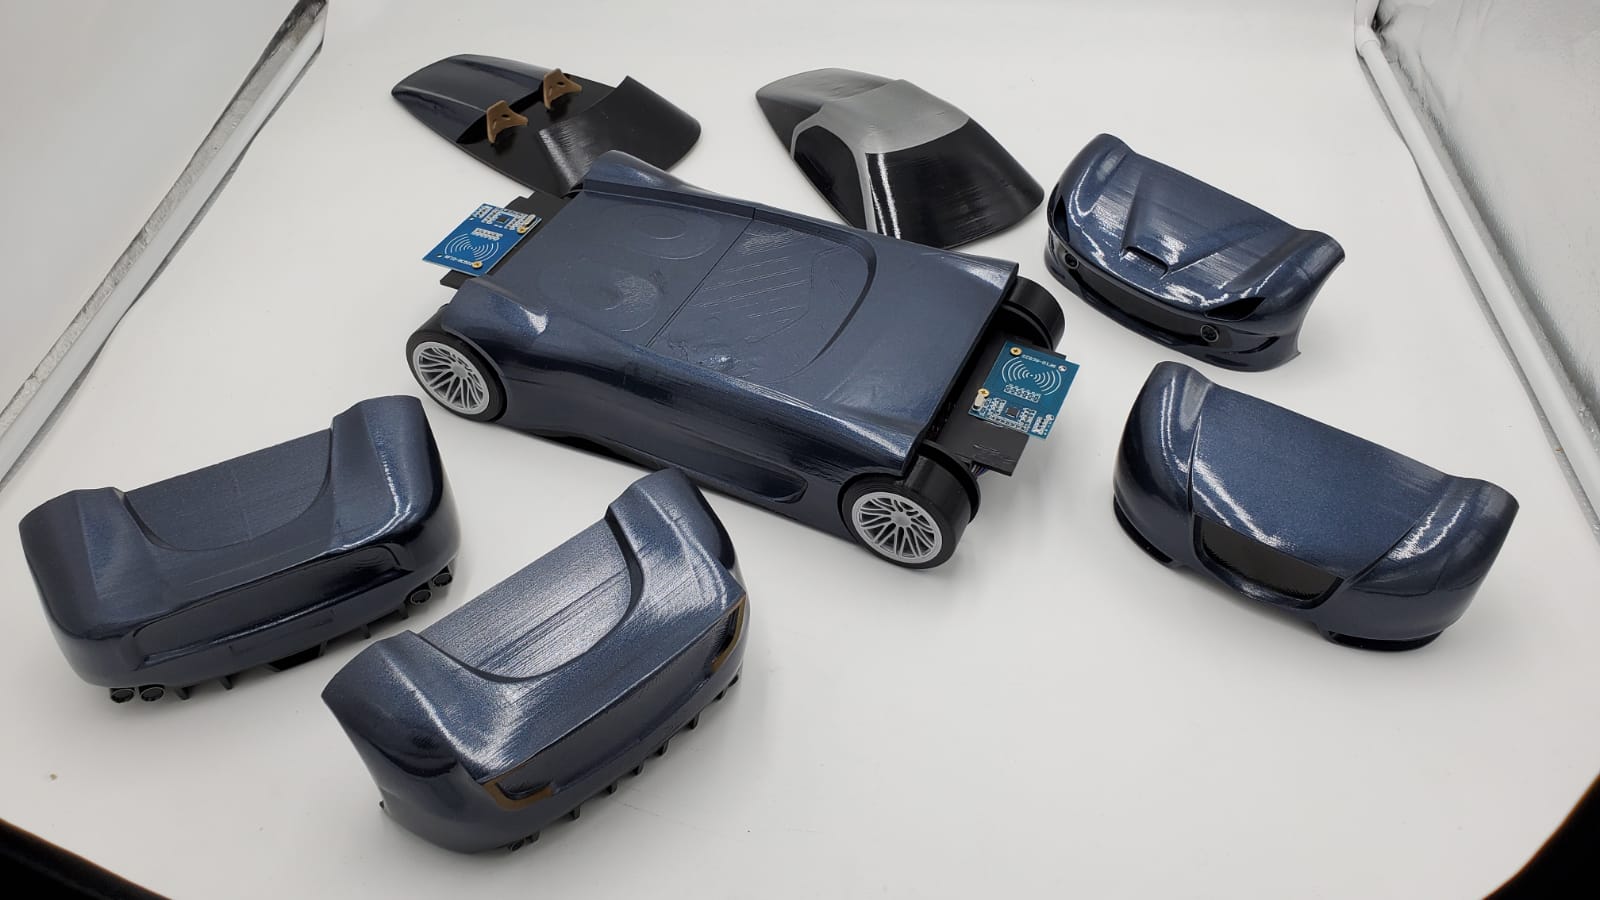
When the part is placed in the body (fixes itself with the magnets) the RFID reads the information stored in a sticker glued to the part, and it reads the card number, therefore shows the information in its relative screen

The models are displayed now in FabLabUE in our permanent exhibit.
Chapter eleven: The slide
I created this slide in a very simple and clear way, to highlight the finishing of the models and the functionalities of the two versions.
Chapter twelve: the video
This video shows the models working, the steps we went through in order to create them.
Chapter twelve: Bill of materials
Spiral One: 1:24 cars and base |
Where to buy? | Amount | Price | Total price | |||||||||||||||||||||||||||||||||||||||||||||||||||||||||||||||||||||||||||
| PLA Plastic | Smartmaterials 3D | 2 rolls | 25,00 €/750g | 50,00 € | |||||||||||||||||||||||||||||||||||||||||||||||||||||||||||||||||||||||||||
| Black Acrylic 3mm | Locally (CEPLASA) | 1 (800 x 450mm) | 20,00 €/unit | 20,00 € | |||||||||||||||||||||||||||||||||||||||||||||||||||||||||||||||||||||||||||
| AtTiny1614 | DigiKey | 2 | 1,00 €/unit | 2,00 € | |||||||||||||||||||||||||||||||||||||||||||||||||||||||||||||||||||||||||||
| Copper boards | Digikey (FabLab Inventory) | 1 unit | 2,00 €/unit | 2,00 € | |||||||||||||||||||||||||||||||||||||||||||||||||||||||||||||||||||||||||||
| OLED Screens | AZ Delivery | 1 unit | 4,00 €/unit | 4,00 € | |||||||||||||||||||||||||||||||||||||||||||||||||||||||||||||||||||||||||||
| RFID Modules | AZ Delivery | 1 unit | 4,00 €/unit. | 4,00 € | |||||||||||||||||||||||||||||||||||||||||||||||||||||||||||||||||||||||||||
| Battery 9V | Amazon | 1 | 3,75 € | 3,75 € | |||||||||||||||||||||||||||||||||||||||||||||||||||||||||||||||||||||||||||
| Battery clip | Amazon | 1 | 4,50 €/2 units | 2,25 € | |||||||||||||||||||||||||||||||||||||||||||||||||||||||||||||||||||||||||||
| Resistors, connectors and LEDs | Digikey (FabLab Inventory) | 1 | 3,00 €/board | 3,00 € | |||||||||||||||||||||||||||||||||||||||||||||||||||||||||||||||||||||||||||
| Regulator | Digikey (FabLab Inventory) | 1 | 1,00 €/unit | 1,00 € | |||||||||||||||||||||||||||||||||||||||||||||||||||||||||||||||||||||||||||
| Automotive grade paint and varnish | Locally (CEPISA) | Different colors | 20 €/can | 120 € | |||||||||||||||||||||||||||||||||||||||||||||||||||||||||||||||||||||||||||
| Others (wood glue, tape, soldering tin, DuPont cables…) | - | - | - | 10,00 € | |||||||||||||||||||||||||||||||||||||||||||||||||||||||||||||||||||||||||||
| Total cost/Spiral One | 222 € |
Spiral Two: Interchangeable parts |
Where to buy? | Amount | Price | Total price |
| PLA Plastic | Smartmaterials 3D | 3 rolls | 25,00 €/750g | 75,00 € |
| Black Acrylic 3mm | Locally (CEPLASA) | 1 (800 x 450mm) | 20,00 €/unit | 20,00 € |
| AtTiny1614 | DigiKey (FabLab Inventory) | 6 | 1,00 €/unit | 6,00 € |
| Copper boards | Digikey (FabLab Inventory) | 2 unit | 2,00 €/unit | 4,00 € |
| OLED Screens | AZ Delivery | 3 unit | 4,00 €/unit | 12,00 € |
| RFID Modules | AZ Delivery | 3 unit | 4,00 €/unit. | 12,00 € |
| Battery 9V | Amazon | 3 | 3,75 € | 11,25 € |
| Battery clip | Amazon | 3 | 4,50 €/2 units | 6,75 € |
| Magnets | Amazon | 1 | 7,00 €/kit | 7,00 € |
| Resistors, connectors and LEDs | Digikey (FabLab Inventory) | 3 | 3,00 €/board | 9,00 € |
| Regulator | Digikey (FabLab Inventory) | 3 | 1,00 €/unit | 3,00 € |
| Automotive grade paint and varnish | Locally (CEPISA) | Different colors | 20 €/can | 80 € |
| Others (wood glue, tape, soldering tin, DuPont cables…) | - | - | - | 10,00 € |
| Total cost/Spiral Two | 256 € |