WEEK11 Input Devices
Group Assignment
probe an input device's analog levels and digital signals
Individual Assignment
measure something: add a sensor to a microcontroller board that you have designed and read it
My Idea
While being busy by big group project (machine building), it's already week 11!
Now it's time to start thinking more about my final project...
Since my project is automatic sake pouring machine, I need to measure the remaining amount of liquid(sake) in the cup.
There are several possible ways to do so such as load cell, sonar sensor and step response.
I consult with my instructors and I decided to try load cell sensor this time.
Purchasing the load cell sensor
I could get the load cell sensor of 5kg for about ten dollars from Amazon.It came with the board HX711.The size of module was 80 x 12.7 x 12.7mm/3.1 x 0.5 x 0.5in
Ref: 5KGロードセル重量センサー+ HX711コンバーターブレイクアウトモジュール
Learning about HX711
Then I researched about it with the help of my instructors. Many examples are shared…
Ref: How STRAIN GAUGE Works | Precision SCALE With Arduino
Ref: Load Cell Amplifier HX711 Breakout Hookup Guide
Ref: 重さを測る その2 0.01gが測れるロードセル
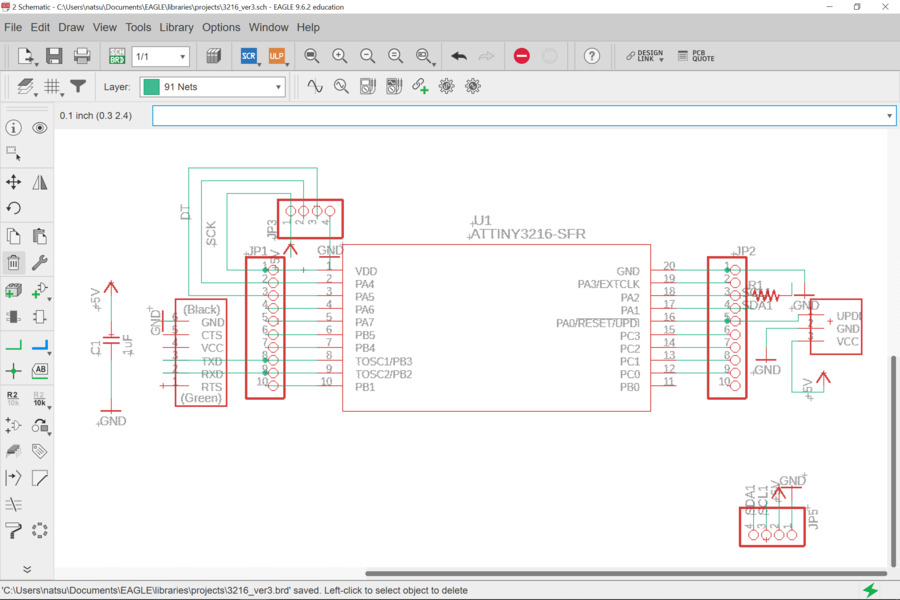
Designing the board on EAGLE
For the board I decided to connect HX711 with ATtiny3216 board which has many pins, because I wanted to add OLED besides HX711On the pre session, I have already made ATtiny3216 but for some problem it didn’t work that time. So I redesigned it and added the necessary parts to connect with HX711 and OLED this time.In this process,I used new eagle library "pinhead-2.lbr".
Problem1 Setting the Design Rules
I forgot to set the design rules at first, and realized about it in the end by the advice from my instructor.
Since I didn’t know there is function which I could change the size of strokes by just touching them, I deleted all the strokes and draw them again…. it took time…!
Problem2 Impossible Connections
There was an only one part I couldn’t connect unless crossing over the other lines. My instructor told me the way to solve this problem, which is to set the 0Ω resistor as the bridge.

Milling
Next was my favorite step, milling. ( I like watching the moves of CNC milling machine.) I referred my documents of week Electronic Designs to review the processes. It was useful but in the other hand, I realized that my documents still has many missing parts and need more information.
Soldering
I could solder more easily than last time. I thought that a tip for soldering is just to keep practicing steadily it to get used to it.

C1 1uF
1X10SMD PIN HEADER
1X10SMD PIN HEADER
1X04SMD/90 PIN HEADER
1X04SMD/90 PIN HEADER
R1206FAB Resistor
FTDI-SMD-SHAPE 1X06-SMD
UPDI_3POS_SMD_SHAPE 1X03SMD
ATTINY3216-SFR

Hero shots
Programming
I tried the following three ways to measure the weight from my load sensor with HX711.
The procedures were as follows:
1.At Arduino library manager, I added “HX711 Arduino Library by Bogdan Necula(Ver 0.7.4)” from "Tool">"Manage Libraries"
2.Open example code, change pin number, delay time and rename/save/write the program.
3.Referred instruction at the library github page, check the value returned by get_units(0) and calibrate the parameter for set _scale(0).
My instructor told me the meaning of lines in this code and the way to calibrate, it was difficult for me to understand... umm...
1.Serial Monitor
Problem3 Debugging of the board
When I connected ATtiny3216 with my laptop, the port was recognized correctly. However serial monitor didn’t show anything.
We investigate the reason for this problem, and found out that the power from FTDI VCC was not supplied to 3216 VDD.I used the jumper wire for quick debugging this time, but after that I realized that 5V line is only 0.4mm away,So, I can use soldering to connect them without charming cable.(Maybe next time)

Jumper cable and nippers
I measured the bottle of water with my weight sensor.Compared to the amount I measured with ready-made electronic scale, the difference was 4g.
 Code to measure weight with HX711
  /**
 *
 * HX711 library for Arduino - example file
 * https://github.com/bogde/HX711
 *
 * MIT License
 * (c) 2018 Bogdan Necula
 *
**/
#include "HX711.h"


// HX711 circuit wiring
const int LOADCELL_DOUT_PIN = 1;
const int LOADCELL_SCK_PIN = 0;


HX711 scale;

void setup() {
  Serial.begin(9600);
  Serial.println("HX711 Demo");

  Serial.println("Initializing the scale");

  // Initialize library with data output pin, clock input pin and gain factor.
  // Channel selection is made by passing the appropriate gain:
  // - With a gain factor of 64 or 128, channel A is selected
  // - With a gain factor of 32, channel B is selected
  // By omitting the gain factor parameter, the library
  // default "128" (Channel A) is used here.
  scale.begin(LOADCELL_DOUT_PIN, LOADCELL_SCK_PIN);

  Serial.println("Before setting up the scale:");
  Serial.print("read: \t\t");
  Serial.println(scale.read());      // print a raw reading from the ADC

  Serial.print("read average: \t\t");
  Serial.println(scale.read_average(20));   // print the average of 20 readings from the ADC

  Serial.print("get value: \t\t");
  Serial.println(scale.get_value(5));   // print the average of 5 readings from the ADC minus the tare weight (not set yet)

  Serial.print("get units: \t\t");
  Serial.println(scale.get_units(5), 1);  // print the average of 5 readings from the ADC minus tare weight (not set) divided
            // by the SCALE parameter (not set yet)

  scale.set_scale(-393.687);                      // this value is obtained by calibrating the scale with known weights; see the README for details
  scale.tare();               // reset the scale to 0

  Serial.println("After setting up the scale:");

  Serial.print("read: \t\t");
  Serial.println(scale.read());                 // print a raw reading from the ADC

  Serial.print("read average: \t\t");
  Serial.println(scale.read_average(20));       // print the average of 20 readings from the ADC

  Serial.print("get value: \t\t");
  Serial.println(scale.get_value(5));   // print the average of 5 readings from the ADC minus the tare weight, set with tare()

  Serial.print("get units: \t\t");
  Serial.println(scale.get_units(5), 1);        // print the average of 5 readings from the ADC minus tare weight, divided
            // by the SCALE parameter set with set_scale

  Serial.println("Readings:");
}

void loop() {
  Serial.print("one reading:\t");
  Serial.print(scale.get_units(), 1);
  Serial.print("\t| average:\t");
  Serial.println(scale.get_units(10), 1);

  scale.power_down();             // put the ADC in sleep mode
  delay(500);
  scale.power_up();
}
2. Serial plotter
I showed some line graphs

3.Processing
Code for Arduino
  #include
  // https://github.com/bogde/HX711
  #include "HX711.h"

  const int DT_PIN = 1;
  const int SCK_PIN = 0;

  HX711 Scale;

  void setup() {
    Serial.begin(9600);
    Scale.begin(DT_PIN, SCK_PIN);

    Scale.set_scale(-386.3);
    Scale.tare();
  }

  int gram = 0;

  void loop() {
    gram = Scale.get_units(10) + 0.5;

    Serial.write(map(gram, 0, 1000, 0, 255));

    Scale.power_down();
    delay(5000);
    Scale.power_up();
  }
Code for Processing
    import processing.serial.*;

    Serial myPort;

    int x;

    void setup(){
      size(1000 , 1000);

      myPort = new Serial(this, "COM3", 9600);
    }

    void draw(){
      background(255);

      ellipse(300,300,x,x);
    }

    void serialEvent(Serial p){
      x = p.read();
      println(x);
    }
Thoughts
-I learned a lot about sensor. For some sensor I could even make it. I shoud think about making loadcell by myself so that I can make the size of the sensor freely.
-"Name" a""replace" comands are very useful on EAGLE.
-I can do much more and have fun with processing!
Files
ATtiny3216 EAGLE data sch brd
ATtiny3216 PNG data top outline
Arduino Code Ver1 Ver2
Written by Natsuka Kamei 亀井 夏香