
3D scanning and printing
Week 5- Documentation
Assignments:
- group assignment:
test the design rules for your 3D printer(s) - individual assignment:
design and 3D print an object (small, few cm3, limited by printer time) that could not be made subtractively
3D scan an object (and optionally print it)
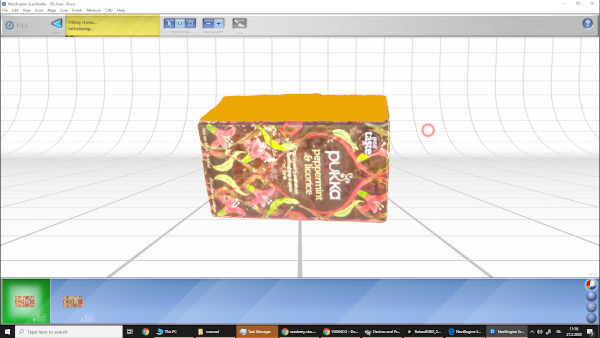
3D scanning with NextEngine:
One of the assignments for this week was to 3D scan an object. When it comes to choosing an object for 3D scanning it's important to choose something that has no reflective sufaces and has the minimum amount of same shapes. If the object has a lot of same shapes the laser sometimes has a trouble to allign the object. To help the laser allign the object it is often good to set different colored dots on the object to help the laser dedect the location of each spot.
- I started out by turning on the scanner and making sure that the spinning platform was the right distance from the scanner(the length of the cord that connects the two pieces together).
- Next I opened up Scan studio and clicked scan in the top left corner.
- After clicking scan you can see the object that you are going to scan and make sure that the object is in the center of the camera. You can also change the settings and I'm going to scan the whole object so I have the program set to 360 degrees.
- After selecting the settings you can click start scan witch starts the scan.
- After the scan is ready you can move on to the next step witch is to allign the object. You click "Allign" and then move at least two point onto the object and make sure that the red dot goes on the same place on both models and so on.
- Next step is to trim and remove all the access material by selecting it with your arrow. When you have selected all the material that you want to remove you click "tim" and the access material should be deleted from the model.
- Then you make another scan and make sure that you turn the object to make sure that you'll get to scan the sides that you missed like the bottom and top.
- After making another scan you allign the both scans together.
- After that you trim the new scan and then both scan should be moved into one.
- After that you move onto the next step witch is to fuse the object and there you just need to click the fuse button (I think it's okay to skip this step).
- After that you move onto the fill and there you need to close all holes and fill the object. To close holes you click the "close holes" button and then select the holes that you want to close with your arrow. After selecting all the holes that you want to close you simply click "fill" and then the software closes all the holes on your model. In fill you can also buff and simplify your model.
- After that you can go to CAD but I'm going to select "output" and there I'm going to click eather "save as obj" or "save as stl" (I did both)


Problems:
Problems that occurred during the scans where that once the cardboard that was my background fell onto the box and pushed the box off the platform. Also the program crashed and I needed to start from scratch.
3D scanning with Autodesk Recap:
At this point I had already scanned in NextEngine and I wanted to scan myself and 3D print a statue of myself to give to friends and family.
- I started out by talking to Frosti and begged him to take many pictures of me, he eventully said .
- Frosti took pictures of me every 10 degrees around me from abowe, under and normal while I sat completely still (53 images in total in my case).
- Frosti made sure that the camera would not auto adjust the brightness so he turned that setting off.
- After Frosti had taken pictures of me I imported the images into ReCap photo.
- To import images into ReCap you need to click on "object" in the create new model section and after you have clicked on that you select the images that you want to be using.
- After selecting all the images you click your file on the dashboard and it will the start to download all the images and that process takes a couple of minutes.
- After that click again on your file but this time it will start to generate your model and that process will take a couple of hours. Autodesk will send you and email when it has finished generating your model (very nice).
- After you have generated your model you go to your model and start editing your model.
- You edit your model by selecting the classes on the left of your screen and finding the right tool for the job. I started out by making the model watertight by slicing it on the bottom witch also makes it flat and then I used "close holes" to close the hole in my head. After that I did a lot of smoothing and sculpting on my hair because I had some extra material there.
- When I was happy with the results I made a viedeo and exported the file as obj and stl.
- The next step for me was to 3D print myself.
- The 3D print went really well, I started out by making a really small model because I was wondering if I needed a support under the jaw and it turnes out that it was a bit rough under there and next time I will add a support under there.


Problems:
There was not many problems during this process, it was pretty straight forward. The only problem that we had was that there where some extra material that occurred in the model that needed to remove. I removed the extra material by using the cissle and smoothing tool.
3D printing:
One of the assignments for this week was to 3D print something that is not possible with a one sided milling from a milling machine. I wanted to test the printer with my design and also make two pieces that would interlock with each other so I made a pretty complex sturcture that is basically only made with collums and bridges. The model is made up with two parts that are stuck together and you can move them but not remove them.
The thinking behind the design was that I wasnted to make a lot of bridges and tests the printer with them and I also wanted to make a japanese pussle or something like that but when I started desingning I could not think of any pussle so I tought it would be funny if I made a structure that could look like a pussle that you should be able to remove one of the parts but could not bacause it was'nt a pussle. The reason why it can't be subtracted is that the two pieces interlock each other and make it impossible to subtract. 
The structure is kinda made up with a bunch of boxes that are connected together and another set of boxes that are connected together and these two set's interlock each other.
- I Started out by exporting my Fusion model as an stl file.
- Then I opened my svg file in Cura.
- I wanted to have a build plate and no support. The reason why I want to have a build plate and no support is that build plate makes the collums stable and the print that I did previous had no build plate and the collums where somwhere not in the right place and the reason behind the no support is that I wanted to test the printer with all those bridges and also the support is just pain in the ass to remove.
- To be sure I made the infill 90%.
- When I had finish with the settings I saved the file to a removable drive that is used with the 3D printer.
- After saving the file to the drive I inserted the file into the 3D printer.
- Then I found the file on the 3D printer and pressed print.
The setting for the printer is:
- Build plate: 60 deg C
- Temp.: 230 deg C
- Speed: 100%
- Material flow: 100% - Also make sure that your build plate is level. WERY IMPORTANT.
- After the printer is done with the project you collect the model and then remove the build plate support.


Problems:
Because the first print was so big it took 10 hours to print and I used no support and a couble of collums in the bottom is got loose and ended bent. Also because the bridges where so long that there where some strings hanging from all of the bridges. I fixed those problems by making the model 70% of the size of the originla model and also added a build plate that keeps the collums stable while printing.
Group assignment- 3D printing tests:
The group assignment for this week was to 3D print test samples and test the design rules for the 3D printer. Link to the group site:Group site
- I started out by going the 3D scanning and printing site for the Fab Academy 2020 and downloaded the links for samples
-overhang
-clearance
-angle
-overhang
-bridging
-wall thickness
-dimensions
-anisotropy
-surface finish
-infill
- After downloading the files I opened them in Ultimaker Cura and used the setting that was already set up for the sample witch was no support and gradual infill 90%
- After that I started them off one by one. the prints took from 7 minutes and up to nearly 3 hours.

Problems:
The main problems was that I wasted a lot of time printing something that I had already printed days earlyer.
Tutorials I used:
- Autodesk ReCap Photo Tutorial: Taking Photos: Learned the basics of Autodesk ReCap Photo
- Autodesk ReCap Photo: for UAV and Drones: Learned the basics of Autodesk ReCap drone shooting
- Processing ReCap Photo Aerial Imagery using Ground Control Points: Learned the basics of Autodesk ReCap Photo drone shooting
Files:
- Bridges sculpture: The skulpture I made with the 3D printer.
- ReCap scan: The greatest statue ever made (statue of me)
- NextEngine scan: The tea box
- overhang
- clearance
- angle
- overhang
- bridging
- wall thickness
- dimensions
- anisotropy
- surface finish
- infill
Software I used:
- Ultimaker Cura: Prepare prints with a few clicks, integrate with CAD software for an easier workflow, or dive into custom settings for in-depth control.
- Recap: Reality capture and 3D scanning software for intelligent model creation
- Scan studio: Software that runs the NextEngine scanner.
- Fusion 360: CAD, CAM, and CAE software from Autodesk. I designed the sculpture in Fusion
Machines I used:
- Ultimaker 2+ series: 3D printer
- NewtEngine: 3D scanner