Introduction into the landscape of computer aided graphical design tools.
context
Being an architect for the last 8 years non-stop I am submerged into various software ranging from more graphical tools (like Adobe Photoshop or InDesign) to 3D modelling tools (ArchiCAD, Rhino) to even coding tools since I got exposed to the world of parametric and data-driven design.
Before Rhino my normal pipeline was Sketch by hand, perform simple analysis in QGIS, mass out shapes in 3D in SkethUp, work through details in ArchiCAD, export views and drawings to be than edited or vectorially in Adobe Illustrator or directly collaged in raster in Photoshop to be ultimately stitched together in InDesign.
With the transition into IAAC more and more of the accent shifted towards establishing principles or pipelines for actual input data to be plugged in. For example, load or gather data, draft out Grasshopper script, apply real geometries form Rhino, use the model in Unity and code custom visualization and animation systems. The outcome than shift from a design itself to a family of designs.
variety
Picking up, thus, new software in the profession became a necessity. However it is natural to fall victim of comfort and get stuck to unique approach in a way limiting variation and cutting outreach of your creative thinking. This is a lesson I believe I got out of exploring various graphical and spatial software this week. With the interconnected world we live in now, it is appropriate that the world of open source software is becoming sufficiently complex and varied, catching up with the proprietary tools. In fact it makes sense, proprietary software is often more centralized which makes kick off easier, however, behind open-source there is quantity which if approached correctly gains mass and translates into quality.
Most appealing tool out of the range became Blender. It went under radar for me for a while appearing every now and then on horizon. Built in tools like sculpting, programmable physics simulations as well as combining modification approach to partitives (thus, not loosing history) makes it a useful tool. These allow for some fun and flexible outcomes that would be rather cumbersome to achieve via boundary and not volume centric software like Rhino.
Detailed exploration into blender can be found here done in the next cycle.
However, ultimate lesson for me, which Neil colorfully described by the phrase “approach software like dating”, - I should remember to test out new stuff and keep looking for ways to expand the arsenal and not get stuck on the known.
Related to this week, I applied parametric modelling skills to make a basic draft-model for the project here. Further more, additional local classes served as base for understanding the language of machines and thus understanding the logic of programs interfacing with them. Lessons learned are described here.
Post Scriptum
Image Processing
General process with adding images to the site for me was: I take pictures on the phone, camera or GoPro, collect everything relevant and filter what I is relevant for the assignment, Batch Shrink it in Photoshop.
After clean install of my operating system, I though I would give a try to opensource software including ImageMagick.
For me extremely useful was to see full set of commands and expanded explanations. Also this local instructions was very instrumental for me.
This article had very useful set of examples for many options of the tool. For instance by putting
-resize 2073600@
I limit the amount of pixels in result rather than actual size (1920*1080 = 2073600).
One caviat with Windows is that On Windows I was getting errors that one parameter or another is invalid. This forum and oficial documentation helped to find the core of the issue: command line was not using the function of ImageMagick, since apparently windows has some builtin feature called this way - the latest version updated commands to be “magick convert” not “convert”. Additionally if making a bat files to automate things, one has to duplicate % signs since they got escaped: forum. Potentially there is more useful tops in this official guide.
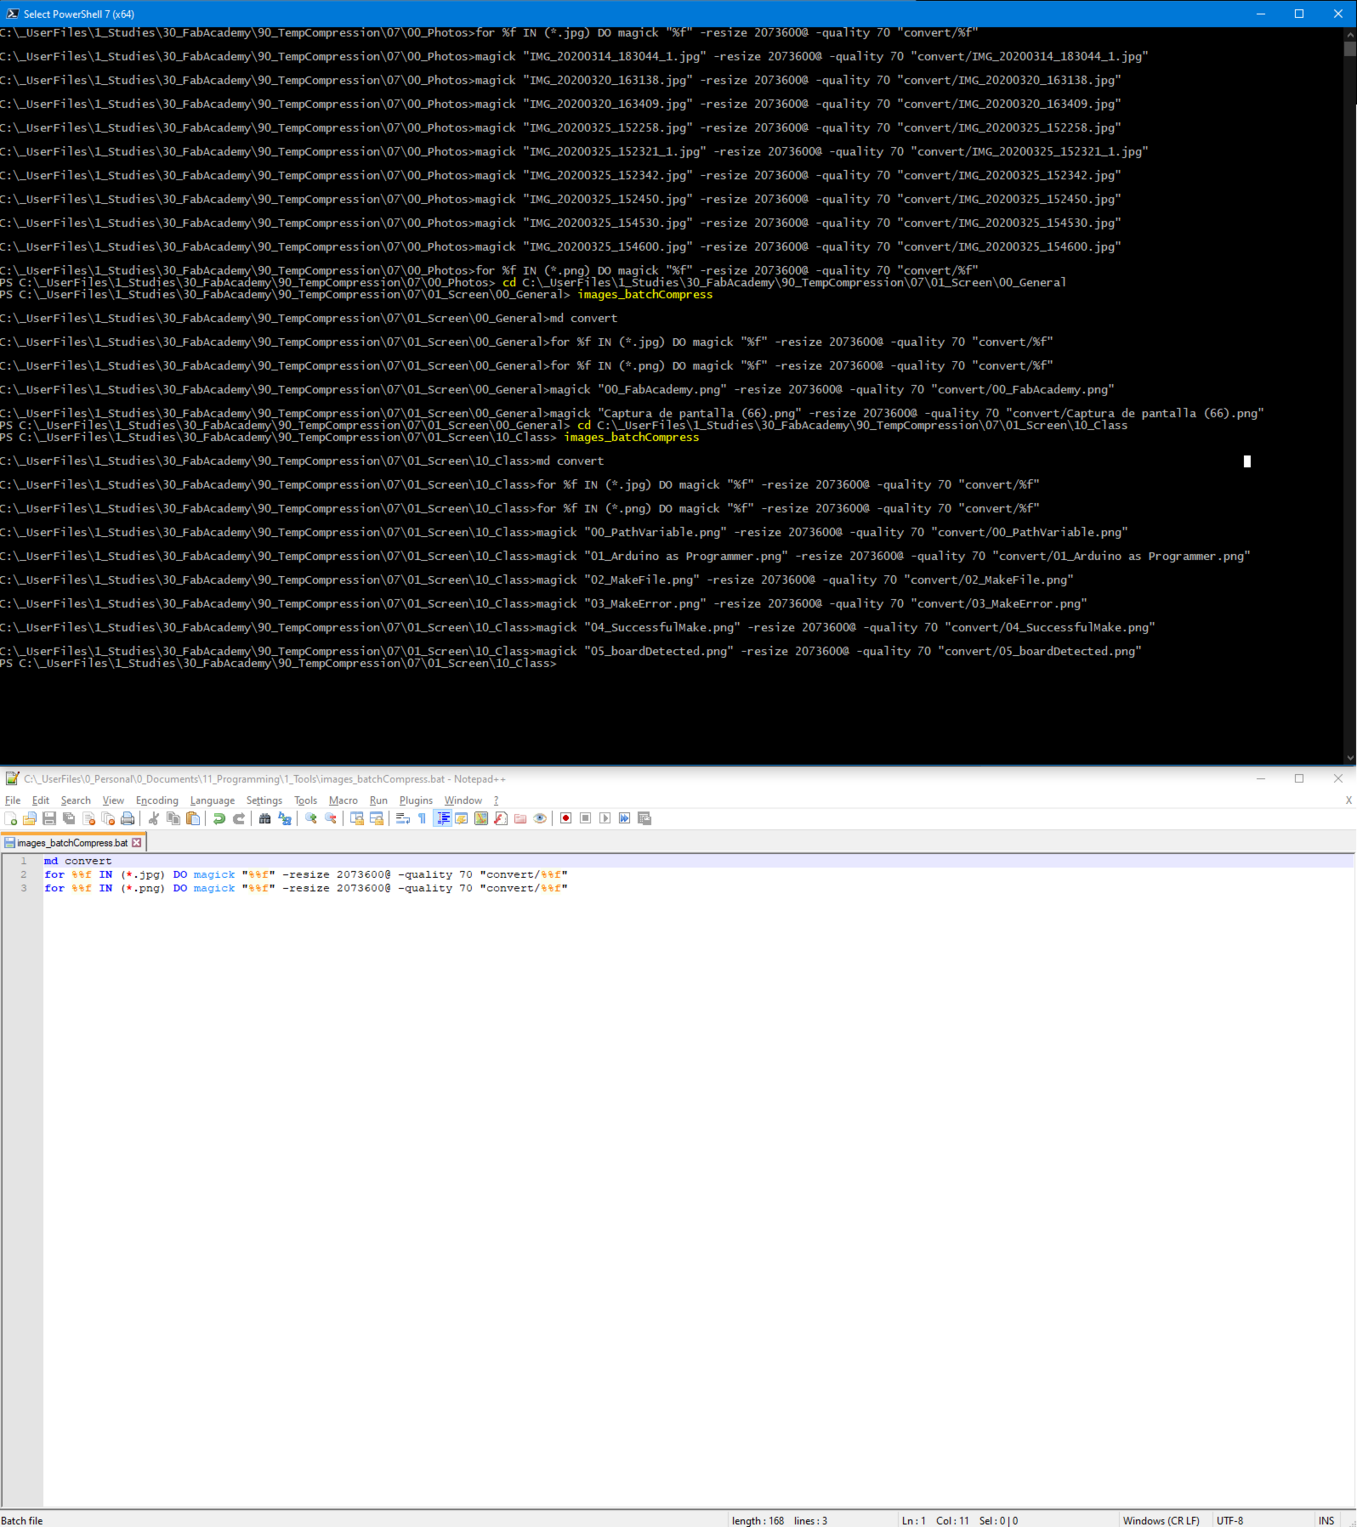
Than following this tutorial I made a batch file:
md convert
for %%f IN (*.jpg) DO magick "%%f" -resize 2073600@ -quality 70 "convert/%%f"
for %%f IN (*.png) DO magick "%%f" -resize 2073600@ -quality 70 "convert/%%f"
So with this file I referenced its location in the system PATH variable and go to the location with the images in the PowerShell and type the name of this batch file.
 – Image Processing –
Another useful feature that came about in my experimentation with Photogrammetry (one of the things I was considering - trim image by the target to reduce time for analysis, which didn’t really payout) - cropping images. To Do that I used
md process
magick convert file.jpg -gravity Center -crop 50x50%%+0+0 process/file.jpg
where
-gravity Center - controls relative to what the cropping occurs, in this case from center.

-crop 50x50%+0+0 - actual crop settings ,where first two numbers definw width and hwight percentage and second 2 numbers - offset form the gravity point. [Official Documentation](http://www.imagemagick.org/Usage/crop/)
Video processing
Following this excellent local tutorial and ffmpeg documentation and ffmpeg filter documentation or video compressing I am using following script:
md convert
ffmpeg -i video.mp4 -c:v libx264 -filter:v "deshake=0.5" -crf 30 -an -preset slow convert/video.mp4
Keeping the size but compressing drastically. For example from 29.5 Mb I got down to 1.84 Mb.
Keys here than are:
-an - without audio [using this forum answer](https://superuser.com/questions/268985/remove-audio-from-video-file-with-ffmpeg)

-c:v libx264 - video codec

-filter:v "deshake=0.5" - remove shakiness [based on this](http://blog.gregzaal.com/2014/05/30/camera-stabilisation-with-ffmpeg/)

-crf 30 - video quality

-preset slow - slow but better compressing preset
On some occasions adding
-filter:v "crop=in_w:in_h*0.75:0:in_w*0.75" - crop video into size (in_w:in_h*0.75) starting from point (0, in_w*0.75) where in_w and in_h initial sizes of the video [thanks to this excellent stackexchange answer](https://video.stackexchange.com/questions/4563/how-can-i-crop-a-video-with-ffmpeg).
To use multiple filters I just put it like this:
-filter:v "filter1, filter2" [thanks to this](https://superuser.com/questions/586045/applying-multiple-filters-at-once-in-ffmpeg)
Also in search for other stabilization techniques I stumbled on this filter:
-filter:v "vidstabdetect=shakiness=5:show=1"
Which output video with analysis of the shakiness as well as a file with this info. More investigation in how to use it is needed.
Next useful application of Ffmpeg I faced when had to compile sequential animation frames into a video. This is done extremely easy:
ffmpeg -framerate 24 -i frame_%05d.png reusltName.mp4
, where framerate - target amount of frames per second, and frame_%05d stands for animation naming convention like this: frame_00000.png, frame_00001.png, etc. More details in this official documentation and some extra recomendations
Another useful thing that I came across when working with Photogrametry is to extract photos from video:
md extract
ffmpeg -i source.mp4 -vf "select=not(mod(n\,5))" -vsync vfr -q:v 2 extract/frame_%04d.jpg
This is extracting every fifth frame from source video. Based on this local class and this forum about selecting frames.
Graphics
When I made a clean install of the system, I thought I would as well try to avoid paid software as much as possible and thus give a try to Inkscape and Gimp instead of Illustrator and Photoshop.
With Gimp my experience is (surprisingly for me) relatively painless - but it takes a long time to get used to new keyboard shortcuts and to searching for the commands in places where you’re not used to.
Some of the useful things I came across:
- in trying to prepare PCBs from KiCAD I used [this function (fill enclosed path)](https://graphicdesign.stackexchange.com/questions/30433/fill-enclosed-path-in-inkscape) to fill in the reverse of the board.