Week 12: Interface and application programming
Group assignment:
Compare as many tool options as possible.
Individual assignment:
Write an application that interfaces a user with an input and/or output device that you made
Group assignment
Worked with Achille, Hannu, and Jari in group assignment this week.
Jari has compared different tools our group has used on this week on his page. My tools can be found from this page as well since they are connected to my individual documentation.
Python by using PyCharm and tkinter
Started with Python before I even had clear idea what to do in this week. Before you can start to work with Python you have to download it from e.g. Python's page. This time instead of using Visual Studio Code I used PyCharm community edition which is Python IDE. Tkinter is GUI-package for Python which comes already installed with PyCharm.
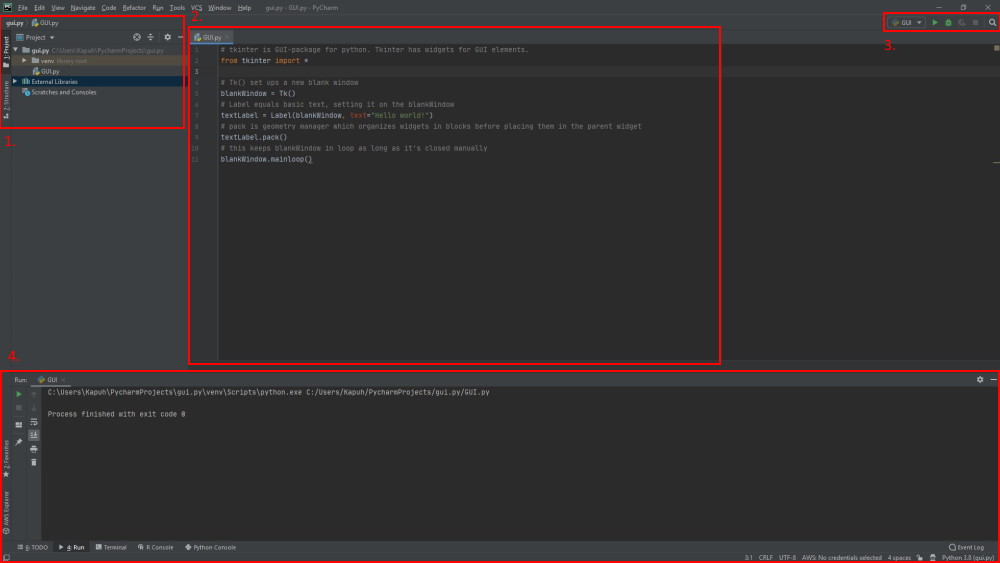
This is the user interface of PyCharm. It includes following elements:
- Projects and list of external libraries
- Main frame for coding. Active file can be seen on top of this screen
- Run (shortcut ctrl+shift+F10), debug and run/debug configurations can be found from here
- Here are the run, terminal and console

Here is the "Hello World!" created with Python and tkinter. If the goal is to only print "Hello world!" on the Run, simply print("Hello world!") is enough.
Processing
I have explained processing more throughly under my individual assignment. Here is example how to print "Hello world!" in two ways.
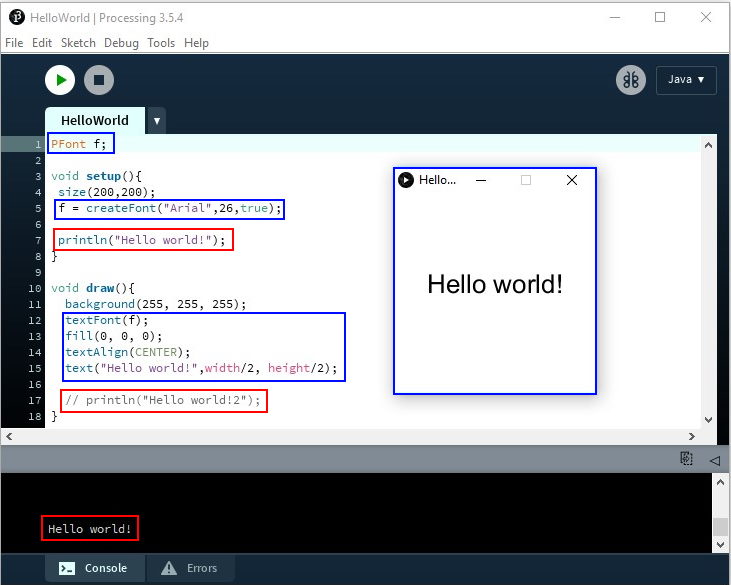
In this example I have showed how to print "Hello world!" in the console (used for testing purposes, e.g. error-messages) and how to print it on a window. Window is created with size(x,y) and it's background is set as white (255,255,255).
Marked with red squares on picture above is two ways to print on text on the console. Less useful way to print it is to put it under the Setup-section of the code. This will print it only once when the software is launched. Another way is to put it under the Draw-section. This will print it in every loop. Useful case would be inside an if-sentence to see that the code actually works properly. I put it inside comment (//) for this example because without if-sentece it activates it in every loop which means that it spams it.
Marked with blue squares on the picture above is the way to print "Hello world!" on the window. This took few more lines compared to printing only on the console. First declaring PFont and then creating the font. In the draw()-section I had to specify which font is used, it's fill color, text aligning and finally calling the text()-function. Text has 3 arguments whic are displayed text, X- and Y-coordinate. In my case I just used width/2 and height/2 to center it near middle.
Individual assignment
Our lab is currently closed due covid-19. Goal for this week for now was to take a look for possible tools to create GUI for final project. To learn tools I am planning to create some kind of slider or something similar to show temperature while using sensor from week 9 since I dont have input/ouput device yet.
On ninth week I used Arduino UNO, breadboard and LM335Z to measure, calculate and print temperature. Even though this doesn't directly help with my final project outside of understanding how read data for GUI, I am interested using something similar in the future on another project.
Processing
After doing "Hello world!" with Python and testing it out little bit more I started to seek easier first touch to world of GUI. Neil mentioned that Processing is similar to a Arduino IDE so it was my next target. Processing is a free open source IDE with graphical libraries. It uses Java. With use of libraries it is easier to use and pick up for non-programmers.
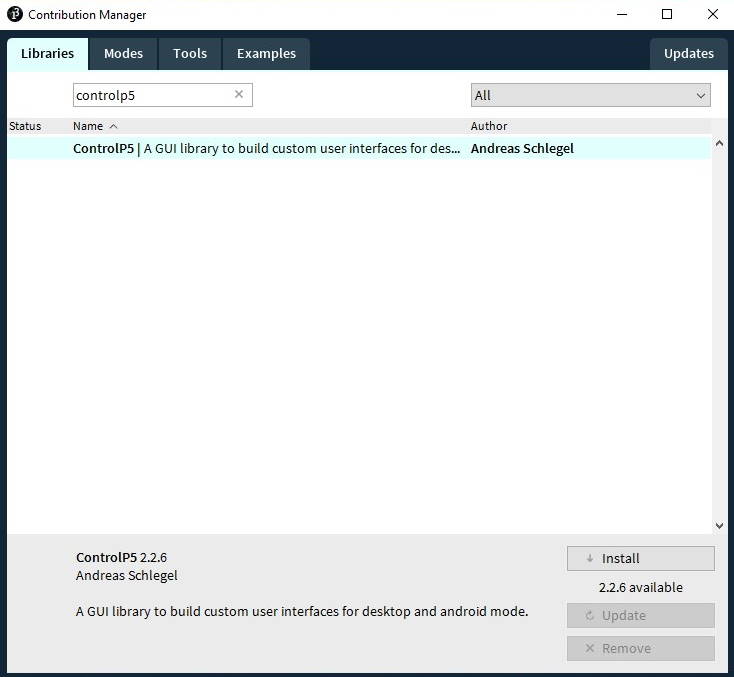
First setting up ControlP5 library. ControlP5 is a library for Processing which includes GUI elements to use. This is not included with the install of Processing so we have to install it manually. In Processing, like in Arduino, you can download new libraries on IDE itself. To install library open Sketch-menu -> select Import library -> press Add library.
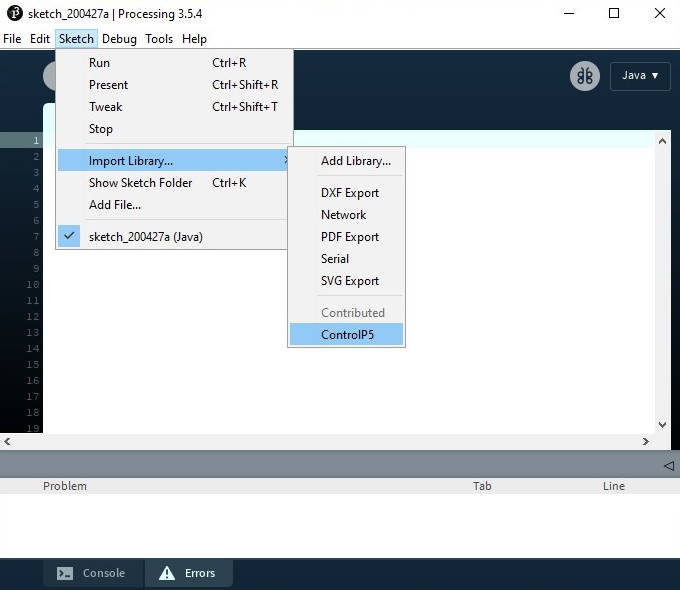
After searcing and installing ControlP5 it needs to be imported to be active on the sketch. This can be done by opening same menu as on adding, but selecting wanted library on the list instead of going to Add library. This adds import ControlP5.* at the beginning of the sketch.

I used this setup for these tests. It has an Arduino UNO R3, LMZ335, 2k ohm resistor and breadboard.
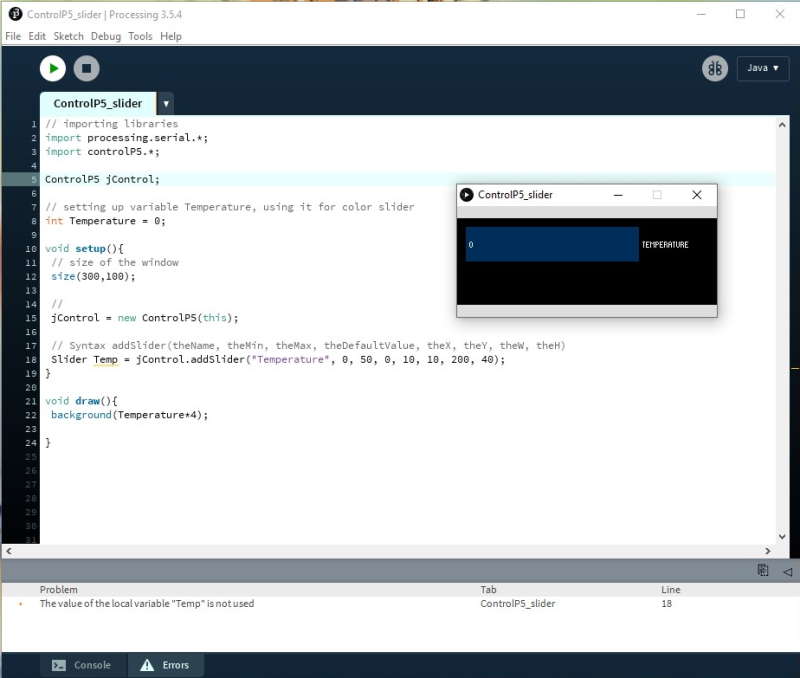
Processing works similarly as Arduino IDE. First import libraries, in this case ControlP5 and also Serial-library. Serial is required to get the data from the sensor. Next I had to declare class jControl to use it for the slider. Put code which should be only ran once under the Setup(). I had to activate the jControl under the setup to be able to make the slider. Slider is finally created with Slider Temp = jControl.addSlider(). Lastly Draw() is same as Loop() in Arduino IDE. It will loop as long as the software is active.

I used mostly code from week 9 for this in Arduino. Took off some useless lines for this use case. To get value from the sensor to Processing I first set analogPin to get data from sensor to Arduino. Next we need serial to transfer data, in this case I used 9600 baud rate. analogRead(analogPin) will give us the a value between 0-1023 from the sensor. Next we have to calculate the value from sensor to get the correct degrees of celsius. Lastly printing the degrees of celsius on serial. Value can be seen on the console of Arduino IDE and it is now possible to get it on Processing through serial.
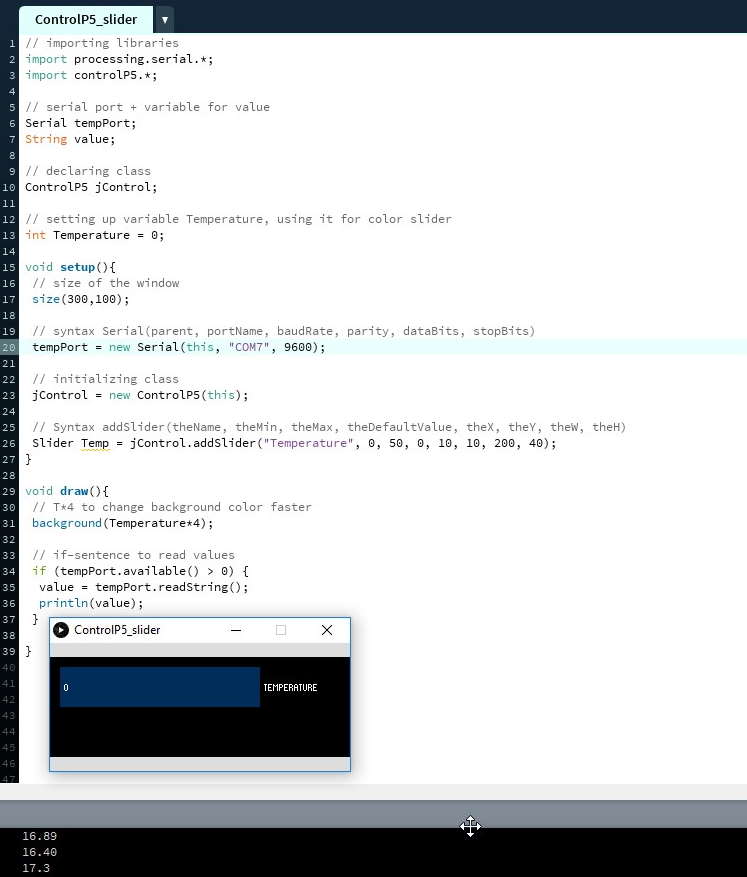
To receive the value from the sensor I set up serial. First declaring class tempPort for the serial and then using it on the setup(). New serial requires at least the parent, portName and baudRate. In my case the baud rate was set on 9600 on Arduino IDE and Arduino UNO was using port COM7 which can be checked from Arduino IDE or Device manager. To check input values in the console I added println at the end.
Now I "Only" required to understand how to update the value of the Slider and this would have been ready. But the struggle started at this point because I didnt find out how to update the value of the slider.
Without finding an answer to this after spending a lot of time searching I changed library.
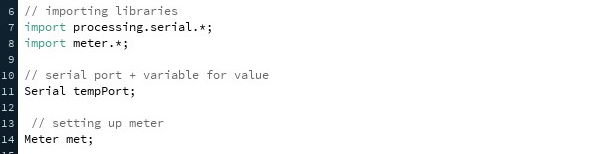
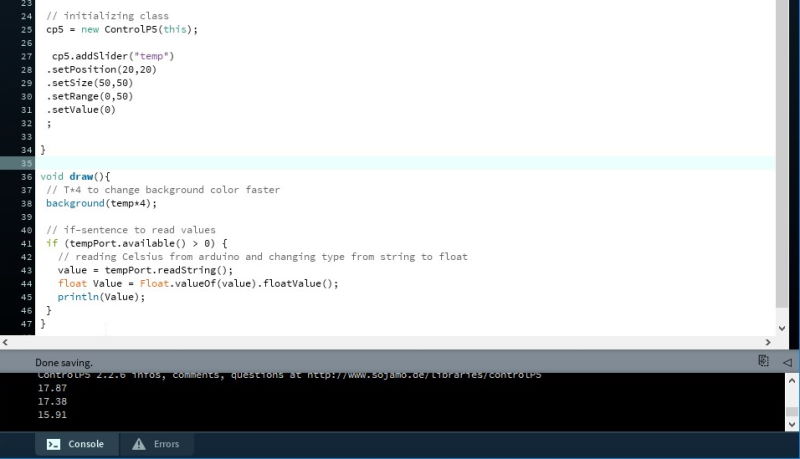
Searched for another libraries to use and found Meter-library from Bill Kujawa. First including libraries and setting them up for later use.
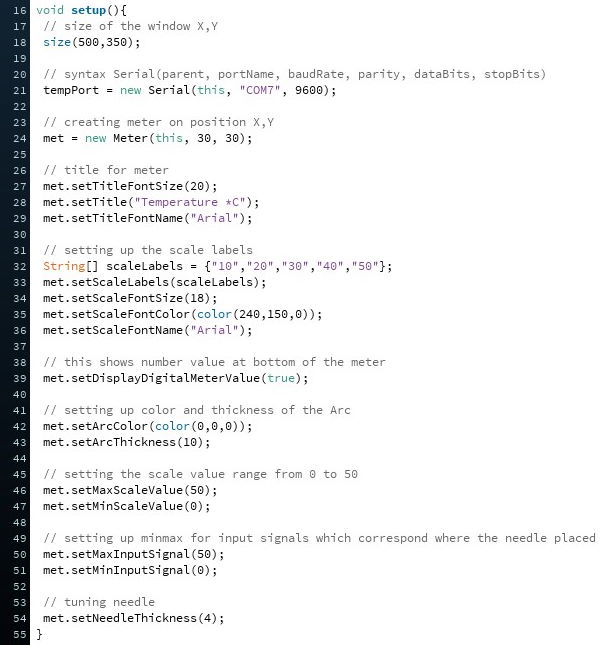
Same as with ControlP5, first I went through making the window and set up serial. With met = new Meter(this, 30, 30) I made the meter. After it I changed how it looks and works. For more specific instructions, check the comments from the code.
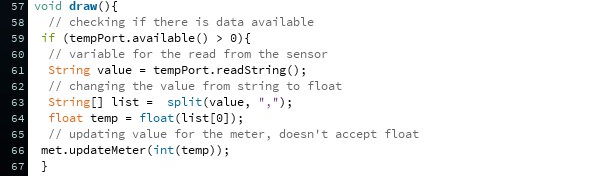
Lastly checking if there is data coming from sensor and updating the value of the meter.
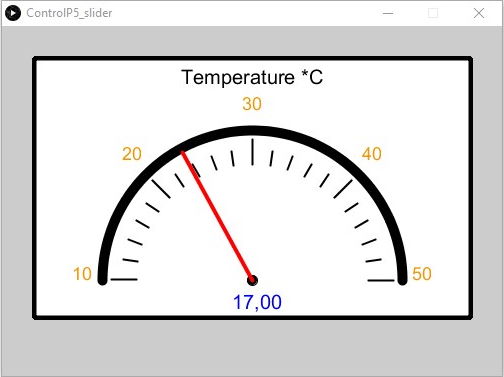
With this I finally managed to update the value of the meter with the data from the temp sensor. Only problem I found out was that the result have be int instead of float. Because of this decimals are not shown correctly.
Meter with final project board
I used the processing program with my final project's potentiometer. I could use mostly same code on the processing, but had to write a new short arduino program.

Here is the short Arduino code required for this. By using analogRead(potPin) it is possible get the digital value from potentiometer. Values from potentiometer can range between 0 and 1023. For more information about potentiometers, check documentation of week 9.
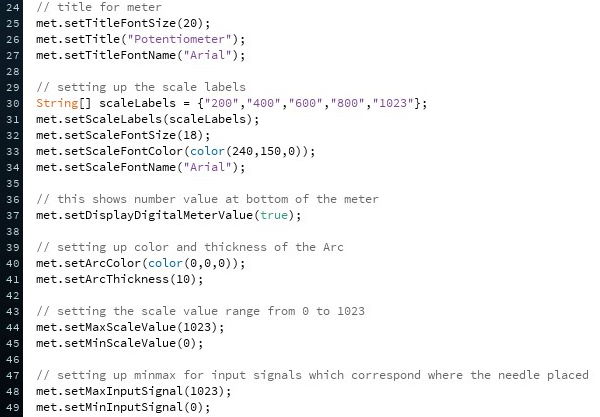
This is mostly same program as with temperature sensor, but changed the range from 0-50 to 0-1023 and name of the meter.
Short video clip showing how potentiometer and processing work together.
Files
GUI.pyTemperature_arduino.ino
Temperature_processing.pde
Potentiometer_arduino.ino
Potentiometer_processing.pde