
Week 05. 3D Scanning and Printing
This week there are also two types of assignments, one group and one individual. In my case being alone in the Fab Lab, I do both.
- Test the design rules for your printer(s). ✔
- Document your work and explain what are the limits of your printer(s) (in a group or individually). ✔
- Design and 3D print an object (small, few cm3, limited by printer time) that could not be easily made subtractively. ✔
- 3D scan an object, try to prepare it for printing (and optionally print it). ✔
- Linked to the group assignment page. ✔
- Explained what you learned from testing the 3D printers. ✔
- Documented how you designed and made your object and explained why it could not be easily made subtractively. ✔
- Documented how you scanned and prepared an object (for 3D printing). ✔
- Included your original design files for 3D printing (both CAD and common format for 3D printing). ✔
- Included your hero shots. ✔
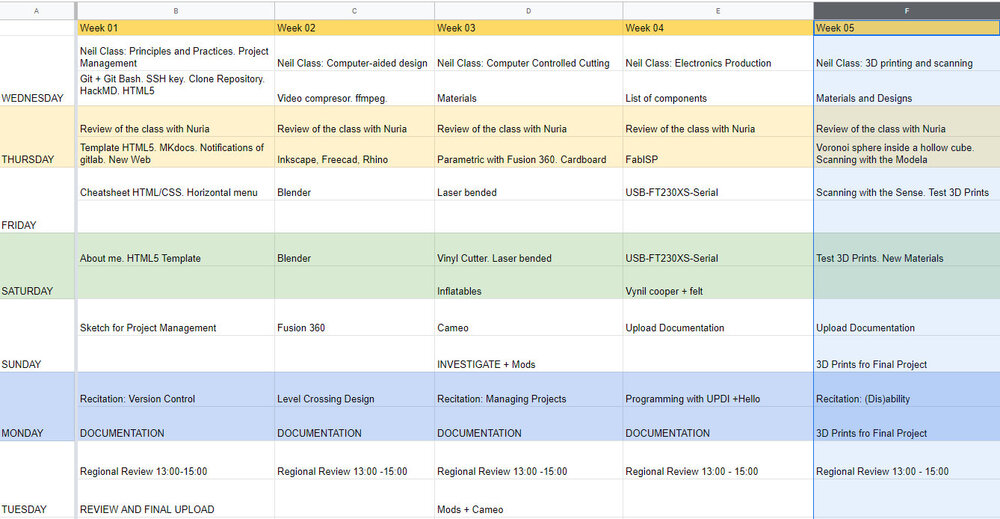
Like every week, my weekly schedule. 😊
The discovery of the Fab Lab León for me was after meeting the 3D Printer Party in 2015. I wanted to know the technology of 3D printing and had never seen it up close, to apply it to model. Since then I fell in love with this world and the fab labs.😍
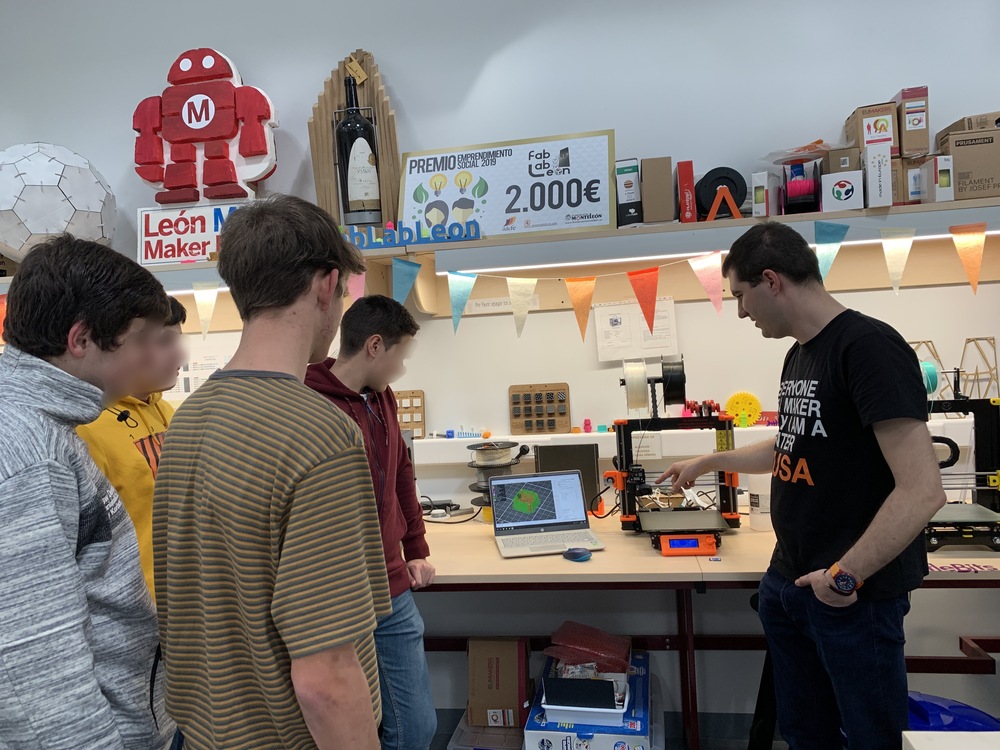
One of the things I like most is to teach, and in the Fab Lab León I like to explain to the "Jovenes Makers" or the "Poderosas" the operation of the machines or help them in the design process. Nuria and Pablo and I taught me my knowledge, I retransmit them to others and it is exciting. Explaining to the "Jovenes Makers" the use of the 3D printer Prusa I3 MK3S and its different functions.
Group Assignment
The Group Assignment page is at the following link.
3D Printers in the Fab Lab León
In the Fab Lab León we have the following printers.
Prusa I3 MK3S
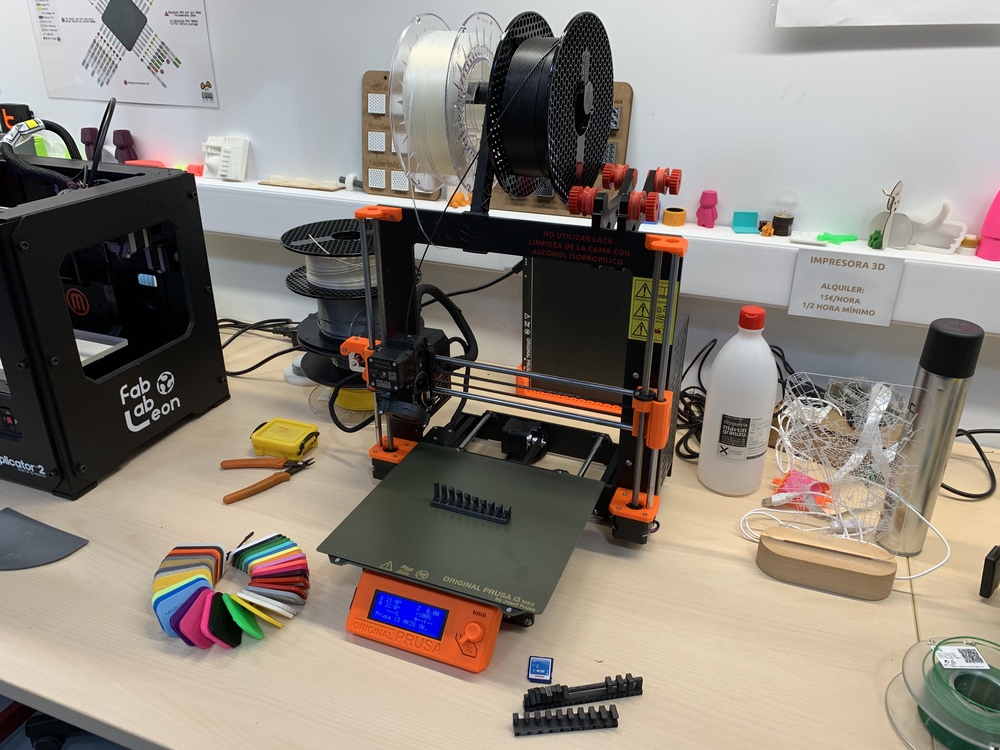
It is the printer that I love the most of the Fab Lab León, because my friends Nuria, Pablo and Dani gave it to me for my birthday. 😇 It is one of the printers with the best value for money and the most awarded. These are its Specifications:
- Type: Fused Depositon Modeling (FDM).
- Nozzle Diameter: 0.4mm. (0,6mm for CorkFill)
- Layer Thickness: 0.05mm -> 0.35mm.
- Filament Diameter: 1.75mm.
- Materials: PLA, ABS, PETG, ASA, FilaFlex, Wood Filament.
- Temperature: PLA-> 215; PETG-> 250; FilaFlex-> 240; CorkFill-> 200.
- Slicer: PrusaSlicer.
- Build volume: 250 x 210 x 210 mm
- Automatic Mesh Bed Leveling, Automatic Axis-Perpendicularity Compensation, Completely Open Source, Quiet TMC2130 Step Drivers, Removable Magnetic Bed, Orange-ness
One of the advantages of Prusa is its self-calibration and the Removable Magnetic Bed. There are two types of base, the Smooth PEI and the Textured PEI. This also helps us with the lower finish if we want it smooth or textured, also for the adhesion of the materials.
When we change the base in the Prusa I3 MK3S we must recalibrate the first layer. These values are different from each printer and sometimes influence even plastics. For the Smooth PEI base only PLA or CorkFill can be used and the value would be - 0.510 for PLA and -0.505 for CorkFill. For PETG or FilaFlex only the Textured PEI base can be used, since it has so much grip the smooth that can be damaged when the piece is removed. For the Textured PEI base, PETG and FilaFlex need -0,700 and PLA -0,715.
As I explain later, but the CorkFill filament is necessary to Change the nozzle.
Here I have the profile of the Prusa I3 MK3S of the Fab Lab León for you to download.
Makerbot Replicator 2
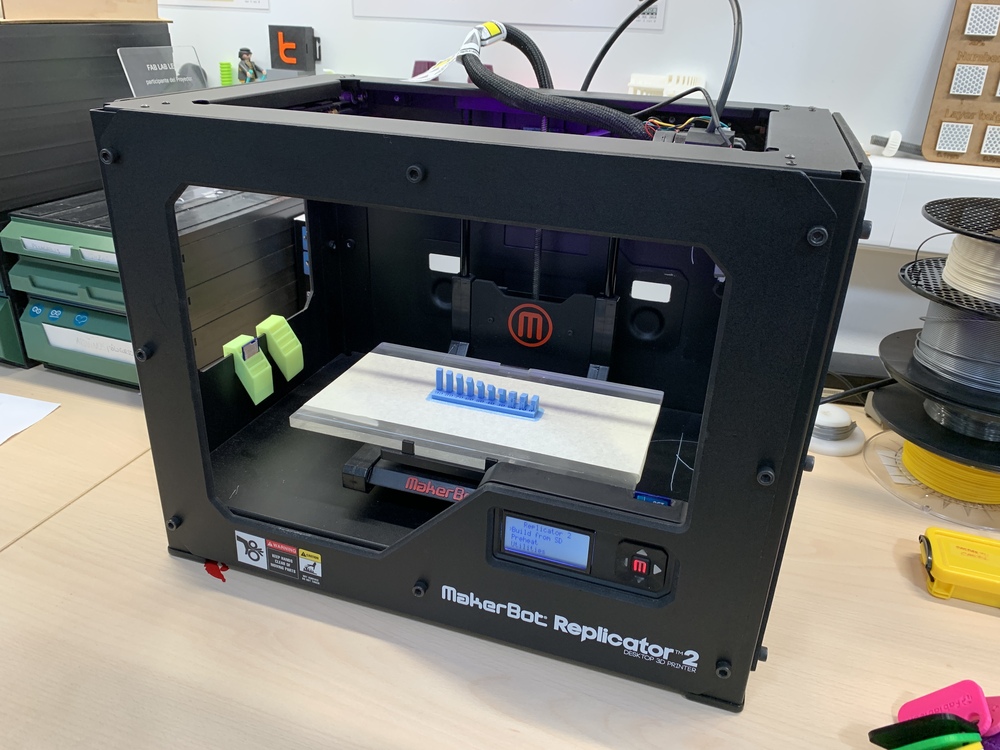
My first printer to use in the Fab Lab León, with great print quality and speed. These are its Specifications:
- Type: Fused Depositon Modeling (FDM).
- Nozzle Diameter: 0.4mm.
- Layer Thickness: 0.05mm -> 0.3mm.
- Filament Diameter: 1.75mm.
- Materials: PLA.
- Temperature: PLA-> 230.
- Slicer: Makerbot Print.
- Build volume: 285 x 153 x 155 mm
In the following link you can download the Makerbot Print, which is the software to prepare the pieces to print with the Makerbot Replicator 2.
León 3D Legio
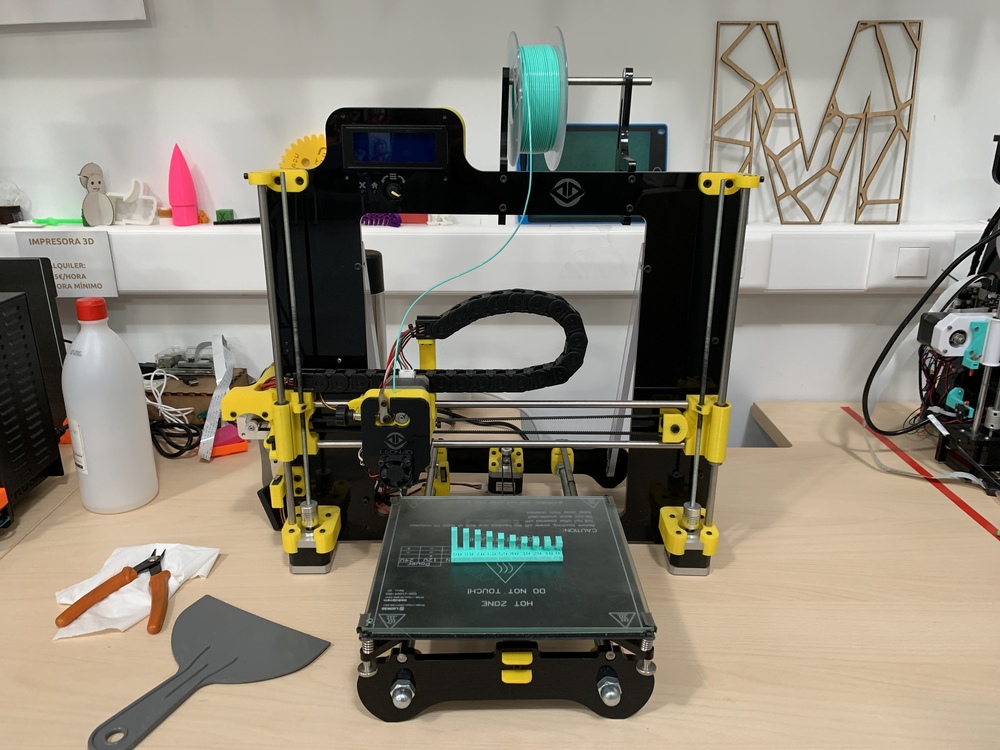
A kit printer manufactured by León 3D in León (Spain) based on a Prusa I3, with improved electronics. It is a very robust printer with good finishes. These are its Specifications:
- Type: Fused Depositon Modeling (FDM).
- Nozzle Diameter: 0.4mm.
- Layer Thickness: 0.1mm -> 0.3mm.
- Filament Diameter: 1.75mm.
- Materials: PLA, ABS, FilaFlex.
- Temperature: PLA-> 218.
- Slicer: Cura.
- Build volume: 200 x 200 x 200 mm
Here I have the profile of the León 3D Legio of the Fab Lab León for you to download.
Monoprice MP Mini Delta 3D Printer
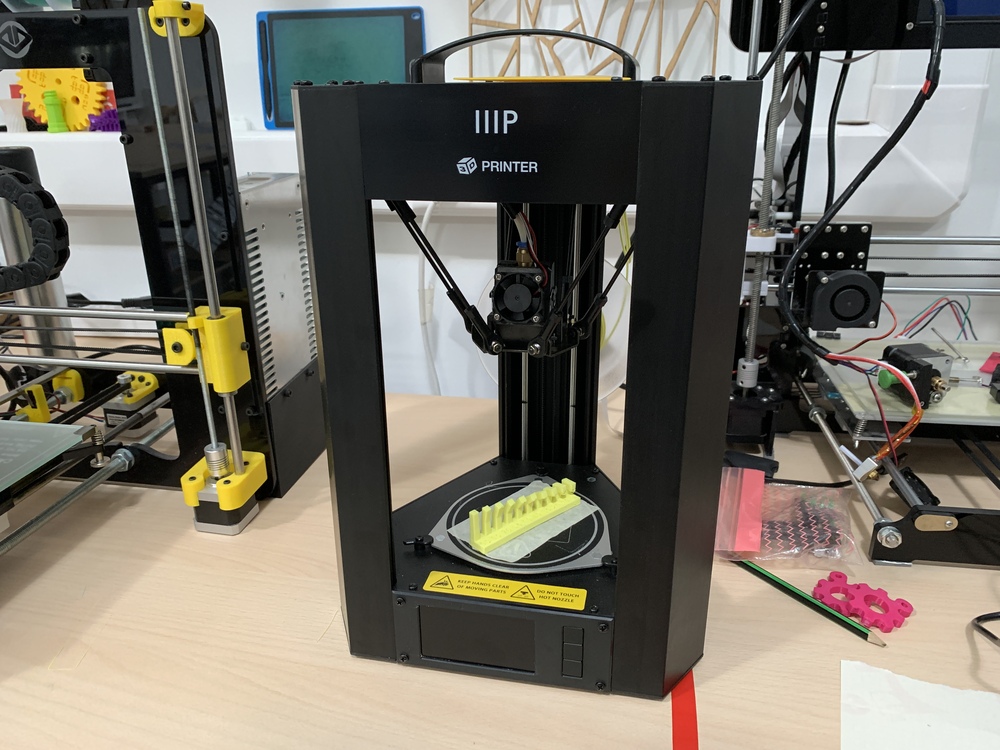
It is the newest printer, it is from Pablo. It is a Delta, but with very good precision and incredible results. It is from the Monoprice brand, a company selling electronic products. These are its Specifications:
- Type: Fused Depositon Modeling (FDM).
- Nozzle Diameter: 0.4mm.
- Layer Thickness: 0.05mm -> 0.3mm.
- Filament Diameter: 1.75mm.
- Materials: ABS, PLA, Wood Fill, Copper Fill, Steel Fill, Bronze Fill.
- Temperature: PLA-> 200.
- Slicer: Cura.
- Build volume: ø110 x 120 mm
- Automatic Mesh Bed Leveling.
In this link you can download the profile for Cura de la Monoprice MP Mini Delta. Important, download the appropriate version for your Cura.
10/08/2020
Prusa Mini
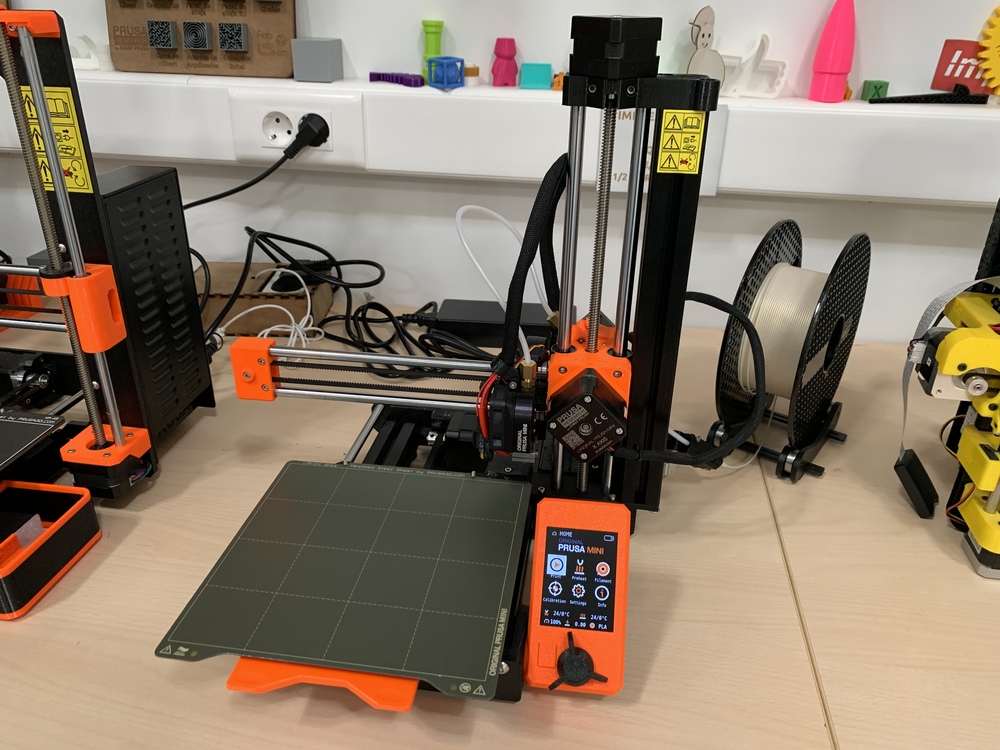
During the months of confinement, I considered buying a printer. The quality of Prusa is incredible, and during my visit to the Maker Faire Roma I saw the new Prusa Mini. It was awesome. So I decided to order it, and it wouldn't arrive until September. But she came ahead hehe, for my birthday. Another Prusa for every birthday. 🤣🤣
These are its Specifications:
- Type: Fused Depositon Modeling (FDM).
- Nozzle Diameter: 0.4mm.
- Layer Thickness: 0.05mm -> 0.35mm.
- Filament Diameter: 1.75mm.
- Materials: PLA, PETG, ASA, ABS.
- Temperature: PLA-> 215; PETG-> 250.
- Slicer: PrusaSlicer.
- Build volume: 180 x 180 x 180 mm
- Automatic Mesh Bed Leveling, Completely Open Source, Removable Magnetic Bed, Orange-ness
An improvement that I have made to the Prusa Mini, is to print the orange piece (below the bed) that I found in PrusaPrinters to help remove the flexible sheet from the bed. Here is the link.
The design rules for the printers
To see what are the design rules for printers I will use two tests that Neil taught in class without supports, angle and overhang. But first I want to show two panels that I made for the Fab Lab León. The one on the left are all the options that PrusaSlicer gives of the different Infill patterns; The one on the right made with the Makerbot explained the main settings in a print. Also then I created a sample of filament materials or colors, which I later use in this assignment. We use both panels during OpenLab to explain to the public how printers work.

Once downloaded the two Neil tests to print without supports, angle and overhang I will show the result on each printer. All tests are printed at 0.2 mm resolution and 15% infill and in PLA filament.
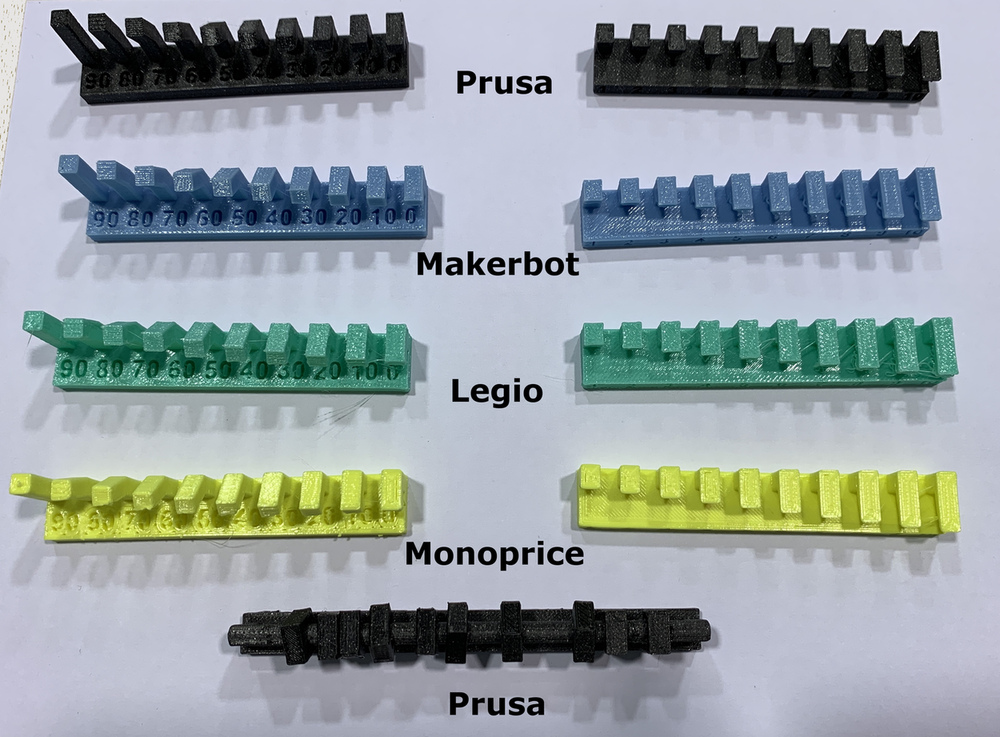
PRUSA I3 MK3S
With the Prusa:
- Angle test: At 20º needs supports. The angle test takes 1 hour and 20 minutes.
- Overhang test: From 4 mm, filament threads begin to come out. The overhang test takes 51 minutes.

PRUSA MINI
With the Prusa Mini:
- Angle test: At 20º needs supports. The angle test takes 1 hour and 15 minutes.
- Overhang test: From 3 mm, filament threads begin to come out. The overhang test takes 49 minutes.
Makerbot Replicator 2
With the Makerbot:
- Angle test: At 10º needs supports. The angle test takes 49 minutes.
- Overhang test: From 2 mm, filament threads begin to come out. The overhang test takes 30 minutes.

León 3D Legio
With the Legio:
- Angle test: At 40º needs supports. The angle test takes 40 minutes.
- Overhang test: From 2 mm, filament threads begin to come out. The overhang test takes 26 minutes.

Monoprice MP Mini Delta 3D Printer
With the Delta:
- Angle test: At 60º needs supports. The angle test takes 1 hour and 9 minutes.
- Overhang test: From 1 mm, filament threads begin to come out. The overhang test takes 46 minutes.

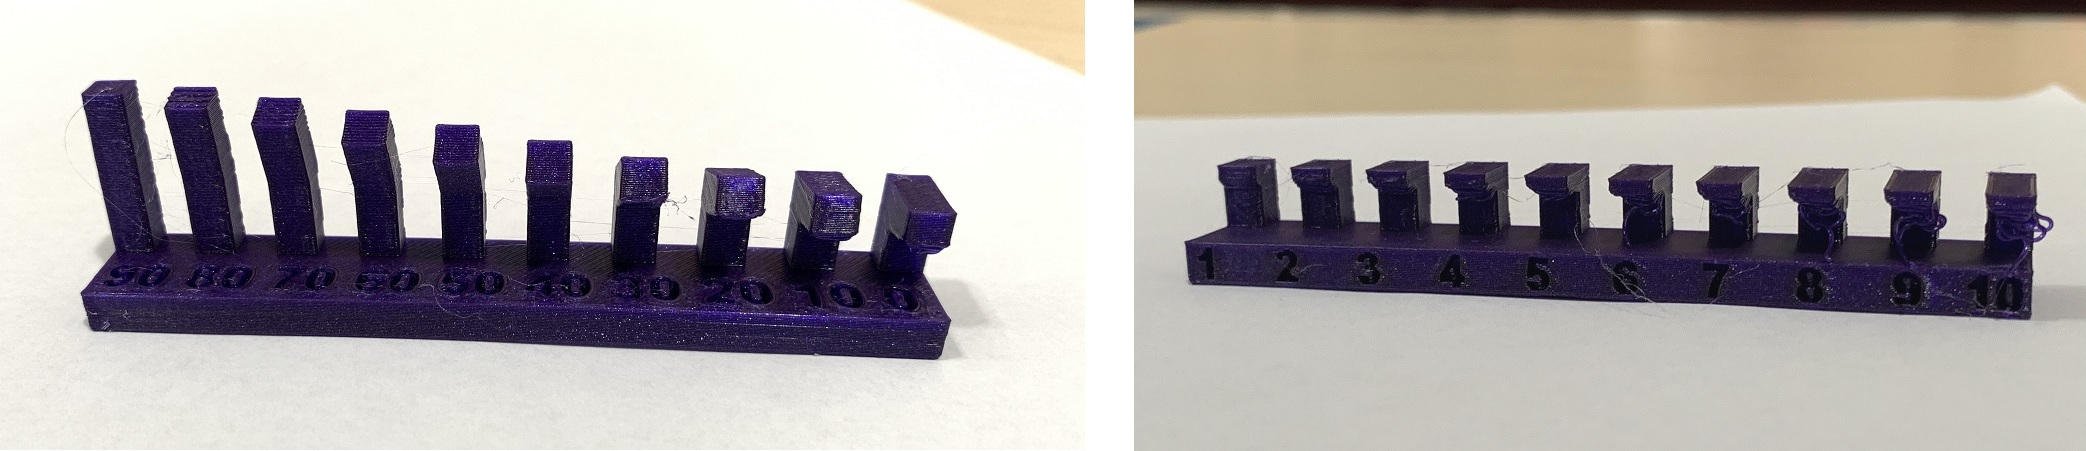
Test Clearance in the Prusa I3 MK3S
Another test I did was that of clearance where you have to add media to the print. This test is very useful for example if we are going to make pieces that fit into each other, because we can see which is the appropriate parameter to offset our design. In this case with 0.2 mm the piece is fixed to the shaft, we are not able to move it.

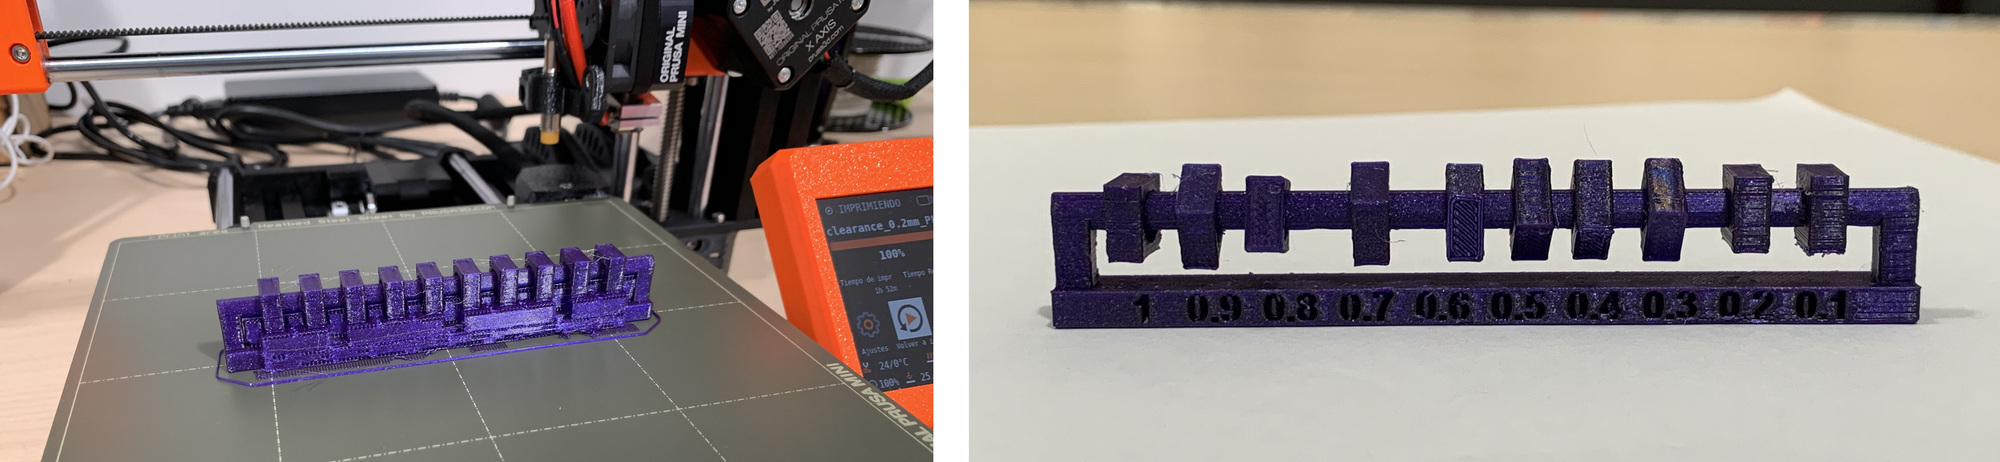
Test Clearance in the Prusa Mini
Another test that I did to the Prusa Mini was the clearence test. Like its "older sister", it behaved the same, the 0.2 mm is fixed to the axis.
Conclusions
It is incredible how there is a difference between printers, the same parameters being for all. There are differences of time, but also of quality; It can also influence the price of each printer. The winners, the Prusa and the Makerbot. And the Prusa Mini is faster than the Prusa I3 MK3S.
Design and 3D print an object that could not be made subtractively.
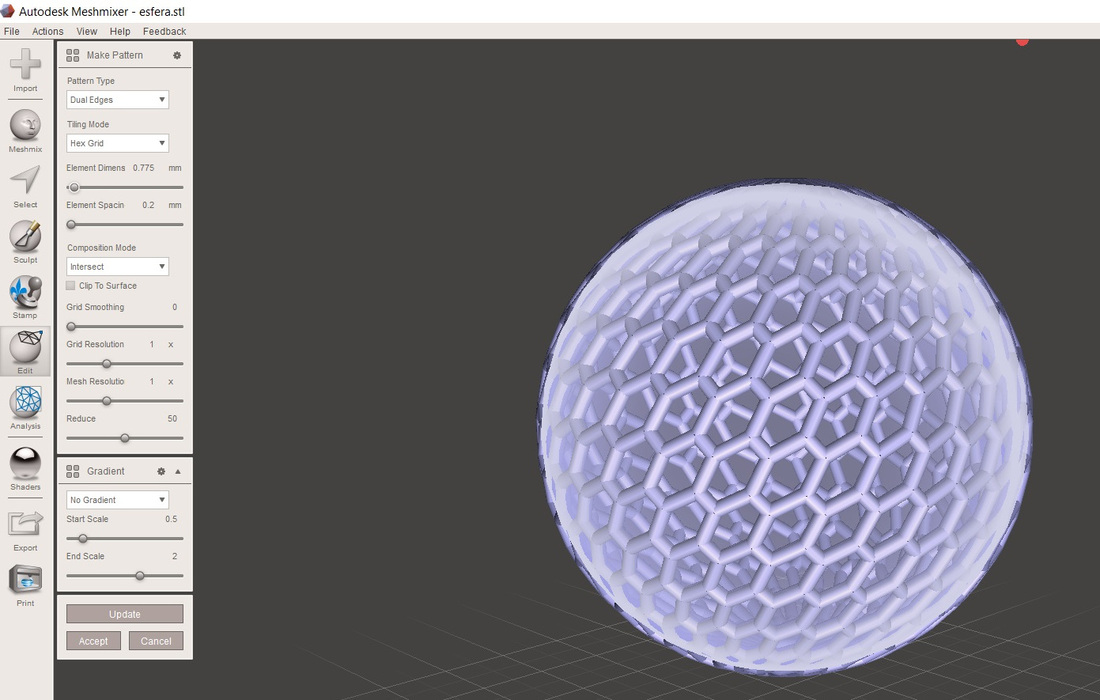
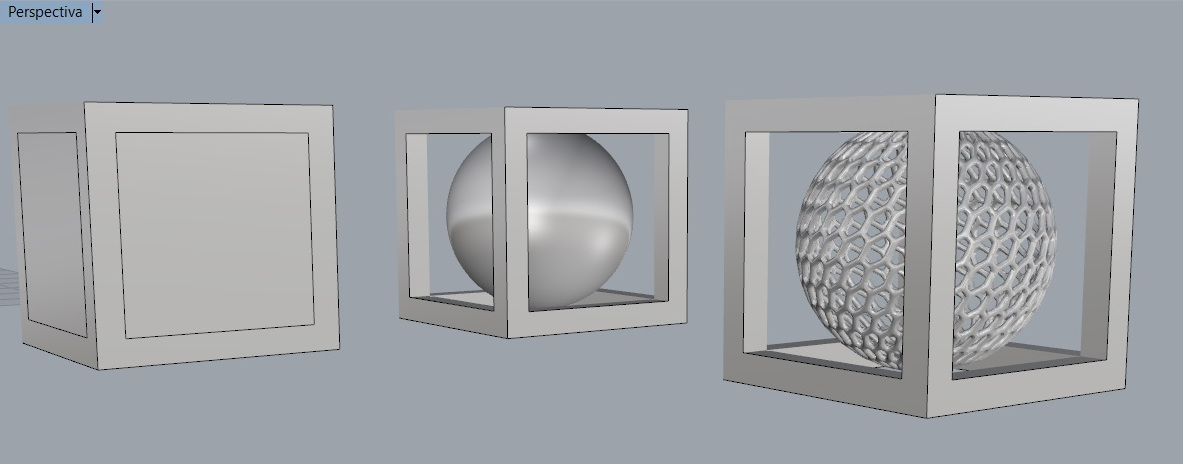
Through Rhinoceros I designed an empty cube that contains a sphere inside. For the sphere, I decide to use the Meshmixer program where I edit it and apply a Voronoi pattern. To know how to use the Meshmixer and how to apply different patterns I follow the following tutorial that is in the Prusa Blog: Three simple methods stylize 3D models
Once the sphere with the Voronoi pattern was finished, I export it as .STL and import it into Rhinoceros to put the sphere inside the cube. The cube has a size of 30 mm and the sphere of 25 mm, I place it in the center of the cube. I hope it doesn't stick much and the sphere moves inside the cube.😅 Here are the steps rendered in Rhinoceros. This piece could not be done by another method that is not 3D printing because the Voronoi pattern is so small its holes and also the sphere is floating inside the empty cube only with edges.
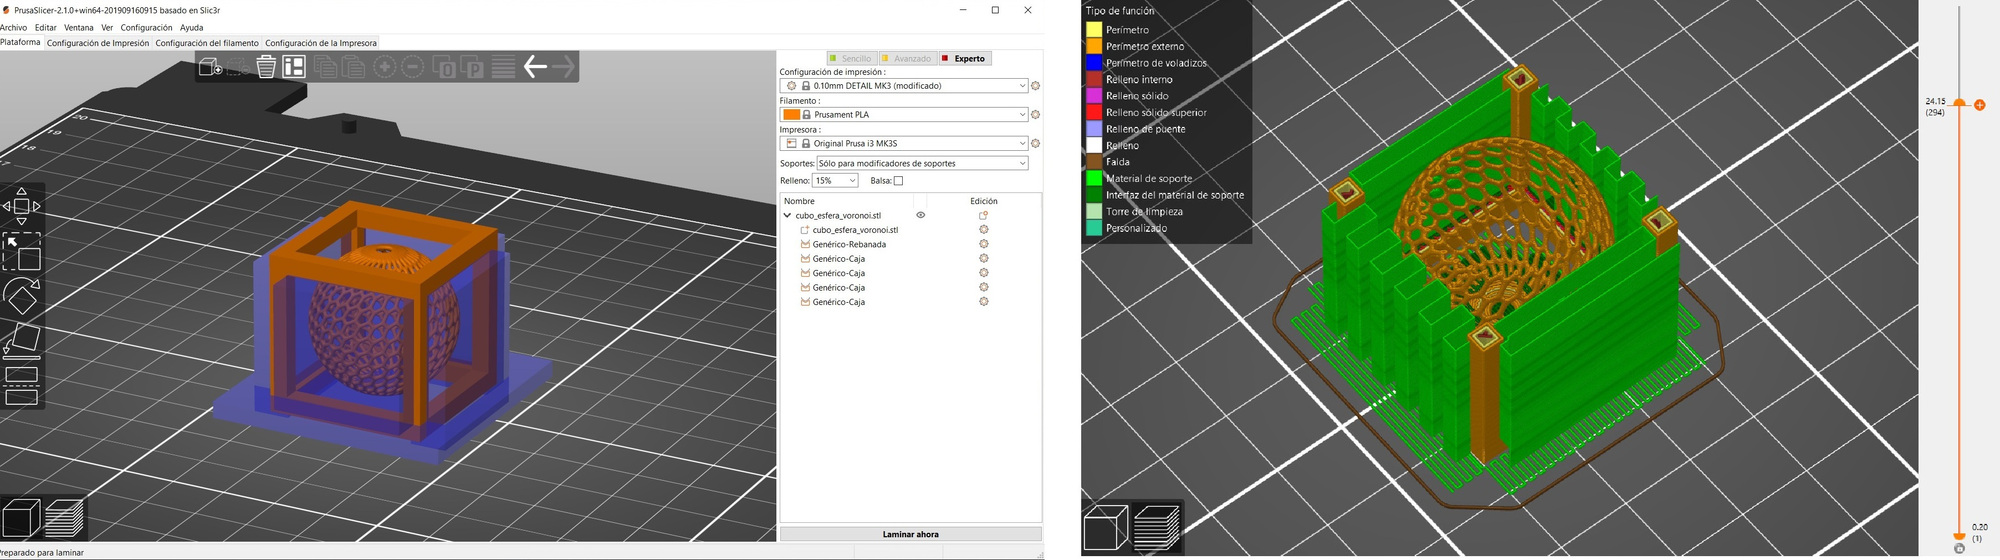
Using the PrusaSlicer, in the Expert Mode it allows you to place supports only in the places you want, with which you get a piece that you do not need to remove as many supports during post-processing. In my case I place supports on the bottom of the sphere and only on the faces of the cube to support the top of the edge. Thanks to the simulation I can adjust to where I want the media to reach, moving or scaling them, it is an incredible tool.The voronoi pattern being so thin, I use 0.10 mm layer height to have better detail.
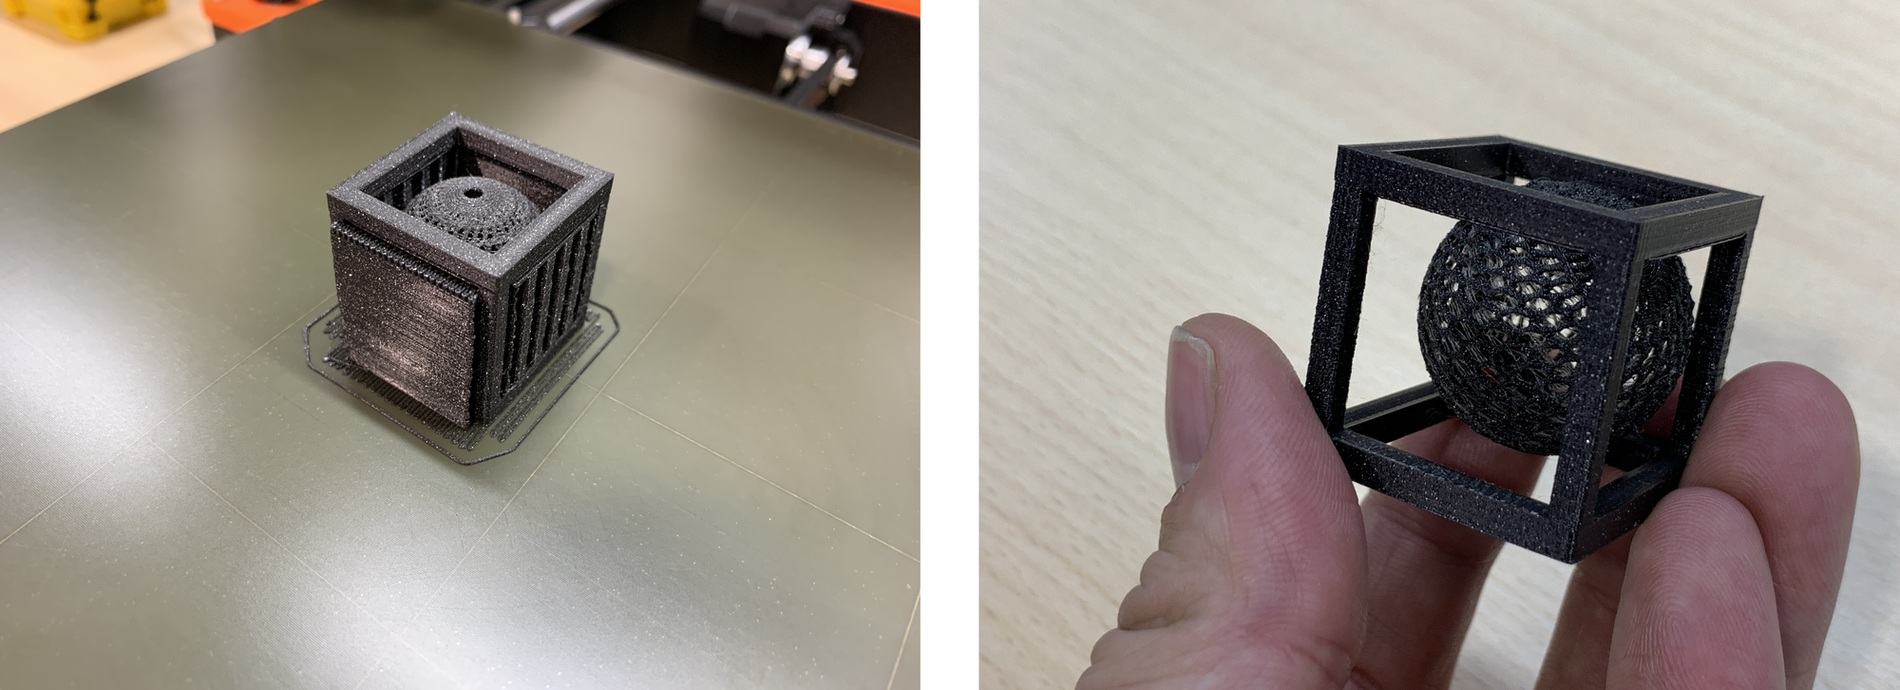
To print the cube and the voronoi sphere I use Prusament PLA Prusa Galaxy Black at a Nozzle temperature of 215ºC and Heatbed temperature 60. Once the supports are carefully removed, make the final piece like this. 🤩
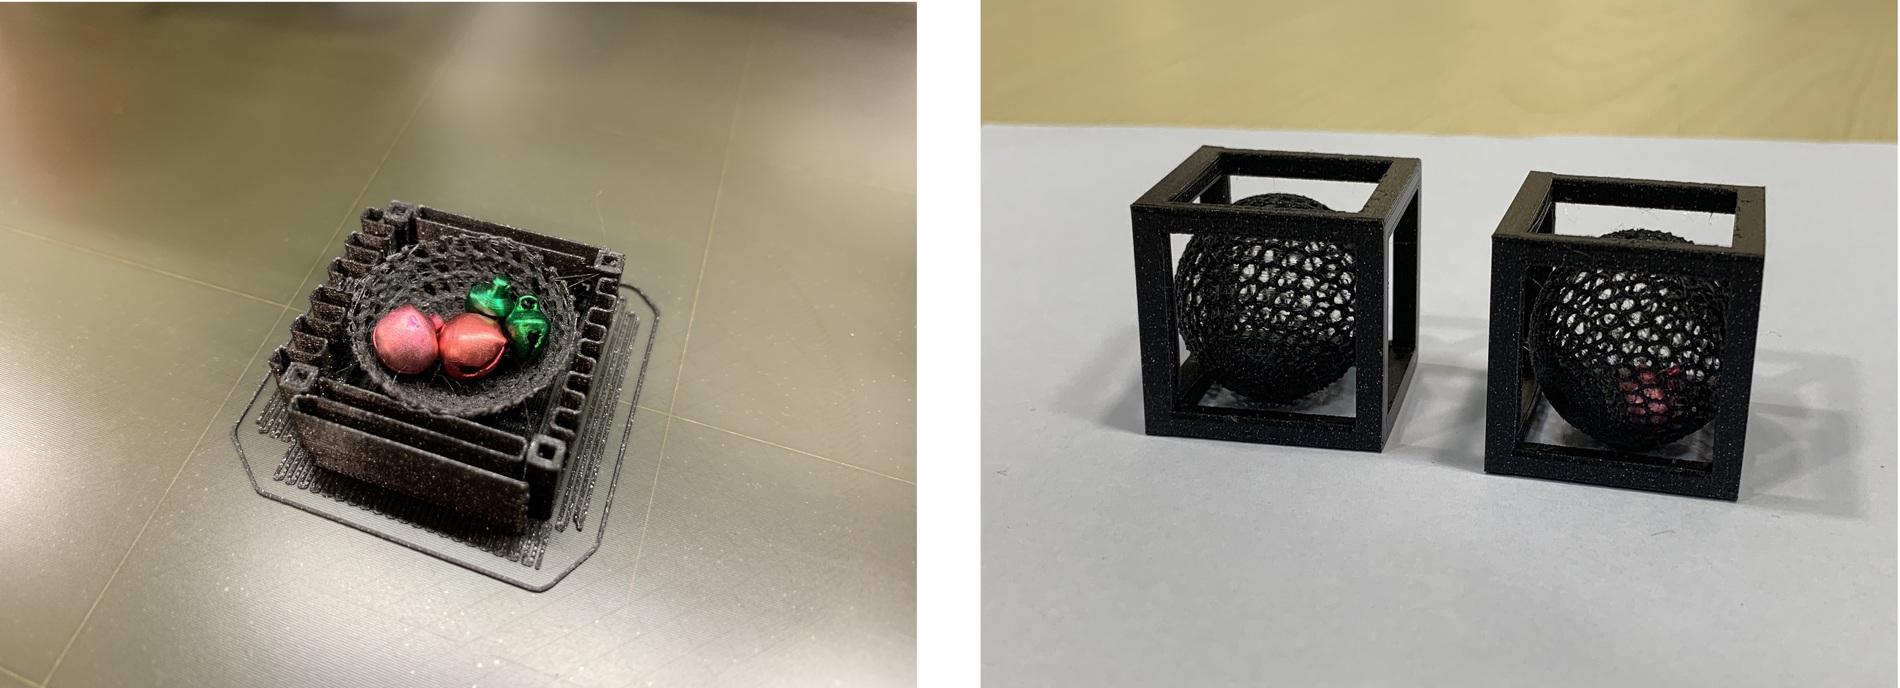
I asked Nuria to leave me some bells that she uses for Poderosas and make a second impression by pausing the Prusa to introduce them into the sphere. You can see that the supports do not touch the sphere.
I have uploaded the design file in .3mf format because it is not as big as the .STL. In .3mf it is 1.7 MB and in .STL it is 5.7 MB. This conversion was done thanks to the PrusaSlicer, without losing the physical measurements of the object.
Here is the file to download.
A small video of the movement, and if you put the audio you will hear the little bells inside. 😍 An ideal toy for a cat. 🐱 😂
Printing with different materials
In this section I will use the following materials in the Prusa I3 MK3S.
- PLA: Prusament PLA Vanilla White. Nozzle temperature: 215° C. Heatbed temperature: 60ºC. Smooth PEI
- PETG: Prusament PETG Carmine Red. Nozzle temperature: 240ºC. Heatbed temperature: 85ºC. Textured PEI
- FilaFlex: Filatech FilaFlex40 Red. Nozzle temperature: 240ºC. Heatbed temperature: 85ºC. Textured PEI
- CorkFill: ColorFabb CorkFill. Nozzle temperature: 205ºC. Heatbed temperature: 60ºC. Important to change the nozzle of the Nozzle from 0.4 mm to 0.6 mm. Smooth PEI
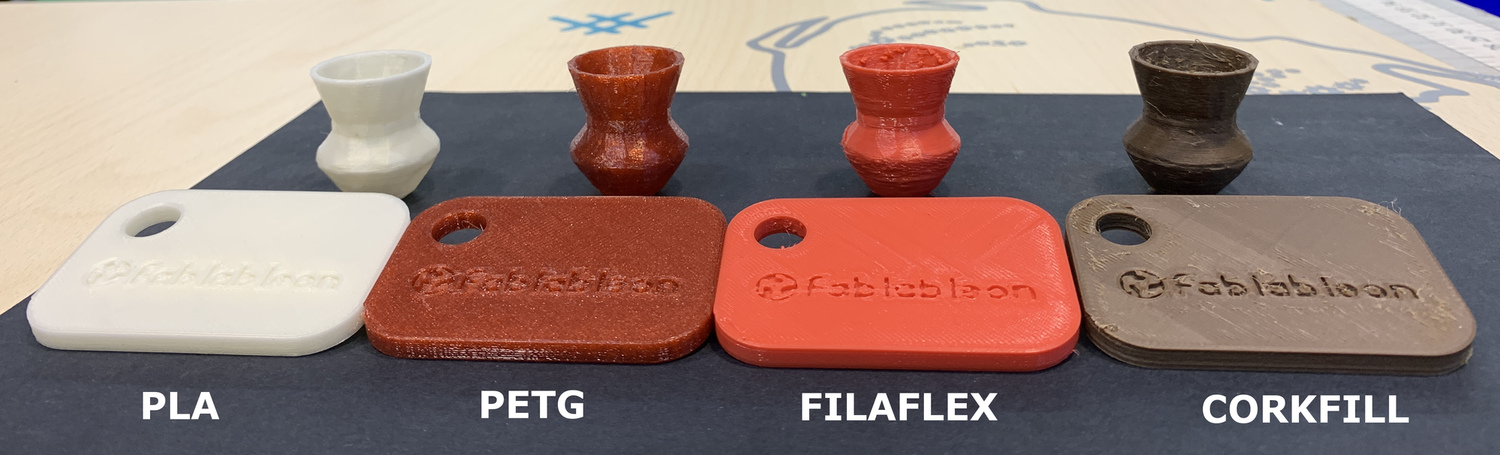
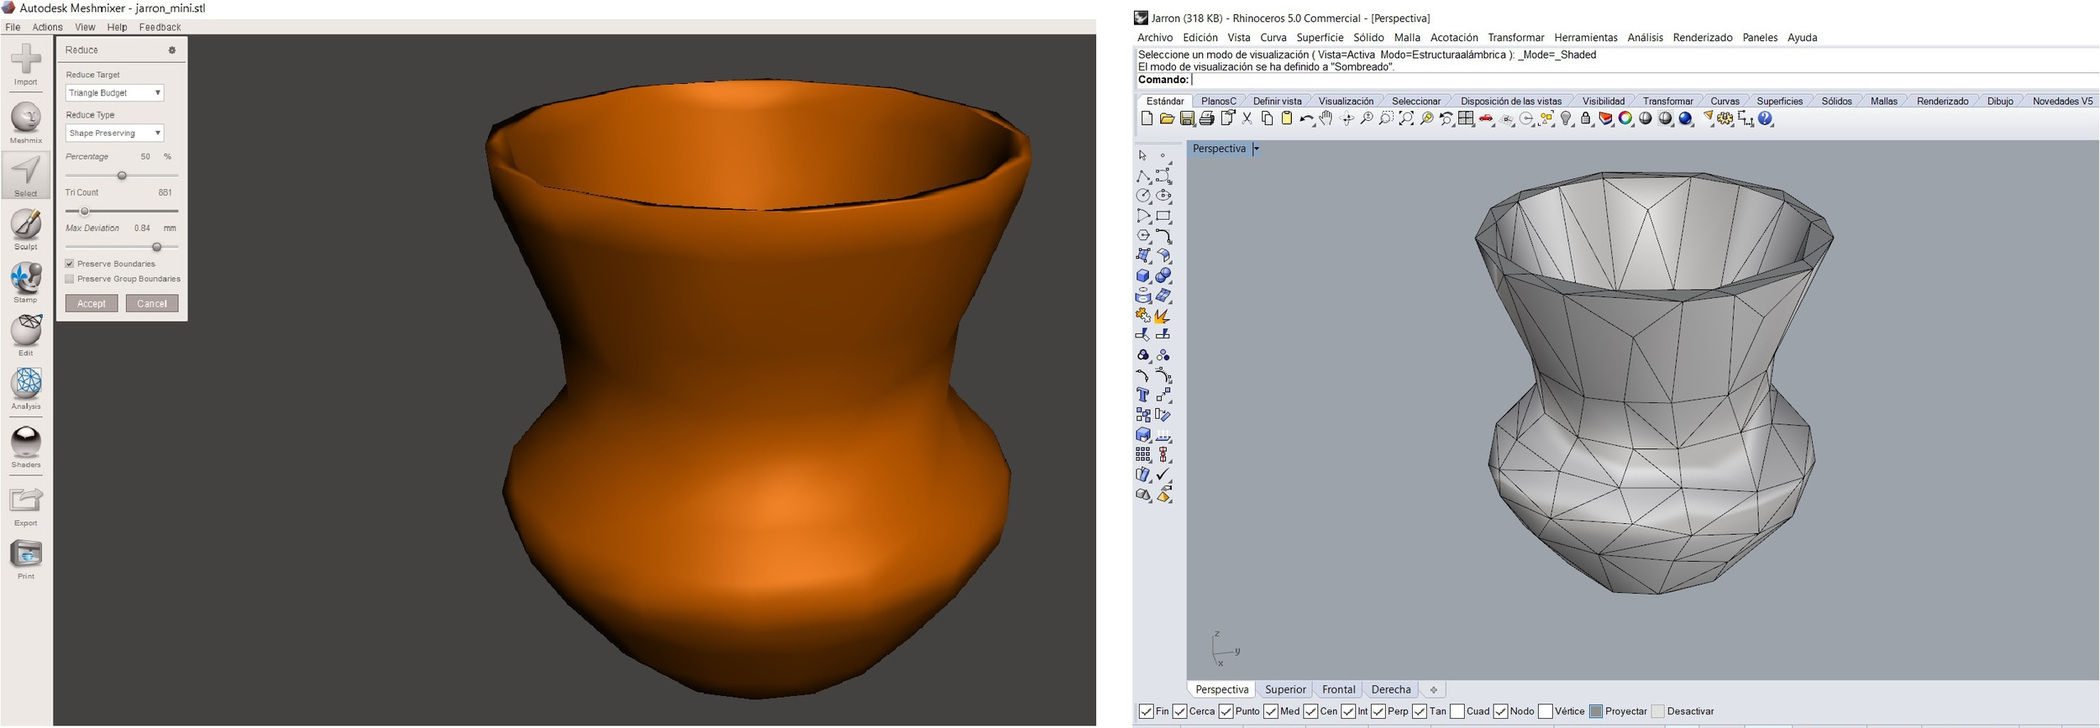
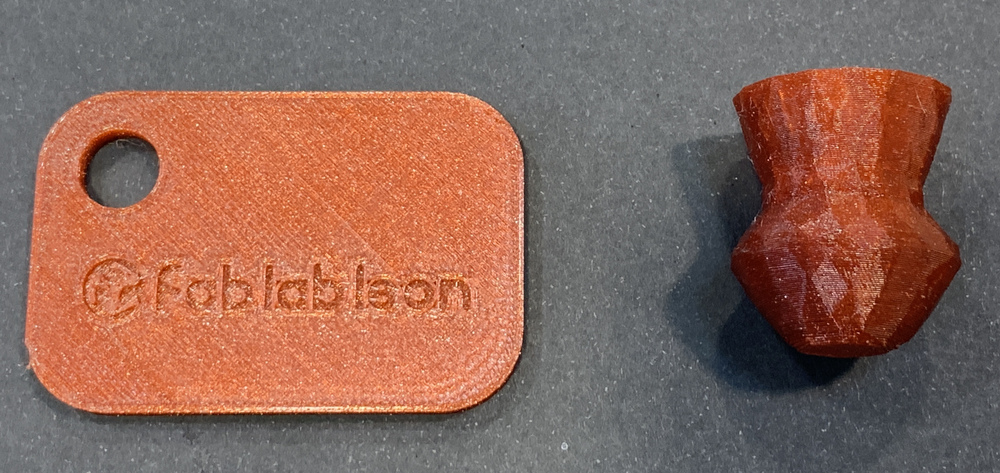
For this I will use two models designed by me, the first one is a keychain that we use for the filament color swatch and a vase designed in Rhinoceros and with the modified Meshmixer with the Low polygon style pattern.
The keychain has measures of 60 x 40 x 4 mm, with a hole of 10 mm.
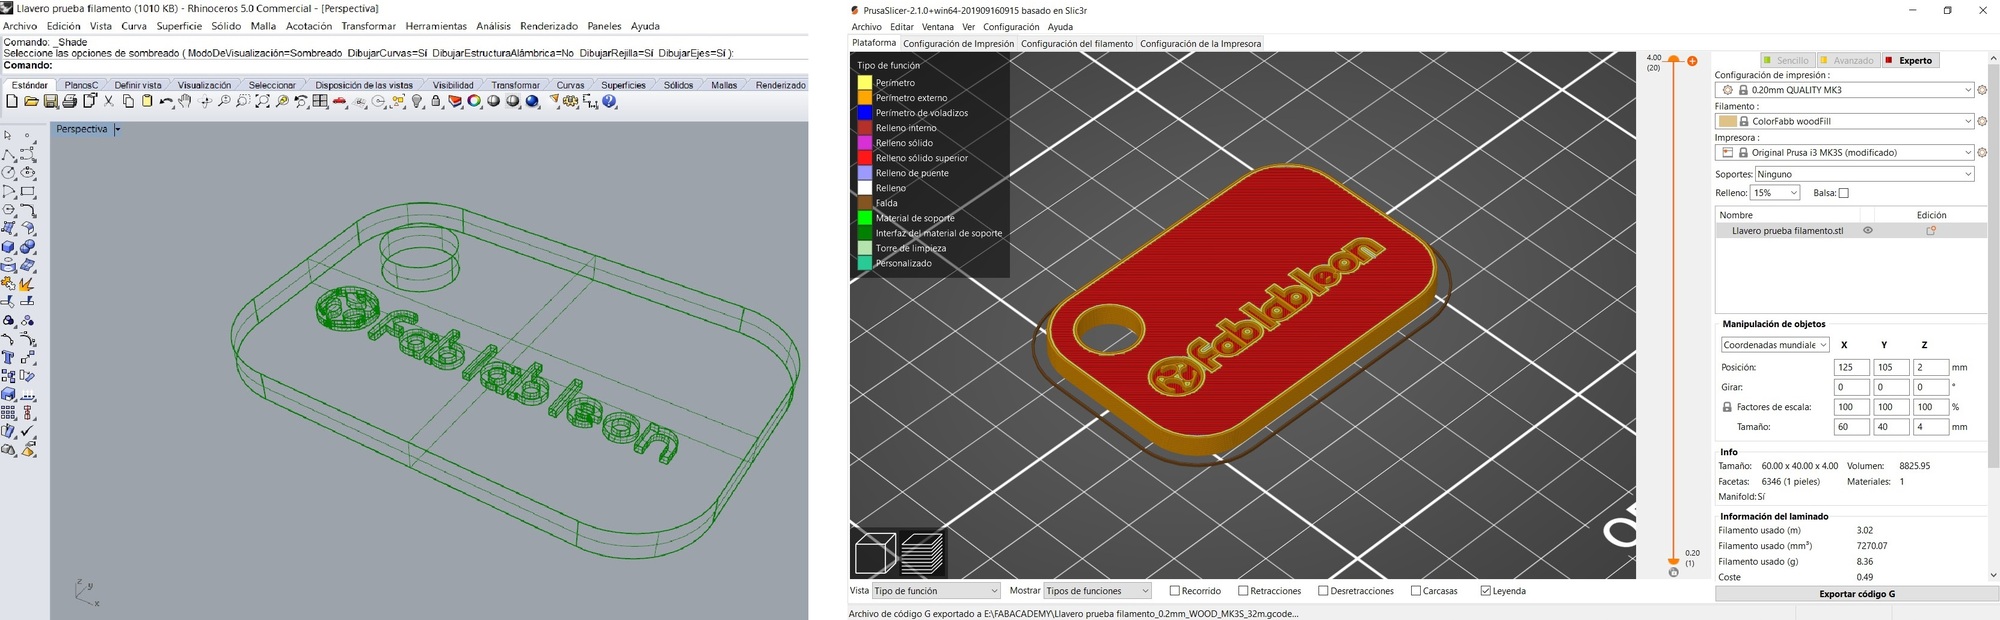
I have designed the vase with Rhinoceros and then use Meshmixer. The vase has a height of 30 mm. In Meshmixer you select the entire piece with control + A and in the Select tab, then Reduce Target with the Triangle Budget option you change the amount of triangles you want your object to have. Nuria told me that from Rhinoceros there is also this option. I have to import the .STL and using the Mesh Edit Tool we click on Reduce Mesh and change the number of triangles. Thank you, Nuria. 😊
PLA
PLA is the most used plastic for 3D printing. In my case I will use the Prusament PLA Vanilla White with the following parameters: Nozzle temperature: 215° C. Heatbed temperature: 60° C. I use a layer height of 0.2 mm, 15% infill and no supports. For this type of plastic I use the Smooth PEI base of Prusa.
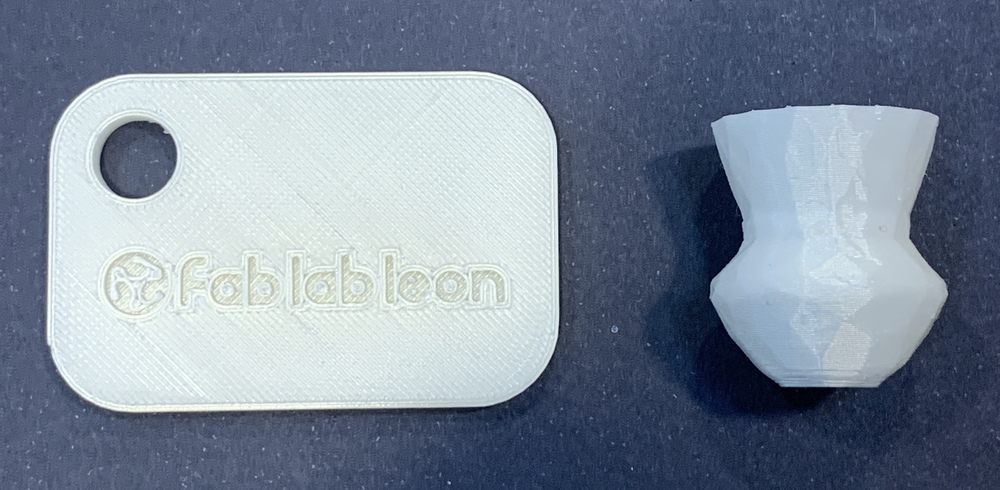
The keychain takes about 33 minutes and the vase takes about 55 minutes. The measures of the key ring are 59.8 mm x 39.8 mm x 4 mm and the hole is 9.9 mm. The letters read perfectly. The vase shows the triangles of the lowpoly and measures 29.8 mm high.
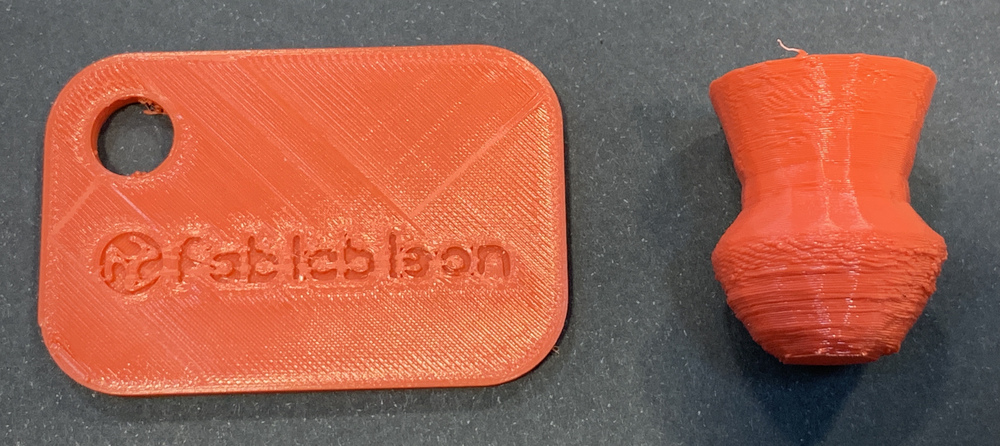
PETG
PETG is the substitute for ABS because it is easier to print and has very similar properties. There is no danger with the gases that emanate during printing and it is easily recyclable. In my case I will use the Prusament PETG Carmine Red with the following parameters: Nozzle temperature: 240° C. Heatbed temperature: 85° C. I use a layer height of 0.2 mm, 15% infill and no supports. For this type of plastic I use the Textured PEI base of Prusa.
The keychain takes about 33 minutes and the vase takes about 54 minutes. The measures of the key ring are 59.7 mm x 39.8 mm x 4 mm and the hole is 9.8 mm. The letters read perfectly. The vase shows the triangles of the lowpoly and measures 30.2 mm high.
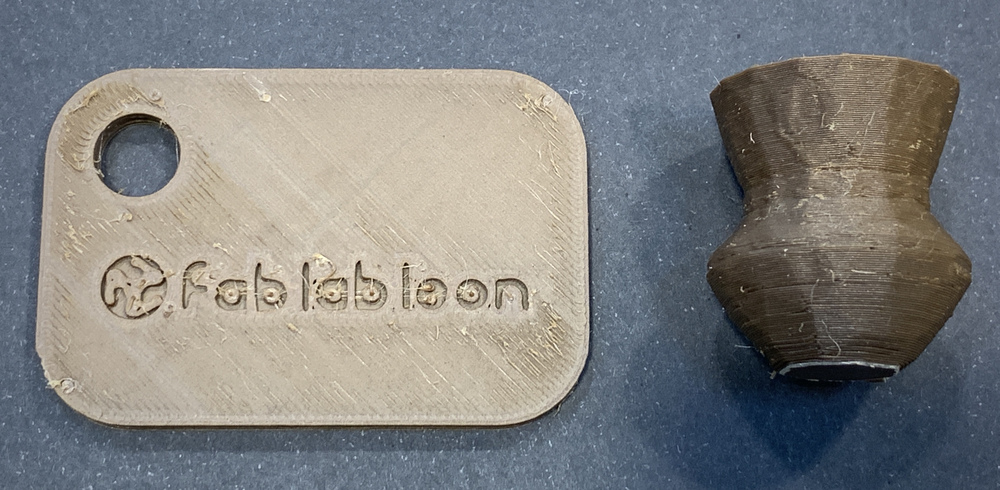
FilaFlex
I had long tried the FilaFlex but on an Anet A8. It is a filament with which soft or flexible pieces can be made. In my case I will use the Filatech FilaFlex40 Red with the following parameters: Nozzle temperature: 240° C. Heatbed temperature: 85° C. I use a layer height of 0.2 mm, 15% infill and no supports. For this type of plastic I use the Textured PEI base of Prusa.
The keychain takes about 1 hour and 21 minutes and the vase takes about 44 minutes. The measures of the key ring are 59.4 mm x 39.6 mm x 4,1 mm and the hole is 9.7 mm. Some letters are no longer read well, and that I am using a 0.4 mm nozzle. The vase no longer shows the lowpoly triangles and at the bottom of the vase it is difficult for the printer to make the layers and measures 29.7 mm high.
A small video of how FilaFlex behaves.
CorkFill
I had never used a wood-based filament and it is incredible. When you look at the resistance of the filament you think that the printer will not be able to melt it. Its smell is like when you cut wood with a jigsaw. In my case I will use the ColorFabb CorkFill with the following parameters: Nozzle temperature: 205° C. Heatbed temperature: 60° C. I use a layer height of 0.2 mm, 15% infill and no supports but if you need Raft (because after performing several tests, the first layer took off and took everything). For this type of plastic I use the Smooth PEI base of Prusa. The manufacturer recommends using a nozzle larger than 0.5 mm, in my case I use a 0.6 mm nozzle. Change of nozzle for me.
The keychain takes about 32 minutes and the vase takes about 56 minutes. The measures of the key ring are 60.2 mm x 40.3 mm x 4.1 mm and the hole is 9.4 mm. The letters are read much better than the FilaFlex and that I am using a 0.6 mm nozzle. The vase shows the triangles of the lowpoly and measures 29,7 mm high.
Conclusions
It is incredible as with the same design and the same printer, the pieces shrink or grow depending on the materials. The times are very similar between all the pieces, it is rare the keychain made with FilaFlex takes so long.
One of the factors that affect 3D printing is the design (if we design pieces smaller than the nozzle size); also if we use supports or not; and the material we use (depends on the retractions).
This implies limitations in 3D printing. If we want to make very small pieces with great detail, we must use a 0.25 mm nozzle for example. If we design a piece with 45º inclinations, we will not need supports, since having them we can break details of the piece. And the material, for example the Filaflex or the Corkfill, is' more complex to print, because it suffers from retractions and the final piece can vary in size.
Here is the files to download. Vase Lowpoly and Keychain
Nozzle Change
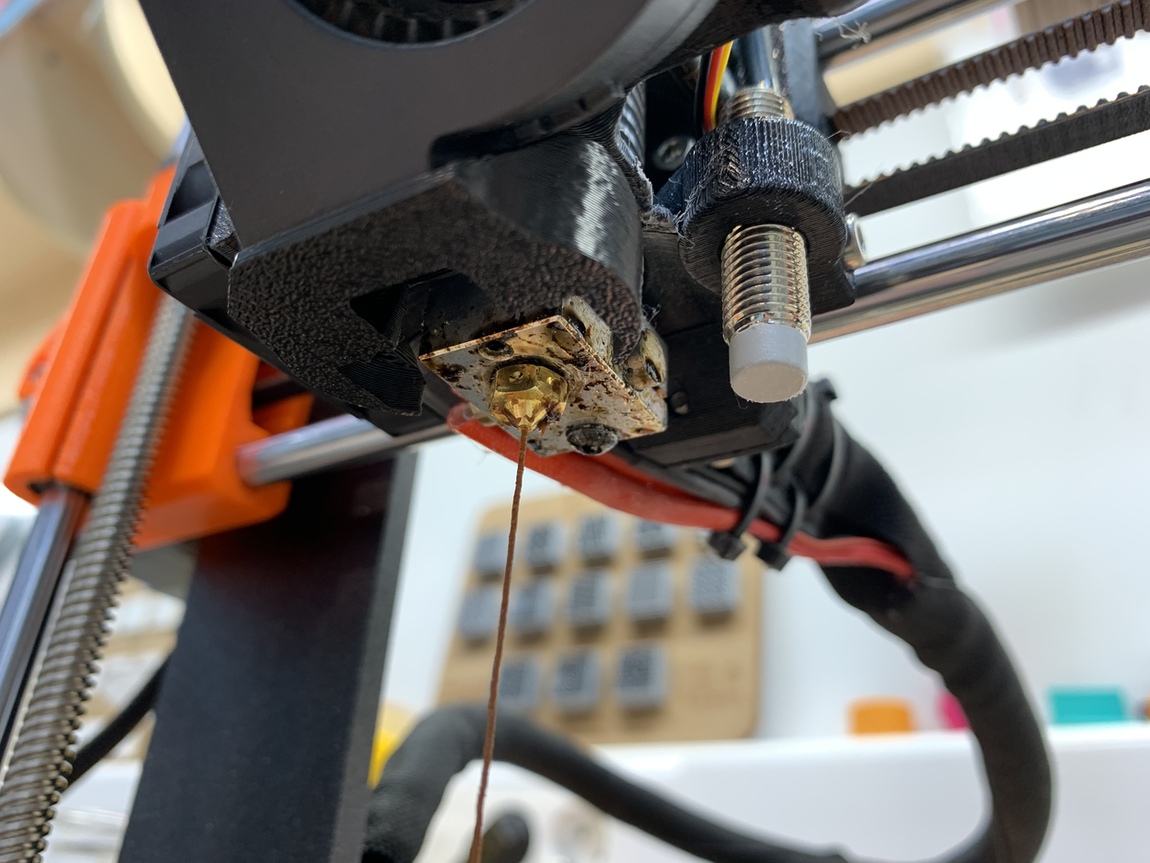
To use the CorkFill filament, the manufacturer recommends changing the nozzle and making it larger than 0.5 mm. When you buy the filament also buy the 0.6 mm nozzle. I have never changed the nozzle of a printer, I have always had jams, but I have been able to solve them by heating the extruder and cleaning it with a needle. So I'm afraid to break something. 😱
Everyone who has a Prusa I recommend that you watch your YouTube channel, has video tutorials explaining different machine processes. Nozzle Change
The tools that are needed are a spanner and a 7mm socket. The extruder must be heated to 285ºC, remove the layer fan and raise the Z axis to the maximum. Once we have removed the nozzle, place it on something that does not spoil with the heat. 🔥
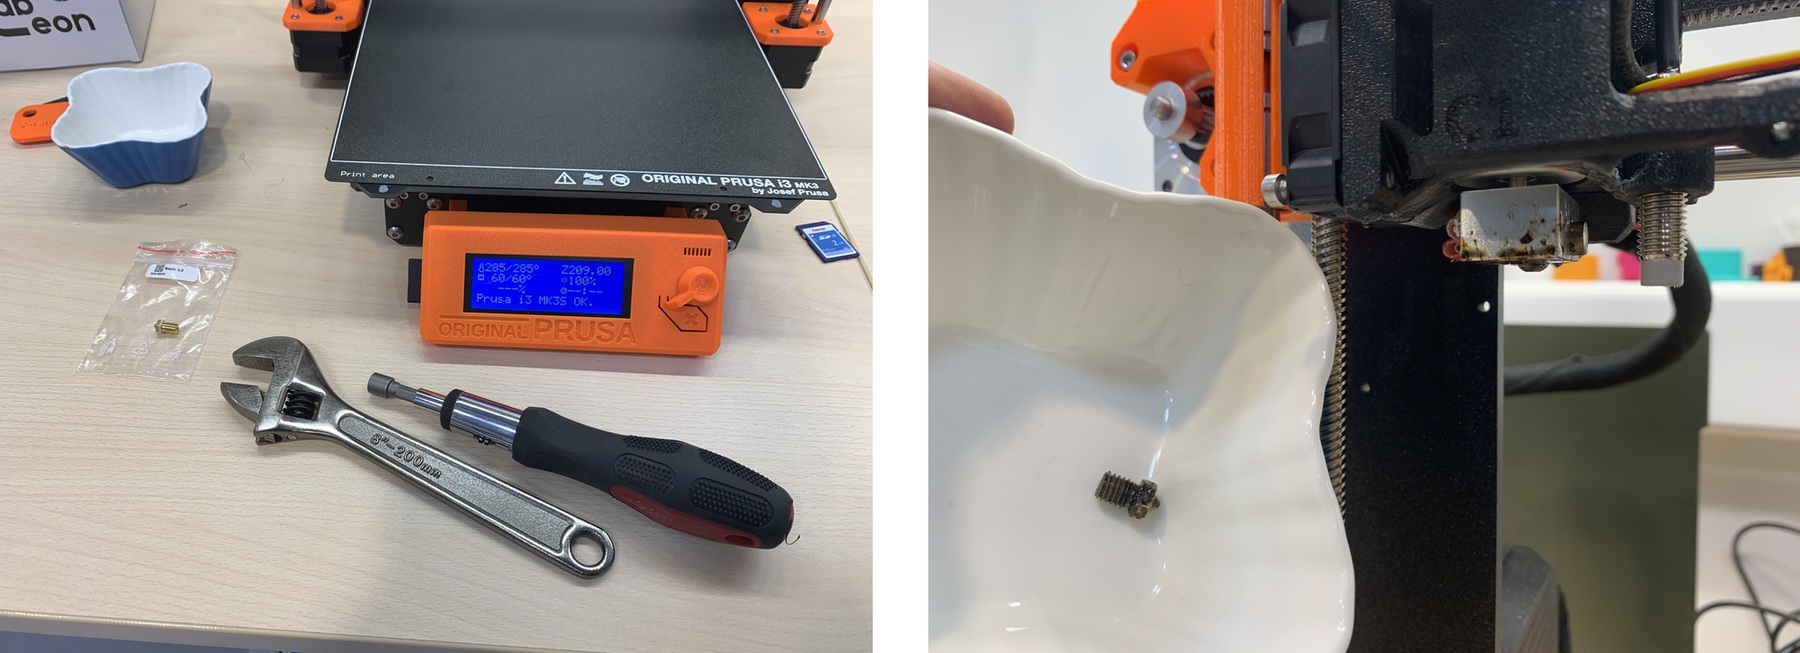
And this is the result, it works and I haven't broken anything. 😅
3D Scanning
In the Fab Lab León there are two types of scanners. The 3D Sense and the adhesion of the Roland MDX-20A Modela. I will try to use both systems.
Roland MDX-20A Modela
Last week I used the Modela to mill the PCB. Apart from being able to mill different materials, this model has a probe that allows us to scan any piece that enters the Modela at high resolution. For this there is to transform the Modela. Nuria is very proud, because she had not taught me anything new at the Fab Lab León for a long time. 😍 It's a lie 😅, she's always teaching me. The first thing we have to do is remove the motor, releasing the cable and two screws.

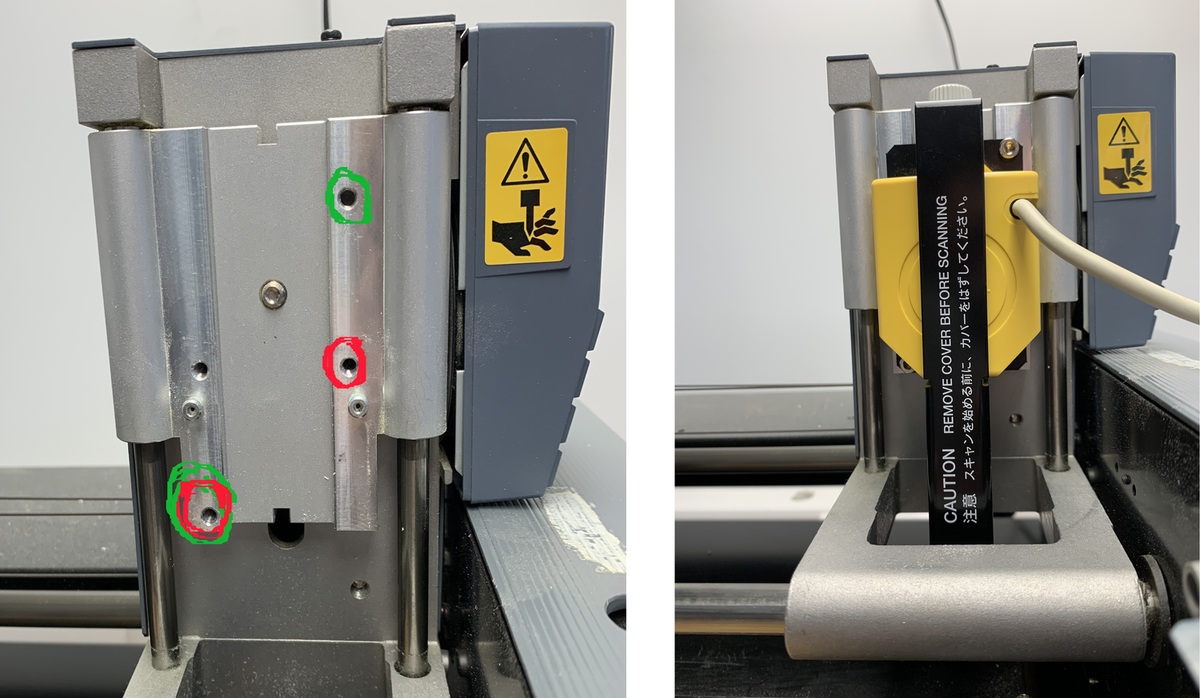
The circles marked in red are to support the milling motor and the green circles are to support the scanner.Once the scanner is fixed, we will connect the data connector. When we turn on the machine, it will mark the Scanning LED. Now we can remove the protector.
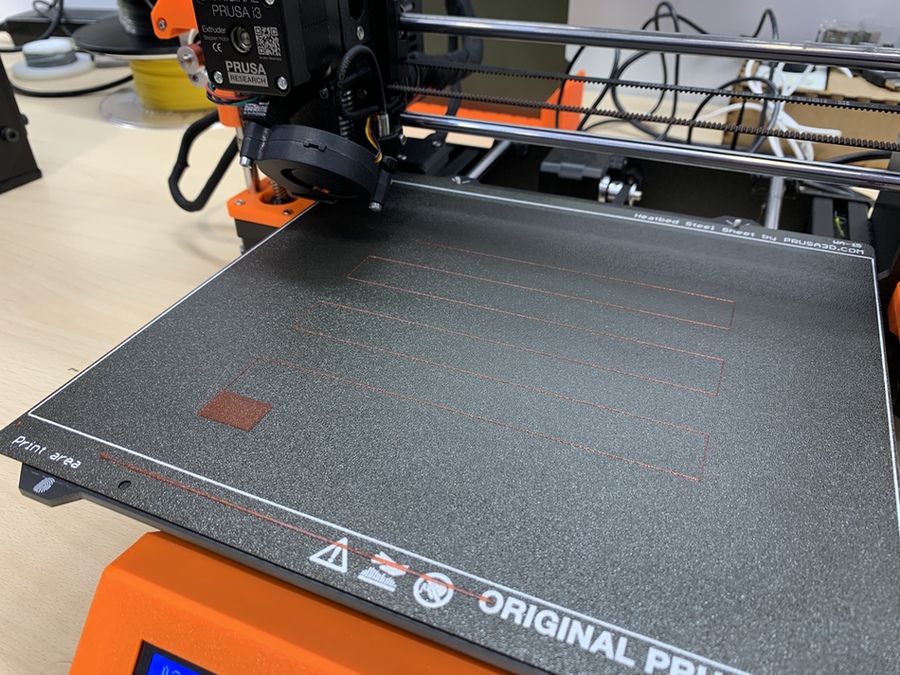
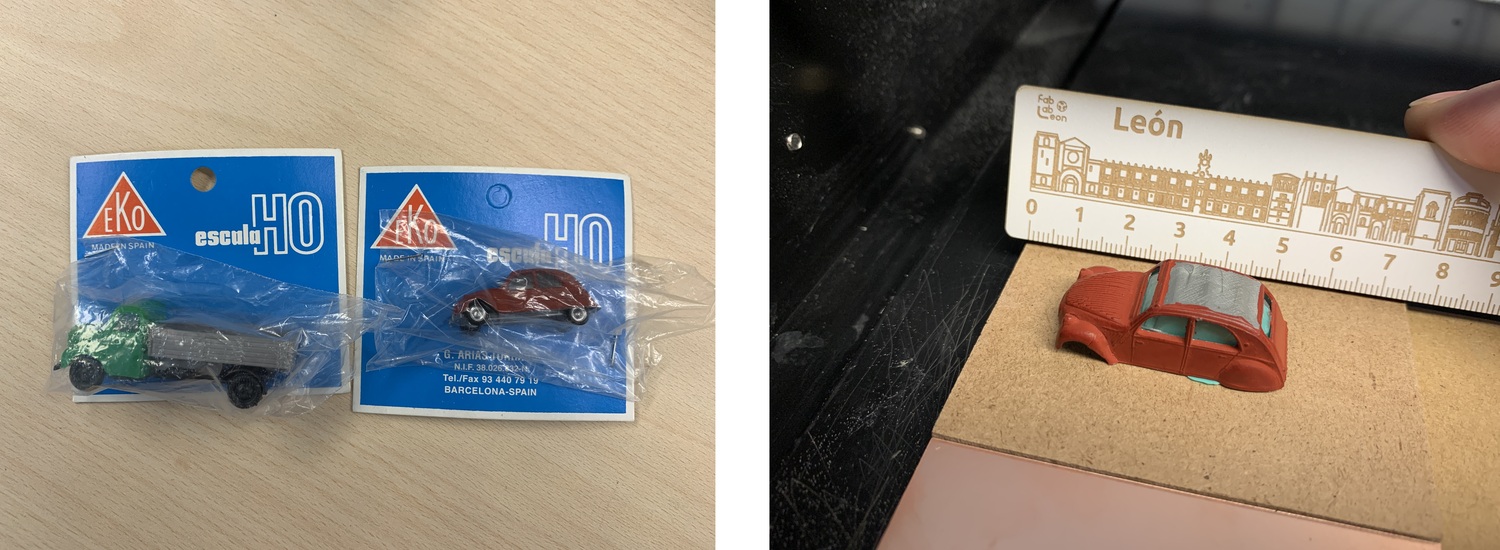
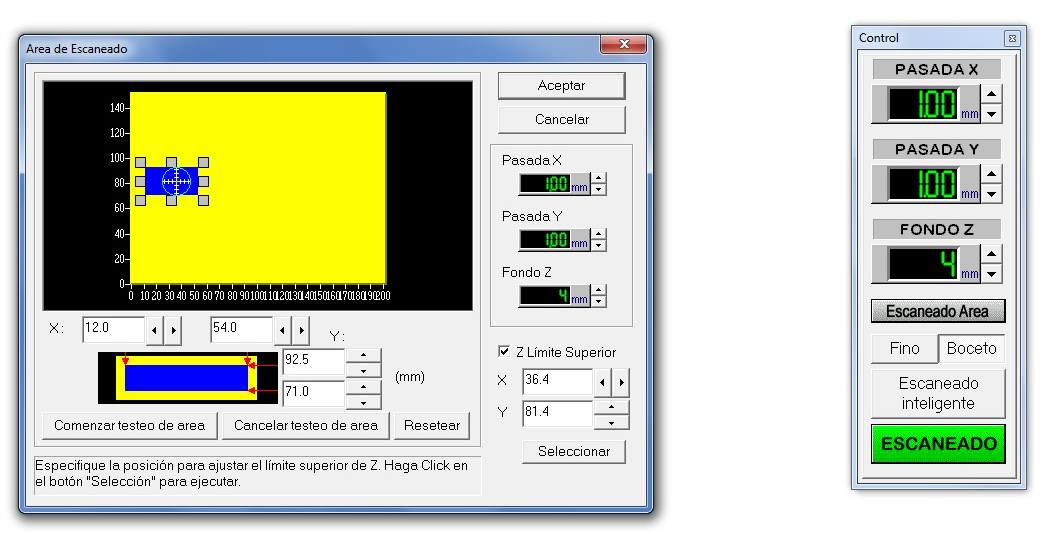
As the Model can scan small pieces of high resolution I will scan a car. A Citröen 2CV of a Spanish brand called EKO that made cars injected in plastic. The scale of the car is 1:87. I take the 2CV and paste it to the sacrificial board with plasticine. I have to delimit the work area, so that it does not scan the entire space. My measurements are X = 12, X1 = 54, Y = 70 and Y = 92.5 mm.
Once I have the measurements, I open the Dr. Picza de Roland program with which I will scan the model. The measures I have taken before I fill them in the program. To test, I will scan at a resolution of 1 mm x 1 mm. It takes 30 minutes.
Once you have finished scanning, the object mesh appears in the Picza program, which we can edit or render. This is the 2CV scanned at a resolution of 1 x 1 mm.
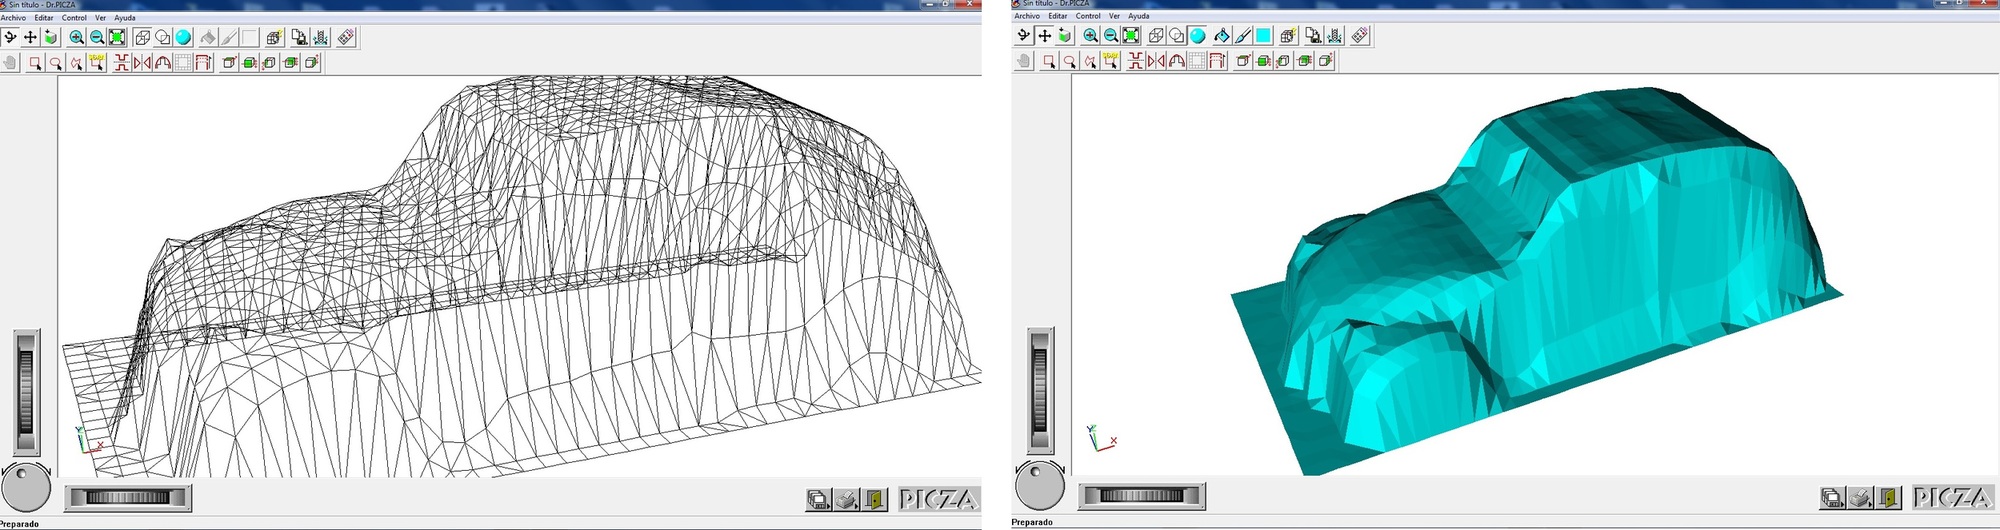
After I have seen that it works perfectly, I modify the resolution to 0.15 x 0.15 mm. It takes almost 4 hours, so I'll leave it all night to see what comes out the next day. 😴 I leave a small video of how the Modela probe that is scanning works.
And this is the final result. The scanner takes out a mesh, only the outside, as if it were a sheet on top of the model.
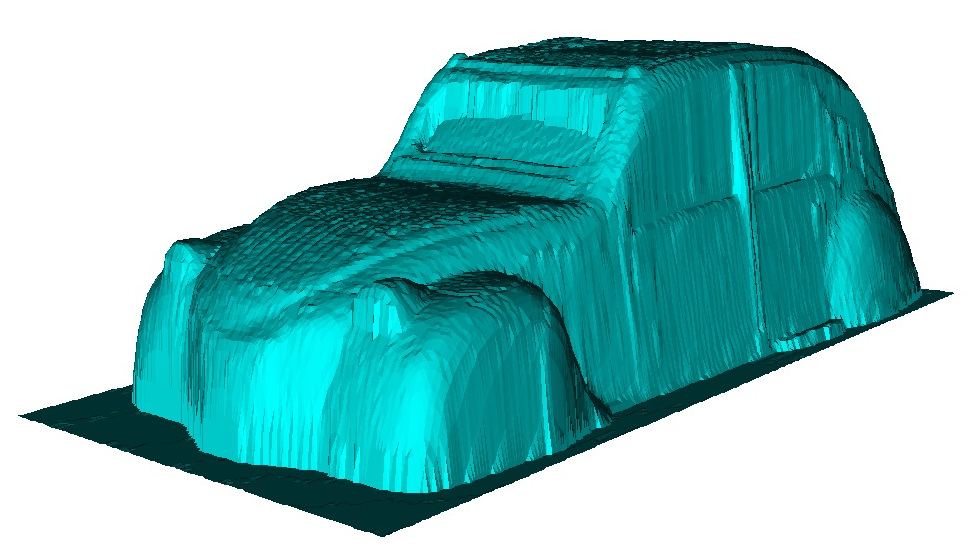
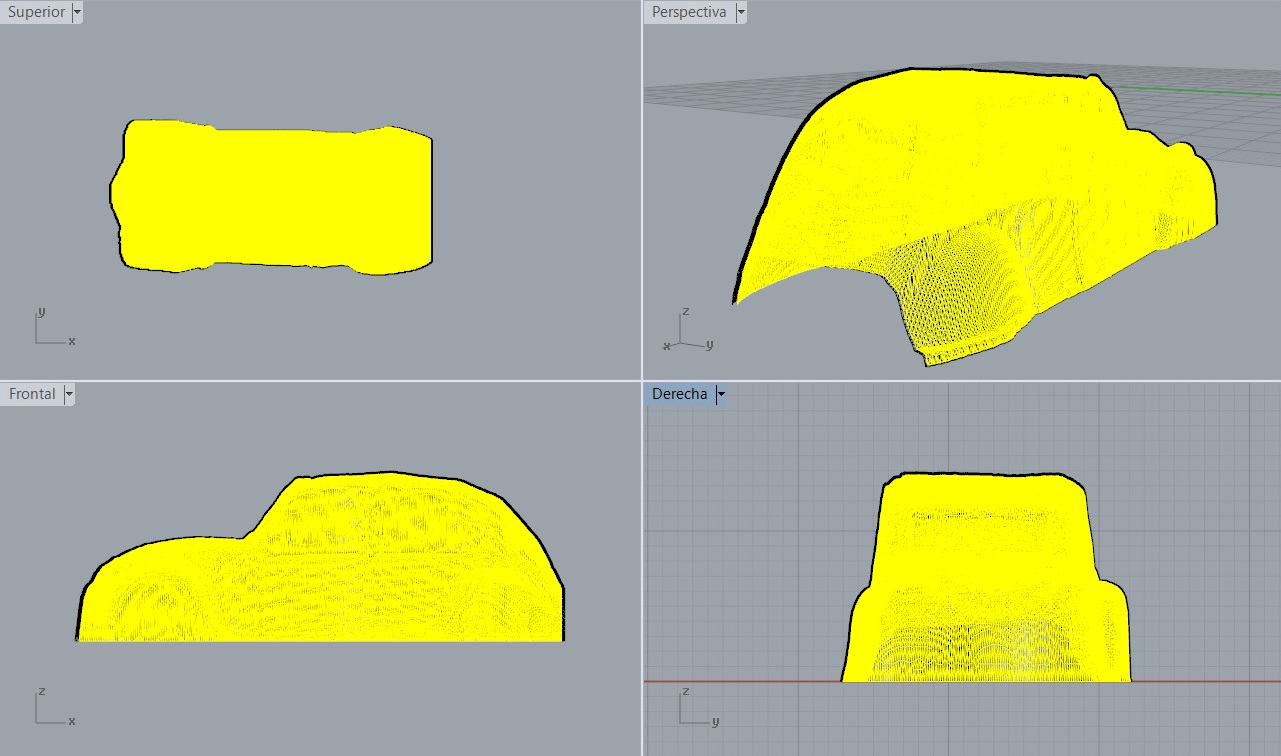
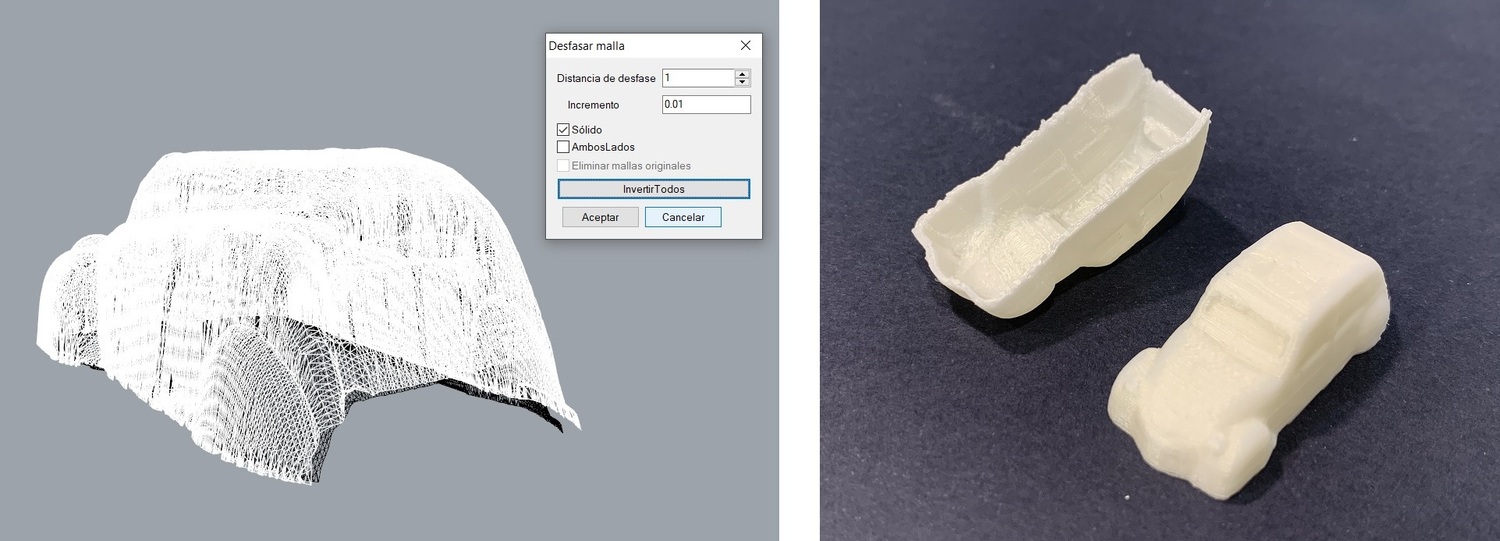
It has an incredible resolution, the pity is that the printers we have in the Fab Lab León are from FDM, if there were any of SLA it would be perfect. But well, I'm going to prepare the file so I can print it. I export the .STL of the Picza program. Using Rhinoceros, I try to create the 2CV housing by offsetting the original mesh inwards. But I can't merge them and fill in the gap in between. I will keep trying.
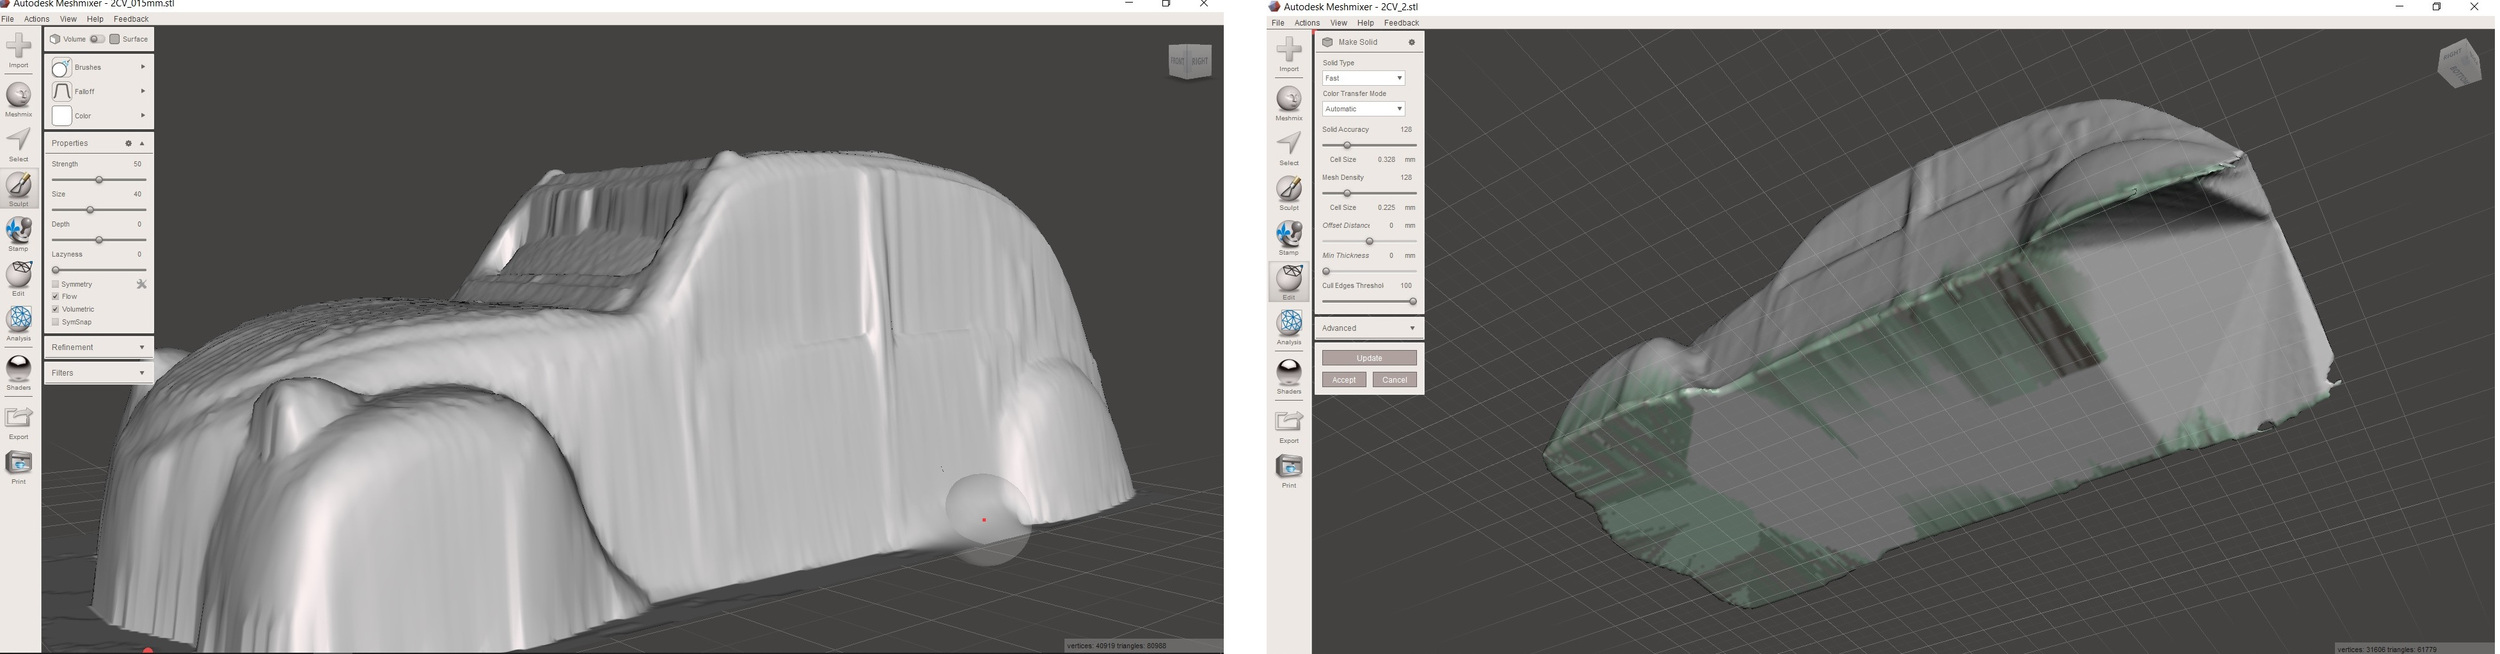
As I can't remove the mesh, I use Meshmixer to erase a small scan defect and make the model solid. Using the sculp tools I erase the defect and cut the bottom part that appeared as a base around the model. Within the edit menu click on the make solid option.
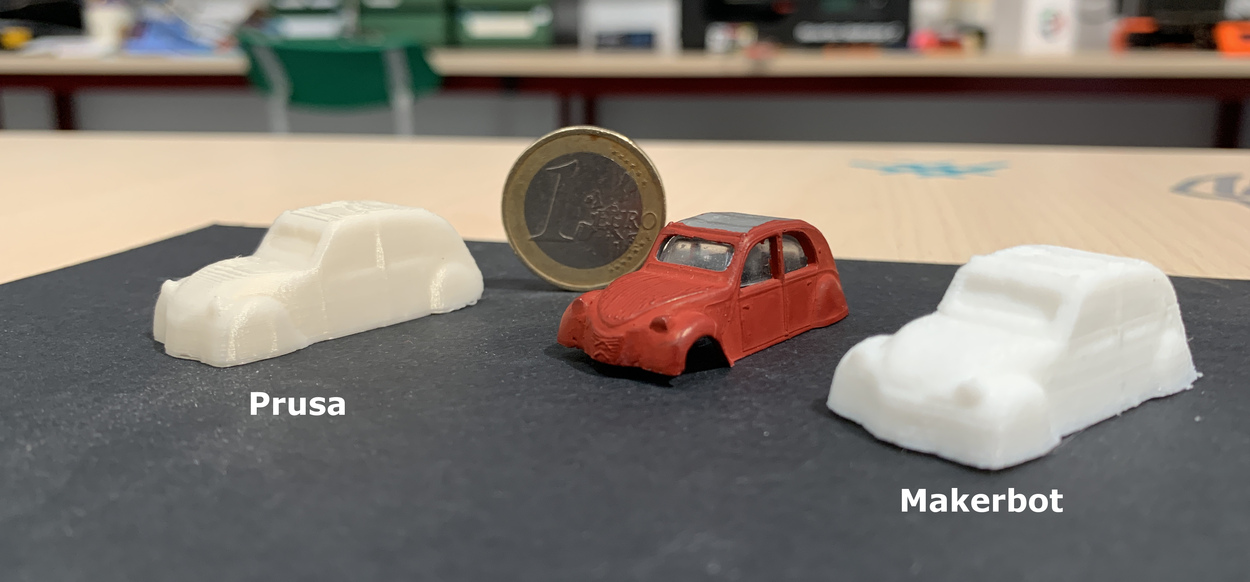
Once I have the final .STl of the 2CV I print it. I will print it with the Makerbot at a resolution of 0.1mm, with supports and 15% infill; It takes 33 minutes. With the Prusa at a resolution of 0.15mm, with supports and 15% infill; It takes 40 minutes. And this is the result, to my liking I keep the 2CV printed by Prusa, the Makerbot scales the design a little more. To see the size of the model, I have placed a 1 euro coin. 🧐
03/03/2020
Nuria recommended that I use the Rhinoceros command to offset mesh. With this command we can make the mesh thicker and be able to print it. In my case I offset it 1 mm inwards. And this is the result.
3D Sense
The Sense scanner is very easy to use, portable and fast. You can scan object and in people the body or head. In the Fab Lab León we mostly use it to scan the heads; All children want to have their mini-self.
Thanks to my instructor Pablo, he scans me using a swivel stool and a tripod to hold the scanner. Special care must be taken during scanning in not moving and light that is uniform.
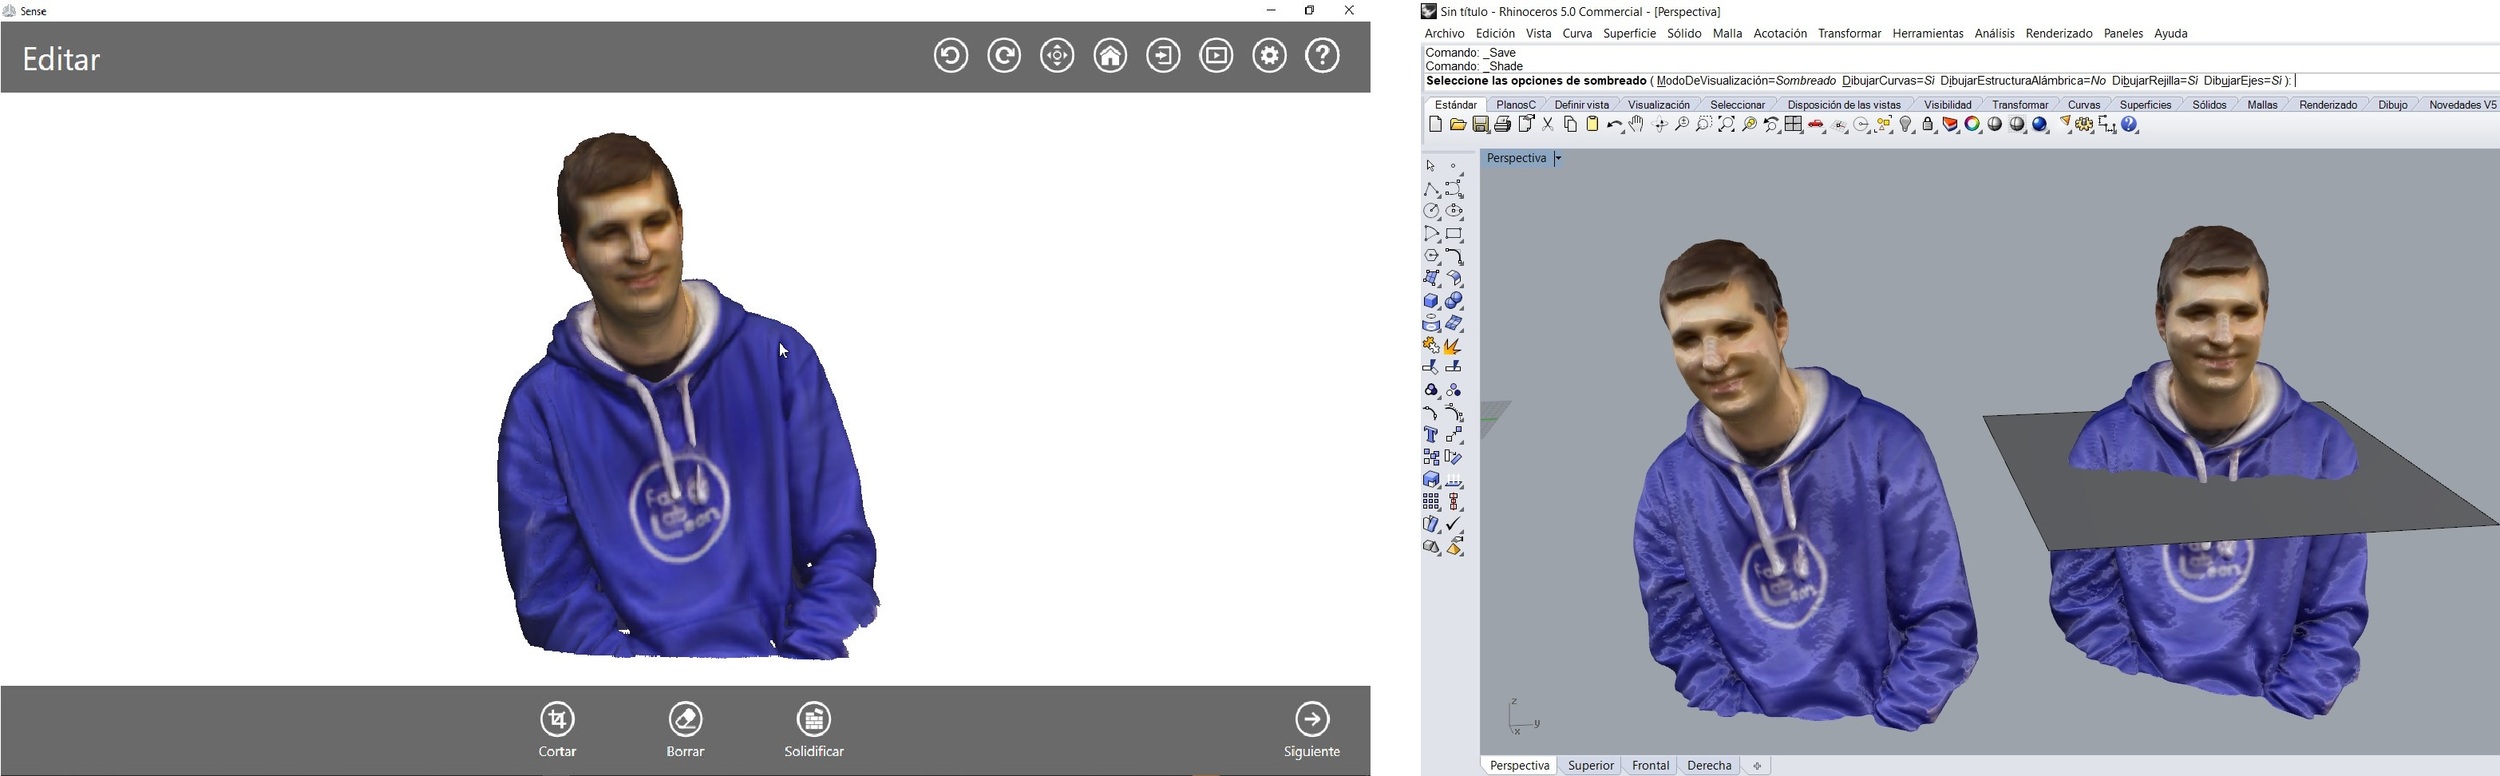
Once scanned, through the Sense program we can retouch some part of the scan and move from the mesh to the solid. I save the scan in .PLY format because it saves the colors within the scan. I import the .PLY into Rhinoceros where, through a short surface, the mini-I and turn it over the vertical.
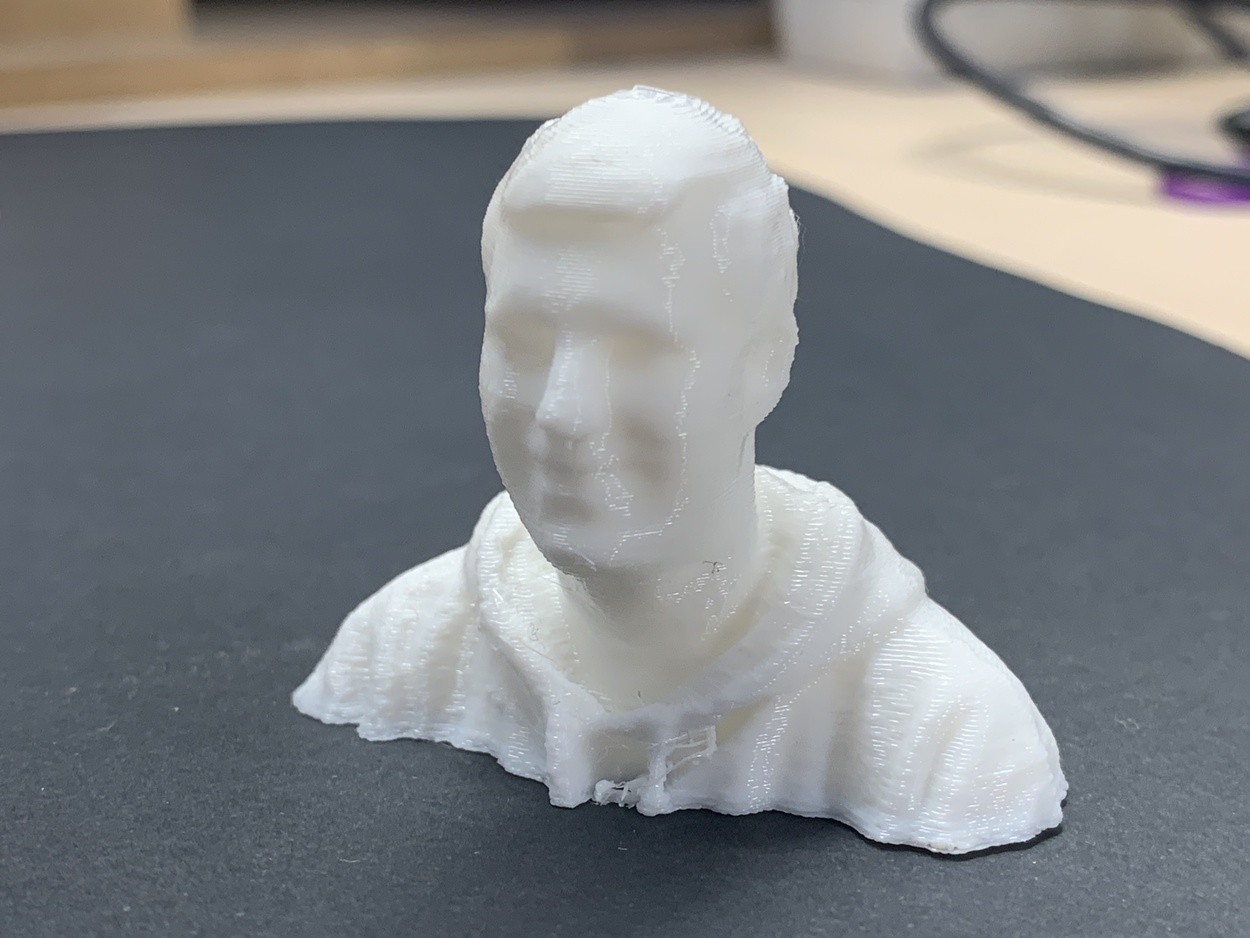
And this is the final result printing my mini-self on the Makerbot with 0.2 mm layer thickness. 😅
3D printing for my Final Project
Barriers and level crossing lights
During the design week, design the barriers and lights using FreeCad. Now is the time to print it. As they are small pieces I have ensured that they are not less than the width of the extruder 0.4 mm and that I can make layer heights of 0.1 mm. In this case I will use the Prusa and the Makerbot to make the pieces. It does not take more than 15 minutes the largest that is the barrier engine.
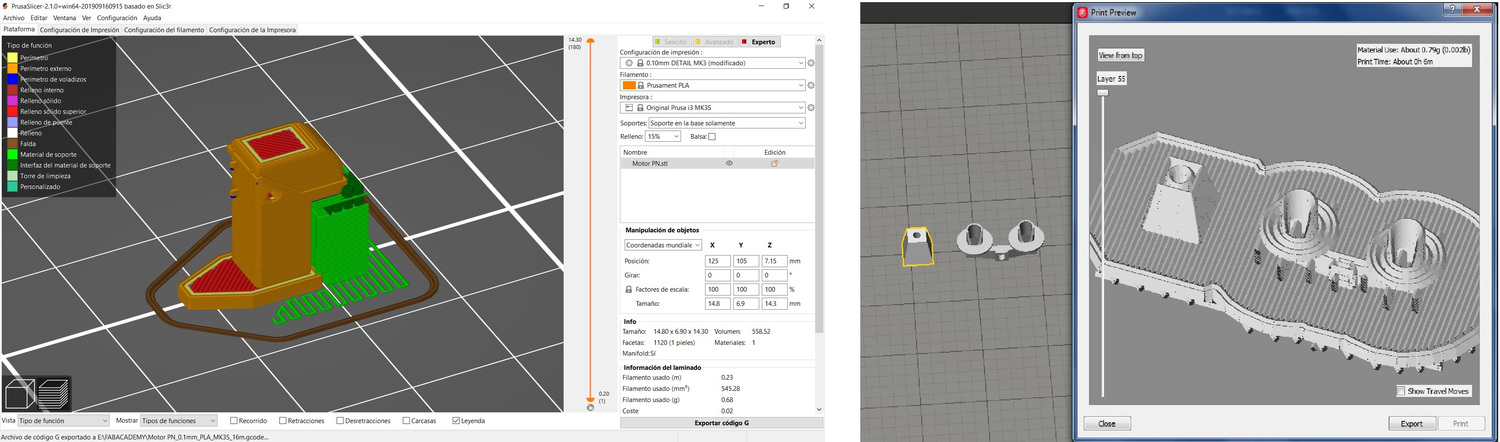
Sometimes it doesn't work out at first, and you try to save time and it's not worth it. Putting some pieces together, I have extrusion problems, because when the piece is so small when it jumps from one to another, the PLA cools and looks bad. So I separate the pieces. Here the progression. I have printed several spare parts and on both machines, so the color of the PLA may be different.

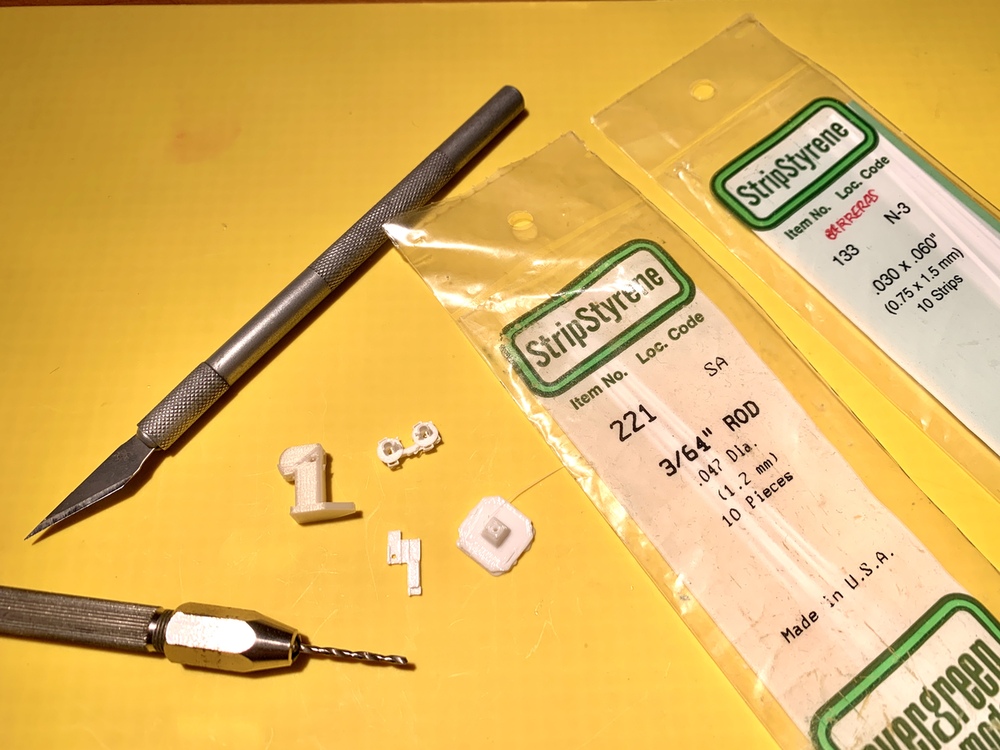
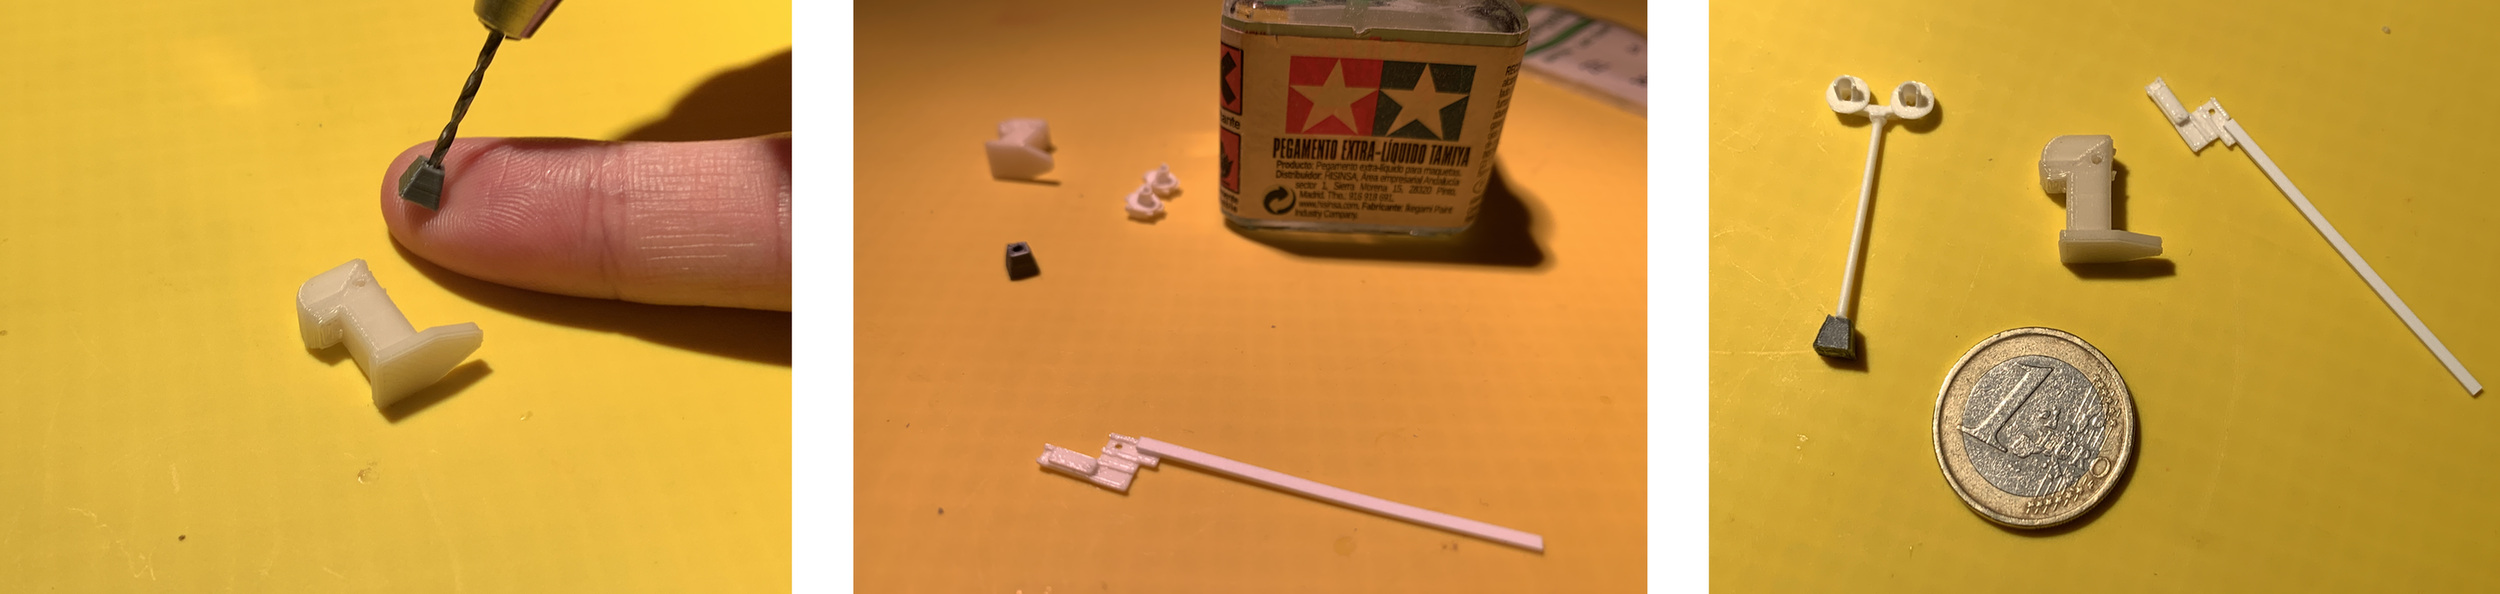
Once the pieces are printed, you have to postprocess them. In my case I remove the supports, but I also use styrene profiles (they are used a lot in modeling, before knowing 3D printing was what I used) for the axis of the barrier, the barrier and the lamppost. I use a small drill to pass the profile through the pieces.
For the bonding process I use SuperGlue and Tamiya liquid glue. The comparison with the 1 euro coin cannot be missing. 🧐
A small video of the movement of the level crossing barriers.
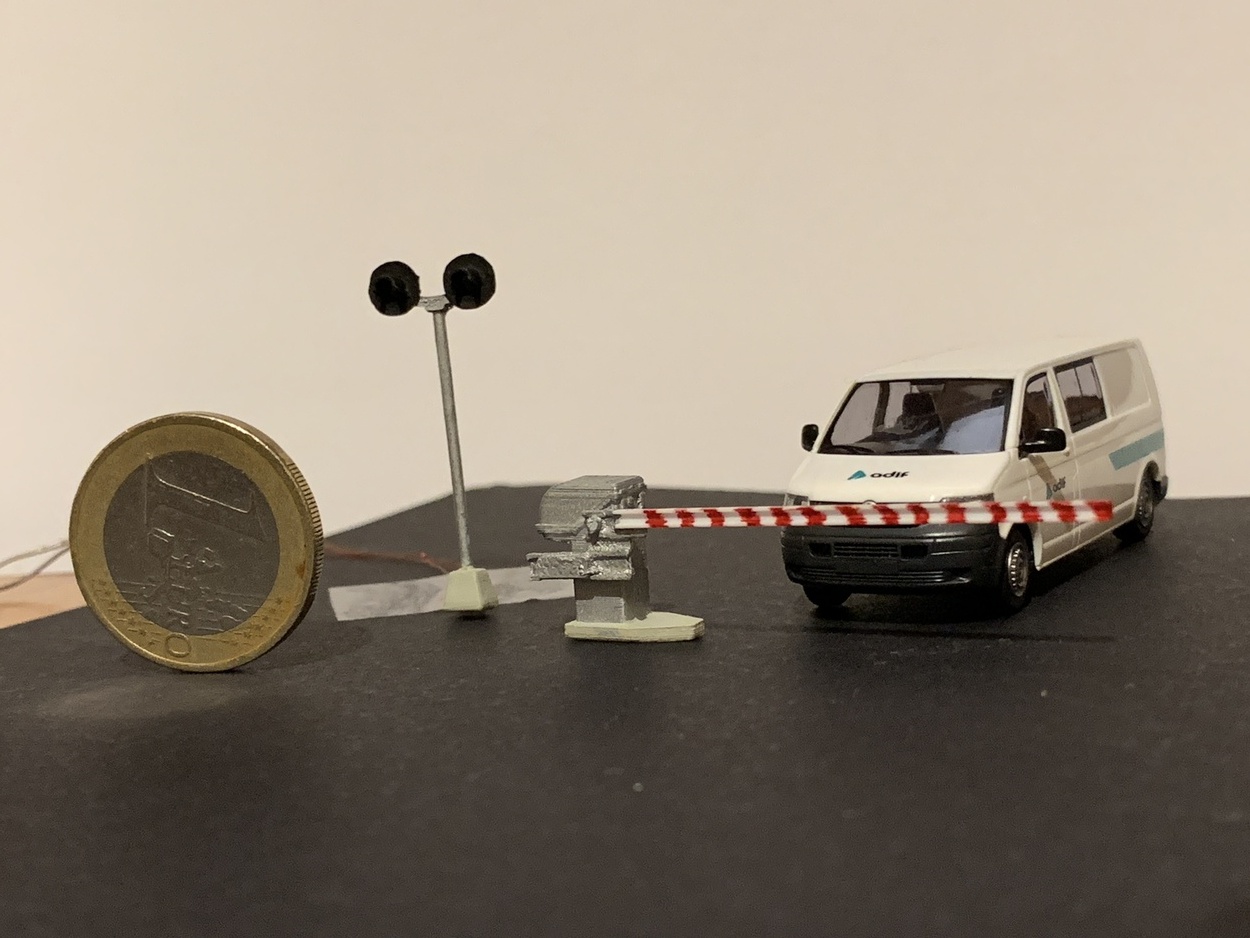
For the lights I will use SMD 1608 LED, they are incredibly small and it costs to weld them. 😣 I reuse the cable that comes inside the headphones because it is varnished and very thin. When I put it in the spotlight, I glue it with SuperGlue and put some baking soda to solidify quickly and have form. In the positive of the LED I pay a resistance of 470 Ohms.

With a little paint and patience 😅, I already have the two barriers and the two lights of the level crossing. Here is an example with a van from my company Adif at 1:87 scale and the euro currency to compare the sizes.
Here is the files to download.
Tree trunk
In week 2 of design I also tried to create the trunk of a tree. Having the Prusa changed the 0.6mm nozzle and the CorkFill filament wanted to prove how the printed log would look like. So using the Meshmixer, I started shaping the branches. When I have it ready, I put the brackets on the PrusaSlicer. I think it will cost the piece to come out. 🙄
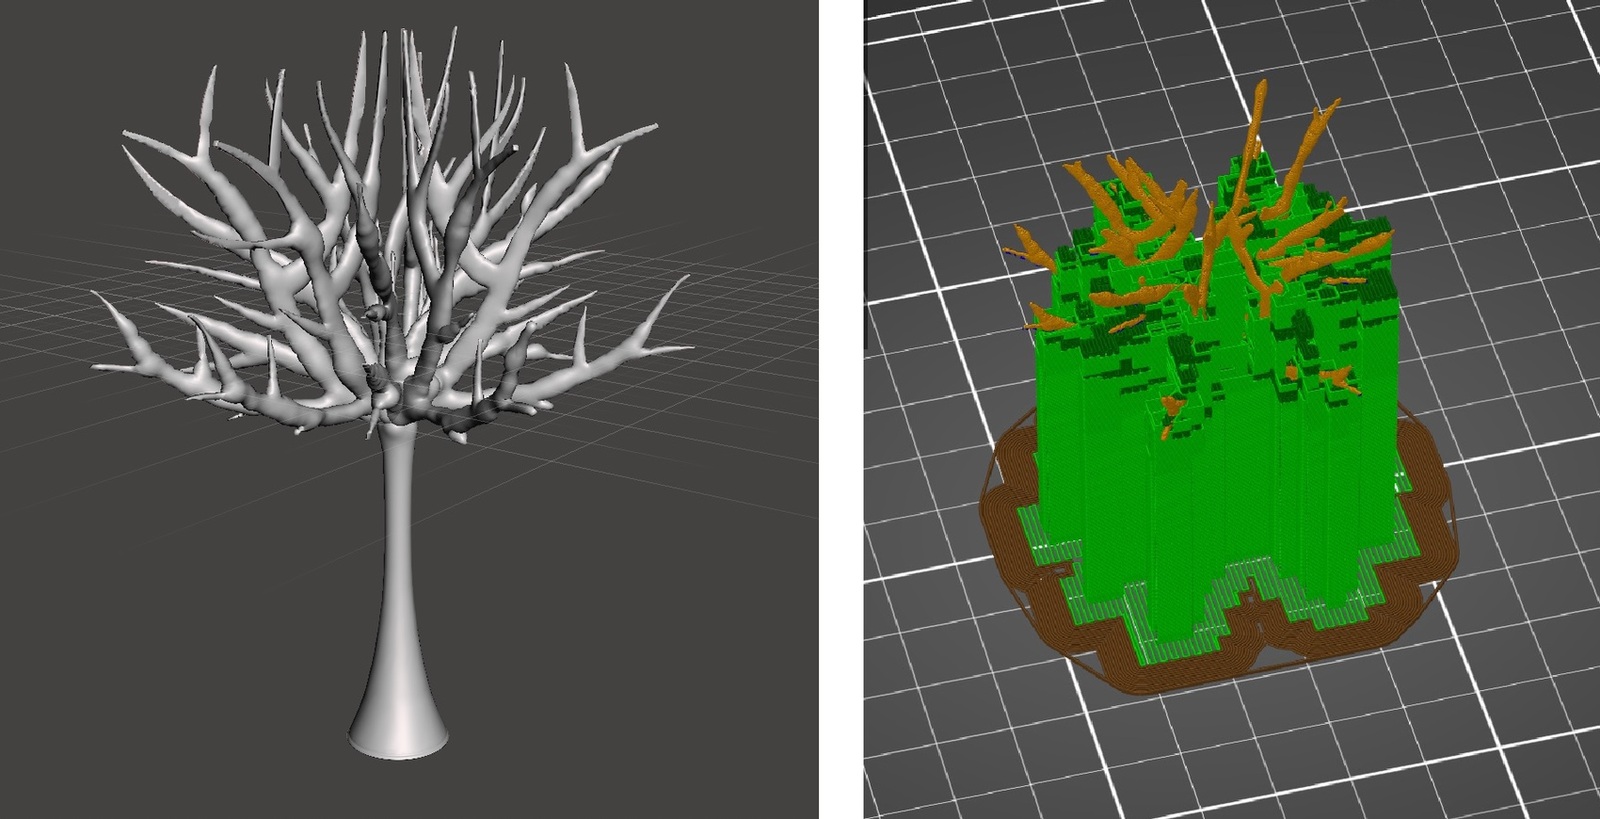
It scares a little like the part in the printer. Gradually I begin to remove supports, some branches are broken ... 😖 In the end I lost more material in the supports than in the final piece. Sometimes there are some models that do not compensate to print them, they are tests. 😐
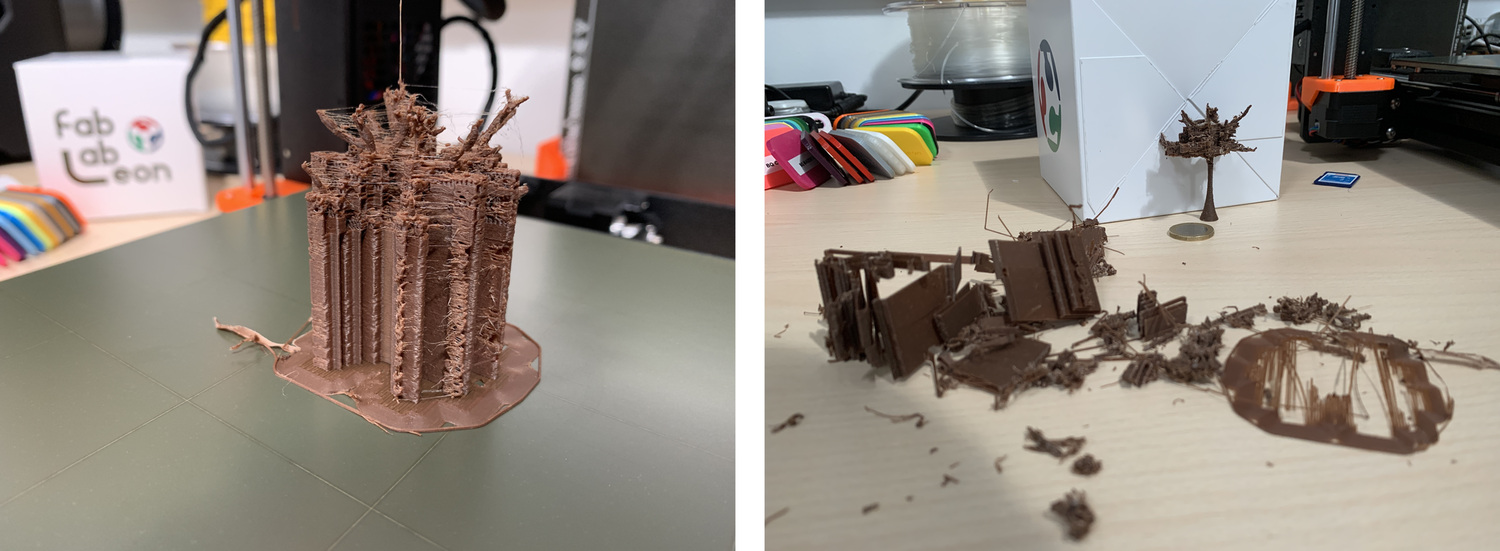
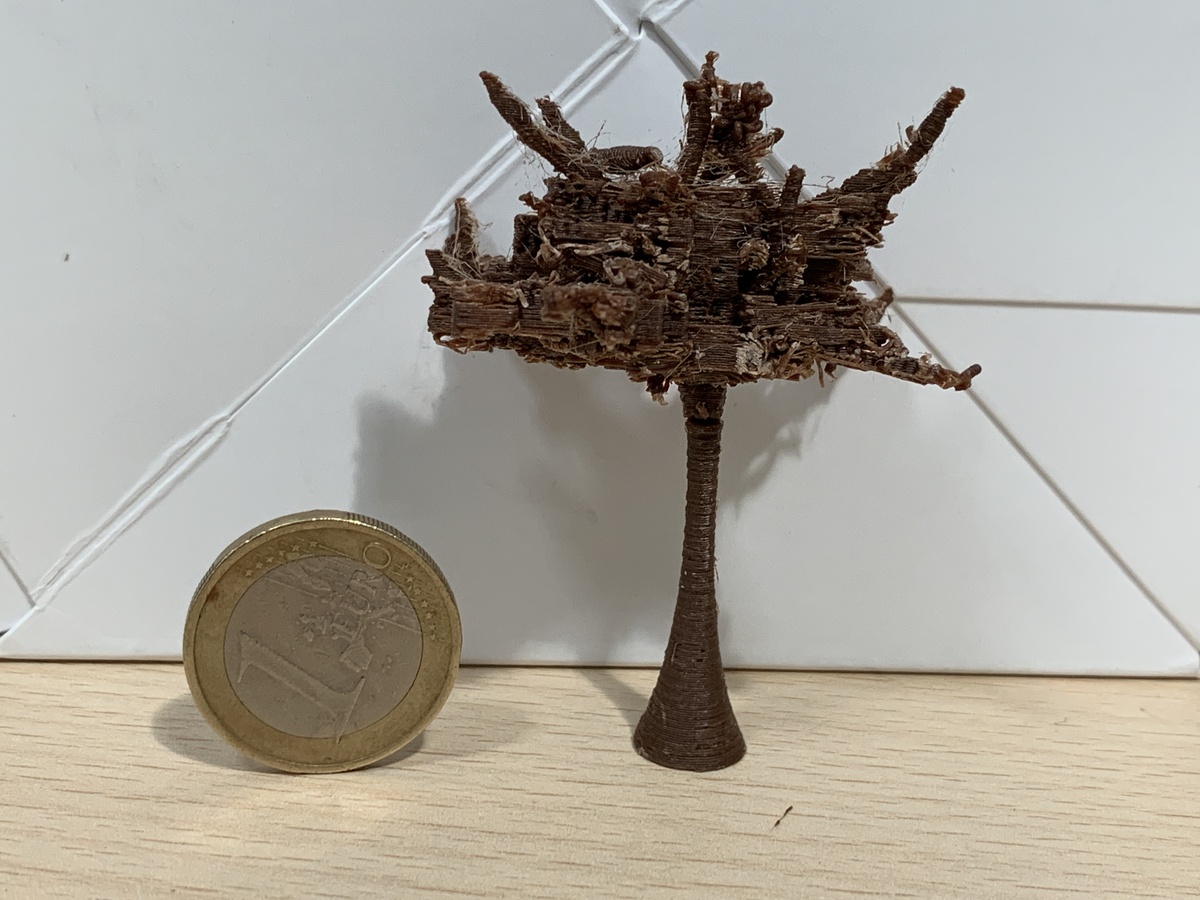
The final result; It is very weak and needs to be supported because it falls off the weight that is not balanced. Here I have had several problems that limit me in 3D printing. The design is not suitable for the 0.6mm nozzle, it has too many supports and the Corkfill is difficult to print due to the retractions too.
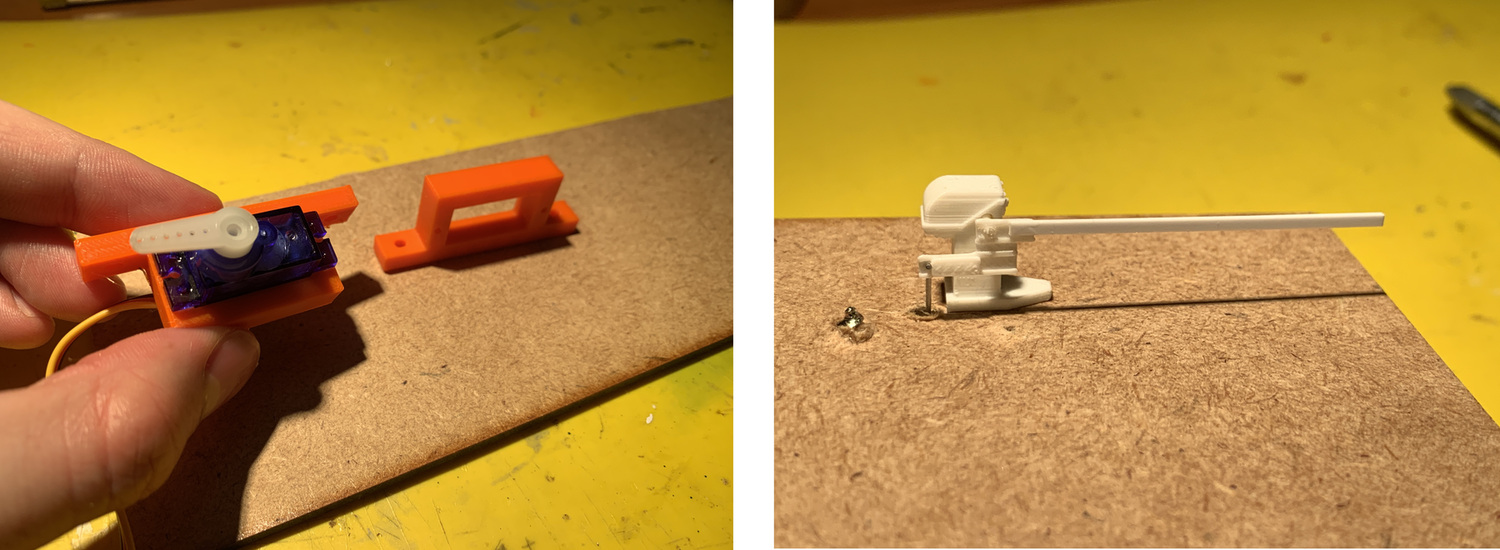
Week 11. Support 3D servo.
To adapt the servo to the base of the model, I was inspired by fastening the servos from the manufacturer PECO. Since I have the Prusa at home, I make a quick design to attach the servo to the base and have some regulation.
Review of the class
During the review of this class I volunteered with the scanning with the Modela MDX-20 in the minute 1:11:20. 😊
20200304 Scanning Printing review from Academany on Vimeo.
Files
Find below the files that I made for this assignment.