最终项目日记与概念更新
2020年6月6日
今天我又决定换掉最终项目了!
我需要农场里的灌溉系统能正常工作,而现在我并不需要更多鸡,所以,好吧,我又换了。这并不意味着我放弃了鸡蛋孵化器。只意味着我可能有两个最终项目 :-)。好吧,也许不是,现实是我会把精力放在灌溉上:我的果树需要水,温室也需要。我现在太需要它了,而且我需要它运转良好,所以这次改变确实值得。
所以不要鸡了!要水!也许也要鸡。
我的新提案的设计
在我写这些的时候,目前还没有设计文件;只有一份代码草图,还有一个装在面包板上的原型!
另一方面,硬件和软件都有要求:
软件要求与阶段
- 通过创建更多函数来简化代码;
- 尝试把 HTML 部分分离出来,让代码更干净;
- 改善代码的外观/界面;
- 给 HTML 添加读数;
- 添加事件日志,比如过流;
- 为设备添加更多安全保护;
- 添加手机界面(APP);
- 添加设置当前时间的功能;
- 为每个继电器添加重命名功能,这样就能把继电器和感兴趣的区域对应起来,或者至少把继电器改成农场里真实的区域名。
设计要求与现状
- 至少要防水;
2020年6月7日
到今天,2020年6月7日,开发情况是这样的。
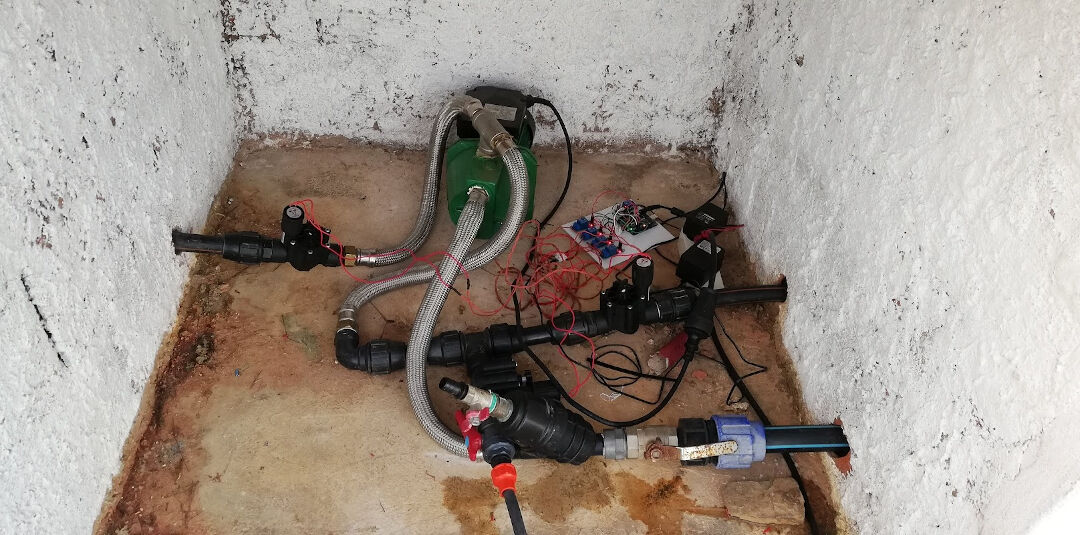
这套装置上运行的代码在 Fabfarm 的 GitHub 上:Autovalve。
我们的一位志愿者 Shakeel 做出了一个能在 ESP8266 上运行的版本,在同一个仓库的这里可以找到。由于疫情,他匆忙离开了我们,没时间测试他的代码,所以它能用但不稳定,因为他英勇地尝试让模拟引脚和 Wi-Fi 共用,导致 Wi-Fi 掉线,系统几乎没法用。我就是从这份代码开始的。
2020年6月8日
在花了很多小时试图理解代码之后,我成功把 Shakeel 的代码移植到了 ESP32,并且把文件拆开,每个函数一个文件。
在这个视频里,我展示了到目前为止在合并代码并让它们在 ESP32 上运行方面的进展。
把代码移植到 ESP32 对程序员来说可能很简单,但对我来说花了很多小时。
步骤:
- 把所有已经是函数的内容分到各自的文件里,让它更易读;
- 然后打开另一个 Arduino IDE 会话,开始把代码的每一部分逐行复制到新会话;在这个会话里,我把主文件重命名为 "esp32irrigation"
- 把引脚重新映射到 ESP32 的引脚
- 对 HTML 运行 Beautify,用的是 Brackets
- 整理代码,让引脚定义放在顶部
- 为 RTC 引脚创建变量
- 把向串口监视器打印错误的那部分代码注释掉
代码太大,无法在 HTML 里显示,所以我留一个链接,指向今天凌晨时分的代码状态:代码在这里。
在这个视频里,你可以看到农场当前灌溉系统的测试装置。
2020年6月9日
今天,在测试继电器之后,我发现有些继电器能用,有些不能用。在实验室电源上测试之后,把 5 伏直接加到信号引脚上,我认为这是因为 ESP32 提供的电压太低,或者是信号电压的问题。
然后我看了 GreatScott! 在 YouTube 上关于继电器和光耦的视频。
我会确保继电器有至少 5 伏的供电,根据数据手册,这是它们要求的电压。信号用 3.3 V 应该没问题。会在现场测试。
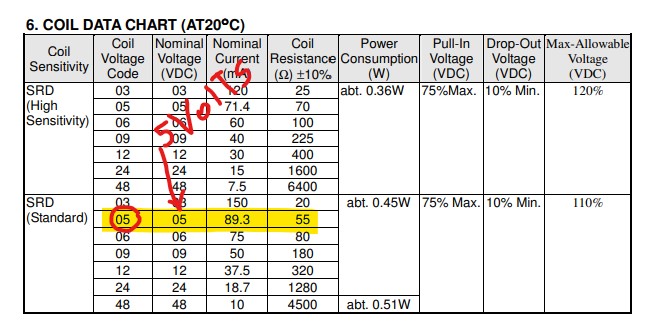
另一个问题是电流读数,完全是错的。为了让灌溉系统工作,我得在没有电流检测的情况下运行它,直到调试好。
2020年6月10日
测试之后,关于电压问题的结论是:ESP32 不应该给继电器供电;那应该来自外部电源,设定为 5 伏。信号可以原样从 ESP32 来,但 ESP32 必须共用同一个地。
代码里更多的改动:
- 把显示时间的间隔从 3000 毫秒增加到 5000 毫秒(5 秒),对应变量:
RTCtimeInterval - 把显示配置的间隔从 10000 毫秒增加到 30000 毫秒(30 秒),对应变量:
configTimeInterval - 在 HTML 界面里给继电器起了可识别的名字
- 进一步清理串口监视器,把设置显示里的秒数去掉
今天早上我会把装置重新弄好,为每次灌溉设定时间,并对 ESP32 灌溉模块做现场测试。
奇怪的是,外部 RTC 时钟走时不准。我会研究一下在断电时用外部电池配合内部时钟。
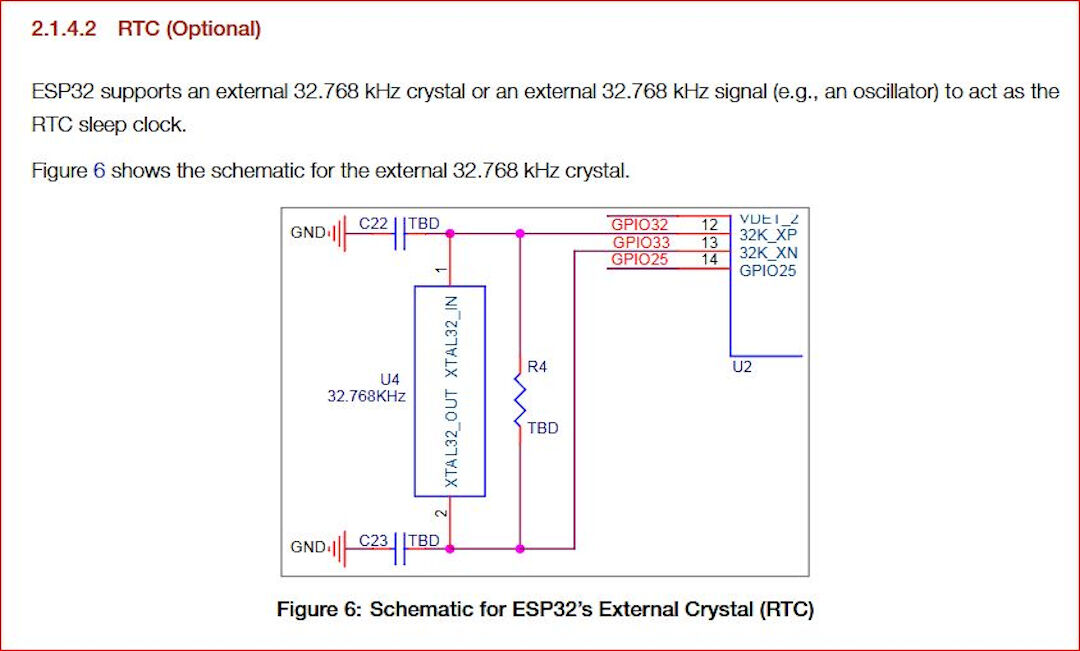
根据 这个 ESP32 仓库里已关闭的 issue 讨论 和这个 ESP 精度话题,内部时钟会漂移("Internal RTC clock frequency error is about 5%");这可以用一个外部 32.768 kHz 晶振解决,按下图组装:
另一个解决办法是让 ESP 始终连接互联网,从互联网获取时间来补偿误差。
醒来后的更新
今天我去安装了临时的测试装置。我排查了几个问题。
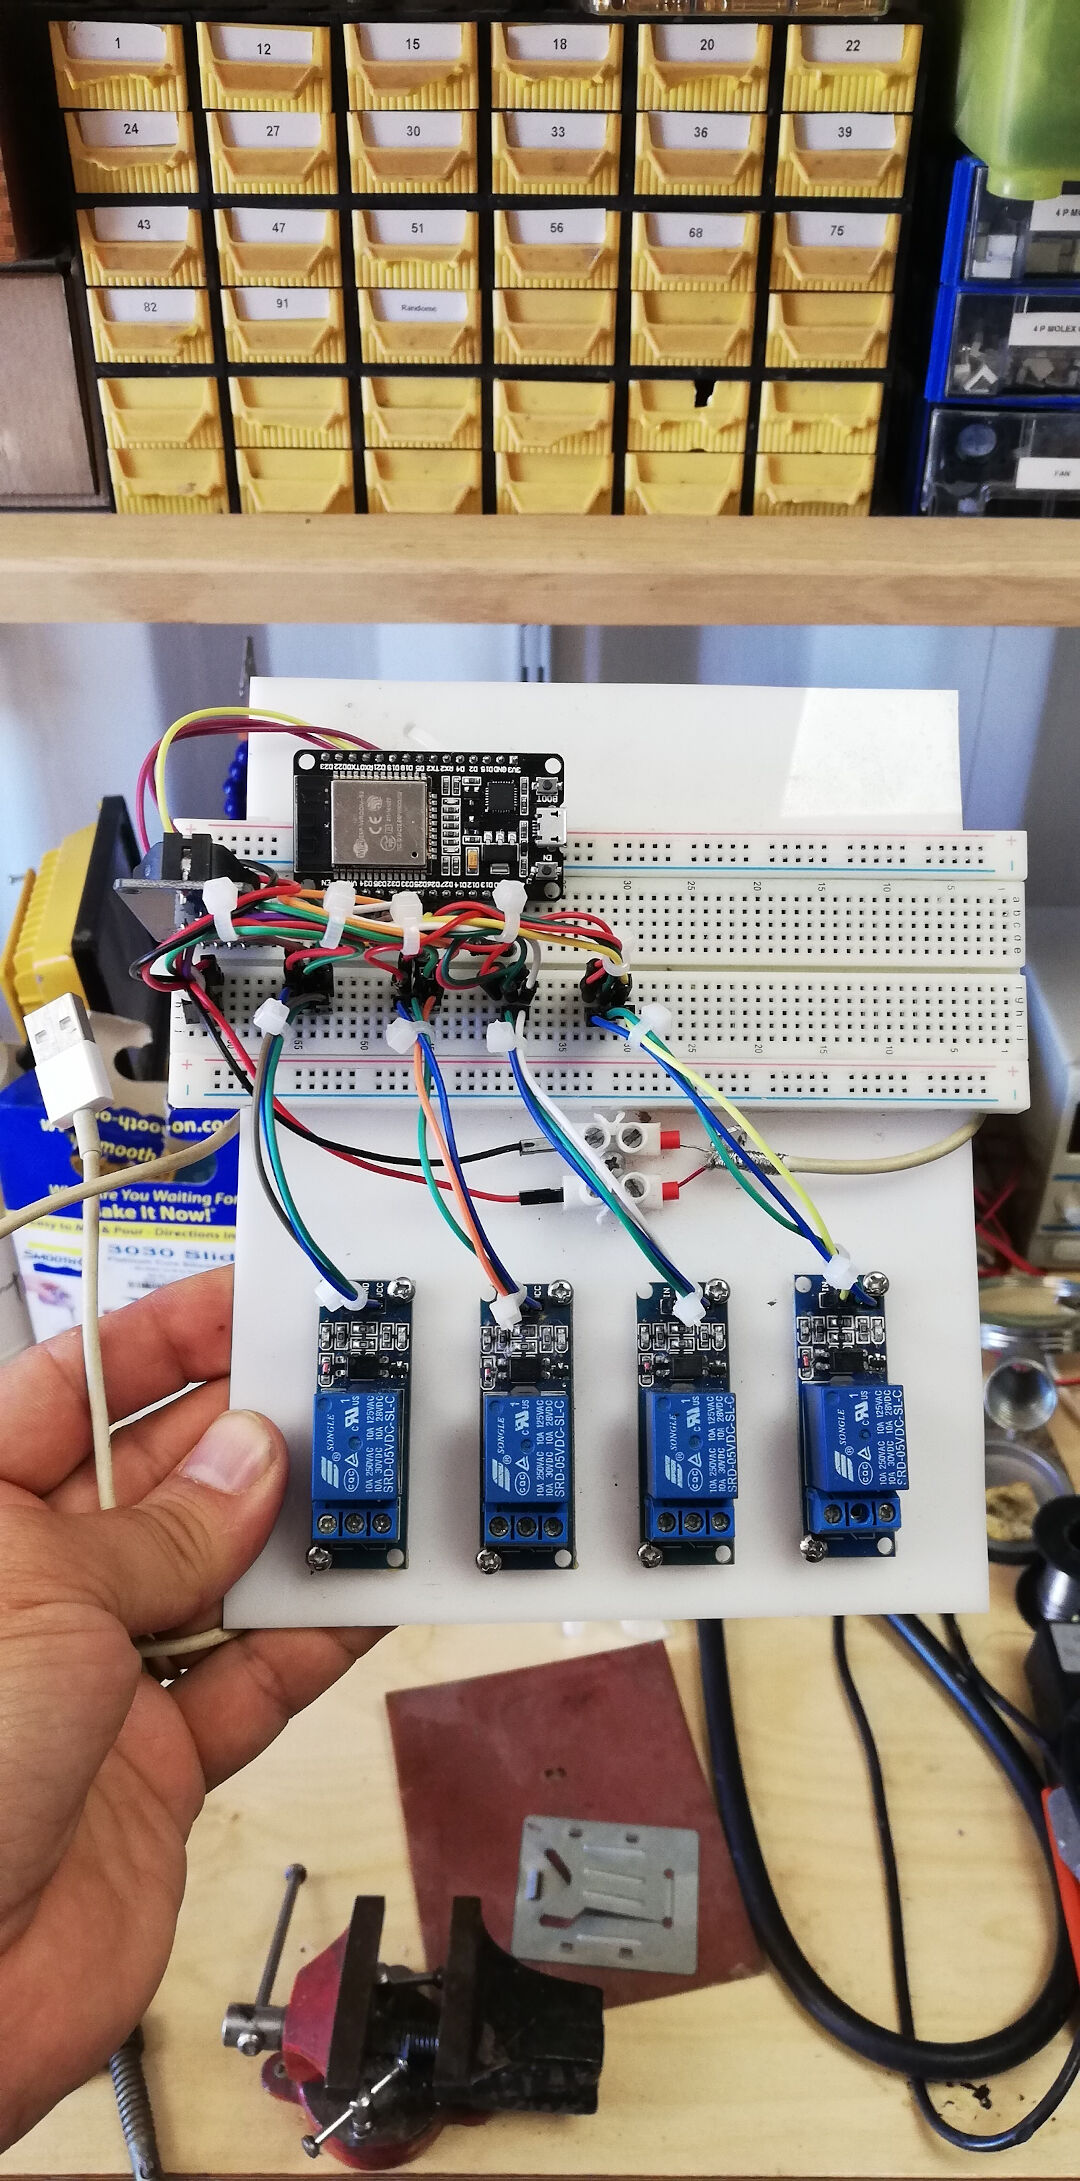
- 装置断开电脑时不工作。解决办法:电源接线不对;我最后接了两根 USB 线,一根给 ESP32,另一根给继电器,它们共用同一个地。我可能也用同样的办法解决了 RTC 时钟问题。
原型现在看起来是这样:
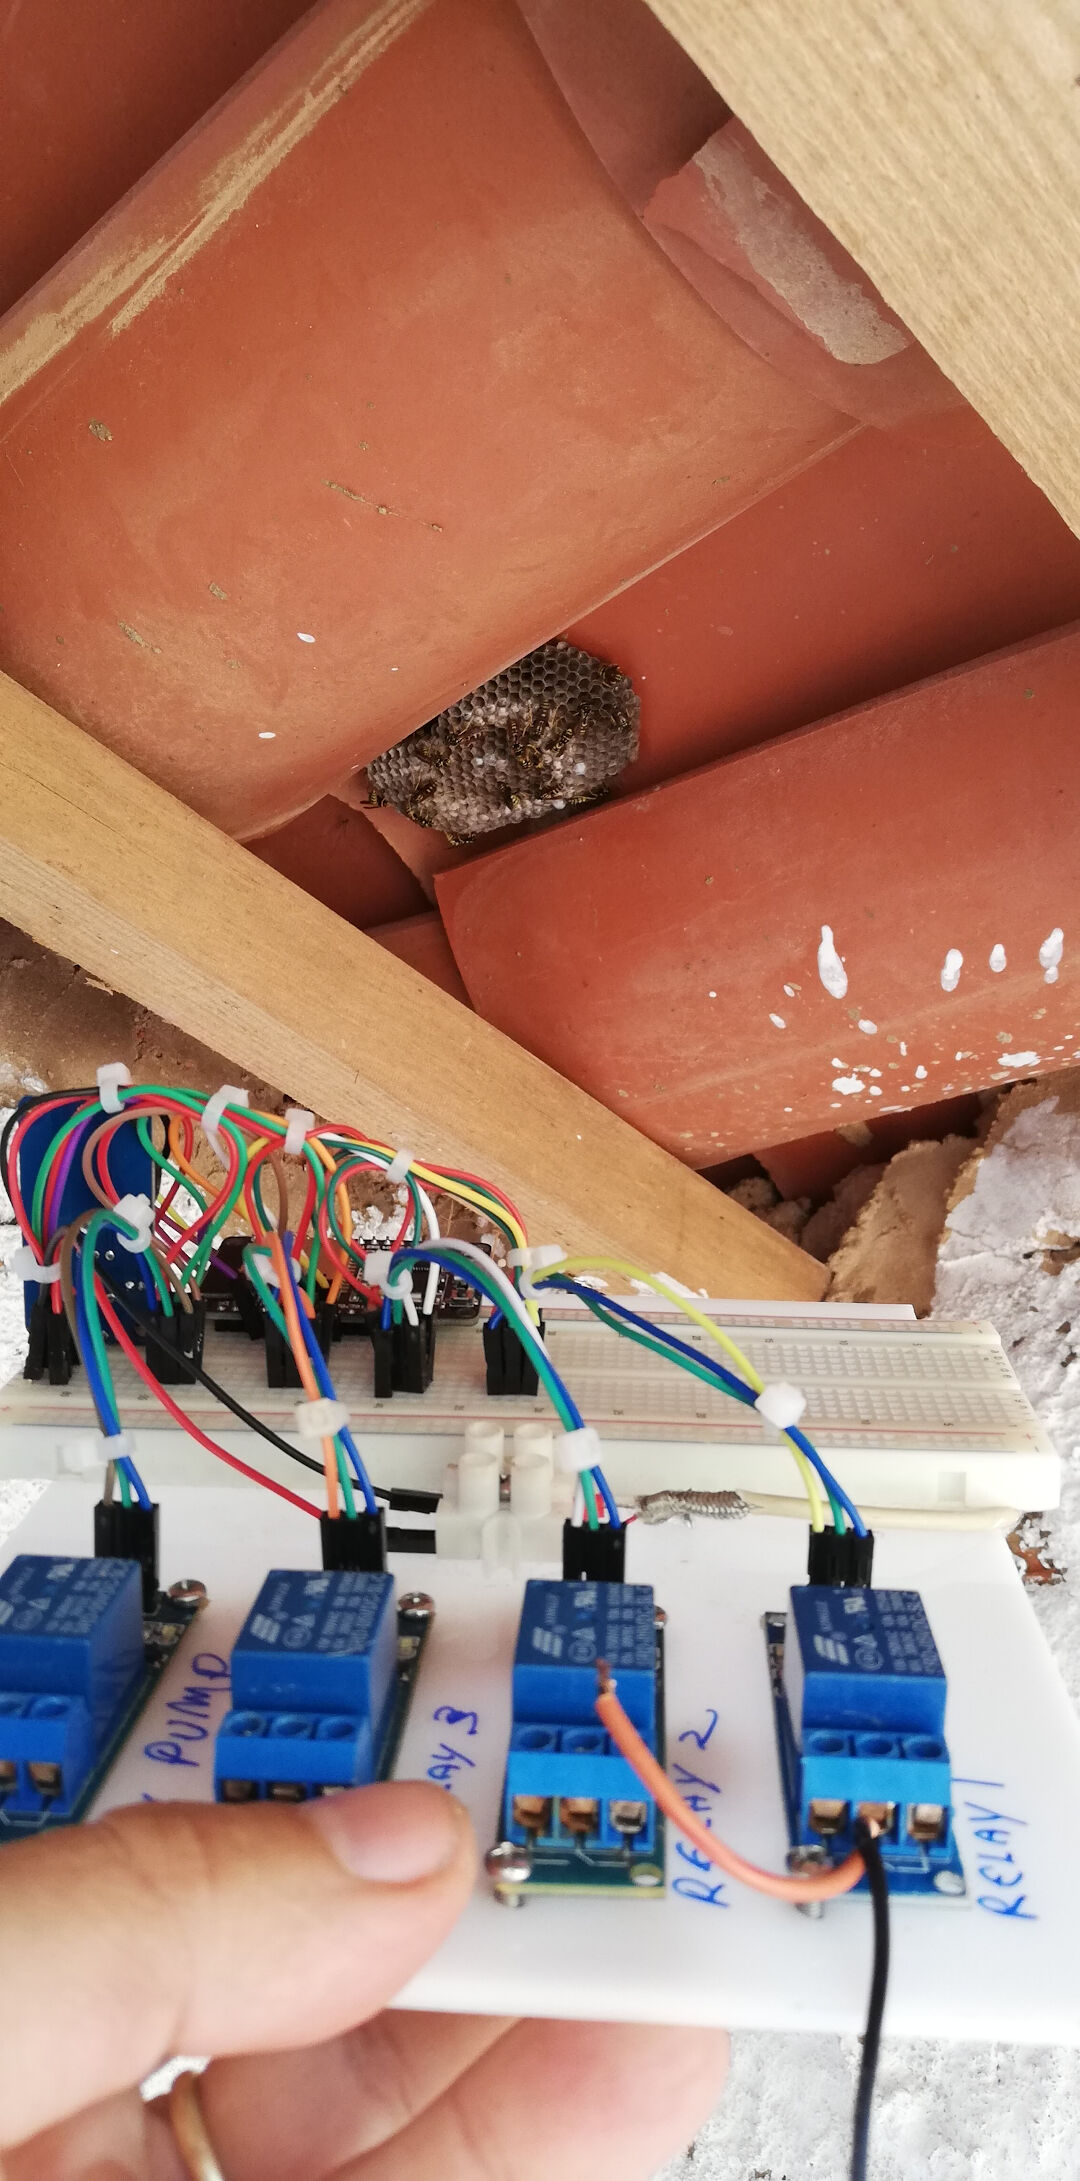
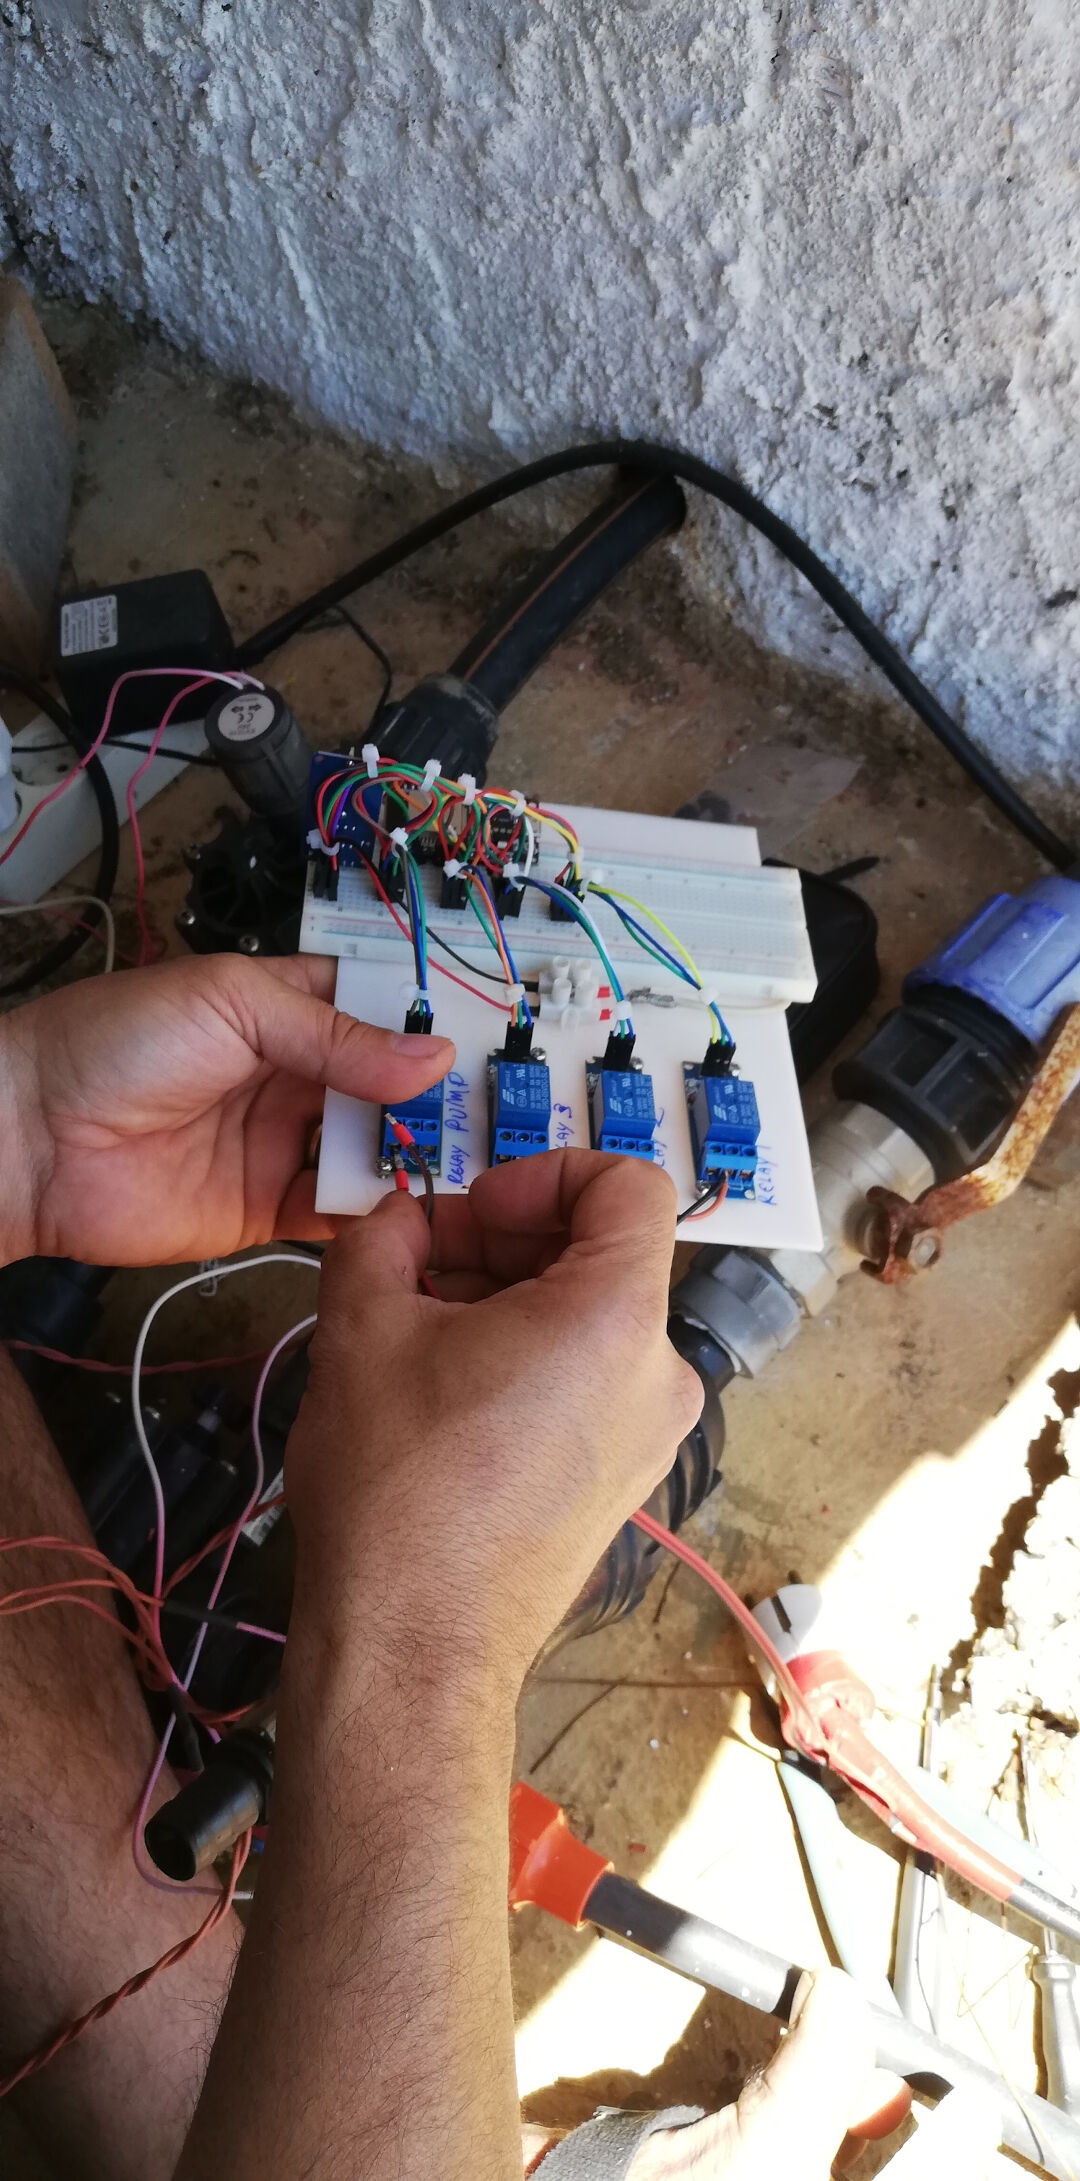
测试之后我回到代码做更多自定义。
我先看了一系列 YouTube 上的视频,讲函数到底是怎么工作的,然后开始创建更多函数。
基本上,我研究了如何减少代码重复,以及如何把值传给函数。
从现有的代码里,我创建了这个函数:
void turnOffRelay(int valveHere){
  // wait then turn valve relay OFF
  Serial.print("Waiting ");
  Serial.print(waitTimeValveOff / 1000);
  Serial.println("s before deactivating Valve Relay 3.");
  delay(waitTimeValveOff);
  digitalWrite(valveHere, LOW);
  valveHere = 0;
  Serial.print("*** Valve Relay ");
  Serial.print(valveHere);
  Serial.println("3 turned OFF ***");
}注意:valveHere = 0; 在 Serial.print(valveHere); 之前运行,所以消息总是输出 "Valve Relay 03 turned OFF",不管是哪个阀门。"3" 也被硬编码在两条消息里。在把它清零之前打印 valveHere(或者删掉那一行),并把固定的 "3" 从字符串里去掉。
每次我想调用这个函数,我都用:
      {
        int valveHere = valveRelay3;
        turnOffRelay (valveHere);
      }
我使用 {} 的原因是我必须声明局部变量 valveHere;这样我每次调用函数时,只需要替换那一小段代码。
从技术上说,调用那个函数就只是有这里的这段代码,turnOffRelay (valveHere);,但它单独是行不通的,因为我总是用这段代码替换阀门继电器的引脚:int valveHere = valveRelay3;
注意:这里的 {} 和局部变量都不需要:引脚作为参数传入,所以只用 turnOffRelay(valveRelay3); 就能做同样的事。
我还没有测试行为,但至少它能编译 :-)
2020年6月9日
我把它烧到了 ESP32 上,行为出乎意料。函数一直不停地打印;我认为我需要返回一个变量的状态,而我没有那样做。我会试着用 return variable; 这段代码来做,然后测试,但首先我会再看一遍函数视频,以便更好地理解。
2020年6月13日
唉……好吧,好久没有更新了。嗯,最后上传的代码能跑,我也有了一些函数,但我还不满意,因为它在 Arduino 上能用,在 PlatformIO 上却不行。到目前为止我学到的是,Arduino IDE 在“底层”做了很多事情,而在 PlatformIO 里你需要更详细地配置。
读一读这些:
我最终能用 PlatformIO 往 SPIFFS 里写文件了。我之前用 Arduino 已经能做到,但并不真正理解怎么做到的;现在我觉得也许我懂了。为此,我必须按照一系列步骤设置 platformio.ini 文件和目录树,那么来看看:
- 我在 PlatformIO 的 "Projects" 选项卡区域创建了一个新项目
- 然后我在与 src 文件夹同一层创建了一个 data 文件夹。另一个选项是在 platformio.ini 文件里给 data 文件夹设置不同的路径。
- 然后,在开发板连接的情况下,我运行了
pio run -t uploadfs - 不得不从 PlatformIO 里移除 Time 库,因为它和 ESPAsyncWebServer 冲突,这里是我找到相关信息的地方。
它成功了。
由此,我开始明白我有多不知道自己在做什么。我一开始用的代码把 HTML 包含在 Arduino sketch 里。这让我不舒服。现在,有了这个新的理解,我可以把 HTML 和 sketch 文件分开。
然后我找到了这个教程:ESP32 Web Server using SPIFFS
还有这个,以防我想用 Arduino IDE 插件来完成上传过程。
我真希望之前能更好地理解它!我在上面花了那么多天!
到目前为止的 C++ 代码。
            /****************************************************************************
            *                                  Aknowledments                           *
            *                                  by LucioPGN                             *
            ****************************************************************************/
           /*  Up to this date: 07th of June 2020 I don't consider myself a programer
            *  so I need to stand on top of giants sholders for my programing projects:
            *  A Portion of this code was based on Rui Santos Code;
            *  A Portion of this code was based on losely based Shakeels code for ESP8266;
            *  A Portion of this code was based on several websites I lost track of....!
            *  My contributions:
            *     -So far I made it work on platformio :), that took me quite a lot of time
            *     -That means:
            *        +created a new project;
            *        +created a folder named data under the main folder (fabfarm_irrigation)
            *        +linked the platformio.ini to the folder of the project + the data folder
            *        +linked the needed libraries to their github repo in the platformio.ini
            *        +found a conflict with time library and ESPAsyncWebserverLibrary can be solved by renaming time library or by removing it
            *        +Made it work with a separate HTML file under the data folder using SPIFFS
            *        +I can load the data to Spiffs inside platformio
            *  Things I still want to program for my final project:
            *    -so far I ported Shakeels code into ESP32;
            *    -simplify the code creating functions rather than repeating the code;
            *    -try to separate the HTML part for a cleaner code (this applies to maybe mix up the other previous code to this);
            *    -Improve the appearance/Interface of the code
            *    -Add readings to HTML
            *    -Add a log of occurrences like over current
            *    -Add more safety for the equipment
            *    -Add a phone interface (APP)
            *    -Add function to set current time
            *    -Add renaming function to each relay so one can relate the relay to the area of interest or at least rename relays to actual areas of the farm.
            *
            ****************************************************************************/


           //Required Libraries
           #include "WiFi.h"
           #include "ESPAsyncWebServer.h"
           #include "SPIFFS.h"
           #include <AsyncTCP.h>

           // Network Credentials
           const char* ssid = "rato";
           const char* password = "imakestuff";

           //Start the Async Web Server listening on port 80
           AsyncWebServer server(80);

           // Set to true to define Relay as Normally Open (NO)
           #define RELAY_NO false

           // Set number of relays, will be used in the array
           #define NUM_RELAYS  4

           // Assign each GPIO to a relay
           int relayGPIOs[NUM_RELAYS] = {26, 25, 33, 32};

           //
           const char* PARAM_INPUT_1 = "relay";
           const char* PARAM_INPUT_2 = "state";

           // Replaces placeholder with button section in your web page
           String processor(const String& var){
             //Serial.println(var);
             if(var == "BUTTONPLACEHOLDER"){
               String buttons ="";
               for(int i=1; i<=NUM_RELAYS; i++){
                 String relayStateValue = relayState(i);
                 //Here parts of the HTML will be parsed to index.html like Relay # followed by its value in variable for the GPIO numbers
                 buttons+= "<h4>Turn on water on " + String(i) + "</h4><h4>Valve (relay) #" + String(i) + " - GPIO " + relayGPIOs[i-1] + "</h4><label class=\"switch\"><input type=\"checkbox\" onchange=\"toggleCheckbox(this)\" id=\"" + String(i) + "\" "+ relayStateValue +"><span class=\"slider\"></span></label>";
               }
               return buttons;
             }
             return String();
           }

           String relayState(int valveRelayNum){
             if(RELAY_NO){
               if(digitalRead(relayGPIOs[valveRelayNum-1])){
                 return "";
               }
               else {
                 return "checked";
               }
             }
             else {
               if(digitalRead(relayGPIOs[valveRelayNum-1])){
                 return "checked";
               }
               else {
                 return "";
               }
             }
             return "";
           }

           void setup(){
             // Serial port for debugging purposes
             Serial.begin(9600);
             // Initialize SPIFFS
             if(!SPIFFS.begin(true)){
               Serial.println("An Error has occurred while mounting SPIFFS");
               return;
             }
             // Set all relays to off when the program starts - if set to Normally Open (NO), the relay is off when you set the relay to HIGH
             for(int i=1; i<=NUM_RELAYS; i++){
               pinMode(relayGPIOs[i-1], OUTPUT);
               if(RELAY_NO){
                 digitalWrite(relayGPIOs[i-1], HIGH);
               }
               else{
                 digitalWrite(relayGPIOs[i-1], LOW);
               }
             }

             // Connect the ESP to the Wi-Fi using the credentials entered before
             WiFi.begin(ssid, password);
             while (WiFi.status() != WL_CONNECTED) {
               delay(1000);
               Serial.println("Connecting to WiFi..");
             }

             // Print ESP32 Local IP Address
             Serial.println(WiFi.localIP());

           /*
           *Now we are going to configure the route where server will be listening for incoming HTTP requests
           and a function that will be executed when a request is received on that route.
           We specify this by calling the "on" method on the server object. With server.on(){};
           As first input, this method receives a string with the path where it will be listening.
           We are going to set it to listen for requests on the "root" route. This could be anything.
           It is basically what you write after the ip adress when in the browser or an APP.
           This website has a great explanation of the ESP32 Arduino: Asynchronous HTTP web server
           https://techtutorialsx.com/2017/12/01/esp32-arduino-asynchronous-http-webserver/
           So...
           - First parameter here is: "/" thats the root directory.
           - Second parameter is HTTP_GET thats an enum of type WebRequestMethod a method defined in the library here --> https://github.com/me-no-dev/ESPAsyncWebServer/blob/63b5303880023f17e1bca517ac593d8a33955e94/src/ESPAsyncWebServer.h
           - Third parameter is a the function AsyncWebServerRequest
           So there is this c++ lambda function used here. My litle understanding is that they are locally declared unamed function this means they dont have a name and are declared locally :-)
            I don't grasp the concept fully haha.
            the syntax is [captures](params){body} where in here [] is empity
           */

             // Route for root / web page
             server.on("/", HTTP_GET, [](AsyncWebServerRequest *request){
               request->send(SPIFFS, "/index.html", String(), false, processor);
             });

            // Send a GET request to <ESP_IP>/update?relay=<inputMessage>&state=<inputMessage2>
             server.on("/update", HTTP_GET, [] (AsyncWebServerRequest *request) {
               String inputMessage;
               String inputParam;
               String inputMessage2;
               String inputParam2;
               // GET input1 value on <ESP_IP>/update?relay=<inputMessage>
               if (request->hasParam(PARAM_INPUT_1) & request->hasParam(PARAM_INPUT_2)) {
                 inputMessage = request->getParam(PARAM_INPUT_1)->value();
                 inputParam = PARAM_INPUT_1;
                 inputMessage2 = request->getParam(PARAM_INPUT_2)->value();
                 inputParam2 = PARAM_INPUT_2;
                 if(RELAY_NO){
                   Serial.print("NO ");
                   digitalWrite(relayGPIOs[inputMessage.toInt()-1], !inputMessage2.toInt());
                 }
                 else{
                   Serial.print("NC ");
                   digitalWrite(relayGPIOs[inputMessage.toInt()-1], inputMessage2.toInt());
                 }
               }
               else {
                 inputMessage = "No message sent";
                 inputParam = "none";
               }
               Serial.println(inputMessage + inputMessage2);

               //This is the last part of the lambda function.
               //This method receives as first input the HTTP response code, which will be 200 in our case.  This is the HTTP response code for "OK".
               request->send_P(200, "text/plain", "OK");
             });

             // Start server here
             server.begin();
           }

           void loop(){

           }
注意:hasParam(PARAM_INPUT_1) & hasParam(PARAM_INPUT_2) 用的是按位 &;逻辑与是 &&。对两个 bool 来说结果恰好相同,但它不会短路,正确的运算符是 &&。
到目前为止的 HTML 代码。
<!DOCTYPE HTML><html>
<head>
  <meta name="viewport" content="width=device-width, initial-scale=1">
  <style>
    html {font-family: Arial; display: inline-block; text-align: center;}
    h2 {font-size: 3.0rem;}
    p {font-size: 3.0rem;}
    body {max-width: 600px; margin:0px auto; padding-bottom: 25px;}
    .switch {position: relative; display: inline-block; width: 120px; height: 68px}
    .switch input {display: none}
    .slider {position: absolute; top: 0; left: 0; right: 0; bottom: 0; background-color: #ccc; border-radius: 34px}
    .slider:before {position: absolute; content: ""; height: 52px; width: 52px; left: 8px; bottom: 8px; background-color: #fff; -webkit-transition: .4s; transition: .4s; border-radius: 68px}
    input:checked+.slider {background-color: #2196F3}
    input:checked+.slider:before {-webkit-transform: translateX(52px); -ms-transform: translateX(52px); transform: translateX(52px)}
  </style>
</head>
<body>
  <h2>Fab Farm Irrigation System</h2>
  %BUTTONPLACEHOLDER%
<script>function toggleCheckbox(element) {
  var xhr = new XMLHttpRequest();
  if(element.checked){ xhr.open("GET", "/update?relay="+element.id+"&state=1", true); }
  else { xhr.open("GET", "/update?relay="+element.id+"&state=0", true); }
  xhr.send();
}</script>
</body>
</html>
它目前看起来是这样:
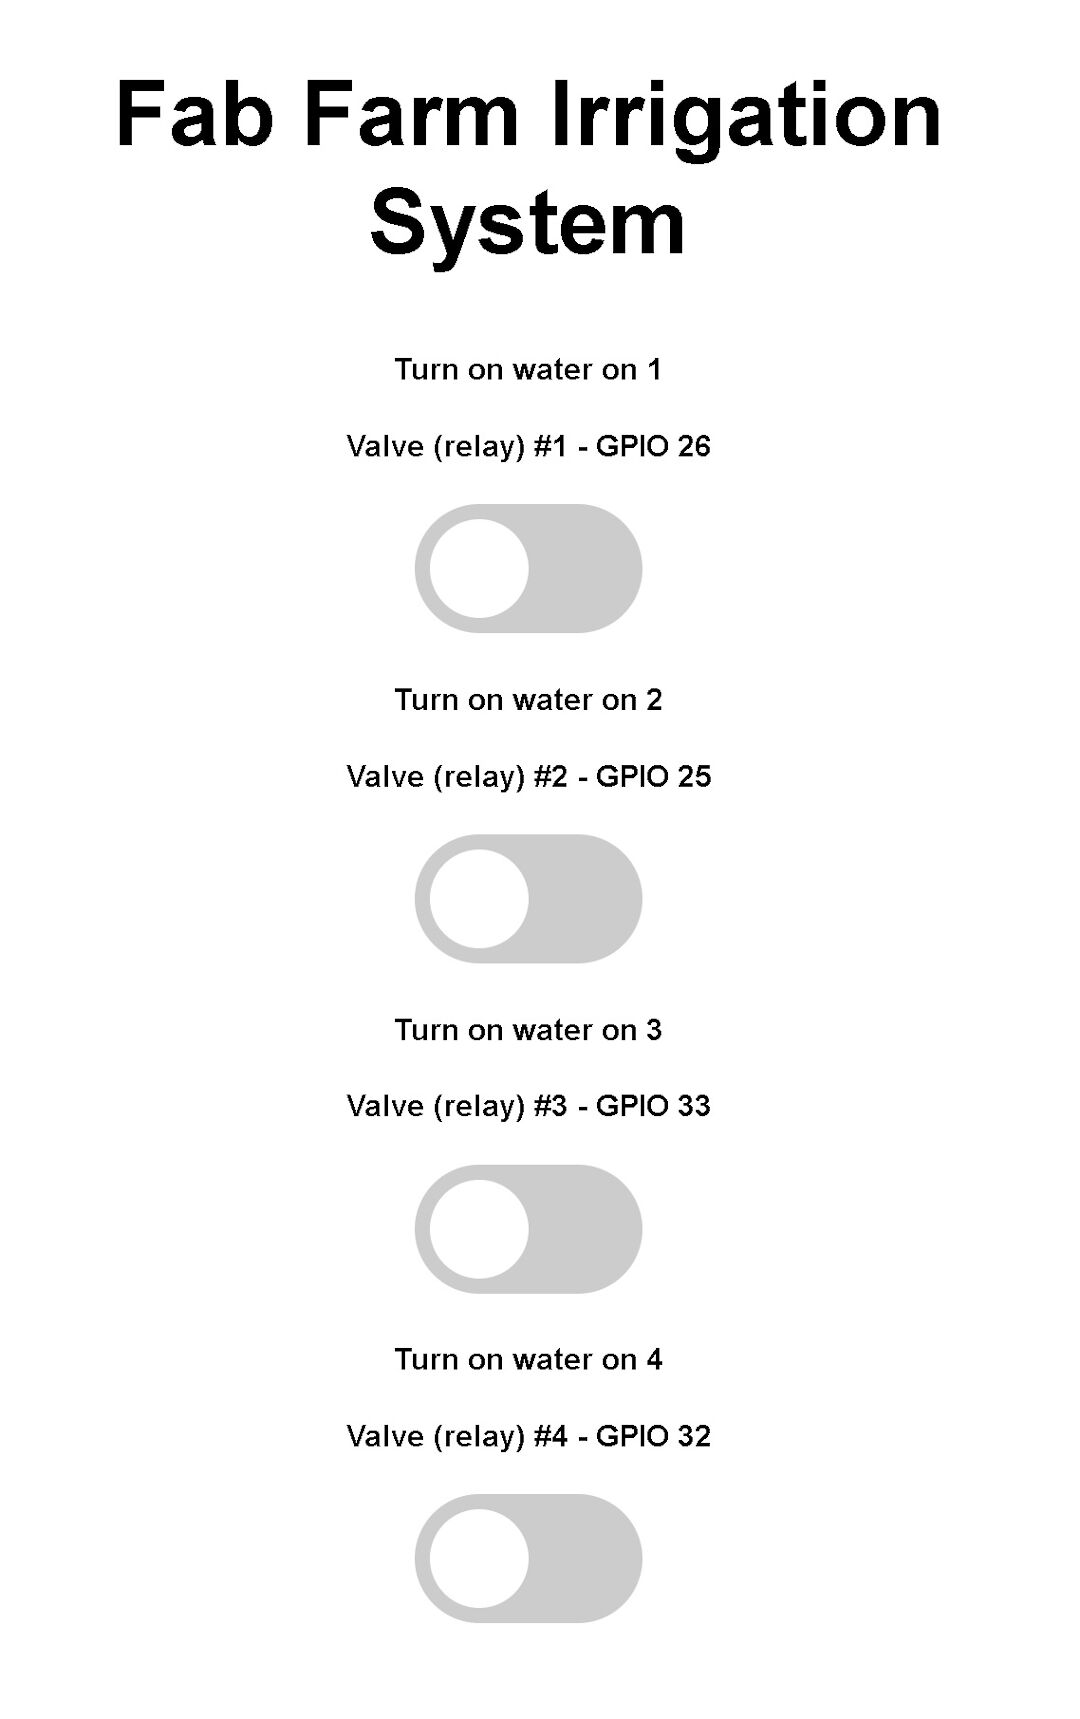
现在的外观和代码与 Random Nerd Tutorials 网站上用 ESP32 控制继电器的文章 基本一样。
与原始代码的主要区别是,它运行在用于 VS Code 的 PlatformIO 上,而且它还为 HTML 文件使用了单独的文件夹结构,HTML 文件会被写入 ESP 的 SPIFFS。
2020年6月14日
在这次个人的大突破之后,我决定需要从零开始写代码,只使用农场里当前灌溉系统的总体算法。原因是代码太乱、太重复;昨天那些资料里的方法让我意识到,把功能一个一个加到最新的代码上,比从农场现在运行的代码重写一切要快。
今天我会尝试添加更新的信息,比如温度和湿度。再一次,我基于 Rui Santos 的工作,就在这个关于气象站的页面上。用这种方法,我相信我也能用 RTC 时钟把一天中的时间加进去。
连接 DHT22 的原理图来自他的网站:
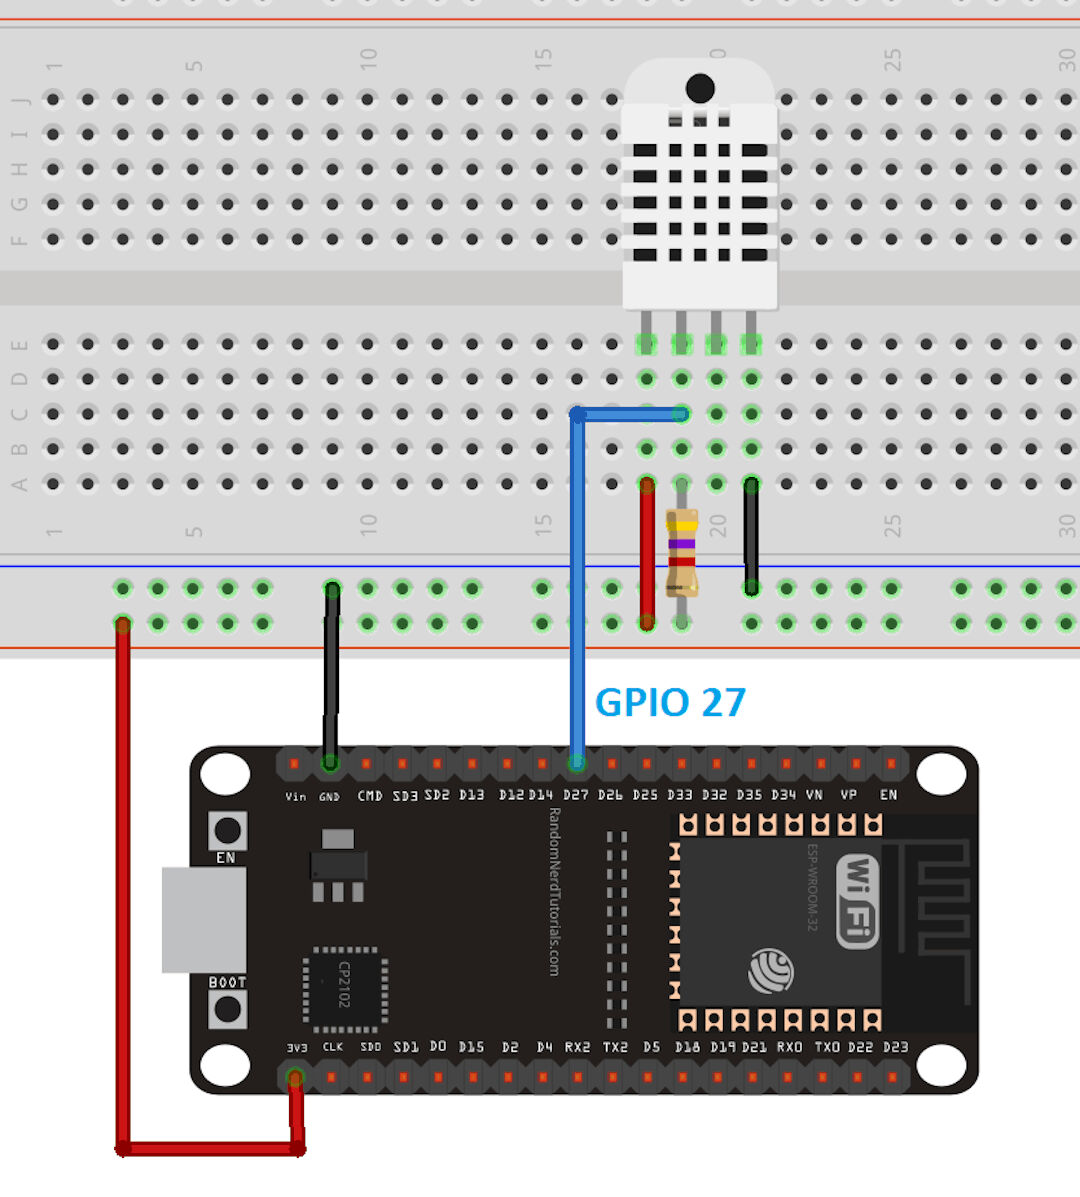
它使用一个 4.7 kOhm 电阻作为上拉电阻。
经过一番工作,页面看起来是这样:
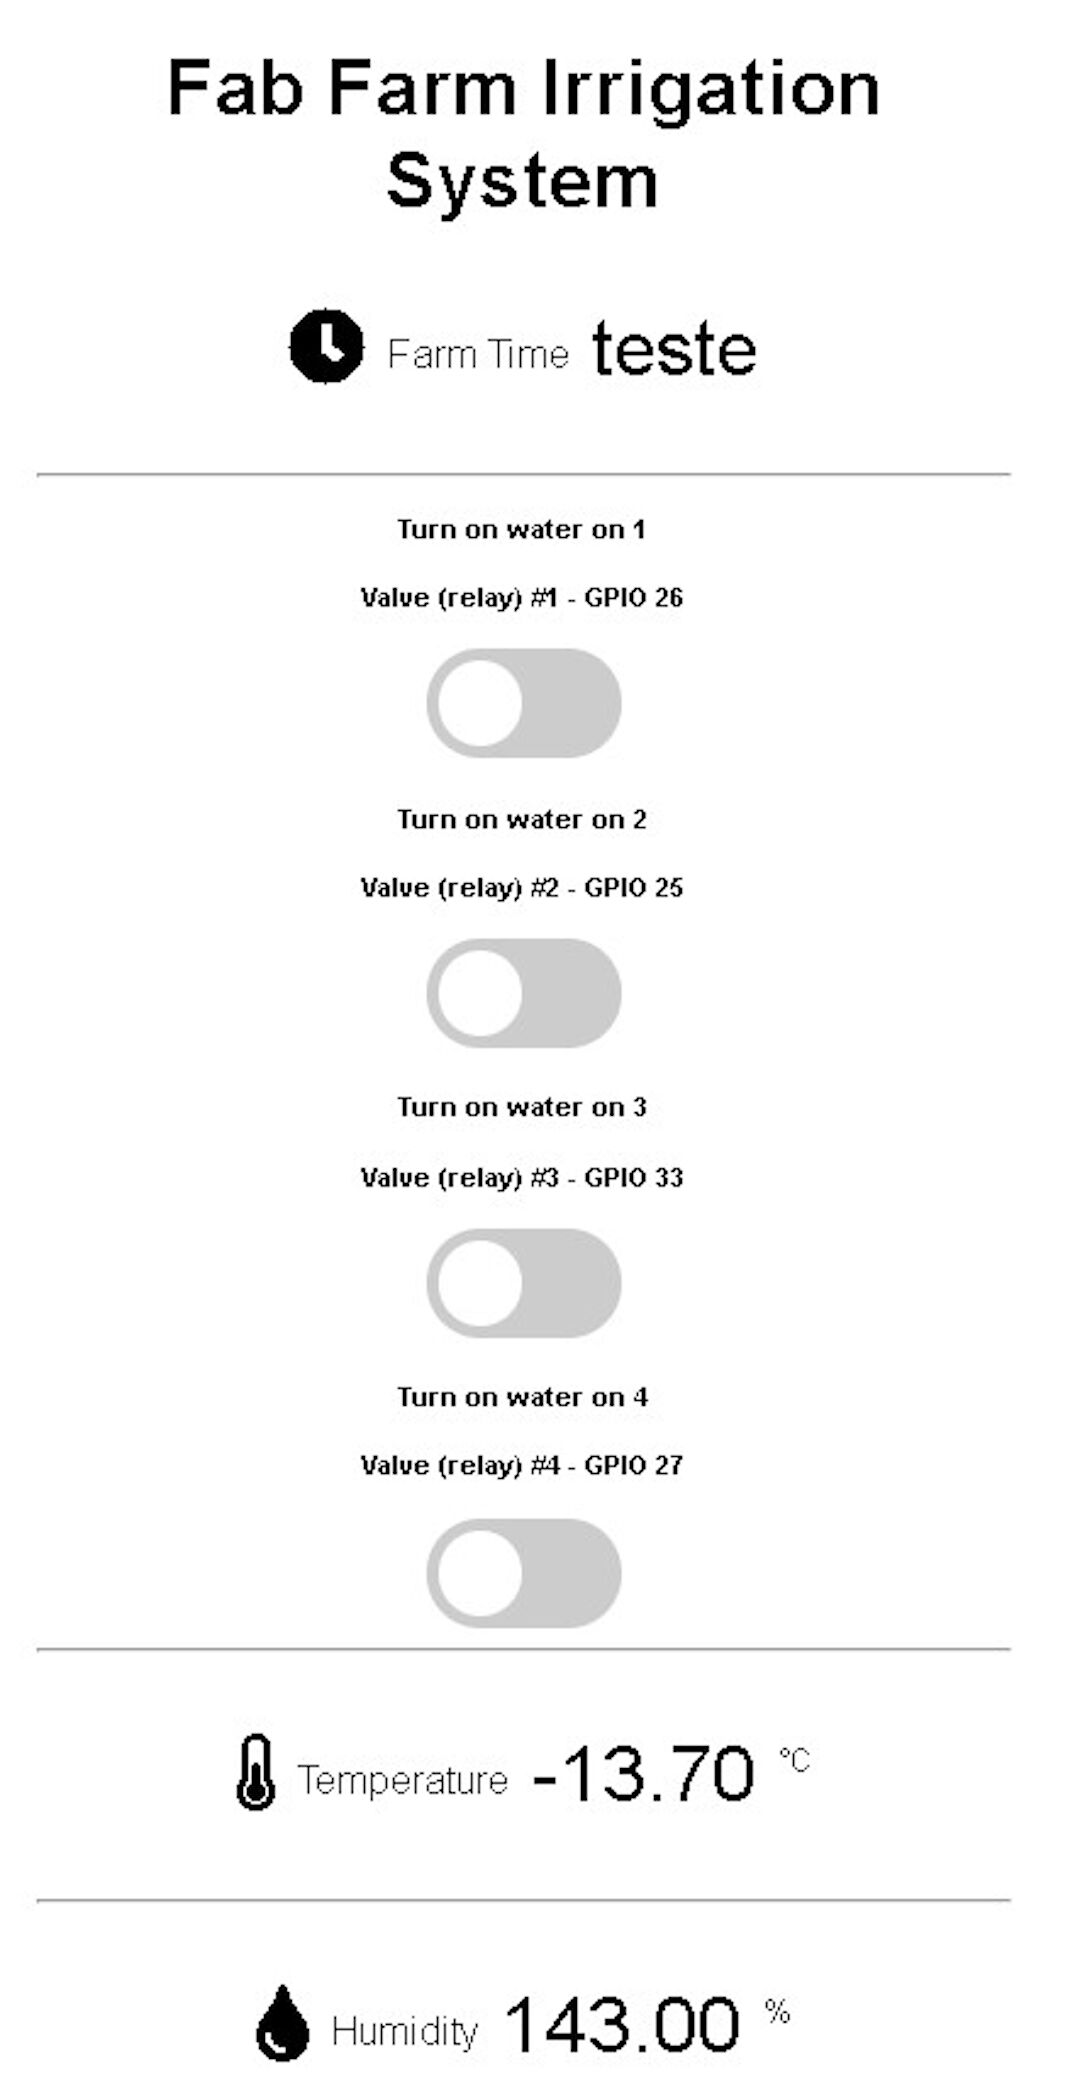
我认为温度现在是负值的原因,是温湿度传感器有故障,或者我的接线有点松。我相信等我铣出自己的电路板并焊好一切,而不是插在面包板上,这会更可靠。不管怎样,我拿到了数值,也能在网页界面上显示它们。
在串口监视器上,我现在能显示互联网时间和网络信息;现在我需要找到一种方法获取时间值并在网页界面里显示。目前我在代码里发送 TESTE 这个词,显示出来的就是它,而不是时间。
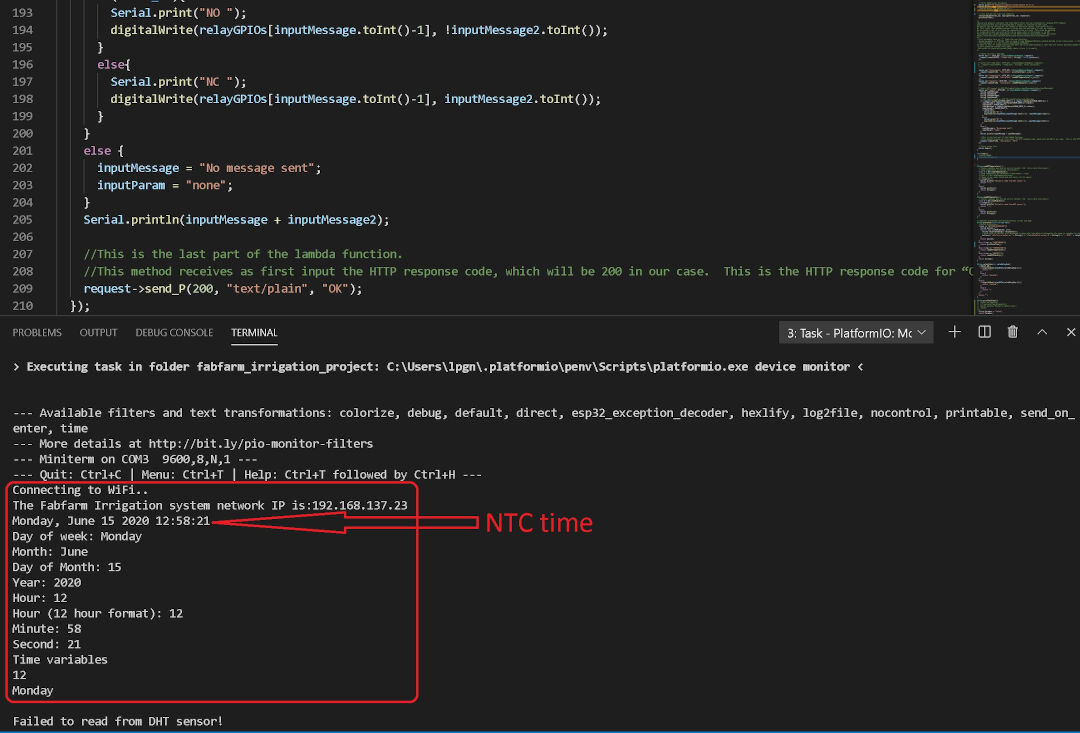
2020年6月15日
今天我会专注于把时间显示在网页界面里,也许创建一个在指定时间打开继电器的函数。
20:44 更新:
- 试了一整天之后,我成功显示了机器时间和灌溉系统(ESP32)的时间。
现在界面看起来是这样:
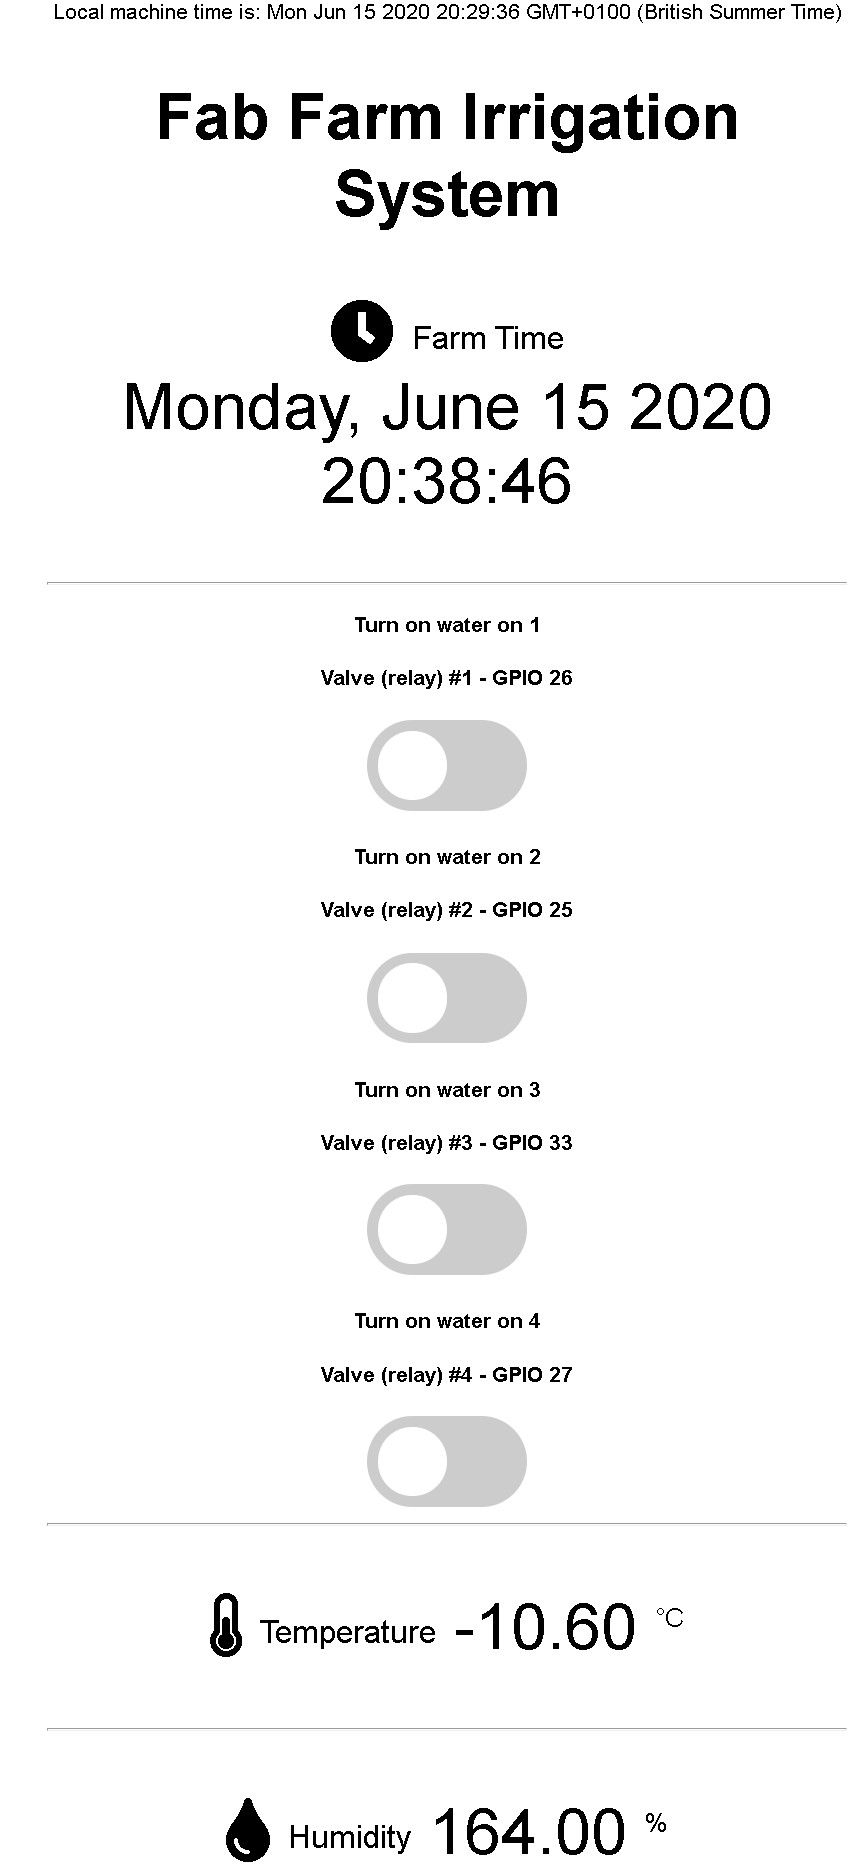
等我长大了我想当程序员 :-),而不是在一件别人几行代码就搞定的事情上花一整天!
一位好心人用 Arduino Stack Exchange 上的这个回答结束了我的挣扎。
下面就是那里发布的原始函数:
void printLocalTime()
{
  time_t rawtime;
  struct tm timeinfo;
  if(!getLocalTime(&timeinfo))
  {
    Serial.println("Failed to obtain time");
   return;
  }
  char timeStringBuff[50]; //50 chars should be enough
  strftime(timeStringBuff, sizeof(timeStringBuff), "%A, %B %d %Y %H:%M:%S", &timeinfo);
  //print like "const char*"
  Serial.println(timeStringBuff);

  //Optional: Construct String object
  String asString(timeStringBuff);
}
做了些小修改,把它从 void 函数改成 String 函数,并加上一个我命名为 "timeAsAString" 的返回值:
//this function was found here https://arduino.stackexchange.com/questions/52676/how-do-you-convert-a-formatted-print-statement-into-a-string-variable
//I did a minor change so instead of a void function it now returns a string to be used to show time in the webinterface
String printFarmTime()
{
  time_t rawtime;
  struct tm timeinfo;
  getLocalTime(&timeinfo);
  char timeStringBuff[50]; //50 chars should be enough
  strftime(timeStringBuff, sizeof(timeStringBuff), "%A, %B %d %Y %H:%M:%S", &timeinfo);
  //print like "const char*"
  Serial.println(timeStringBuff);

  //Construct to create the String object
  String timeAsAString(timeStringBuff);
  return timeAsAString;
}
注意:这个版本去掉了 if(!getLocalTime(&timeinfo)) 检查,所以如果 NTP 还没回应,它就会格式化出一个空的(垃圾)时间。保留这个检查,并在失败时返回类似 "time not set" 的内容。
那么,这件事解决之后,我会尝试创建按照预定时间开关继电器的函数。看看今天能不能完成……
2020年6月16日
没有,我没做那个,我累了,所以今天我画了几张草图。

在这张草图里,我展示了包装盒的形状会是什么样,以及网页界面会是什么样。
我可以采用这样的方法:把日期当作 String 拆分,并为我要做的操作把它们转换成其他类型的值。另一种可能性是从一开始就以我需要的类型获取数据。虽然我更喜欢后一种,但我还没找到它的解决办法,因为我还没完全理解 getLocalTime() 函数。所以我现在会多读一些关于它的内容。
等等……这也太快了!我找到了一篇满足我需求的帖子。就在这里:

于是我基于上面的帖子创建了下面的函数:
      int gimeTime(char what) {

          int OnlyYear;
          int onlyMonth;
          int onlyDay;
          int onlyHour;
          int onlyMin;
          int onlySec;

          struct tm timeinfo;
          if(!getLocalTime(&timeinfo)){
            Serial.println("Failed to obtain time");
            //return;
            }
          onlyHour = timeinfo.tm_hour;
          onlyMin  = timeinfo.tm_min;
          onlySec  = timeinfo.tm_sec;
          onlyDay = timeinfo.tm_mday;
          onlyMonth = timeinfo.tm_mon + 1;
          OnlyYear = timeinfo.tm_year +1900;

          switch (what) {
            case 1:
            return onlyHour;
            break;
            case 2:
            return onlyMin;
            break;
            case 3:
            return onlySec;
            break;
            default:
          // if nothing else matches, do the default
          // default is optional
          break;
          }
      }
注意:这里的 default 分支结束前没有 return,所以对于 1、2、3 之外的任何值,函数都会返回一个未定义的值(在那里放 return -1;)。当 getLocalTime() 失败时也一样:return 被注释掉后,它会继续读取一个没有有效时间的 timeinfo。
就是这样,现在我终于可以处理定时器调度代码了。顺便说一句,我几乎花了一整天想找一种更简单的方法来获取时间,但就是找不到,因为我在费劲地理解 (struct) 类型。好吧,也许将来我会再回来看,但现在这样挺好。
2020年6月17日
超清晨更新:
我非常沮丧,我需要转向原子,把我项目的比特部分收尾。
深夜时,我最多只做了一个关掉继电器的小函数;它在这里:
        int zoneStartStop (int zone, int startStop){
        int waitTime = 1000;
        if (startStop == 1){
        digitalWrite(relayGPIOs[zone], startStop);
        Serial.print("*** Zone Valve");
        Serial.print(zone);
        Serial.println("ON ***");
        delay(waitTime);
        digitalWrite(pumpGpio, startStop);
        Serial.print("*** Pump turned ON ***");
        }
        else{
        digitalWrite(pumpGpio, startStop);
        Serial.println("*** Pump turned OFF ***");
        delay(waitTime);
        digitalWrite(relayGPIOs[zone], startStop);
        Serial.print("*** Zone Valve");
        Serial.print(zone);
        Serial.println("OFF ***");
        }
        }
(后来修正的代码:停止时,水泵现在会在阀门关闭之前先关闭,所以它永远不会顶着关闭的阀门推,消息里说的是 OFF。)
这是个开始,但还没到位,而且我还没测试。
早上更新:
所以我现在会看另一个设置定时器的例子,又是 Rui Santos 的,在这里;也许我可以稍微改一下,集成到我的代码里,加上开始时间,然后用滑块设置它运行多长时间(以分钟计)。目前这样就够了!
到目前为止,我让代码与 PlatformIO 兼容了,还把 index.html 文件从 C++ 代码里分离出来,放在它自己的文件夹里,由我在 13/06/2020 描述的保存到 SPIFFS 的例程来保存。
参考资料
脚注
链接: