
TARS version 1.0
Summary

After all this time of sweat, blood, pain there were also moments of joy, fun and celebrating. I guess those are always going hand by hand. It is time to sum everything up and look at it from broader perspective. This test fits extremely to picture above!
The idea
Can you actually buy it?
What does it do?
Who's done what beforehand?
What did I designed?
- Motherboard - ATMega328p based steering board
- Interface - powering board with inputs and outputs
- Rainbow Generator - High power LED circuit with radiator and 1/4 Ohm Resistor with additional scattering foil extracted from CD
- Planet Projector - High power LED circuit with radiator and 1/4 Ohm Resistor with additional black-painted concave lens
- Chassis - 3 [mm] laser cut and engraved MDF
- Case pins - 3D printed pins, which holds case together
- Firmware - based on Arduino IDE and pinmap
I was looking for similar toy/lamp/robot but didn't really find anything similar. In general there are many tributes to Interstellar and TARS was 3D printed in various projects but it is difficult to find anything similar to my project.
Project was both challenging and fun. I was beginning with rough idea, what I would like to put there. More or less I knew how I would like to make things done but it was just a concept. I'm happy that I managed to make most crucial parts: Rainbow Generator (RNG) and Dark Sky Map (DSM), which actually evolved.
I always wanted TARS to be powered from USB, this limited my output Current to 500 mA and Voltage to 5 V. I roughly estimated that I could use 300 mA for both RNG and DSM and in the end I managed to use around 360 mA. Remaining current I planned to use for feeding ATMega and LCD screen. There are also some 'leakages' as sensors were working as voltage dividers. It was safe estimation but probably I could even feed RNG and DSM with 200 mA.
As I mentioned before Dark Sky Map morphed into Planet projector after I realized I would require much stronger light source that High Power LED I was using. I simply used concave lens and painted it black putting too much ink and making nice waves, which look pretty nice when illuminated.
Rainbow Generator is based on CD foil (or a cover), which scatters the light. Normally, in such lamps there is halogen used as light source, which is much stronger but requires much more power (or voltage). I had to play with foil in a way that light will reflect from the surface. Effect is satisfying.
From two sensors only photoresistor is working nicely as I misinterpret datasheet and used analog comparator output to read value of thermistor. It turned out ADC is not working properly in such manner.
Buttons are nicely controlling both lamps in the arms, when LCD is perfectly visualizing current status of TARS.I left ISP connection so robot may be reprogrammed almost in any moment.
I was basing on two ideas how to make rainbow generator and dark sky map (which become Planet projector later). Rainbow Lamp by wannabemadsci and various Star Projectors on Pinterest. Those were two crucial parts, which requite biggest amount of thinking.
There were many quite many things. Basically I designed TARS from toes to the top of its head, if I may speak about robot like that. I will listmost crucial parts:
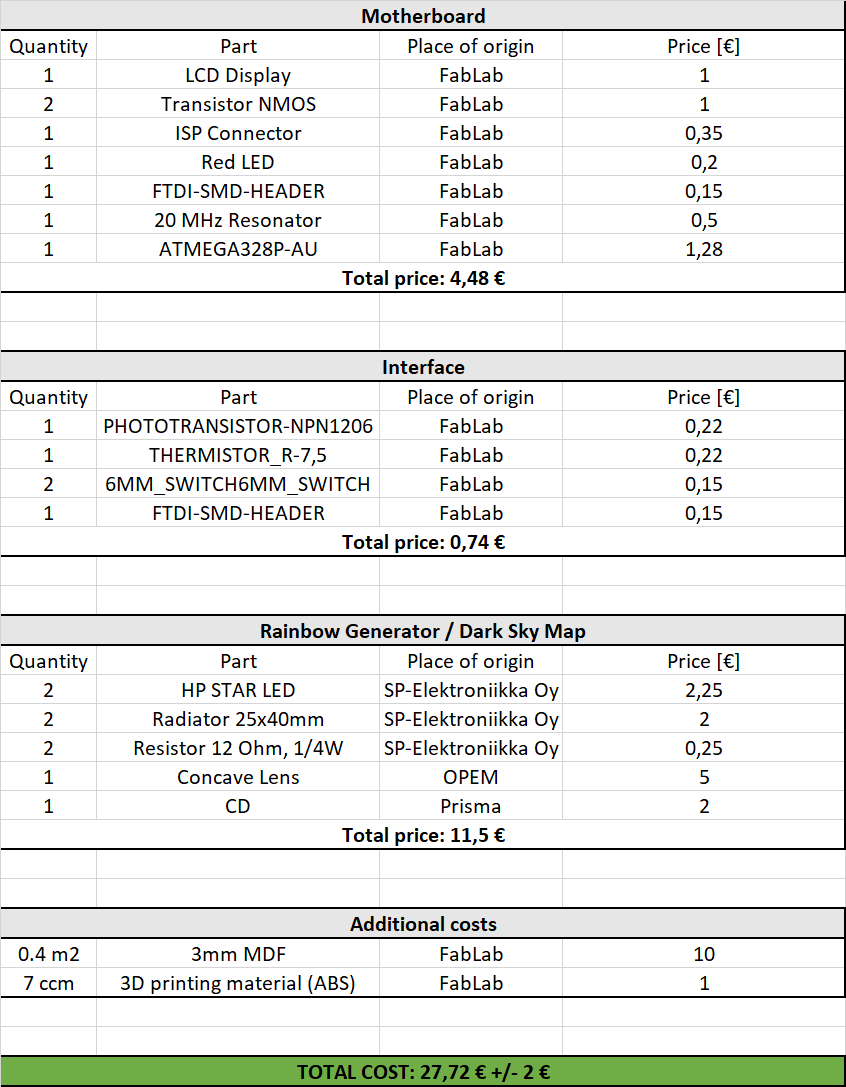
Materials and prices:
In this place I'm attaching full list of used materials. Some things changed during development process but my bill of materials remained constant. I have quite a lot of experience with designing electronics so I know from the beginning what I will need. I'm not mentioning components (such as SMD resistors and capacitors), which costs less than 3 cents each. Their total cost wouldn't not exceed 2 Euro.
What questions were answered?
How was it evaluated?
What are the implications?
- 2D/3D design - Chassis and holding pins
- Additive/Subtractive fabrication processes - Chassis and holding pins
- Electronics Design and Manufacturing - two independent circuits: Motherboard and Interface
- Microcontroller Interfacing - ATMega328p
- Featuring peripheral components - two HP LEDs circuits with radiators
- System Integration and Packaging - assembling the device
Outcomes
My repository basically shows how to build Tele Astronomical Robotic-like Stereopticon. It shows how to make simple Rainbow Generator and Planet Projector. It also visualize how to make ATMega328p working with LCD screen, buttons and sensors. Moreover, it is also describing how to operate high-current peripherals with microcontrollers, in this instance High Power Light Emitting Diodes.
From manufacturing side it shows how to laser cut, engrave, print 3D objects (pins) and fabricate/solder printed circuit boards.
From software point of view it is describing how to create firmware for Atmel microcontrollers (ATMega328p AU in this case).
I went trough assumptions I made. Except of thermistor circuit, everything worked as planned. Nevertheless, there were one change during making process. Dark Sky Map was transformed into Planet projector. I also ensured that TARS can stand it to kind of positions.
Licensing
Chosen licenses: (CC for hardware and MIT for software).
Recording and time spent on TARS
Recording is available under: Final result page. Open shot Video Editor was used for managing recorded movies. Clips were taken by me and Gleb Bulygin, to whom I would like to thank for the help.
Music used for the recording is Space Epic by Jon Wright,which is under open license
Files
Download: Design of chassis (SVG)
Download: 2D-laser cut and engraved chassis (PDF)
Download: Chassis pins (F3D)
Download: Chassis pins (STL)
Download: All PCB - related files (ZIP)
Download: Firmware (ARDUINO IDE)