Computer Aided design
Week 03
For this assignment I would like to try several software of 2D and 3D Design but above all animation software as I am planning to have movable pieces for my final project. After a deep research about the different software that Neils showed as in the lecture, I decided to try with Freecad, Rhinoceros 3D, Fusion 360 and 3Ds Max.
I decided to try Fusion 360 and 3Ds Max because I already have AutoCAD. I’m an architect, but also a professor, so it is a program that I use all the time and I already have a licence for the Autodesk family. If you are an student, you can get one free for three years, but if you are not I do not recommend you to use these software because the free trial of 30 days is not enough for the whole fab academy and the licences are pretty expensive.
So the first thing that I did was to download the software. I have to say that some of them such us Fusion 360 or 3DMax, both from Autodesk, have a really long installation, so I recommend you to organized your time and if you want to use it, leave the computer installing the software a couple of our before you start working otherwise you will lose a lot of time of your available time to work. In my case, it took two hours and half to install all the software and during that time it was impossible for me to work fluently with the computer because the installation takes a lot of memory. It was great when I didn’t have to wait for using Onshape because it runs at the Internet browser.
2D Design. Freecad
I started with Freecad, and I have to say that I liked a lot. The software uses geometric restrictions to create a parametric design. It is very easy to use, it takes a few seconds to open, the interface is nice and very visual and illustrative, so it is really easy to find the command that you want to use even if you are new with the program like I am.
So I created this shape in the sketcher mode, which could be one part of the main structure of my lamp. Then I applied some restrictions than allow me to redesign the dimensions of shape just changing the size of the main circles.
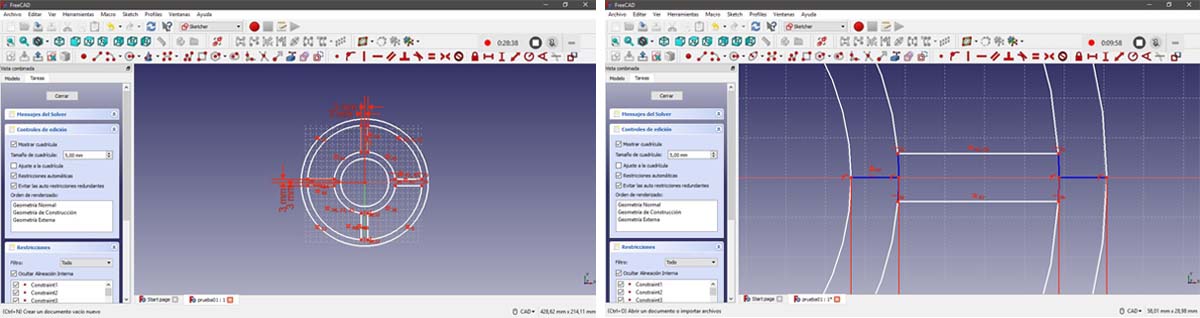
One of the things that I wanted to implement for this design was the restriction of having always the same thickness. For the vertical and horizontal elements I used the command “fix vertical/horizontal distance” but for the thickness of the circular elements the software doesn’t allow you to take the distance between two circles. In this kind of situations is when the auxiliary lines are very useful. These lines allow you to have a reference elements which you can use for the restriction operations but don’t show up in your design. Using them (blue lines) is how I solved my problem and I could restrict/fix that thickness.
Freecad is pure geometry, pure geometrical operations, and I really love it. It was fortunate to discover this software and you can be sure that I will use it a lot from now on.
For this exercise I was very useful for me the video tutorials made by Juan Gonzalez Gomez (Obi-Juan) in Youtube. - Freecad tutorial - Juan Gonzalez Gomez
3D Design. Rhinoceros 3D
When I had the main shape done in Freecad I exported it into .dxf and I opened it in Rhino and here I developed my design in 3D. I used very basic commands such us like extrude, revolve, copy vertically or rotation with copy.
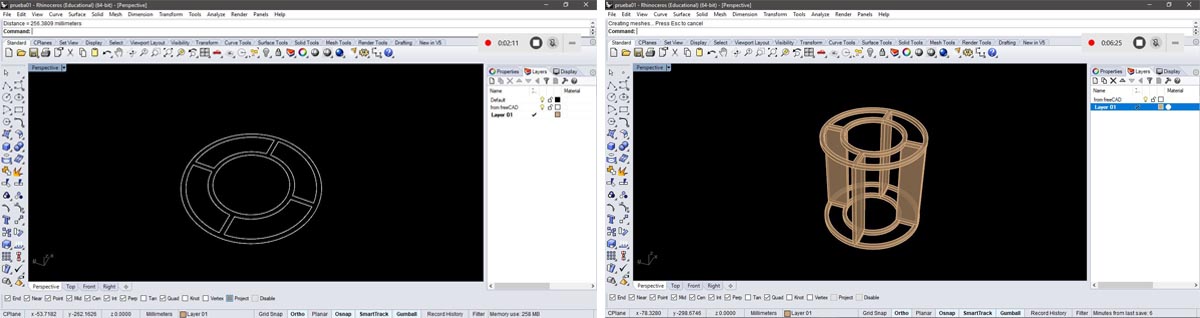
One of the things that I wanted to have in this first basic digital 3D model was the mobile parts of the lamp, those elements which will compress/fold and extend/unfold the exterior layer.
My main idea was to have a circular lamp, but when I added these mobile parts I realized that as the centre of these mobile elements is different than the centre of the lamps where the bulb will be, the circles that the movement describes are different of the concentric circles that I designed at the beginning and this means that the main shape of the lamps needs to be made by four circles instead of just one, so it will looks like a “flower” (from the top view).
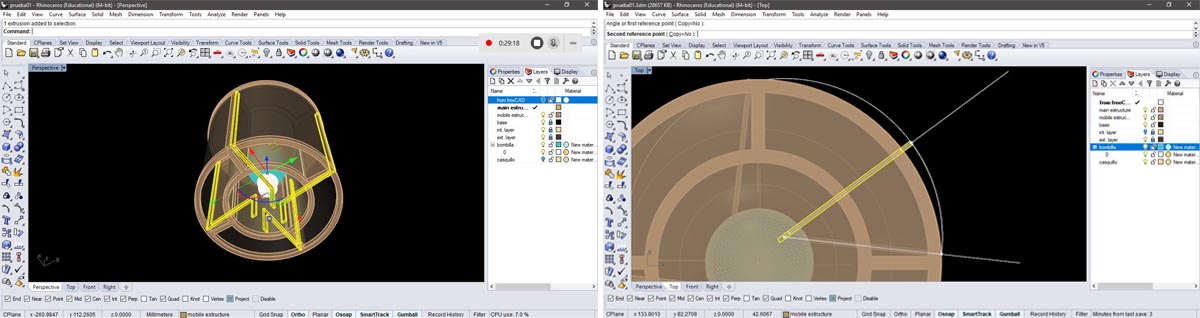
I like a lot to work with Rhino. Is a very intuitive program that allows you to work in the different views (top, perspective, front…) at the same time and that is really useful. You can also activate multiples reference points that allow you to model a precise 3d file. But one of the utilities that I like the most is that you can actually write the command that you want to use, for example, you want to extrude a curve, just write “extrudecrv”; that you want to move something, just write “move”; that you want to make a revolve operation, write “revolve”; and then the software go giving you the instructions to work with that command, for instance, if you want to rotate, first Rhino asks you the object to rotate, then the centre, then the first reference angle, and so on… So is very easy to work with it.
Rendering. Fusion 360
When I had ready my file in Rhino I exported it into .stp file and I opened it in Fusion 360.
In the render view I was applying materials to each part of my model until to get a possible texturized file. To do that in Fusion 360 you only have to open the appearance window, choose one of the pre-set materials (that you can modify) and drag and drop right onto each part of your model.
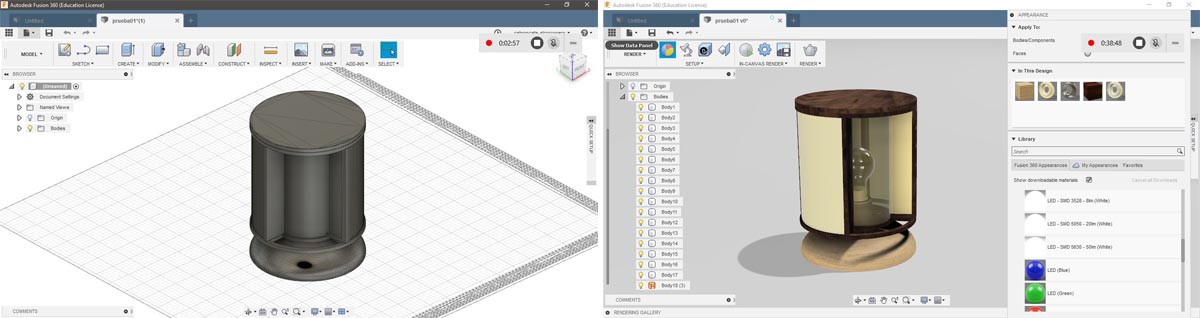
It was easy to apply the different materials, some of them are really good. What thing that I didn’t like is that you need to be connected to the Internet all the time, otherwise the variety of the options that the program offers is limited. I also had some problems with the shadows and the reflections of the ground that I haven’t solved yet. On the other hand, it is a very heavy program and it takes a bit to open. The first time that I opened it a message appeared telling me that my graphic card is not the optima for running Fusion 360, although the software was running well, no freezing or delaying. I like the rendering mode and if I am able to find the solution for the reflections and the shadows I will probably use it again.
For this exercise I was very useful for me the following video tutorials: - How to apply materials in Fusion 360 ; - How to get realistic renderings in Fusion 360 ; - Fusion 360: Rendering Tutorial
Animation. 3Ds Max
I wanted to try 3Ds Max to make animations so I can simulate the movement of the mobile structure of my final project. Using the same .stp file as a base, I started watching some tutorials about how to make the animations and practiced with a basic shape before importing my 3d file.
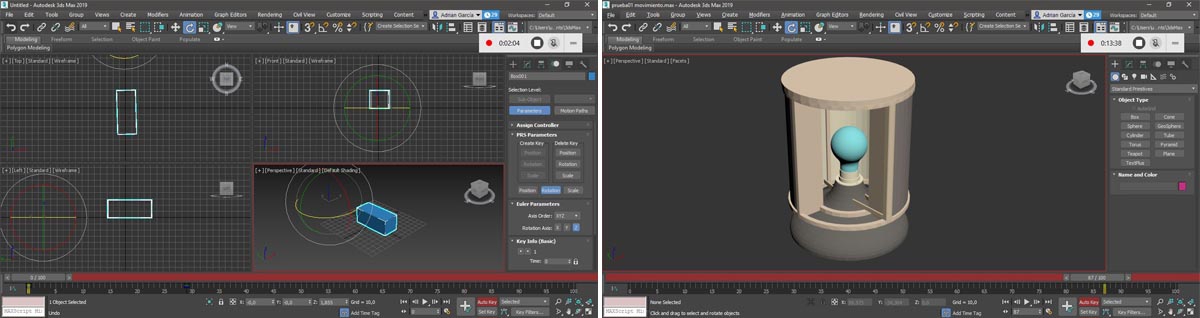
The interface is similar to Rhino so it was easy to follow the program and understand how the software works. I know that 3DsMax also has a render mode which I would like also to try but for this time I just played with the animation features.
I thought that to animate a 3d object would be really difficult to do for a new user, even if you work with the most basic movements. But for my surprise it was really easy to work with 3Ds Max, the process is very simple and clear. The only part a bit more tricky was to generate the video of the animation (but I was also checking other applications and the process than they follow is pretty similar). I had never done nothing similar before and I loved it! It was really exciting and satisfying and now I am looking forward to have the opportunity to use it again!!
In this case the following tutoriales help me a lot:- 3Ds Max 2010 Tutorials ; - 3Ds Max Animation Rotation ; - 3Ds Max animation: how to save your animation into a video
Other software.
AutoCAD is a commercial computer-aided design (CAD) and drafting software application. From my experience, it’s able to generate very precise and complex 2D vector drawings.
Blender is a free and open-source 3D computer graphics software toolset used for creating animated films, visual effects, art, 3D printed models, interactive 3D applications and video games.
Onshape is a computer-aided design (CAD) software system, delivered over the Internet. It makes extensive use of cloud computing, with compute-intensive processing and rendering performed on Internet-based servers. Onshape allows teams to collaborate on a single shared design, the same way multiple writers can work together editing a shared document via cloud services.
Scketchfab is a platform to publish, share, discover, buy and sell 3D, VR and AR content. It provides a viewer that allows users to display 3D models on the web, to be viewed on any mobile browser, desktop browser or Virtual Reality headset.
Useful links
Freecad
Rhinoceros 3D
Fusion 360
3Ds Max
AutoCAD
Blender
Cinema 4D
Onshape
Sketchfab
3D Models
Files
Find below the files that I made for this assignment. Please do not hesitate to download it!! I hope you enjoy it!!
FreeCAD file
Fusion 360 file
3Ds Max file
.stl file from Rhinoceros 3D