Week 17: Machine Design
- make a machine - document the group project and your individual contribution
For a complete view of the project, go here.
This week in machine building the mission was to automate it. My task was to make the code work.
Setup
We decided to use Gestalt nodes in our machine. For references and starting point, I used this tutorial. To make the nodes to work with python scripts, few things needed to be installed.
Python 2.7 and pySerial, which I had installed in week 12, and
pygestalt(home and instructions,
.zip).
A modified USB_FTDI_RS-485 cable was needed for the setup, to get that extra 12V power source to run the motors. Fab academy tutorial site had good instructions to create one, but we used one from Fab 2017 group work.
Testing
When physical setup was complete, it was time to test it. I hooked up one Gestalt node, 12V power supply and set up pygestalt example code, single node.
I needed to change the COM port name in initInterfaces, to match the USB_FTDI_RS-485 port.
else: self.fabnet = interfaces.gestaltInterface('FABNET', interfaces.serialInterface(baudRate = 115200, interfaceType = 'ftdi', portName = 'COM7'))
Running the code now prompted me to click the button of an x-axis node. By doing so, motor rotated briefly, indicating that the setup was working.
Persistence file
Next I tried out xy_plotter code, which controlled two nodes. This, however, didnt work. After a short troubleshooting, I discovered the existence of a persistence file. After setupping gestalt node(s), a persistence file is created, to allow faster future startups by storing the axis setup. But, if the setup is changed(node positions changes, additional nodes), the persistence file must be deleted. Otherwise the init will be skipped and the system will fail due to wrong setup. In code you can see the name of the file:
stages = virtualMachine(persistenceFile = "test.vmp")
After deleting the file and running the code, it prompted x axis button press as well as y axis, and the code worked as it should.
Adding more nodes
Because xy_plotter only has control for two motors and we used four, some additions and modifications needed to be done. New lines and changes are bolded in the following code snippets. Full python script can be found in the end.
Started adding two more axes. First in initControllers function:
self.zAxisNode = nodes.networkedGestaltNode('Z Axis', self.fabnet, filename = '086-005a.py', persistence = self.persistence)
self.tAxisNode = nodes.networkedGestaltNode('T Axis', self.fabnet, filename = '086-005a.py', persistence = self.persistence)
self.xyztNode = nodes.compoundNode(self.xAxisNode, self.yAxisNode, self.zAxisNode, self.tAxisNode)
Then add two more lines in initKinematics and change the number to match the amount of nodes(motors):
self.zAxis = elements.elementChain.forward([elements.microstep.forward(4), elements.stepper.forward(1.8), elements.leadscrew.forward(8), elements.invert.forward(False)])
self.tAxis = elements.elementChain.forward([elements.microstep.forward(4), elements.stepper.forward(1.8), elements.leadscrew.forward(8), elements.invert.forward(False)])
self.stageKinematics = kinematics.direct(4) #direct drive on all axes
Modify one line in initFunctions:
self.move = functions.move(virtualMachine = self, virtualNode = self.xyztNode, axes = [self.xAxis, self.yAxis, self.zAxis, self.tAxis], kinematics = self.stageKinematics, machinePosition = self.position,planner = 'null')
Add two more value slots in initCoordinates:
self.position = state.coordinate(['mm', 'mm', 'mm', 'mm'])
Last thing to set in __main__ was the speed setting line, to change the node variable:
stages.xyztNode.setVelocityRequest(8)
Moving the motors
Next was to create movement value sets. As we had four motors, single set needed as many values, or basicly coordinates. value is amount of millimeters from origin. To move every motor 20mm forward, the set would look like this:
This would leave the system to that position, and for it to go back to origin, zero set needs to be added in the end.
To move the motors with code, I replaced hard coded values with variables, as following:
Gestalt packets in the Fabnet
To get an understanding how things moved in the Gestalt nodes and in the Fabnet, to use with our sensor, I read this document about Gestalt.
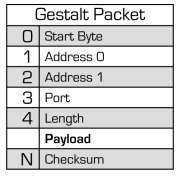
"The payload is the core of the packet, and is used by the service routines to pass messages like how many steps to take or the current value of a sensor"
Understanding this could open up the possibility to use Arduino(or any board) as an extra node and send Gestalt packet with sensor data in it. For the time being, this requires more in depth research of the subject, and we ended up trying something easier.
The sensor
We used my Atmega328P board for extra serial communication and button sensor. Serial line sensor query was added after motor movement in the loop, and the serial line itself was opened at the start of __main__.
.
.
.
ser.write('A')
ask = ser.read()
if (ask == '1'):
ser.write('K')
On it own, it worked. But as a part of the main python code, the activation came too late and it somehow hanged the system, cutting every cycle short after. This seemed to be a timing issue, which we tried to solve by increasing the baud rate in python/board. It made the response time a little bit better, but it was still too much. It could also be because of the laptop in the middle, connecting two serials. Unfortunately we run out of time to troubleshoot this any further.
Files
button for machinepython check for button
python code to run the machine