Wildcard week - Building a base for my turtle robot
I did not want to "waste" any more time not doing something for my final project, so I decided to use this week to start working on the base for my wall avoiding turtle robot.
During previous weeks I have:
- Built a sonar board for it on input week, so that it can detect obstacles
- Built a connected H-bridge board for two motors on output week, so that it can move, turn, reverse etc.
--> I still have to make the motors react to sonar input, and have no idea how to do this, but onwards and upwards!
And onwards and upwards for me means that for wildcard week I have selected to work with composites. I will create a two sided mold for the base in fusion360, mill it, and then work with composites to build a base using the mold.
When the composite base is ready, I will attach the electrical components on top of it, and the wheels in the bottom. To cover the electronic parts, I will have the shell/dome of the turtle
--> for the shell I am thinking slicer for Fusion + lasercutter. 3D printing will take so much time.
Designing the turtle mold in Fusion360
I opened Fusion360, and selected file --> New design
First I drew the outline of the turtle using the sketch --> Line tool. I tried to make the turtle somewhat symmetrical. The total height of the turtle is 180mm (18cm) including the head, and the total width of the turtle from the widest point is 130 mm. The area of the the turtle body should be more than enough to hold my sonar board, my H-bridge board, and the battery.

2. Next I used the create --> Press pull tool from the menu above, to create a body out of the sketch. I made the turtle 11mm deep.

3. As I thought this flat shape was a bit boring for the turtle, I proceeded to use the modify --> Chamfer tool to shave off the strict angles. I proceeded to select all of the edges I wanted to chamfer, and specified I want to take off 3mm, then clicked OK. Here I have selected to chamfer the head of the turtle, but after chamfering that, I chamfered the body to match as well.

4. Here is the chamfer done on the whole turtle body

5. I proceeded to start creating the mold for the turtle. I clicked on sketch --> Create sketch, rotated the turtle, and proceeded to select that I want to place the sketch on it's backside. Then I selected skech --> 2 point rectangle and created it around the turtle, leaving generous space on the sides.

6. Then I clicked on create --> extrude, and extruded the rectangle backwards -15mm. this creates a base for the turtle

7. After the base for the mold was done, it was time to draw the edges for it.
I clicked on sketch --> New sketch, and this selected to create it on the top surface of the rectangle I had just done.

8. I draw it inside the first rectangle.

9. Then I clicked on create --> Extrude, and selected the small space between the rectangles to extrude. I extruded it 13 mm so the mold is a bit deeper than the turtle (the turtle is 11mm, the sides of the mold 13mm). Now the bottom part of the mold was done

10. I proceeded to create the top part for the mold.
I clicked on sketch--> New sketch, rotated the base, and chose to create the sketch on the bottom

11. I draw a rectangle that was exactly the same size as the first one. The height of the rectangle was 240mm, the width was 190.365mm

12. I proceeded to click create --> extrude, and as I wanted this other rectangle to create a lid for the first one, I added a bit offset (6mm) to it, so it was created a bit higher than the original box.

13. Before I pressed OK, i changed the "operation" setting to new body, as I did not want to to use the new rectangle as a cutting tool, but create a new one.

14. Then it was time to use the base as a tool to cut the lid part.
I clicked on modify --> Combine.

15. I selected the lid as the "target body", and I selected the base as the "tool body". I also selected to "keep the tool" so that the base would not be lost

16. Now I basically had both sides of my mold ready. But I wanted to move them side by side for machining.
I selected the lid, rightclicked on it, and chose "move". I selected rotate as the move type, and specified that I want to rotate the lid 180 degrees

17. As the bottom and the lid were now a bit on different levels, I clicked on modify --> Align, and close to align the lid with the base.


18. When the two parts were on the same level, I moved them apart a bit, to allow for machining

19. This is pretty much the molds done. But now the fit would be really, really tight, and I was explained by our local instructor Jari that I should leave some room between the lid and the base for the composite to be fitted there.
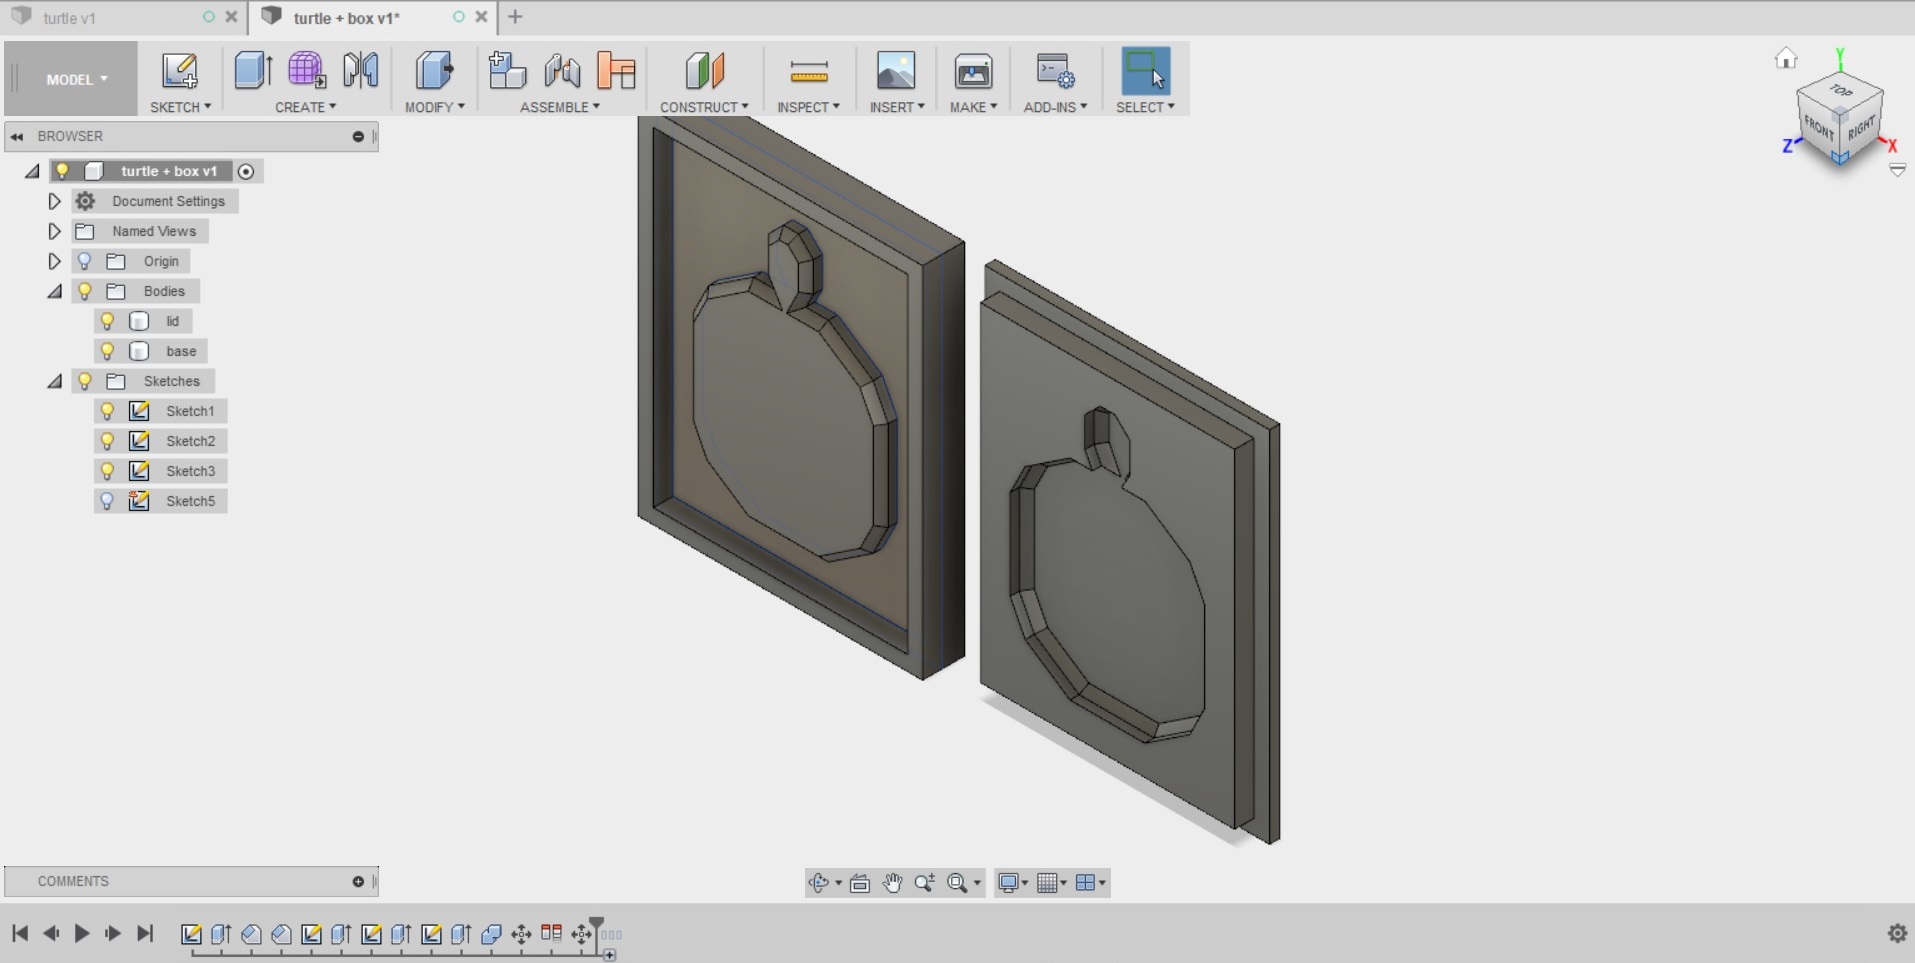
20. For this purpose, I used the modify --> Press pull tool, and selected to "offset" certain faces of the lid. I selected all of the faces that meet the bottom of the mold, or the turtle shape on the base. As I had used the chamfer tool, there were quite a few of them (42). I selected them all, and selected the offset to be -5mm, This mens that this amount of material will be shaved off them.

I did not add any offset to the sides of the mold, as I fugured a tight fit would be in order here, hopefully this will be OK
Here is the mold all ready

Files
- The design file for the mold
Machining the mold
Next I proceeded to carry out the CAM part of the assignment, for machining the mold out. At FabLab Oulu the molds will be cut out with the same CNC machine we had previously used on the "make something big" -week, so it was already familiar to me. The molds will be cut out of foam that is 10cm deep, using a ball end milling bit of 8mm of diameter and a flute length of 20mm.
1. I switched from Model to CAM in fusion360
New setup
I clicked on setup --> New setup.

I chose to use the model orientation for the setup, as the XYZ azis were pointing where they should, I just moved the origin to the lower left corner, to the top surface.
 to the bottom left upper corner.jpg)
In the stock tab, I specified the the top offset and side offset to 0. This was the setup done.

Creating a roughing process
1. I started by clicking 3D --> Parallel to create the roughing process

2. I selected to use the 8mm ballhead milling bit from the fabOulu library

3. The tool settings I used for the roughing process
- Coolant: Disabled
- Spindle speed: 15000 rpm
- Surface speed: 376.991 m/min
- Ramp spindle speed: 15000 rpm
- Cutting feedrate: 6000 mm/m
- Feed per tooth: 0,2mm
- Lead-in feedrate: 6000 mm/min
- Lead-out feedtate: 6000 mm/min
- Ramp feedrate: 3000 mm/min
- Plunge feedtate: 750 mm/min
- Feed per revolution; 0,05mm

4. The geometry settings I used for the roughing process
- machining boundary: silhouette
- Tool containment: Tool center on boundary
- Additional offset: 0mm
- Contact point boundary: Tab unselected
- Contact only: Tab selected
- Slope, rest machining, tool orientation, model, avoid/touch surfaces tabs left unchecked

4. The heights settings I used were also the default ones
- Clearance height: From retract height, offset 10mm
- Rectract height: From stock top, offset 5mm
- Top height: From stock top, offset 0mm
- Bottom height: From model bottom, offset 0mm
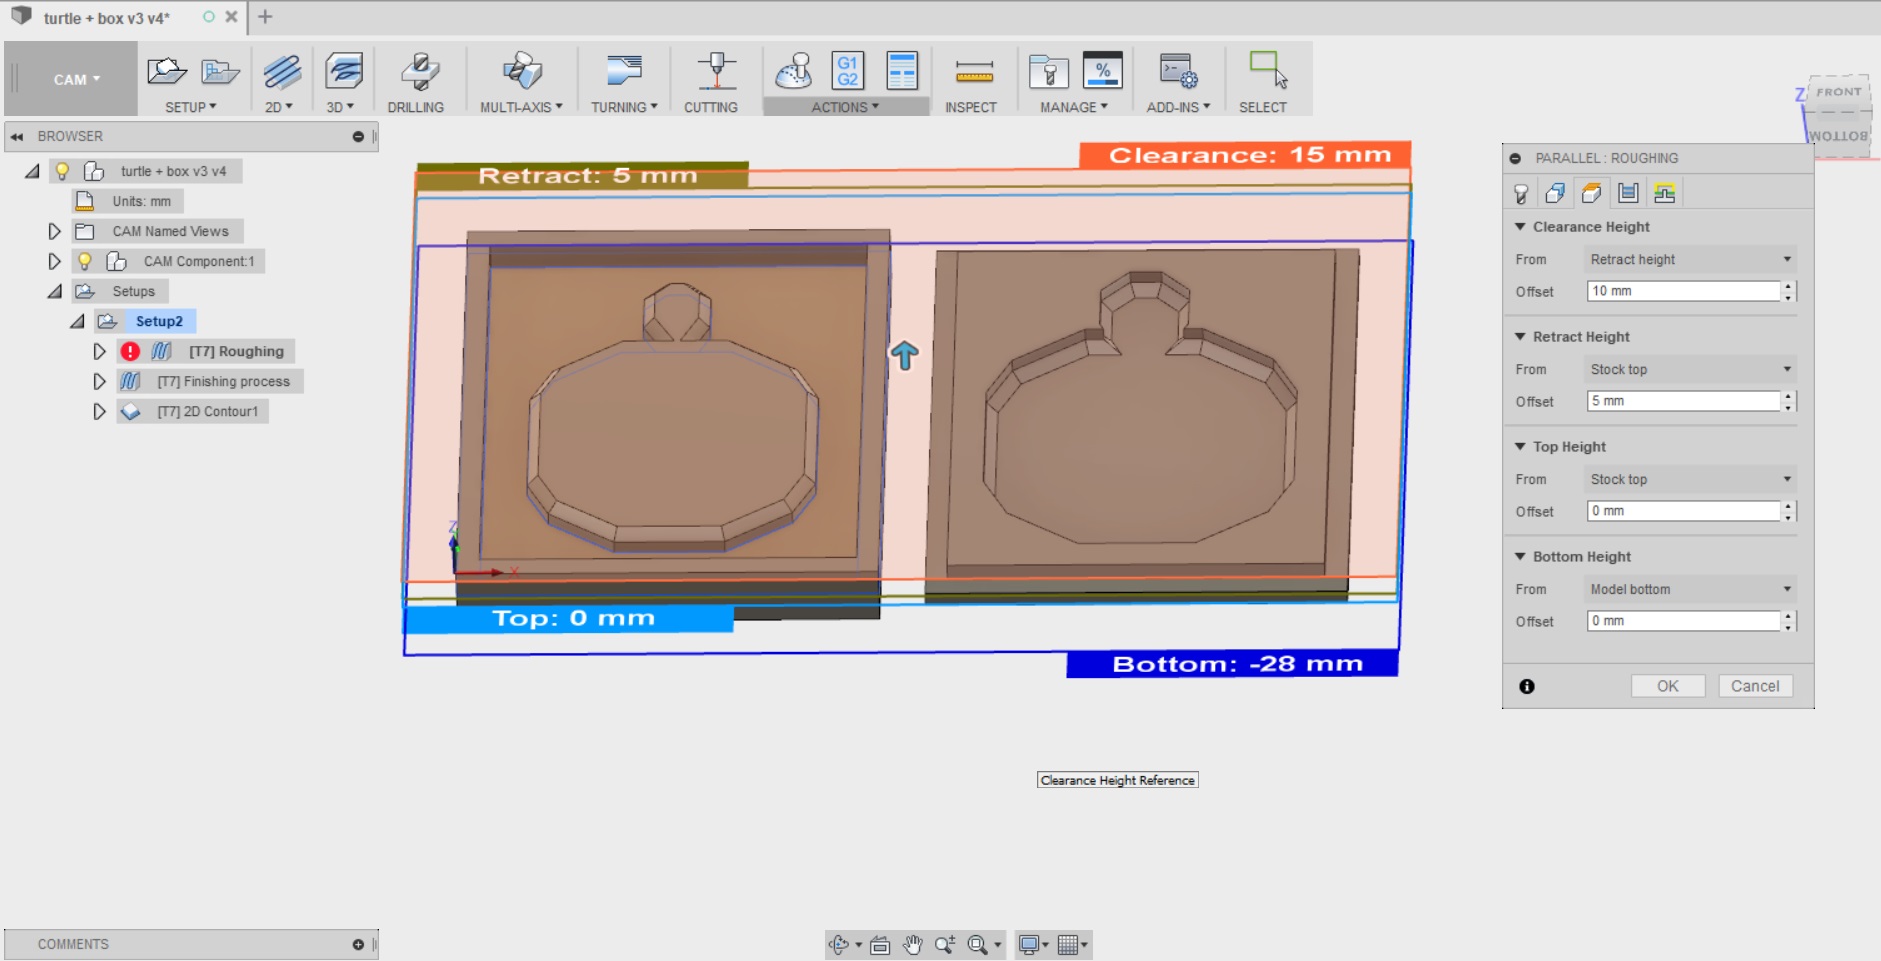
5. The passes settings I used:
- Tolerance: 0.01mm
- Machine steep areas, add perpendicular passes, machine straight on, simple ordering: All left unchecked
- Pass direction: 0deg
- Stepover: 4mm
- Direction: Both ways
- Axial offset passes: unchecked
- Up/down milling: Don't care
- Stock to leave, fillets, smoothing and feed optimization: All left unchecked

6. The linking settings I used:
- Rectration policy: Full retraction
- High feedrate mode: Preserve rapid movement
- Allow rapid retract: Checked
- Safe distance: 2mm
- Maximum stay down distance: 50mm
- Horizontal lead in radius: 0,8mm
- Vertical lead in radius: 0,8mm
- Horizontal lead out radius: 0,8mm
- Vertical lead out radius: 0,8mm
- Transition type: Smooth
- Entry positions: nothing

After all the settings were I done ran a simulation that shows that the roughing process will take about 5 mins

Creating the finishing process
1. Settings in the tool tab
- Tool is the 8mm ball as in roughing
- Coolant: Disabled
- Spindle speed: 10000rpm
- Surface speed: 251,327
- Ramp spindle speed: 10000 rpm
- Cutting feedrate: 2000 mm/min
- Feed per tooth: 0.1mm
- Lead in feedrate: 214 mm/min
- Lead out feedrate: 214mm/min
- Ramp feedrate: 214 mm/min
- Plunge feedrate: 150mm/min
- Feed per revolution: 0,015mm

2. Settings in the geometry tab
- Machining boundary: Selection
- Machining boundary selection: the lower edges of the molds
- Tool containment: Tool center on boundary
- Additional offset 0mm
- Contact point boundary: unchecked
- Contact only: checked
- Slope, rest machining, tool orientation, model and avoid/touch surfaces: All left unchecked

3. Settings in the heights tab
- Clearance height: from rectract height, offset 10mm
- Retract height: from stock top, offset 5mm
- Top height: From Stock top, offset 0mm
- Bottom height: From model bottom, offset 0mm

4. Settings in the passes tab
- Tolerance: 0,01mm
- Machine steep areas, add perpendicular passes, machine straight on and simple ordering: All left unchecked
- Pass direction: 0 deg
- Stepover: 1mm
- Direction: Both ways
- Axial offset passes: Unchecked
- Up/Down milling: Don't care
- Stock to leave, fillets, smoothing, feed optimization: All left unchecked.

5. Settings in the linking tab
- Retraction policy: Full retraction
- High feedrate mode: Preserve rapid mode
- Allow rapid retract: checked
- Safe distance: 2mm
- Maximum stay-down distance: 50mm
- Horizontal lead-in radius: 0.6mm
- Vertical lead-in radius: 0,6mm
- Vertical lead-out radius: 0,6mm
- Vertical lead-out radius: 0.6mm
- Transition type: Smooth
- Entry positions: Nothing

6. Simulating the finishing process. It is estimated to take about an hour

Creating the 2d contour process to cut out the pieces
1. Settings in the tools tab:
- Tool is the 8mm ball as in roughing and finishing
- Coolant: Flood
- Spindle speed: 10000rpm
- Surface speed: 251,327
- Ramp spindle speed: 10000 rpm
- Cutting feedrate: 2000 mm/min
- Feed per tooth: 0.1mm
- Lead in feedrate: 214 mm/min
- Lead out feedrate: 214mm/min
- Ramp feedrate: 214 mm/min
- Plunge feedrate: 150mm/min
- Feed per revolution: 0,015mm

2. Setting for the geometry:
- Contour selection: 2 chains --> bottom outer sides of both the lid and the base for the machining boundary (2 chains)
- Tangential extension distance: 0mm
- Separate tangential end extension: unchecked
- Stock contours, tabs, rest machining, wrap toolpath, tool orientation: all left unchecked

3. The heights settings I used were the default ones
- Clearance height: From retract height, offset 10mm
- Rectract height: From stock top, offset 5mm
- Feed height: From top height: offset 5mm
- Top height: From stock top, offset 0mm
- Bottom height: From model bottom, offset 0mm

4. The passes settings I used:
- Tolerance: 0.01mm
- Sideways compensation: Left (climb milling)
- Compensation type: in computer
- Minimum cutting radius: 0mm
- Finishing smoothing deviation: 0mm
- Multiple finishing passes: unchecked
- Finish feedrate: 1000 mm/min
- Repeat finishing pass: unchecked
- Finishing overleap: 0mm
- Lead end distance: 0mm
- Outer corner mode : Roll around corner
- Tangential fragment extension distance: 0mm
- Preserve order: unchecked
- Both ways: Unchecked
- Roughing passes: Unchecked
- Multiple depths: Checked
-- Maximum rounghing stepdown: 9mm
-- Finishing stepdowns: 0
-- Finishing stepdown: 0,2mm
-- Wall taper angle: 0 deg
-- Approach mode: Along wall
-- Finish only at final depth: unchecked
-- Rough final: Checked
-- Use even stepdowns: Unchecked
-- Order by depth: unchecked
-- Order by islands: Checked
-- Use thin wall: unchecked
- Chamfer: Unchecked
- Stock to leave: Unchecked
- Smoothing: Unchecked
- Feed optimization: unchecked

5. The linking settings I used:
- High feedrate mode: Preserve rapid movement
- Allow rapid retract: Checked
- Safe distance: 2mm
- Keep tool down: Unchecked
- Lift height: 0mm
- Lead-in (entry): Checked
- Horizontal lead in radius: 0,6mm
- Lead in sweep angle: 90 deg
- Linear lead-in distance: 0,8mm
- Perpendicular: unchecked
- Vertical lead in radius: 0,6mm
- Lead out (exit): Checked
- Same as lead-in: checked
- Ramp: unchecked
- Predrill positions: Nothing
- Entry positions: Nothing

The simulation shows that the whole cutting out process takes about 9 minutes.

Last simulation and post process
Once all of the processes I needed were ready, I did a final simulation with all of them combined. the simulation estimates that the total time for machining will be 2 hours and 5 seconds.
I proceeded to generate the code for our CNC router using the post process. I saved all processes (roughing, finishing and cutting out) in their own files:
I selected actions --> post process, and proceeded to save the files to my computer.

The cutting
Then I moved to the CNC machine used in FabLab Oulu. We cut the molds in XPS sheets that are 2x50mm thick. Before machining they were secured into the board sacrificial layer with long screws so that it stays in place during the milling. We also inserted the 8mm ball end tool into the machine.
The machine is controlled from a computer next to it.
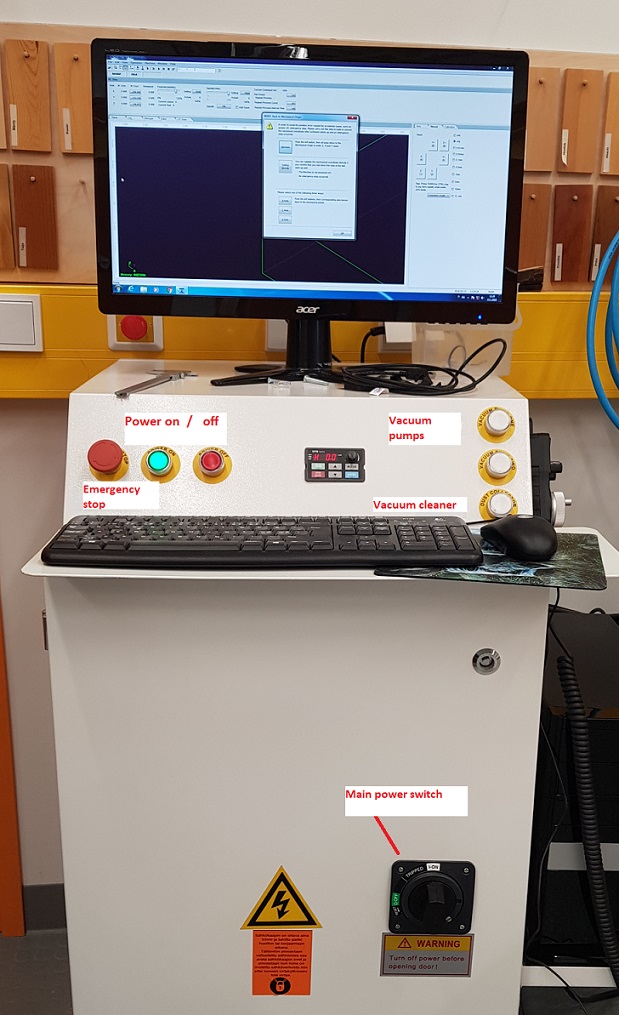
I turned on:
- main power: switch
- machine power: Power on button
- The computer
I opened the NC studio software:
If the machine has been turned off, there is a need to build the mechanical coordinates when the software is started. In this case a pop-up window will appear during startup.
--> Select "all axes", and the program will automatically move all axes to the correct mechanixal origin spot for the X, Y and Z axis. After it is finished, you can just press OK.
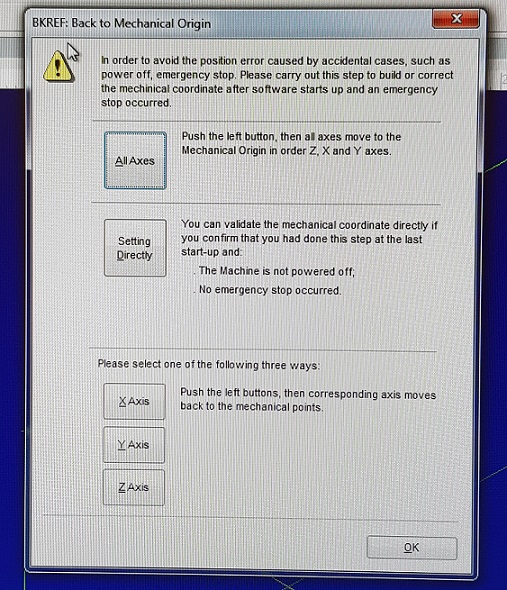
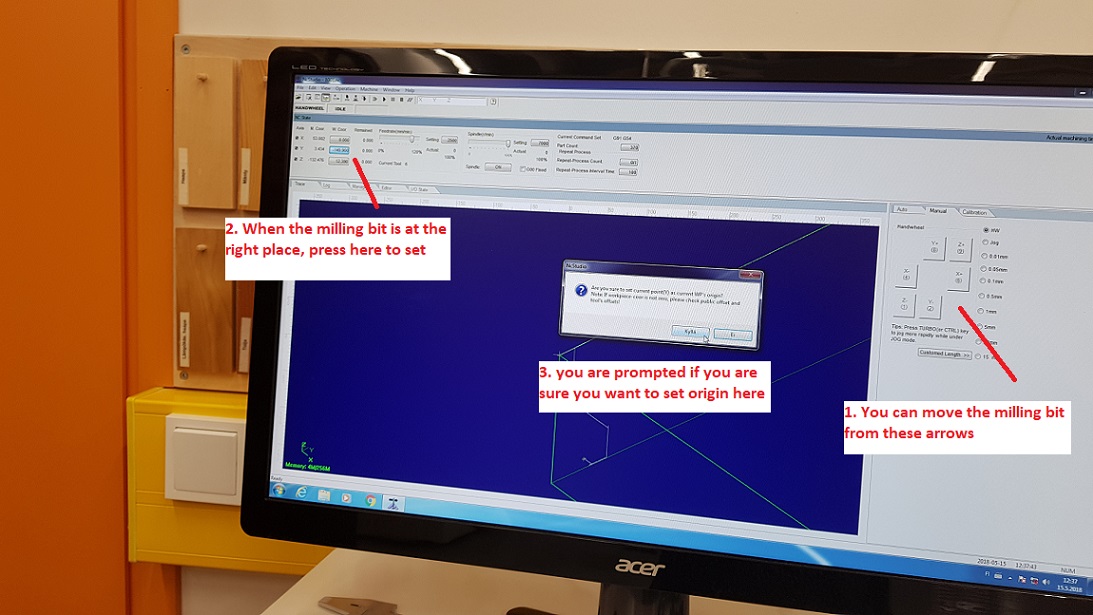
- When this was done, I moved the milling bit to the point in the board where I wanted to set my origin point. The milling bit can either be moved from the arrows on the software, or by handheld controller.I have set the origin of my design to be at the top surface of the stock, in the left "lower corner".
- I proceeded to move the milling bit to the left lower corner of the board, and set the x, and Y axis by clicking the X and Y buttons next to the coordinates in the software.
- Next I set the z axis (think depth) by moving the milling bit to the surface of the board, and clicking the button next to the Z axis by clicking button next to the coordinates in the software.
- I removed all the previous movement recorded on the screen (right click --> clear)
- I proceeded to load my roughing NC code to the software (file --> Open and load)
- I ran a simulation before the actual cutting.
- Once everything looked OK, I turned on the vacuum and dust collector and put in hearing protection
- Clicked cut
When operating the machine
- If feedrate and spindle values were too high, the machine would have made high pitched sounds, so pay attention (remember emergency off!)
Here the machine is doing the roughing process, which lasted about 15 mins.

The roughing left quite a rough surface to the mold, so I decided to do the finishing process as well
I removed all the previous movement recorded on the screen (right click --> clear)
- I proceeded to load my finishing NC code to the software (file --> Open and load)
- I ran a simulation before the actual cutting.
- Once everything looked OK, I clicked cut
Here the machine is doing the finishing process, which lasted about 60 mins.
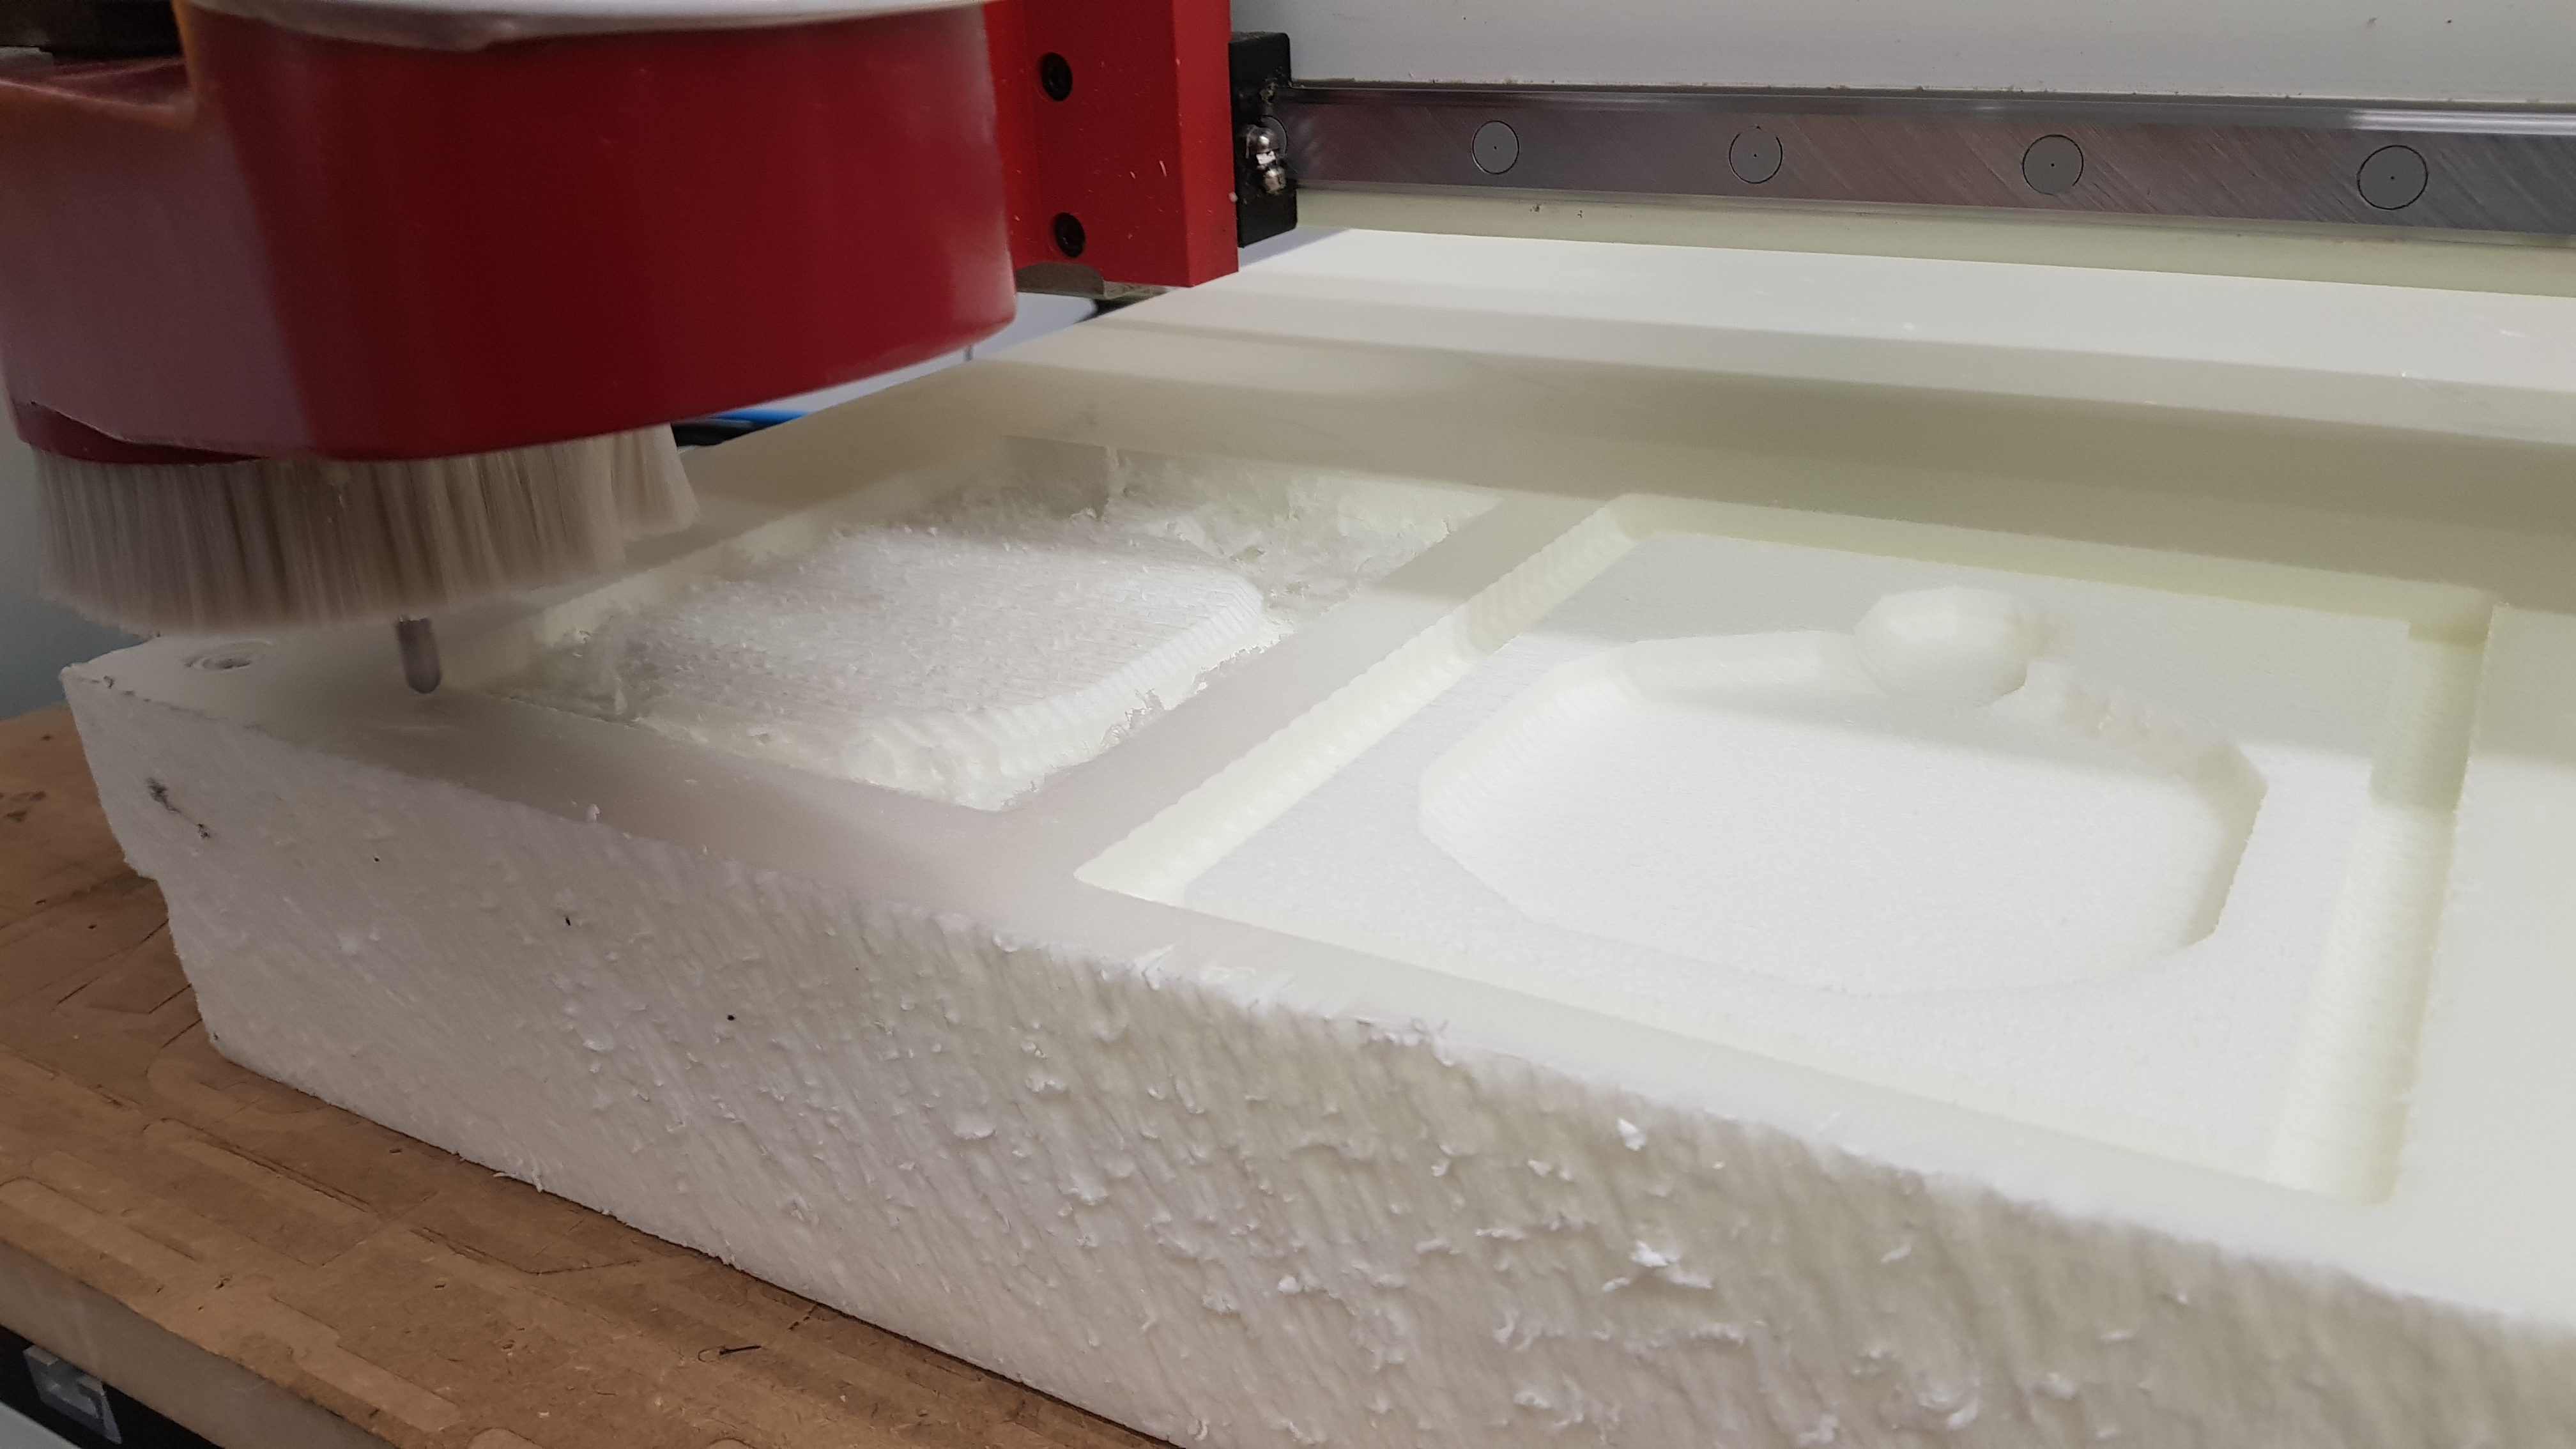
We decided not to do the cutting out process with the CNC machine, instead we used an electric saw.
Files
- The design file for the mold with the CAM and post process done
- The stl file for the mold with the CAM and post process done
- The roughing nc code for machining
- The finishing nc code for machining
- The cutting out nc code for machining (not used)
Doing the composite
For laminating we used SUPER SAP 100/1000 SYSTEM which is composed of part A) Super Sap 100 Epoxy (a modified, liquid epoxy resin), and part B) Super Sap 1000 Hardener. They come in two large pump bottles. To get started, we had to read the
Techical Data Sheet and safety data sheets for the epoxy and for the hardener as the chemicals used are hazardous to skin, eyes or breathing. They are also hazardous to environment so waste must be handled correctly.
Key features from the technical data sheet
- Mix Ratio (by volume): 2 parts epoxy (Part A), 1 part hardener (Part B)
- Pot life: 25 mins
- Curing time until can be handled: ~24h
- Full cure: 7 days!!!!
Hazard statements from the safety data sheet:
- Causes skin irritation
- May cause an allergic skin reaction.
- Causes serious eye irritation
- Toxic to aquatic life with long lasting effects.
Precautionary statements from the safety data sheet:
- Avoid breathing dust/fume/gas/mist/vapors/spray.
- Wear protective gloves/protective clothing/eye protection/face protection.
--> If on skin: Wash with soap and water.
--> If in eyes: Rinse cautiously with water for several minutes.
--> If skin irritation or a rash occurs: Get medical advice/attention.
- Wash skin thoroughly after handling.
- Take off contaminated clothing and wash before reuse.
- Contaminated work clothing should not be allowed out of the workplace.
- And of course: avoid release to the environment, collect spillage.
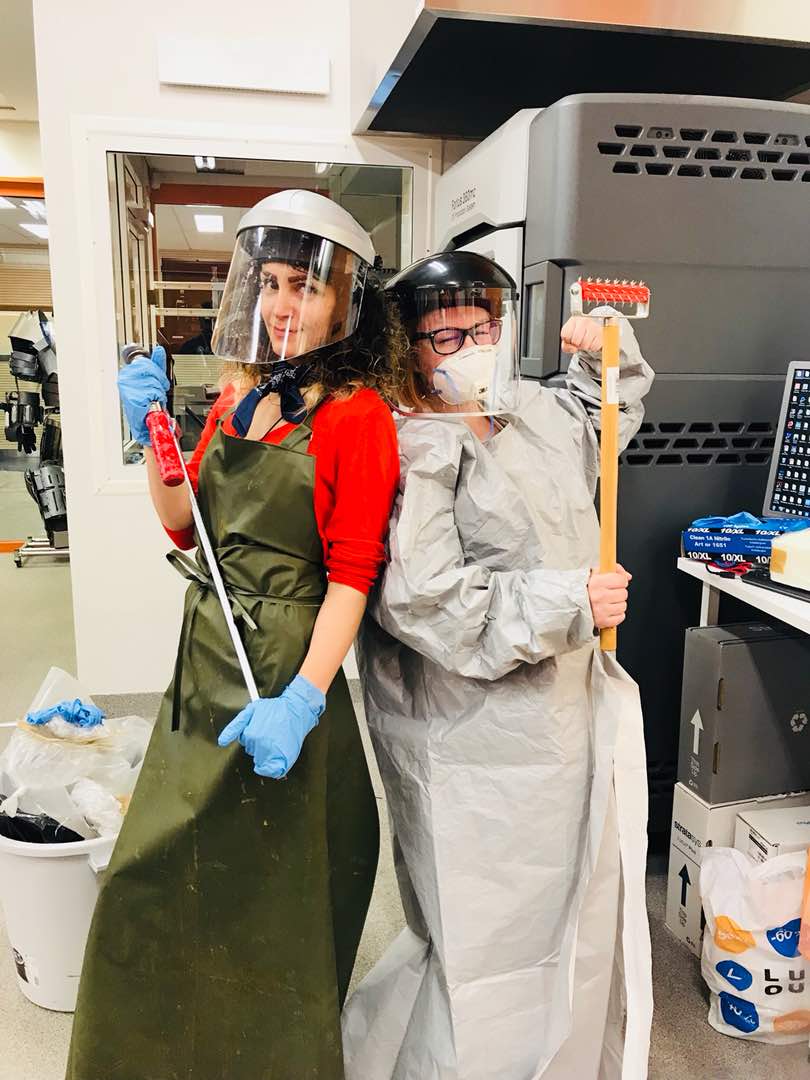
After properly getting worried about working with this stuff, we covered all surfaces we are using in the Fablab with thick plastic, and got into our protective gear. Here we are with Behnaz, looking cool as ever
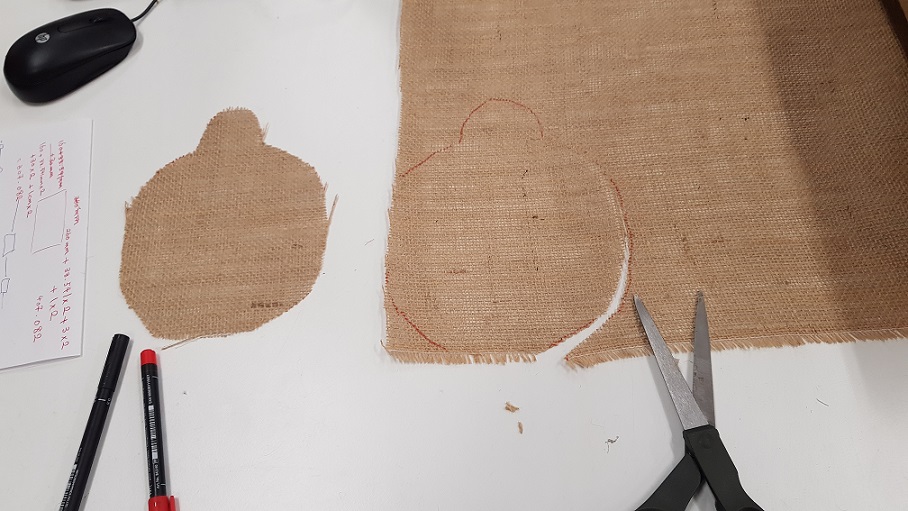
Before I got started - I cut out 9 layers of burlab sack, in pieces that are roughly big enough to cover my turtle. I started out cutting 5 which I thought would be enough, but was suggested by our local instructors Juha-Pekka and Jari who had done this the previous year, that more might be better. As for the cutting, I did not measure very specifically - I just placed one piece over my turtle in the mold, covered it up with the fabric, and drew the outline there with a marker that is just slightly larger than the turtle itself. Then I cut all the following layers using that first one as a model.
The process of working with composites that we used :
0. We covered both the lid, and the base of the mold with plastic film to protect it
--> Here it is important to make sure that the film is not too tight (it needs to have some give as you need to be able to push the resin on the bottom of the mold, and then fit the lid on top of it)
1. We mixed up the epoxy and hardered in 1/2 ratio
2. We took up one piece of material we had cut ready before, slapped resin on top of it, and spread it to soak the fabric using our hands and the stick, then we inserted the fabric into the mold
--> This process is repeated with all of the layers. Soak them separately, and layer on top of each other
--> It is important that all parts of the fabric are wet, but they should not be dripping with resin
6. When all of the needed layers were in place, we covered them with one layer of plastic film that we had put airholes in.
7. Then we put in breather material that we had also pre cut so that it covers the mold.
8. Covered the breather material with intact plastic film.
9. Put in the lid
10. Let it dry for long enough duration in compression.
(no photos, sorry - hard to manage that while working with gooey messy stuff)
Here is my mold in compression
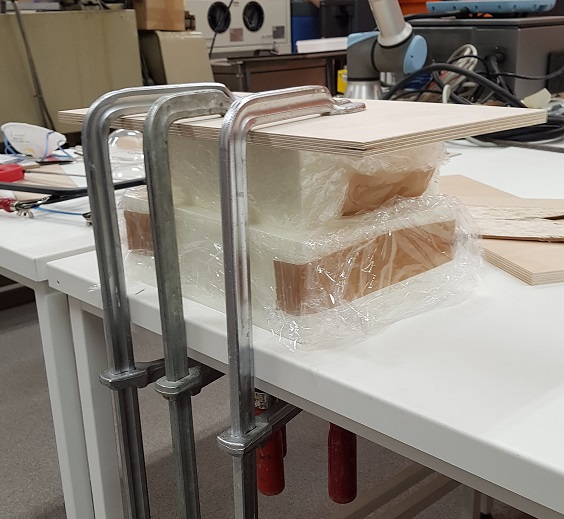
We let our composites dry for about 22 hours, then started unwrapping them, documenting backwards

When I lifted the lid, the first thing that I saw was that the composite had seeped to the breather material, so there had been quite much moisture

I proceeded to dig in, cutting away the plastic film from the sides, so that I can remove the breather material and expose the composite.

The composite lifted out of the mold together with the film, and I saw that it had filled the sides of the mold as well, so there was quite a lot of material there.

Thankfully, the breather material had not stuck, and was quite easy to remove

Here is the composite, fresh out of the mold, just removing some plastic film residue

I proceeded to cut out the excess material with electric saw, to preserve only the turtle shape. Some shots of the ready turtle.
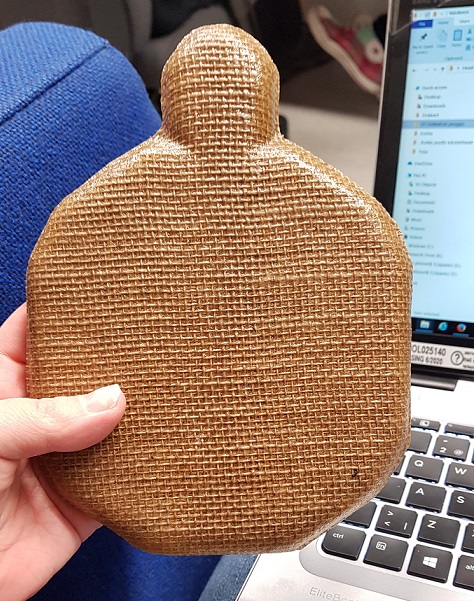


It turned out really nice I think - And hard as a rock, there is no give whatsoever. It will be almost a shame to cover it with electronic parts and put wheels underneath :D
Problems had and lessons learned
- Modelling went quite easy, I think my experiences from Molding and casting week and the "make something big"-week really helped here
--> I however created one unnecessary process in CAM: The 2D contours --> Instead we cut the pieced out using an electric saw.
- Working the CNC machine was also familiar from the "make something big"-week. It did surprise me though how slow the process was even though the material was quite light - the roughing went by rather fast, 15 mins or so, but the look really was rough, and the finishing lasted about an hour.
-Doing the composites was fun, although we were melting in our protective gear. Also We mixed up way too little composite material first, and had to repeat the process. It was really hard to estimate how much is needed.
- We were advised that we need to soak the material in resin, but we should not use too much resin. It is really hard to estimate how much is enough when working with composites for the first time.
Copyright © Heidi Hartikainen 2018
Template copyright ©Blackrock Digital LLC 2013-2018

This work is licensed under a Creative Commons Attribution-NonCommercial-ShareAlike 4.0 International License.