- Assignment 08
Embedded Programming
After building a programmer and a programmable board it's time to program it, so first I found the information to do it and then I tried it with different methods.
Datasheet
The datasheet contains all the information about the components. In this case I searched the datasheet of my 8-bit AVR Microcontroller: the ATtiny44 produced by Atmel.
The first chapter that we find is Pin Configurations, in the image is possible to see how are arranged the pins, their names and the name of their functions.
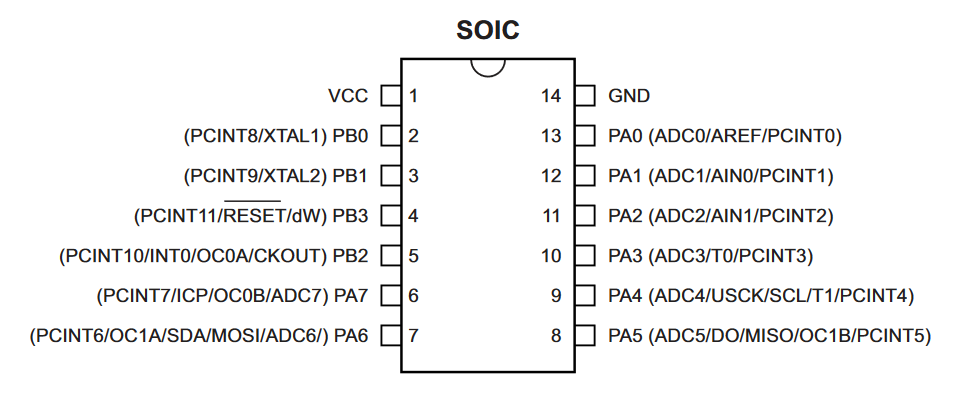
Figure 1. Pinout Atmel ATtiny44
In the section 2.3 Pin Descriptions is present a short pin descriptions, useful to understand better the pinout.
In figure 7-2 Crystal Oscillator Connections there is the schematic of the Crystal Oscillator, I have used an all-in-one component.
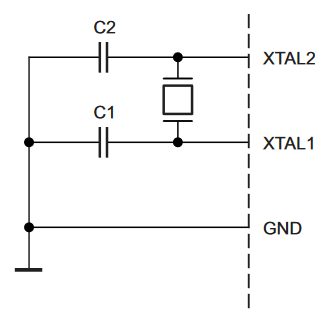
Figure 2. Crystal Oscillator Connections
The section 12 I/O Ports explains all the digital input and output functions and how to use them; at the end of 12.2.4 Reading the Pin Value there is also a very useful example of code in C on how to set up, write and read on the ports.
unsigned char i;
...
/* Define pull-ups and set outputs high */
/* Define directions for port pins */
PORTA = (1<<PA4)|(1<<PA1)|(1<<PA0);
DDRA = (1<<DDA3)|(1<<DDA2)|(1<<DDA1)|(1<<DDA0);
/* Insert nop for synchronization */
_NOP();
/* Read port pins */
i = PINA;
...
In the section 21.6 Serial Downloading also explains how to load firmware using the serial SPI bus.
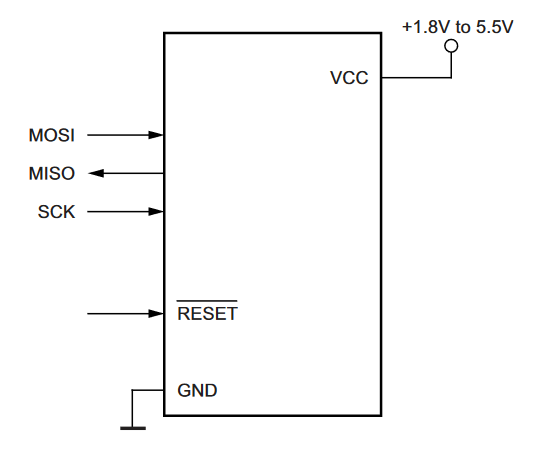
Figure 3. Serial Programming and Verify
In the section 22.1 Absolute Maximum Ratings there are some information to consult to avoid permanent damage to the device.
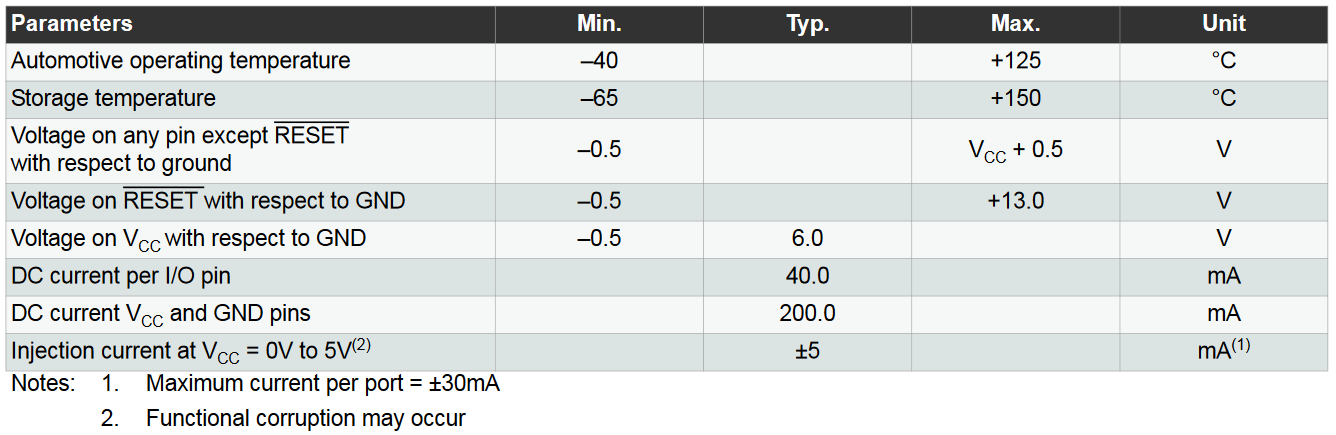
Figure 4. Absolute Maximum Ratings
Finally in section 27.2 we can find the Packaging Information
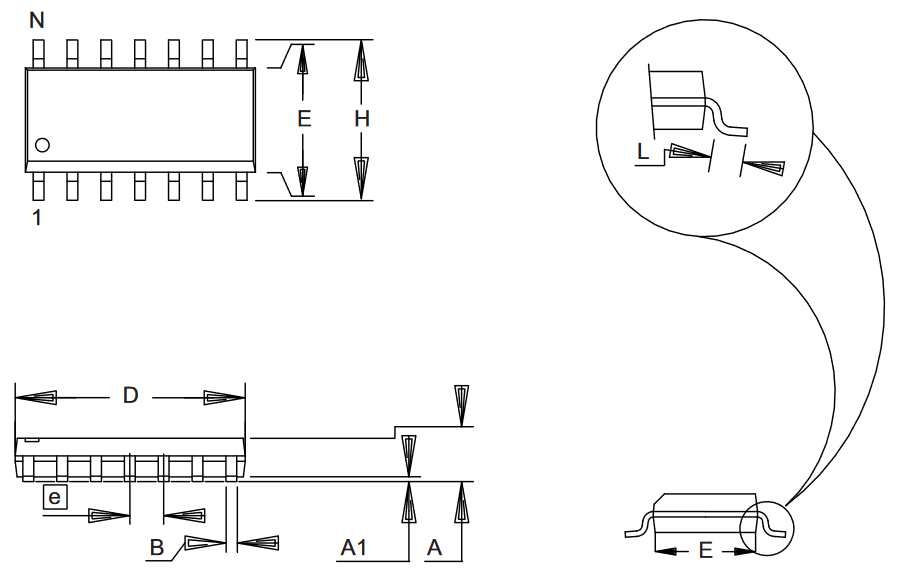
Figure 5. Packaging Information
Arduino IDE & Wiring
The easiest method of programming the HelloBoard is with the Arduino IDE and its native language Wiring.
Requirement
I had already satisfied all the requirements for testing the board, then I connected everything and selected the right parameters in the Tools.
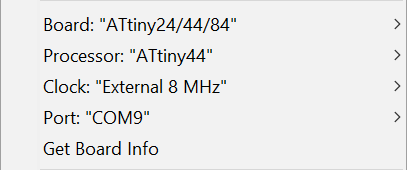
Figure 6. Tools
Sketch
The sketch is a simple blink that changes frequency between the three preset each time I press the button.
download HelloWorld 957 byte (.ino)#define LED 7 // define the led pin
#define BTN 3 // define the button pin
// Variables will change:
bool previous_state = 0; // previous state of the button
int i = 1; // index delay
// the values of delay
int delays[3] = {50, 100, 200};
void setup() {
// set the led pin like output
pinMode(LED, OUTPUT);
// set the button pin like input
pinMode(BTN, INPUT_PULLUP);
}
void loop() {
// read the pushbutton input pin:
bool button_state = digitalRead(BTN);
// compare the buttonState to its previous state
if (button_state != previous_state) {
// if button has pressed, increment the counter
if (!button_state) {
i++;
if (i > 2) i = 0;
}
}
// save the current state as the last state,
//for next time through the loop
previous_state = button_state;
//blink
digitalWrite(LED, HIGH);
delay(delays[i]);
digitalWrite(LED, LOW);
delay(delays[i]);
}
Upload
To upload the sketch just press on Upload and if all goes well a message will be returned confirmation with some information about the memory used.
Sketch uses 992 bytes (24%) of program storage space. Maximum is 4096 bytes.
Global variables use 18 bytes (7%) of dynamic memory, leaving 238 bytes for local variables. Maximum is 256 bytes.
Visual Studio Code & C
A lower level but more versatile method is programming using C and make in Visual Studio Code.
Requirement
In VS Code I installed the
C/C++ plugin
and in the .vscode/c_cpp_proprieties.json file that is created inside
the project folder I inserted C:\\Program Files\\avr8-gnu-toolchain\\avr\\include in the
includePath of Win32.
I also made a personal version of Makefile to compile and upload the sketch.
PROJECT=HelloWorld
MMCU=attiny44
F_CPU = 8000000
PROGRAMMER ?= usbtiny


SOURCES=$(PROJECT).c
CFLAGS=-mmcu=$(MMCU) -Wall -Os -DF_CPU=$(F_CPU)

$(PROJECT).hex: $(PROJECT).c
	avr-gcc $(CFLAGS) -I./ -o $(PROJECT).out $(SOURCES)
	avr-objcopy -O ihex $(PROJECT).out $(PROJECT).hex
	avr-size --mcu=$(MMCU) --format=avr $(PROJECT).out
	del $(PROJECT).out

upload: $(PROJECT).hex
	avrdude -p t44 -P usb -c $(PROGRAMMER) -U flash:w:$(PROJECT).hex

clean:
	del $(PROJECT).hex
Sketch
The sketch does the same as the previous one, but written in C and using direct port manipulation.
download HelloWorld 1,52 KB (.c)#define __AVR_ATtiny44__ // define for clang
#include <avr/io.h>
#include <inttypes.h>
#include <util/delay.h>
void delay_ms(uint16_t ms);
#define BUTTON_PORT PORTA /* PORTx - register for button output */
#define BUTTON_PIN PINA /* PINx - register for button input */
#define BUTTON_BIT PA3 /* bit for button input/output */
#define LED_PORT PORTA /* PORTx - register for LED output */
#define LED_BIT PA7 /* bit for button input/output */
#define LED_DDR DDRA /* LED data direction register */
int main(void)
{
// Variables will change:
int previous_state = 0; // previous state of the button
int delays[3] = {50, 100, 200};
int i = 1;
/* set LED pin as digital output */
LED_DDR = _BV(LED_BIT);
/* led is OFF initially (set pin high) */
//LED_PORT |= _BV(LED_BIT);
/* turn on internal pull-up resistor for the switch */
BUTTON_PORT |= _BV(BUTTON_BIT);
while (1)
{
// read the pushbutton input pin:
int button_state = bit_is_clear(BUTTON_PIN, BUTTON_BIT);
// compare the buttonState to its previous state
if (button_state != previous_state)
{
// if the state has changed, increment the counter
if (!button_state)
{
i++;
if (i > 2)
i = 0;
}
}
// save the current state as the last state,
// for next time through the loop
previous_state = button_state;
// blink
LED_PORT ^= _BV(LED_BIT);
delay_ms(delays[i]);
}
}
// like Arduino delay()
void delay_ms(uint16_t ms)
{
while (ms)
{
_delay_ms(1);
ms--;
}
}
Upload
To upload the file I first compiled by launching in the integrated terminal make.
C:\Users\Paso\Documents\Arduino\HelloWorld>make
avr-gcc -mmcu=attiny44 -Wall -Os -DF_CPU=8000000 -I./ -o HelloWorld.out HelloWorld.c
HelloWorld.c:1:0: warning: "__AVR_ATtiny44__" redefined
#define __AVR_ATtiny44__  // define for clang
^
<command-line>:0:0: note: this is the location of the previous definition
    avr-objcopy -O ihex HelloWorld.out HelloWorld.hex
    avr-size --mcu=attiny44 --format=avr HelloWorld.out
    AVR Memory Usage
    ----------------
    Device: attiny44

    Program: 234 bytes (5.7% Full)
    (.text + .data + .bootloader)

    Data: 6 bytes (2.3% Full)
    (.data + .bss + .noinit)


    del HelloWorld.out
And then I uploaded with make upload.
C:\Users\Paso\Documents\Arduino\HelloWorld>make upload
avrdude -p t44 -P usb -c usbtiny -U flash:w:HelloWorld.hex

avrdude: AVR device initialized and ready to accept instructions

Reading | ################################################## | 100% 0.01s

avrdude: Device signature = 0x1e9207
avrdude: NOTE: FLASH memory has been specified, an erase cycle will be performed
To disable this feature, specify the -D option.
avrdude: erasing chip
avrdude: reading input file "HelloWorld.hex"
avrdude: input file HelloWorld.hex auto detected as Intel Hex
avrdude: writing flash (234 bytes):

Writing | ################################################## | 100% 0.39s


avrdude: 234 bytes of flash written
avrdude: verifying flash memory against HelloWorld.hex:
avrdude: load data flash data from inpavrdude: input file HelloWorld.hex auto detected as Intel Hex
avrdude: input file HelloWorld.hex contains 234 bytes
avrdude: reading on-chip flash data:

Reading | ###


avrdude: verifying ...
avrdude: 234 bytes of flash verified

avrdude: safemode: Fuses OK

avrdude done. Thank you.
Working
Group Assignment
More info on the Opendot group assignment page.