Project Development
Control System (mechanism) for Vertical Farming.
The idea of the mechanism is to be implemented and attached to a “passive hydroponic system” which is an easy and a cheap way to start a small farming project. That's the main object of the FabAcademy Final Project, soon I will continue with my personal research, attaching new “things” to the control system.
The Evolution (involution) of the project.
At the beginning of the FabAcademy my project idea was interesting and a personal challenge for me but too complex for the FabAcademy workflow, that's why I decided to reorganize the final aim of my idea.
The Local Farming project is a personal research that I want to continue after The FabAcademy, the relation between “no space” and “no food” is something that attract me a lot, how to be more self sufficient in our environment or lets say in our life style. “Small – space” - “in-between”, “local”, three strong words for my proposal.
Fab Academy Barcelona Class No.19
Assignament: Project Development "Local Farm"
By Robert Garita
The “Local Farm” project will be explained through 5 steps / process:
1. Mechanism,
2. 3D printing,
3. Electronics,
4. Coding and
5. General Fabrication.

The mechanism is based in the COREXY project. CoreXY provides a fundamental building block of many computerized fabrication tools - cartesian motion - in a simple and adaptable format.
Three main concepts of the COREXY are:
Fast: We believe in speed. COREXY (mostly) parallel kinematics mean that the motors, typically the largest source of inertia on a DIY-grade stage, are stationary. This permits rapid accelerations.
Simple: COREXY can be implemented with only three structural plates, all of which can nest during fabrication.
Flexible: Whether your medium is fabric or aluminum, the principle behind COREXY permits motion stages to be rendered in a variety of materials and a wide range of sizes.

The first step of the project was to find the best solution for the mechanism, in contrast with the COREXY idea, the most common applications are on horizontal surfaces, my target is to find the cheapest way to build the system for a vertical application (also including the horizontal one). This goal is difficult to get it because of the material that I want to implement (cheap stepper motors and hemp rope).
I designed each piece of the mechanism with the logic of be printed in the MakerBot Replicator 2 machine that we have in the FabLab. In the next diagram I described all the components for the mechanism and the value used for the printing process.


Quantity PLA plastic used for each element:
A. Top Pieces: 76 grams (2 units),
B. Middle Piece: 60 grams (1 units),
C. Side Pieces: 58 grams (2 units),
D. Bearing Ring: 25 grams (9 units),
E. Bottom Pieces: 38 grams (4 units),
F. Bottle Holder: 48 grams (4 units),


The first test for the pieces was to define the best tolerance for all the holes and gaps on each model, also the best thickness for every wall of the pieces. For the “Side Pieces” I was looking for a flexible but strong behavior because of the press fit idea of each connector.


One of the most common issues using the MakerBot Replicator 2 of the Fab Lab Barcelona is that if you change the filament every property charge as well. We run out of the orange filament that I was using for the first test, so I changed for the dark green and the black one and all the results were terrible, bad finish quality and most of the time we I was printing a flat and long element it was very hard because of the behaviour of the material, as you can see on the pictures it was bending up on the laterals, so I decided to apply the rate option of the Makerware software, I solved the bending problem but the final result was even worst.


Because of space problems and poor performance of Fab Lab Barcelona machines 3d printers, I decided to move to the Fab Lab Sitges where I have a good friendship with the main team especially its Director Francisco Sanchez who attended the Fab Academy Barcelona last year. So I sent the files again but this time with a 3.00 mm PLA (not 1.75mm like in Barcelona) and using the Ultimaker 2 printer and for my surprise and I got an amazing finishing of every single piece.

When I was making the test with the Top pieces of the mechanism I realized that the PLA plastic was slippery when I attached the gear to the stepper motor, It was impossible to rotate and move the hemp rope at the same time, with a rubber elastic band I fixed the problem.

Before the Fab Academy final presentation one of the gears of the Top pieces broke because of the hemp cable tension so I was trying to fix the problem with glue but it was taking a lot of time and actually it was not the best solution, so I decided to print one emergency piece again in the Fab.

All the pieces are available for everybody in my personal account of Thingiverse so if you want to reproduces one of them, is as simple as download the STL file.


For my electronic process one of the first challenges was to create my personal Arduino, now with the name of Fa_Duino - click if you want to download the eagle file That's decision came in one conversation with my tutor because it was better for my final proposal to control the all circuits using my F_Duino and separated boards for the inputs and outputs. So as you can see my F_Duino is based in the FabKit but with some changes in the microprocessor, using the ATMEGA88 and adding one Voltage Regulator for the power supply.


Following the advised of my tutor to use separated boards for my project I decided to modify Neil's hello.stepper.bipolar board in order to run the outputs with my F_Duino. The idea is to use two bipolars stepper motors, I found on my research that those motors are more power and with a better torque than a unipolar one, while one can actively control the position on a step motor.
I called my board GS_Stepper, as the brains of my board im using two A4953 drivers, both required to power one 4-wire bipolar stepper motor.Each driver is coupled with a 0.1uF and 10uF capacitor, while I also took the two 4 pin headers from the hello.stepper using one to connect the driver outputs to the motor and the other being connected to an external 9V battery supply needed to run the motor.
Download the design of the GS_Stepper if you want to used, works very nice for me.

For my project I used the Arduino IDE “Accel Stepper” Library
that allowed me to have a better control of the general idea of the code. This library lets me declare specific positions, as well as moving the servos simultaneously in the same direction, independently and controlling the acceleration and speed of each single one of the stepper motors.
One of the biggest problems I found regarding programming, was trying to control the right speed of the stepper motors so that the hemp rope didn’t slip. Therefore, I developed two codes: “Code 1” and “Code 2”. Each code lets me control de motors in different ways.


Since my project runs the risk of getting in touch with water, I decided to keep the electronics isolated. I selected a part of the pallet that had enough space to fit my circuit boards. Then, I laser-cut caps for it in orange metacrylic and I called it the “Local Brain”.

The speppter motors I used in my project have complete circular points, which makes it very difficult to attach or hold other pieces that need movement, because they would slip down. In my case it was even worse, because I tried to join the PLA plastic from the 3D printed pieces and the metal elements. For this reason, I decided to wear down the metal and create a “D”point which allows me to have a stop while rotating against a force
.
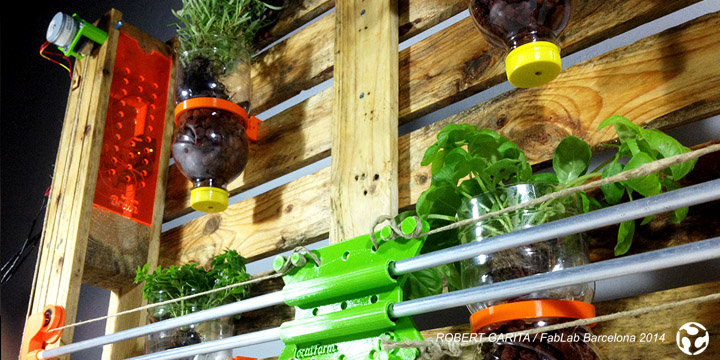
Taking into consideration that the concept of my project is to keep the cost as lowest as possible, the frame that contains the mechanism is a re-used pallet I found in the streets of Barcelona. It size is 800x600 mm. I sand-papered it and treated it with linseed oil to give it a better finishing and durability
.
Finally, you can see the assembling process in which the 3D printing pieces, the electronics and the laser cutting parts of my project form the first stage of the Local Farm 1.0
.


