Week 05-3D Scanning and printing
3D Scanning and Printing · Fab Academy 2026 – Industrial FabLab UCuenca
1. Introduction
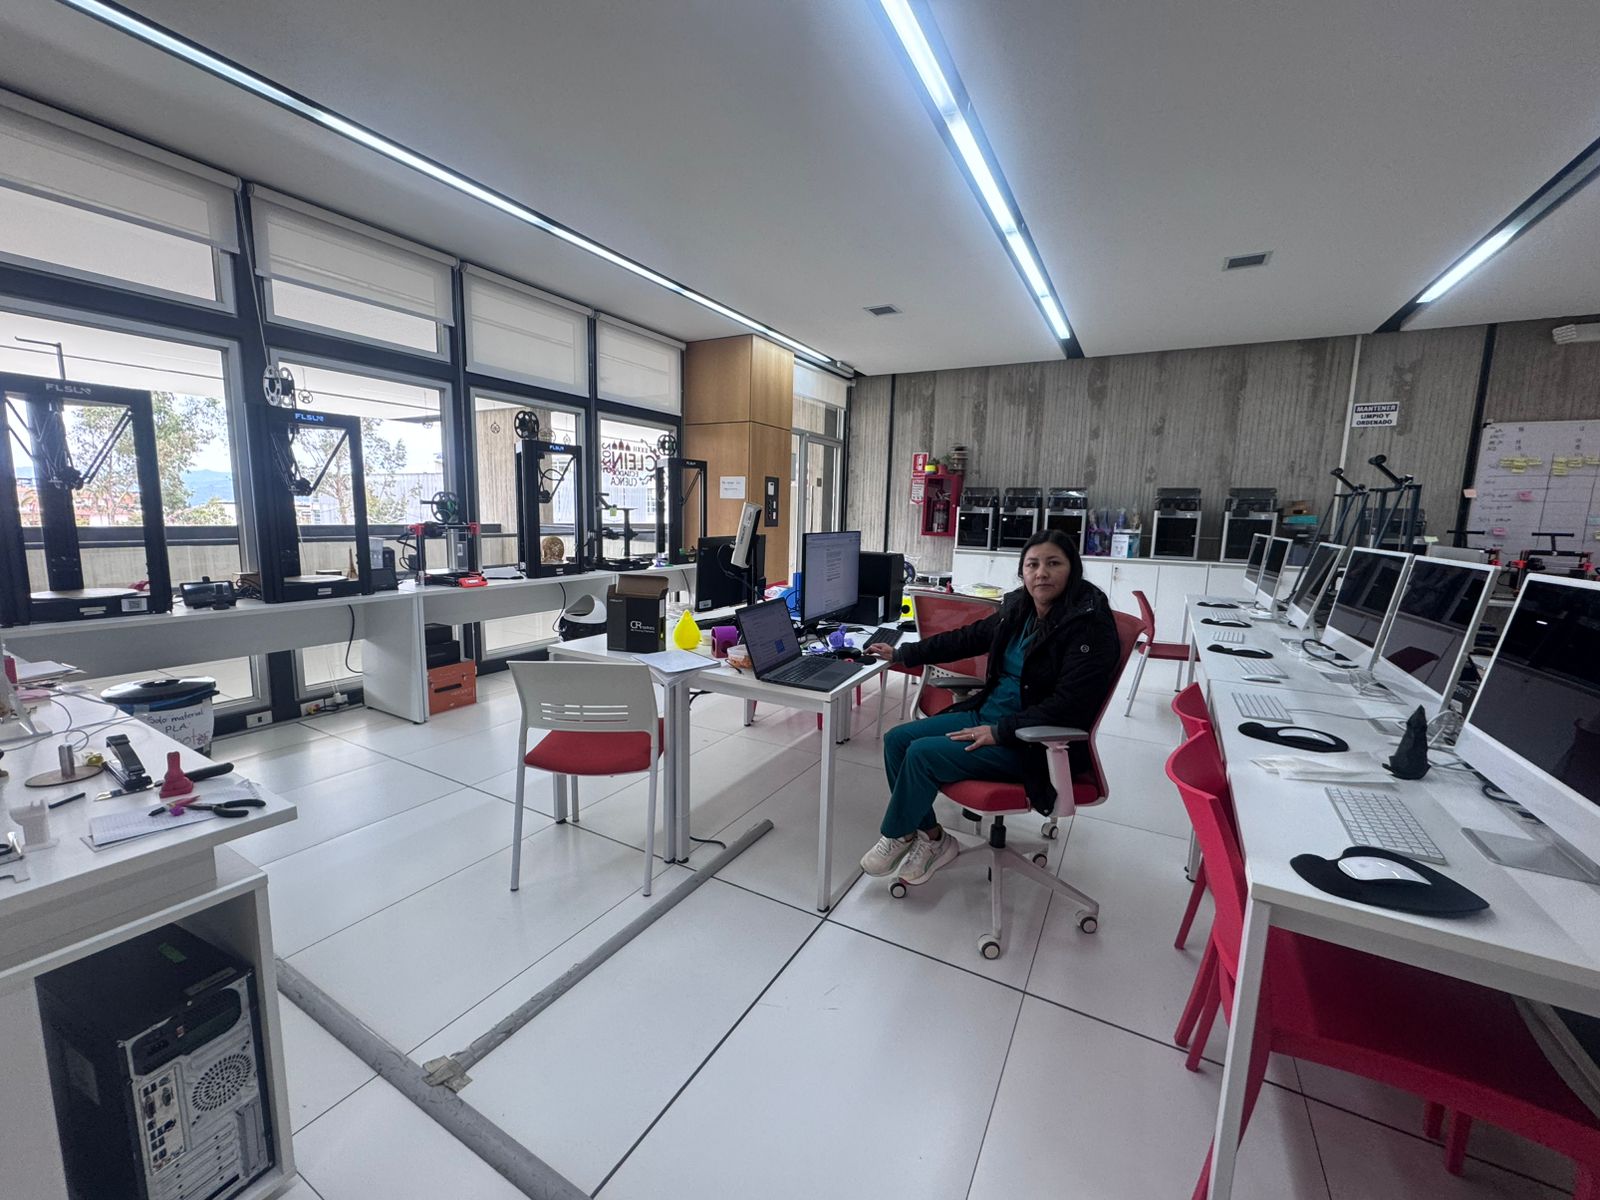
During this week, the 3D Scanning and Printing module was conducted at the FabLab of the University of Cuenca, focusing on the principles of additive manufacturing (AM) using Fused Deposition Modeling (FDM) technology. Unlike subtractive methods such as CNC milling, additive manufacturing builds objects layer by layer, allowing the fabrication of complex geometries that would otherwise be impossible to achieve.
This work was carried out in a collaborative group composed of Ing. Rodrigo Guamán and myself, as students of the FabAcademy 2026 program. The learning objectives established by our instructor Roberto were the following:
- Perform a predefined calibration print test and analyze the results across the different 3D printers available in the FabLab UCuenca.
- Evaluate the quality of the print, with emphasis on surface finish, dimensional accuracy, and machine calibration parameters.
- Conduct the tests using PLA filament and a 0.4 mm nozzle diameter.
- Design an object that cannot be fabricated by subtractive manufacturing but only through additive processes, to demonstrate the capabilities of 3D printing.
- Ensure that the designed object is printed in a single piece, without requiring external assembly or supports.
2. Designing an Object in 3D
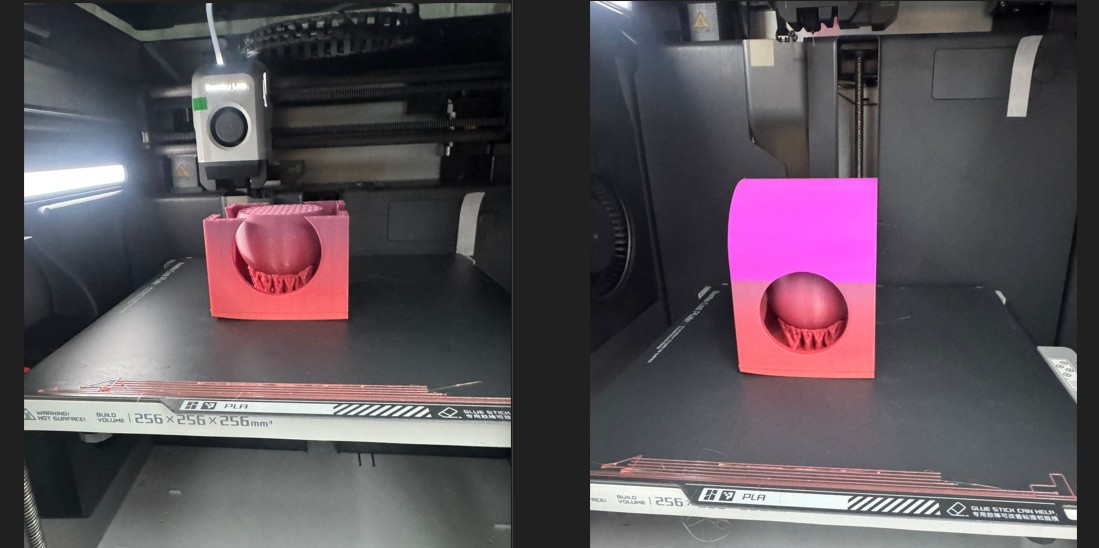
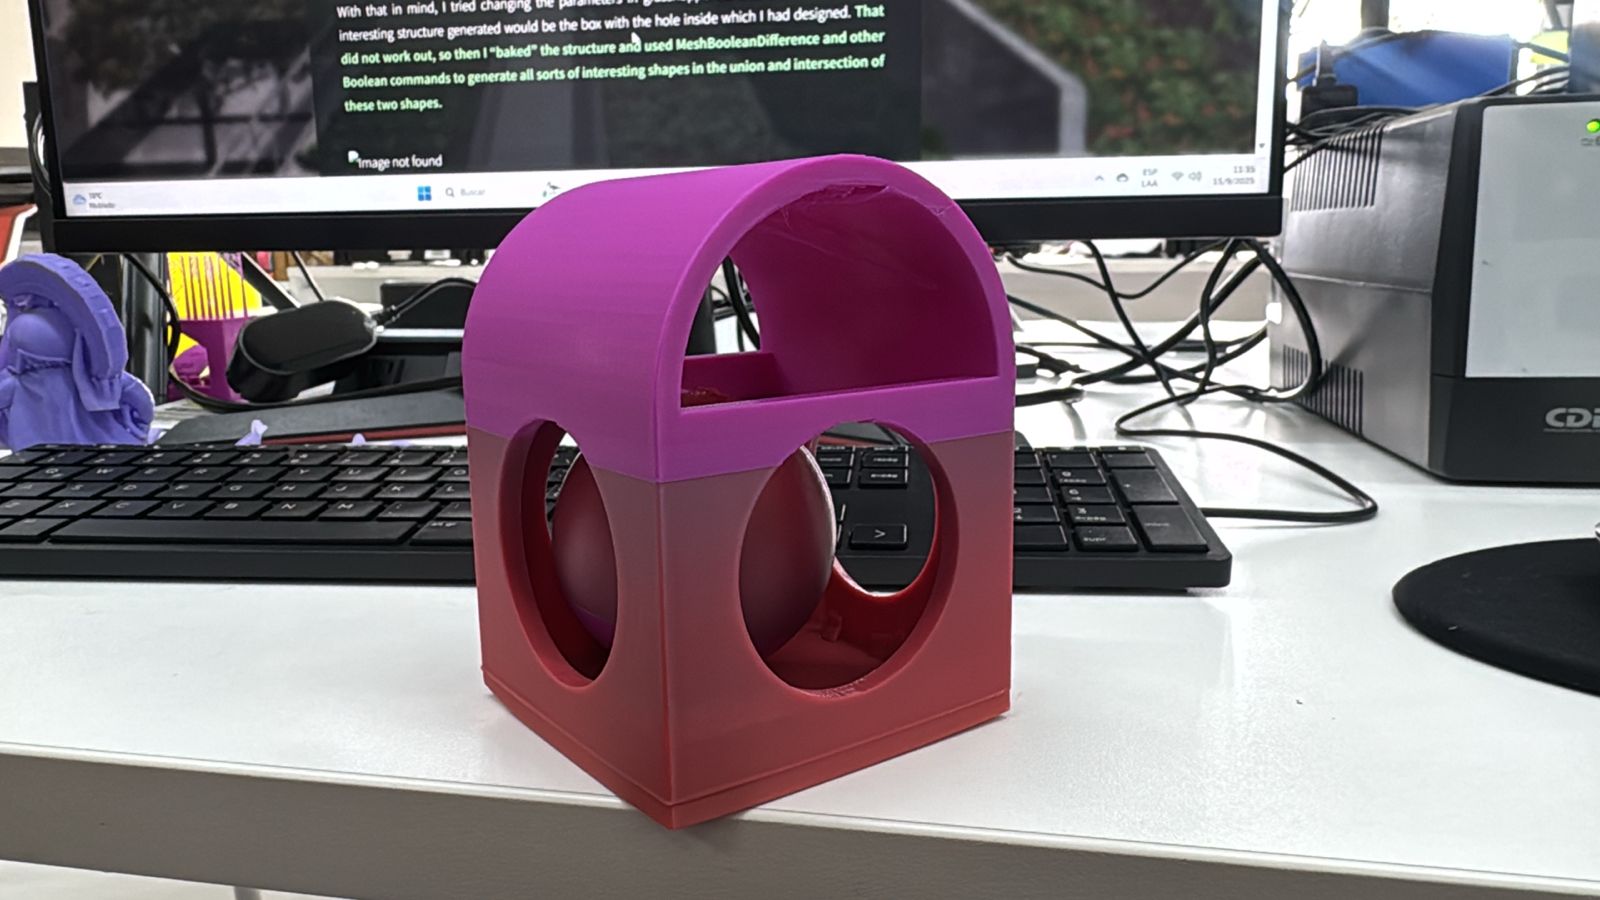
The design challenge required the creation of an object that could only be manufactured by additive methods. To accomplish this, I used Autodesk Fusion 360 as the CAD platform. The selected geometry was a nested object design, where one component is trapped inside another in such a way that they cannot be separated, which is not achievable by CNC machining or other subtractive methods.
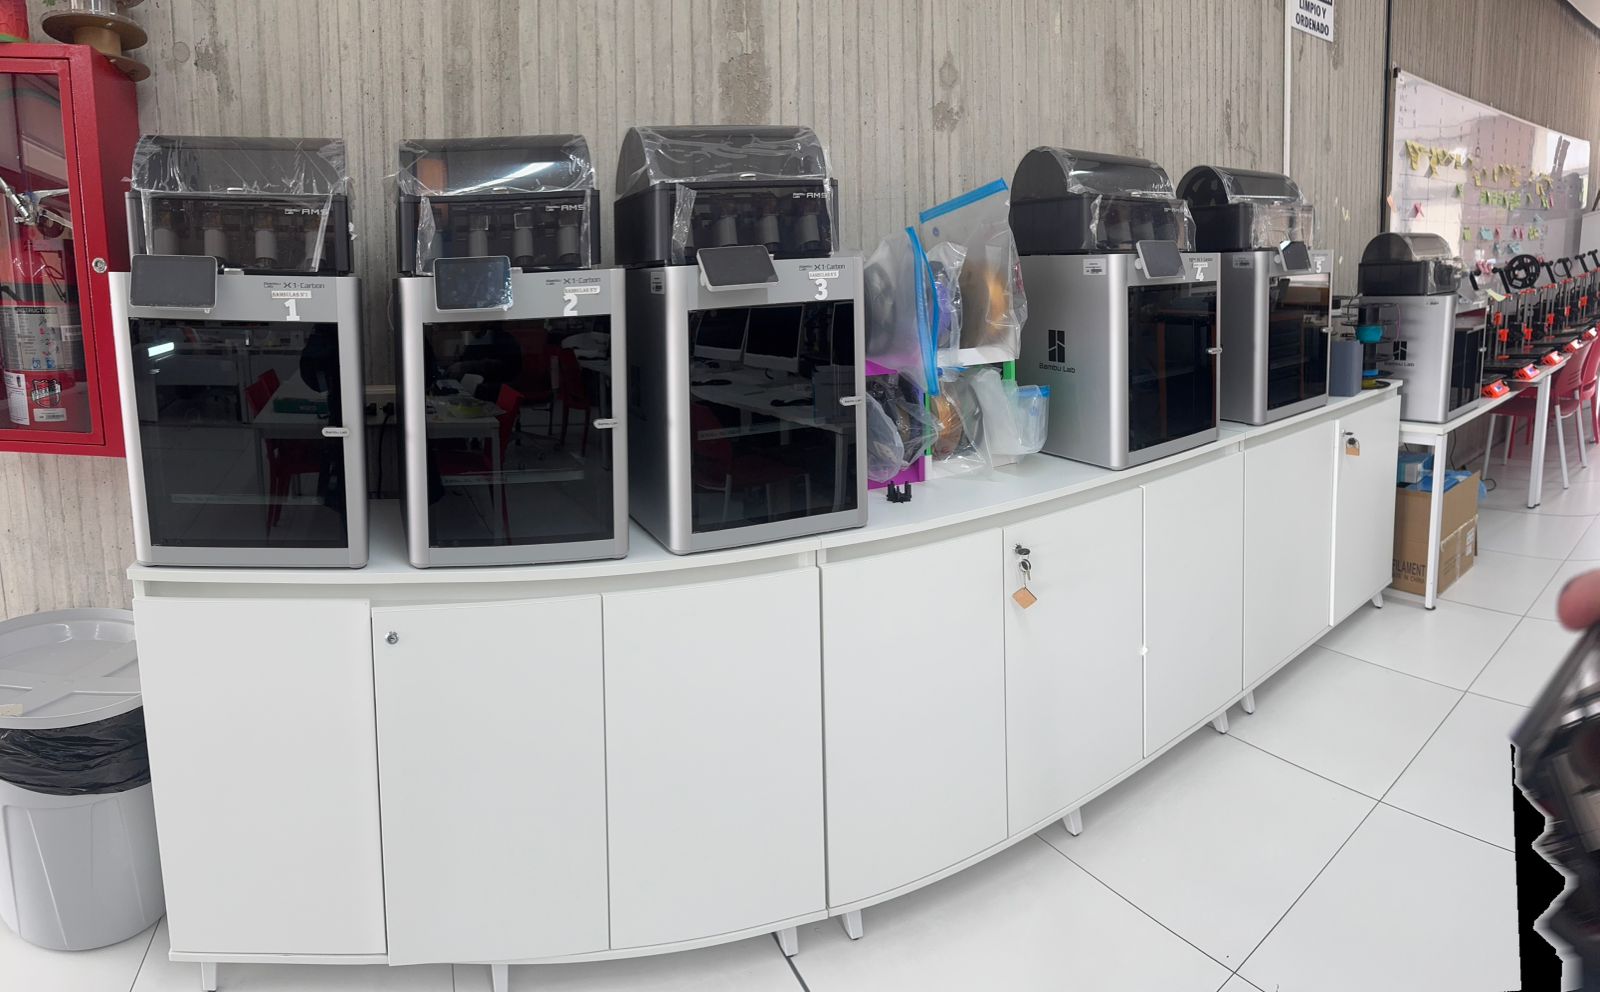
The chosen printer for this task was the Bambulab X1 Carbon, which is one of the most advanced FDM systems available in our lab.
Bambulab X1 Carbon Technical Specifications:
- Technology: FDM (Fused Deposition Modeling)
- Build Volume: 256 × 256 × 256 mm
- Nozzle Diameter: 0.4 mm (standard, interchangeable 0.2–0.6 mm)
- Layer Resolution: 0.1–0.4 mm
- Print Speed: Up to 500 mm/s (typical 200 mm/s)
- Acceleration: 20,000 mm/s²
- Filament Compatibility: PLA, ABS, PETG, TPU, ASA, Nylon, Carbon-fiber composites
- Bed Leveling: Automatic 16-point bed leveling with lidar calibration
- Heated Bed: Up to 110 °C
- Extruder Temperature: Up to 300 °C
- Connectivity: Wi-Fi, SD card, Bambu Studio software
This printer was selected due to its high precision, advanced calibration sensors, and stability in long-duration prints.
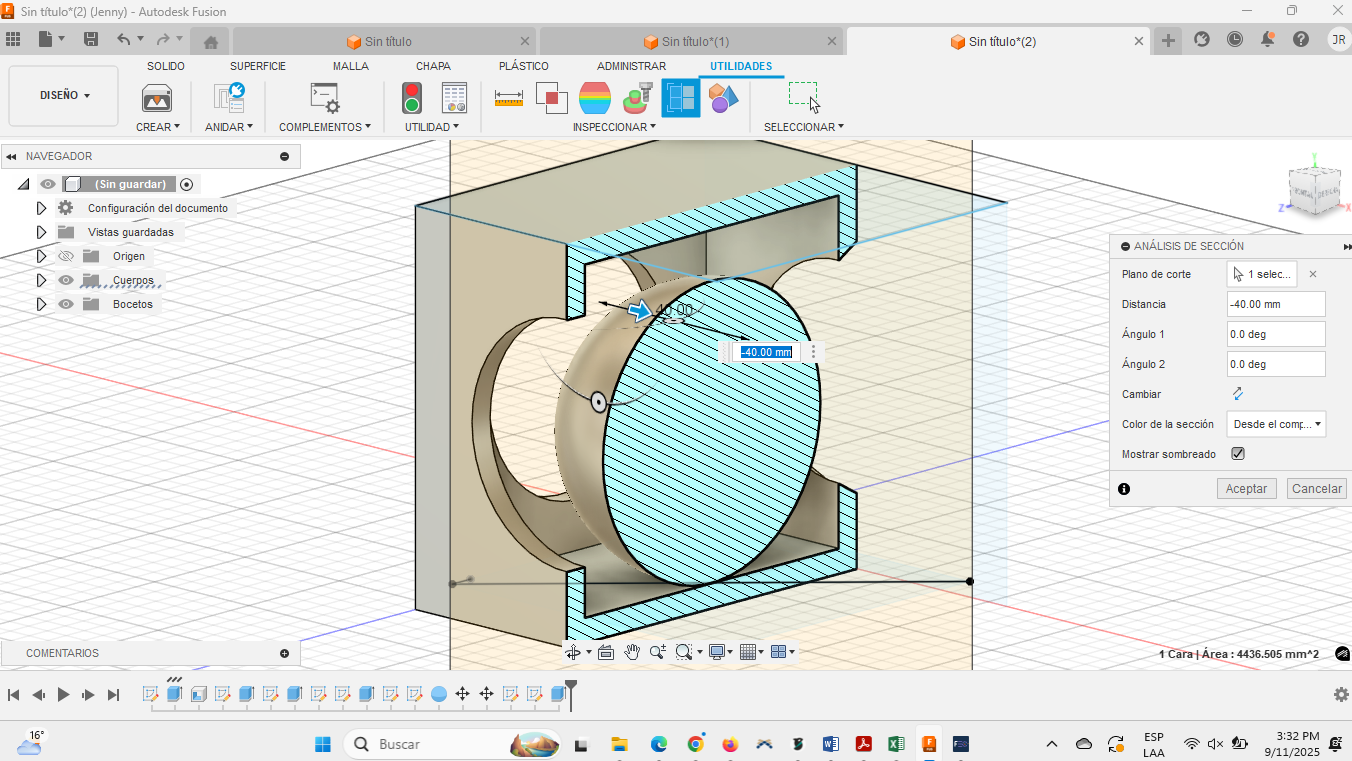
Design Files:
And so, the model of the object was completed. Time to set it up for the printer.
3. Preparing the Object to be Printed in 3D
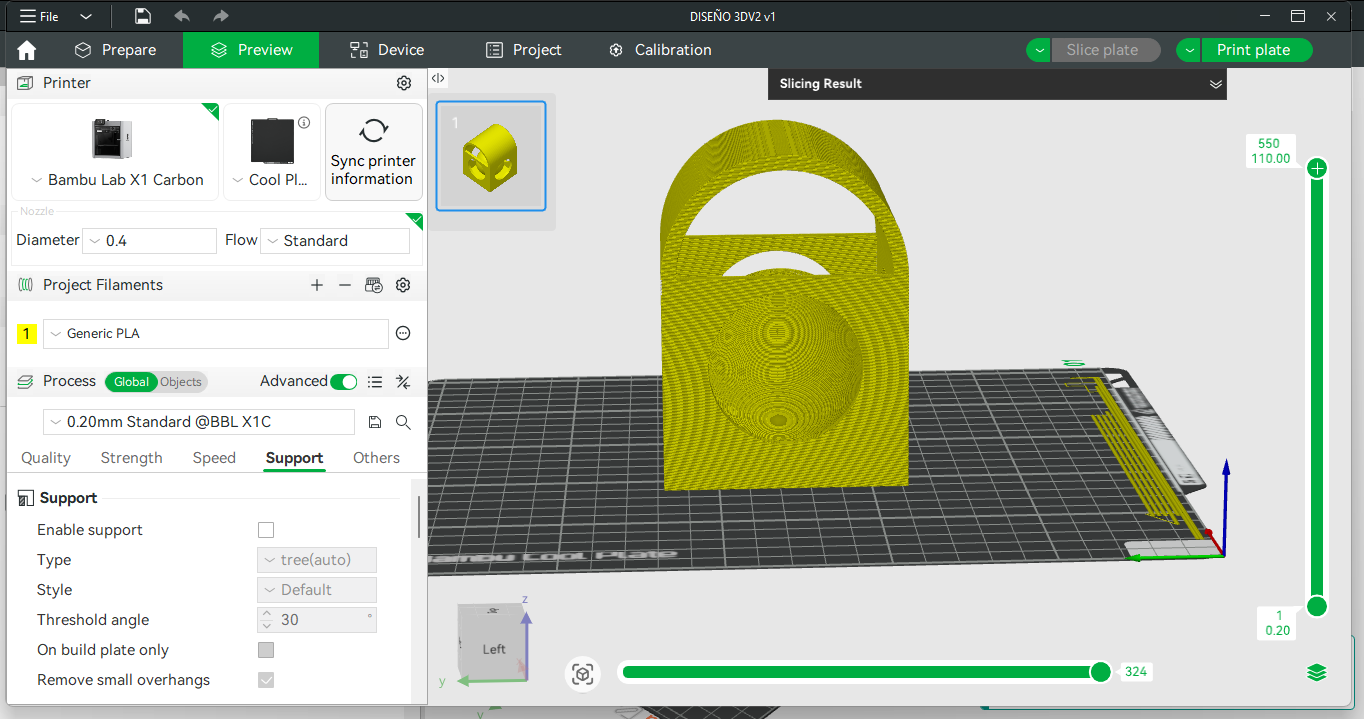
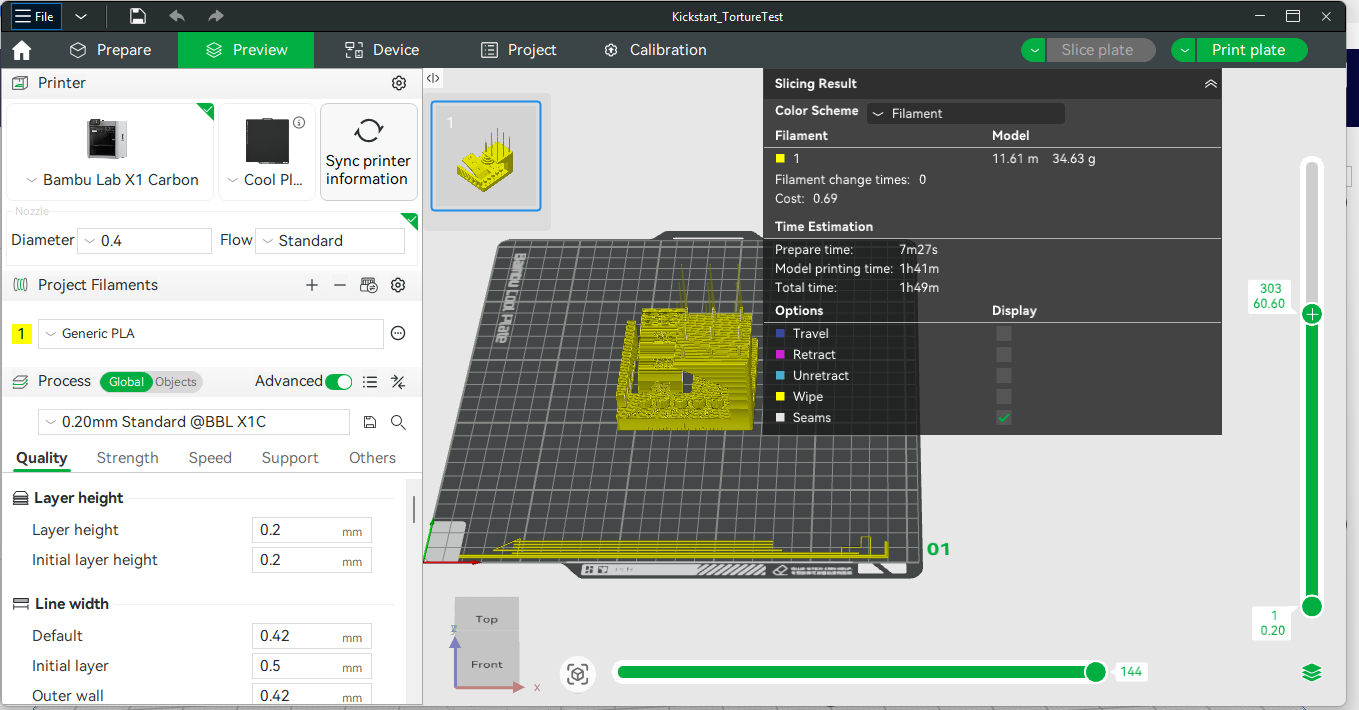
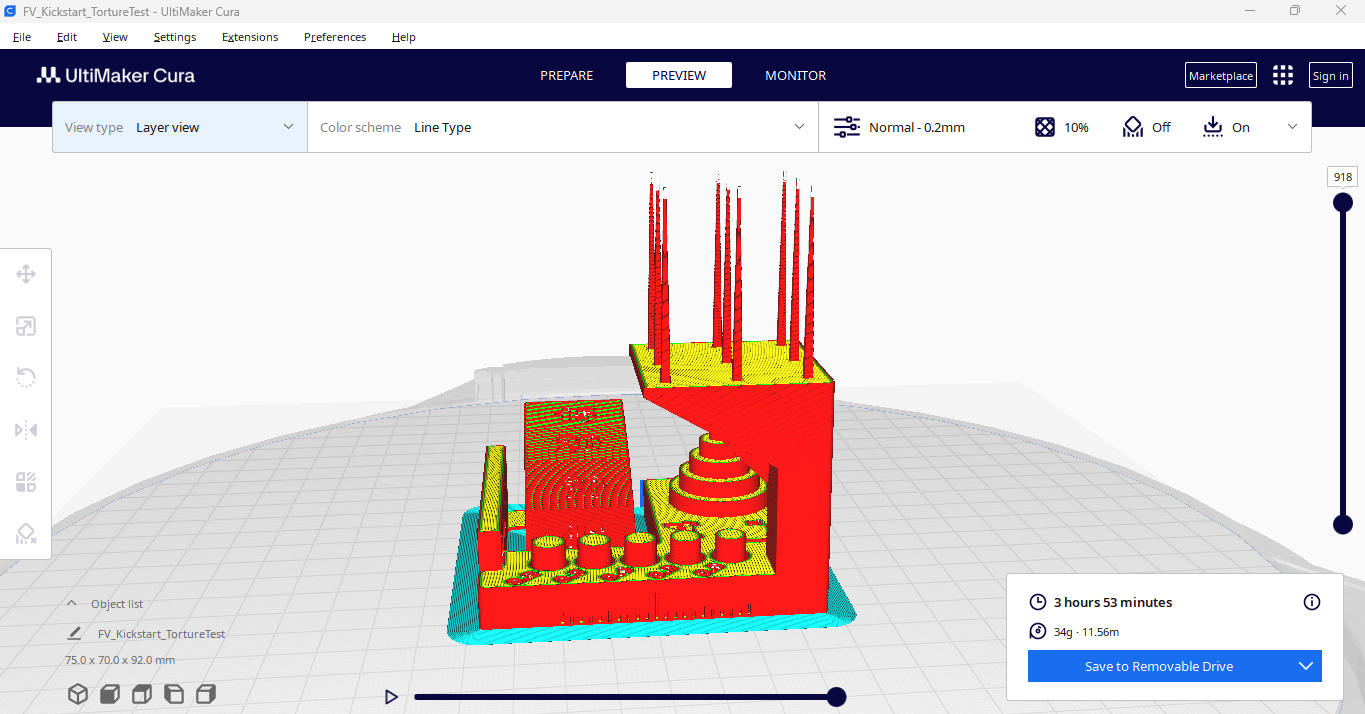
The slicing process was carried out using Bambu Studio, the proprietary slicer of Bambulab printers. The following printing parameters were applied:
Printing Settings:
- Layer height: 0.15 mm
- Wall thickness: 1 mm
- Top/bottom thickness: 1 mm
- Infill density: 15% (grid)
- Printing temperature: 200 °C
- Build plate temperature: 60 °C
- Print speed: 60 mm/s
- No supports
- Build Plate Adhesion: skirt
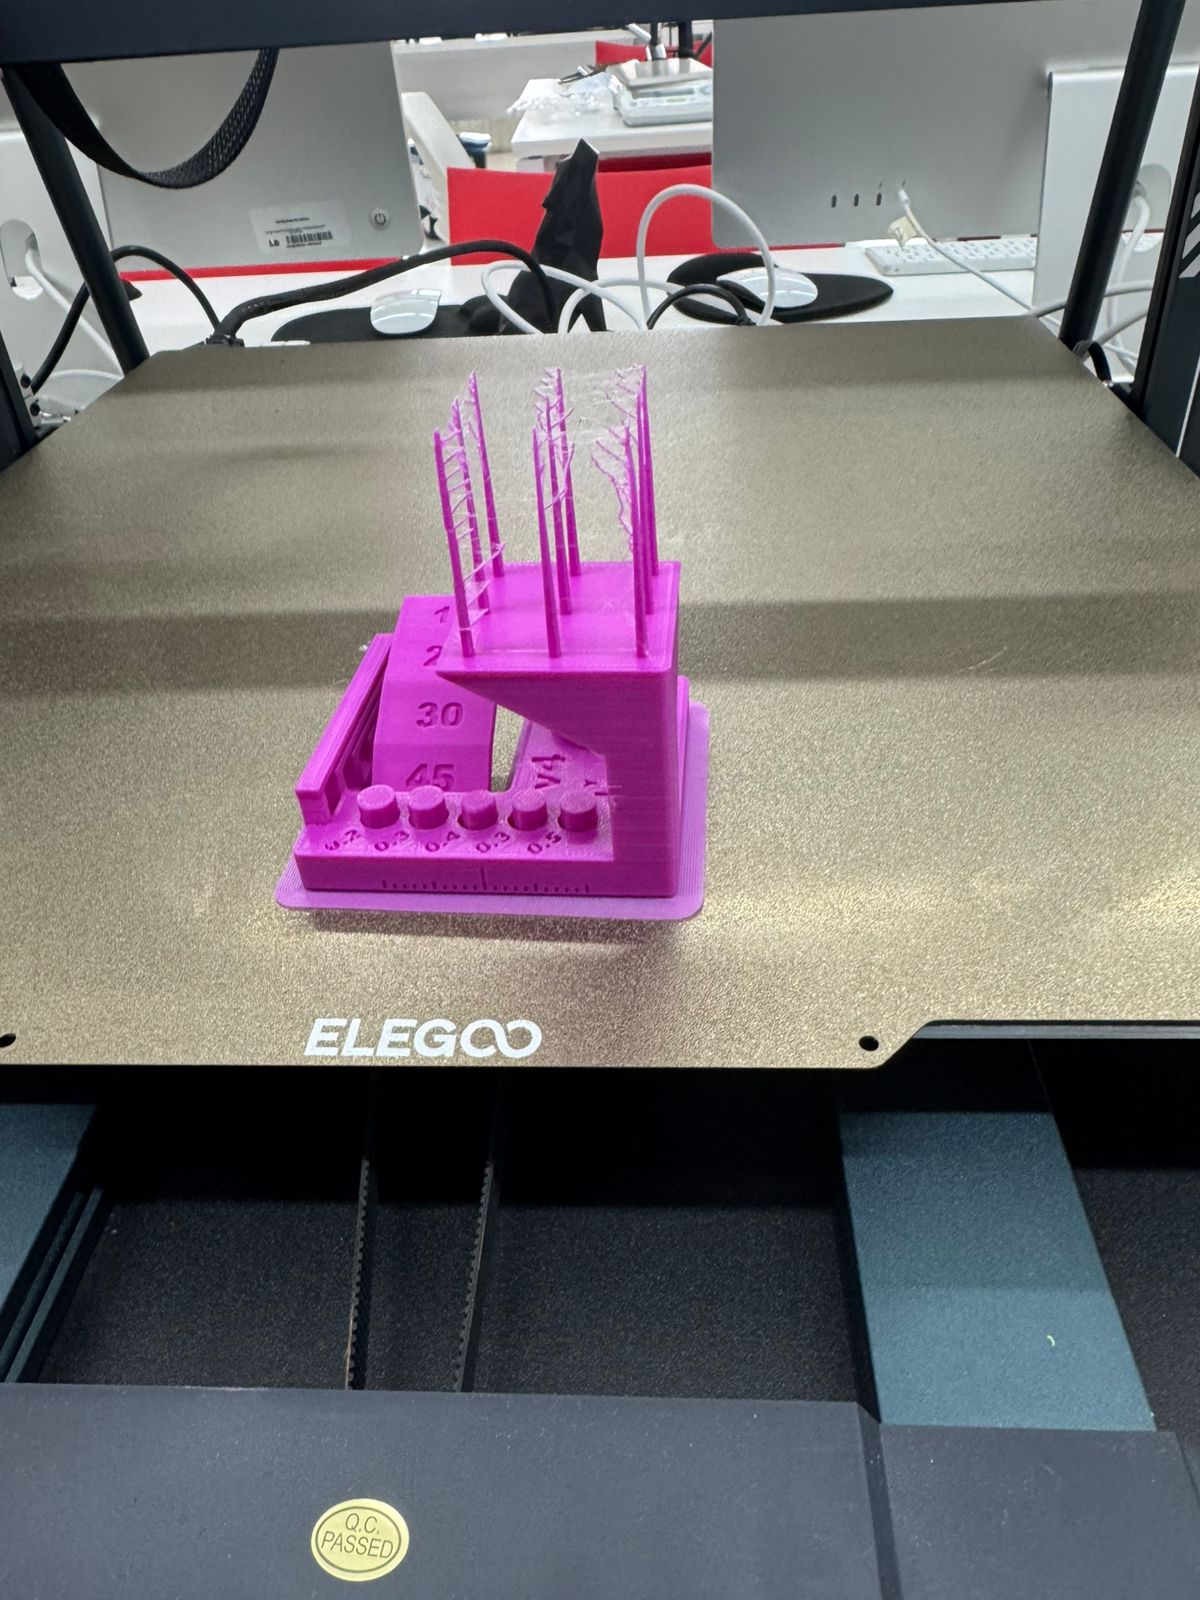
4. 3D Testing – Group Assignment
This work was carried out in a collaborative group composed of Ing. Rodrigo Guamán and myself, as students of the FabAcademy 2026 program.

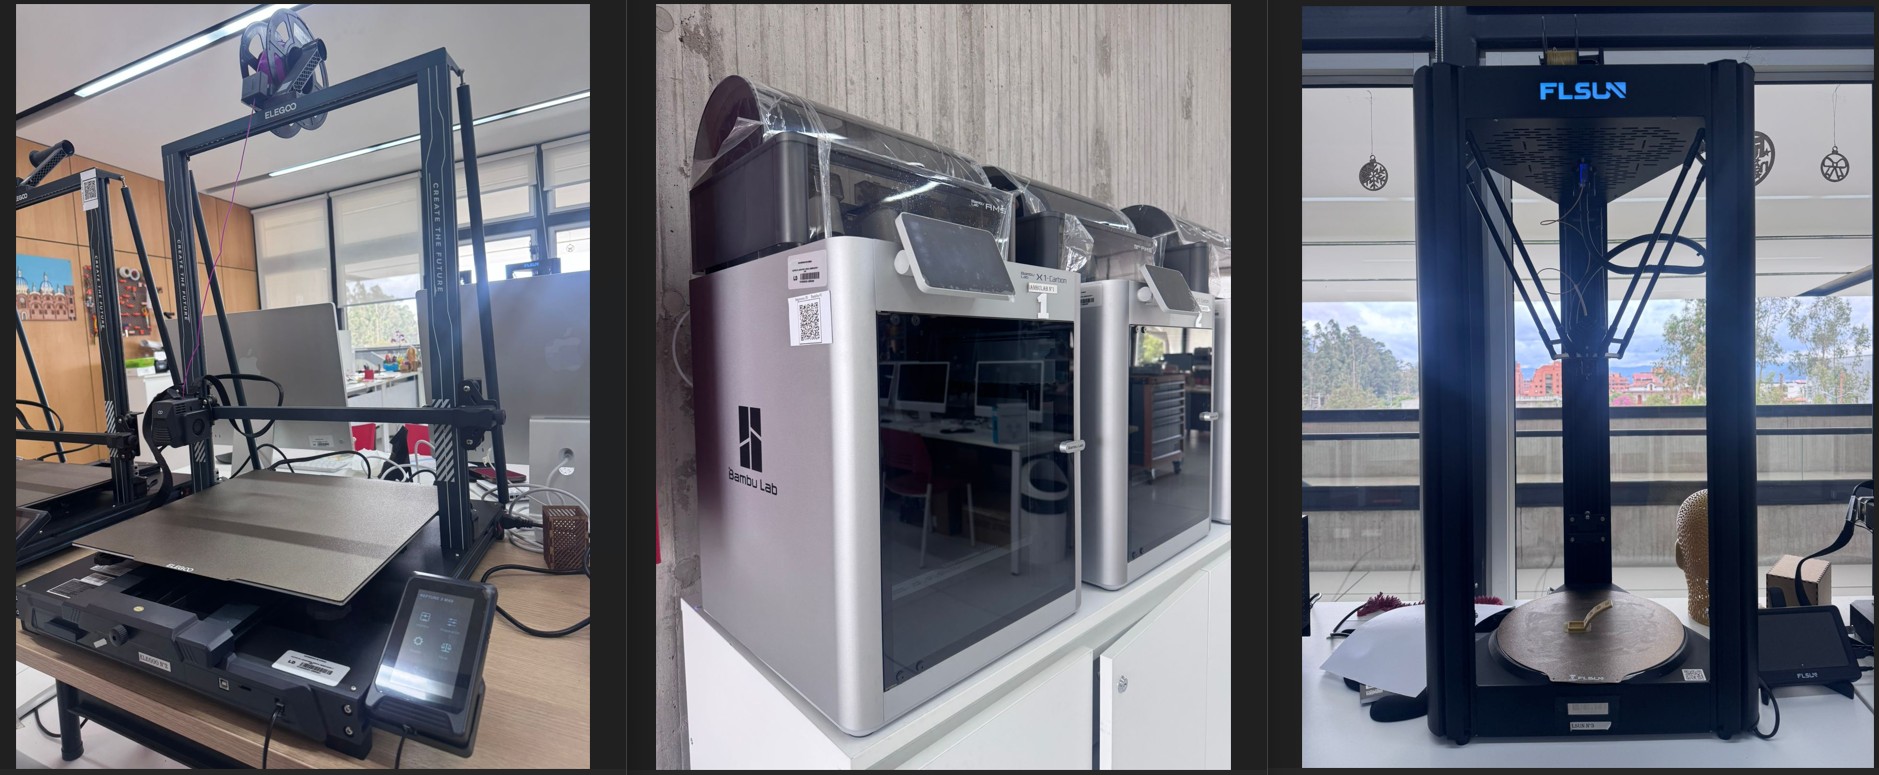
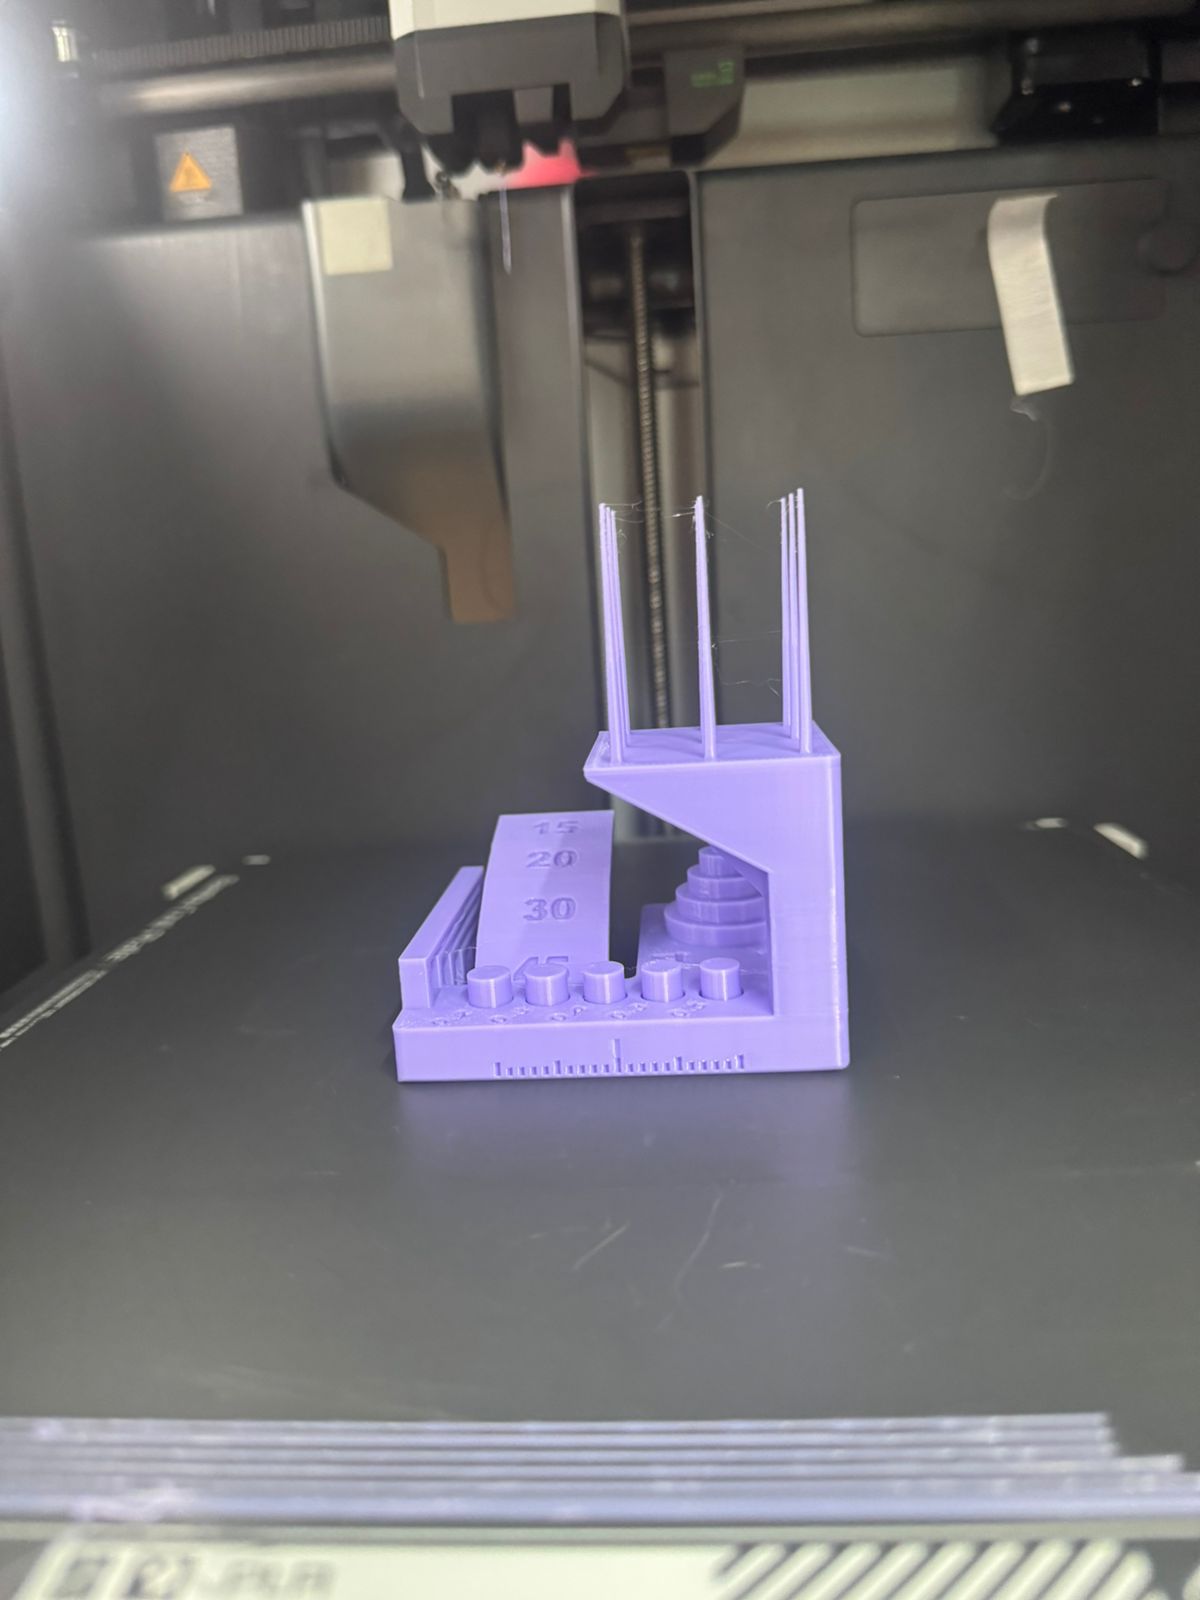
To evaluate the performance of different machines, the same test file was printed on three different 3D printers available in the FabLab:
1. Bambulab X1 Carbon
- Build volume: 256 × 256 × 256 mm
- Max speed: 500 mm/s
- Nozzle: 0.4 mm
- Heated bed: Yes (110 °C)
- Auto-leveling: Yes (lidar + sensors)
2. FLSUN V400 (Delta 3D Printer)
- Technology: FDM, Delta architecture
- Build volume: Ø 300 × 410 mm
- Max speed: 400 mm/s
- Nozzle: 0.4 mm
- Heated bed: Yes (100 °C)
- Auto-leveling: Yes (inductive probe)
- Key Feature: Extremely high printing speed with delta kinematics
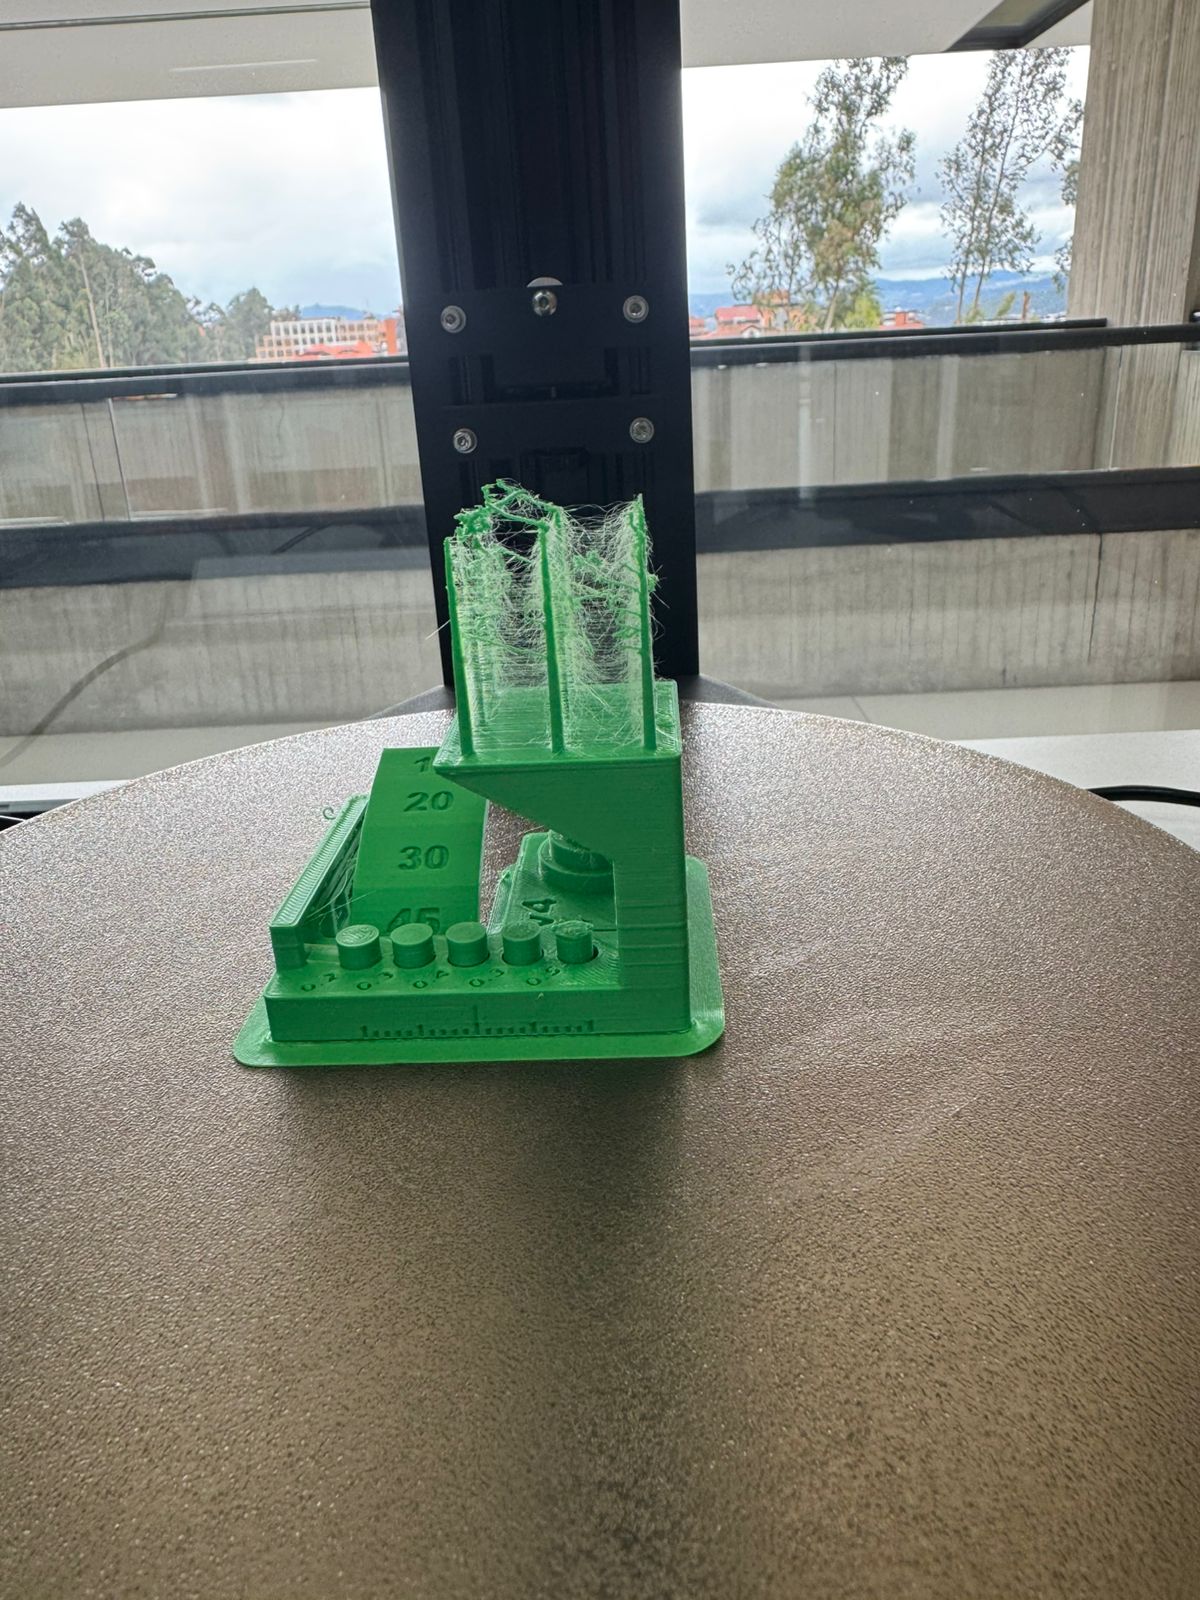
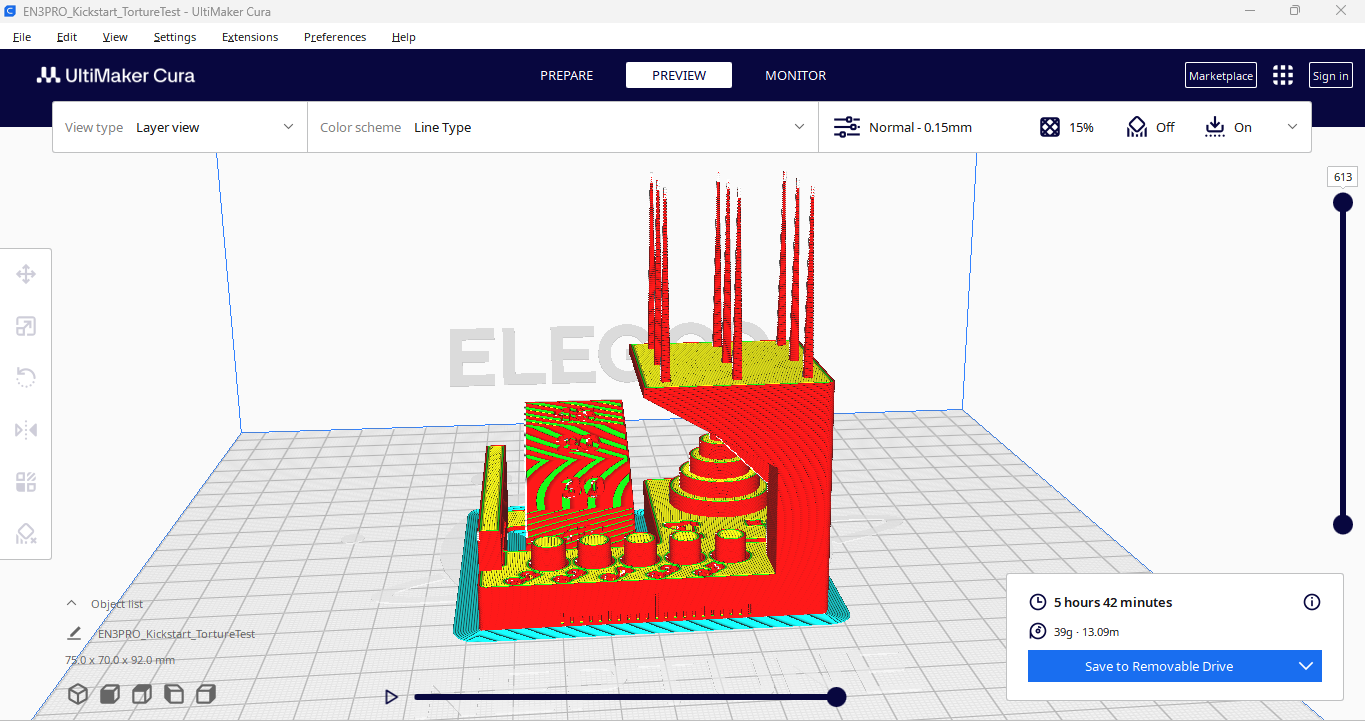
3. Elegoo Neptune 3 Max
- Technology: FDM, Cartesian
- Build volume: 420 × 420 × 500 mm
- Nozzle: 0.4 mm
- Heated bed: Yes (100 °C)
- Auto-leveling: 49-point mesh leveling system
- Extruder temperature: Up to 260 °C
- Special Feature: Large-scale printing capability at affordable cost
5. Digital vs Actual
Across the three machines, dimensional variations were observed between 0.5% and 2% relative to the CAD model. The Bambulab X1 Carbon achieved the best surface quality and dimensional accuracy, while the FLSUN V400 excelled in speed but with slightly more noticeable layer artifacts. The Elegoo Neptune 3 Max was effective for large objects but required more careful calibration to reduce warping at the edges.
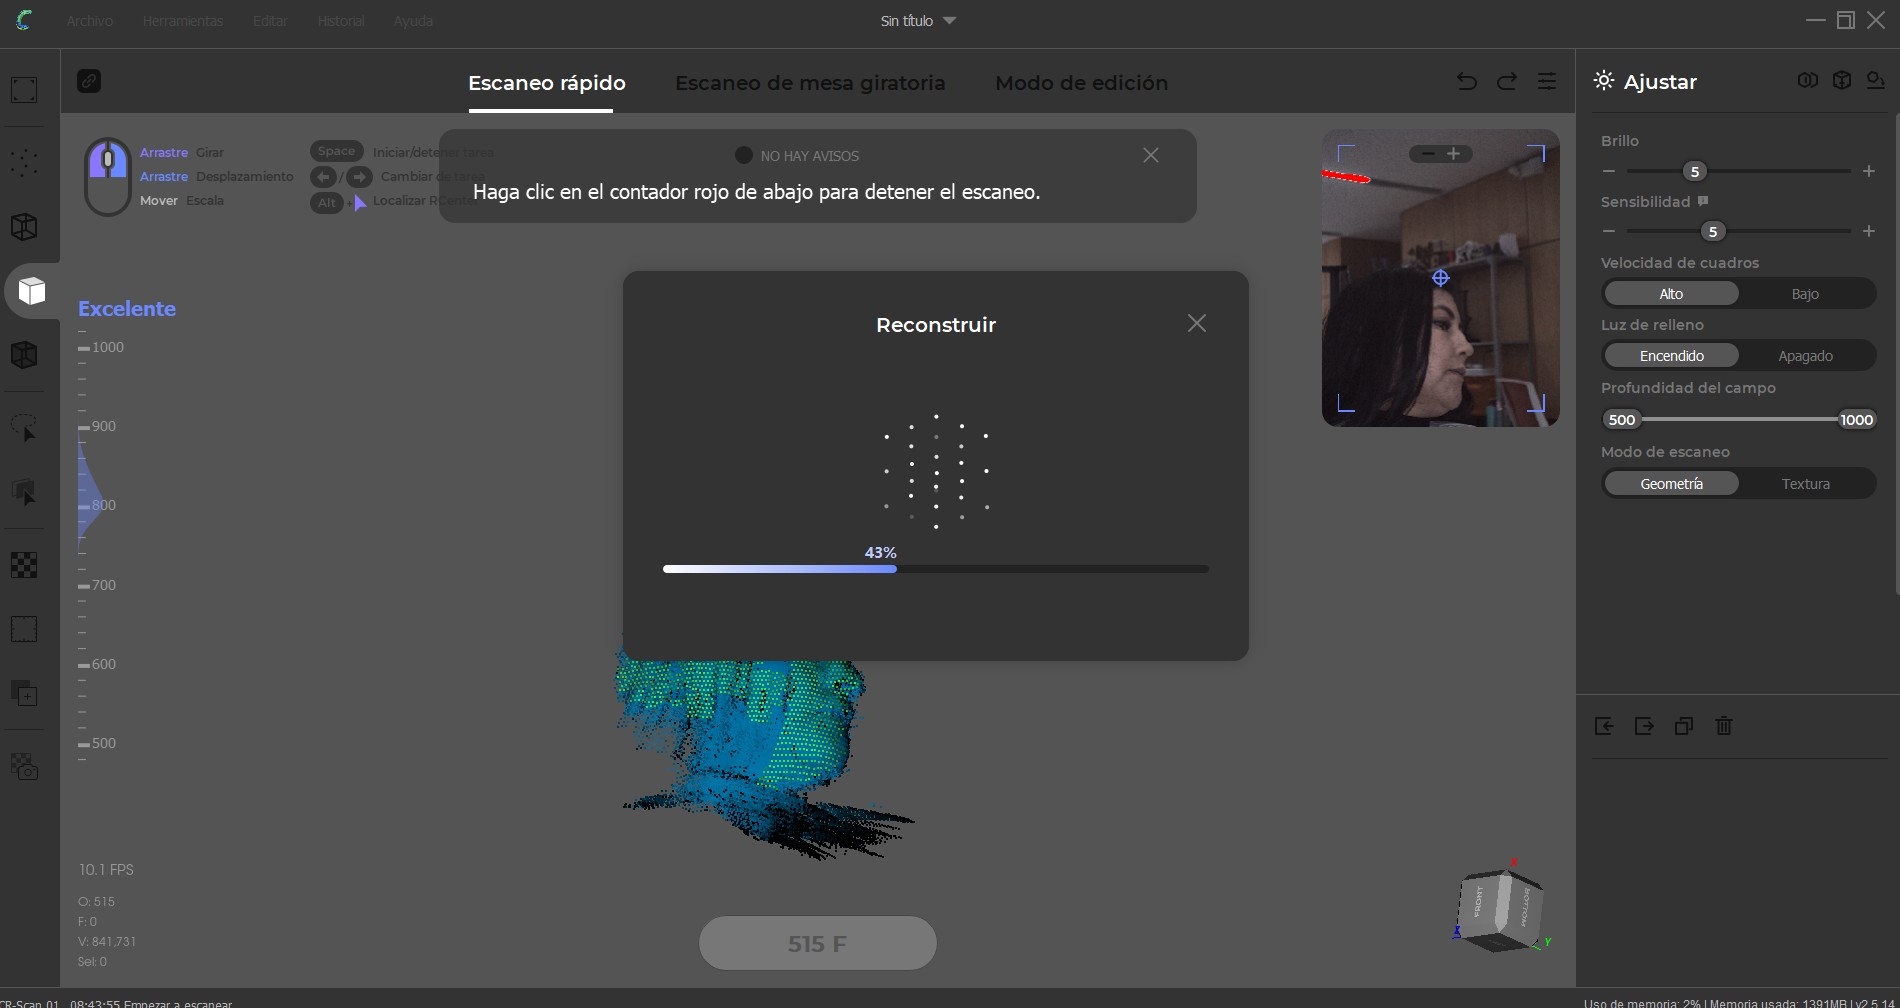
6. 3D Scanning
For the scanning activity, the Creality CR-SCAN 01 handheld 3D scanner was used. Creality CR-SCAN 01 Specifications:
- Technology: Structured light (white light)
- Scan Accuracy: ±0.1 mm
- Scan Range: 400–600 mm
- Capture Speed: Up to 10 fps
- Output Formats: OBJ, STL, PLY
- Software: CR Studio (native)
- Working Modes: Handheld scanning / turntable scanning
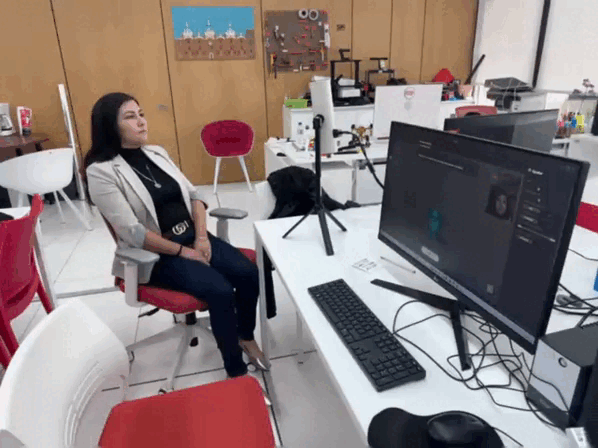
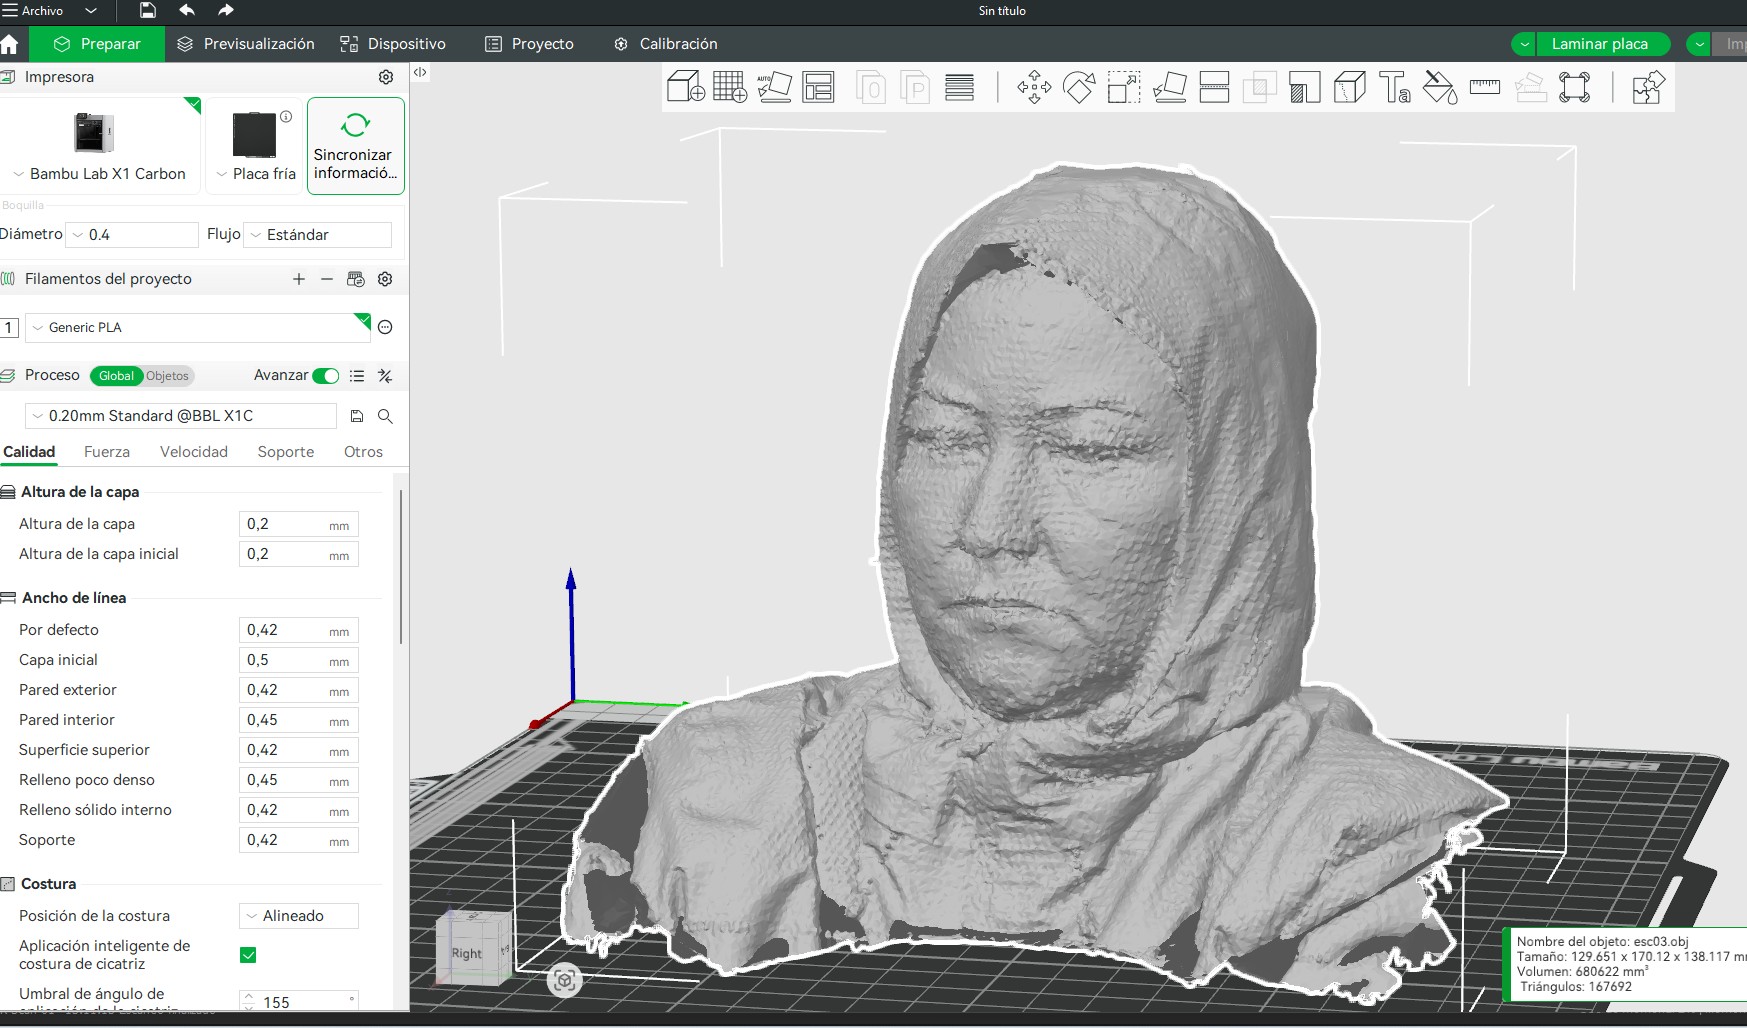
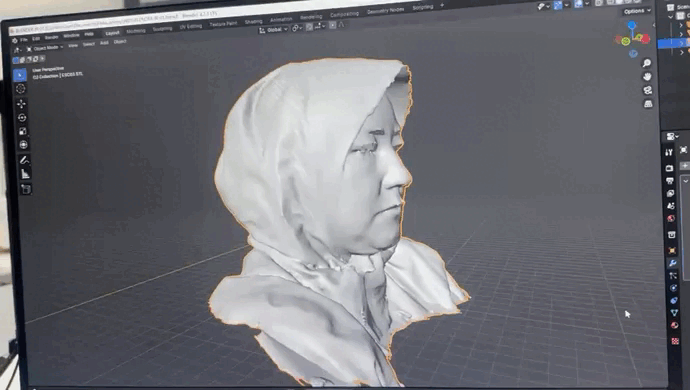
The scanned object was an organic form (a bust scan of myself). The result was initially a point cloud, which required post-processing in Blender to smooth surfaces, close mesh gaps, and eliminate noise.


The scanned object was an organic form (a bust scan of myself). The result was initially a point cloud, which required post-processing in Blender to smooth surfaces, close mesh gaps, and eliminate noise.
7. 3D Printing the Scanned Object
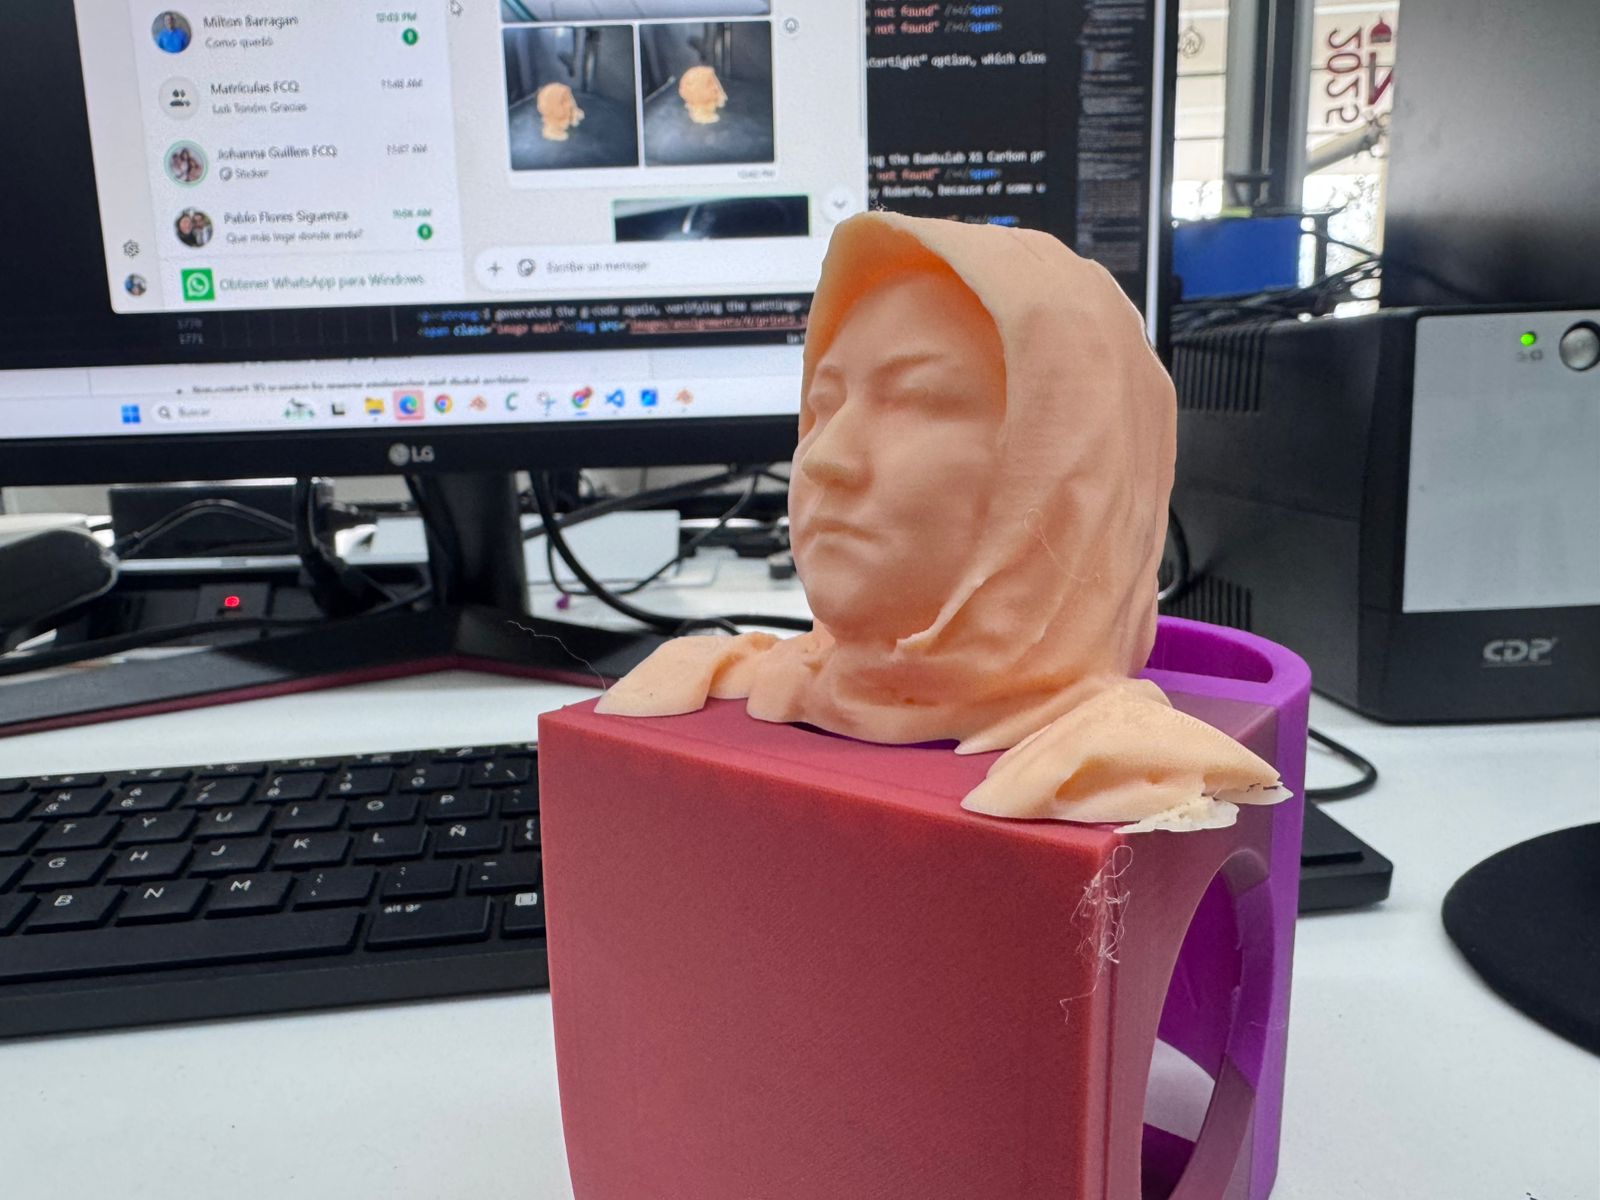
The cleaned 3D model was exported and prepared again in Bambu Studio using the Bambulab X1 Carbon printer. No supports were required due to the design orientation. A smooth surface finish was achieved using the slicer’s “smooth” tool path optimization, resulting in a detailed and faithful reproduction of the scanned geometry.
Our first test of that did not work out, as confirmed by Roberto, because of some unexpected printing error which made the machine stop randomly and refuse to continue the printing job. This is when the printer stopped working:
8. Advantages and Limitations of 3D Printing and Scanning Technology
Advantages:
- It’s an additive form of production, which means that it can create objects that CNC milling and Laser cutting can’t produce.
- It can create very complex objects, and depending on the machine, it can also have very high quality.
Disadvantages:
- It takes a lot of time and some machines may not be very exact.
- The size of production is also limited to the size of the machine, so generally the objects have to be small.
Other Observations:
- Material: PLA is preferred over ABS, because ABS can be toxic when heated.
- Resolution: depends on the machine and the object being printed.
- Time: printing takes a long time.
- Cost: varies, but machines can be cheap.
- Overhangs: up to 80 degree overhangs.
- Supports: sometimes necessary.
- Angle: up to 80 degrees vertical.
- Dimensions: limited to machine size.
- Orientation: affects speed and supports.
- Fills: 15% grid type was used.
9. Conclusion
3D printing is a great tool to create small objects or parts of an object and has lots of advantages vs CNC milling and Laser Cutting. I enjoyed this exercise as it helped me understand how the printer works, and the possibilities of it. I think it is a great way to create objects, however, because of time, it may be better to create the mold of an object using 3D printing and then use another faster process to create objects.
Final Checklist Documentation — Week 05
-
Linked to the group assignment page
This assignment was developed as part of the group work conducted at the Industrial FabLab UCuenca. The calibration tests across the three 3D printers (Bambulab X1 Carbon, FLSUN V400, and Elegoo Neptune 3 Max) were carried out collaboratively with Ing. Rodrigo Guamán. The group documentation includes comparative evaluation of dimensional accuracy, surface quality, and calibration parameters.
-
Explained what you learned from testing the 3D printers
Through comparative testing, I learned that dimensional variation ranged between 0.5% and 2% depending on the machine. The Bambulab X1 Carbon provided the best dimensional accuracy and surface finish due to its lidar-assisted calibration and stability. The FLSUN V400 demonstrated extremely high speed but introduced slightly more visible layer artifacts. The Elegoo Neptune 3 Max proved suitable for large-scale prints but required more calibration effort to avoid edge warping. These observations reinforced the importance of calibration, printer architecture, and motion systems in additive manufacturing.
-
Documented how you designed and 3D printed your object and explained why it could not be easily made subtractively
The object was designed in Autodesk Fusion 360 as a nested geometry where one internal component is mechanically trapped inside an external shell. This configuration cannot be produced through subtractive manufacturing methods such as CNC milling because the internal geometry would require tool access that is physically impossible once the outer shell is closed. The model was sliced using Bambu Studio with a 0.15 mm layer height, 15% grid infill, 1 mm wall thickness, and no supports. The object was printed in a single piece using PLA filament and a 0.4 mm nozzle diameter.
-
Documented how you scanned an object
The scanning process was performed using the Creality CR-SCAN 01 structured light scanner. The object scanned was a bust of myself. The initial result was a point cloud which required post-processing in Blender to smooth surfaces, repair mesh gaps, and eliminate noise. The cleaned mesh was exported in STL format and prepared again in Bambu Studio for printing. This workflow demonstrated the full pipeline: scanning → mesh processing → slicing → printing.
-
Included your original design files for 3D printing
The original design and manufacturing files are included in the documentation:
-
Included your hero shots
Final hero shots of both the designed object and the scanned model are included in the documentation, demonstrating successful fabrication and surface quality results. These images validate dimensional fidelity and structural integrity of the printed components.
Checklist
- Linked to the group assignment page
- Explained what you learned from testing the 3D printers
- Documented how you designed and 3D printed your object and explained why it could not be easily made subtractively
- Documented how you scanned an object
- Included your original design files for 3D printing
- Included your hero shots