Charlotte Super Fab Lab Machine Week Group Project
Link to our slideLink to our video
Note, we currently don't have access to edit the node's group page, so we are posting the group documentation to our indvidual pages.
Our group is Heaven Whitby and Jeff Ritchie, remote students out of the Charlotte Super Fab Lab.
Neither Heaven nor Jeff have an engineering background and both are remote and about ten hours distant, so we wanted to come up with a process that accommodates our situation.
Our tasks for the next two weeks:
First week
- design a machine that includes mechanism+actuation+automation+function+user interface
- build the mechanical parts and operate it manually
- document the group project and your individual contribution
second week
- actuate and automate your machine
- document the group project and your individual contribution
- prepare a demonstration of your machines for the next class
Our first meeting's goals
- Define functionality and specifications
- Ensure consistent parts beyond inventory
- Assign specific tasks to each of us- we can’t say that we did a task.
- Set goals for this first week
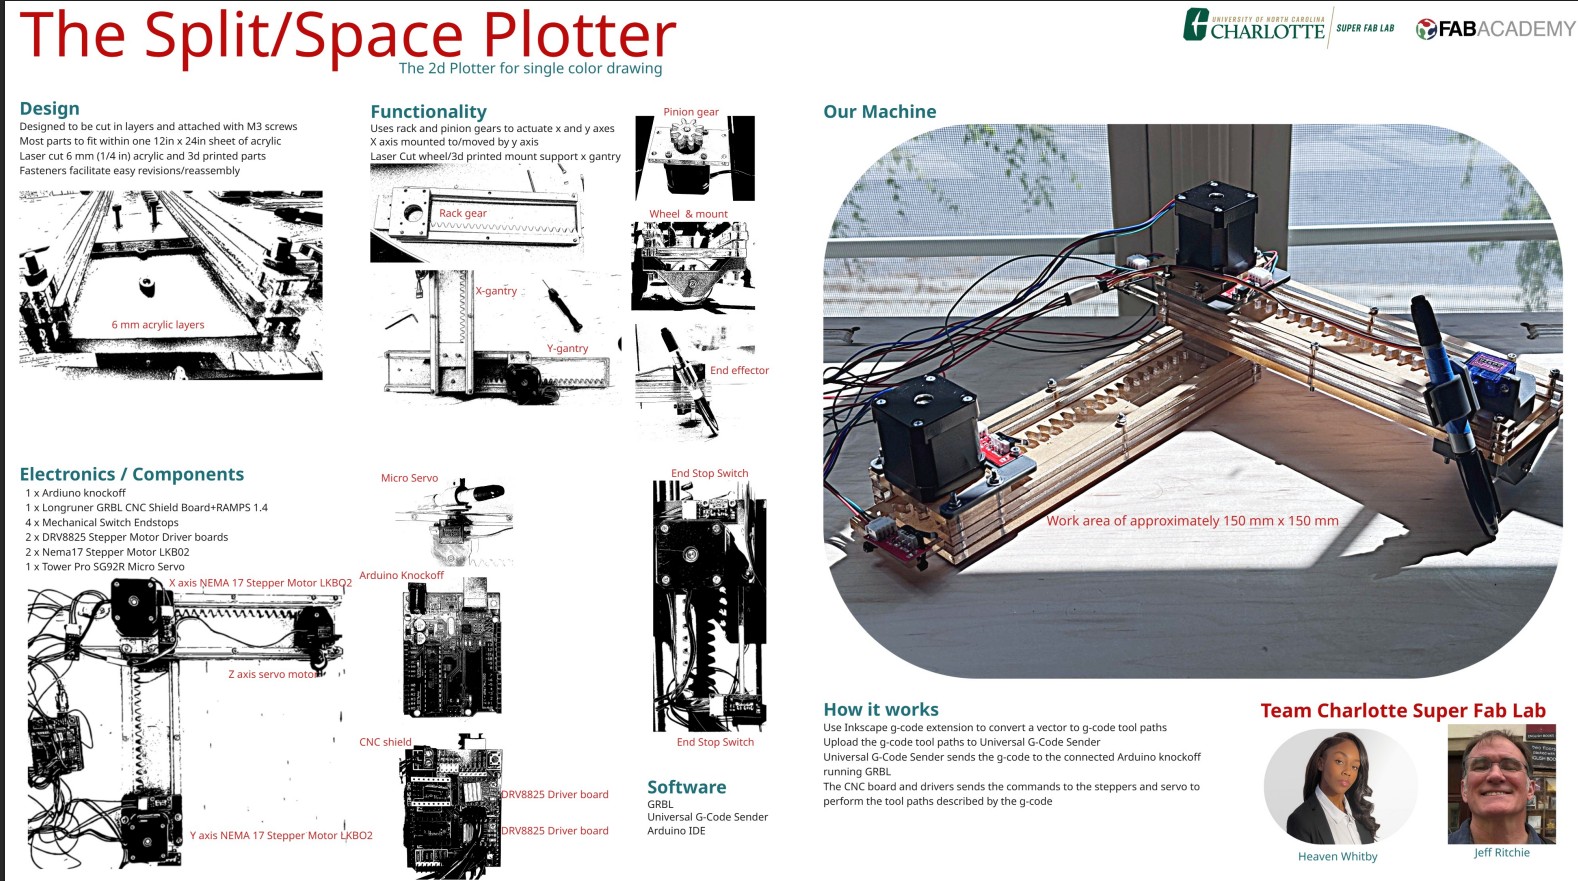
First, we brainstormed and decided on a plotter as our machine week project.
We met with Nick Anastasia to get his advice on the project. Nick suggested that we look at an Instructables project that Jeremy and Dave from UNCC SFL 20205 referenced
CircuitsArduino, MertArduinoin. “Arduino Mini CNC Plotter.” Instructables. Accessed April 8, 2026. https://www.instructables.com/Arduino-Mini-CNC-Plotter/.
Because we are remote AND are not together in the same place, we should make sure that the we use the same components.
We will use NEMA 17 steppers, but we need to ensure that we use the same boards and other components, many of which will not be in the fab academy inventory. We purchased the following kit
https://www.amazon.com/Longruner-Arduino-Professional-Mechanical-LKB02
It has the following components
- 1 x Ardiuno knockoff
- 1 x Longruner GRBL CNC Shield Board+RAMPS 1.4
- 3 x Mechanical Switch Endstops (you really need at least six)
- 4 x DRV882 Stepper Motor Driver boards plus heat shields
- 3 x Nema17 Stepper Motor LKB02
- cord
Because of time considerations, we opted to laser cut most of the components that we are to fabricate.
We created a shared library using the app Zotero. “Zotero | Your Personal Research Assistant.” Accessed April 9, 2026. https://www.zotero.org/.
For our second meeting, we were to have searched and reviewed plotter projects for machine week, seeing which projects were the best place to begin thinking about the project. The list we reviewed included:
- “09. Machine Design - Vasco Neves - Fab Academy.” Accessed April 2, 2026. https://fabacademy.org/2021/labs/benfica/students/vasco-neves/assignments/week09/.
- “15 & 17. Mechanical Design & Machine Design - Narender Sharma.” Accessed April 2, 2026. https://fabacademy.org/2019/labs/akgec/students/narender-sharma/assignments/week15%20&%2017/.
- “17. Machine Design - Phanuwit Rico Kanthatham.” Accessed April 2, 2026. https://fabacademy.org/2019/labs/kamakura/students/phanuwit-kanthatham/assignments/week17/.
- “Archive.Fabacademy.Org/Archives/2017/Fablabwaunakee/Students/87/Assignment9.Html.” Accessed April 2, 2026. https://archive.fabacademy.org/archives/2017/fablabwaunakee/students/87/assignment9.html.
- “Archive.Fabacademy.Org/Archives/2017/Fablabwaunakee/Students/87/Assignment11.Html.” Accessed April 2, 2026. https://archive.fabacademy.org/archives/2017/fablabwaunakee/students/87/assignment11.html.
- “Chocolate 3d Printer and Pen Plotter.” Accessed April 2, 2026. https://fab.cba.mit.edu/classes/863.18/CBA/people/tina/portfolio/week11_machine_week/.
- euphy. “Vector Drawing Styles.” GitHub. Accessed April 7, 2026. https://github.com/euphy/polargraph/wiki/Vector-Drawing-Styles.
- “Fab Academy 2017 - Ilia Feldshtein.” Accessed April 7, 2026. https://archive.fabacademy.org/archives/2017/fablabisrael/students/104/week11.html.
- “Fab Lab Frosinone.” Accessed April 2, 2026. https://archive.fabacademy.org/fabacademy2016/fablabfrosinone/mtm.html.
- “FabLabil.” Accessed April 2, 2026. https://archive.fabacademy.org/2017/fablabisrael/project.html.
- “Gaurang Shetty - Fab Academy 2017.” Accessed April 2, 2026. https://archive.fabacademy.org/archives/2017/fablabriidl/students/377/assignment111.html.
- “Gaurang Shetty - Fab Academy 2017.” Accessed April 2, 2026. https://archive.fabacademy.org/2017/fablabriidl/students/377/assignment9.html.
- “Machine Design.” Accessed April 2, 2026. https://archive.fabacademy.org/2017/fablabkitakagaya/machine.html.
- “Machines That Make.” Accessed April 2, 2026. https://archive.fabacademy.org/fabacademy2017/fablabwaunakee/group%20project.html.
- “Mateo’s HTMAA Machine Week.” Accessed April 2, 2026. https://fab.cba.mit.edu/classes/863.23/Architecture/people/Mateo/week13.html.
- “Mechanical Design.” Accessed April 2, 2026. https://fabacademy.org/2018/labs/fablabkamplintfort/mechanical-design.html.
- “Nathan Melenbrink — How to Make [Almost] Anything.” Accessed April 2, 2026. https://fab.cba.mit.edu/classes/863.14/people/nathan_melenbrink/Week_15.html.
- Sleigh, Andrew. “Week 16 - More Machine Building.” Andrew Sleigh—Fab Academy 2018, May 16, 2018. https://fabacademy.org/2018/labs/fablabbrighton/students/andrew-sleigh/assignments/2018/05/16/wk16-more-machine-building.html.
- “Visual CAM.” Accessed April 7, 2026. https://nraynaud.github.io/webgcode/webapp/visucamTest.html#/jobs/1.
- “Week 8.” Accessed April 2, 2026. https://fab.cba.mit.edu/classes/863.17/EECS/people/rtran/week9.html.
- “Week 12, Machine Design - Charlotte Super Fab Lab - Fab Academy 2025.” Accessed April 2, 2026. https://fabacademy.org/2025/labs/unccharlotte/assignments/week12/week12/.
At our next meeting we each chose our top projects. We agreed that two projects best align with out concept:
- “Fab Lab Frosinone.” Accessed April 2, 2026. https://archive.fabacademy.org/fabacademy2016/fablabfrosinone/mtm.html.
- “FabLabil.” Accessed April 2, 2026. https://archive.fabacademy.org/2017/fablabisrael/project.html.
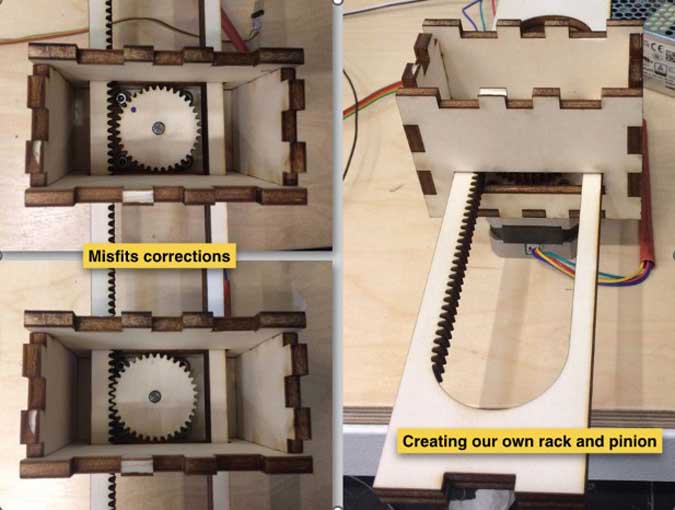
Based on these projects, we opted on the mechanism and machine we create to be based loosely on FabLabili’s project and an Instructables project that uses a rack and pinion gear as a means of moving the x and y axes.
Both of our labs have an epilog Laser cutter, with a bed of 12 in x 24 in. Because we are laser cutting the materials, this constraint will shape the dimensions of our machine.
We agreed that the material we both have access to is acrylic. The thickness we will use is 6mm or 1/4 in.
During our meeting we decided to use otter.ai to summarize our meetings.
Our goal for our next meeting-
- Define functionality and specifications
- Develop and document an idea for eliminating lateral movement of the X/Y mechanism and produce a Fusion file to present at the next meeting
- Develop and document an idea for eliminating lateral movement of the X/Y mechanism and produce a Fusion file to present at the next meeting
- Ensure consistent parts beyond inventory
- Assign specific tasks to each of us- we can’t say that we did a task.
- Set goals for this first week
We were unable to meet for the next five days.
When we next met with our instructor, we reviewed the x and y gantry and our project to date.
Our instructor, Terence, approved of the design and gave us tips on how to proceed. Problems we noted include:
- It is unclear how to use a servo in lieu of a stepper for the z-axis, given the board we’ve chosen. It would be faster to switch it out to be a stepper as the software controls steppers- not servos.
- The placement of the x-axis stepper at the end of the gantry over the wheel adds unwanted stress on the gantry and could negatively affect its use.
- We have to control the range of motion of the x and y axes (and we don’t have enough end stops).
- We now have to automate and actuate the machine- which we opted to use GRBL and Universal G-Code Sender. We need to understand how those work
- We don’t have the permissions to to create or edit a page on the UNCCSFL lab site for our group project documentation
- We need to create a video and slide of the project and post it to our group page and as a comment on Issue #8
Redesigned the mount to hold a stepper rather than a servo.
Redesigned the end effector to go on the nema 17 stepper.
We made the changes that were recommended. Heaven reached out to mattermost/instructors to answer questions on GRBL and the design of the machine electronics.
We met again to review the changes, identify any remaining problems that needed to be solved, and identify how best to finalize the project through actuating and automating it. The instructors suggested that the stepper was too heavy and that we should go back to the servo.
We used otter.ai to transcribe our meeting. The action items were:
- @Jeff Ritchie - Complete the machine-week project documentation by transferring remaining build notes into the shared Google doc, including the parts list and any key decisions from this meeting, and summarize the discussion for use in the final transcript.
- @Heaven.Whitby - Evaluate Vertical Designs as a potential solution for wire management and mounting of the control board to minimize the machine’s footprint while maintaining functionality.
- @Jeff Ritchie - Send both of you the meeting transcript files after the call.
- @Jeff Ritchie - Spend most of today reviewing Rico’s comments and feedback and using them to advance your final project documentation.
- @Jeff Ritchie - Tomorrow, swap the X-axis motor from the existing stepper to the recommended servo as suggested by Rico.
- @Jeff Ritchie - Adjust the trim pots on the CNC shield to tune the current for the motors, based on Rico’s recommendations.
- @Jeff Ritchie - Adjust the stepper drivers to activate microstepping on the servos, based on Rico’s recommendations.
- @Jeff Ritchie - Reassemble the machine with the servo mount and original end effector and begin experimenting with the appropriate G-code starting tomorrow.
- @Heaven.Whitby - Add a note to the build documentation describing the need to use a bolt and washer between the gantry and the stepper mount so the spindle does not extend too far into the rack.
- @Heaven.Whitby - Design and implement a base and mounting solution for the electronics (board, power supply, and related components), including dedicated space for cords and power connections routed vertically to keep wires tidy.
- @Heaven.Whitby - Create the slide and one-minute video for GitLab for the midterm review.
We met again and divided the tasks. Heaven will make the video, design for cable management, and a base for the device. Jeff will work on getting the g-code to run - to actuate and automate the plotter.
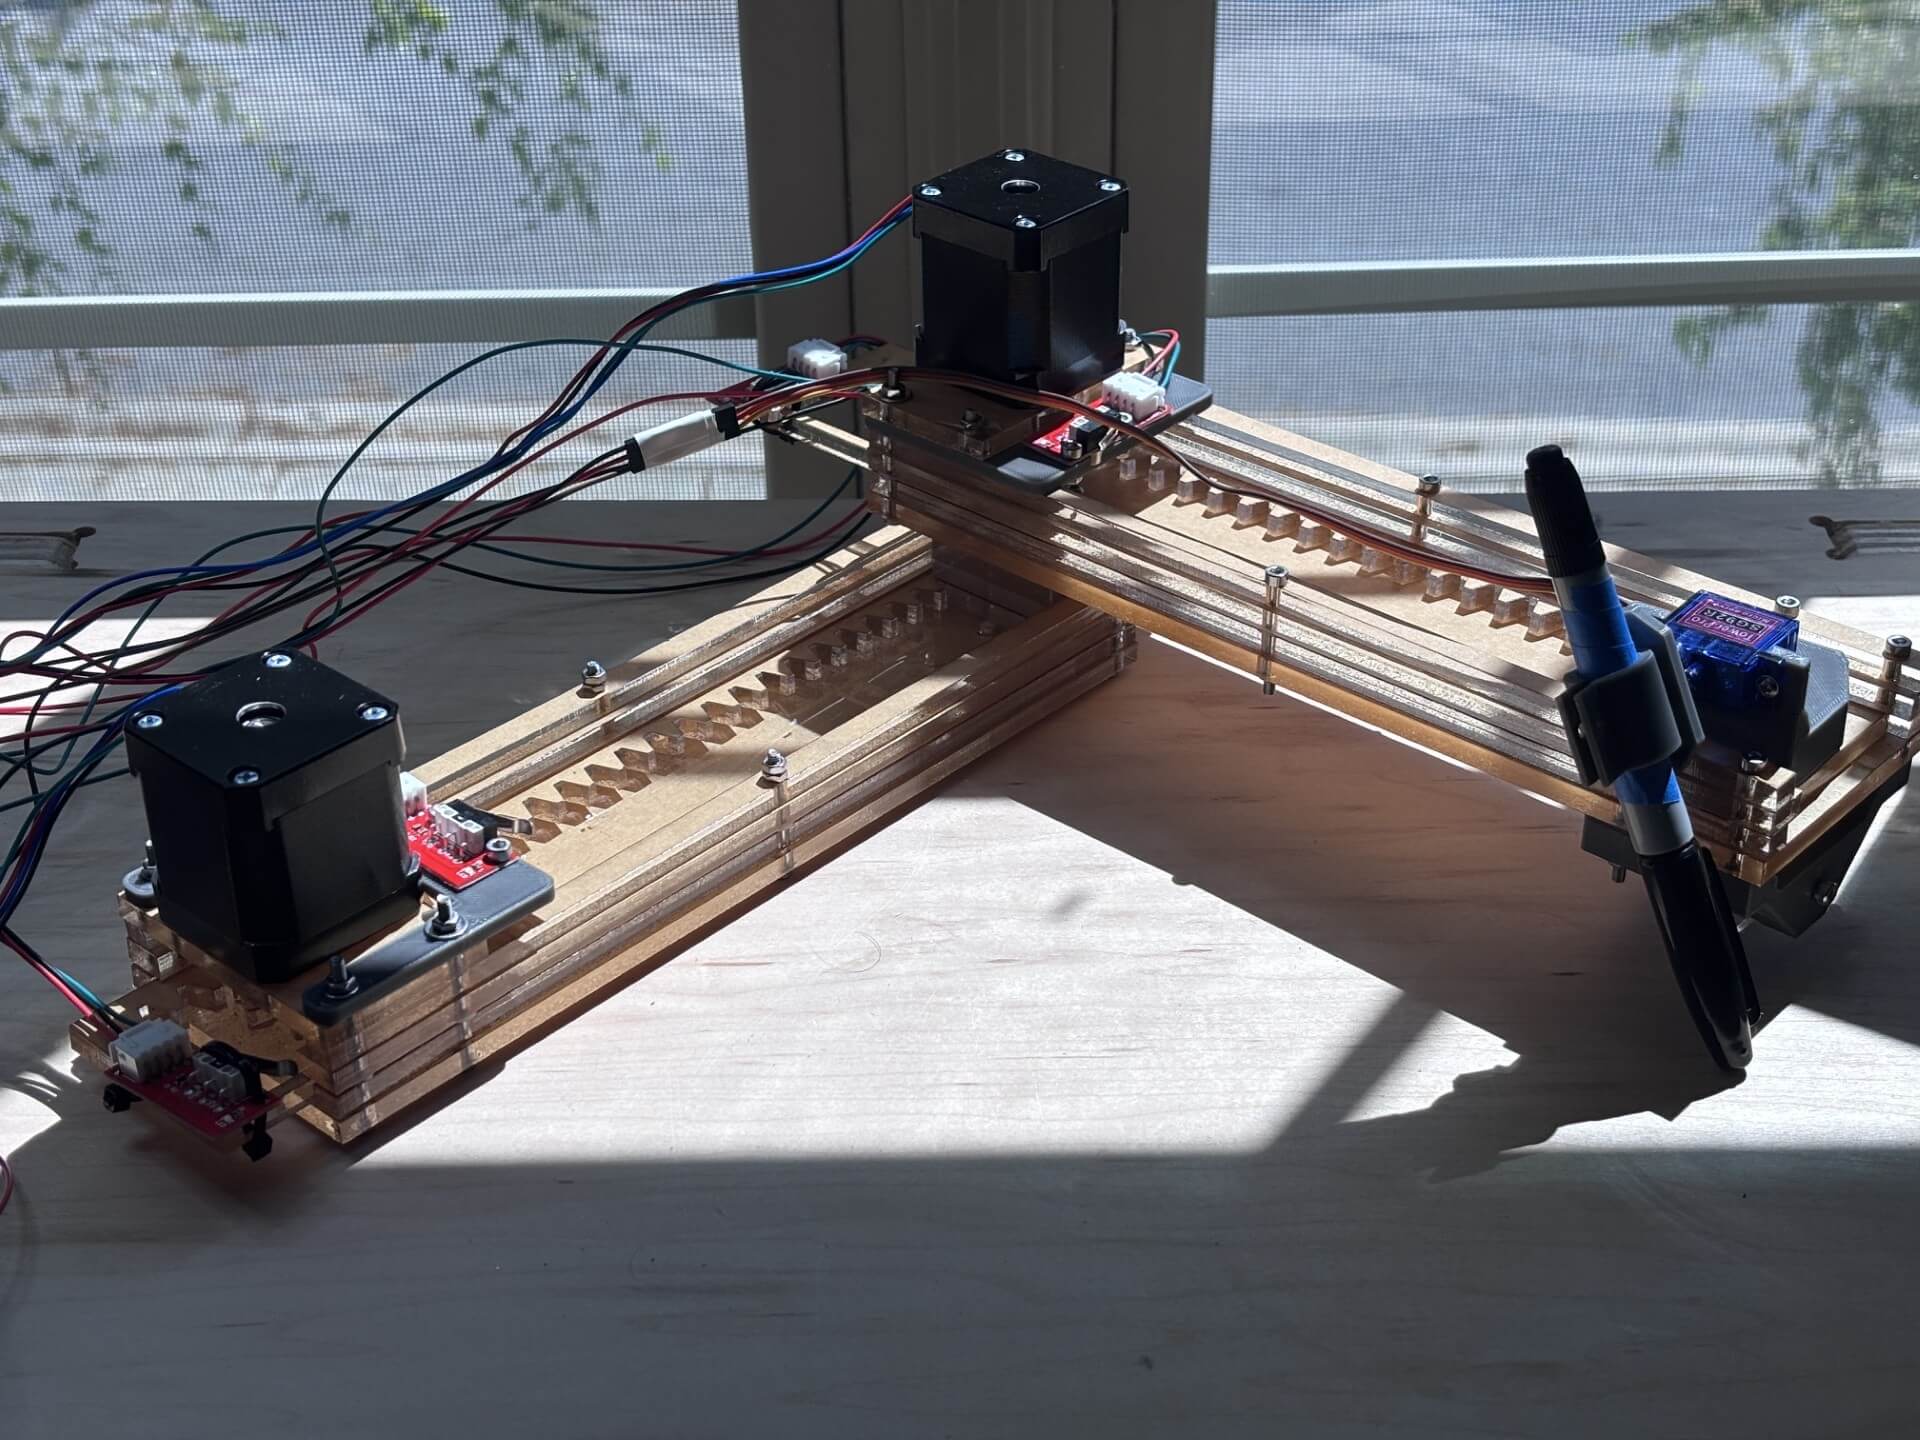
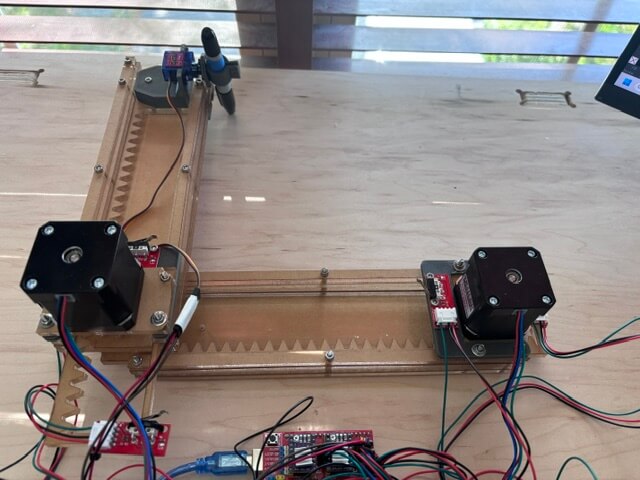
The final project is:
Here is a video of the project working:
A more elaborate test image of a png of an institution's logo.
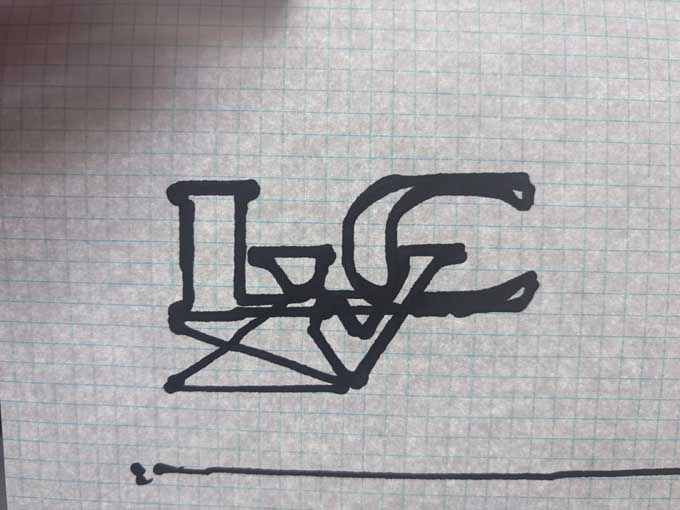
Success!
Future revisions/improvements:
- reduce the friction in the x and y axes
- better z control
- transpose the x axis gantry and stepper
- enclosure to make the machine easier to transport
- enclosing/managing the electronics and cables
- increase the size of the work area to fit 8.5 x 11 inches
- a means of securing the paper
- install universal g-code sender on a raspberry pi that would be dedicated to run the machine- or an arduino uno q
The Project's Files
- base.svg
- circletest.svg
- endeffector.3mf
- endeffectorv3.3mf
- endstop holder.svg
- Healiacal Gear (8R@0.00 m=3.0).svg
- Healiacal Rack (254.00000000000003mm R@0.00 m=3.0).svg
- leftlip.svg
- leftspacer.svg
- logo_0007.ngc
- motorholdera.svg
- output_0009.ngc
- rightlip.svg
- rightspacer.svg
- spacer2.svg
- spacer2lft.svg
- spacer2rt.svg
- spacerlft.svg
- spacerrt.svg
- testSVG.svg
- wheel.svg
- wheelv3.3mf
- zaxisv4.3mf