Understanding Soft
Robotics
I had always been fascinated by those octopus-like tentacle arms that could grip and manipulate objects with elegant, organic motion. When I first learned that this concept fell under the field of soft robotics, everything clicked. This week became an opportunity to turn that curiosity into reality—to design and fabricate a working pneumatic soft robotic actuator from scratch.
What is Soft Robotics?
Soft Robotics is a revolutionary branch of robotics that uses flexible and deformable materials such as silicone, rubber, or soft polymers instead of rigid mechanical structures. These robots are inspired by living organisms like octopus tentacles, worms, and human muscles, allowing for safer and more adaptive movements compared to traditional rigid robotic systems.
A pneumatic soft actuator is a common example, where internal air chambers inflate and generate bending or gripping motions. When pressurized, the flexible structure deforms in predictable ways based on its geometry and material properties—the shape of those chambers determines how it moves. Ribs create controlled bending, symmetrical chambers create gripping, and tapered walls create smooth, gradual motion.
The Paradigm Shift: From Rigid to Flexible
Soft robotics represents a fundamental shift in how we think about machines. While traditional robots are built from rigid metal parts, steel joints, and electric motors, soft robots use flexible materials and gentle forces to achieve safer, more natural movement. The difference is revolutionary.
Conventional industrial robots are incredible at repetitive, high-precision tasks—but they come with inherent dangers. Their metal arms move with mechanical force. If a rigid robot collides with a human, it causes injury. They can't conform to irregular shapes. They can't handle delicate objects without crushing them. They move with jerky, angular motions that feel nothing like biology.
Soft robots flip this paradigm. By using materials like silicone, rubber, and air pressure instead of metal and motors, soft actuators are inherently safe. If a soft robot touches your hand, it's gentle. They can squeeze into tight spaces, conform to irregular objects, and handle delicate items without damage. Their movements are smooth, continuous, and organic—mimicking nature rather than fighting against it.
How Pneumatic Actuation Works
Air is the ideal actuator for soft robots. When pressurized air fills internal chambers in a flexible silicone body, the entire structure deforms smoothly. Unlike electric motors, pneumatic actuation is simple, scalable, and forgiving. A syringe or hand pump can power a prototype. There's no complex electronics—just pure mechanical ingenuity combined with material science.
Soft Robotics Architecture & Applications
The following diagram shows the complete architecture of a soft robotic tentacle actuator, demonstrating how pneumatic pressure drives the system and how different geometric designs enable different types of motion:
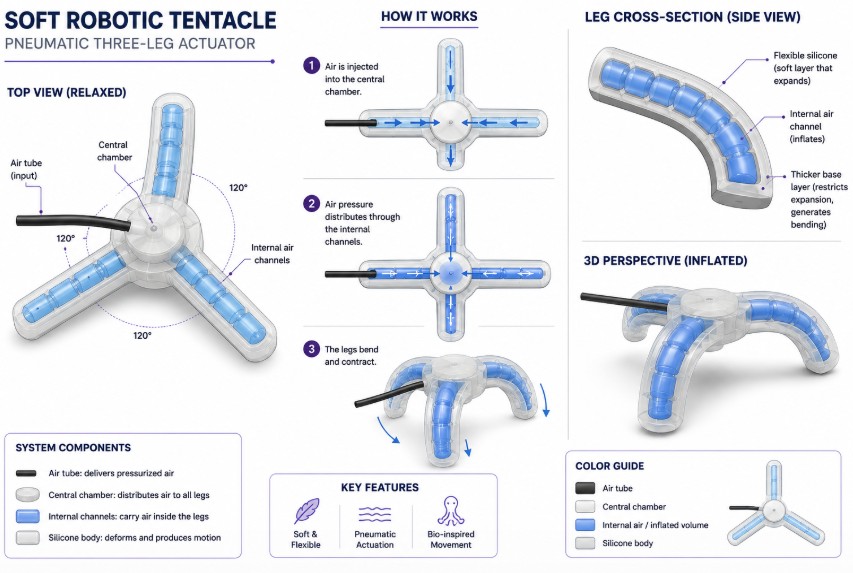
Illustration created with AI visualization
Key Characteristics
Silicone, rubber, or soft polymers allow safe interaction with humans and delicate objects.
Inspired by natural organisms like octopuses, enabling complex movement patterns.
Air pressure drives movement instead of electric motors or rigid joints.
Can conform to irregular shapes and environments with flexibility.
Common Applications Across Industries
Soft robotics is widely used in several key industries, each with unique requirements:
- Industrial Automation: Soft grippers for delicate object handling in manufacturing and assembly
- Medical & Healthcare: Minimally invasive surgical tools and rehabilitation exoskeletons
- Research & Exploration: Bio-inspired robots for studying environments and organisms
- Wearable Technology: Flexible exoskeletons for rehabilitation and human augmentation
- Search & Rescue: Flexible probes and tentacles for navigating confined spaces
The Foundation: Week 14 Knowledge
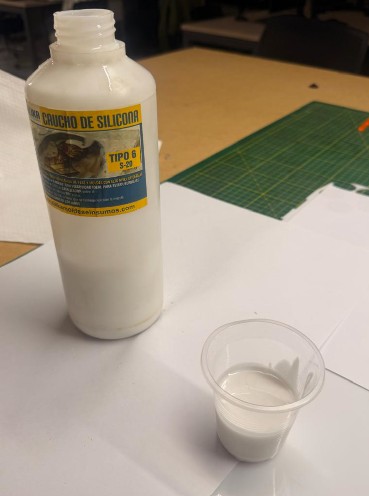
The techniques from Week 14: Molding and Casting proved essential to this project. Understanding silicone's properties—its Shore hardness, catalyst ratios, curing times, and deformation characteristics—directly determined the success of this actuator. Every decision about material density, wall thickness, and internal geometry traced back to lessons learned while casting.
If you haven't explored Week 14, I strongly recommend it—the foundation is critical to understanding why this soft robotic tentacle works the way it does.
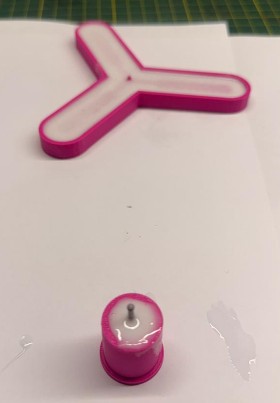
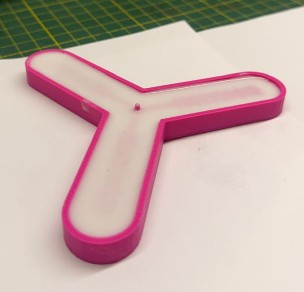
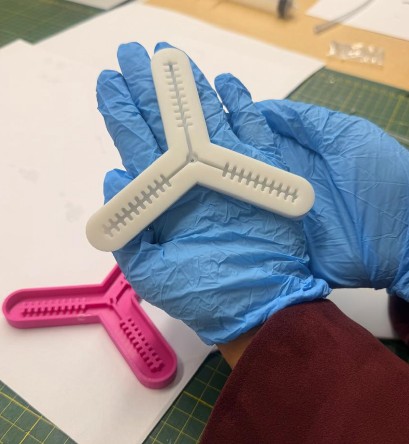
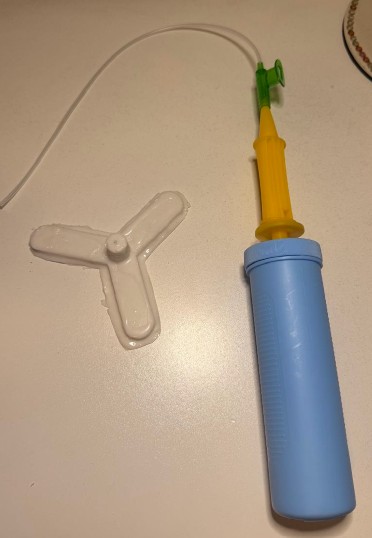
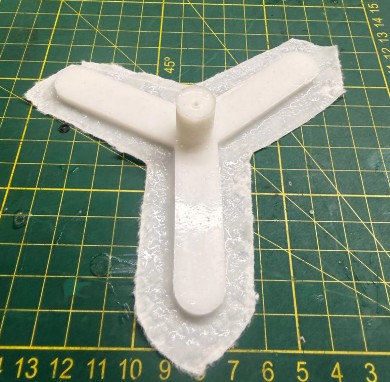
For this project, a three-legged soft robotic tentacle was developed using silicone casting and 3D printed molds. The actuator design consists of three flexible arms connected to a central chamber. Inside each arm, internal air channels distribute pneumatic pressure through the structure.
When air is injected through the tube into the central chamber, the internal channels inflate and generate deformation in the silicone body. Due to the geometry and wall thickness of the actuator, the structure bends and contracts, creating soft and flexible motion similar to biological tentacles.
System Components
Connected to the pneumatic tube for air input and distribution.
Extending from the center, designed to bend and contract independently.
Ribbed structures that distribute pressure evenly along each tentacle.
Allowing controlled deformation and motion during inflation.
Mold Fabrication Process
To fabricate the soft robotic tentacle, I designed a 3D printed mold in Autodesk Inventor. The objective was to create a three-legged pneumatic actuator with internal air channels that allow the silicone structure to bend when air pressure is applied.
Step-by-Step Mold Design
Create the Base Profile
I created the main sketch of the actuator starting with a central circle, which serves as the main base for the air distribution channels. This central circle represents the chamber where air enters before being distributed to the three tentacle branches.
Next, I designed the first tentacle arm using the True Center Rectangle tool. The tentacle was created from a rectangular shape connected to the central circle. The position of the rectangle was critical—I placed it so that the midpoint of its lower side touched the internal midpoint of the circle. This positioning ensured proper connection when applying circular patterns later.
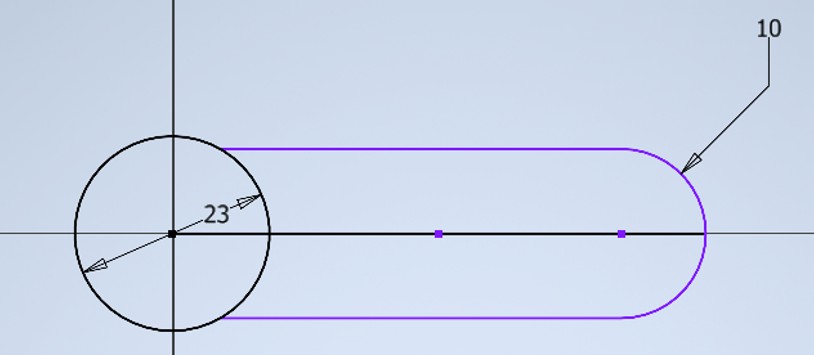
Refine the Tentacle Shape
After creating the rectangle, I applied a Fillet of 10 mm to the end of the tentacle arm. This created the rounded tip of the tentacle, which is important because it avoids sharp corners in the silicone. Sharp corners create weak points and can lead to premature failure during inflation. The rounded shape allows smoother deformation when the actuator is pressurized.
Then, I trimmed the excess lines from the side of the circle. This step was necessary to join the circle and the tentacle into one continuous closed profile.
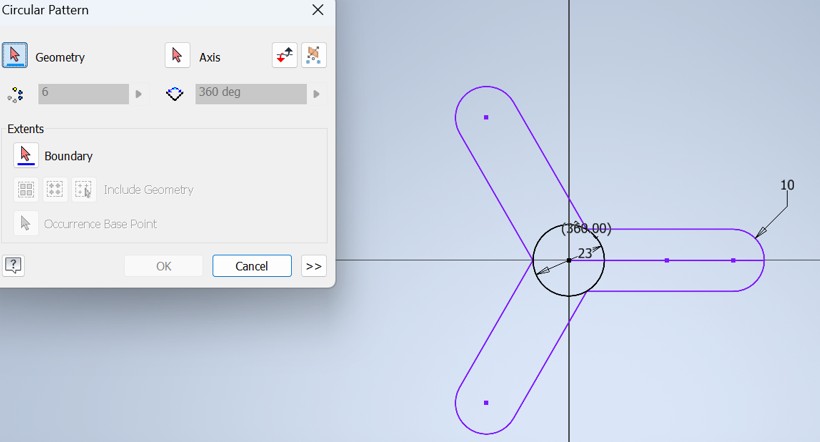
Create Circular Pattern
Once the first tentacle shape was ready, I used the Circular Pattern tool to generate the three tentacles. I selected the center of the circle as the axis of rotation and used a full angle of 360 degrees. This created three identical tentacle branches evenly distributed around the central chamber, separated by 120 degrees.
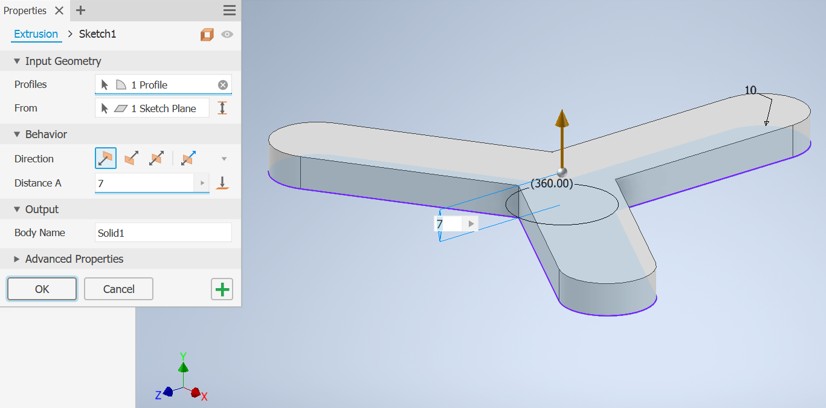
Extrude to 3D
I used the Extrude tool to turn the 2D profile into a 3D solid. I extruded the entire figure to a height of 7 mm, creating the main body of the mold. This height was chosen to provide sufficient wall thickness for the silicone casting.
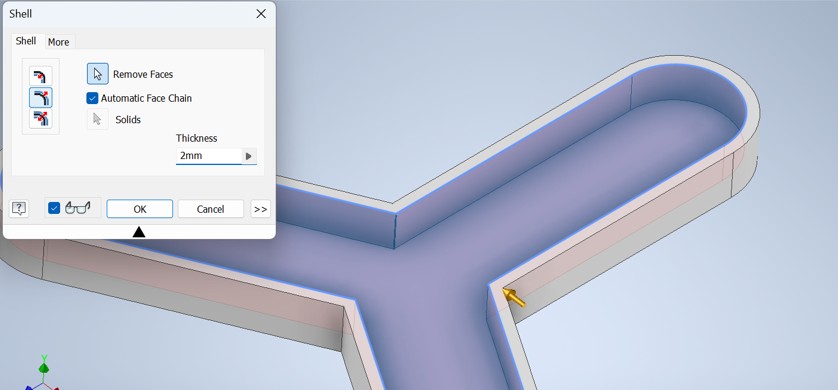
Create the Hollow Cavity
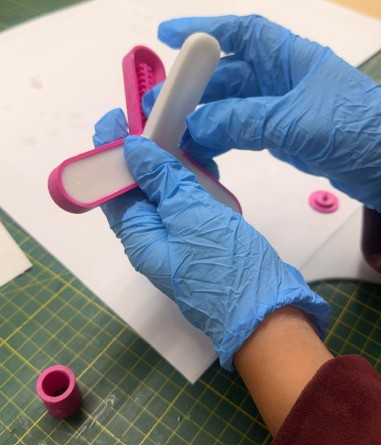
Then, I used the Shell tool to hollow the mold. I left a wall thickness of approximately 2 mm, which created the cavity where the silicone would be poured. This hollow shape defines the external body of the soft robotic tentacle.
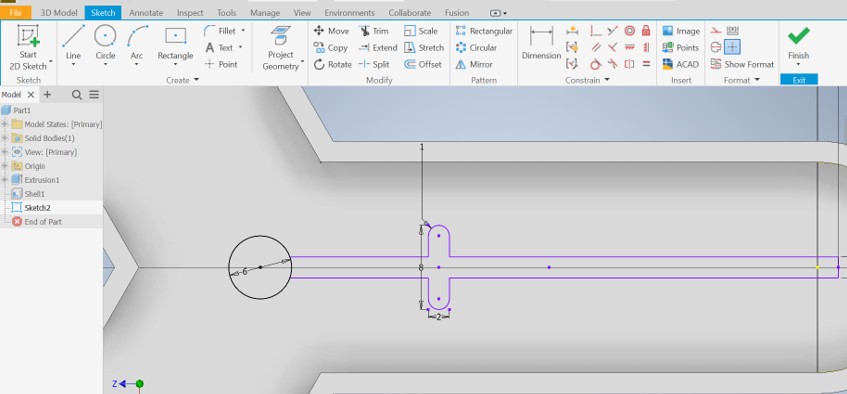
Design Internal Air Channels
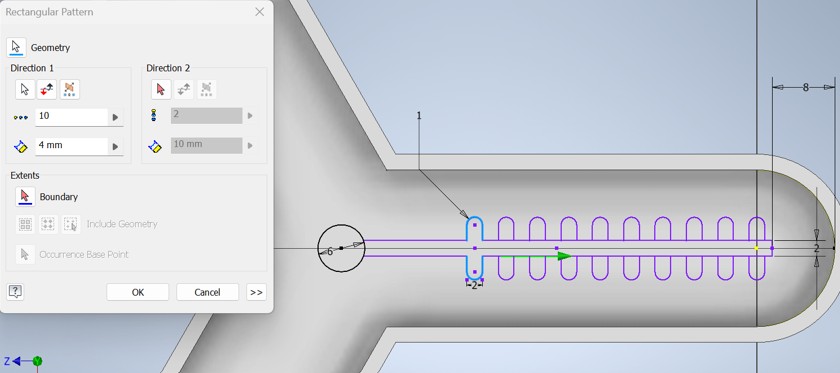
Inside the hollow mold, I created a new sketch to design the internal air distribution channels. I started by working on only one tentacle first. At the beginning of the channel, I created a small circle of 6 mm, which connects the central chamber with the air channel system.
Then, I designed the first rib structure. These ribs form the internal air distribution chambers. Each rib was designed with a length of 8 mm and a thickness of 2 mm.
Pattern the Internal Channels
After creating the first rib, I used the Rectangular Pattern tool to repeat it along the tentacle. I created 10 repeated ribs, with a spacing of 4 mm between them. This helped create an even ribbed air channel without manually drawing each rib. These ribs act as structural supports inside the tentacle while also creating chambers for air distribution.
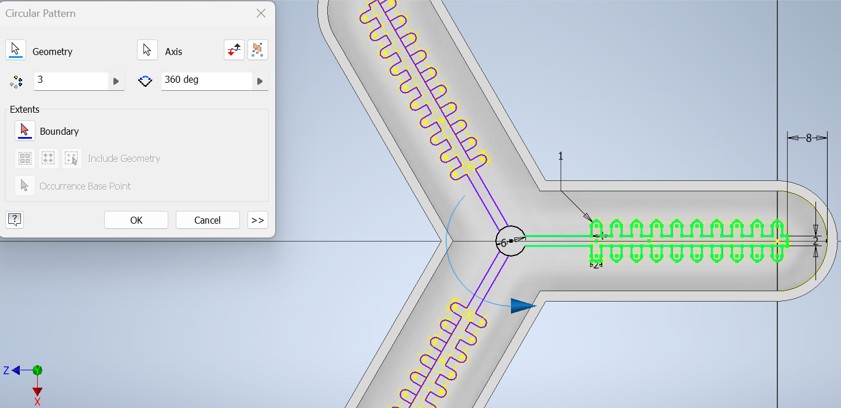
Replicate to All Tentacles
After finishing the air channel design in one tentacle, I used the Circular Pattern tool again to replicate the complete ribbed channel system into the other two tentacles. This ensured that all three tentacles had the same internal pneumatic structure and would inflate uniformly when pressurized.
Create Support Structure
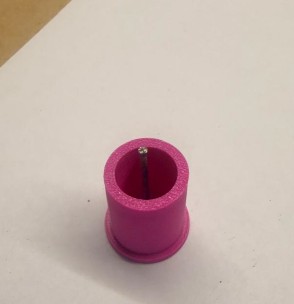
After finishing the main mold, I created a cylindrical support. This cylinder works as the base that allows air to enter the system through a syringe or a tube. The support connects the external air input with the central air distribution chamber of the mold.
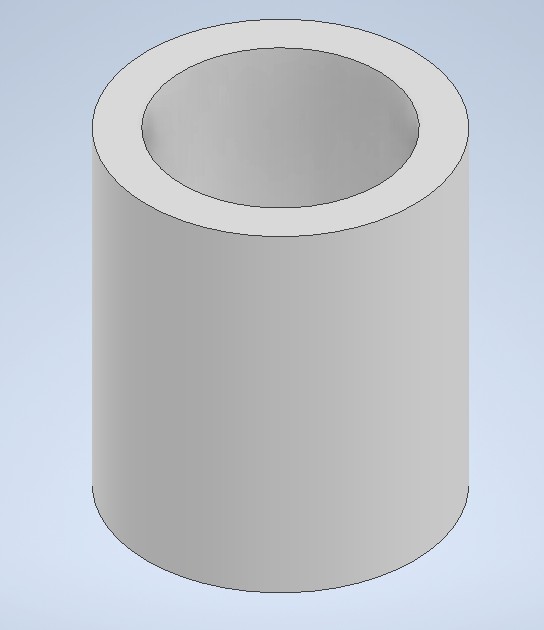
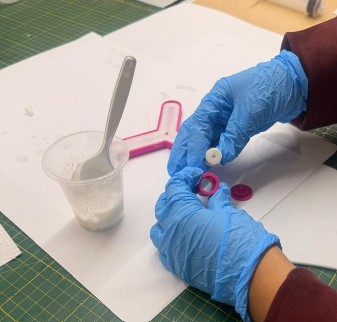
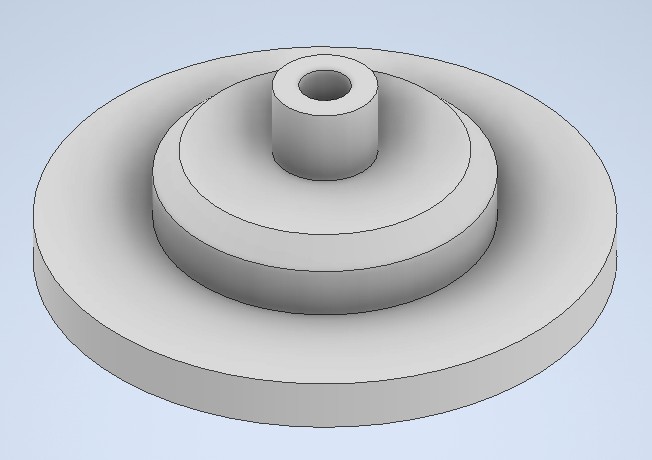
Design Support Cap
Finally, I designed the support cap. The cap has a total diameter of 22 mm. The second circle has a diameter of 13.85 mm, which was designed considering the tolerance of FDM 3D printing. This tolerance allows the cap to fit correctly with the cylindrical support after printing.
I also added a 1 mm hole in the center of the cap. This small hole allows a nail or thin metal pin to be inserted to help create the air duct. This duct will allow air from the syringe or tube to enter the central chamber and distribute through the three tentacles.
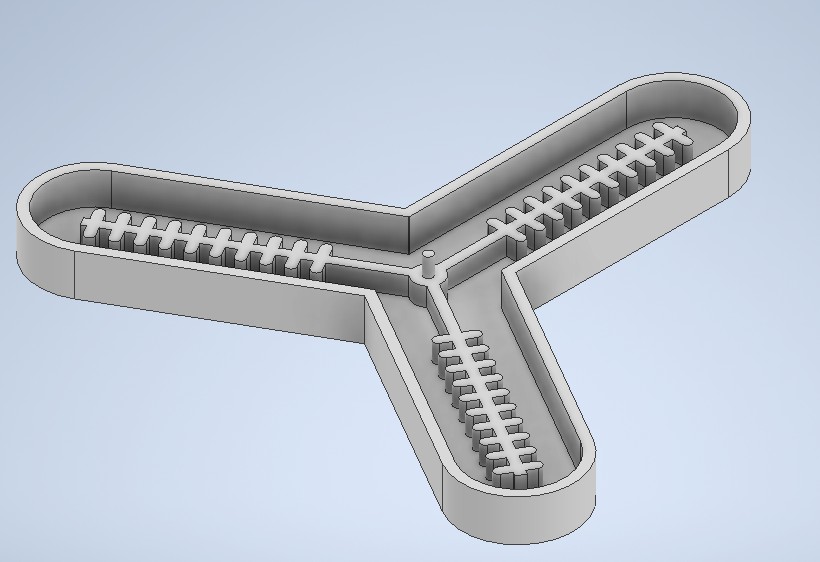
The complete mold design includes the main silicone cavity, the three tentacle branches, the internal ribbed air channels, the central air distribution chamber, the cylindrical support, and the support cap for the air input connection.