Week 11 > Networking & Communications
Group Assignment Work
by Tamrat Teklemarkos & Rico Kanthatham
MQTT
To practice using the MQTT protocol for wireless communication, we reference the video tutorial Getting Started with ESP32 & MQTT by IoT Bhai.
Tutorial Key Learning:
- HTTPS protocol not ideal for microcontroller work > constant polling/power drain at MCU, meaningful latency, prone to network failures
 image from IoT Bhai
-
MQTT more efficient for microcontroller applications > push not poll/much reduced power drain, no handshake = lower latency, subscriber model doesn’t require sender/receiver verification
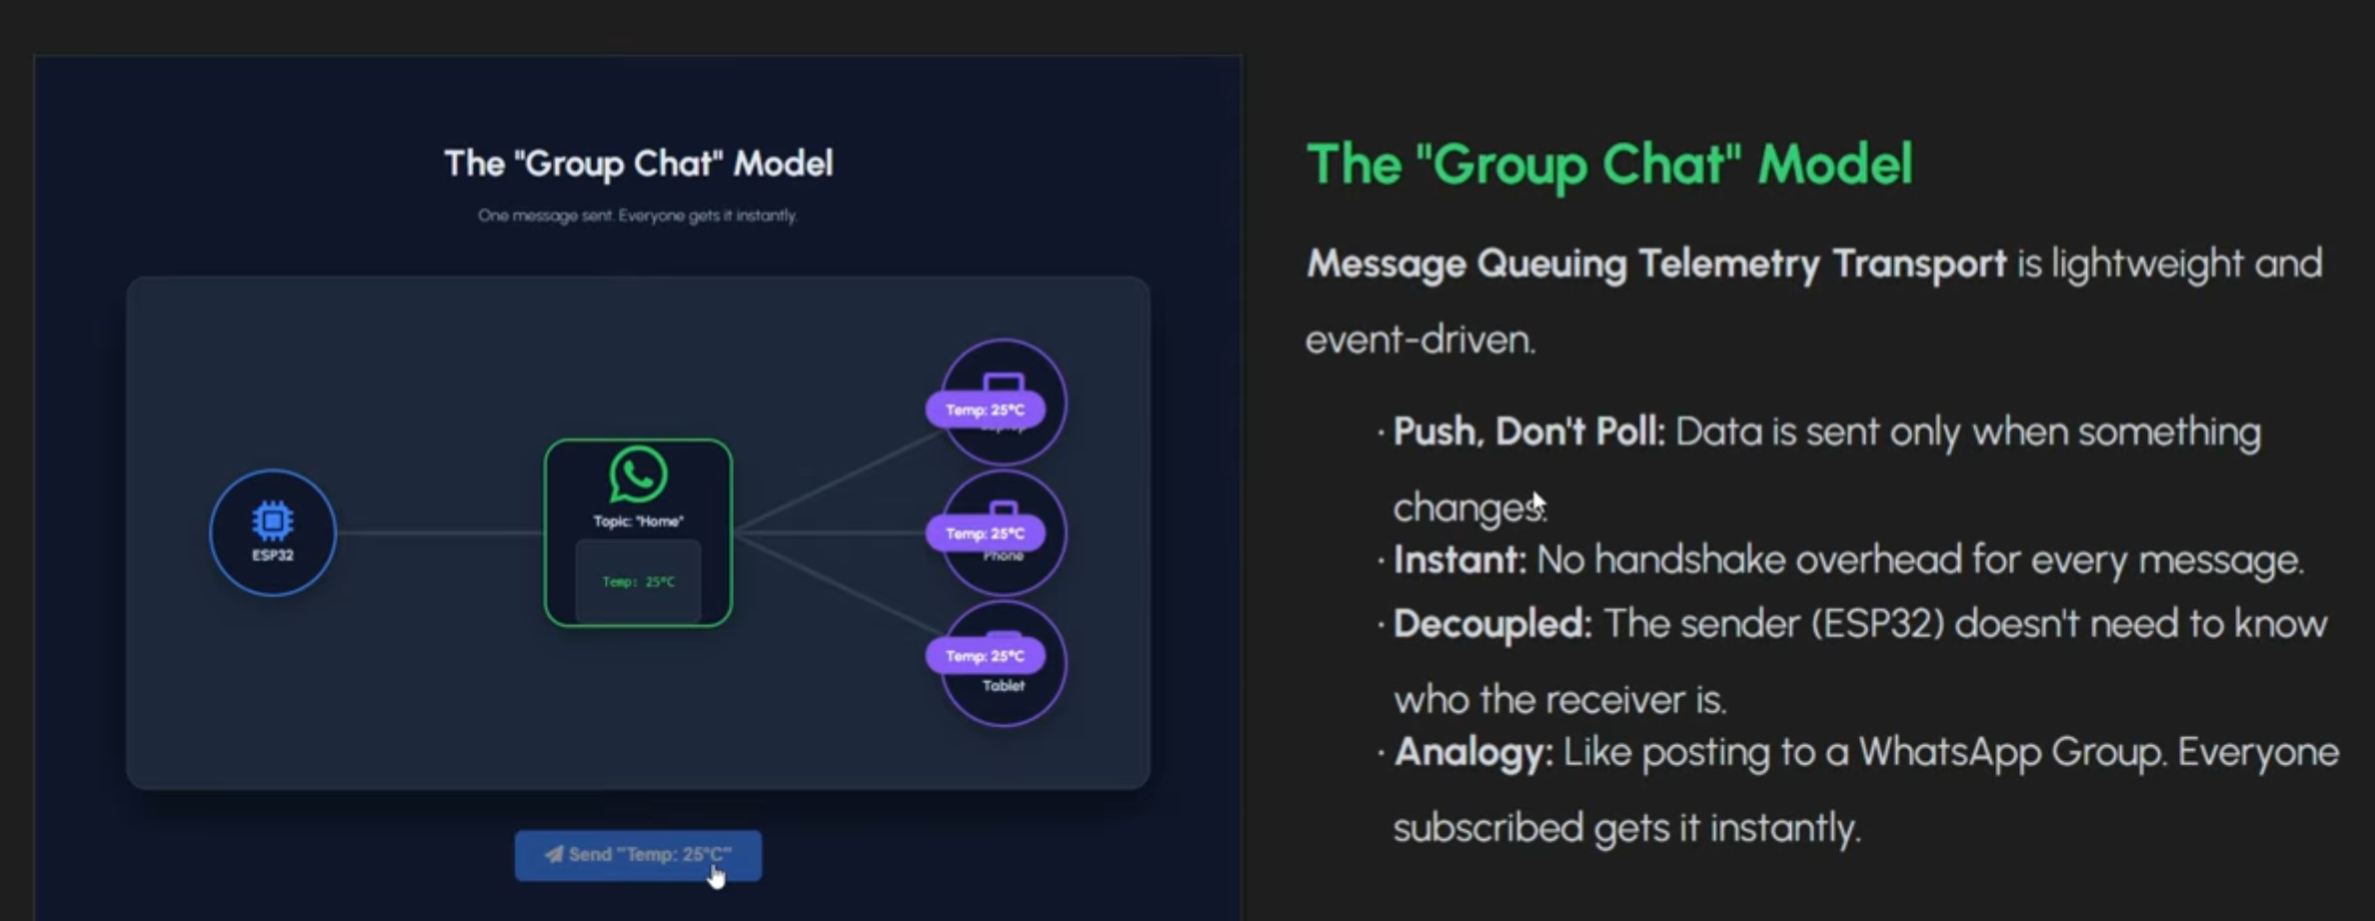
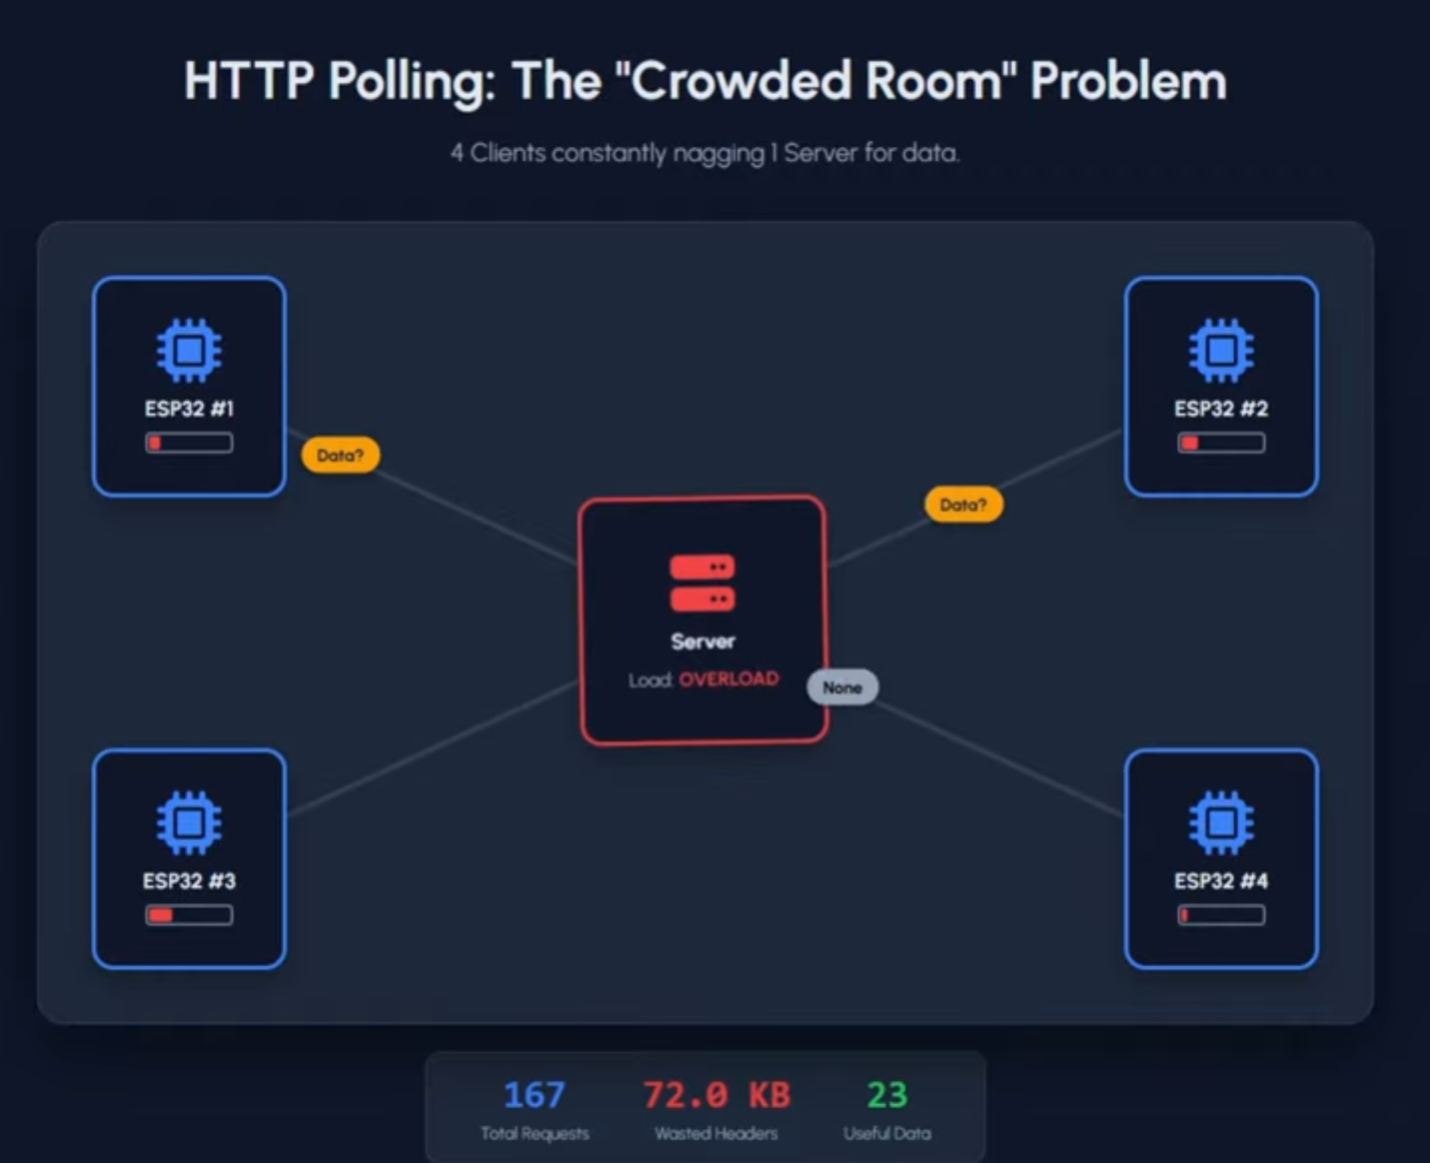 image from IoT Bhai
 -
MQTT is like a group chat
- Publisher + Broker + Subscriber
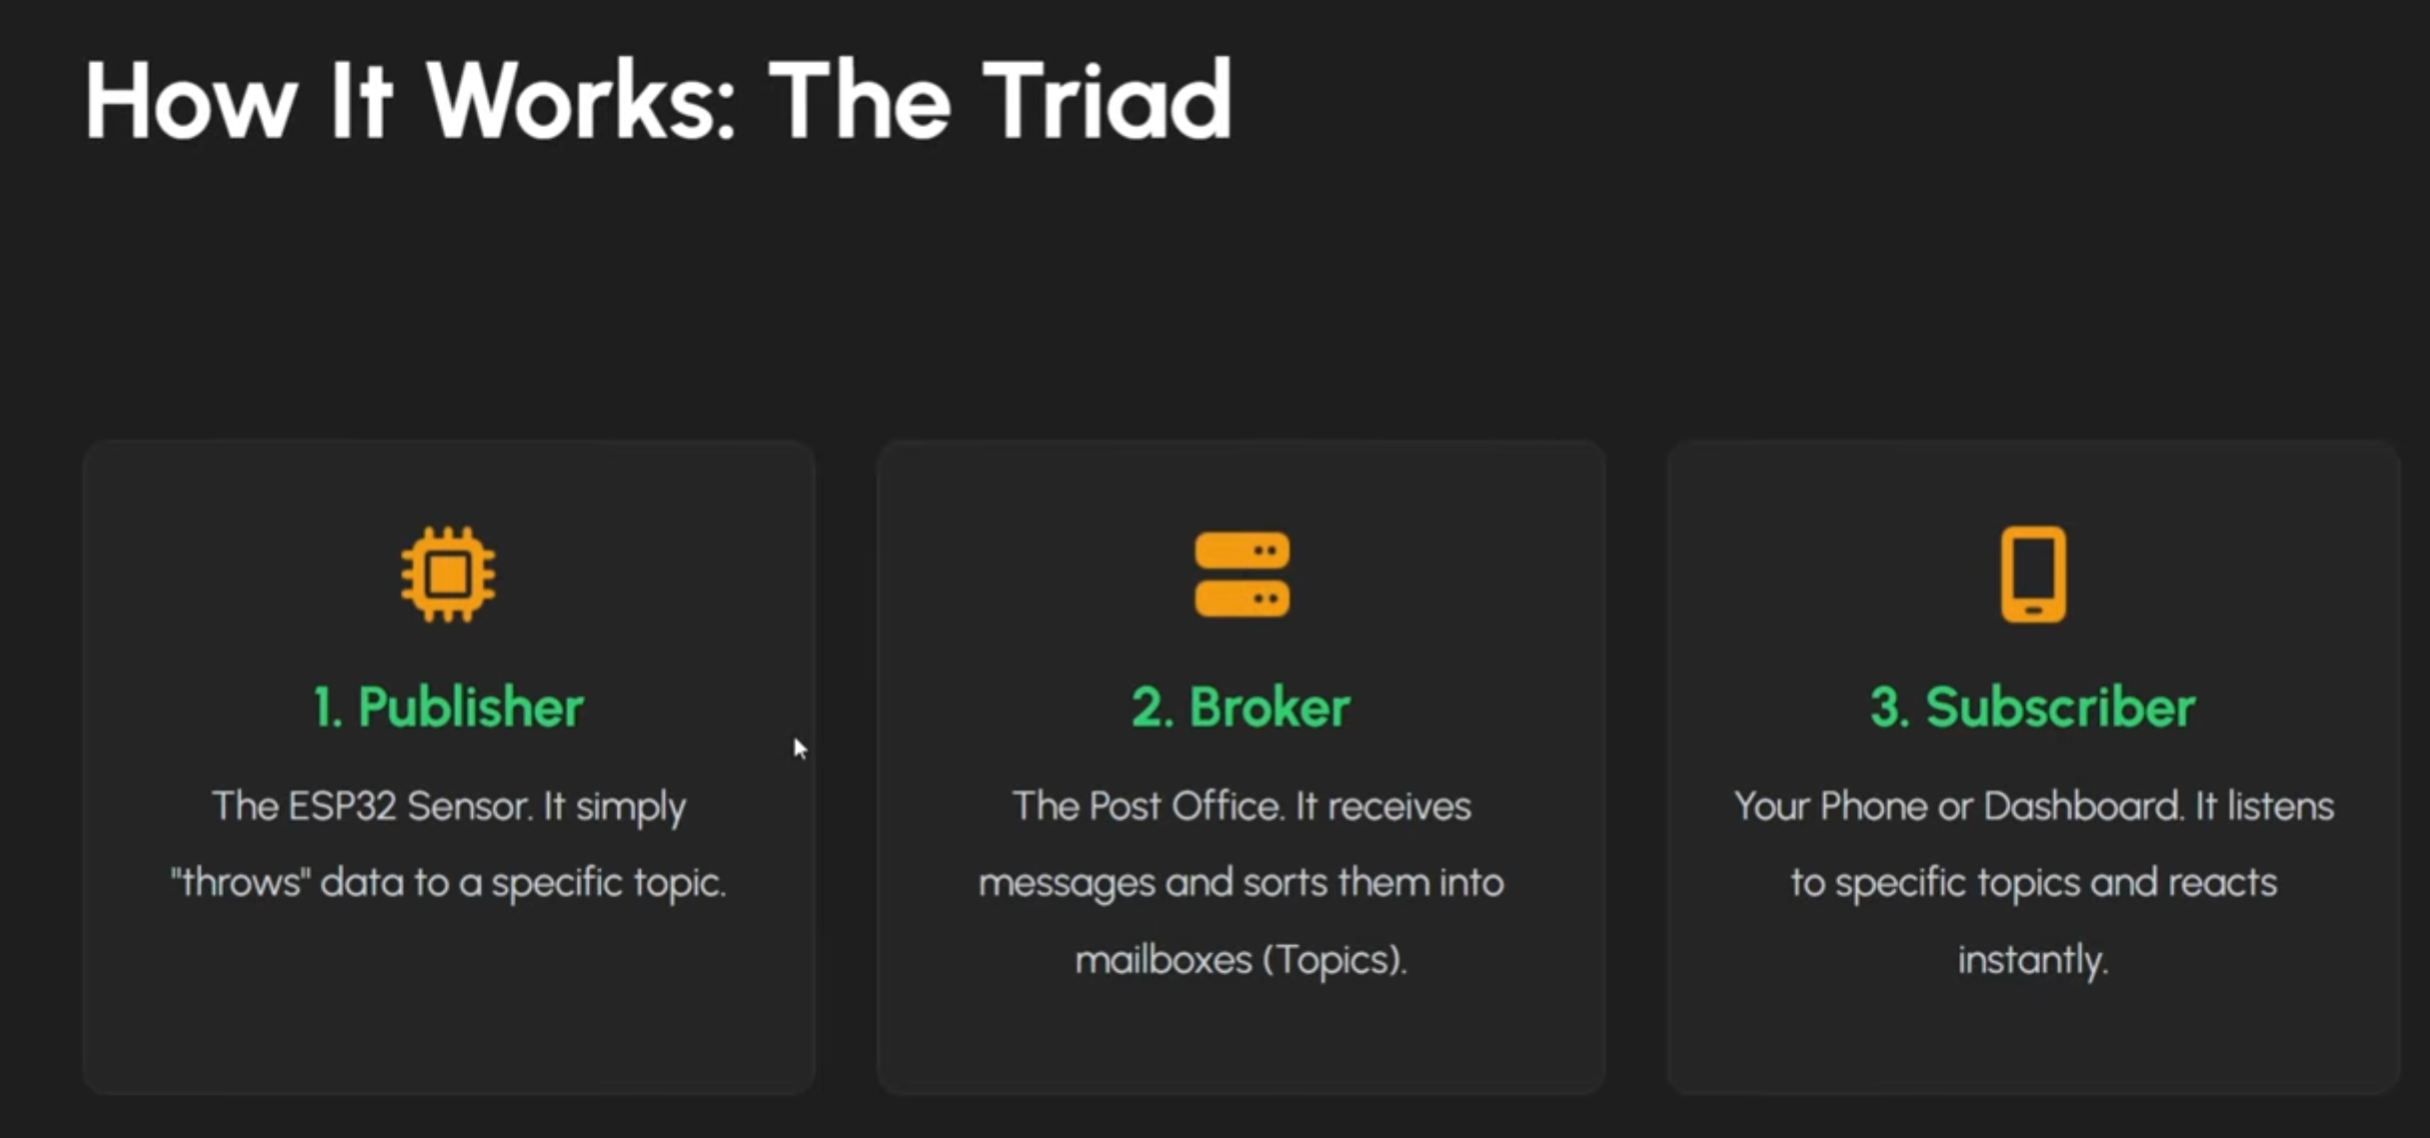
image from IoT Bhai
The MQTT Example
- An ESP32 microcontroller (at Skylabworkshop by Tamrat Telemarkos) will publish temperature values to the MQTT network
- A Mobile App (MQTTX) will publish ON/OFF instructions to the MQTT network
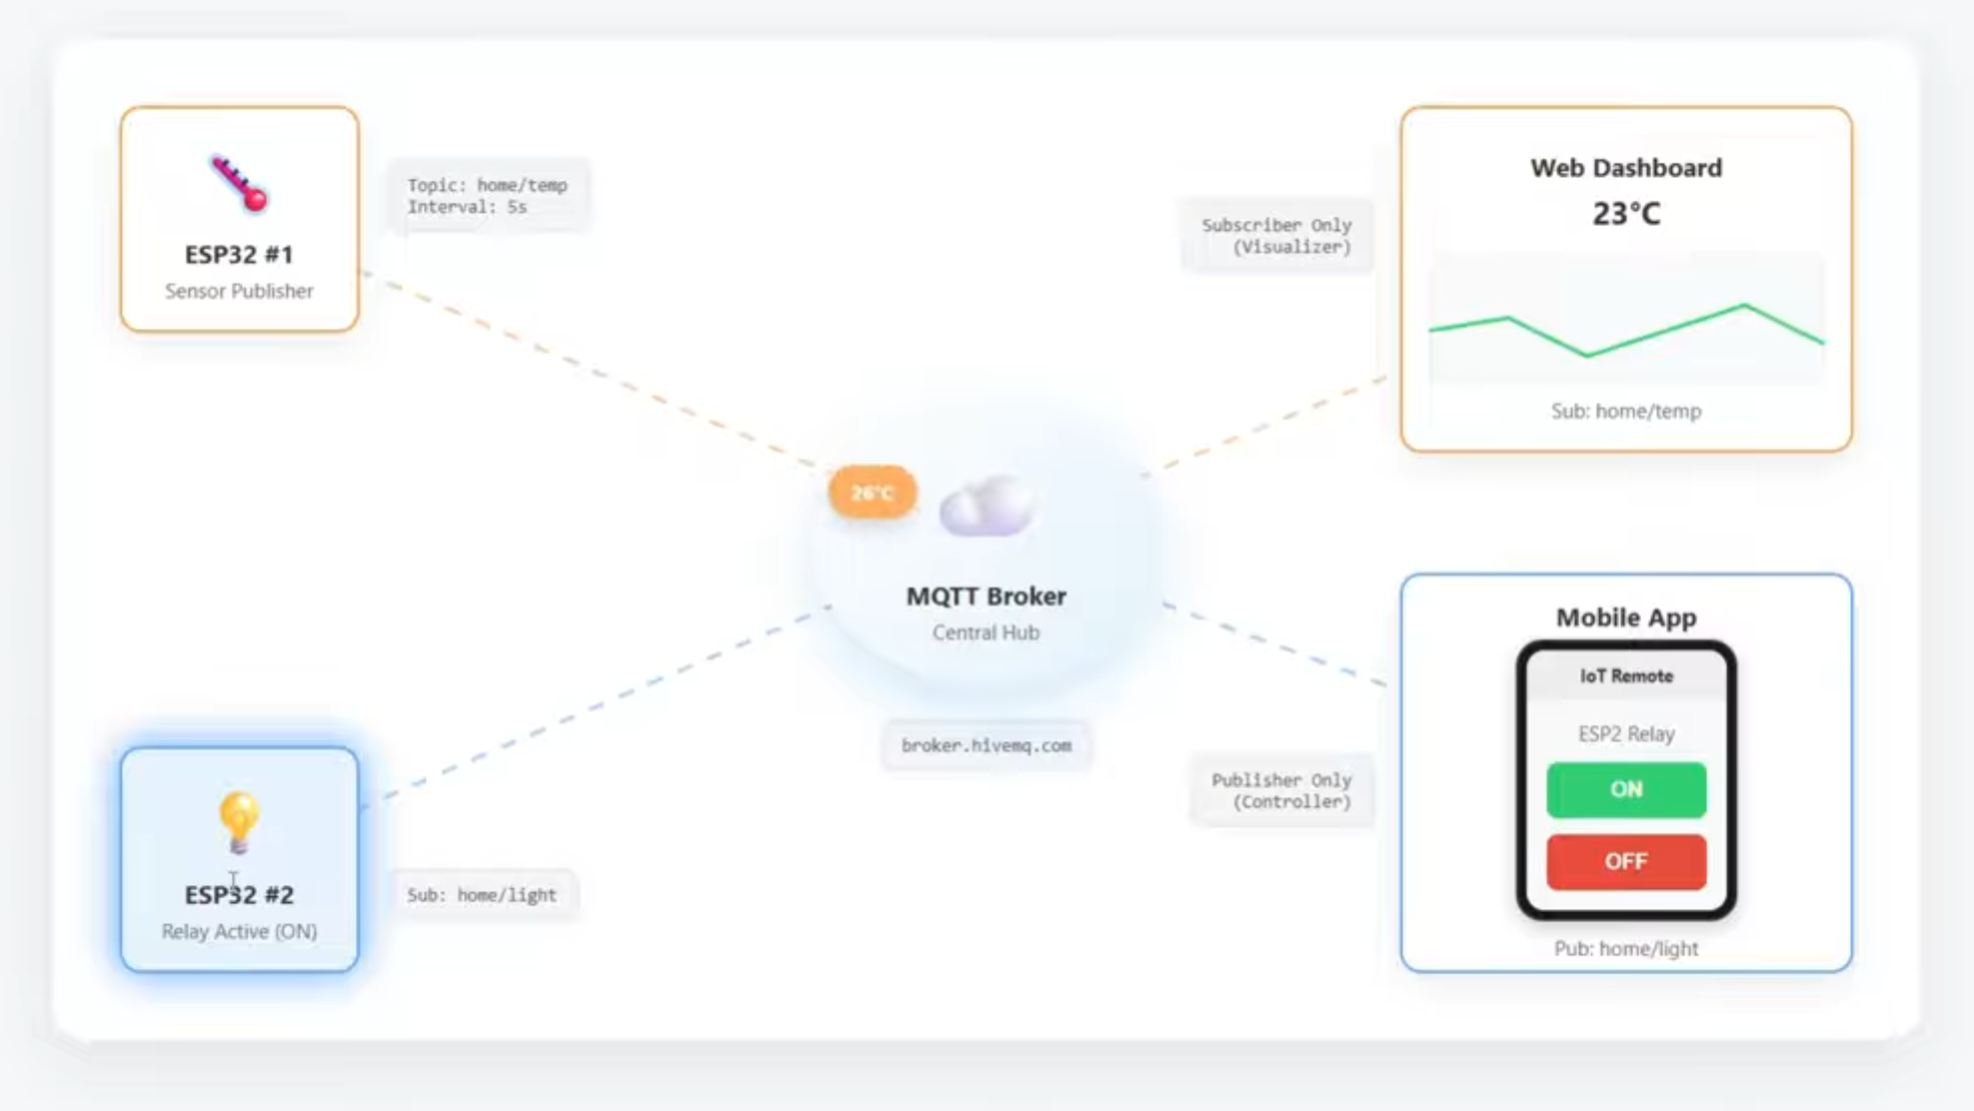
image from IoT Bhai
The Microcontroller Circuit
The following circuit was built at Skylabworkshop:
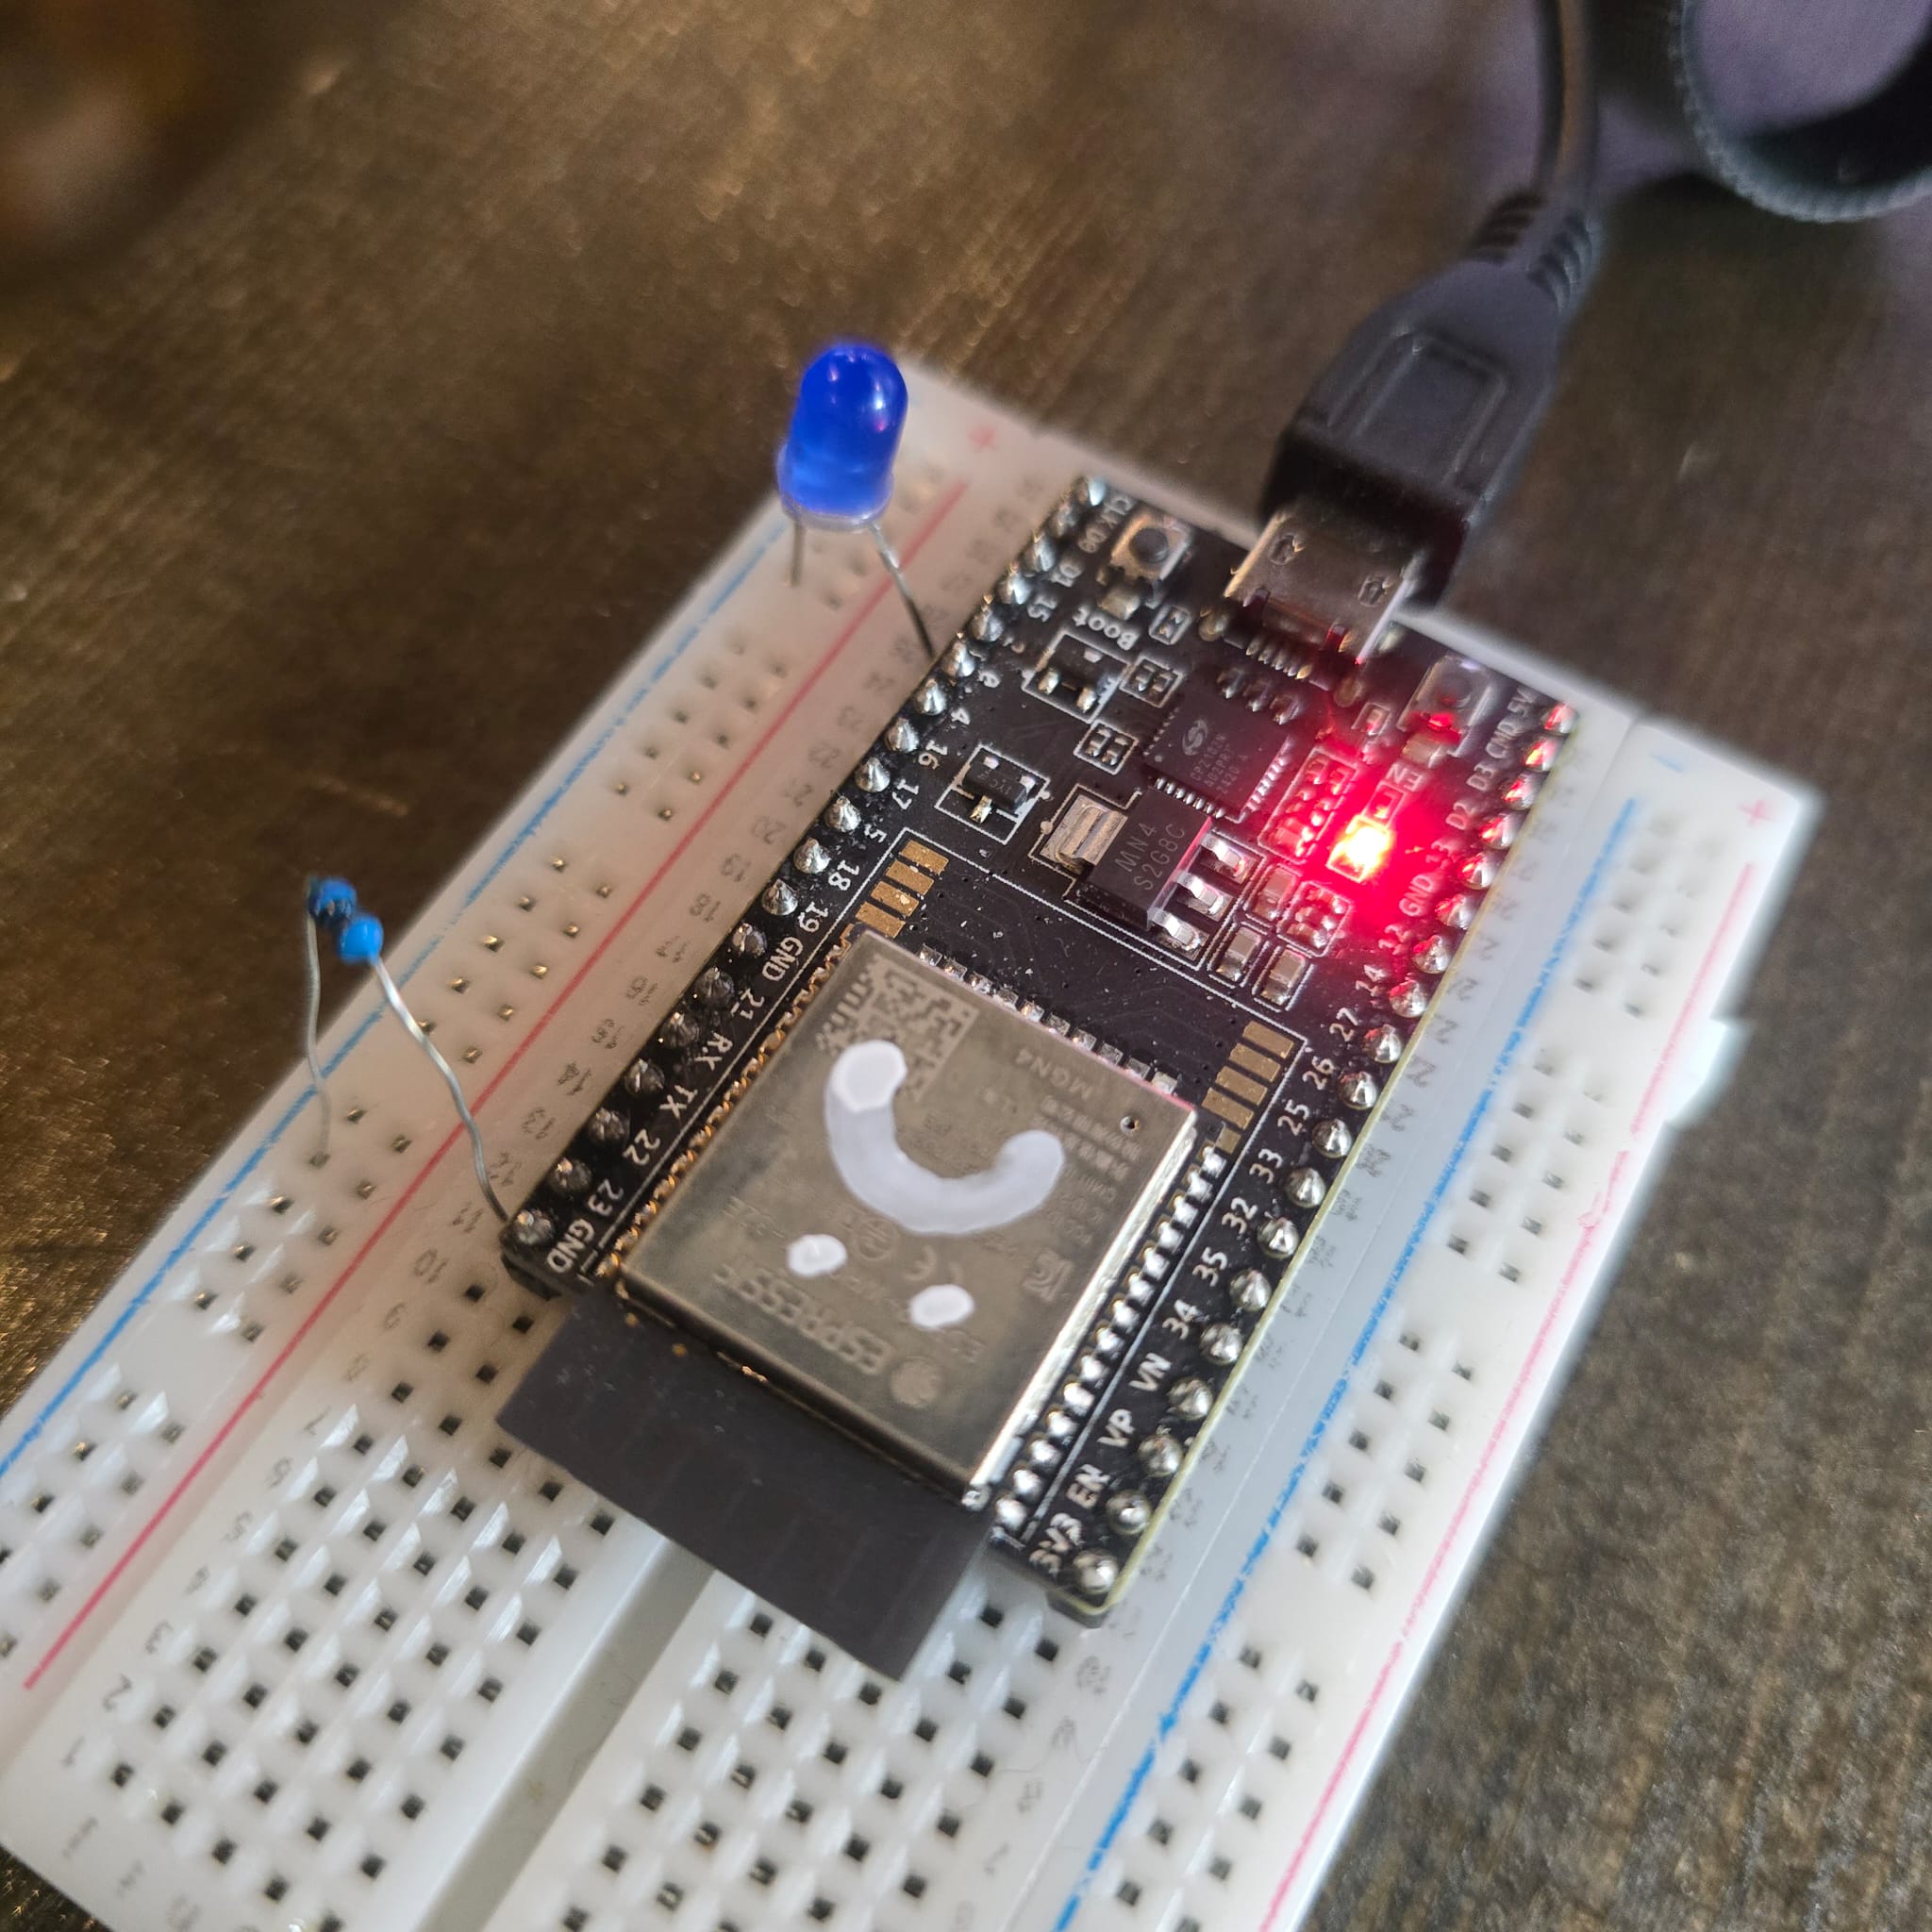
- MCU: ESP32 Development Board
- OUTPUT: LED (GPIO 2) + 470 ohm Resistor (GND)
The Arduino Code - Provided by the tutorial by IoT Bhai - Utilizes 2 libraries: PubSubClient (Nick O’Leary), ArduinoJson (Benoit Blanchon)
/*
 * PROFESSIONAL MQTT EXPERIMENT - ESP32
 * * Features:
 * - Non-blocking Architecture (No delay())
 * - Automatic Reconnection (WiFi & MQTT)
 * - LWT (Last Will & Testament) for State Monitoring
 * - JSON Data Serialization
 * - Remote Command Handling
 */

#include <WiFi.h>
#include <PubSubClient.h>
#include <ArduinoJson.h>

// ==========================================
// 1. CONFIGURATION (Edit these)
// ==========================================
const char* ssid = "Your SSID"; //<<< INPUT
const char* password = "Your WIFI password"; //<<< INPUT

// MQTT Broker Settings (Using public HiveMQ for demo, change for production)
const char* mqtt_server = "broker.hivemq.com"; //<<< INPUT
const int mqtt_port = 1883;
const char* mqtt_user = ""; // Leave blank for public brokers
const char* mqtt_pass = "";

// Unique Device ID (Must be unique on the broker)
const char* device_id = "skylab_ESP32"; //<<< INPUT

//IMPORTANT!!
// Topics (Structure: device_type/device_id/function)
const char* topic_telemetry = "esp32/skylab/data";   // Where we send sensor data
const char* topic_command   = "esp32/skylab/cmd";    // Where we listen for commands
const char* topic_status    = "esp32/skylab/status"; // LWT (Online/Offline)

// ==========================================
// 2. GLOBAL OBJECTS & VARIABLES
// ==========================================
WiFiClient espClient;
PubSubClient client(espClient);

// Timers for non-blocking delays
unsigned long lastMsgTime = 0;
const long interval = 5000; // Send data every 5 seconds

#define LED_PIN 2 // Onboard LED

// ==========================================
// 3. SETUP WIFI
// ==========================================
// boilerplate wifi setup

void setup_wifi() {
  delay(10);
  Serial.println();
  Serial.print("Connecting to WiFi: ");
  Serial.println(ssid);

  WiFi.mode(WIFI_STA);
  WiFi.begin(ssid, password);

  while (WiFi.status() != WL_CONNECTED) {
    delay(500);
    Serial.print(".");
  }

  Serial.println("");
  Serial.println("WiFi connected");
  Serial.print("IP address: ");
  Serial.println(WiFi.localIP());
}

// ==========================================
// 4. CALLBACK (Handle Incoming Messages)
// ==========================================
// message receipt

void callback(char* topic, byte* payload, unsigned int length) {
  Serial.print("Message arrived [");
  Serial.print(topic);
  Serial.print("] ");

  // Convert payload to string for easier handling
  String message;
  for (int i = 0; i < length; i++) {
    message += (char)payload[i];
  }
  Serial.println(message);

  // -- Command Logic --
  // Action: If we receive "ON", turn on LED
  if (String(topic) == topic_command) {
    if (message == "ON") {
      digitalWrite(LED_PIN, HIGH);
      // Feedback: Publish new state immediately
      client.publish(topic_telemetry, "{\"led\": \"ON\"}");
    } else if (message == "OFF") {
      digitalWrite(LED_PIN, LOW);
      client.publish(topic_telemetry, "{\"led\": \"OFF\"}");
    }
  }
}

// ==========================================
// 5. RECONNECT (The Engine Room)
// ==========================================
// reconnection if disconnected

void reconnect() {
  // Loop until we're reconnected
  while (!client.connected()) {
    Serial.print("Attempting MQTT connection...");

    // --- LWT CONFIGURATION ---
    // define Last Will: Topic, QoS, Retain, Message
    // If this ESP32 dies, the Broker will post "offline" to the status topic automatically.

    if (client.connect(device_id, mqtt_user, mqtt_pass, topic_status, 1, true, "offline")) {
      Serial.println("connected");

      // Once connected, publish an announcement that we are alive (Retained = true)
      client.publish(topic_status, "online", true);

      // Resubscribe to command topics
      client.subscribe(topic_command);
    } else {
      Serial.print("failed, rc=");
      Serial.print(client.state());
      Serial.println(" try again in 5 seconds");
      delay(5000); // Blocking delay here is acceptable as we can't operate without connection
    }
  }
}

// ==========================================
// 6. MAIN SETUP
// ==========================================
// boilerplate

void setup() {
  Serial.begin(115200);
  pinMode(LED_PIN, OUTPUT);

  setup_wifi();

  client.setServer(mqtt_server, mqtt_port);
  client.setCallback(callback);
}

// ==========================================
// 7. MAIN LOOP
// ==========================================
//

void loop() {
  // Ensure we stay connected
  if (!client.connected()) {
    reconnect();
  }
  client.loop(); // Keep MQTT alive...necessary insert in loop function...enable ESP32 receive messages

  // --- Non-Blocking Timer for Telemetry ---
  unsigned long now = millis();
  if (now - lastMsgTime > interval) {
    lastMsgTime = now;

    // Create a JSON Document
    JsonDocument doc; // ArduinoJson v7
    doc["device"] = device_id;
    doc["uptime"] = millis() / 1000;
    doc["wifi_rssi"] = WiFi.RSSI(); //print WIFI strength

    // Add dynamic data (simulated sensor)
    doc["temp"] = random(20, 30); //<<<SEND random temperature values

    // Serialize JSON to String
    char buffer[256];
    serializeJson(doc, buffer);

    // Publish to MQTT
    Serial.print("Publishing data: ");
    Serial.println(buffer);
    client.publish(topic_telemetry, buffer);
  }
}
Step 1: Modifying & Uploading the Arduino Code
- For the most part the code provided can be used as is, but…
- Must input the local WIFI SSID in line 18
- Must input the WIFI Password in line 19
- Must identify the MQTT Server in line 22 > I left it as the default “broker.hivemq.com”
- Should change the Topics names in lines 31-33 > I changed to “esp32/skylab/data” for temperature telemetry, “esp32/skylab/cmd” for LED ON/OFF command, and “esp32/skylab/status” for LWT status
Uploading to the ESP32 DevBoard was procedural with the following settings in Arduino IDE: - Tools > Board > “DOIT ESP32 Dev Kit” - Tools > Board > “COM 11”
Connection Confirmation is displayed in the Serial Monitor. Initially WIFI connection a ‘FAIL’…because I had some errors in my SSID and Password text. It is important to make sure capitalization and spelling or these items are correct or there will be an error.
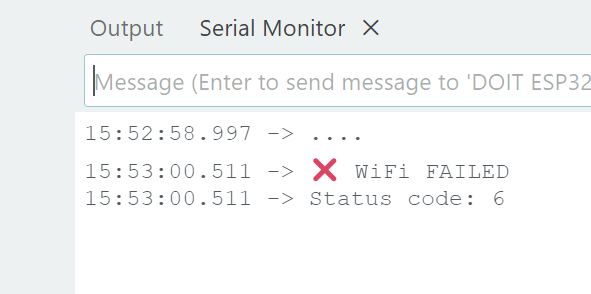
After adjusting for the mistype, connection was successful.
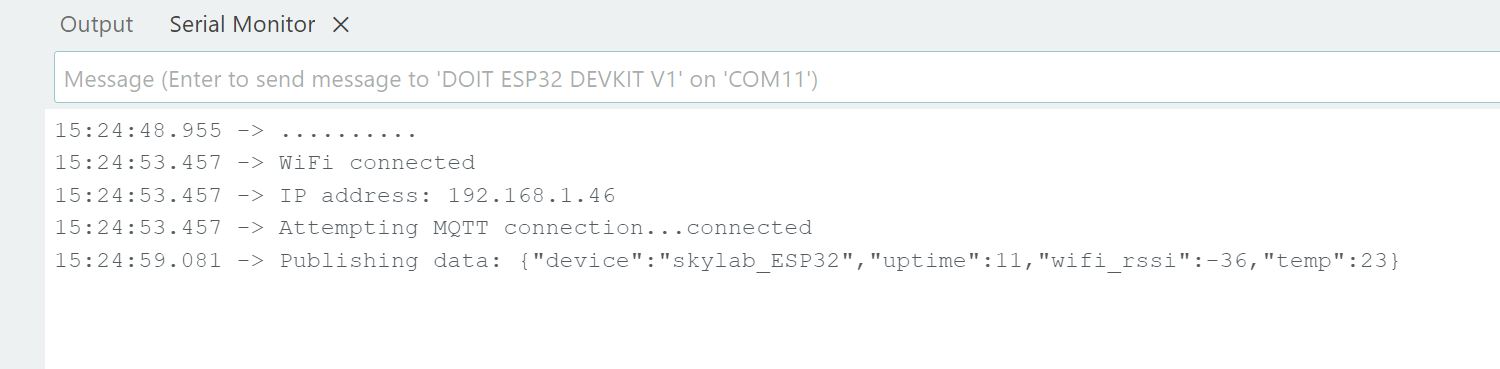
With the code uploaded, the ESP32 DevBoard will broadcast temperature every few seconds…and wait to receive ON/OFF commands from the Broker to turn ON/OFF the LED connected to GPIO2.
Step 2: MQTTX > Receiving Temperature Telemetry
The tutorial recommended the MTTQX app as a way to visualize MQTT communication and also to be the sender of the ON/OFF commands back to the ESP32 DevBoard. Installation was reasonably strightforward, with only the warning that the app is potentially harmful given us pause.
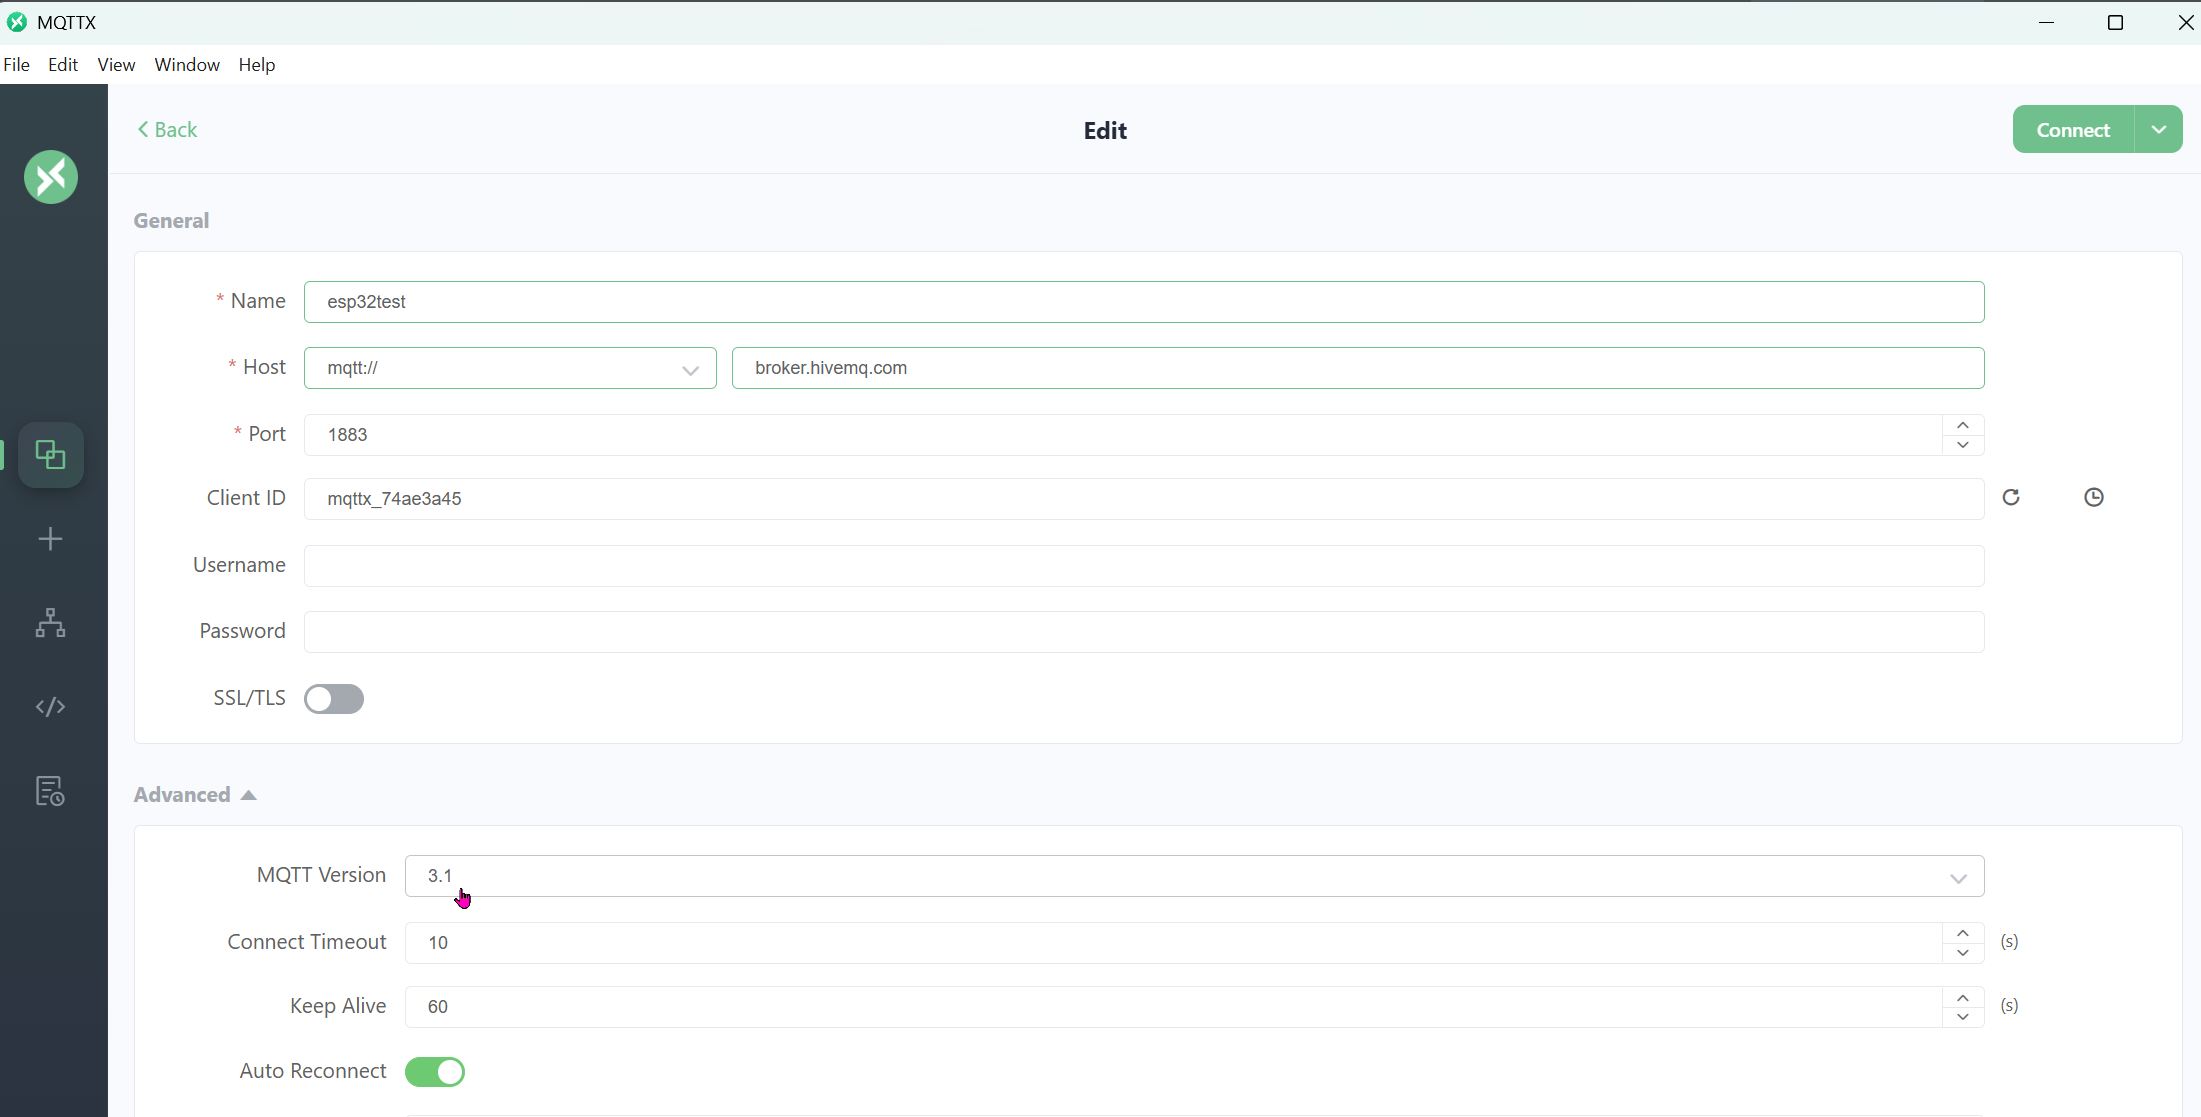
Setting up MQTTX required a few steps.
1. General > Name > “esp32test”
2. General > Host > “broker.hivemq.com”
3. General > Port > “1883”
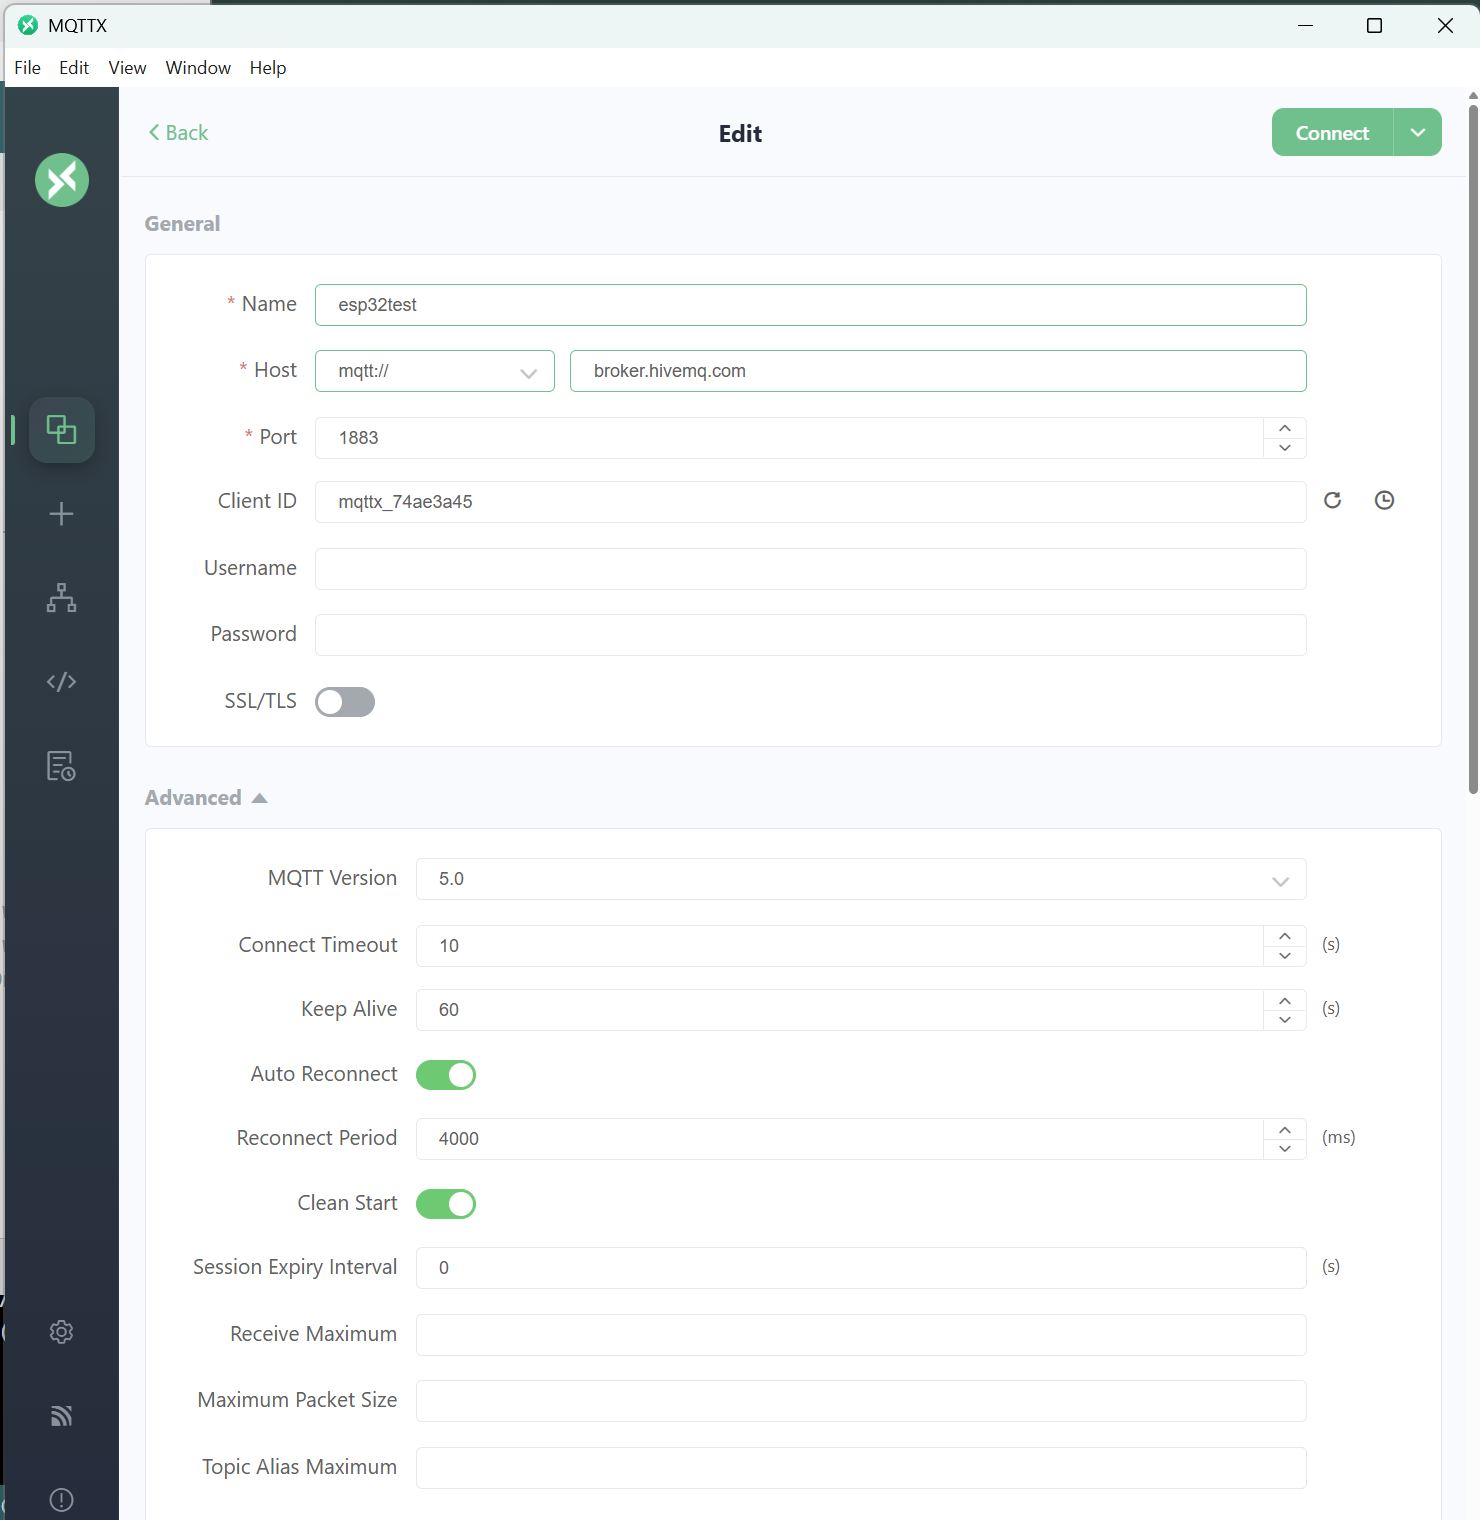
4. Last Will and Testament > Last-Will Topic > “esp32/skylab/status”
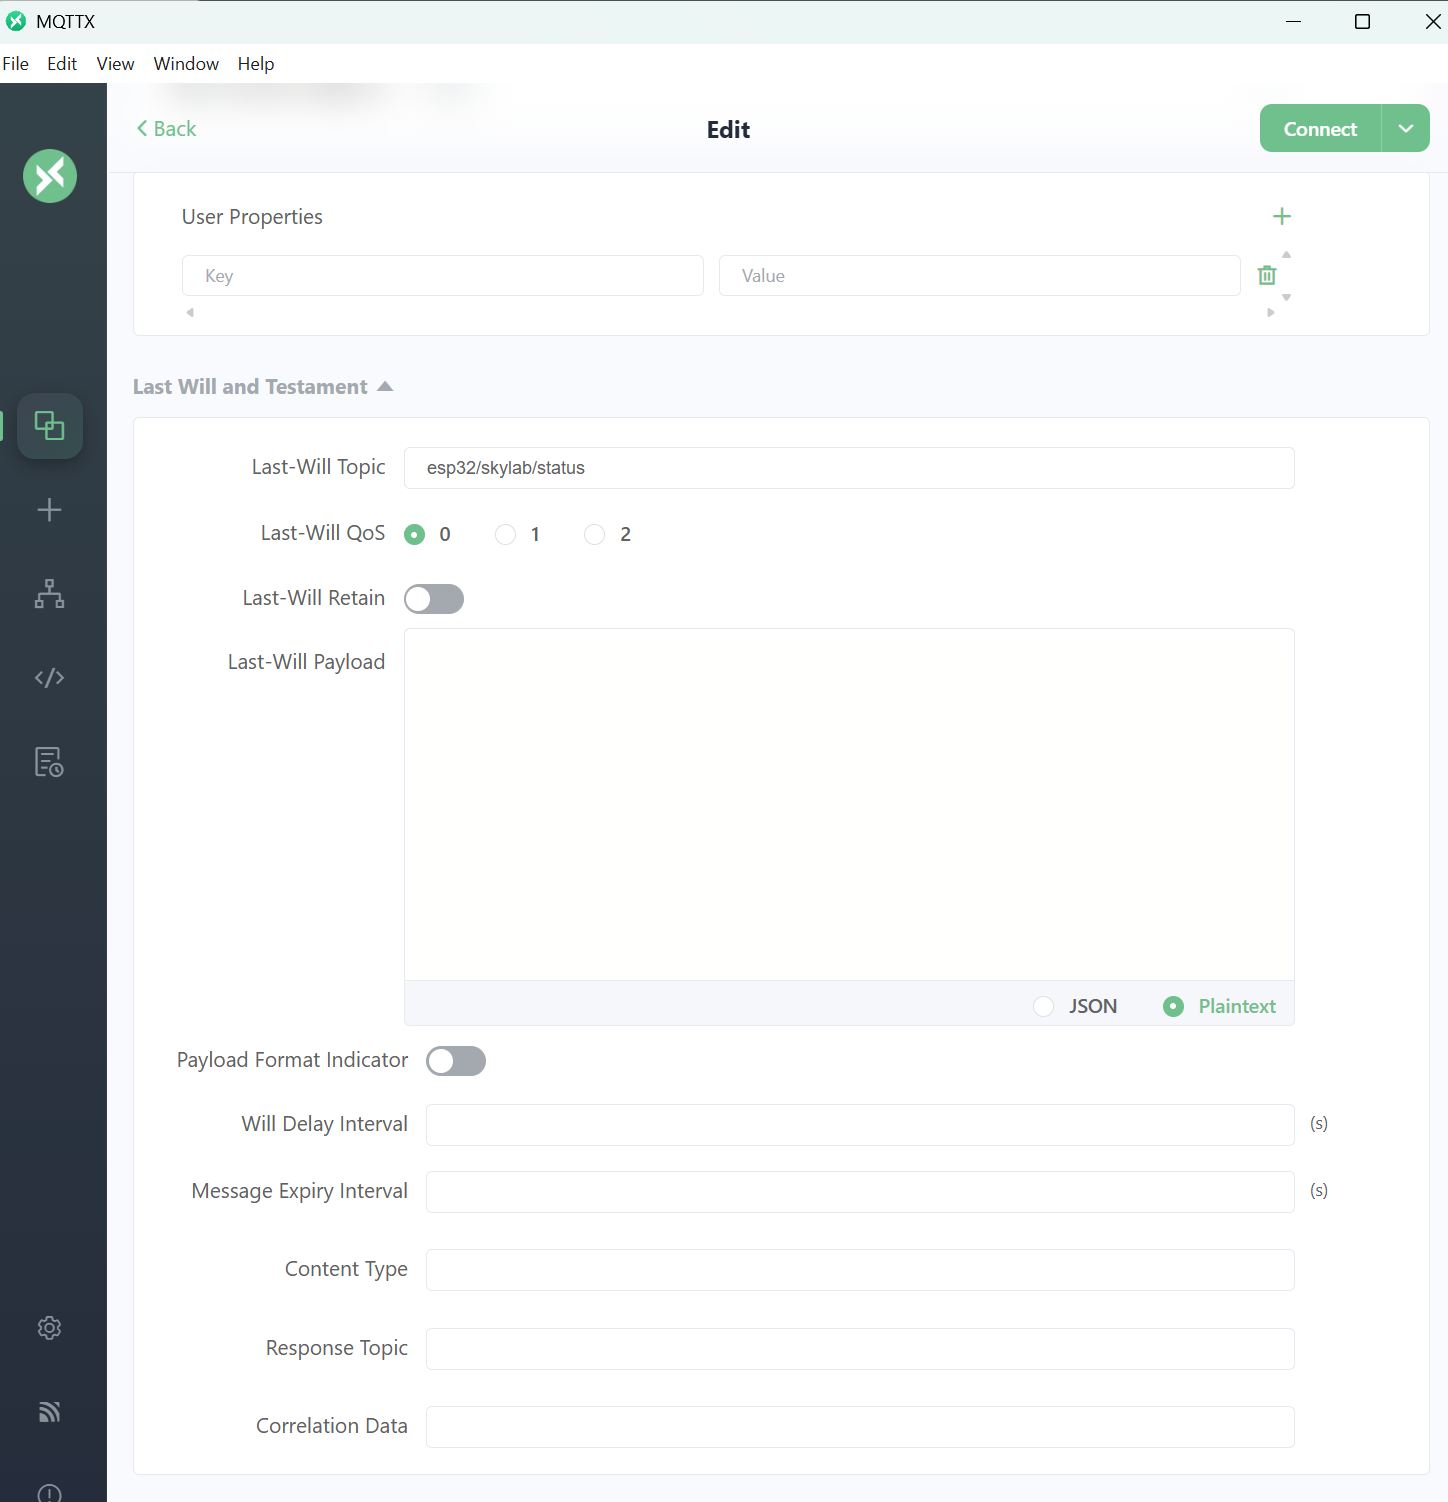
5. press “Connect”
6. press “+ New Subscription”
7. Enter the topic to subscribe to, in this case the temperature telemetry topic sent by the ESP32: Topic > “esp32/skylab/data”
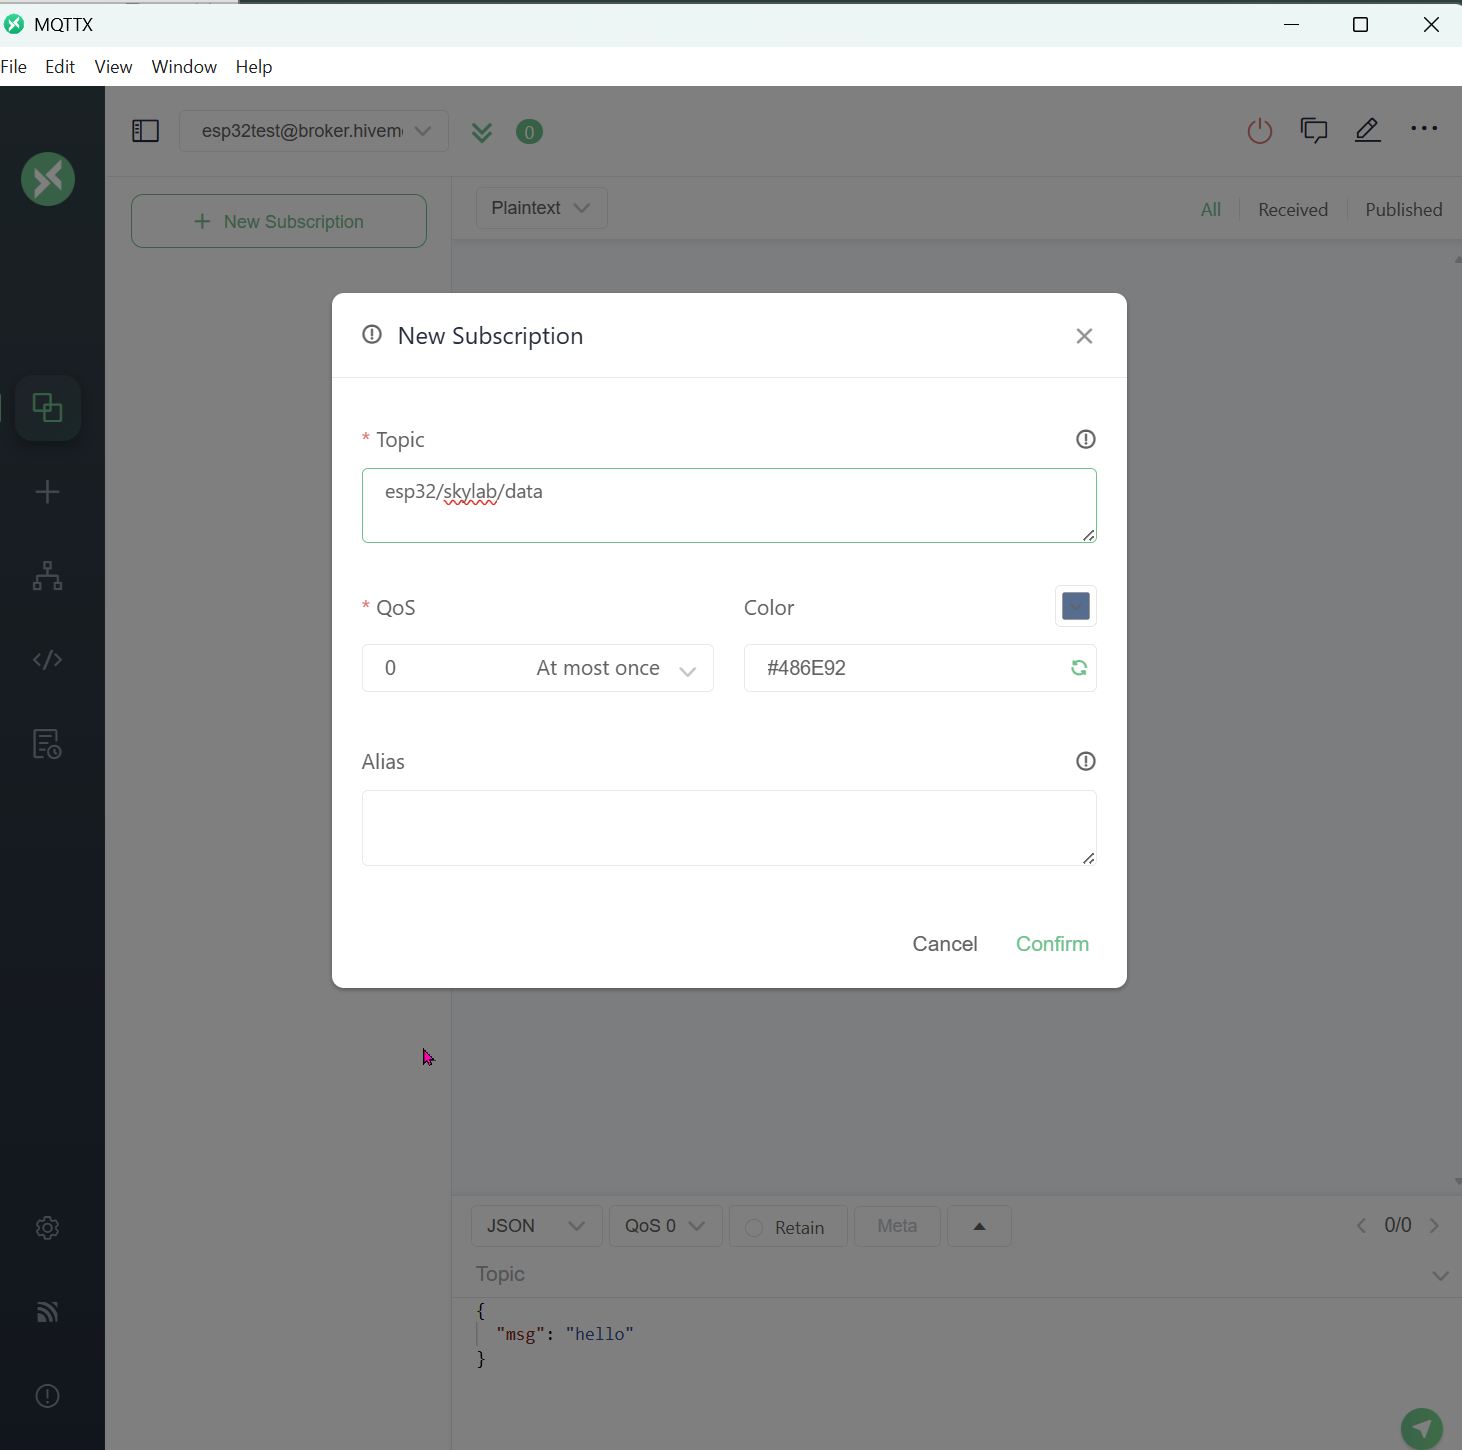
- press “Confirm”
At this point, I ran into a problem. Everything had been setup correctly, but no temperature telemetry was being received by MTTQX.
After some debugging with ChatGPT, the solution was to use MQTT v3.1 not the default MQTT v5.1.
- Advance > MQTT Version > 3.1
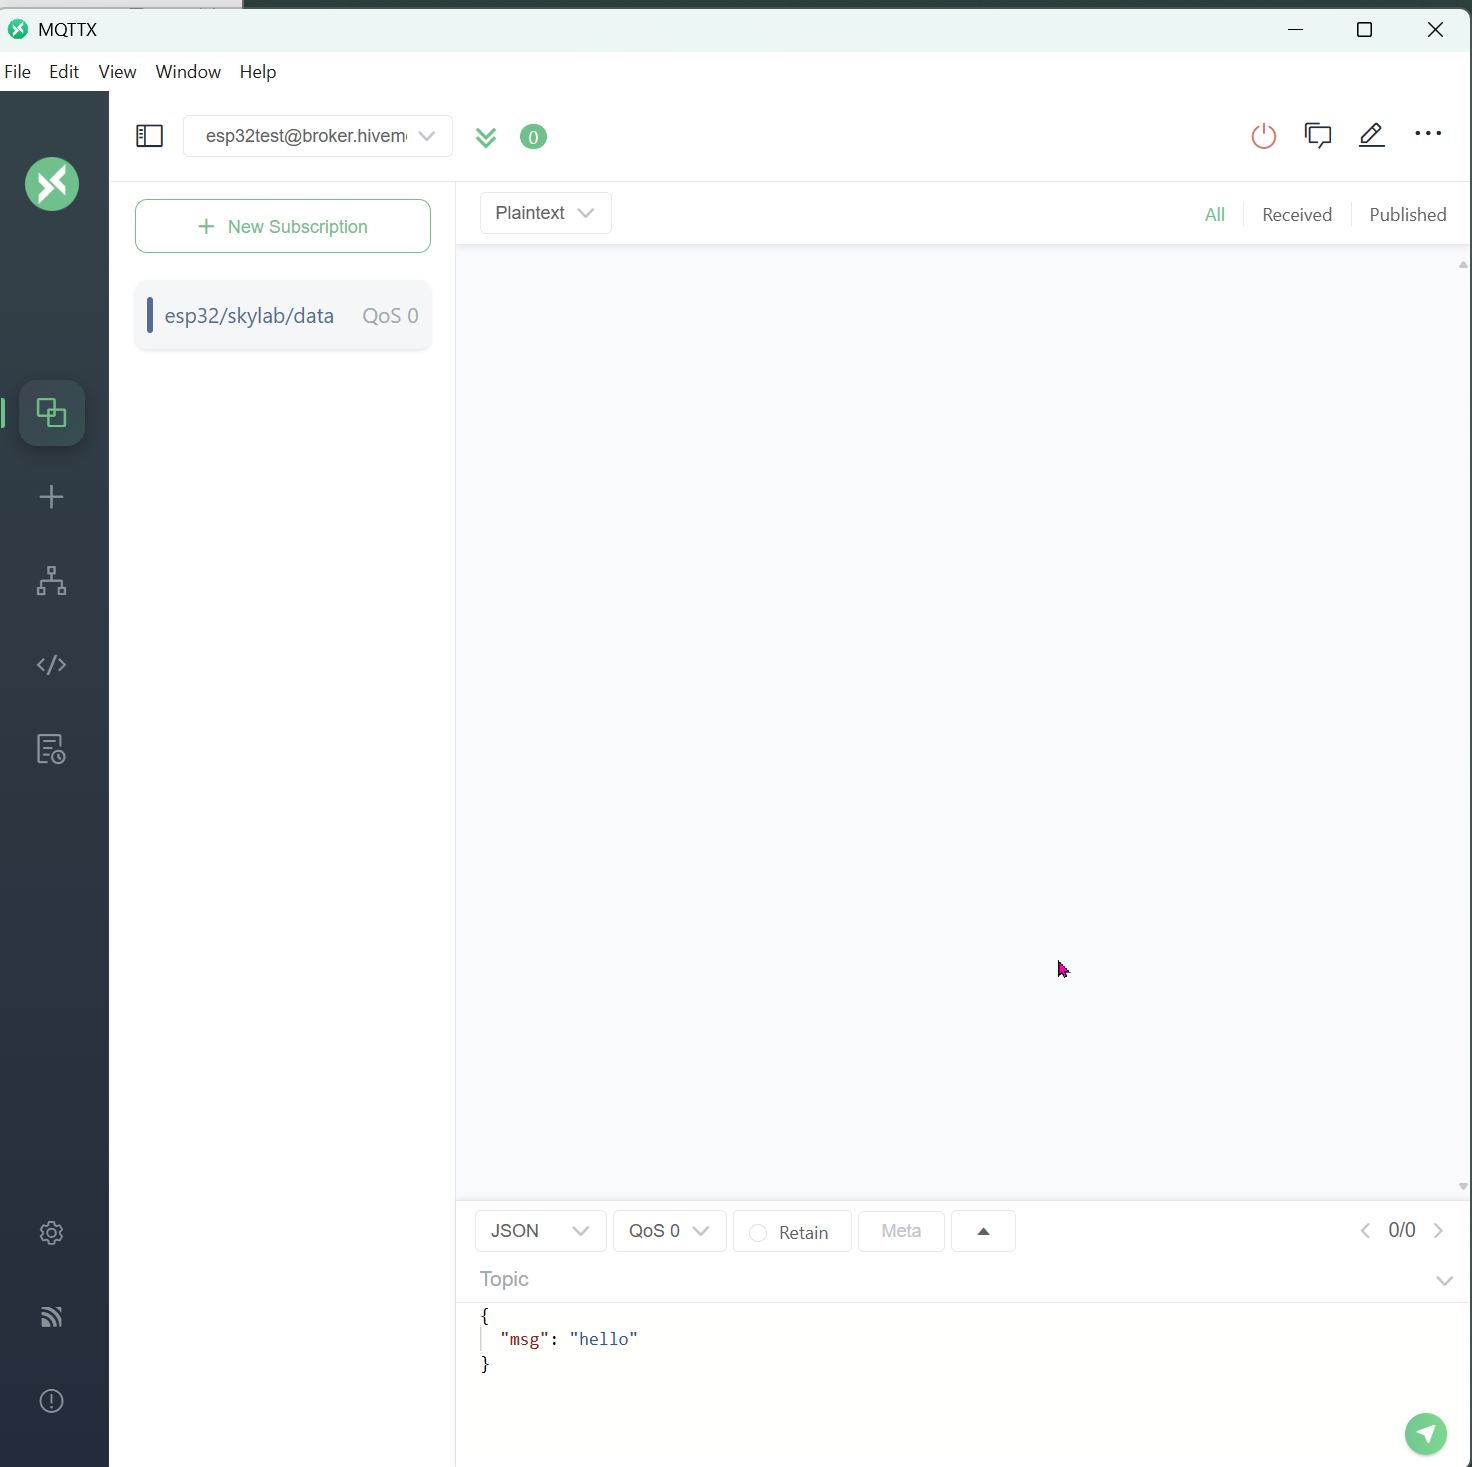
And temperature telemetry appeared.
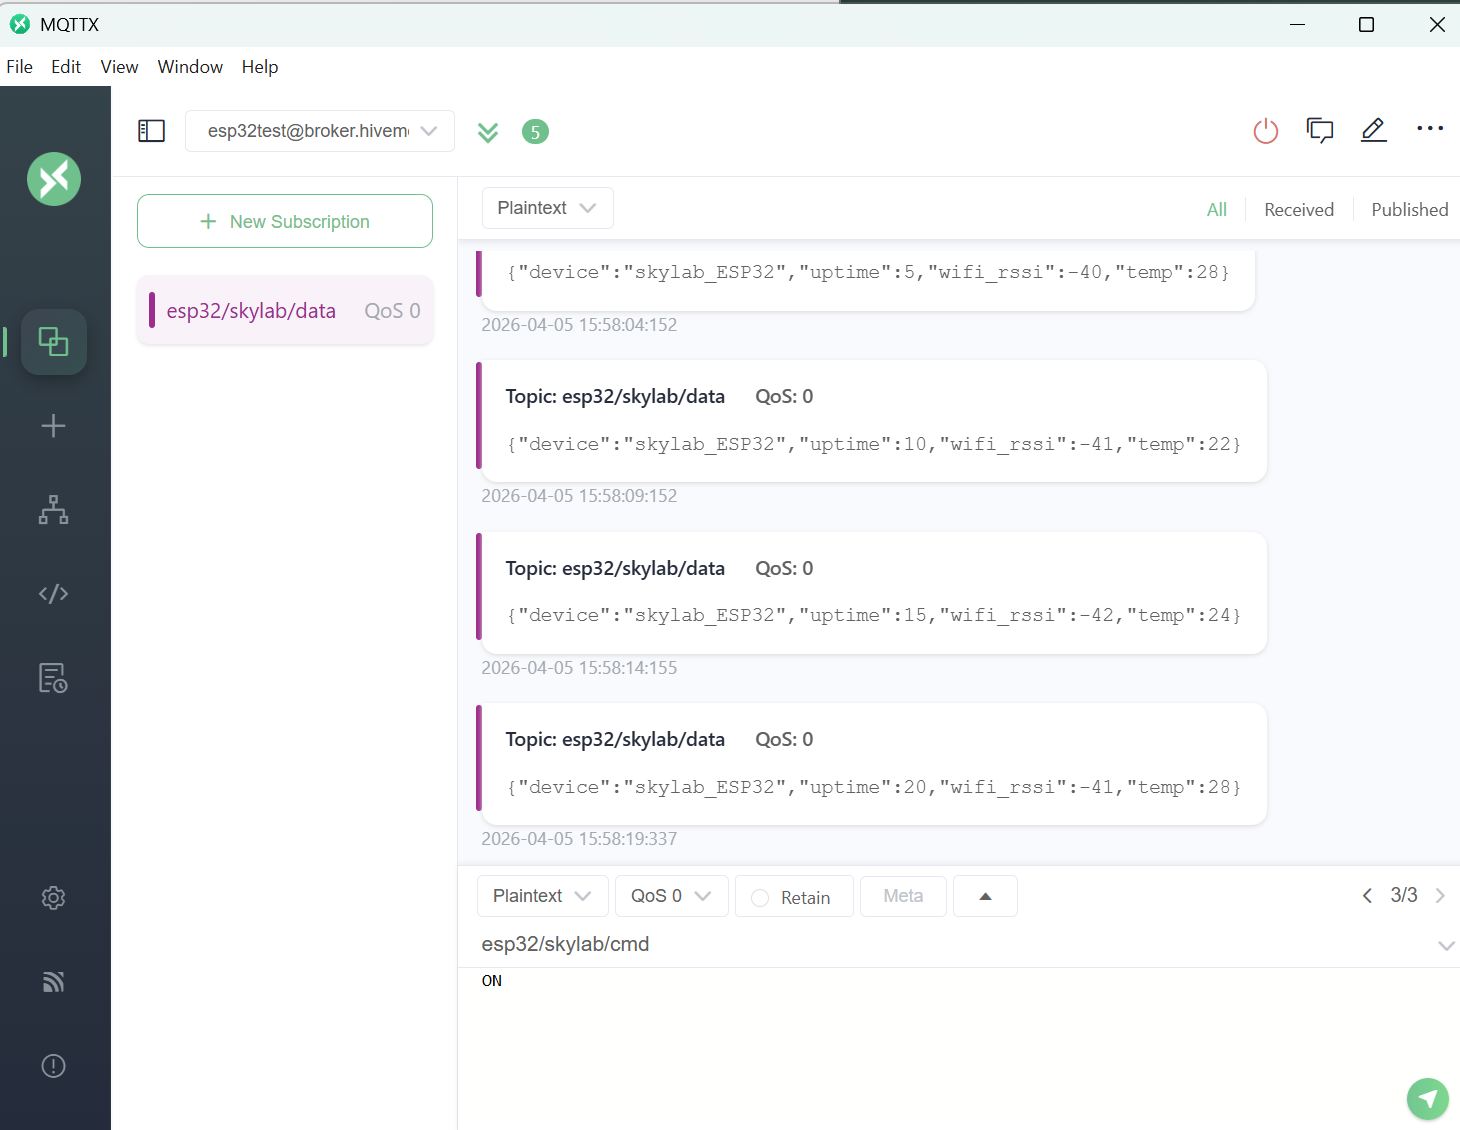
At this point, it is confirmed that the ESP32 is broadcasting temperature telemetry and that it can be received by a Subscriber.
Step 3: MQTTX Sending ON/OFF Command
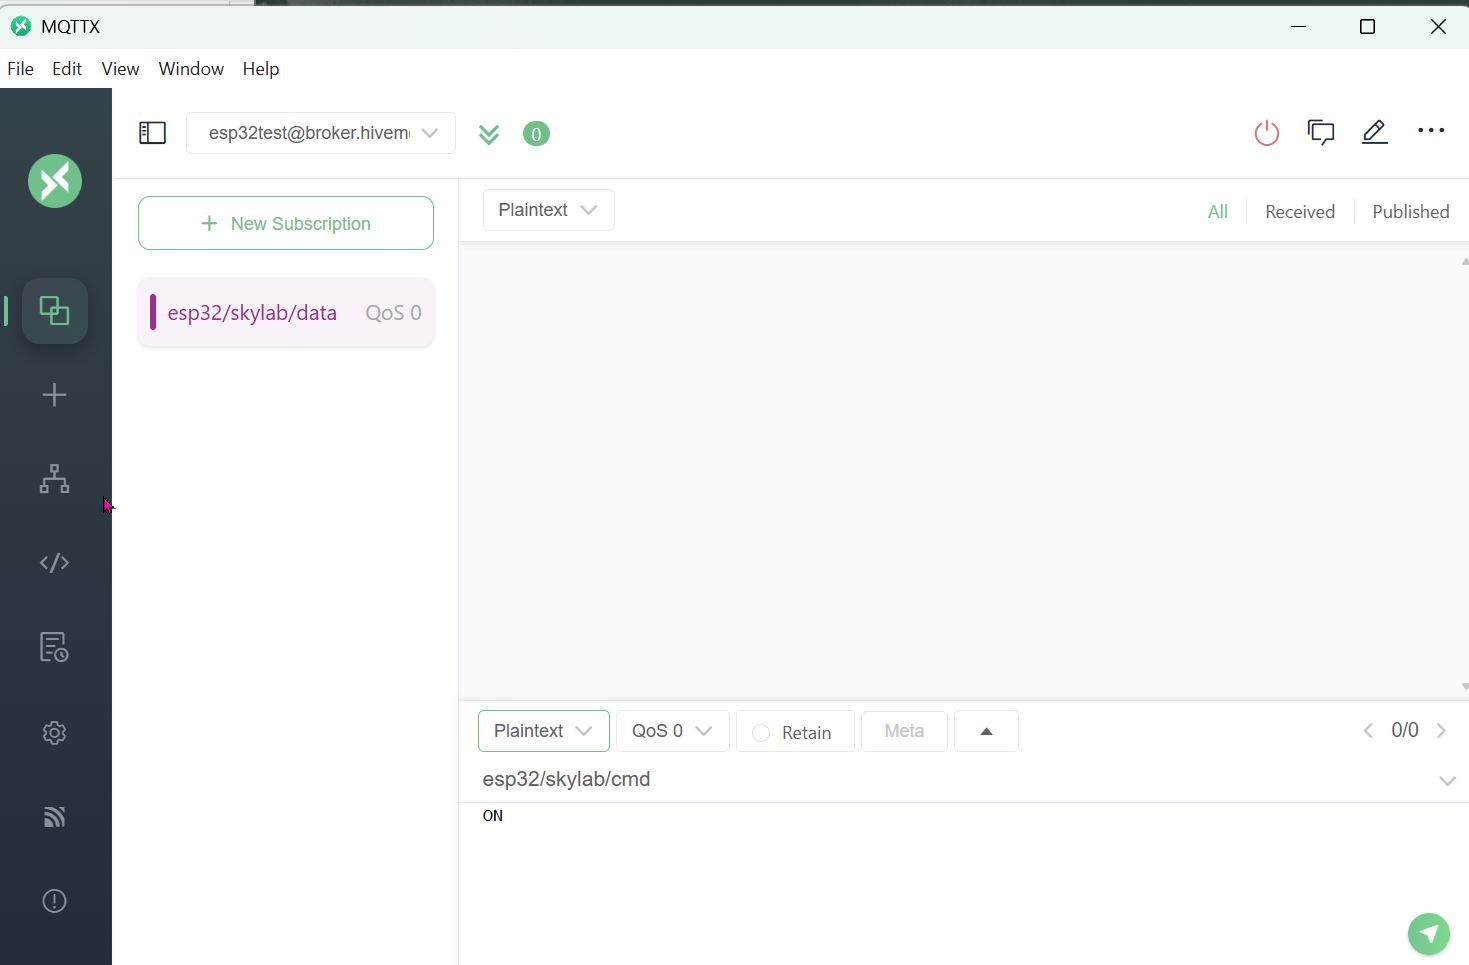
At the bottom of the connection window, is a console window where commands can be typed to send to the ESP32. Some settings need to be completed:
- change “JSON” to “Plain Text”
- enter the command topic “esp32/skylab/cmd”
Then “ON” and “OFF” can be entered below and sent with the green arrow button.

Finally, success.