Created a dissemination plan for your final project?
1. Dissemination Plan
The project has a clear final user: Lámparas y Candiles de Oaxaca, the family business for which it was designed. The dissemination plan has two parts:
- Part 1 — Direct delivery to the company: The machine will be physically delivered to the business at the end of Fab Academy, along with the link to the MQTT dashboard. The project documentation on the Fab Academy page will serve as a technical reference manual if in the future any subsystem needs to be repaired, replicated, or improved — since I am not currently living in Oaxaca.
- Part 2 — Open dissemination through Fab Academy: All project documentation is public and freely accessible through the Fab Academy page under a Creative Commons license. This means that anyone in the world facing a similar problem can use this project as a reference or starting point. Additionally, the intention is to eventually offer the machine commercially to other lamp businesses facing the same problem — after a long period of testing and improvements.
Outlined future possibilities and described how to make them probabilities?
2. Future Possibilities
Short-term
- Complete the staple bending system and validate that it works within the full machine cycle.
- Fine-tune the speed synchronization between the conveyor belt motors.
- Finish the physical packaging: MDF box with the company logo engraved.
Medium-term
- Automate the organization process for the cut crystals and the staples.
- Add error detection: if a staple does not fall at the correct angle, the machine detects and discards it.
- Improve the dashboard with production statistics (average speed, maintenance alerts).
Long-term
- If the machine works well, evaluate whether it can be adapted to other chandelier models with different crystal and staple sizes and shapes.
- Manufacture an improved version to sell to other lamp stores (initially at a local level, i.e., Oaxaca) and calculate production costs for financial analysis.
What tasks have been completed, and what tasks remain? What's working? What's not?
3 and 4. Current Project Status
What is already working
- The PCB for stepper motor control (NEMA 17 with DRV8825 drivers).
- The MQTT dashboard that allows the operator to configure the number of pieces desired and monitor progress in real time.
In progress and pending before June 8, 2026
- Full physical assembly of the machine (conveyor belts, bending system, MDF box).
- Integration of all subsystems into a single functional structure.
- End-to-end validation of the complete production cycle.
What questions need to be resolved?
5. Questions That Need to Be Resolved
- Will the rail system manage to orient 100% of the staples correctly, or will it need a rejection mechanism?
- Does the Raspberry Pi Pico 2W have enough processing capacity to control all 4 NEMA 17 motors simultaneously and smoothly?
- Will the machine's production speed be competitive compared to the manual process, or will the motor cycle times need to be optimized?
Planned what will happen when?
6. Project Timeline
| Date | Task |
|---|---|
| Monday, June 1 | Finish the conveyor belt for the cut crystals. |
| Wednesday, June 3 | Design and build the infrared sensor staple dispenser. |
| Thursday, June 4 | Full physical assembly of the machine. |
| Thursday, June 4 | Integration and end-to-end testing of the complete cycle. |
| Friday, June 5 | Final packaging: MDF box with engraved logo. |
| Saturday, June 6 | Upload final documentation to the Fab Academy page. |
| June 8, 2026 | Project completion deadline. |
| June 11, 2026 | Fab Academy final presentation. |
What have you learned?
7. What I Have Learned
First of all, I feel very happy to be able to help my family with what I learned at Fab Academy. Despite all the technical knowledge acquired throughout the program, the most important thing I learned goes beyond electronics or programming: learning to manage your time is fundamental, because it allows you to move forward without falling behind on weekly assignments and to deliver the complete project on time.
I also learned that to avoid falling behind, it is vital to know which battles to fight and which ones to let go: if something takes too long without progress, you need to change your approach, find another path, or simplify the project. The best way to learn is always to start with the simplest version and build from there.
Creative Commons License
How to protect my authorship
Creative Commons (CC) is a licensing system that allows you to share your work publicly while deciding which rights you reserve and which you grant. It is not a patent or an industrial property registration — it is a way of telling the world: "You can use my work, but under these conditions."
Types of Creative Commons Licenses
Creative Commons has 7 types of licenses. Each one combines different conditions:
| License | Requires credit? | Commercial use? | Allows modifications? |
|---|---|---|---|
| CC0 1.0 | No | Yes | Yes — full public domain, you waive all rights. |
| CC-BY 4.0 | Yes | Yes | Yes — the most open license with mandatory credit. |
| CC-BY-SA 4.0 | Yes | Yes | Yes, but modifications must be shared under the same license. |
| CC-BY-ND 4.0 | Yes | Yes | No — cannot be modified or adapted. |
| CC-BY-NC 4.0 | Yes | No | Yes — free to modify, but never for commercial purposes. |
| CC-BY-NC-SA 4.0 | Yes | No | Yes, but modifications must be shared equally and non-commercially. |
| CC-BY-NC-ND 4.0 | Yes | No | No — can only be used as-is, without modification or profit. |
How I Generated My License
-
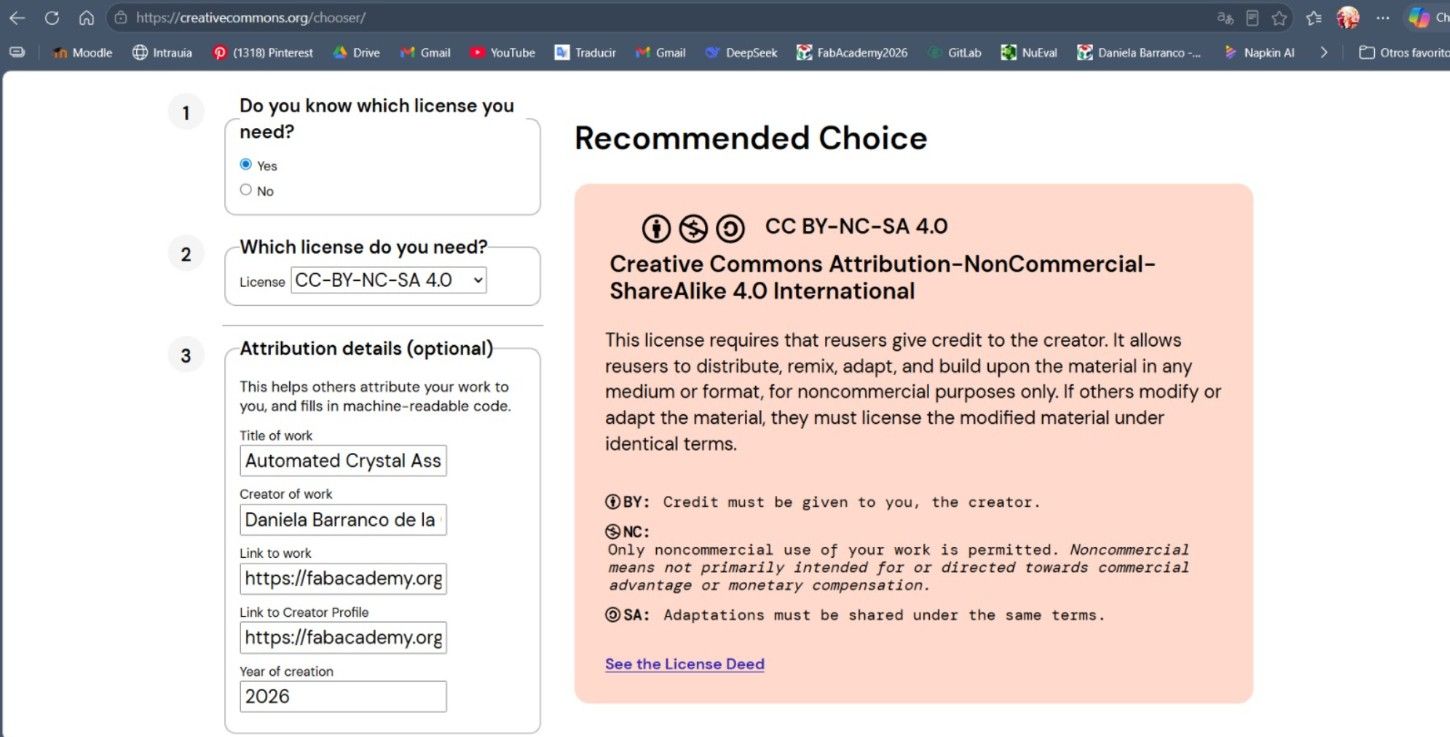
I went to https://creativecommons.org/choose/
-
I answered the assistant's questions:
Question My Answer Do you know which license you need? Yes — I used the following Claude prompt to find out which license I needed: Prompt: "Tell me what type of Creative Commons license you recommend for my Fab Academy project, which is explained at the following link: [add your Final Project link or describe your project]."
Which license do you need? CC-BY-NC-SA 4.0 -
I filled in the Attribution details (optional).
-
Under Mark Your Work in HTML, I checked the "Full Tool Name" option and manually copied the code that appeared there.
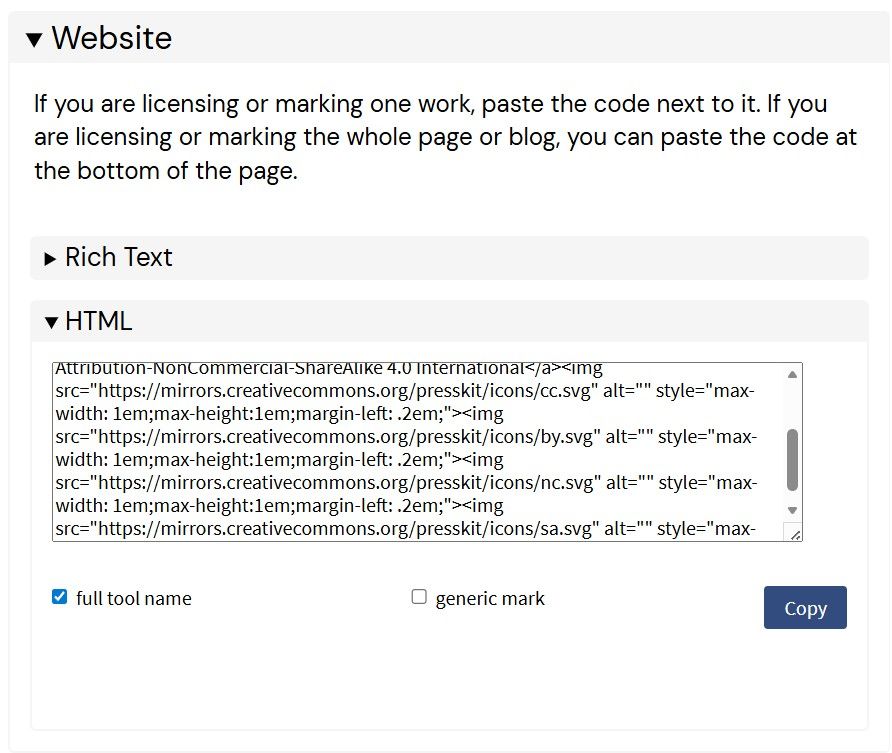
-
I placed that copied code in the footer of my Final Project HTML page on Fab Academy.

Why I Chose This License
I chose CC BY-NC-SA 4.0 because:
- BY (Attribution): My project is original work, so anyone who uses it or takes it as a reference must give me credit as the author.
- NC (Non-Commercial): The machine was designed specifically for my family business. It would not be right for another person or company to replicate it and profit from it without my permission. This condition protects that interest.
- SA (ShareAlike): If someone improves my design, this condition requires that the improved version also be free and accessible to everyone, under the same conditions.
Note: I decided to call my project Crystalinator informally; however, after researching, I realized that the suffix -inator is strongly associated with Phineas and Ferb by Disney, which means registering it as a trademark or using it in Creative Commons could create legal complications if I ever wanted to commercialize it.
For that reason, I made the following decision: I use Crystalinator freely as an informal name within Fab Academy and for the delivery to my family, but for the formal Creative Commons registration I used the descriptive name Automated Crystal Assembly System. If I ever decide to patent or commercialize the project, I will look for a completely original name.
What is not working
12. What Is Not Working
The crystal orientation system (the component designed to position the cut crystals before they reach the assembly station) has been prototyped and it does work mechanically — the crystals can be placed and held in position. However, after testing it in practice, several problems emerged that make the current design insufficient for integration into the full machine:
- Loading is slow and error-prone. Inserting the cut crystals into the orientation slots is more difficult than expected: during the loading action itself, the operator can accidentally rotate the crystal, causing it to end up misaligned. Correcting this requires removing the crystal manually, which eliminates the time savings the system was supposed to provide.
- The crystals do not fall cleanly into the hexagonal cavity. When the crystal is released, it does not drop perfectly into the hexagonal-shaped hole — it rotates slightly during the fall, arriving at the next station at the wrong angle. This inconsistency means the assembly station cannot reliably receive the crystal in the correct orientation.
- No gate mechanism to control the release onto the conveyor belt. The current design releases the crystal directly, but the conveyor belt has open gaps where the crystal can slip through instead of being carried forward. A controlled gate or release mechanism needs to be added so the crystal lands precisely on a solid section of the belt.
- The design is already obsolete relative to the current conveyor belt layout. Since the orientation system was designed before the conveyor belt geometry was finalized, the two components are no longer geometrically compatible. The entire orientation subsystem needs to be redesigned and adapted to fit the updated belt dimensions and spacing.
In summary: the system demonstrates the correct concept but is not yet reliable enough for continuous automated operation. It will be redesigned as part of the next iteration of the machine.
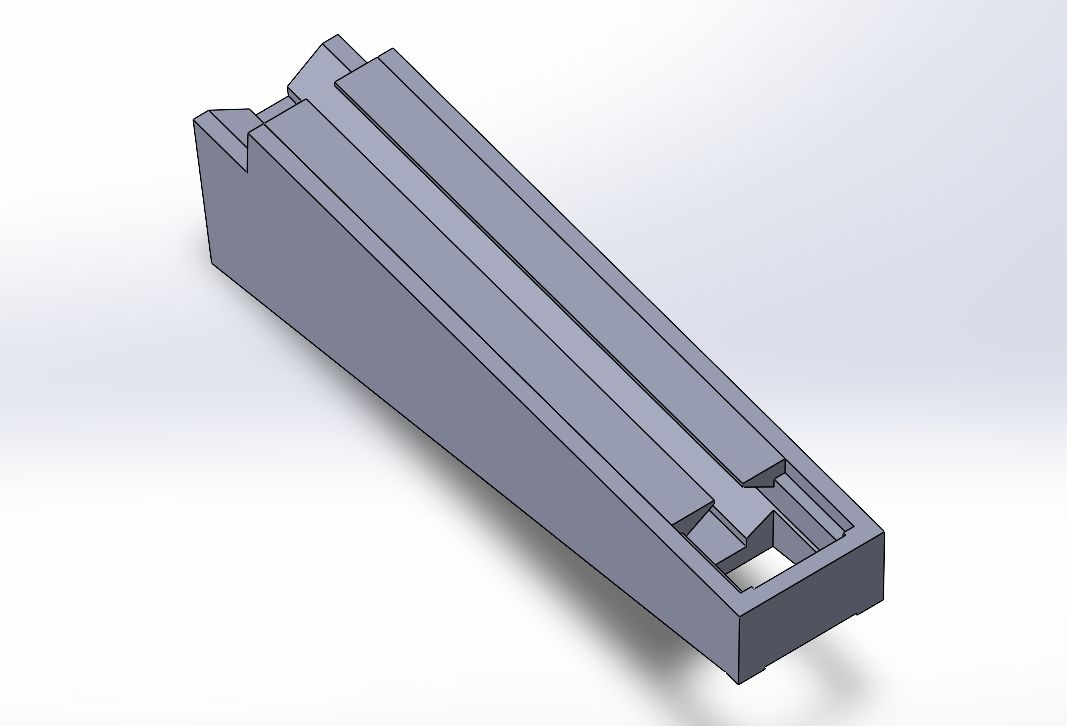
This is the cut crystal organizator.
What I have learned
13. What I Have Learned
- Parametric design from the start saves redesign time. In Week 3 (Laser & Vinyl Cutting) I built the staple container using a parametric construction kit. When the box dimensions needed to change later to fit the machine structure, updating a single parameter in the design regenerated all the joints correctly — without having to redraw anything from scratch.
- A custom PCB is more reliable than a breadboard for motor control. In Week 12 (Mechanical Design) I designed and milled a dedicated PCB for four DRV8825 drivers controlling NEMA 17 stepper motors. Having fixed traces instead of jumper wires eliminated the intermittent connection failures that appeared during early tests on a breadboard, and made the wiring significantly cleaner and more reproducible.
- MQTT decouples the interface from the hardware. In Week 14 (Interface and Application Programming) I built a web dashboard that communicates with the microcontroller over MQTT. Because the dashboard only publishes and subscribes to topic strings, I was able to redesign the HTML interface multiple times without touching the firmware — and test the dashboard from a phone while the board was running on the bench.
- Resin 3D printing tolerances are tighter than FDM but require post-cure validation. In Week 13 (Moulding and Casting) I learned that resin molds reproduce fine detail much better than FDM, but an uncured or improperly cured resin surface will inhibit platinum-cure silicone — causing the silicone to remain permanently sticky at the interface. The fix (extended UV cure + sun exposure) only works if caught early, before pouring silicone.
- Camera-based sensing requires controlled lighting to be reliable. In Week 9 (Input Devices) I used the XIAO ESP32-S3 with an OV2640 camera and SenseCraft for person detection. I found that the detection confidence varied significantly depending on ambient lighting conditions — a lesson directly applicable to the crystal counting subsystem of the final project, which will need a fixed, diffuse light source to produce consistent counts.
- Mechanical subsystems must be validated together, not only in isolation. Each subsystem of the machine (orientation rail, conveyor belt, bending mold) worked individually during bench tests. However, when I tried to connect them sequentially, timing mismatches and geometry incompatibilities appeared that were invisible during isolated tests. This taught me that integration testing needs to happen at every stage, not only at the end.