wildcard Week - Machine Learning + Machine Vision
The wildcard week is big opportunity for us students to try new skill/machines to expand our personal “toolbox”. There are a lot of things this FAB Academy 2026 does not cover, that can be useful for a vast variety of projects. The assignment we can make this week is free, considering the availability of certain machines in our respective Labs. In my university we have access to water-jet cutters, electrical discharge machines, clothing printing and knitting machines, welding equipment, etc.
I could have chosen any of these machines to do my assignment on. But after thinking about it for some time, I came to a big realization: I’m a software engineer. Most skill I’ve learn to this point can be applied to my area of study, as to give software related projects a physical dimension with electronics production, 3D design and printing, etc. The reality is that, whilst useful to learn how to weld or produce clothing, the chances of me finding an opportunity to use these skill in a real life, personal project are low.
Then I saw “Machine Learning” and “Machine Vision” options on the assignment guide page. Both of those are skills that I’m familiar with. Considering that my final project involve Machine Learning + Vision, plus I realized no one, at least in my Lab, no one else will be doing an assignment involving Machine Learning + Vision. So, I decided to use this week’s assignment as a platform to showcase and teach the very basics of this skill for the rest of my fellow students.
Machine Vision
During this FAB Academy we’ve become familiar with micro-controllers. Micro-controllers by themselves are powerful tiny computing devices capable of receiving, process and output data, using programming logic, communication protocols, etc. Micro-controllers can do any task we want with the correct input/output device combo. One input device we haven’t seen though, is “Machine Vision”.
Machine vision is an interesting area of study, as it opens the doors for applications that, without it, might seem imposible to achieve. Giving “eyes” to our devices streamlines imputing real life data (images) into our projects. There are countless real life applications for Machine Vision, specially in industry related applications. If learned, using Machine Vision elevates projects by itself.
Adding Machine Vision to our projects is not as easy as, say, a sensor that we just plug and read data from. It is also not as easy as hooking up a camera to our device, though that is the first step. Adding a camera to our device only covers the “seeing” part of the equation. Our devices need to understand what they are seeing to act upon. Here’s where Machine Vision is (almost) always paired with another area of study: Machine Learning.
Machine Learning
Machine learning is a subfield of artificial intelligence that uses algorithms trained on data sets to create models capable of performing tasks without human intervention. If Machine Vision is how devices “see”, Machine Learning is how machines “learn to process information in a useful way”. The objective of a Machine Learning model is to give it data and receive information on it, with out our intervention.
The most common example of Machine Learning models are drawn number identification machines, where we handheld draw numbers and the model can identify which one is. This YouTube video by the Green Code channel explains the process of creating this exact model. Essentially, we trained our model to understand how numbers are drawn in a grid. Then, with that trained model, whenever we pass it a number drawn in a grid, it should be able to recognize it.
This might seem intimidating for someone with no experience with programming, hence why I’m not getting into detail on the real math/algorithms behind Machine Learning. The reality is that, nowadays, coding our model from scratch is not necessary. There are a lot of tools out there that will help us create our models fast and easily, and we’ll get to those in a minute.
Teachable Machines
Let’s get started with using Machine Learning and Machine Vision for a real life project. As stated before, we need a camera and a model to work with. Our camera can be our computer’s camera fo now, although any external camera or camera module will also work. For the model, we need to train it with the information we want. For this, I recommend we start with Teachable Machines.
Teachable Machines is a free online platform to train classification models. Classification models, as it name implies, classifies our image into 2 or more “classes”. For this first model, I will be training a model to identify if I’m wearing safety glasses or not.
To start using Teachable Machines, simply go to the Teachable Machines main page an click “get started”.
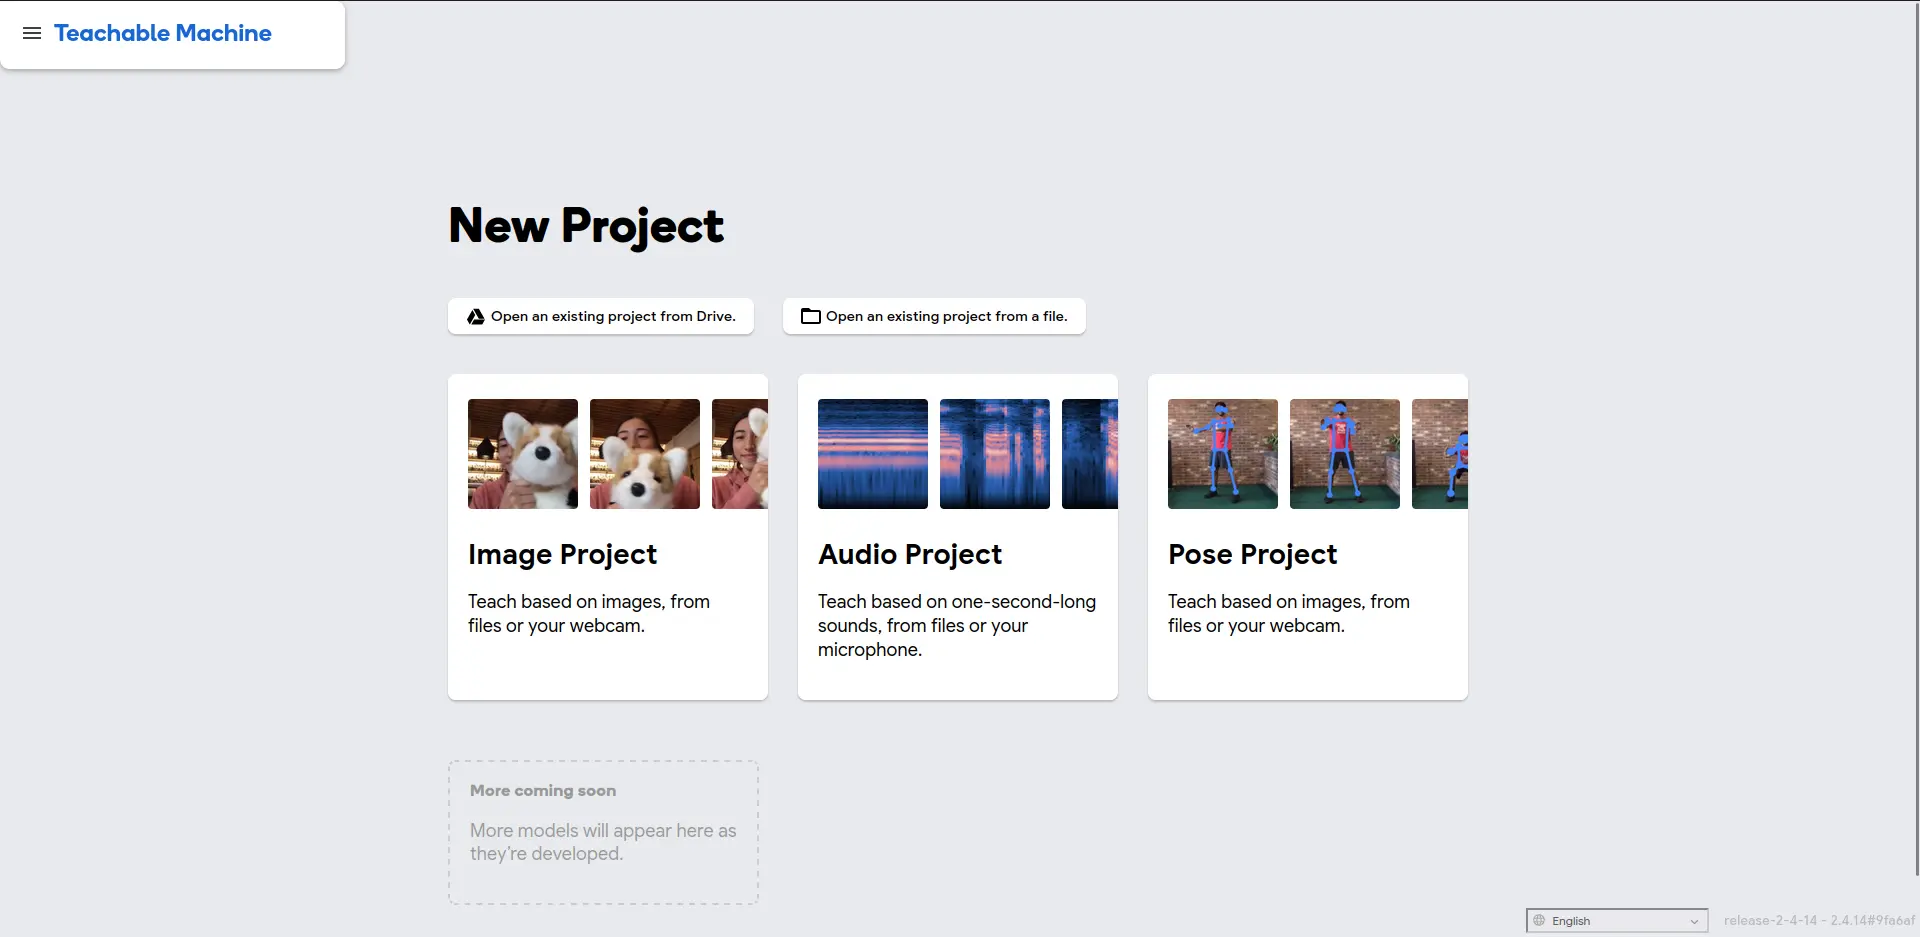
Now, we select a new “Image Project”. You can also do project with audio recognition and full body imaging if you wish. I recommend exploring these other project types in the future. Once we selected our project type, we will have two options: Standard or Embedded. If your model will live in a computer (like this example), select “Standard”. If your model will live inside a micro-controller as part of an embedded script, select “Embedded”. Embedded models are smaller in size, allowing them to fit in a micro-controllers limited storage, at the cost of being “less accurate”. We will select “Standard” for now:
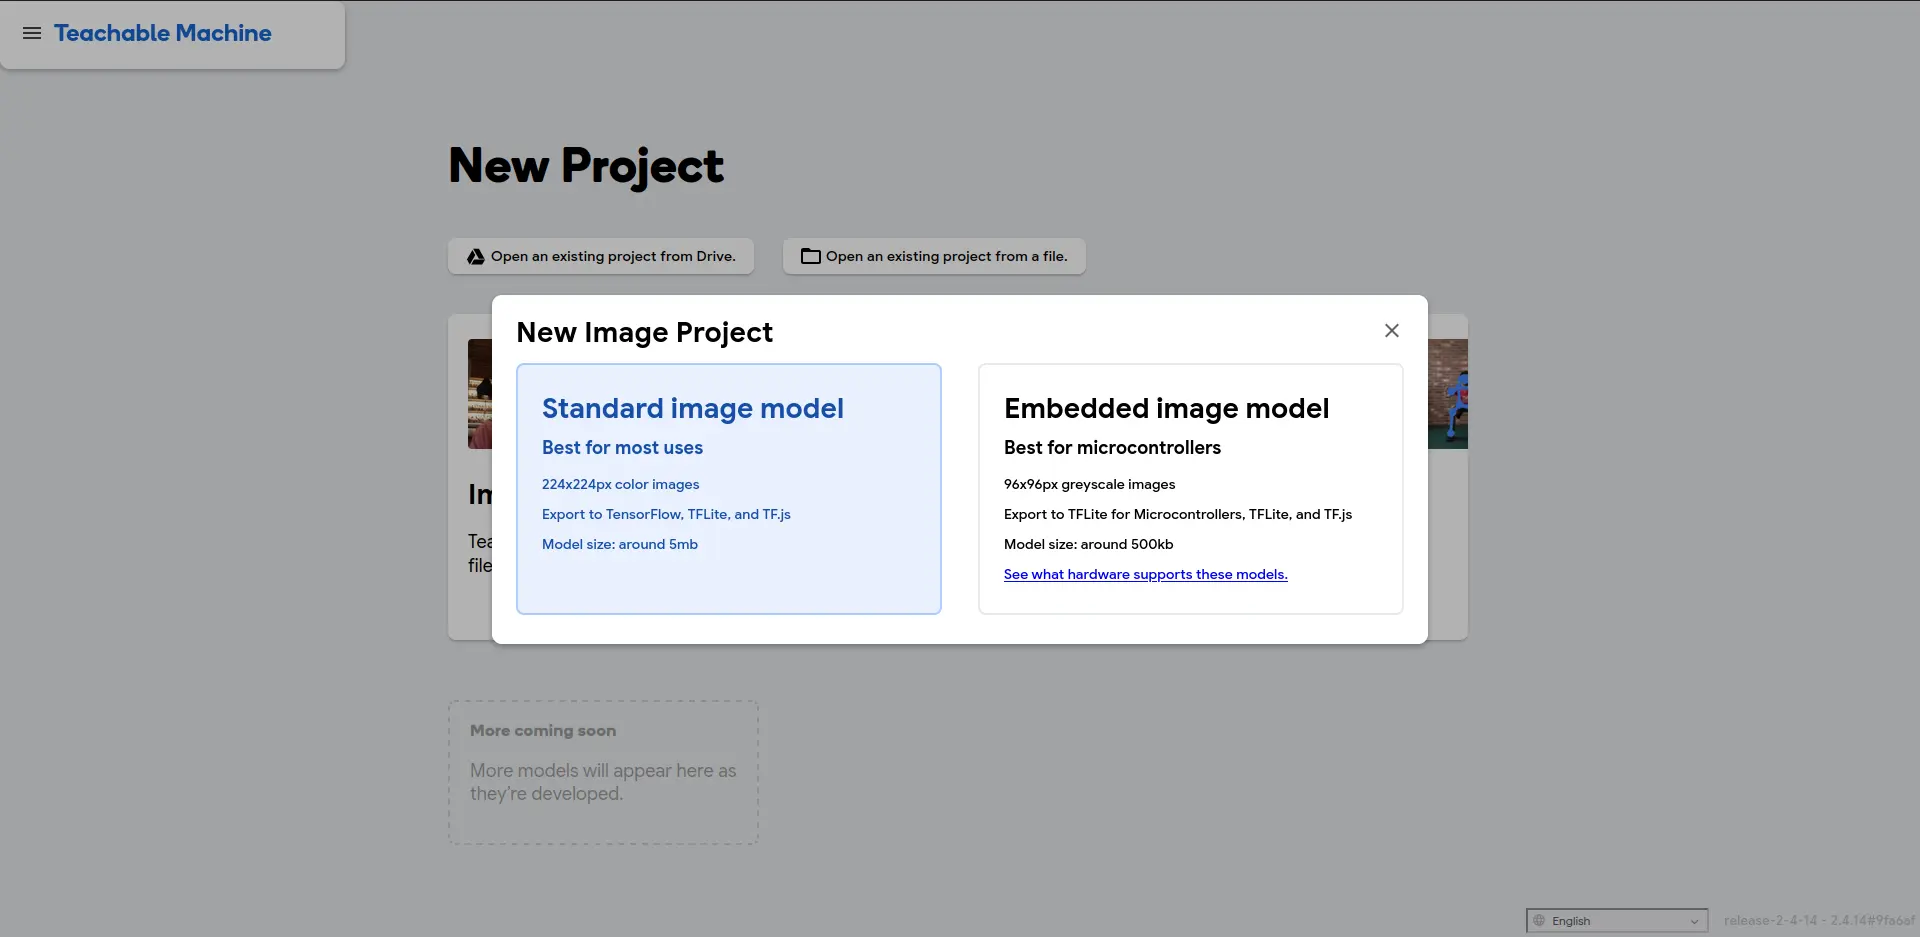
Now, we will see our main working space:
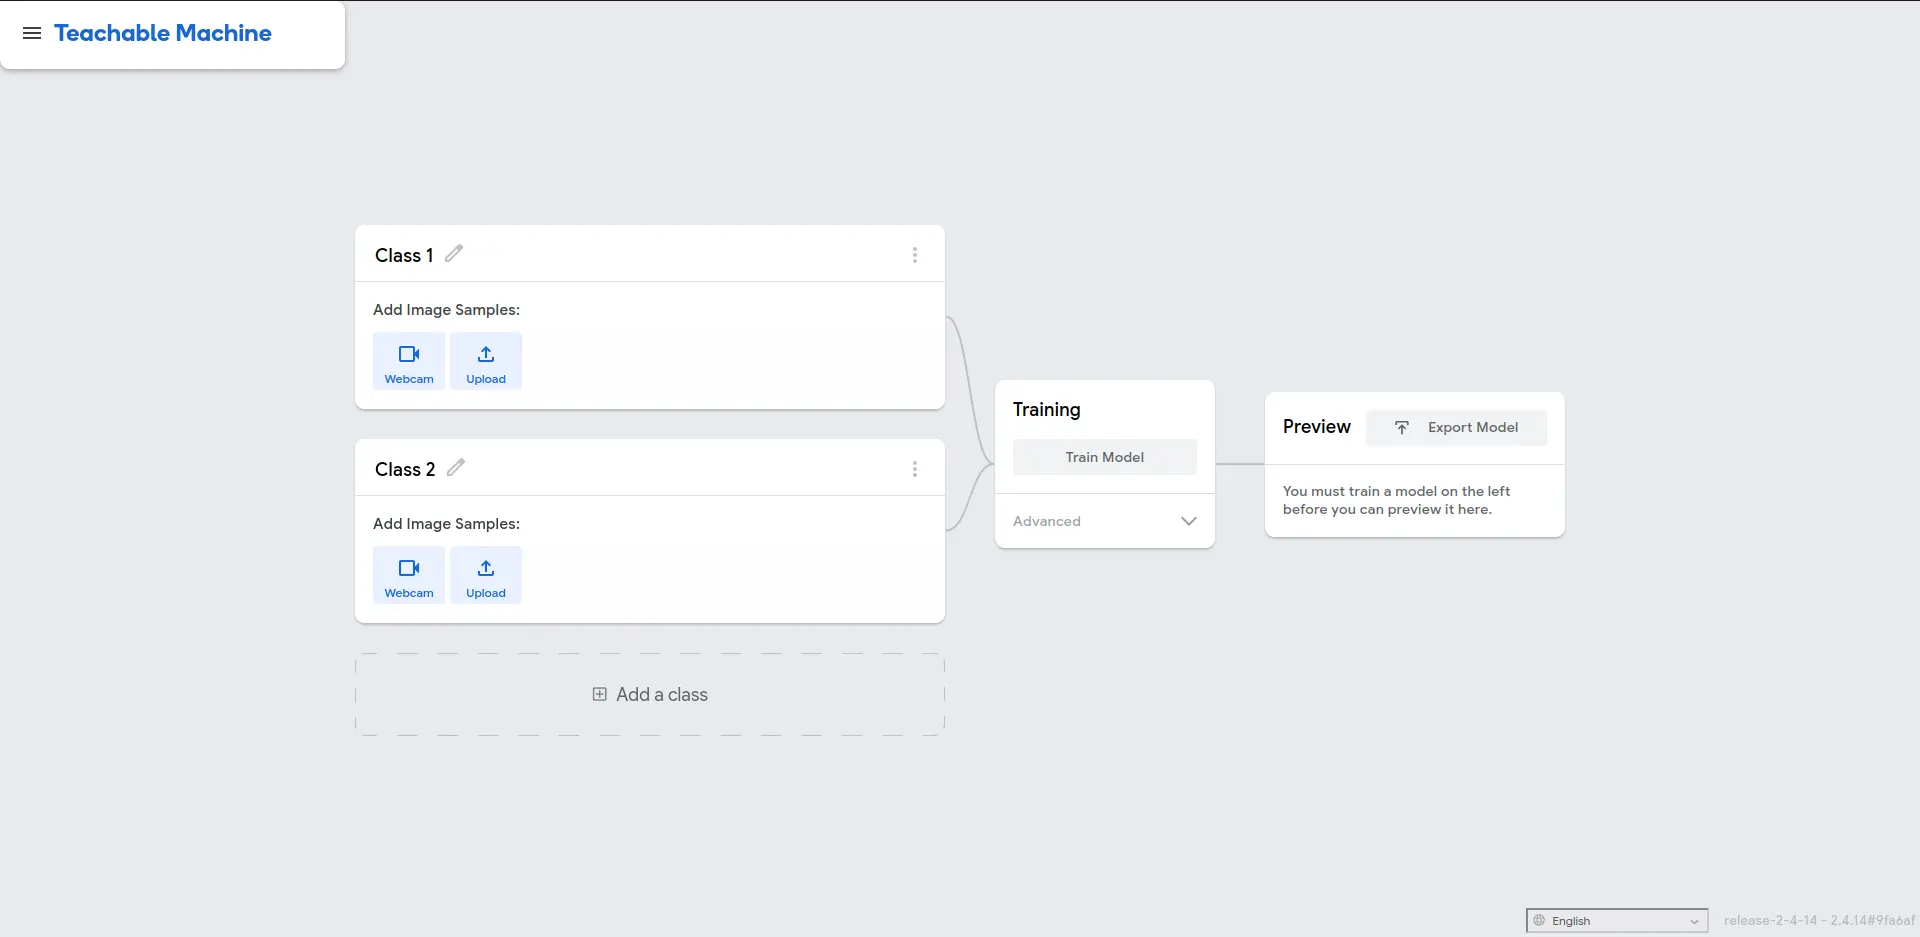
First thing we see is our classes area. We can change our main classes names clicking on the pencil icon on their right side. Teachable Machines allows us to input data (images) in two ways: Pre-gathered images with the “upload” button, or live image gathering with the “Webcam” button. If you have a set of images, called dataset, an you want to train your model with them, click the “upload” button. This option is better suited for applications when our classes to detect exist in different shapes, colors, even backgrounds. Having a dataset to train our model with is the standard practice. For now, we will be using the “Webcam” option. The “Webcam” option is better for first timers, as the process of gathering images is relatively easy. We just need to present our class object to the camera and, whilst recording, move the images around to get as much samples of it as possible. Webcam training is best if the camera and space we are training in will always stay the same.
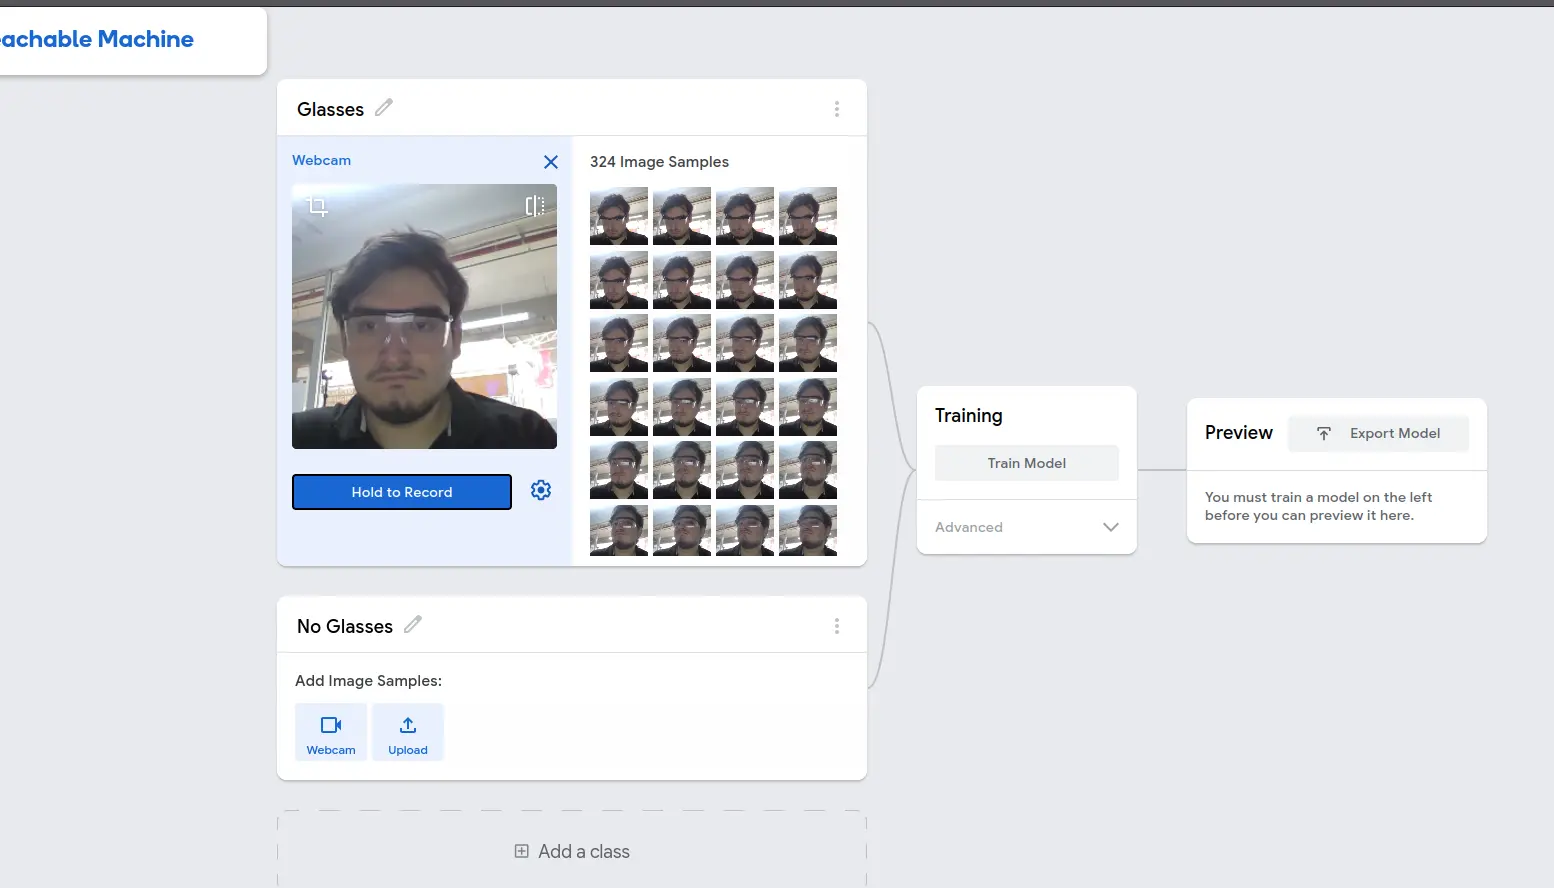
Pressing the “Hold to Record” button will start taking pictures of each frame in our video. We need as many pictures as possible in various angles to get the best result possible. The minimum image quantity I recommend is 500 for each class, although the more the better. We must repeat this process with the rest of our classes. In this case, I trained a “glasses” and “no glasses” class.
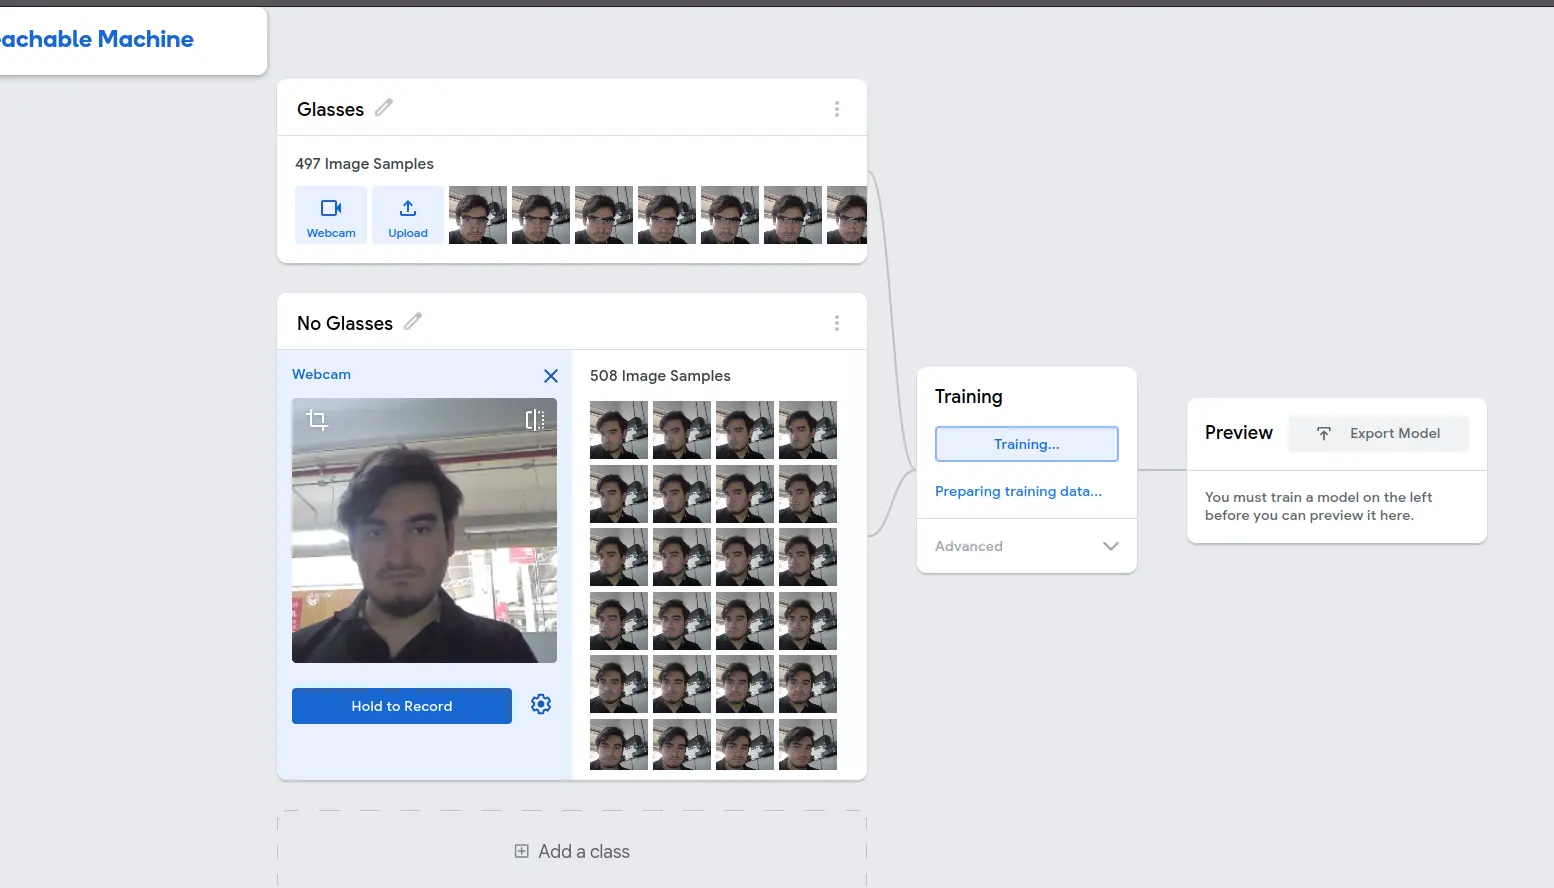
Once our classes are feed with our dataset, we can click the “Training” button. There are advanced tweaks for our training, but we are not going to touch them. Now, we wait. DO NOT close or change tabs whilst the training is going on. Once our model is trained, we will get a live preview of our trained model. There, we will be able to test the confidence of our model, or how sure it is of the classification it is given to what it is seeing. This model is now ready to be used, and for that we must click the “Export” button:
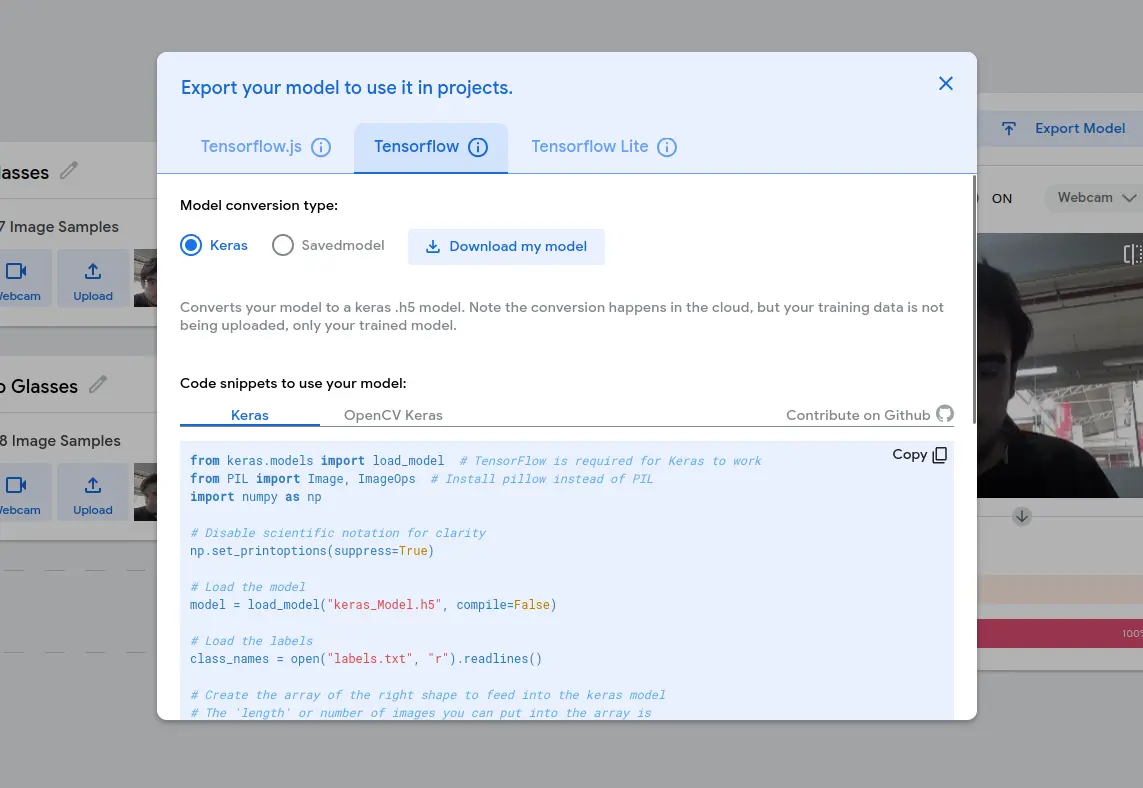
We will be using this model with later down this page in a script of our own. For that, we need to export our model in the “Tensorflow Kears” format. Go to the “Tensorflow” tab and then select the “Keras” option. Now, click “Download my model”. You will get a Zip file. This zip file will contain 2 files: a .txt file with the labels for each class and a .h5 file which is the model it self. Save it for now, as we will need it for later.
Limitations
Teachable Machines is a really wonderful tool. It was taught to me and my friends on our very first semester of software engineering at Ibero Puebla as a way of learning the possibilities of Machine Learning and AI. The sad reality is that Teachable Machines is more of a playground than an actual Machine Learning training site. Don’t get me wrong, you can do amazing stuff with models trained with Teachable Machines. But for more professional applications, this platform is limited.
One of its limitations is the “classification” nature of the models it trains. We can only tell what class we are seeing. If we do not show anything to our camera, leaving just our background visible, we will still get a class returned to us. This class will have a low confidence level, meaning that the background is somewhat similar to that class object. We can train a “No detection”, but the outcome repeats it self when we show an object that was not classified.
Some applications may require an “identification” model. Unlike classification models, identifications will only trigger if the object/class they are trained upon show in the image. Returning to our safety glasses example, an identification model will only trigger if we show the glasses on camera.
Roboflow / Ultralytics
For project that require identification models, where we only need to know if a class is present on the image, we need a different platform. There are two main platforms I want to showcase, both of them working similarly and achieving the same goals: Roboflow and **Ultralytics.
Both platforms allow us to train models with a new technique called labeling. Labeling is the process of drawing “boxes” around the object we are trying to classify. This way, when training the model, it knows that “everything inside this box is a ___ class”. Labeling is a crucial step in the Machine Learning process. It is also one of the most time consuming, as it requires manual input. There are ways of “Auto labeling” in these platforms, but manual labeling will always be the superior method.
I will be teaching the process with Roboflow, as it is the platform I’m most familiar with. I encourage you to try both platforms by yourself.
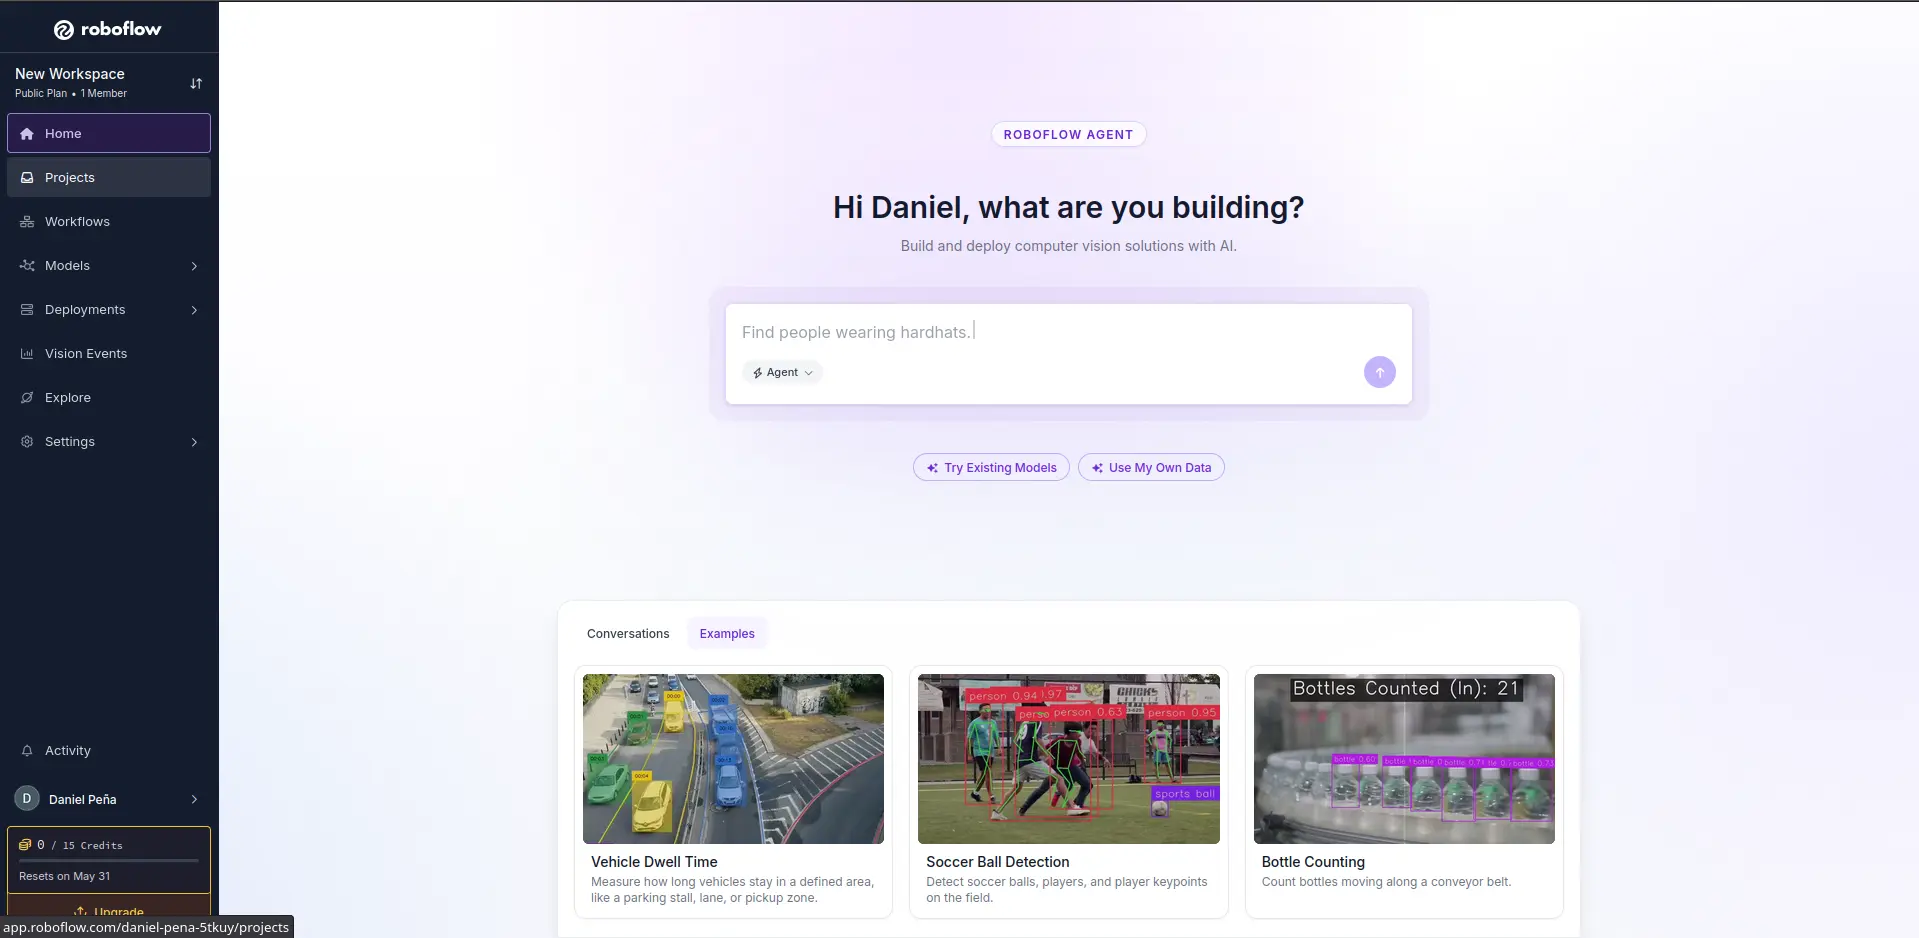
To start using Roboflow, go to the Roboflow main page and create an account. Once your account is created, you will see your workspace:
Navigate to Projects -> Create New Project and click it. You will be asked to select your project type:
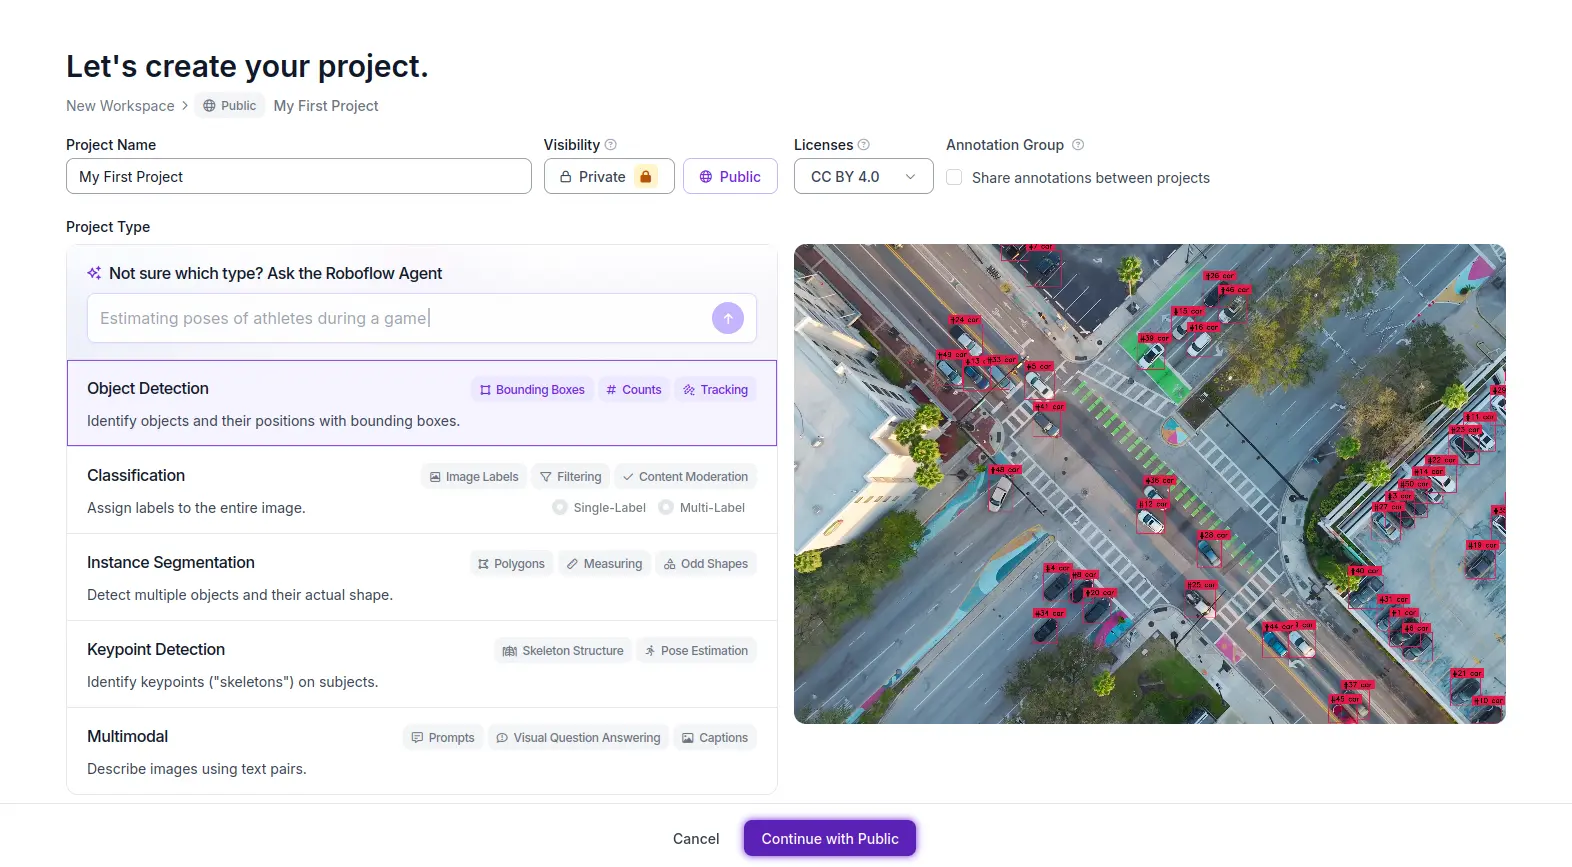
We will be choosing the “Object Detection” type. As you can see, you can also train a “Classification” model just like the Teachable Machine’s one. Give your project a name and choose “Public” for visibility. This means that anyone will be able to use your model for their projects. If you with to make your model private, you will need to pay a pro plan. Once everything is ready, click “Continue”.
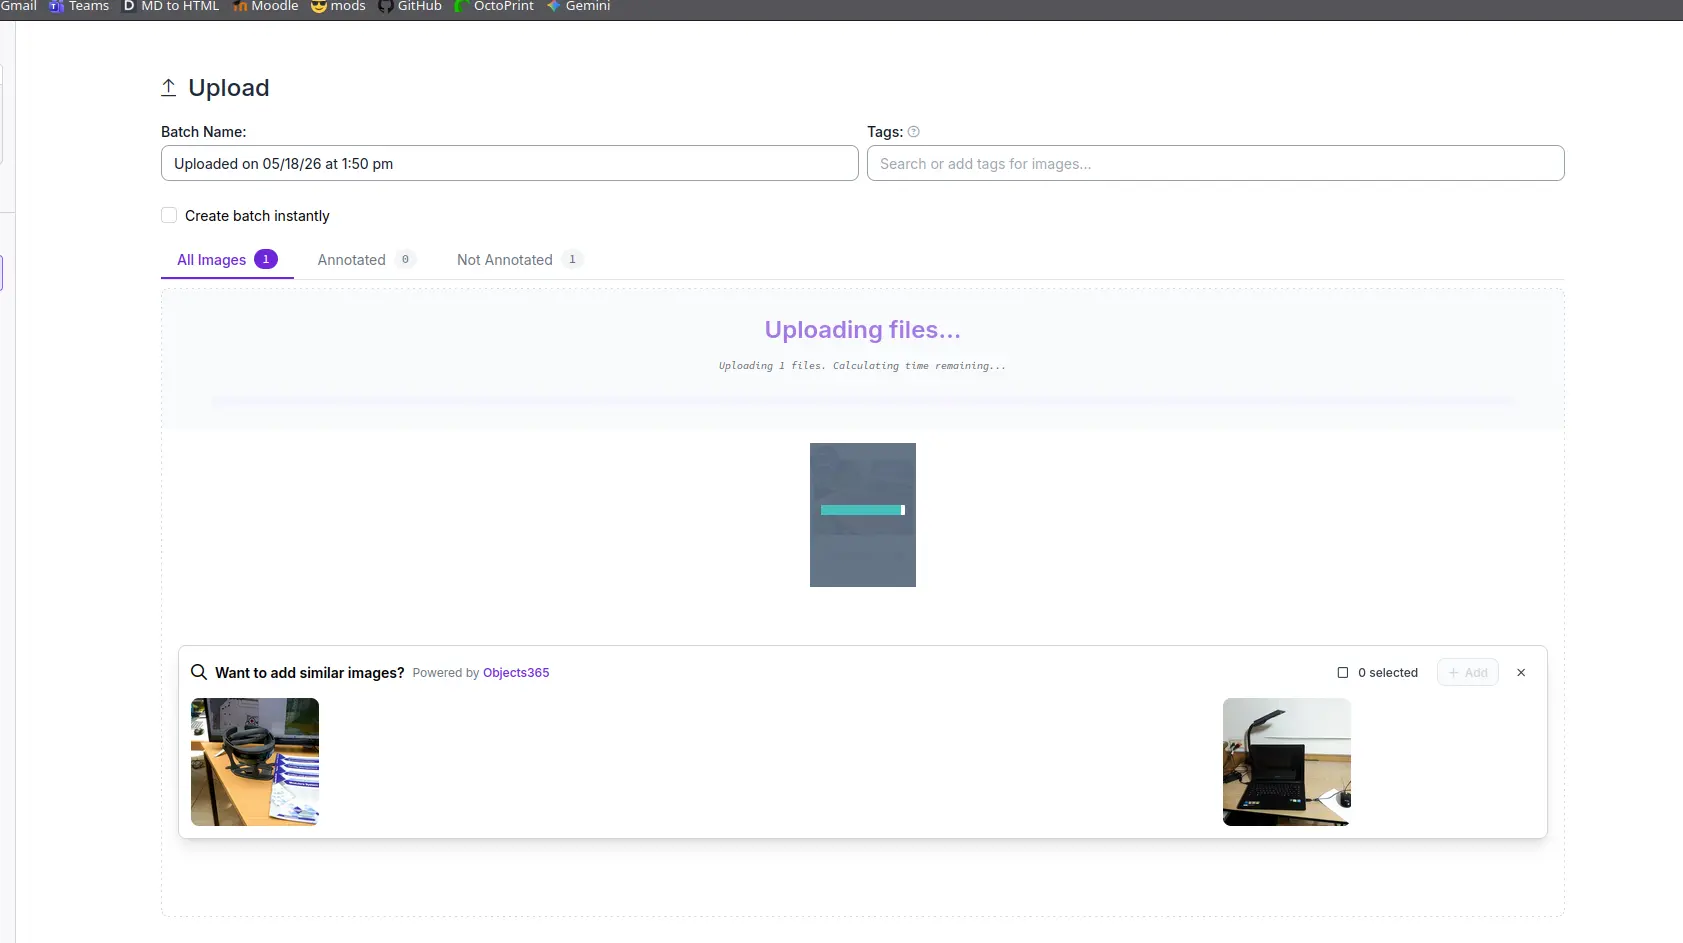
Now its time to load your dataset. You can always expand your data set in the future. Remember, the larger the dataset the better results. For this show case, I just selected a random image.
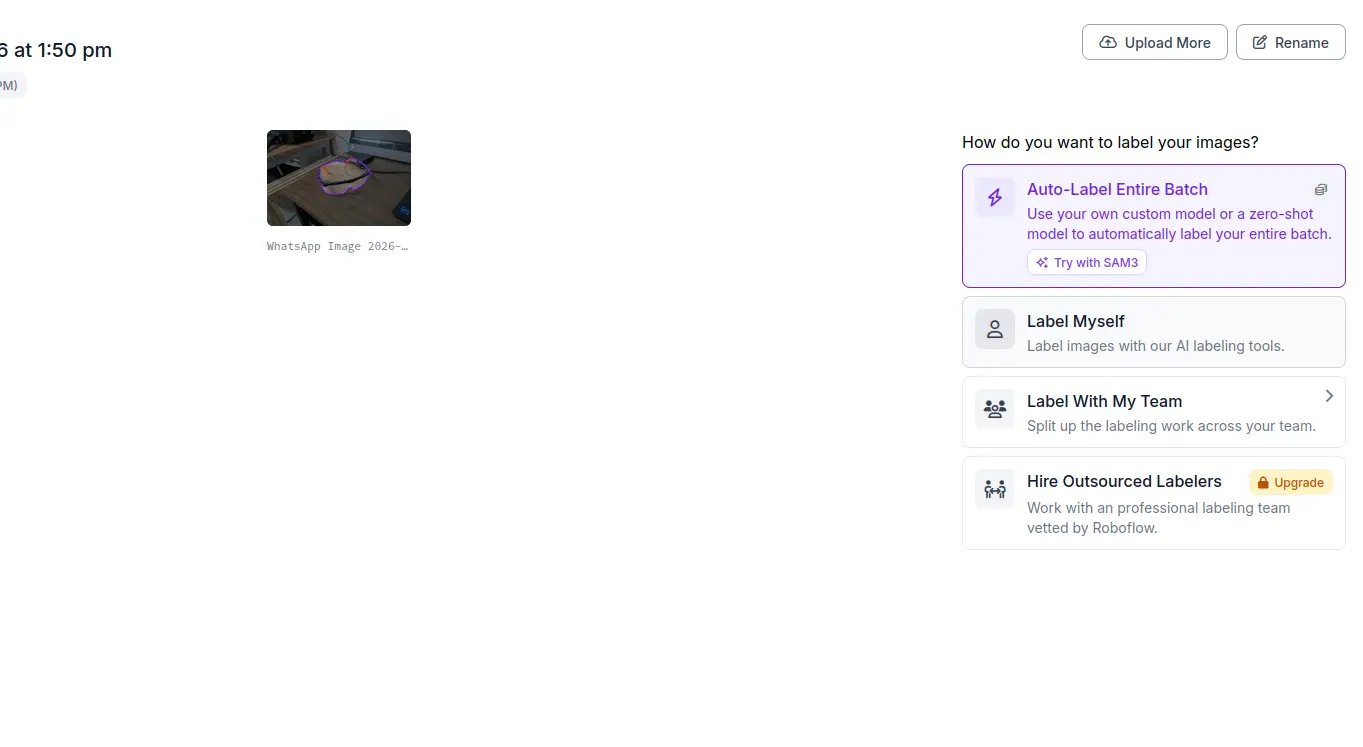
Now, it is time to annotate our image. Go to the “Annotate” tab under the “Data” section. There will be three columns: Unassigned, Annotating and Data set. Your image will appear in the Unassigned column. Click it. Now, select the “Label Myself” option.
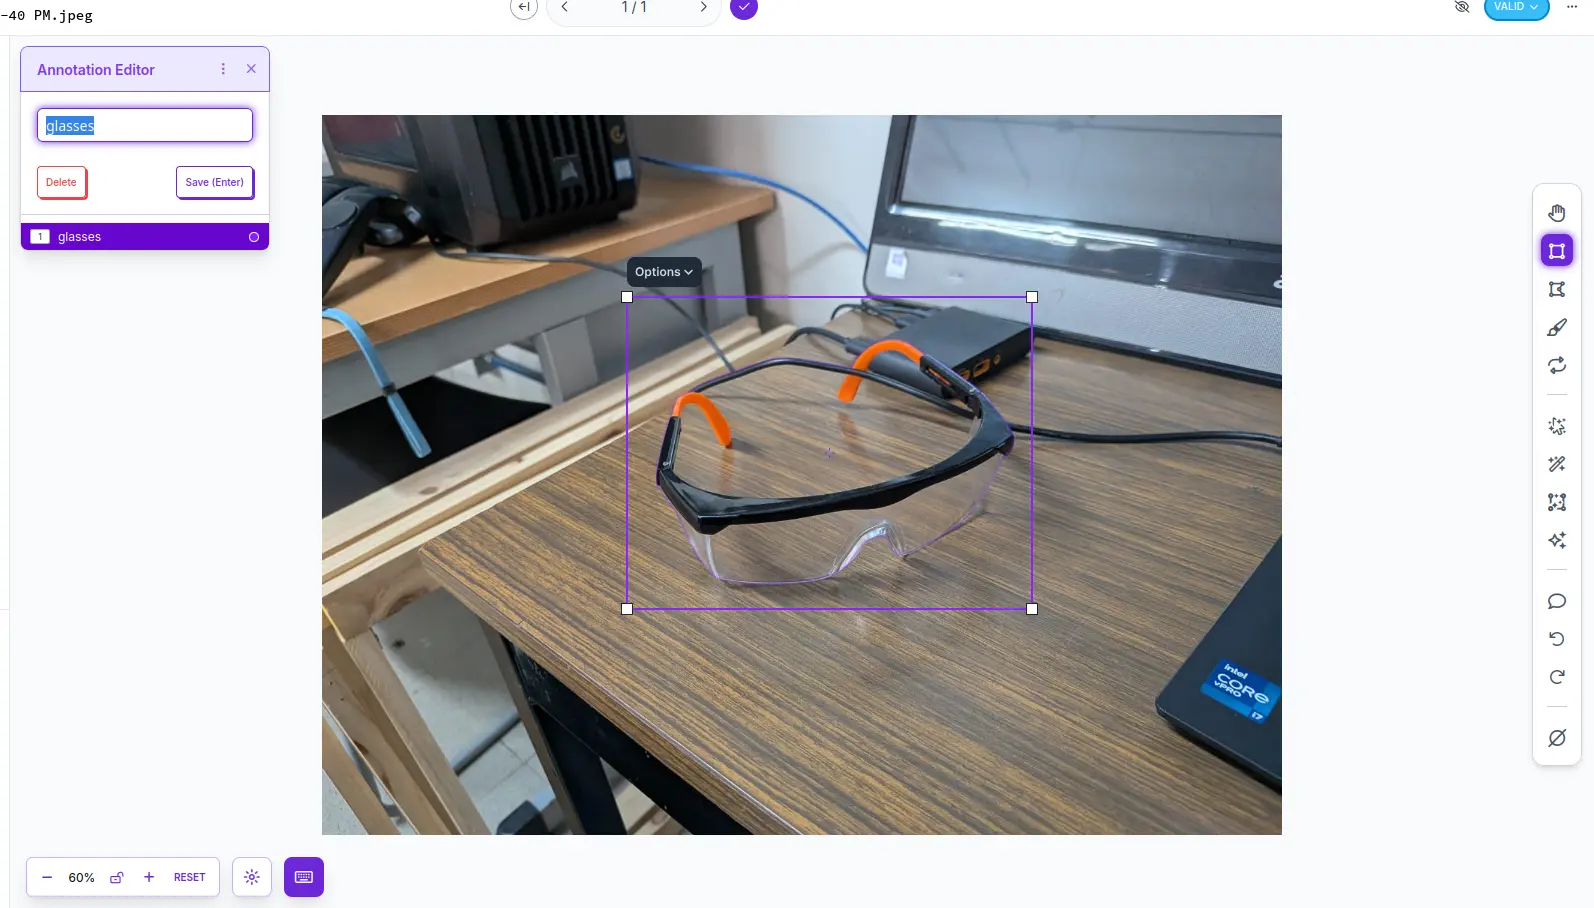
You will now see the labeling workspace. Underneath the “Tags” section, you can create your classes. In my case, my only class will be “glasses”. On the right side of the image you will see a toolbox with different types of selection tools. Each tool serves a different purpose, allowing to adjust the selection of the object in the image as best as possible. For now, will be using the “bounding box” tool. Drag and drop the bounding box to fit your object. A pop up will appear, asking you to give it a tag. We will give it the “glasses” tag.
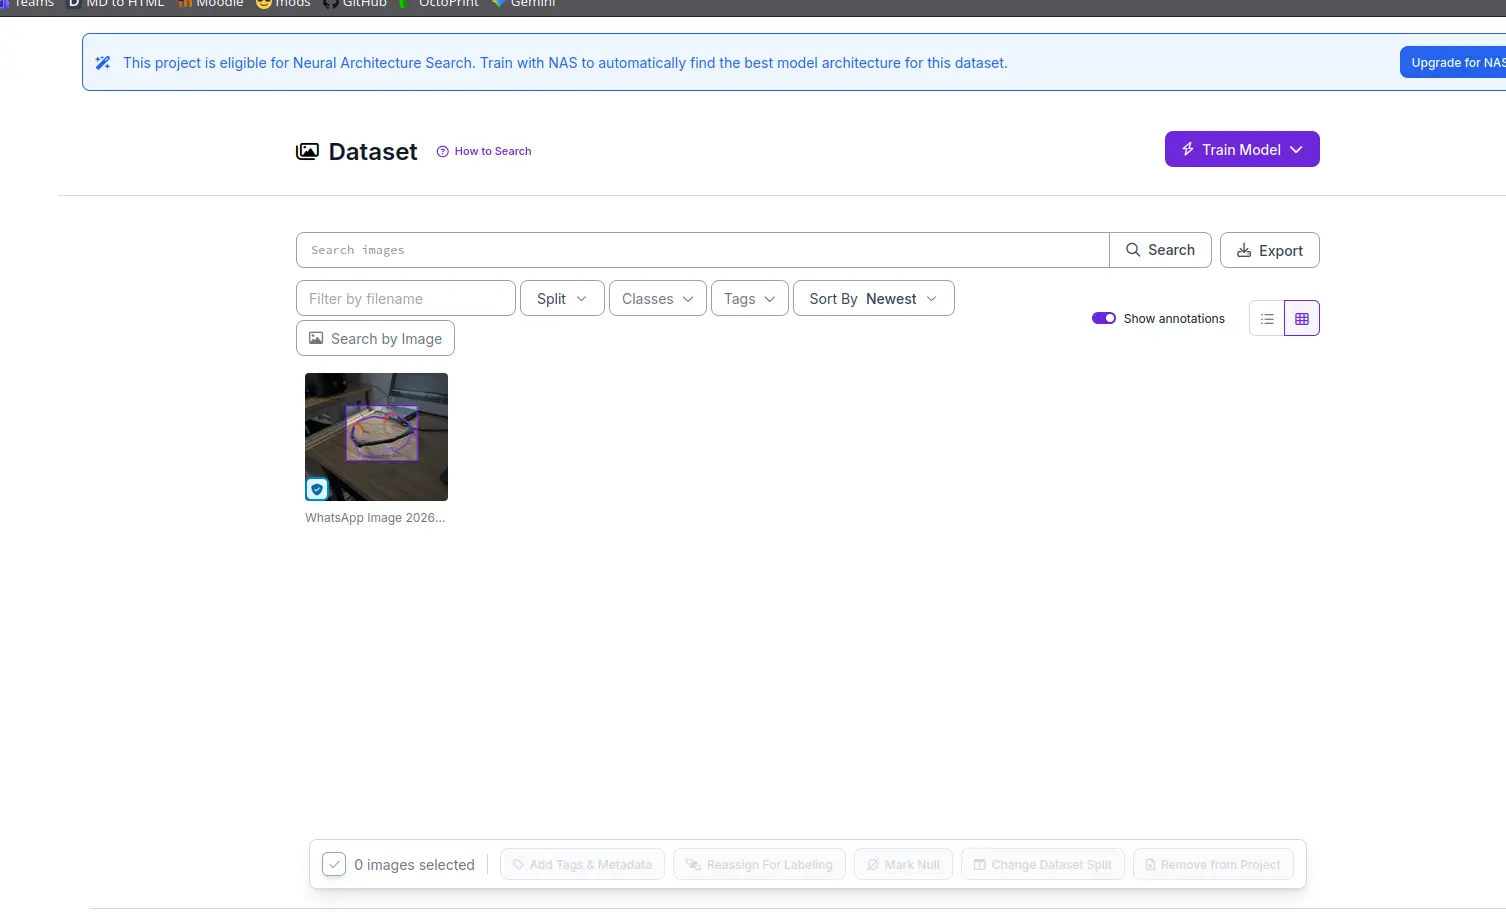
Once our labeling is done, on the right top corner of the page there will be a button. Click it, and select the “Move to train” option. When training models, the dataset is usually split into three parts: the training section, the valid section and the test section. The training section, the largest one, will be used to train the model. The validation section will be used to “validate” the results of the trained model. And the test section, the smallest one, will be used as the first test of the model in action. DO NOT mix images from each section, this can cause problems with the training. With this in mind, click the arrow on top of the image and click “save to dataset”. Now, navigate to Data > Dataset on your left sidebar. Here you will se all your labeled images ready to be trained. Once ready to go, click the “Train Model” button and select the “Custom” option.
In this new screen we will select the training parameters of our model. Under the “Select Architecture” tab we will choose “YOLOv11”. YOLO (You Only Look Once) is a Machine Vision processing tool. We will not be showcasing YOLO later on, but it will get its honorary mention.
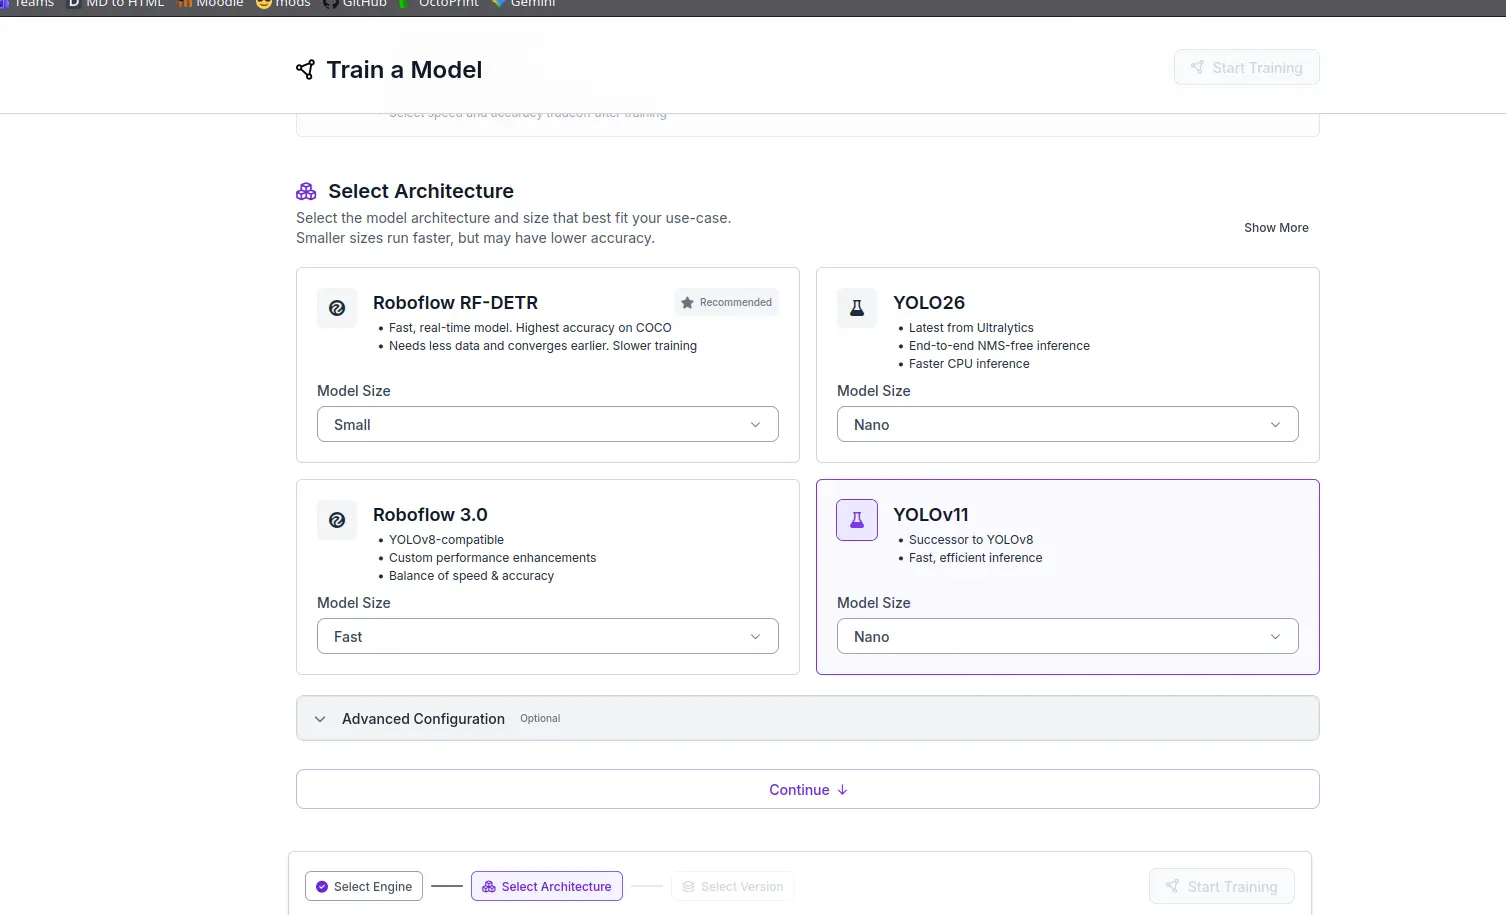
The rest of sections can now stay as they are.
Note: As you can see, a warning is stopping me form advancing. The Train, Valid and Test sections need each more than 2 images to train a model. In a real life application, you will have more that 2 in each class. The rest of this explanation asumes this criteria is met for you.
And with that, after our model finishes training, we will end up with a .pt file we can use with YOLO, one of the few technologies of Machines Vision + Learning processing we will see now.
OpenCV
We now have a brain for our Machine Vision processing. This model, when paired with a capturing device, will be able to do exactly what we trained it for. We are missing one key part of the process, though. We still need that “medium” in which our model and our capturing device can understand each other. For this we need a library/framework for real-time Machine Vision processing.
OpenCV is one of (if not) the most famous example of libraries used to give vision to our computer. OpenCV has a collection of functions that will help us in our Machine Vision applications, such as iframes to see our camera’s pov, built-in detection models, bounding box drawing functions, etc.
OpenCV is also quite easy to use. Here is the most basic OpenCV code you can find:
        import cv2

        hog = cv2.HOGDescriptor()

        # Load the pre-trained SVM classifier for people detection.
        hog.setSVMDetector(cv2.HOGDescriptor.getDefaultPeopleDetector())

        # Open the default webcam (index 0).
        cap = cv2.VideoCapture(0)

        while True:
            ret, frame = cap.read()
            if not ret:
                break

            boxes, weights = hog.detectMultiScale(
                frame,
                winStride=(8, 8),
                padding=(4, 4),
                scale=1.05
            )

            for (x, y, w, h) in boxes:
                # Draw a green rectangle around each detected person.
                cv2.rectangle(frame, (x, y), (x + w, y + h), (0, 255, 0), 2)

            cv2.imshow("OpenCV HOG — Person Detection", frame)

            if cv2.waitKey(1) & 0xFF == ord('q'):
                break

        cap.release()          # Release the camera resource
        cv2.destroyAllWindows() # Close all OpenCV windows
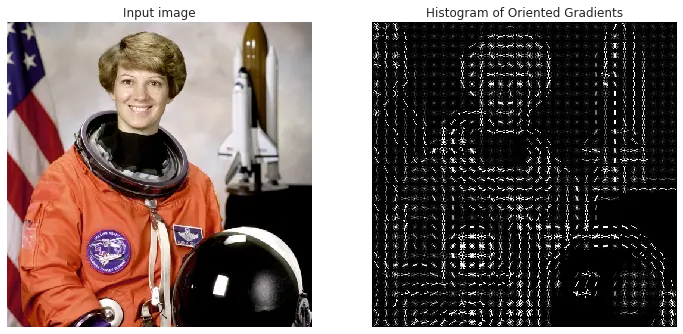
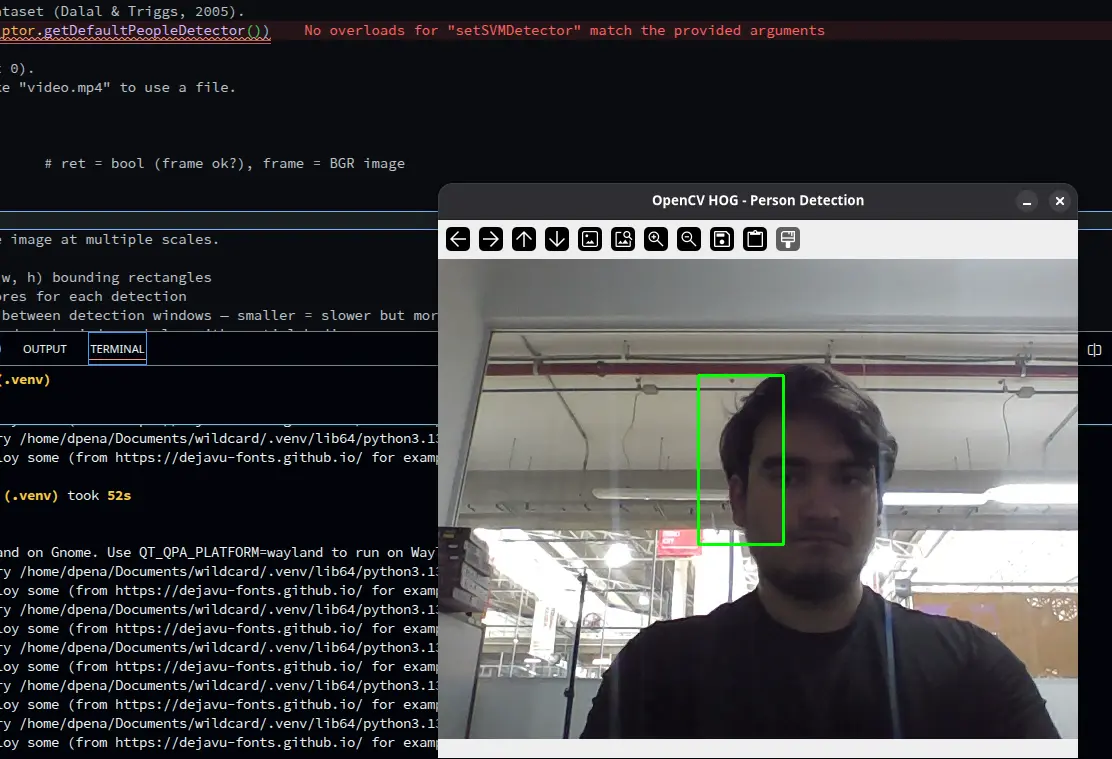
As you can see, in a few lines of code, we can use our devices camera to detect persons and draw boxes around them. The code is also quite easy to understand. We first start with the hog variable. “Hog”, or “Histogram of Gradients” is one of the oldest object identification methods. With out getting much into detail, hog divides an image into small chunks, calculating the overall direction of its gradient value. Then, it creates a histogram chart of each direction, creating a “silhouette” of the object. Similar objects have similar silhouettes, and that’s how we identify them.
By declaring this hog variable, we are telling OpenCV to use this method for image processing. The rest of the code is even easier to understand. We then tell hog to run the built-in person detection model. With cap = cv2.VideoCapture(0) we are telling OpenCV to use the default camera of the device. Changing the argument of the function from 0 to another source, like an USB camera or URL for video streaming, changes the input source.
We then define how our bounding boxes should look, including its size and color. And finally we open the iframe for the detection:
MediaPipe
In the previous image it is not as apparent, but OpenCV running hog often gives false positives, creating bounding boxes where a person is not present. This is not a “ghost detection” functionality, its the symptom of how hog works. MediaPipe solves this issue, with better identification algorithms and faster detection speed. Using MediaPipe involves a couple extra steps. First, we need to install it by running pip install mediapipe in our venv. Then, we must download the model we will be using from MediaPipe’s official documentation page.
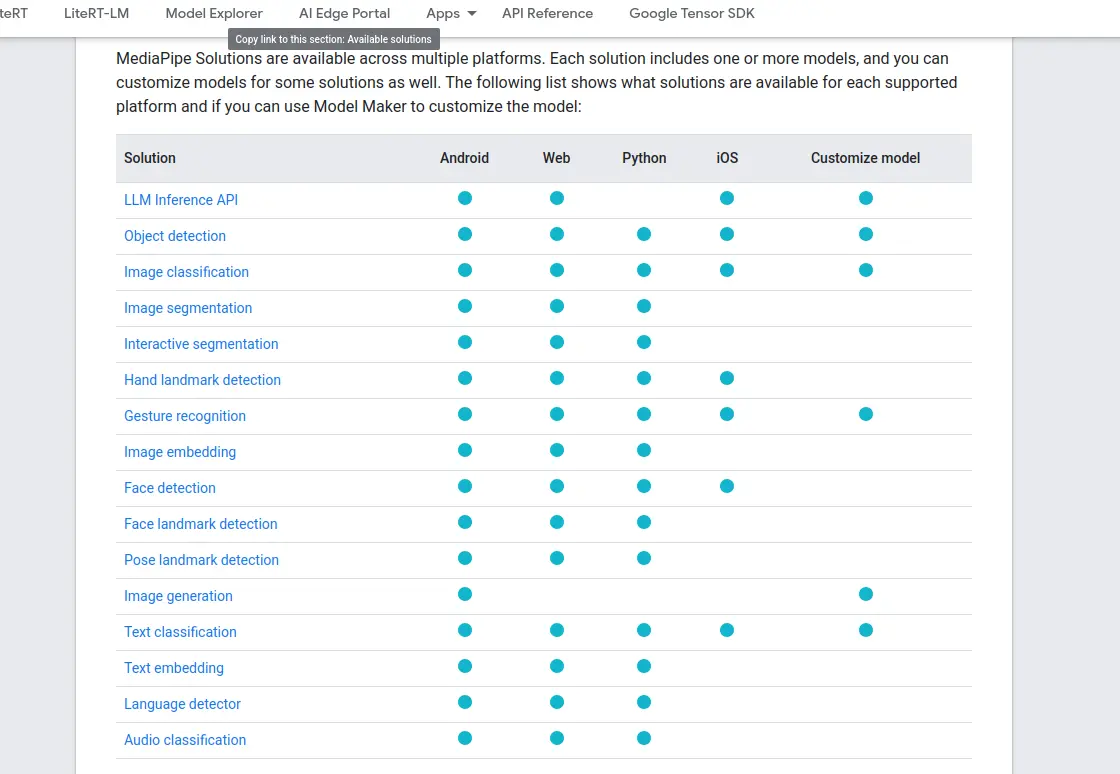
In this table we can look at the pre-trained models. We can click on anyone we desire, in our case we will be using the “Hand landmark detection” model.
If we click on the “Try it” button, we will get a live preview on how the model works. If we navigate down the page, we can see a “Models” section with a hyperlink to download the latest version of the model. For convenience here is the link to that exact part. Download the file and add it into your working folder.
Now, we can run the following code:
        import cv2
        import mediapipe as mp
        from mediapipe.tasks import python
        from mediapipe.tasks.python import vision

        MODEL_PATH = "hand_landmarker.task"
        base_options = python.BaseOptions(model_asset_path=MODEL_PATH)
        options = vision.HandLandmarkerOptions(
        	base_options=base_options,
        	num_hands=1,
        	min_hand_detection_confidence=0.7,
        	min_hand_presence_confidence=0.7,
        	min_tracking_confidence=0.7
        )

        detector = vision.HandLandmarker.create_from_options(options)
        video_capture = cv2.VideoCapture(0)

        if not video_capture.isOpened():
        	print("Error: cannot connect to ESP32-CAM")
        	exit()

        while True:
        	ret, frame = video_capture.read()
        	if not ret:
        		print("Error: No frame detected")
        		video_capture = cv2.VideoCapture(0)
        		continue

        	frame = cv2.resize(frame, (640, 480))
        	h, w, _ = frame.shape

        	img_rgb = cv2.cvtColor(frame, cv2.COLOR_BGR2RGB)
        	mp_image = mp.Image(image_format=mp.ImageFormat.SRGB, data=img_rgb)
        	result = detector.detect(mp_image)

        if result.hand_landmarks:
        	for hand_landmarks in result.hand_landmarks:
        		# Draw landmarks
        		for lm in hand_landmarks:
        			cx, cy = int(lm.x * w), int(lm.y * h)
        			cv2.circle(frame, (cx, cy), 4, (0, 255, 0), cv2.FILLED)
        		break

        	cv2.imshow("Hand Tracking - ESP32-CAM", frame)
        	if cv2.waitKey(1) & 0xFF == ord('q'):
        		break

        video_capture.release()
        cv2.destroyAllWindows()
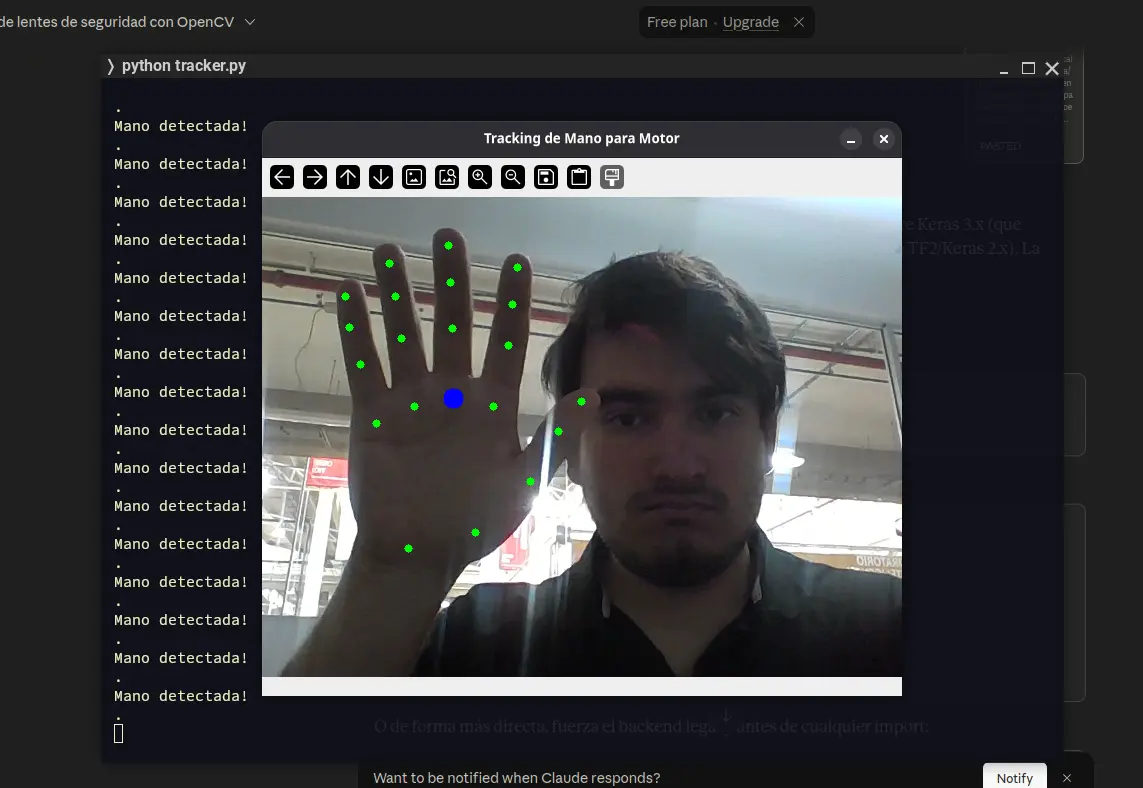
The idea of code is similar to the OpenCV one, with some key differences. At the top of the code, we import our downloaded .task file from the MediaPipe documentation. Then, we configure the options of our detection logic. We are configuring, for example, a max hand count of 1. Now we start the detection and our iframe. We also need to add the hand landmark drawing logic, similarly on how we added bounding box creation logic in the OpenCV script. When running this script, the difference of speed and tracking from OpenCV to OpenCV + MediaPipe will be noticable.
YOLO
YOLO is yet another image processing framework. YOLO is would be the “professional” version of the previous two, it is more customizable to fit a project requirements with different versions to train your model with, some of them fast, small, powerful, etc. Unlike just using OpenCV and MediaPipe, YOLO does require some understanding on how both YOLO and the model you trained on Roboflow or Ultralytics (owners of YOLO). This is why I cannot recommend YOLO for prototyping and first time users, as it does require some more knowledge to get the best out of it. If learnt correctly, YOLO becomes, in my opinion, the best Machine Vision tool out there, suitable for the most advanced and professional use cases.
Note: The following code is just here to show case how YOLO is implemented on its most basic form, but a real project with YOLO involves more than this. This is why there is no example image on the results provided by this code.
To use YOLO, you first need to install the following dependencies with pip install tensorflow ultralytics python-opencv. Then you can run:
        import cv2
        from ultralytics import YOLO

        # These models are trained on COCO — 80 classes including person, car, dog, etc.
        model = YOLO("yolov8n.pt")

        # The COCO class index for "person" is 0.
        PERSON_CLASS_ID = 0

        cap = cv2.VideoCapture(0)

        while True:
        	ret, frame = cap.read()
        	if not ret:
        		break

        	results = model(
        		frame,
        		conf=0.4,
        		classes=[PERSON_CLASS_ID],
        		verbose=False
        	)

        	# results[0] is the Result for our single frame.
        	# .boxes contains all detections as a Boxes object.
        	for box in results[0].boxes:
        		x1, y1, x2, y2 = [int(v) for v in box.xyxy[0]]
        		conf = float(box.conf[0])
        		label = model.names[int(box.cls[0])] # e.g. "person"

        		# Draw bounding box
        		cv2.rectangle(frame, (x1, y1), (x2, y2), (0, 200, 255), 2)

        		# Draw label + confidence above the box
        		cv2.putText(
        			frame,
        			f"{label} {conf:.2f}",
        			(x1, y1 - 8), # position: just above the box
        			cv2.FONT_HERSHEY_SIMPLEX, # font face
        			0.6, # font scale
        			(0, 200, 255), # BGR color
        			2 # thickness
        		)

        	cv2.imshow("YOLOv8 — Person Detection", frame)
        	if cv2.waitKey(1) & 0xFF == ord('q'):
        		break

        cap.release()
        cv2.destroyAllWindows()
If you wish to use your trained model, you can change the model = YOLO("yolov8n.pt") variable to have your model’s path in the argument.
Tensorflow
MediaPipe showed us that we can perfectly add our models into these libraries to run them. We already have a model trained of our own, the glasses/no glasses model from Teachable Machines. We downloaded this model in the .h5 format, a format made for Tensorflow. Tensorflow is yet another AI and Machine Learning library, this one being more suited for advanced AI training and Machine Learning algorithm design. Tensorflow is the standard library for serious AI development.
We can take advantage of Tensorflow’s power, with a few lines of code that will let us use that glasses/no glasses model we trained. First of all, we need to install pip install tensorflow numpy python-opencv. Then, we can run:
        import cv2
        import tensorflow as tf
        import numpy as np

        model = tf.keras.models.load_model("model.h5")

        cap = cv2.VideoCapture(0)

        while True:
            ret, frame = cap.read()
            if not ret:
                break

            # Preprocess — adjust size to whatever your model expects
            input_img = cv2.resize(frame, (224, 224))
            input_img = input_img / 255.0                        # normalize
            input_tensor = np.expand_dims(input_img, axis=0)     # add batch dim

            predictions = model.predict(input_tensor, verbose=0)
            print(predictions)  # shape depends on your model output

            cv2.imshow("Custom H5 Model", frame)
            if cv2.waitKey(1) & 0xFF == ord('q'):
                break

        cap.release()
        cv2.destroyAllWindows()
Running this code lets us see exactly what we trained in Teachable Machines, but in our own script:
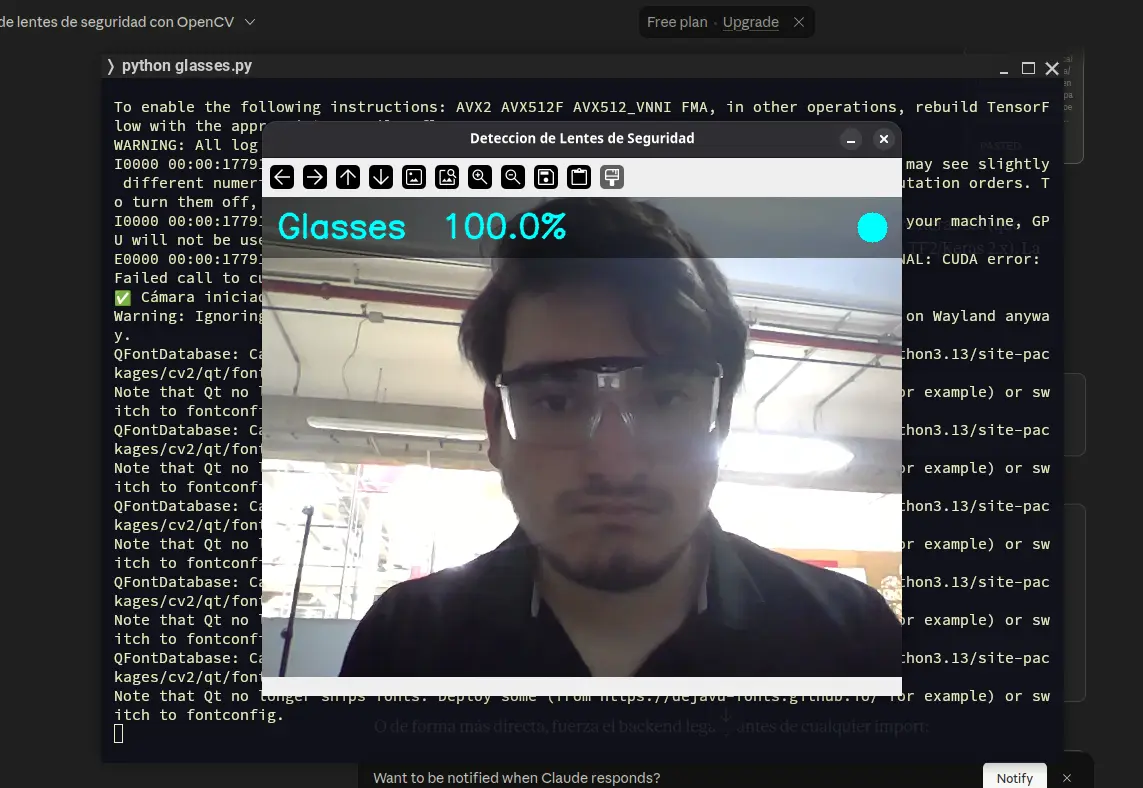
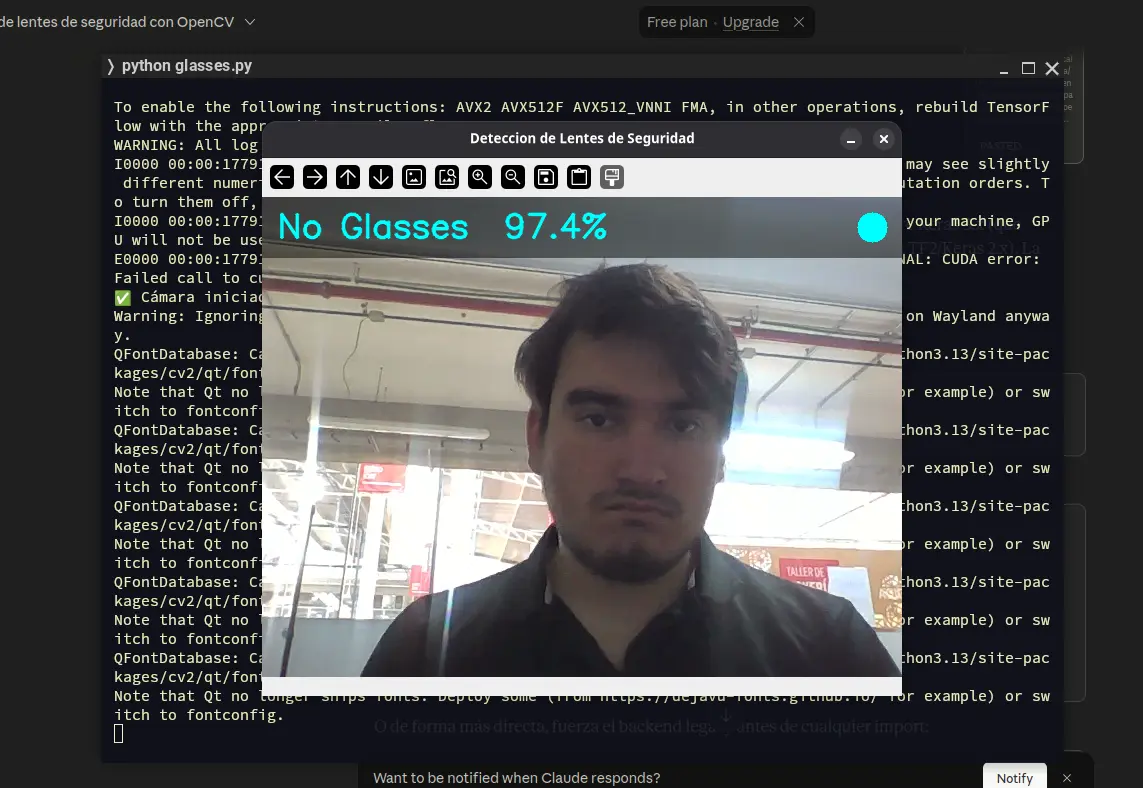
Tensorflow uses our model flawlessly, as it was trained for it to use it. This Tensorflow example demonstrates how all the power of Machine Learning and Machine Vision is in our hands, with easy to use and understand tools that open up a hole new world of opportunity.
Libraries Comparison
Even though all the showcased libraries and frameworks achieve the “same” result, there are differences between them that make them more suitable for different jobs:
| OpenCV | MediaPipe | YOLO | TensorFlow | |
|---|---|---|---|---|
| Speed | Slow | Fast | Fast (depends on the model) | Fast |
| Precision | Low-Medium | High | State of the Art (depends on the model) | High |
| External Models? | NO | NO | YES | YES |
| GPU needed? | Not necessary | Not necessary | Recommended | Recommended |
| Ease of use | Easy | Easy | Hard | Easy |
| Best for… | Fast prototyping and first aproach | Human body detection projects. | Max control, own models, investigation. | Own models, multi-object detection. |
My personal recommendation, depending on the project you are working on, would be TensorFlow. Learning TensorFlow will not only help you integrate Machine Vision in your projects, it also teaches you Machine Learning and how it works (and how to make a model from scratch!). I will be learning more of TensorFlow in the future, not only for my future projects, but as an essential skill for software engineers to know.
Real Life Examples
The beauty of this past examples is the liberty we have on them. We can add logic to trigger as soon as a detection is made. To do this, we simply need to add that logic under the “if result” part of each code.
For OpenCV:
        for (x, y, w, h) in boxes:
            cv2.rectangle(frame, (x, y), (x + w, y + h), (0, 255, 0), 2)

            print("Detection!")
            # The rest of your logic here
For MediaPipe:
if result.hand_landmarks:
        	print("Detection")

        	# The rest of your logic here

        	for hand_landmarks in result.hand_landmarks:
        		# Draw landmarks
        		for lm in hand_landmarks:
        			cx, cy = int(lm.x * w), int(lm.y * h)
        			cv2.circle(frame, (cx, cy), 4, (0, 255, 0), cv2.FILLED)
        		break
And for YOLO:
          for box in results[0].boxes:
        	print("Detection!")

        	# The rest of your logic here

        	x1, y1, x2, y2 = [int(v) for v in box.xyxy[0]]
        	conf = float(box.conf[0])
        	label = model.names[int(box.cls[0])] # e.g. "person"

        	# Draw bounding box
        	cv2.rectangle(frame, (x1, y1), (x2, y2), (0, 200, 255), 2)

        	# Draw label + confidence above the box
        	cv2.putText(
        		frame,
        		f"{label} {conf:.2f}",
        		(x1, y1 - 8), # position: just above the box
        		cv2.FONT_HERSHEY_SIMPLEX, # font face
        		0.6, # font scale
        		(0, 200, 255), # BGR color
        		2 # thickness
        	)
Our logic can be anything we want it to be. The possibilities are endless. My final project, for example, involves tracking a person’s position and adjusting a rotating base towards it. In my image processing script, I added a logic that sends the bounding box x values divided by two, to get the middle of the horizontal position of the person. With that value, sent via Serial to a controlling micro-controller, we can adjust the position of a rotating base to fase the person it detected.
As a way of showcasing the possibilities of Machine Vision + Learning (and to have a more tangible deliverable) I created a “Safety shutdown” simulation. I used a web camera to look at the forwards facing area of a spinning stepper motor (with a gear attached to its shaft to simulate a “dangerous” machine). The camera input was sent to the MediaPipe code from above. I then added some custom logic: When a hand is detected, even before drawing the landmarks on my screen, a signal is sent through Serial to the micro-controller. When this signal arrives to the micro-controller, the enable pin of the stepper motor is activated, instantly stopping the stepper motor.
In this other video, you can see the whole setup:
Note: The delay you can see on this last video was probably caused because extended use of my ESP32 webcam causes it to overheat and reduce the frame quantity streamed to the MediaPipe script. The first video stops the motor instantly, as this was the first test with a freshly pluged-in ESP32 webcam.
The Bottom Line
As I said at the top of this page, I wanted to use this wildcard week as a way of teaching others everything I’ve already learnt about Machine Vision and Machine Learning in my years of university. I hope that the contents of this page inspire my fellow students to use these amazing technologies in their projects, and that my examples, codes and instructions serve as a first approach to this world. Everything written in this page is just a beginning, there is a whole area of study to get immersed in and explore. So go out there and explore everything Machine Vision and Machine Learning has to offer!